The shoulder might seem like a small part of a garment, but it can have a big impact. It affects everything from the fit and balance to the proportions and overall shape of a garment. So getting it right can make a noticeable difference to how a garment looks and feels.
One factor to consider is the shoulder slope. Because everyone’s shoulders are different, the slope drafted into a pattern won’t necessarily work perfectly for every body. The good news is, it’s a relatively straightforward thing to adjust.
In this article, I’ll focus on how to assess the shoulder slope on your body and on a toile, recognise when an adjustment might be needed, and how to adjust the pattern accordingly.
What Is the Shoulder Slope?
On the body:
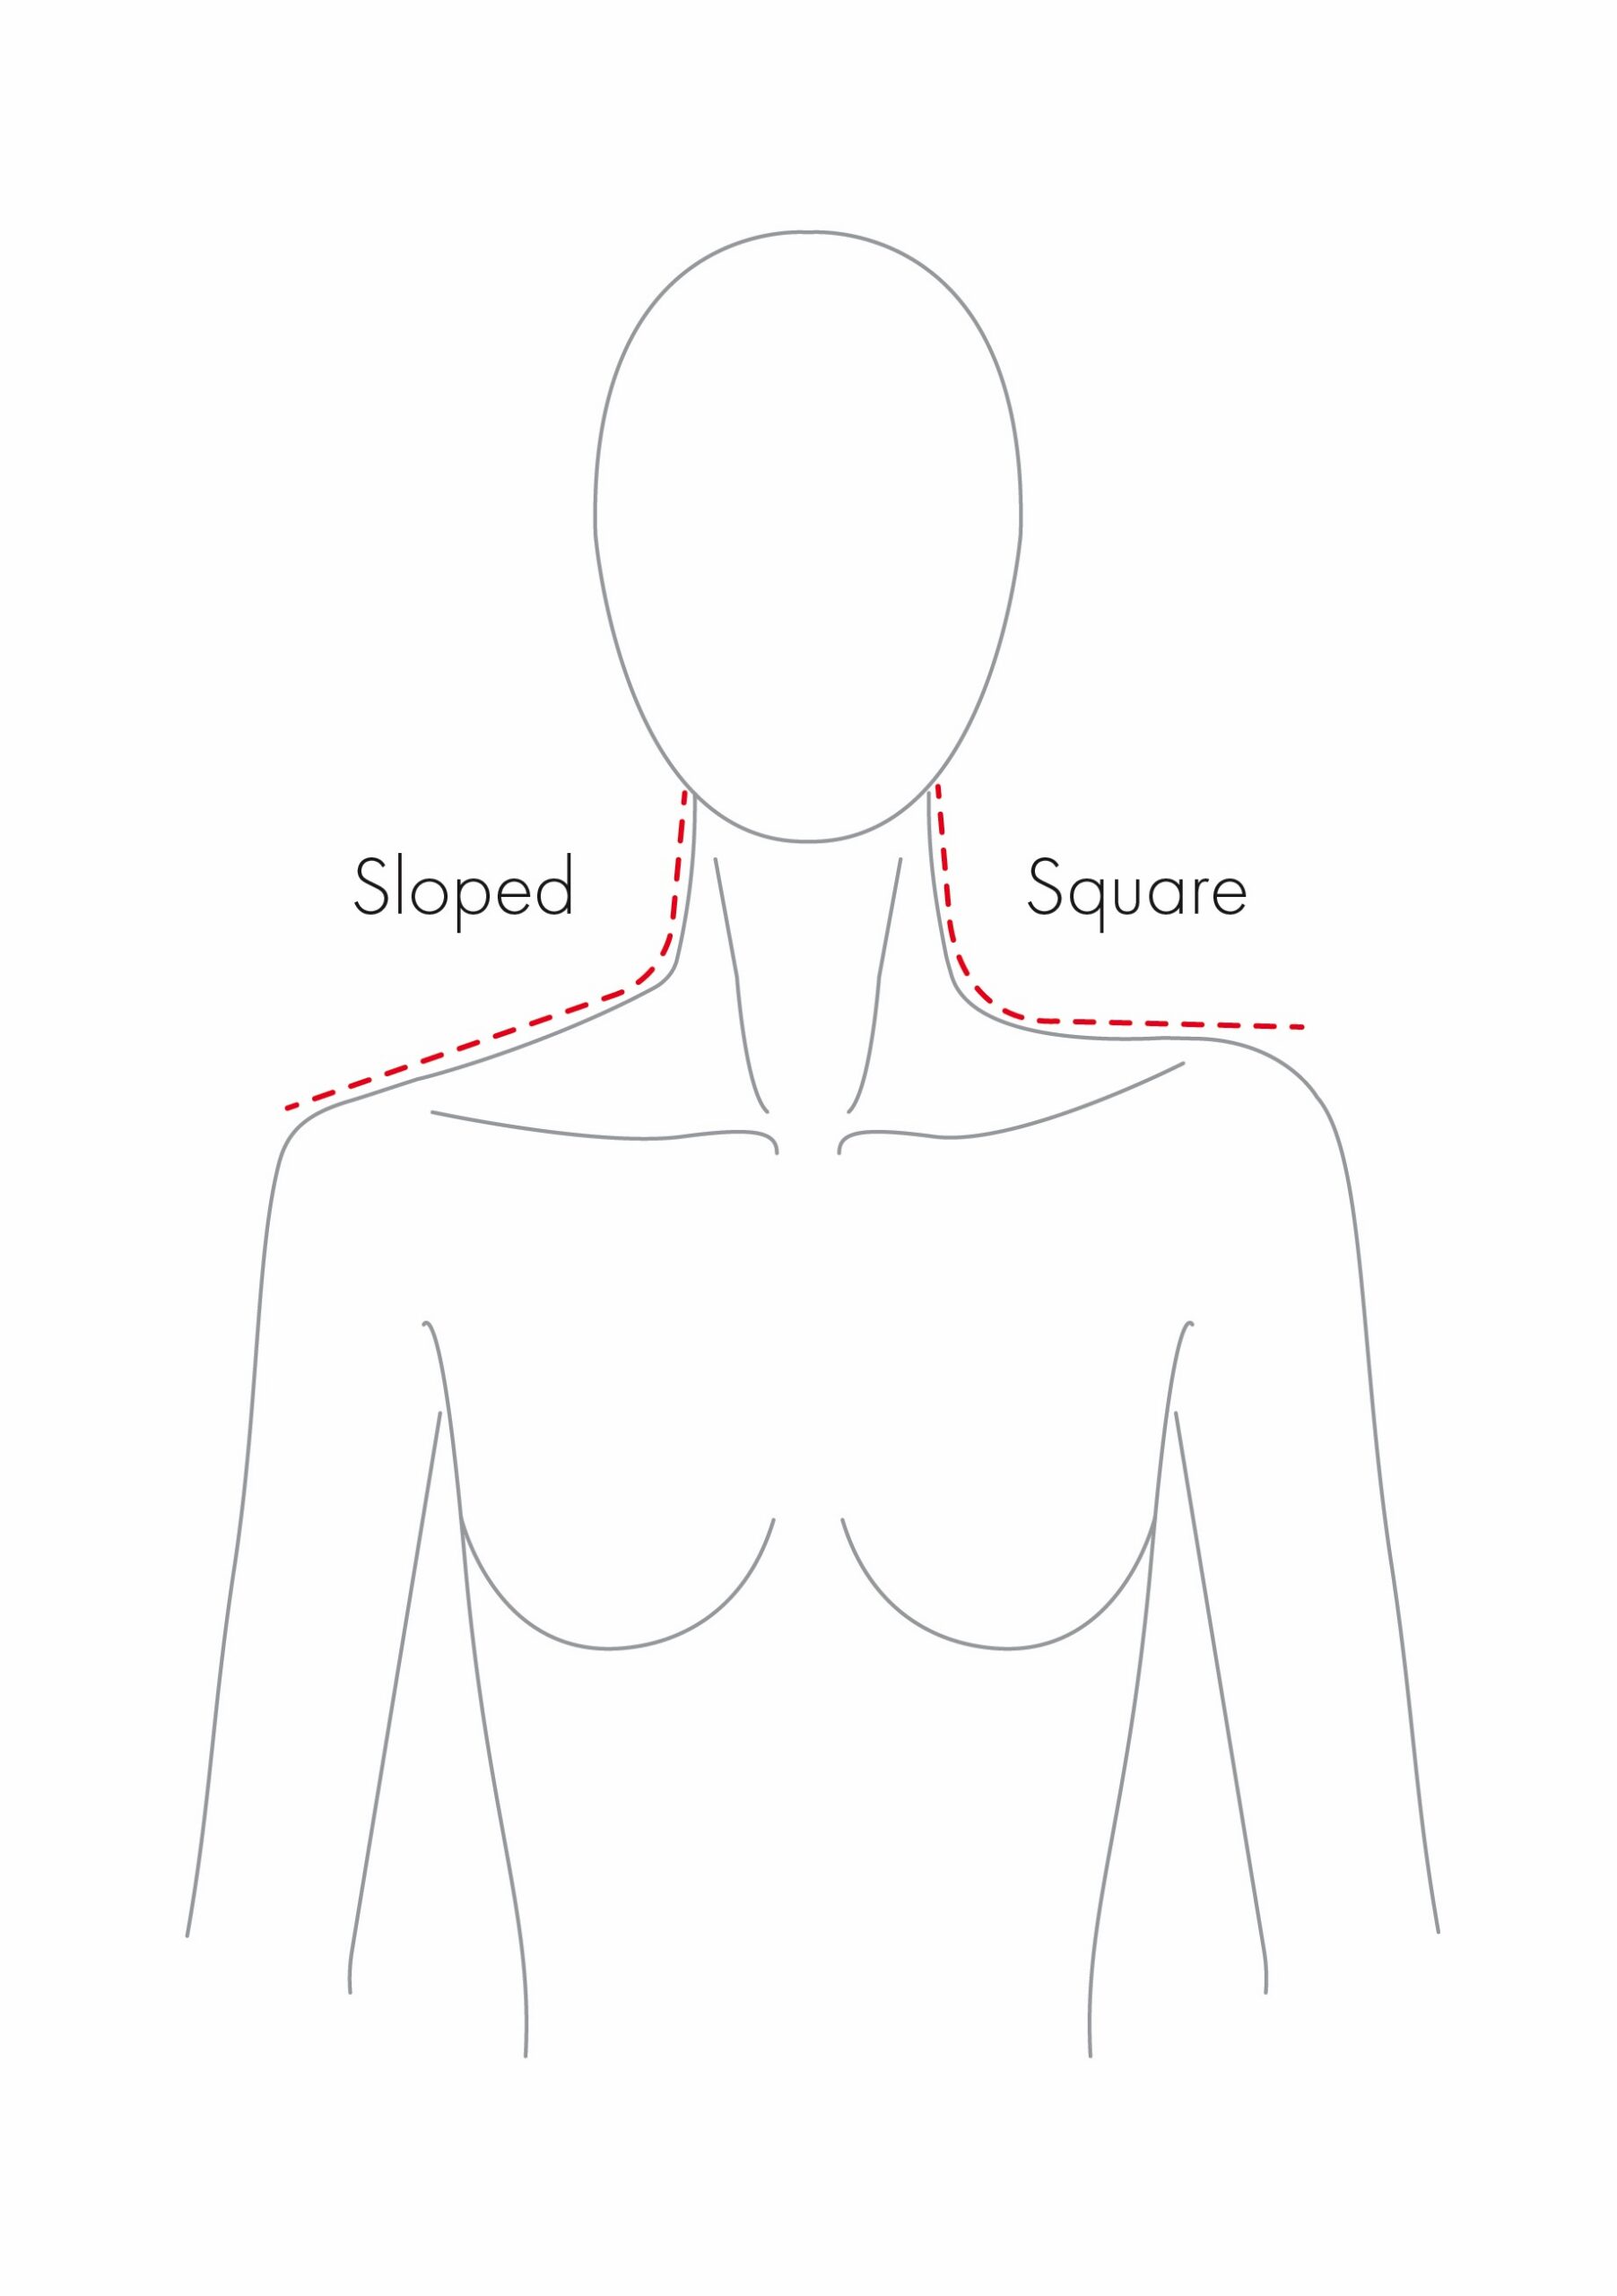
The shoulder slope refers to the angle at which the shoulder line descends from the base of the neck towards the shoulder point (where the shoulder transitions into the arm).
The easiest way to get a sense of your own shoulder slope is to stand in a relaxed position in front of a mirror and imagine a line running from the base of your neck to the outer point of your shoulder. If this line angles downwards from the neck towards your shoulder point, then you have more sloping shoulders. On the other hand, if this line looks relatively straight or flat, then they are more square. Most people, of course, fall somewhere between the two.
On a pattern:
On a block or pattern, the shoulder slope is the angle of the shoulder seam between the neckline and the low point of the shoulder (LPS). Most patterns will include some degree of downward slope along both the front and back shoulder seams.
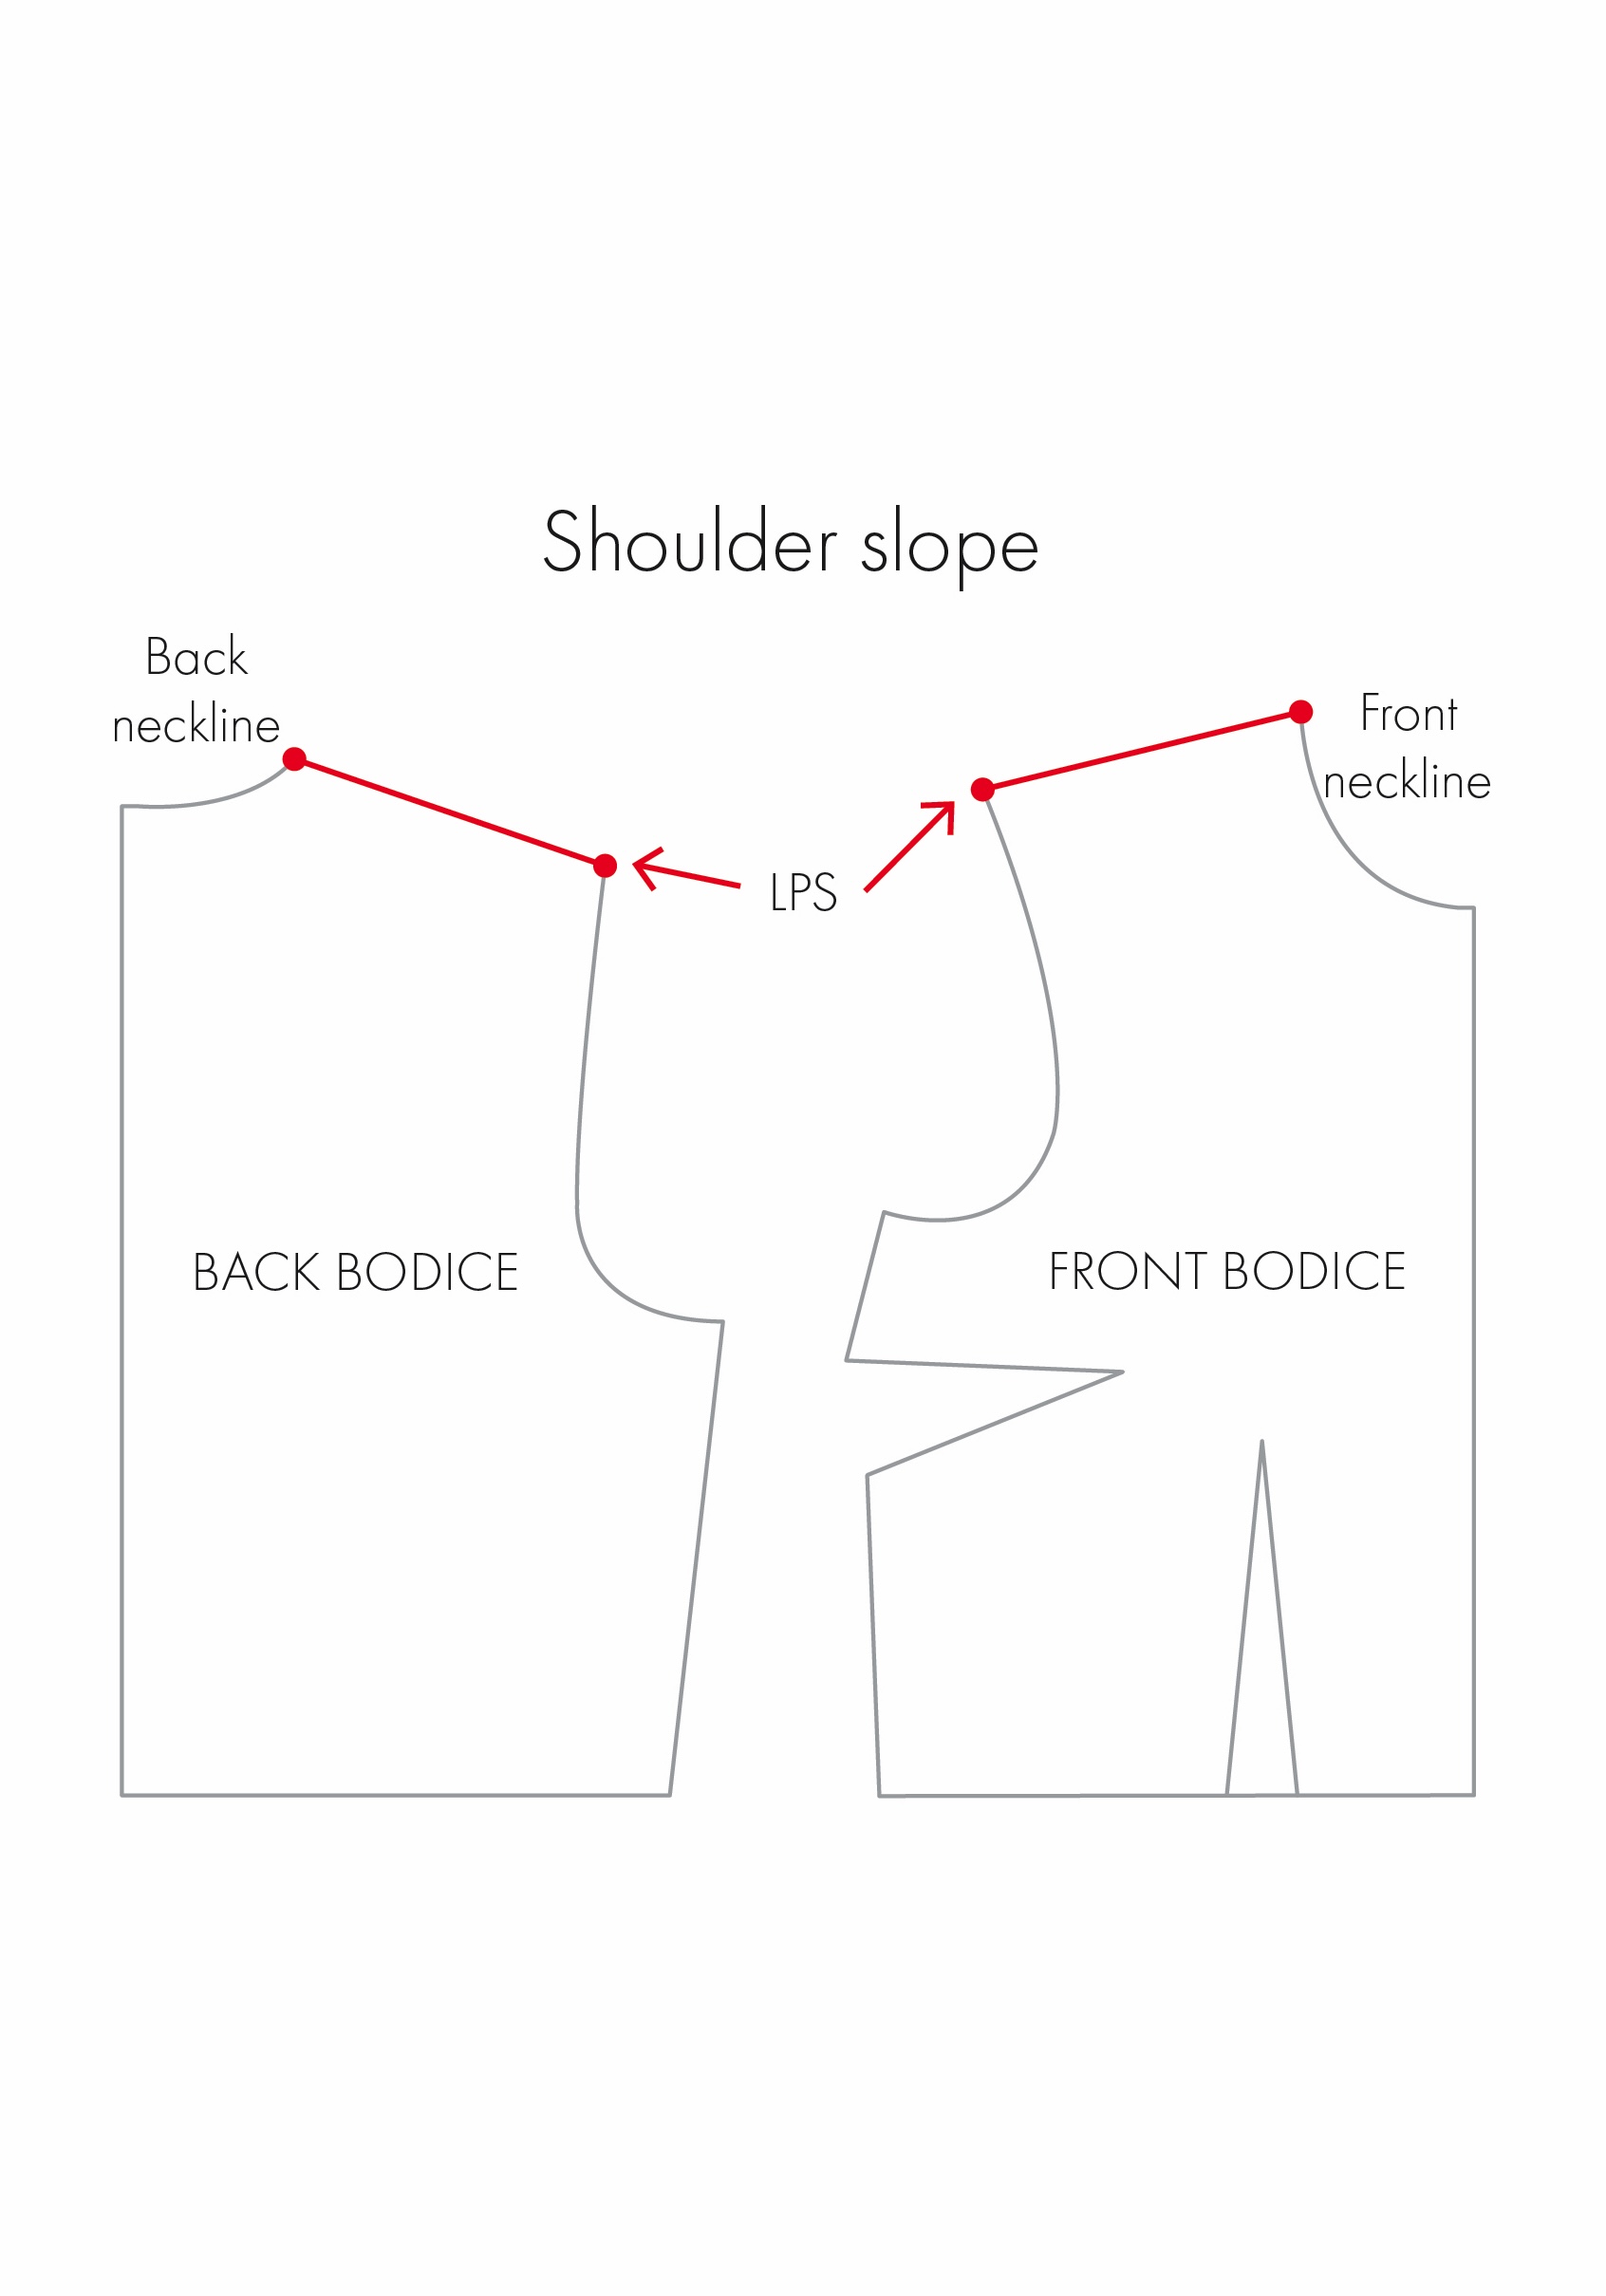
The shoulder slope isn’t equally as critical for every garment style. For example, it is more relevant in garments with a defined shoulder seam, like that of a set-in sleeve. However, it is generally less critical in designs with narrow shoulder straps or raglan sleeves.
Every pattern is designed differently, but for the purpose of this article I will demonstrate the adjustments on a basic bodice block with a standard set-in sleeve.
What to Look Out For in A Well-Fitting Shoulder Seam?
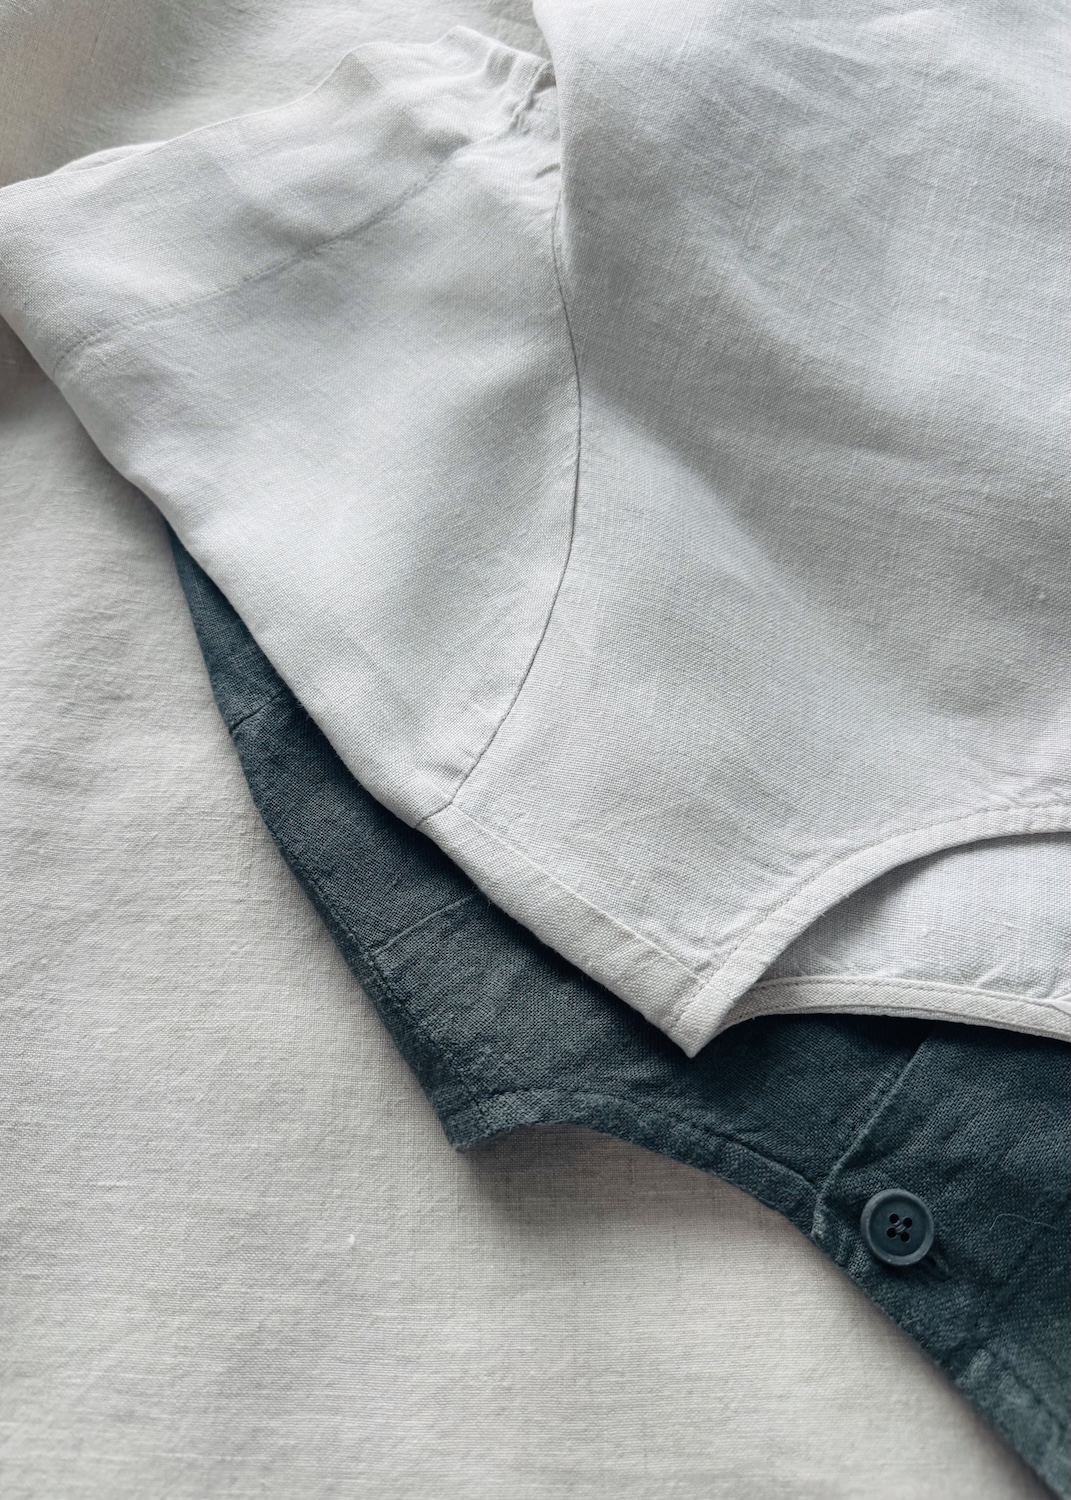
A well-fitting shoulder seam should sit along the shoulder line and follow the shape of the shoulder along its entire length. There shouldn’t be any obvious wrinkles or creases caused by excess fabric, or collapsing or gaping around the shoulder and the armhole opening where the sleeve is attached (i.e. the armscye). Nor should there be draglines caused by tension or pulling of the fabric.
How Do I Know Whether I Need to Change the Shoulder Slope?
Make a toile
I know many people really dislike making toiles as they can be time consuming and a waste of fabric, but in this case, it is pretty important. It is the most reliable way to determine whether an adjustment is needed, and how much of a change is required.
I recommend making a full toile because, as I mentioned earlier, the shoulder really can affect the overall fit and balance of a garment. But remember you don’t necessarily need to include every little detail, such as hems, pockets, or other finishes.
Assess the shoulder fit
Put on the toile and stand in front of a mirror, or get someone to help you assess the fit. You want to be looking at where the garment’s shoulder seam is sitting on the body, and how the fabric around the shoulder, neckline and armscye is behaving.
If you have more sloping shoulders, you may notice that the garment sits away from the shoulder at the shoulder point. You may also see excess fabric, collapsing, or gaping around the armscye, which can create folds or creases.
On the other hand, if you have squarer shoulders, you may notice drag lines, or pulling across the shoulder. The shoulder may also push the fabric upwards and away from the body, or cause it to sag and create folds at the neckline.
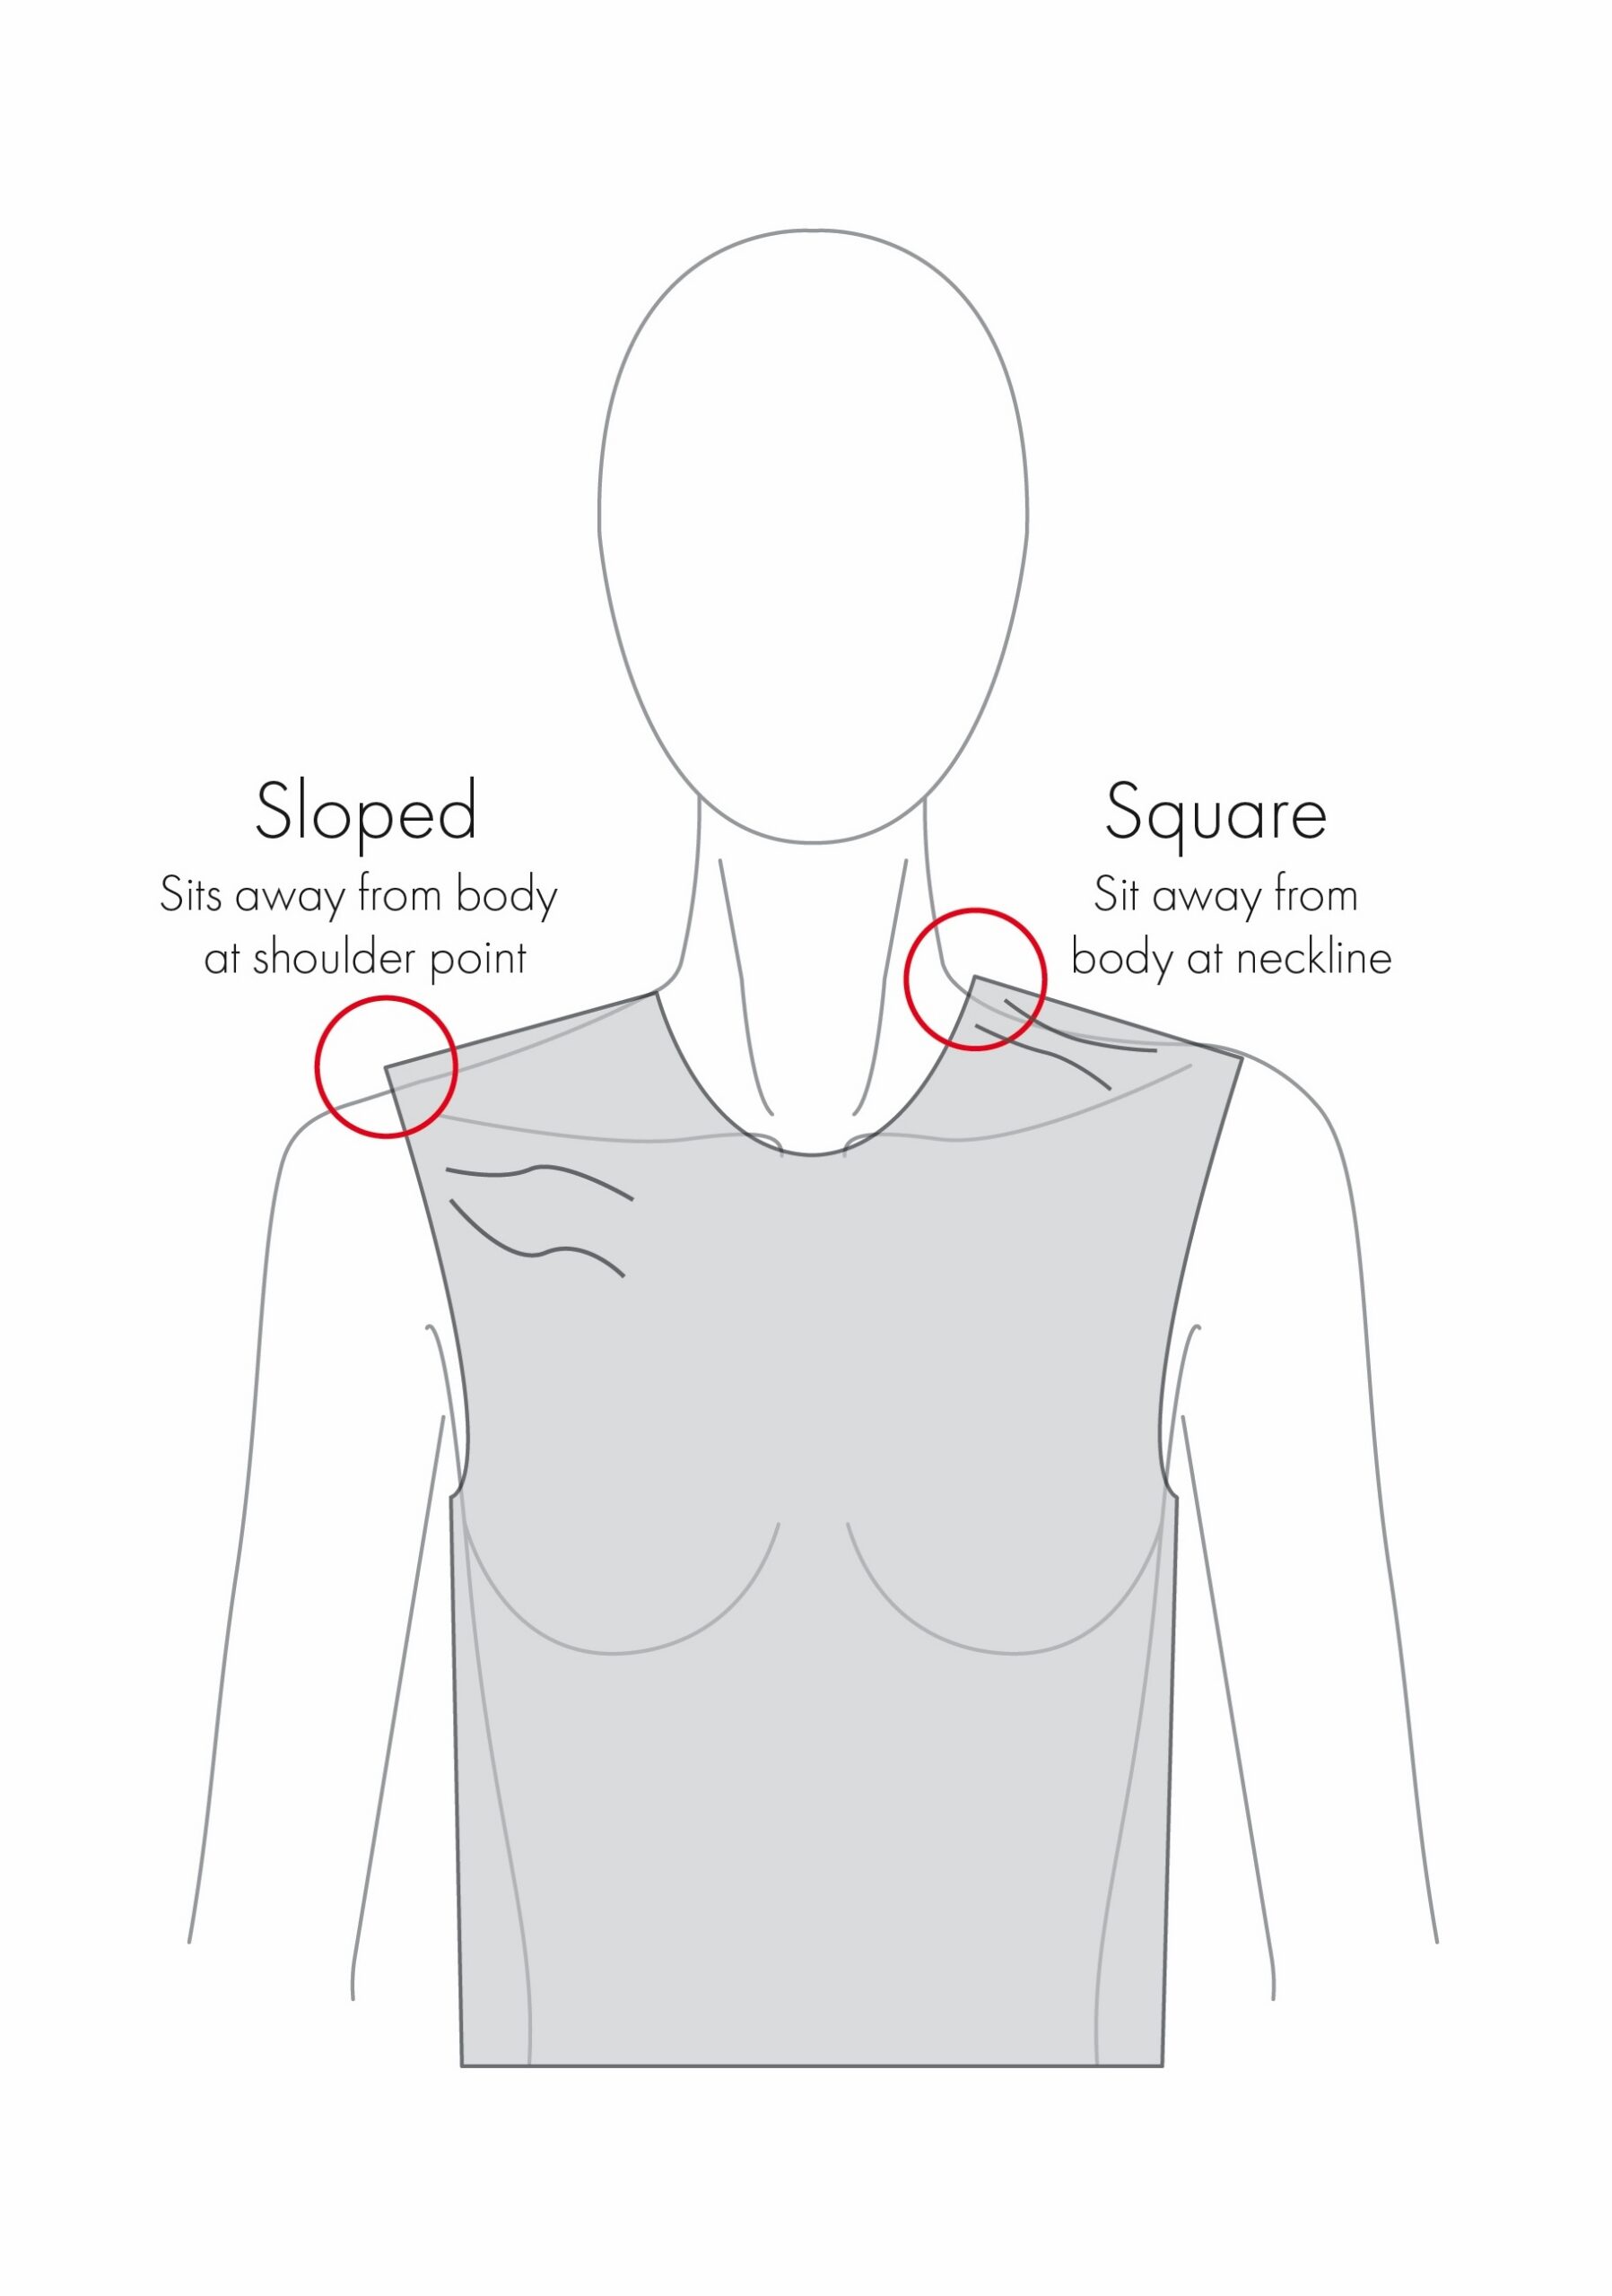
Now issues with the shoulder slope do not always occur in isolation, there may be other factors at play that need adjusting (which I hope to cover in future articles). For now, I am simplifying things and focusing only on those that may be associated with the shoulder slope.
How Much Should You Adjust the Shoulder?
1. Open the shoulder seam: Remove the toile and cut or unpick along the shoulder seam, stopping just short of the neckline to create a little hinge.
2. Try on the toile again: Assess the fit at the shoulder.
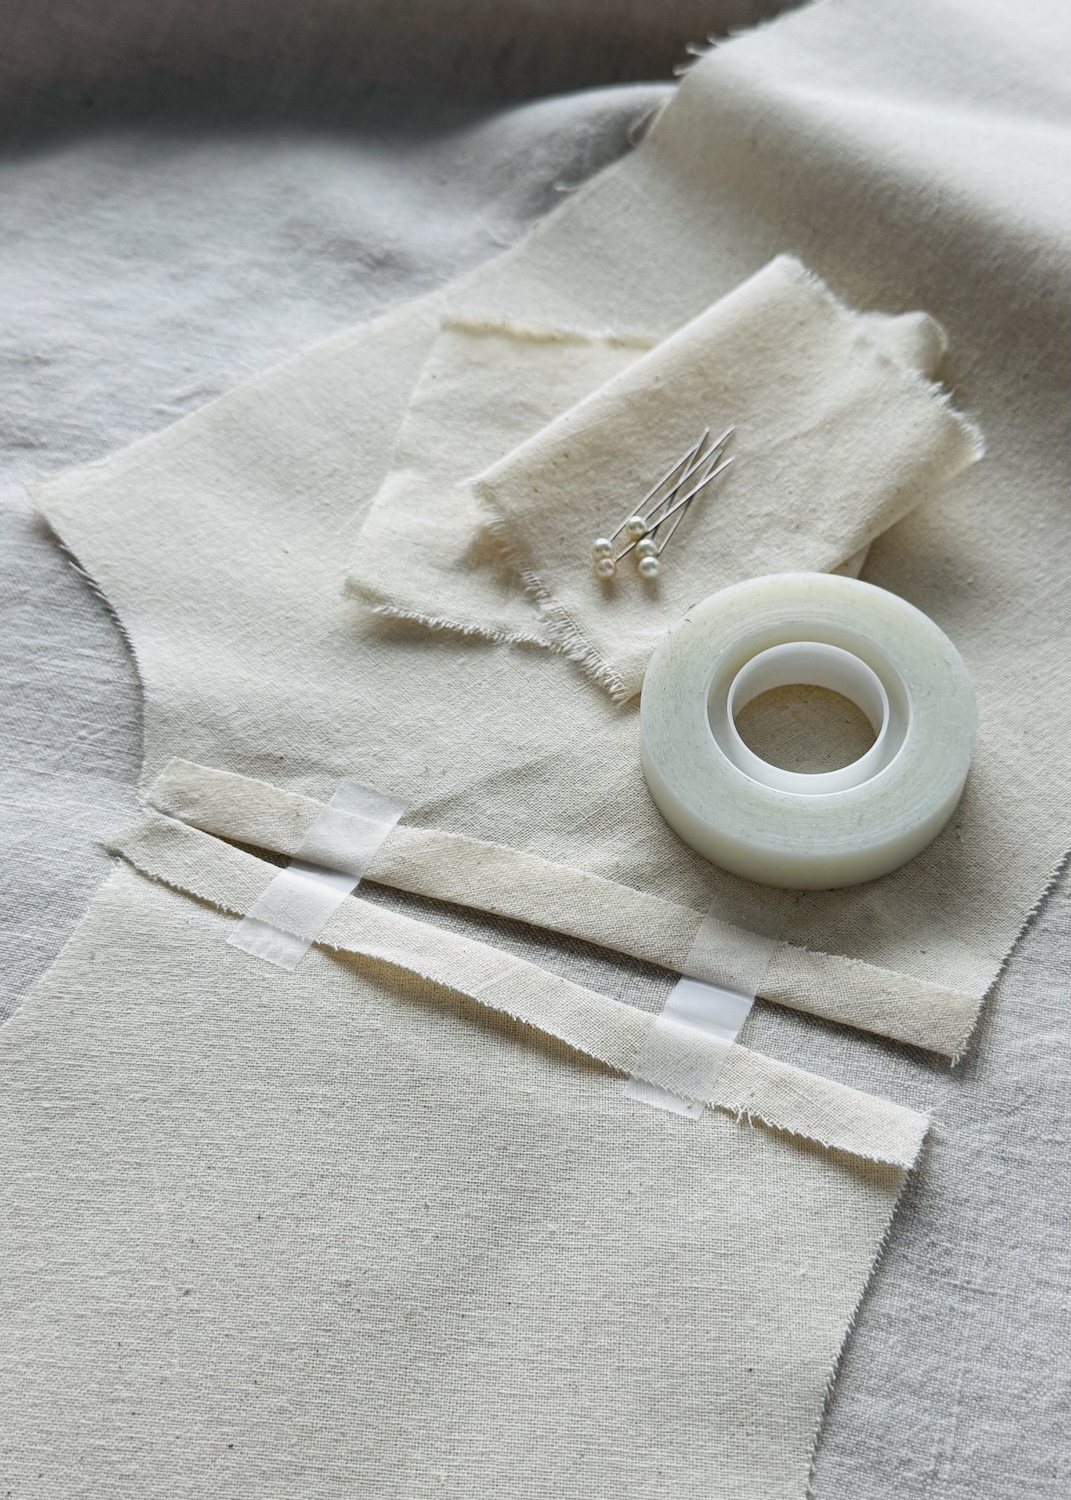
3. Adjust the shoulder: If there is too much fabric at the shoulder, overlap the two sides of the opened seam until the shoulder sits nice and comfortably. Pin or tape the overlap in place. If the shoulder needs more room, allow the seam to separate and secure in place. To do this you can either:
- Pin or tape a piece of fabric or paper behind the opening to bridge the gap.
- Apply tape across the opening at various points, aligning the tape on the both the inside and outside of the toile, anchoring one side to the other.
How to Transfer Adjustments From Toile to Pattern
Once you’ve determined the amount of adjustment needed on the toile, the next step is to transfer it to the pattern.
When adjusting the shoulder slope on a pattern, you are essentially changing the angle of the shoulder seam between the neckline and the low point of the shoulder.
Because the shoulder seam is essentially shared between the front and back pattern pieces, I tend to divide the adjustment evenly between them (given no other adjustment is required, such as for a forward shoulder adjustment, which is a whole other adjustment). For example, if you overlapped the shoulder seams by 8 mm, lower the low point of the shoulder by 4 mm on the front pattern piece and 4 mm on the back. Likewise, if you opened the shoulder seams by 10 mm, raise the low point of the shoulder by 5 mm on each pattern piece.
Two Ways to Adjust Shoulder Slope
There are a couple of ways you can adjust the shoulder slope, depending on the amount of alteration required and how you want to handle the armscye.
- Method 1 adjusts the shoulder slope only, altering the armscye.
- Method 2 adjusts the shoulder slope while maintaining the original armscye curve and length.
Note: Although I will be working digitally to demonstrate these shoulder slope adjustments, the process can easily be transferred to manual pattern making. The diagrams are also not to scale, and all seam allowances have been removed from the diagrams, as changes should be made to the stitching line.
Method 1: Adjust the shoulder slope only
The key thing to consider with this method is that changing the shoulder slope also changes the armscye. You’ll therefore need to adjust the sleeve head to accommodate this change.
I would tend to use this method only when a relatively small adjustment is needed and I am comfortable allowing the armscye to change slightly.
Step 1: Determine the original sleeve head ease
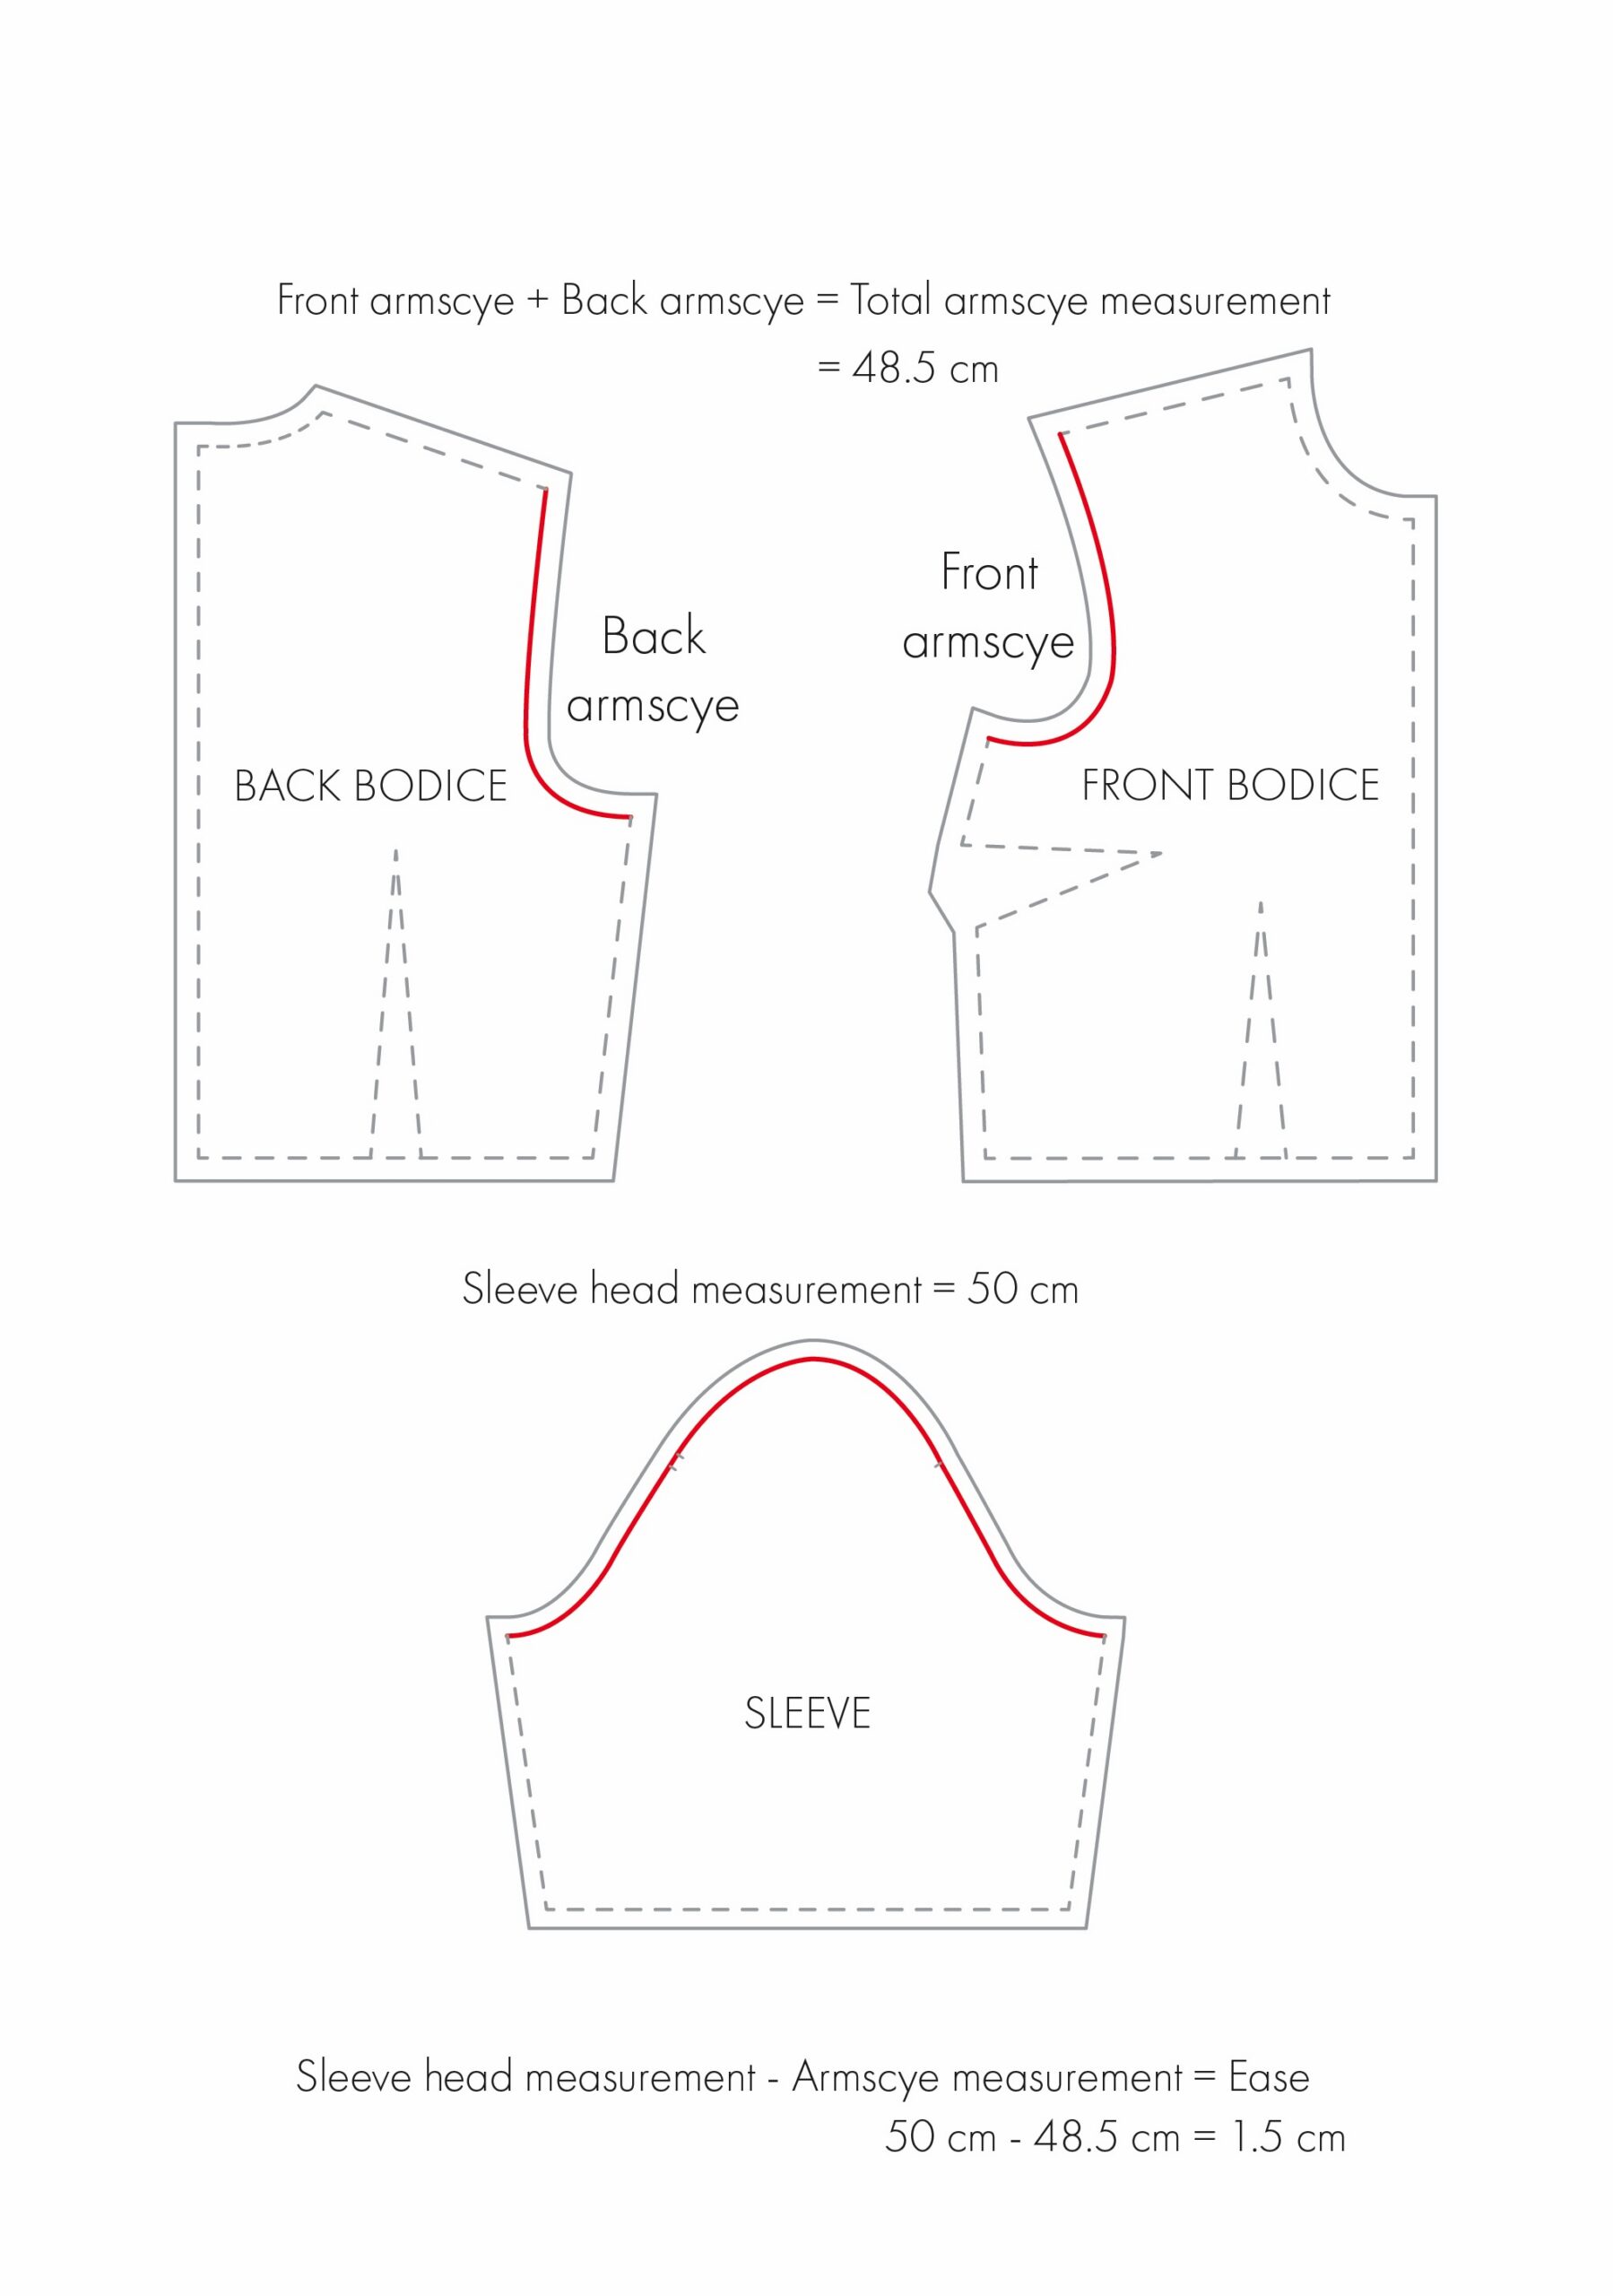
To determine the amount of sleeve head ease in the original pattern measure the stitching line of both the front and back armscye and sleeve head. Then subtract the total armscye measurement from the sleeve head measurement to determine the original amount of sleeve head ease.
Sleeve head measurement — armscye measurement = Sleeve head ease
So as an example, the sleeve head might measures 50 cm, while the combined front and back armscye measures 48.5 cm. This means the sleeve block has 1.5 cm of sleeve head ease.
Note: I won’t go into much detail about ease here, as I have already covered it in the article ‘An Introduction to Garment Ease’.
Step 2: Adjust the shoulder
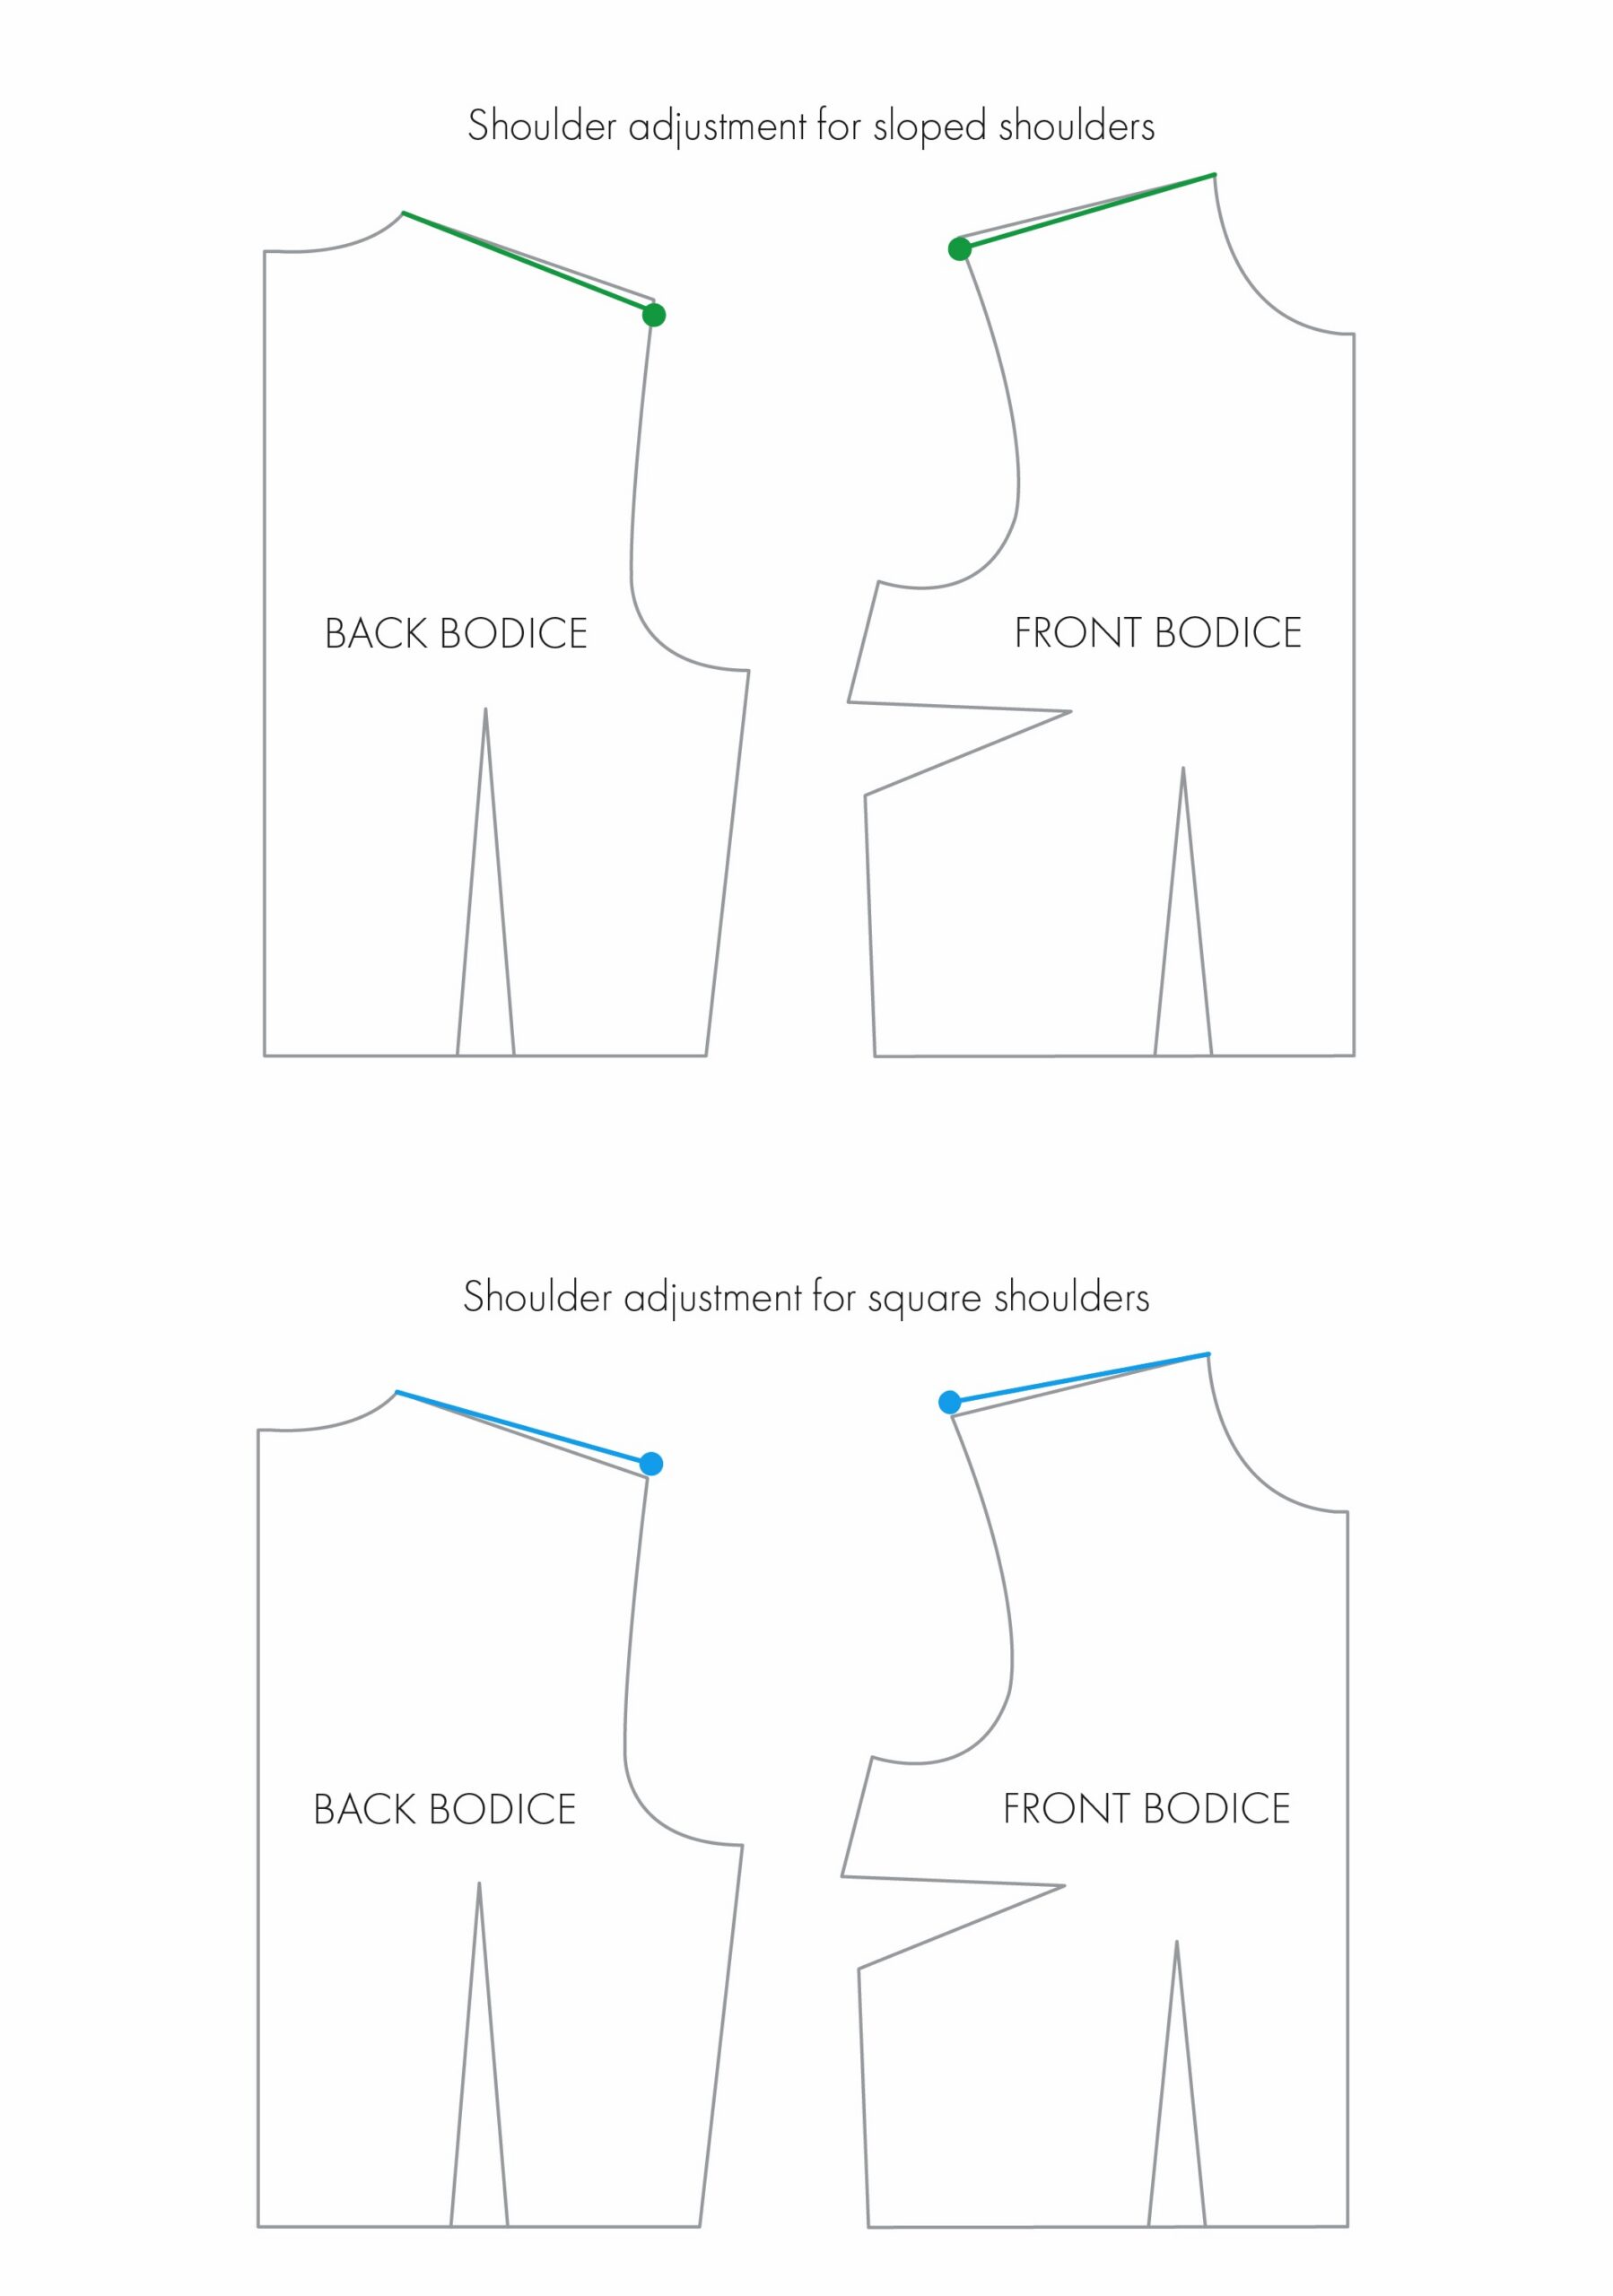
For a sloping shoulder adjustment, simply lower the low point of the shoulder while maintaining the neckline position (green line).
For a square shoulder adjustment, raise the low point of the shoulder (blue line), again keeping the neckline position unchanged.
Step 3: Check and adjust the sleeve
As I mentioned earlier, this method also changes the length of the armscye.
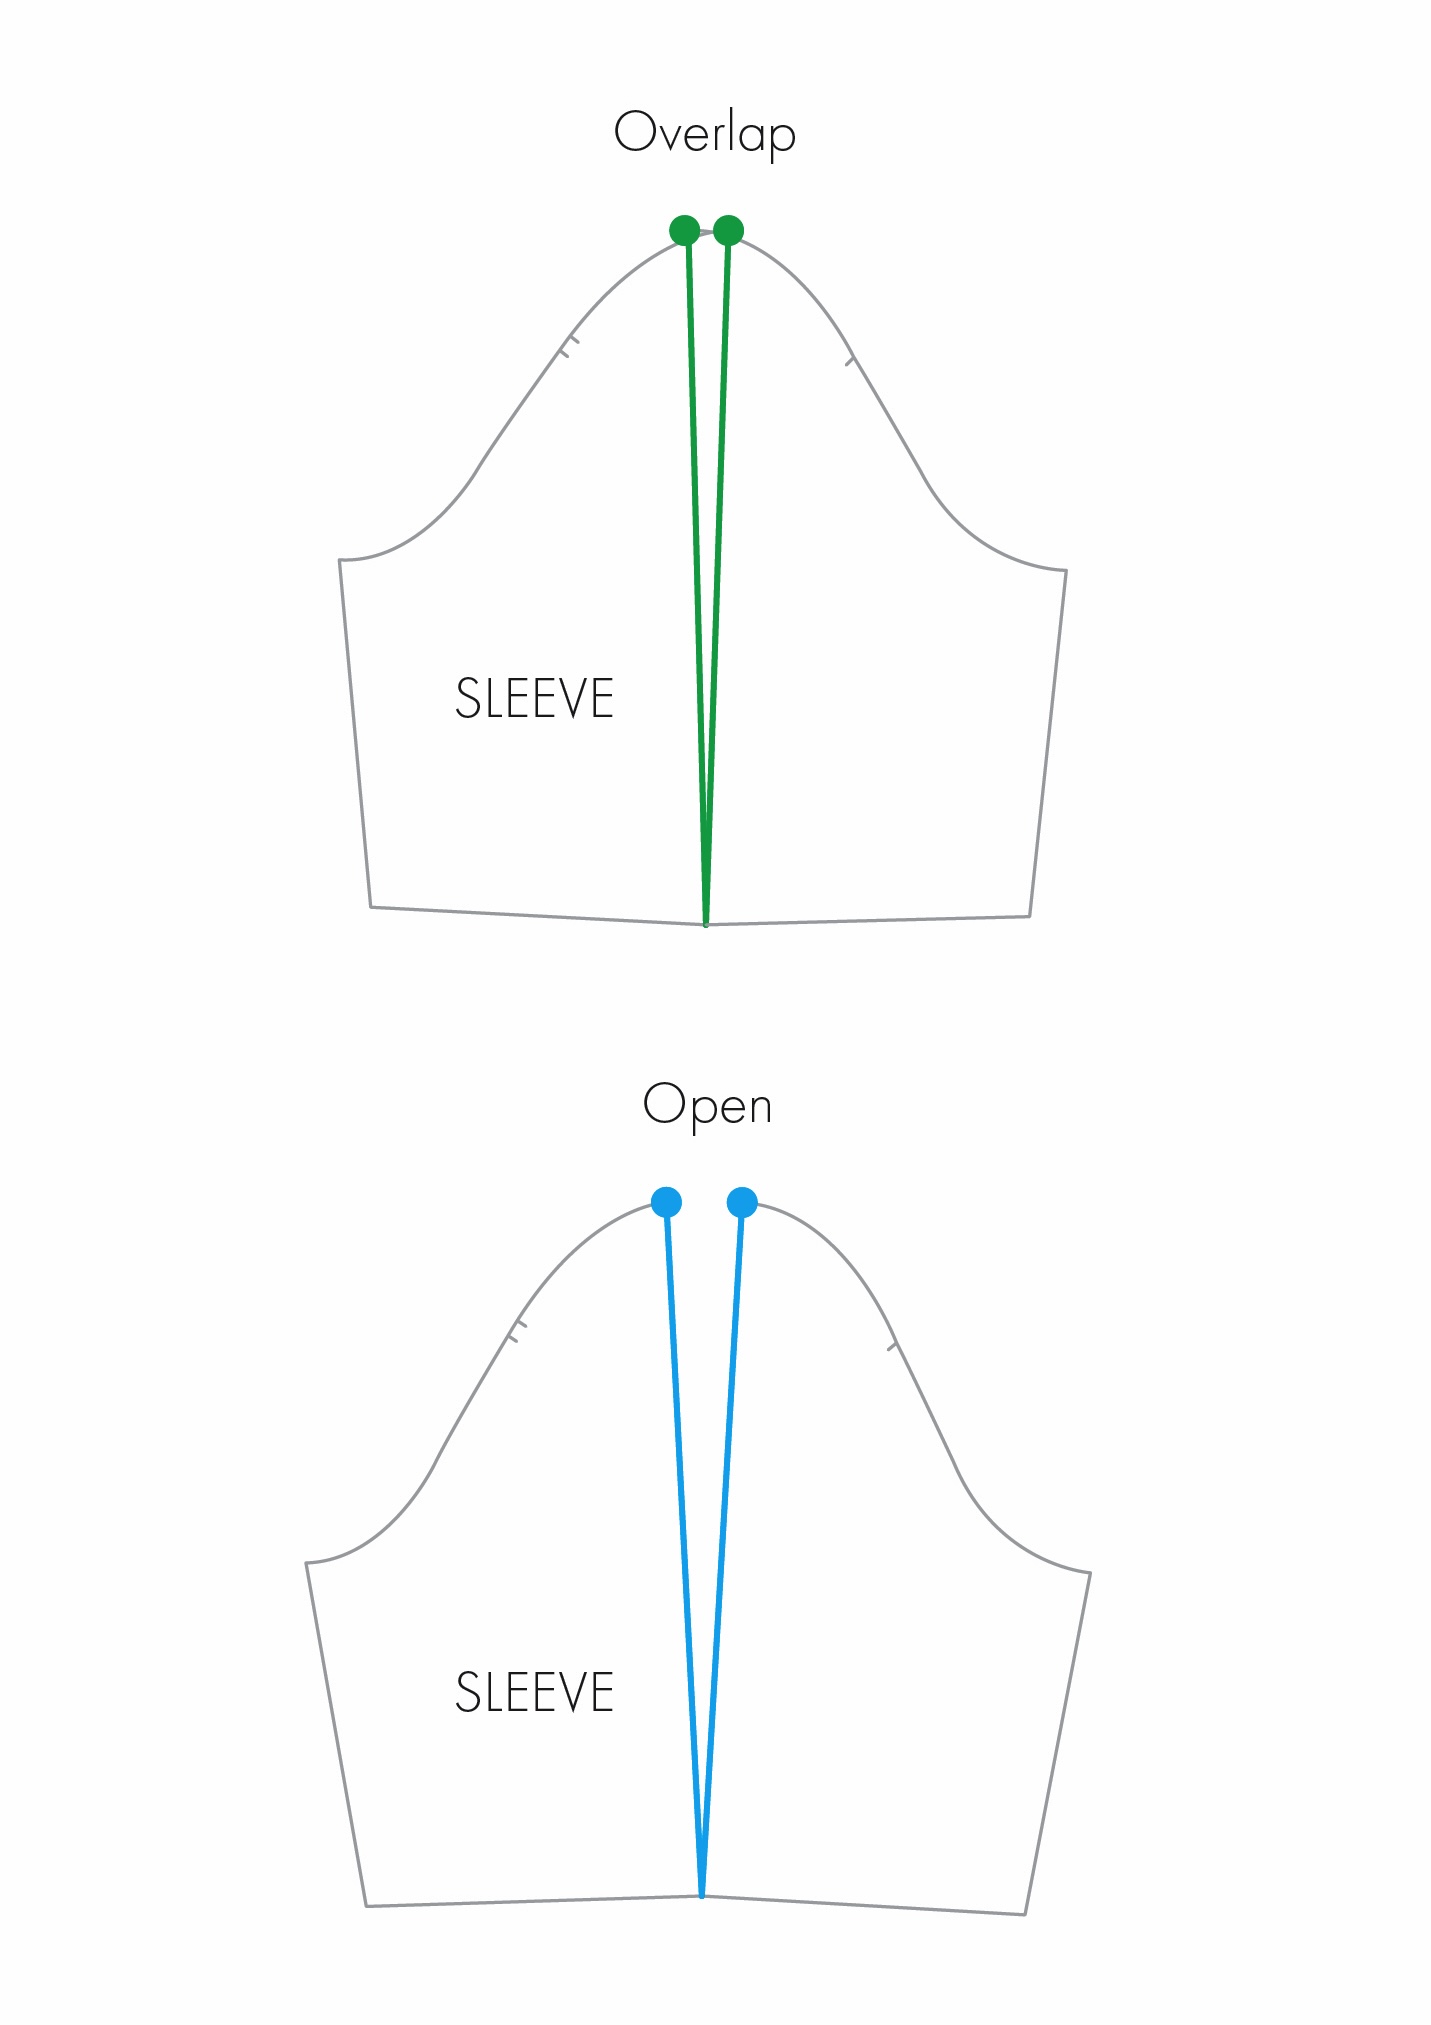
Lowering the low point of the shoulder shortens the armscye, while raising it lengthens it. As a result, the sleeve head needs to be adjusted accordingly. You want to maintain the same amount of sleeve head ease that you identified in Step 1.
To do this, cut and spread or cut and overlap the sleeve head as needed to restore the original amount of ease. Once you’ve made the adjustment, double check things by remeasuring the total armscye and sleeve head to ensure that the original amount of ease has been maintained.
For more on cutting and spreading, take a read of my article ‘An Introduction to the Cut and Spread Method’.
Step 4: Blend and true the pattern
Blend and redraw the new shoulder slope and armscye, add the seam allowance and true the pattern.
Method 2: Adjusting the shoulder slope and armscye together
This is my preferred method because it adjusts the shoulder slope while maintaining the original length and shape of the armscye. This creates what I find to be a more balanced and controlled alteration.
Step 1: Divide the shoulder
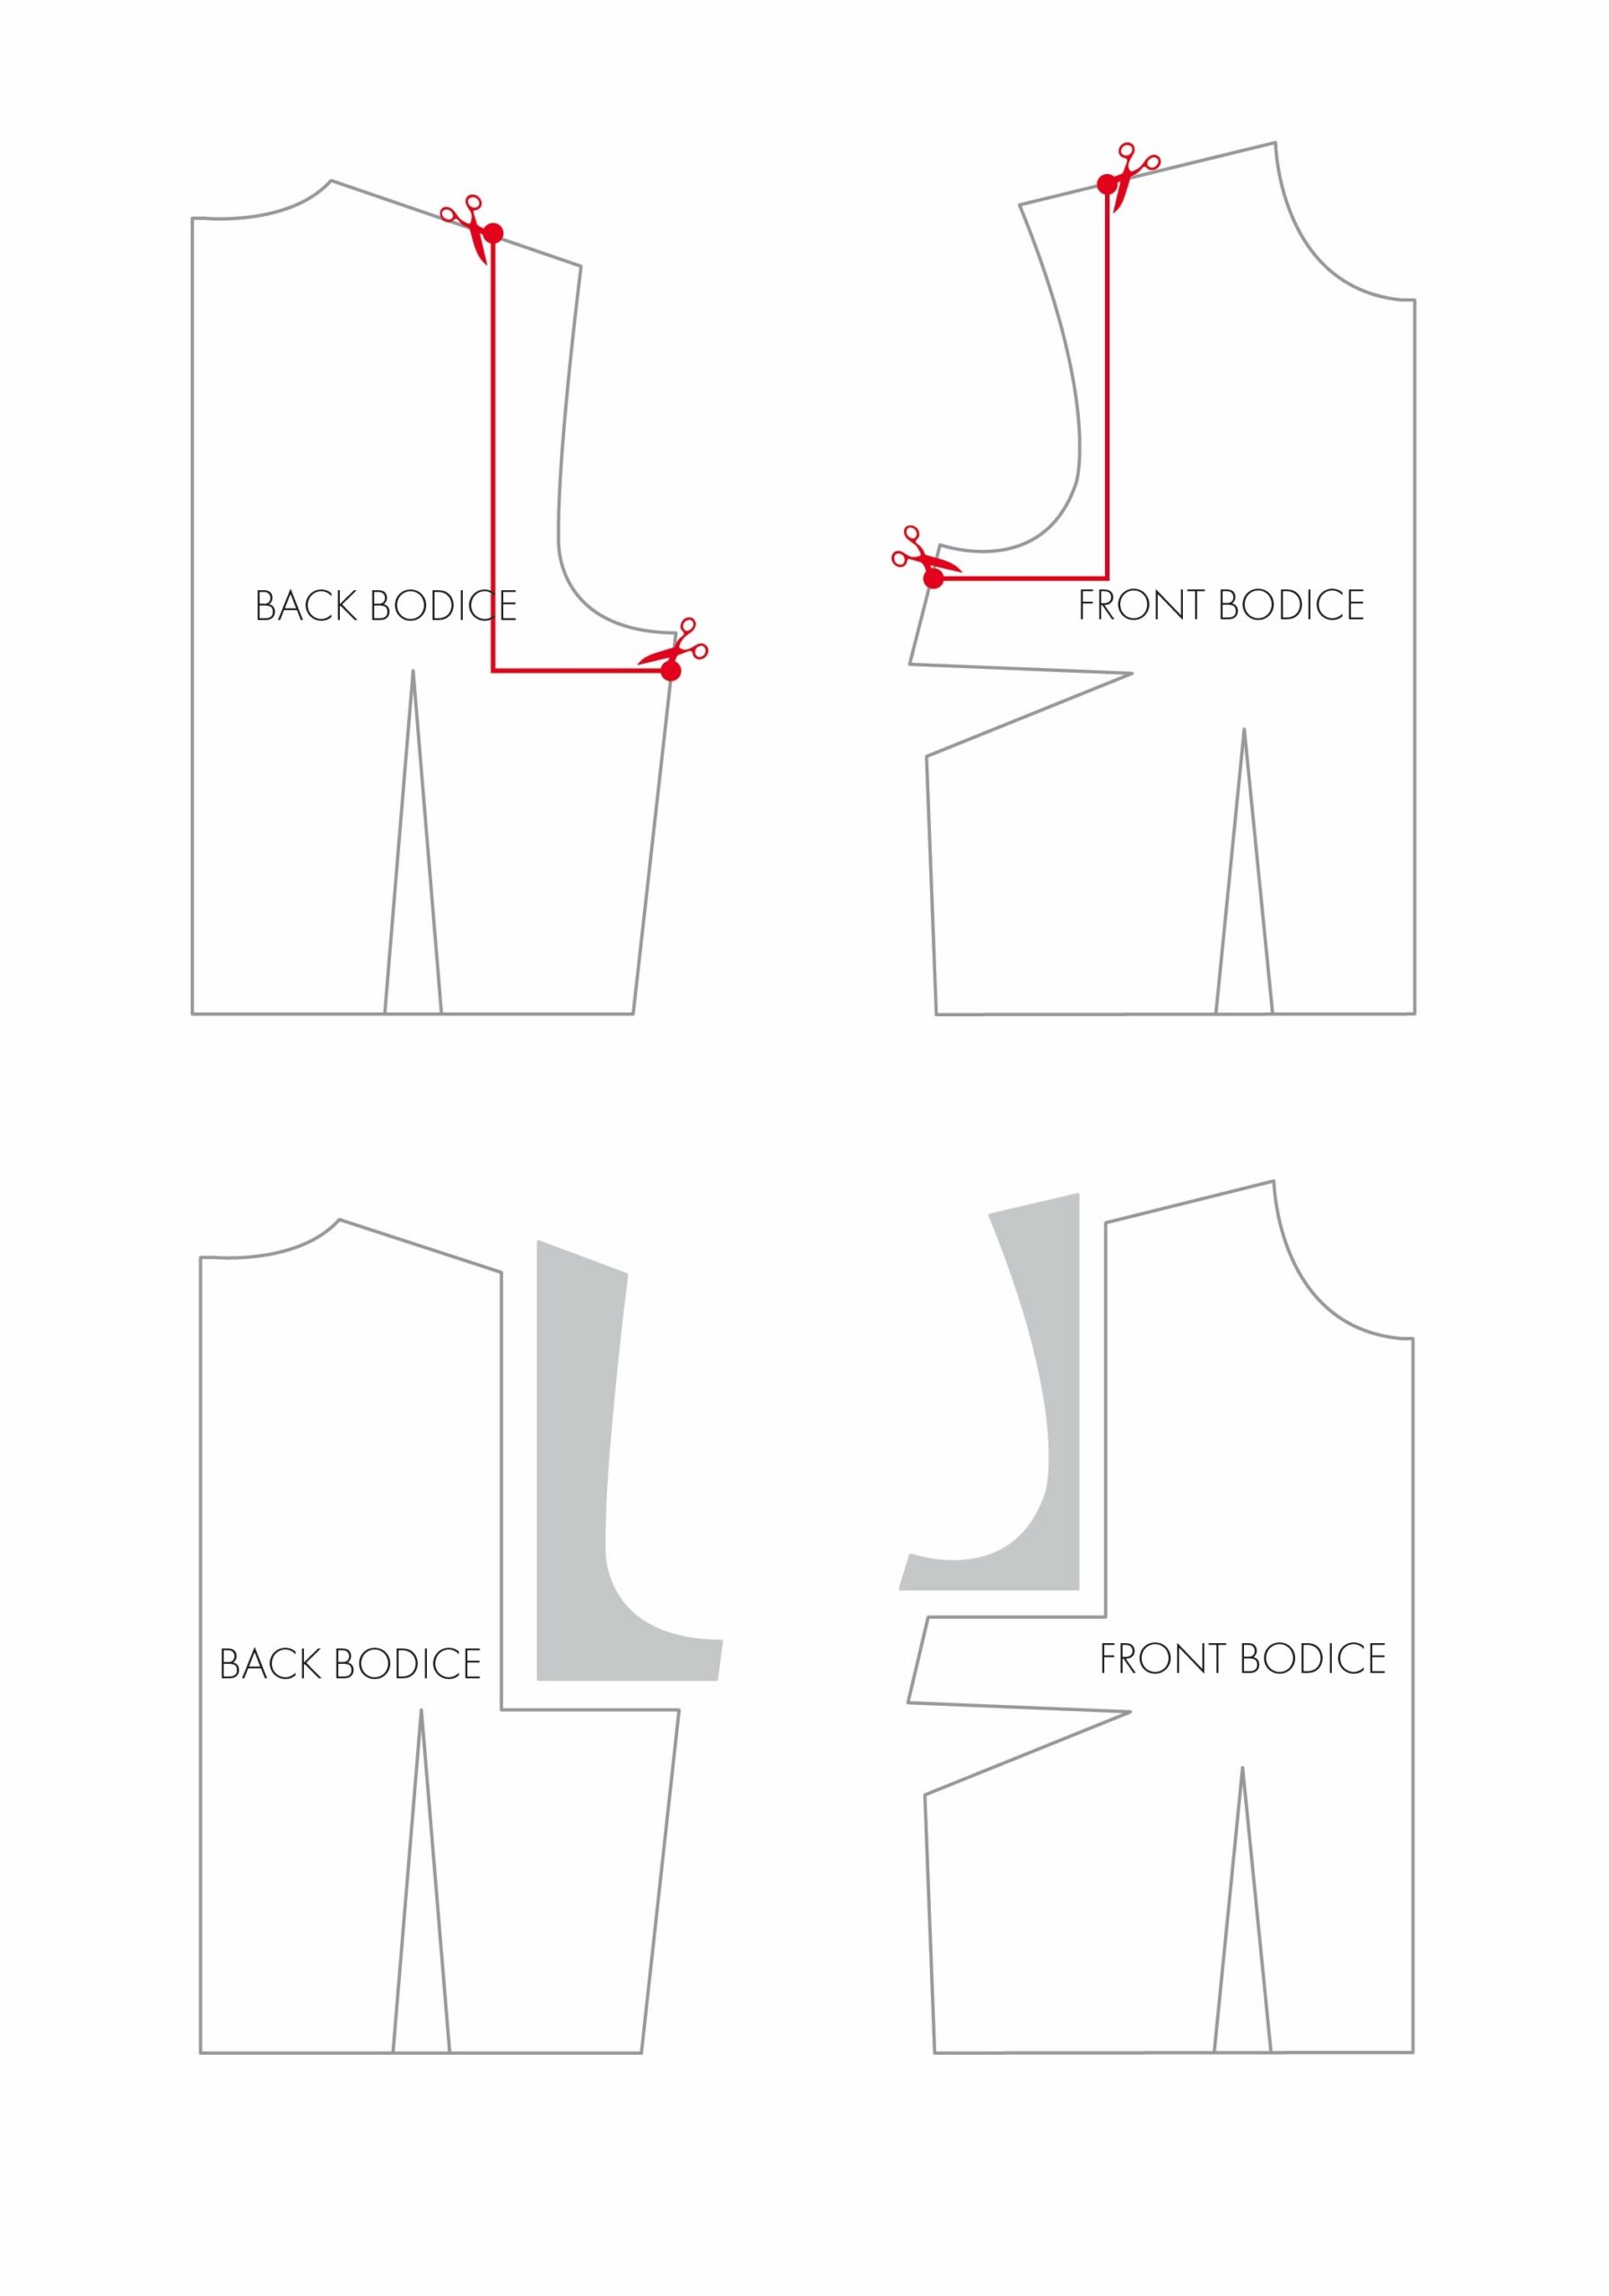
Divide the shoulder seam on the pattern or block into roughly thirds and mark the point closest to the low point of the shoulder. This point should sit just inside the armscye. From this point, draw a vertical line downwards.
Then, mark a second point a couple of centimetres below the underarm point. Draw a line from this point to meet the vertical line extending down from the shoulder.
Step 2: Cut the pattern
Cut along these lines, separating the pattern into two pieces.
Step 3: Shift the pattern
To create a more sloping shoulder, shift the smaller piece encompassing the armscye downwards. This lowers the low point of shoulder and the underarm.
To create a squarer shoulder, shift this piece upwards, raising the low point of the shoulder and the underarm point.
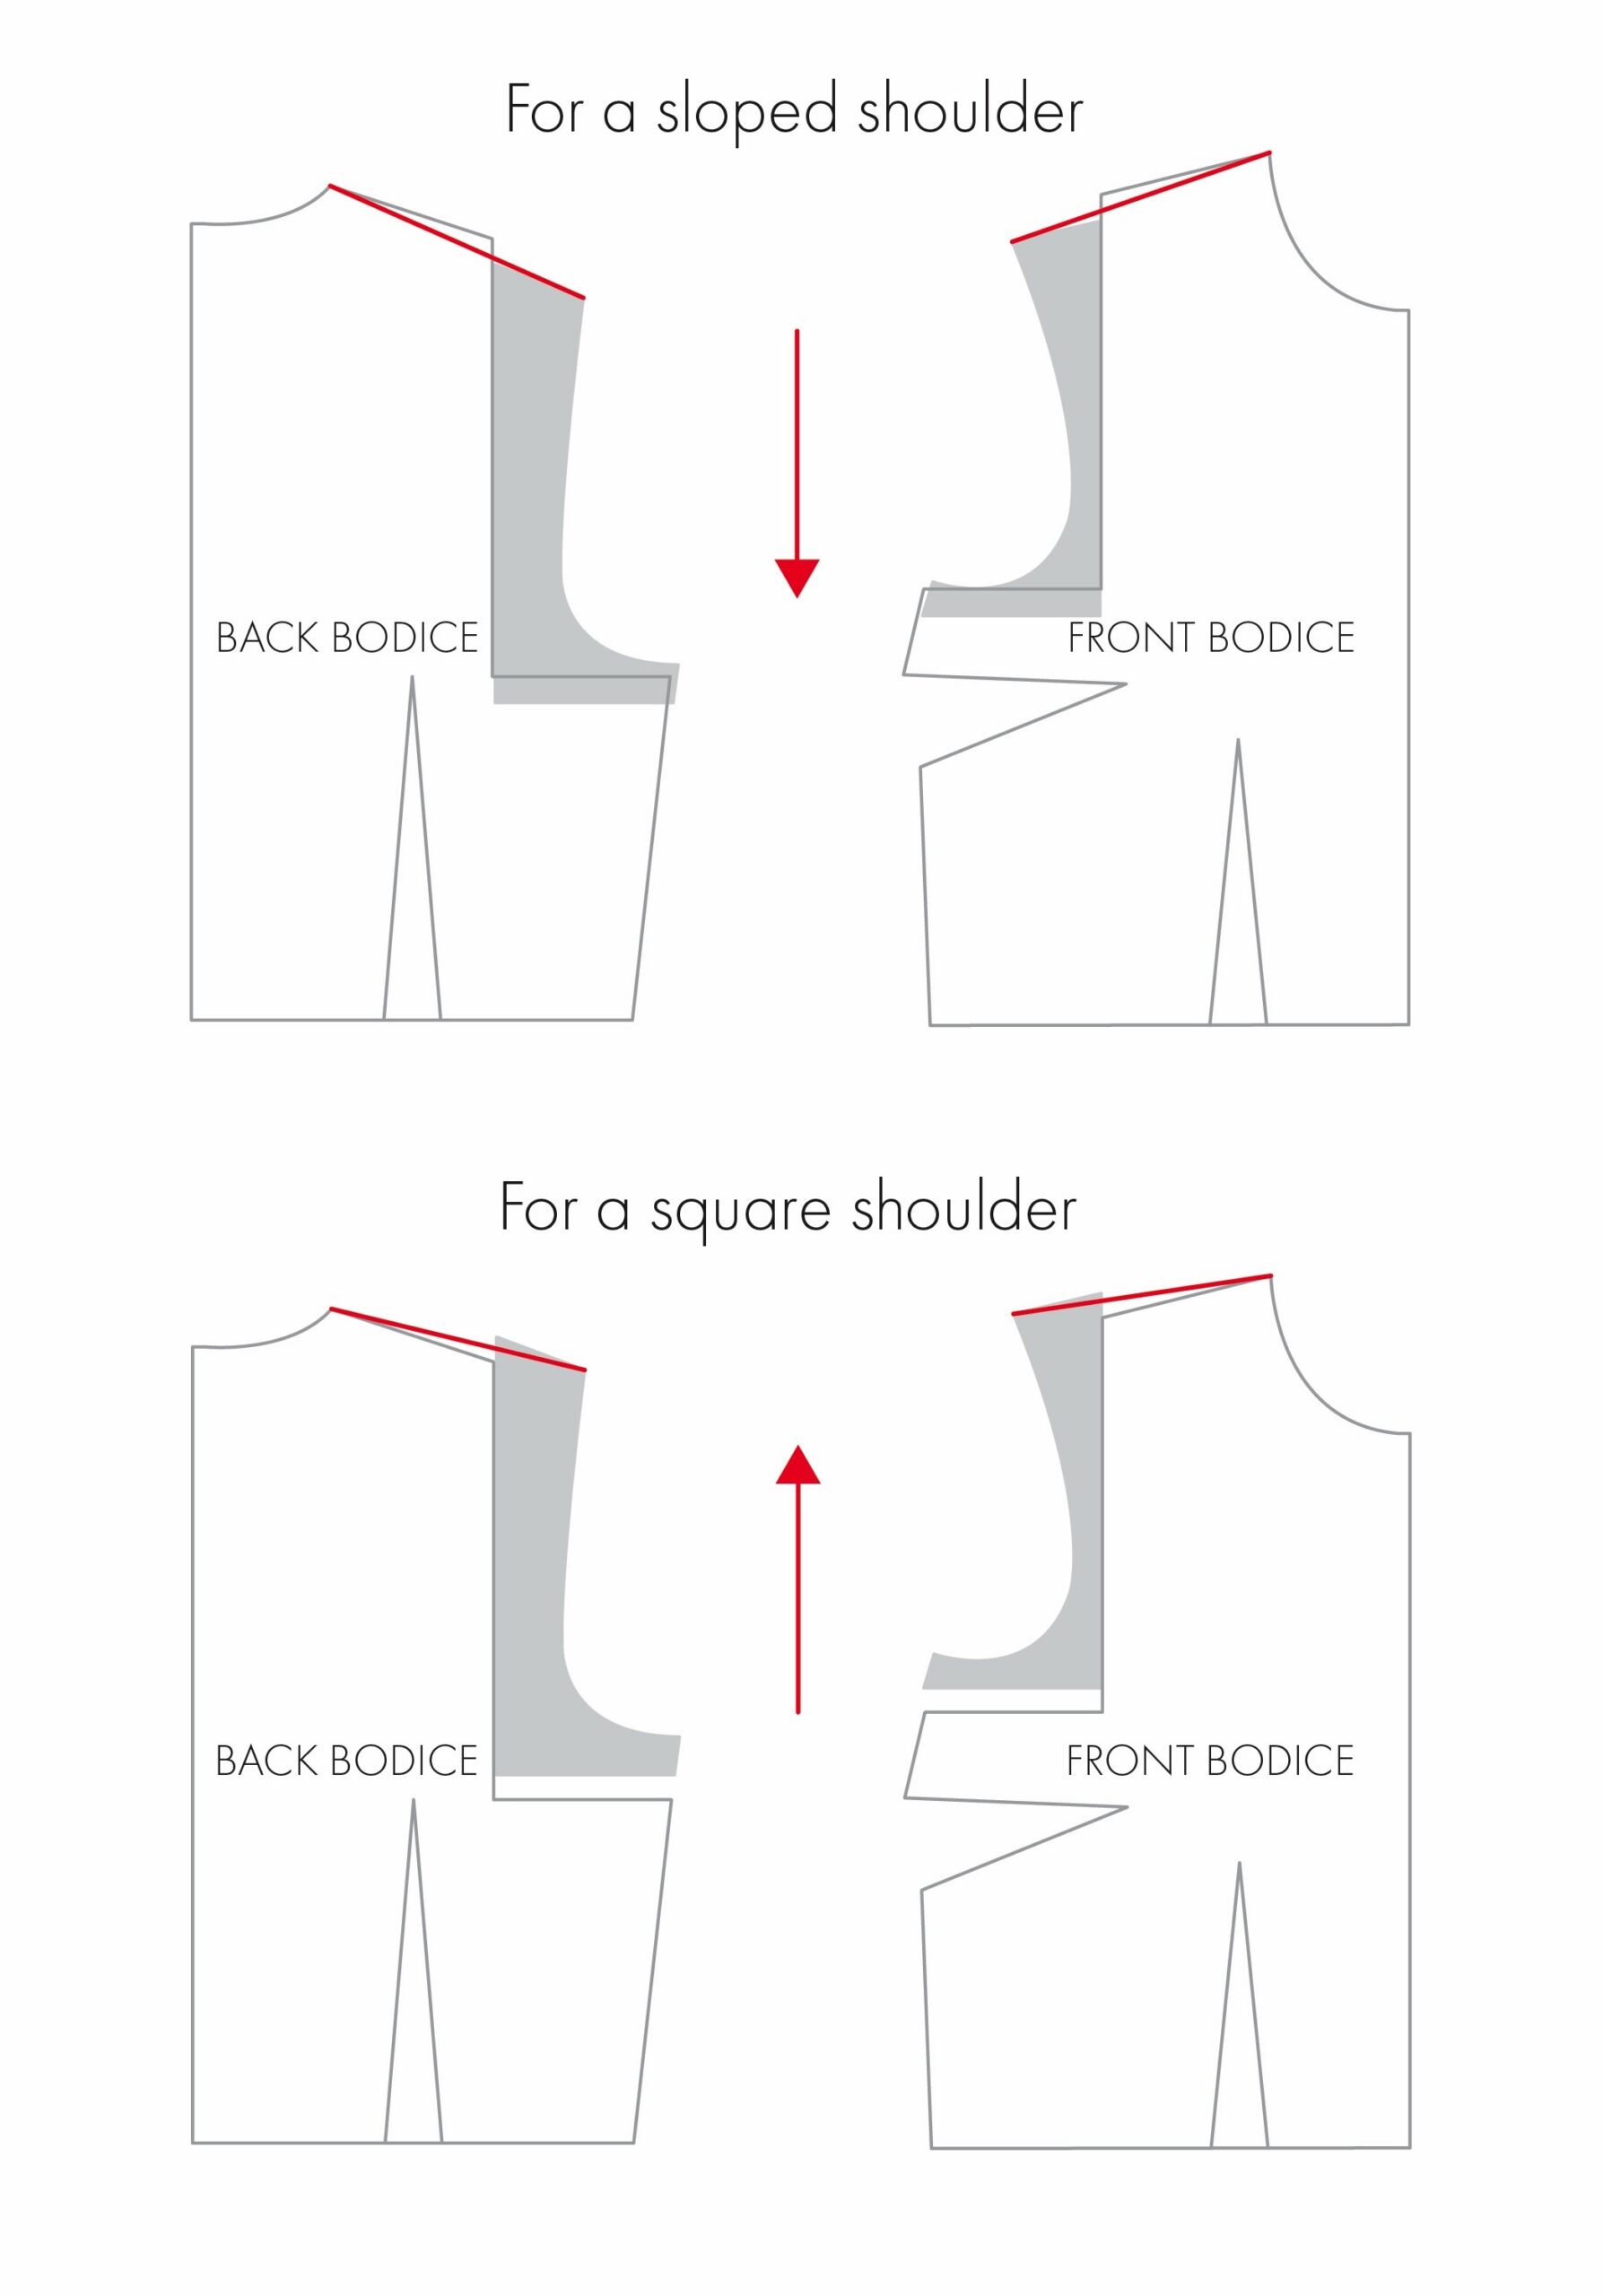
Note: Just remember that while you have maintained the original armscye, you have now altered the length of the side seams. Therefore, additional adjustments may be needed to ensure these still match and work with the rest of the garment.
Step 4: Blend and true the pattern
Blend and redraw the new shoulder slope, armscye, and side seams. Add the seam allowance and true the pattern.
Check Your Alterations
Once you have completed transferring the shoulder slope adjustments to the pattern, I would recommend making another toile to check the fit and balance of the new shoulder, armscye, neckline and sleeves (sorry!).
Shoulder slope is just one of many adjustments you can make to improve the fit of the shoulder, but it can have a big impact on the overall fit, shape and balance of a garment.
Because everyone’s shoulders are different, a pattern may just need a little adjusting to fit your body. But by making a toile first you can see whether an adjustment is needed and by how much. From there, you can choose the patternmaking method that best suits the adjustment.