
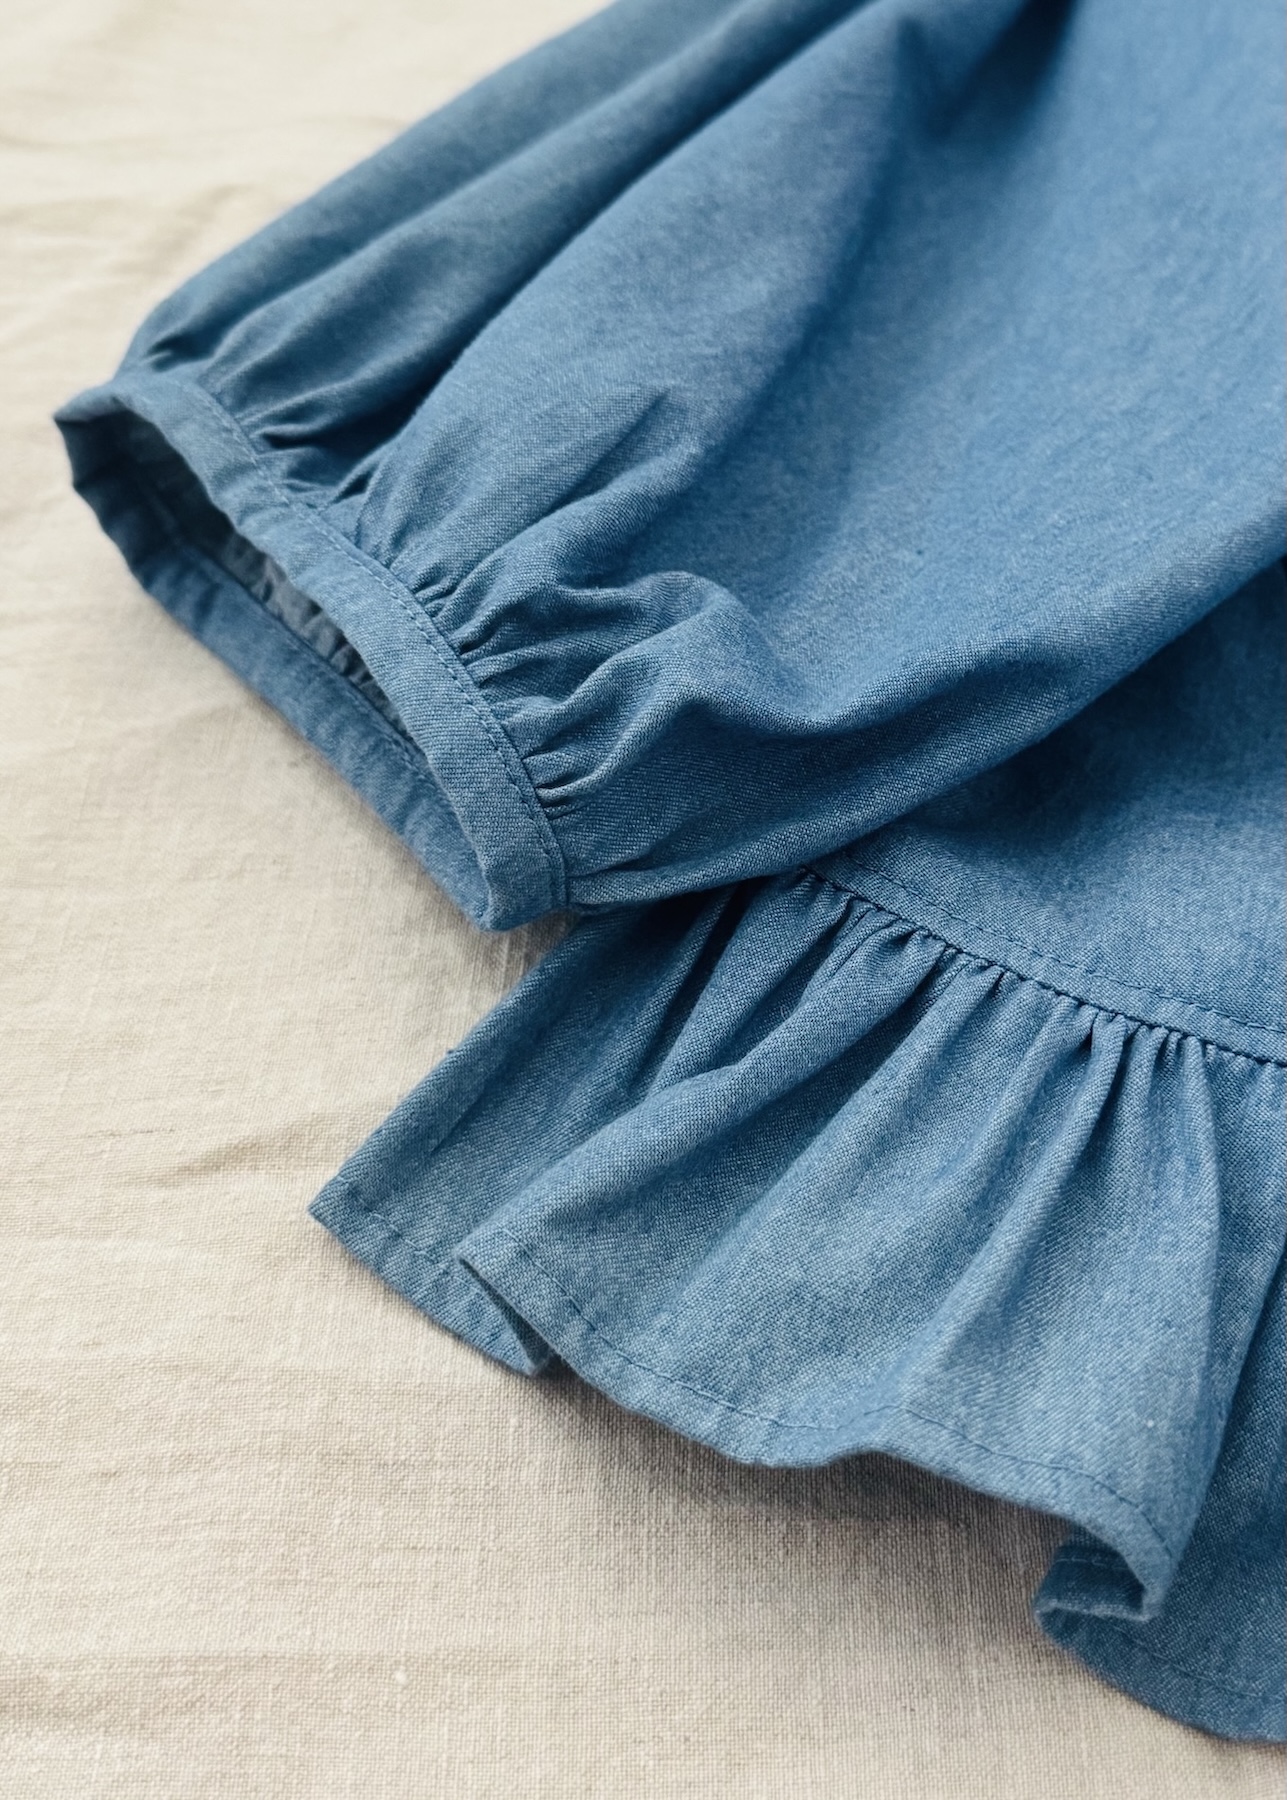
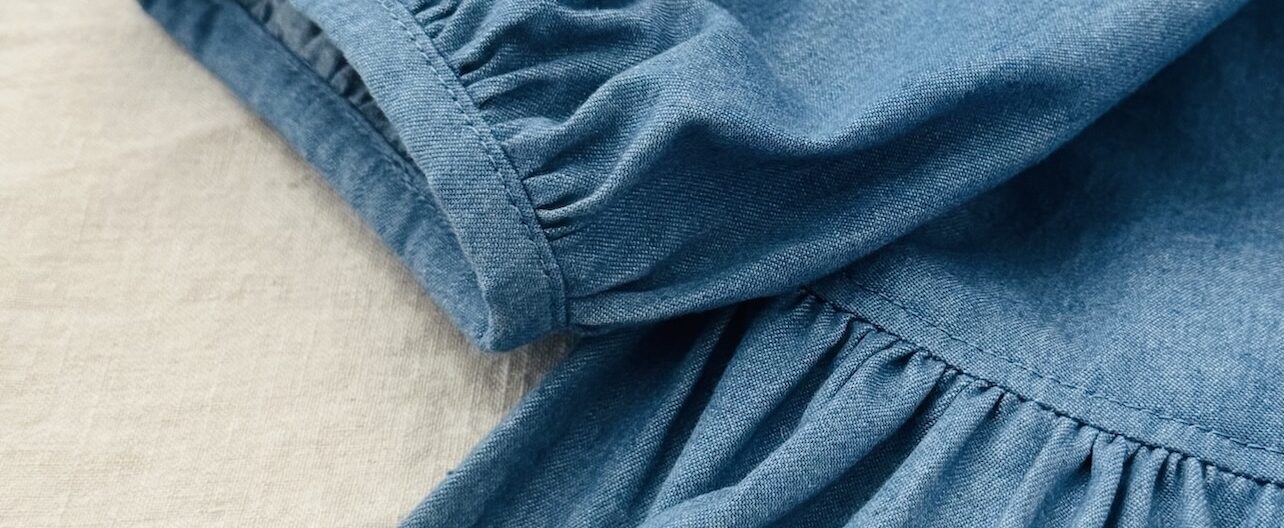
If you know me at all, or follow my makes, you’ll know I don’t like anything fitted. The more ease and fullness, the better. Most pieces I make have some sort of gathering.
So I thought I would introduce you to one of my favourite techniques for adding fullness to your patterns. Whether you are creating your own patterns from scratch or hacking an existing one, this is a really handy skill to have. Once you have the basics down pat, which I hope to provide here, there really is no limit to what you can do with it.
To demonstrate this, I will be focusing on the cut and spread method.
What is the Cut and Spread Method?
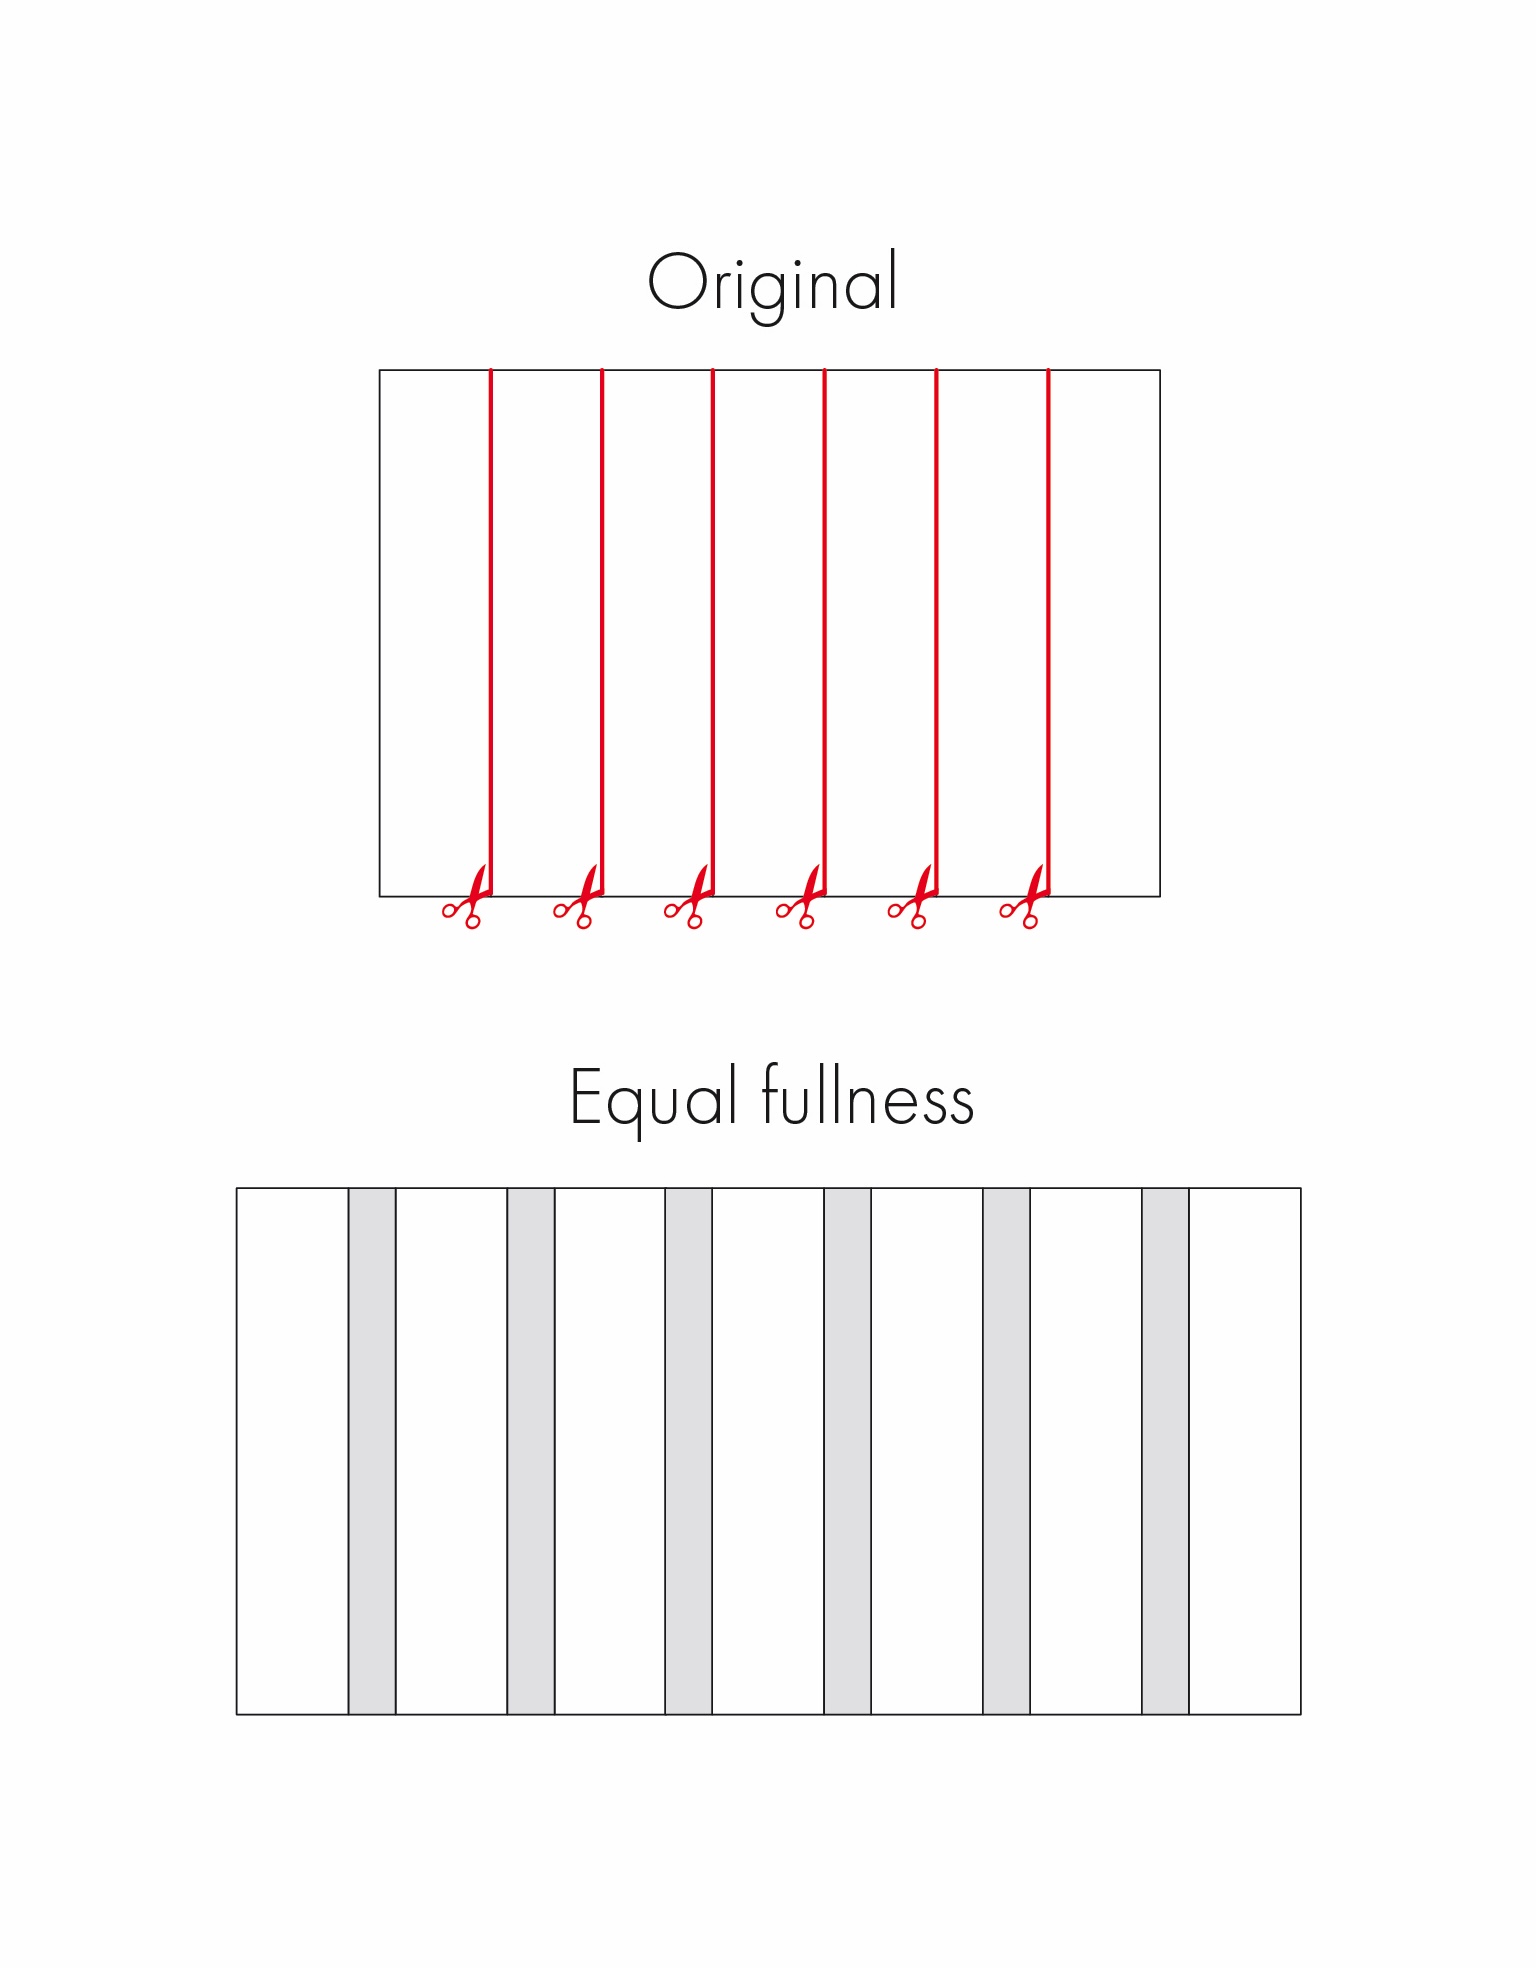
The cut and spread method (also referred to as the slash and spread method) is exactly what it sounds like. It’s a pattern making technique where you cut a pattern along predetermined lines and spread the sections apart to introduce volume and shape.
Three Ways of Adding Fullness
- Equal fullness: The pattern piece is spread evenly at both sides.
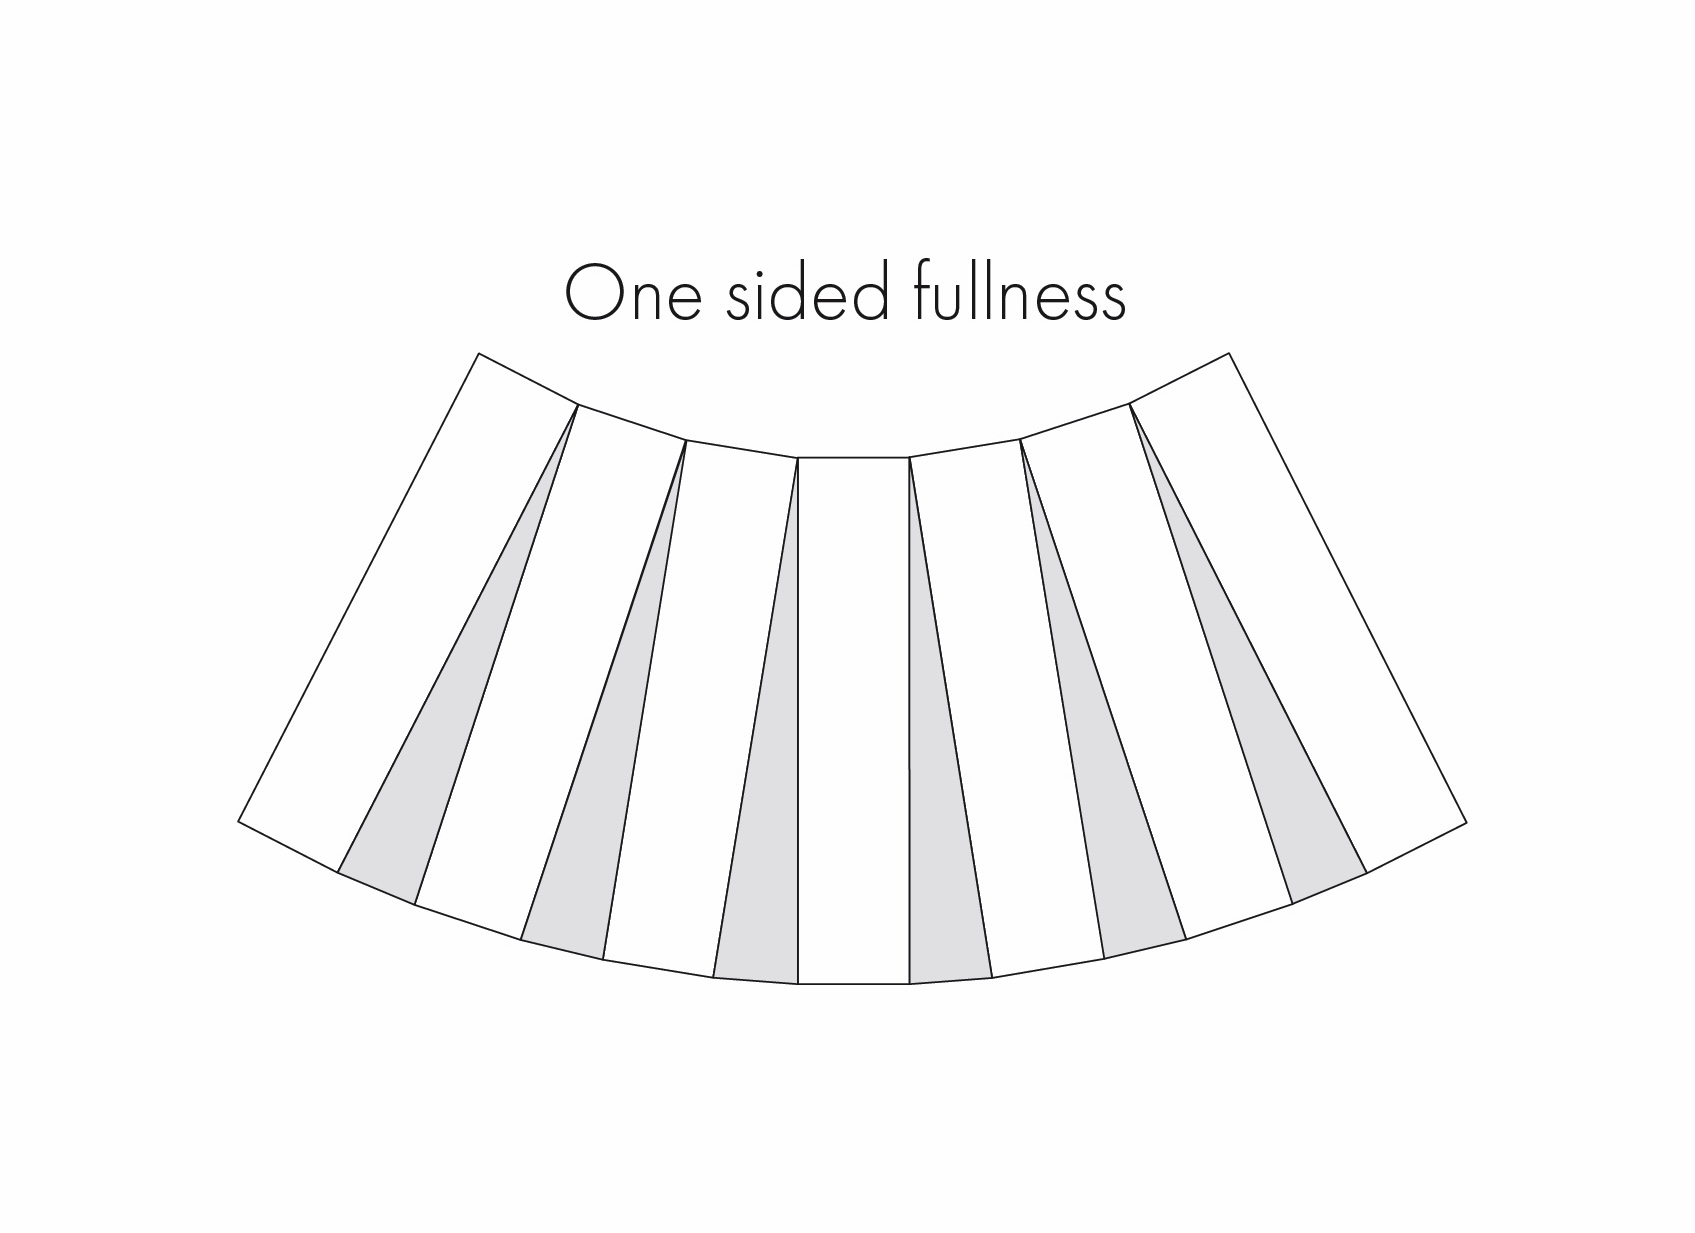
- One sided fullness: Only one side of the pattern piece is spread, creating an arc shape.
- Unequal fullness: Each side of the pattern piece is spread by a different amount, with one side being spread more than the other. This also creates an arc shape.
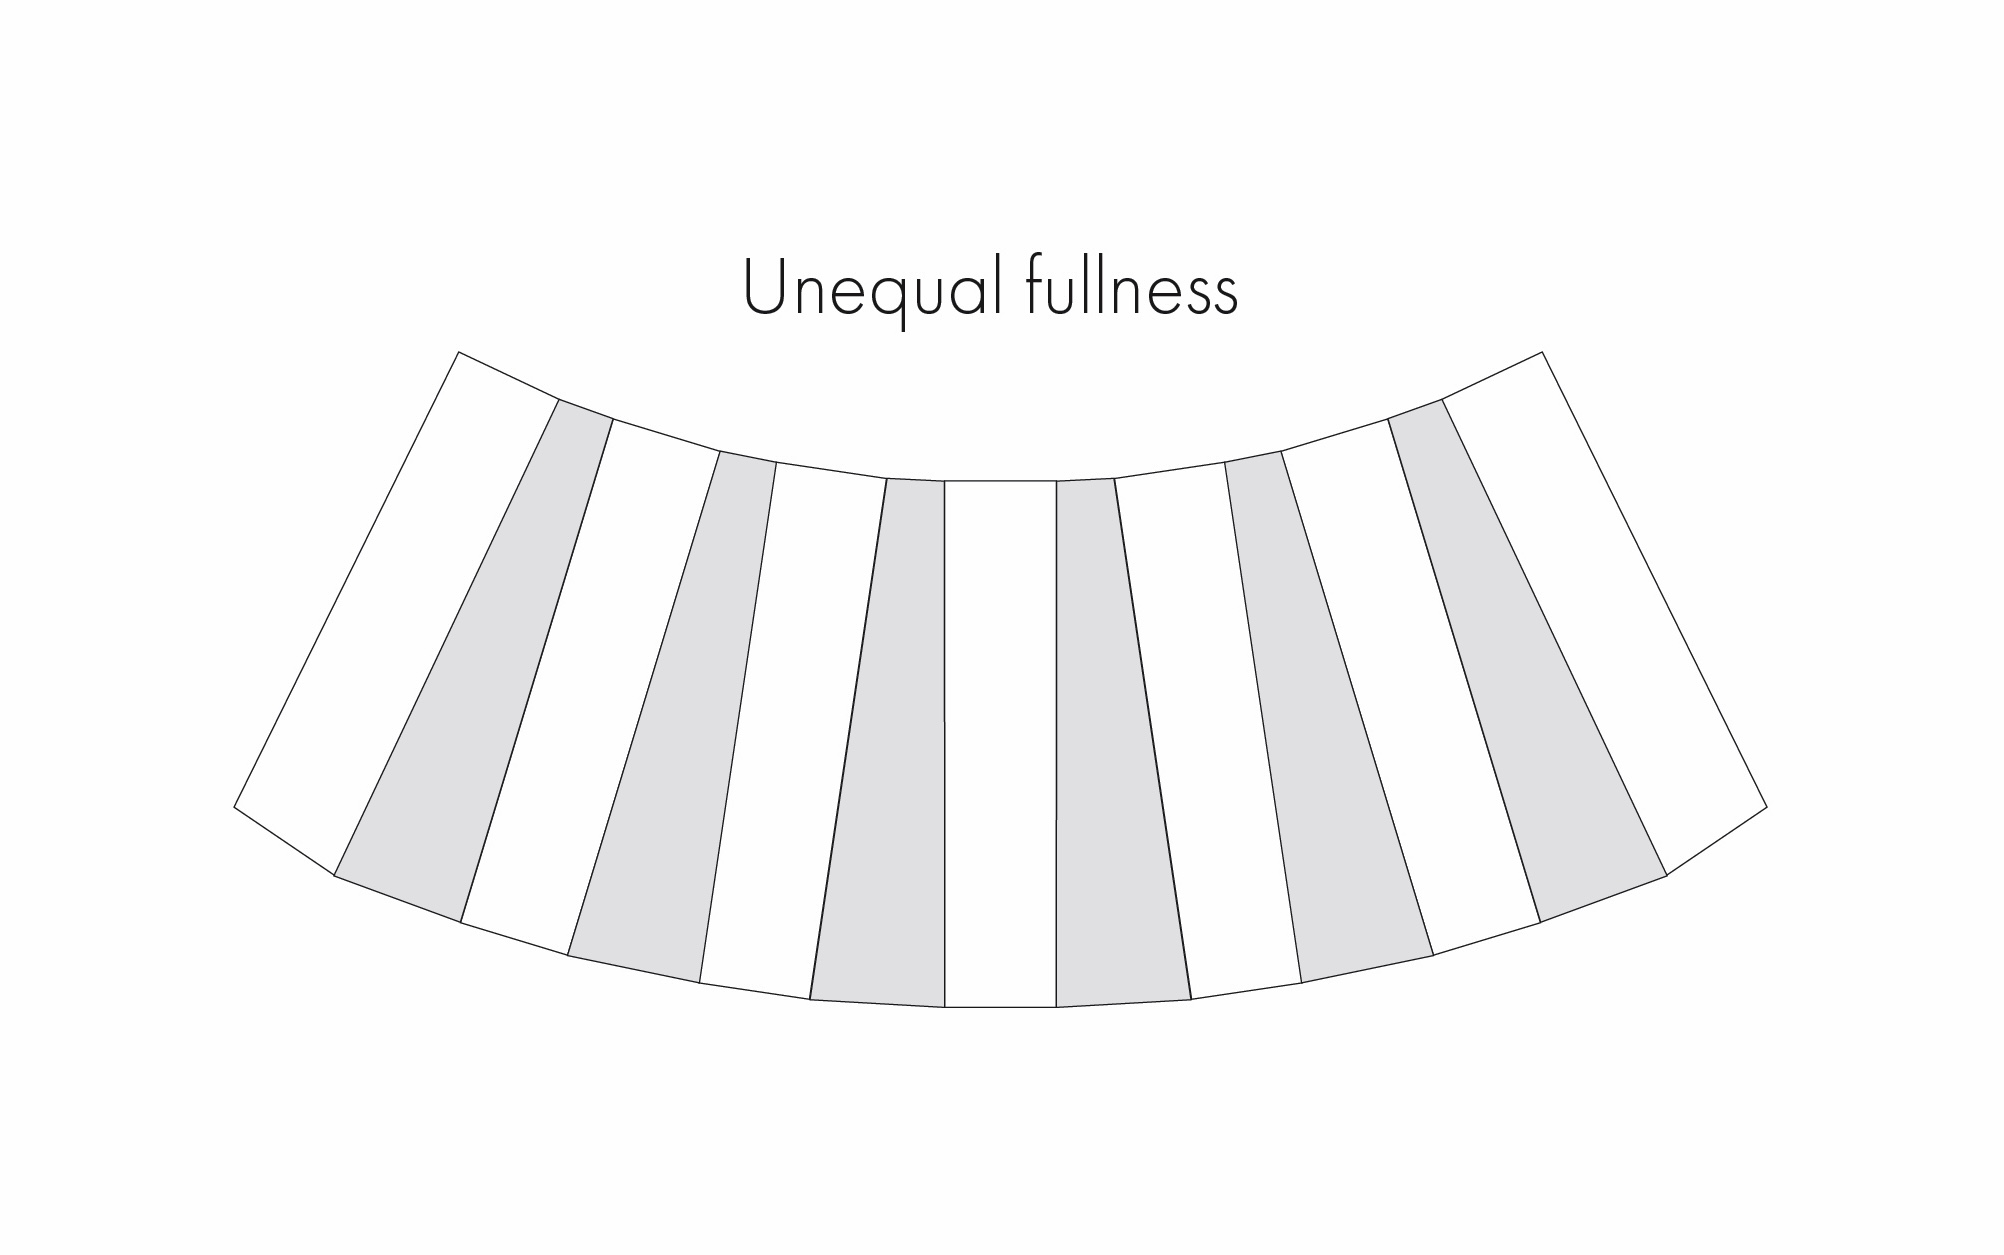
How Much Fullness to Add
There is no one rule fits all when it comes to adding fullness. The amount you add really depends on things like the fabric, the design and your personal preference.
For example, lightweight fabrics with good drape tend to gather easily and can handle more fullness without becoming bulky. This means you can generally add more fullness. Conversely, heavier or thicker fabrics with limited drape can become bulky and not hang as nicely when gathered, so less fullness is better.
Like most things, my recommendation would be to simply experiment and test. With time you will get a feel for how much different fabrics can handle and what suits your personal style.
To better understand how fullness is added in different situations, let’s look at some common examples. While I have created my diagrams digitally, the process is easily transferrable to manual pattern making with a few pieces of equipment.
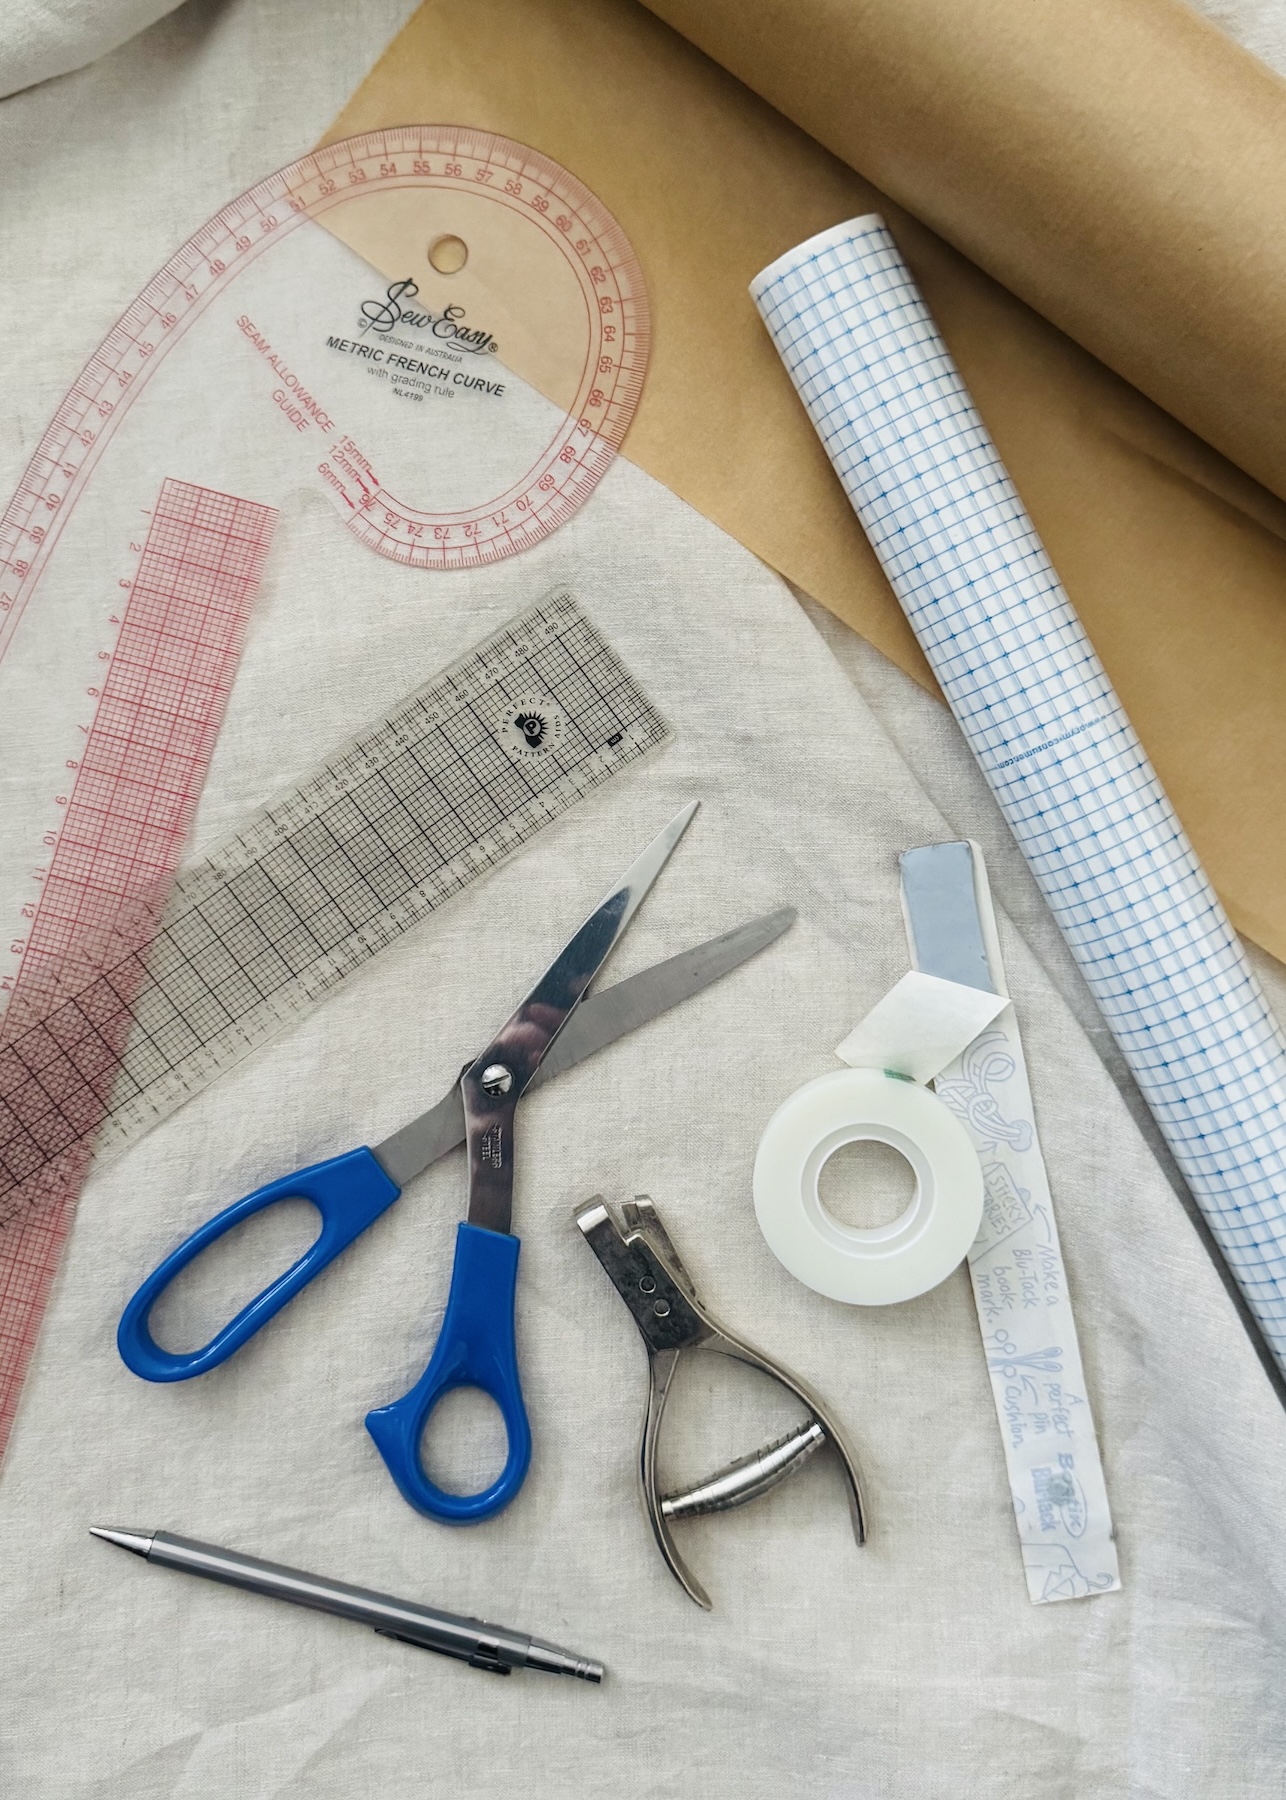
Tools and Equipment if Working Manually
- Pattern paper
- Tracing paper (I like the gridded kind for easy alignment)
- Pen or pencil
- Paper scissors
- Rulers (a straight ruler and French curve are useful)
- Tape or Blu-tak (I like Scotch Magic tape as you can peel and re-stick, and also write on it)
- Notcher (optional, but helpful)
Key Things to Remember When Cutting and Spreading
- I recommend removing all seam allowances before making any pattern alterations and adding them back afterwards, as most edges will need blending and truing after the pattern has been manipulated. For more on how to do this, check out my articles ‘Checking, Blending, and Truing Your Sewing Patterns – Part 1’ and ‘Part 2’.
- Make sure you maintain the grainline when spreading the pattern. Redraw it onto your tracing before you cut and spread.
- Remember to transfer or add necessary notches after altering the pattern. These may be to indicate fold lines, alignment points, or the centre of a pattern piece. I’ve also written more about notches in ‘Sewing Essentials: A Simple Guide to Notches’.
- If you’re new to this method, start small. You might be surprised at how much even smaller changes can affect the pattern.
Note: The following drawings and diagrams are made up and not to scale. I have simplified things to demonstrate the key principles. I have also only focused on part of the pattern (e.g. front pant leg) so these steps would need to be repeated for the corresponding pattern pieces.
Adding Equal Fullness
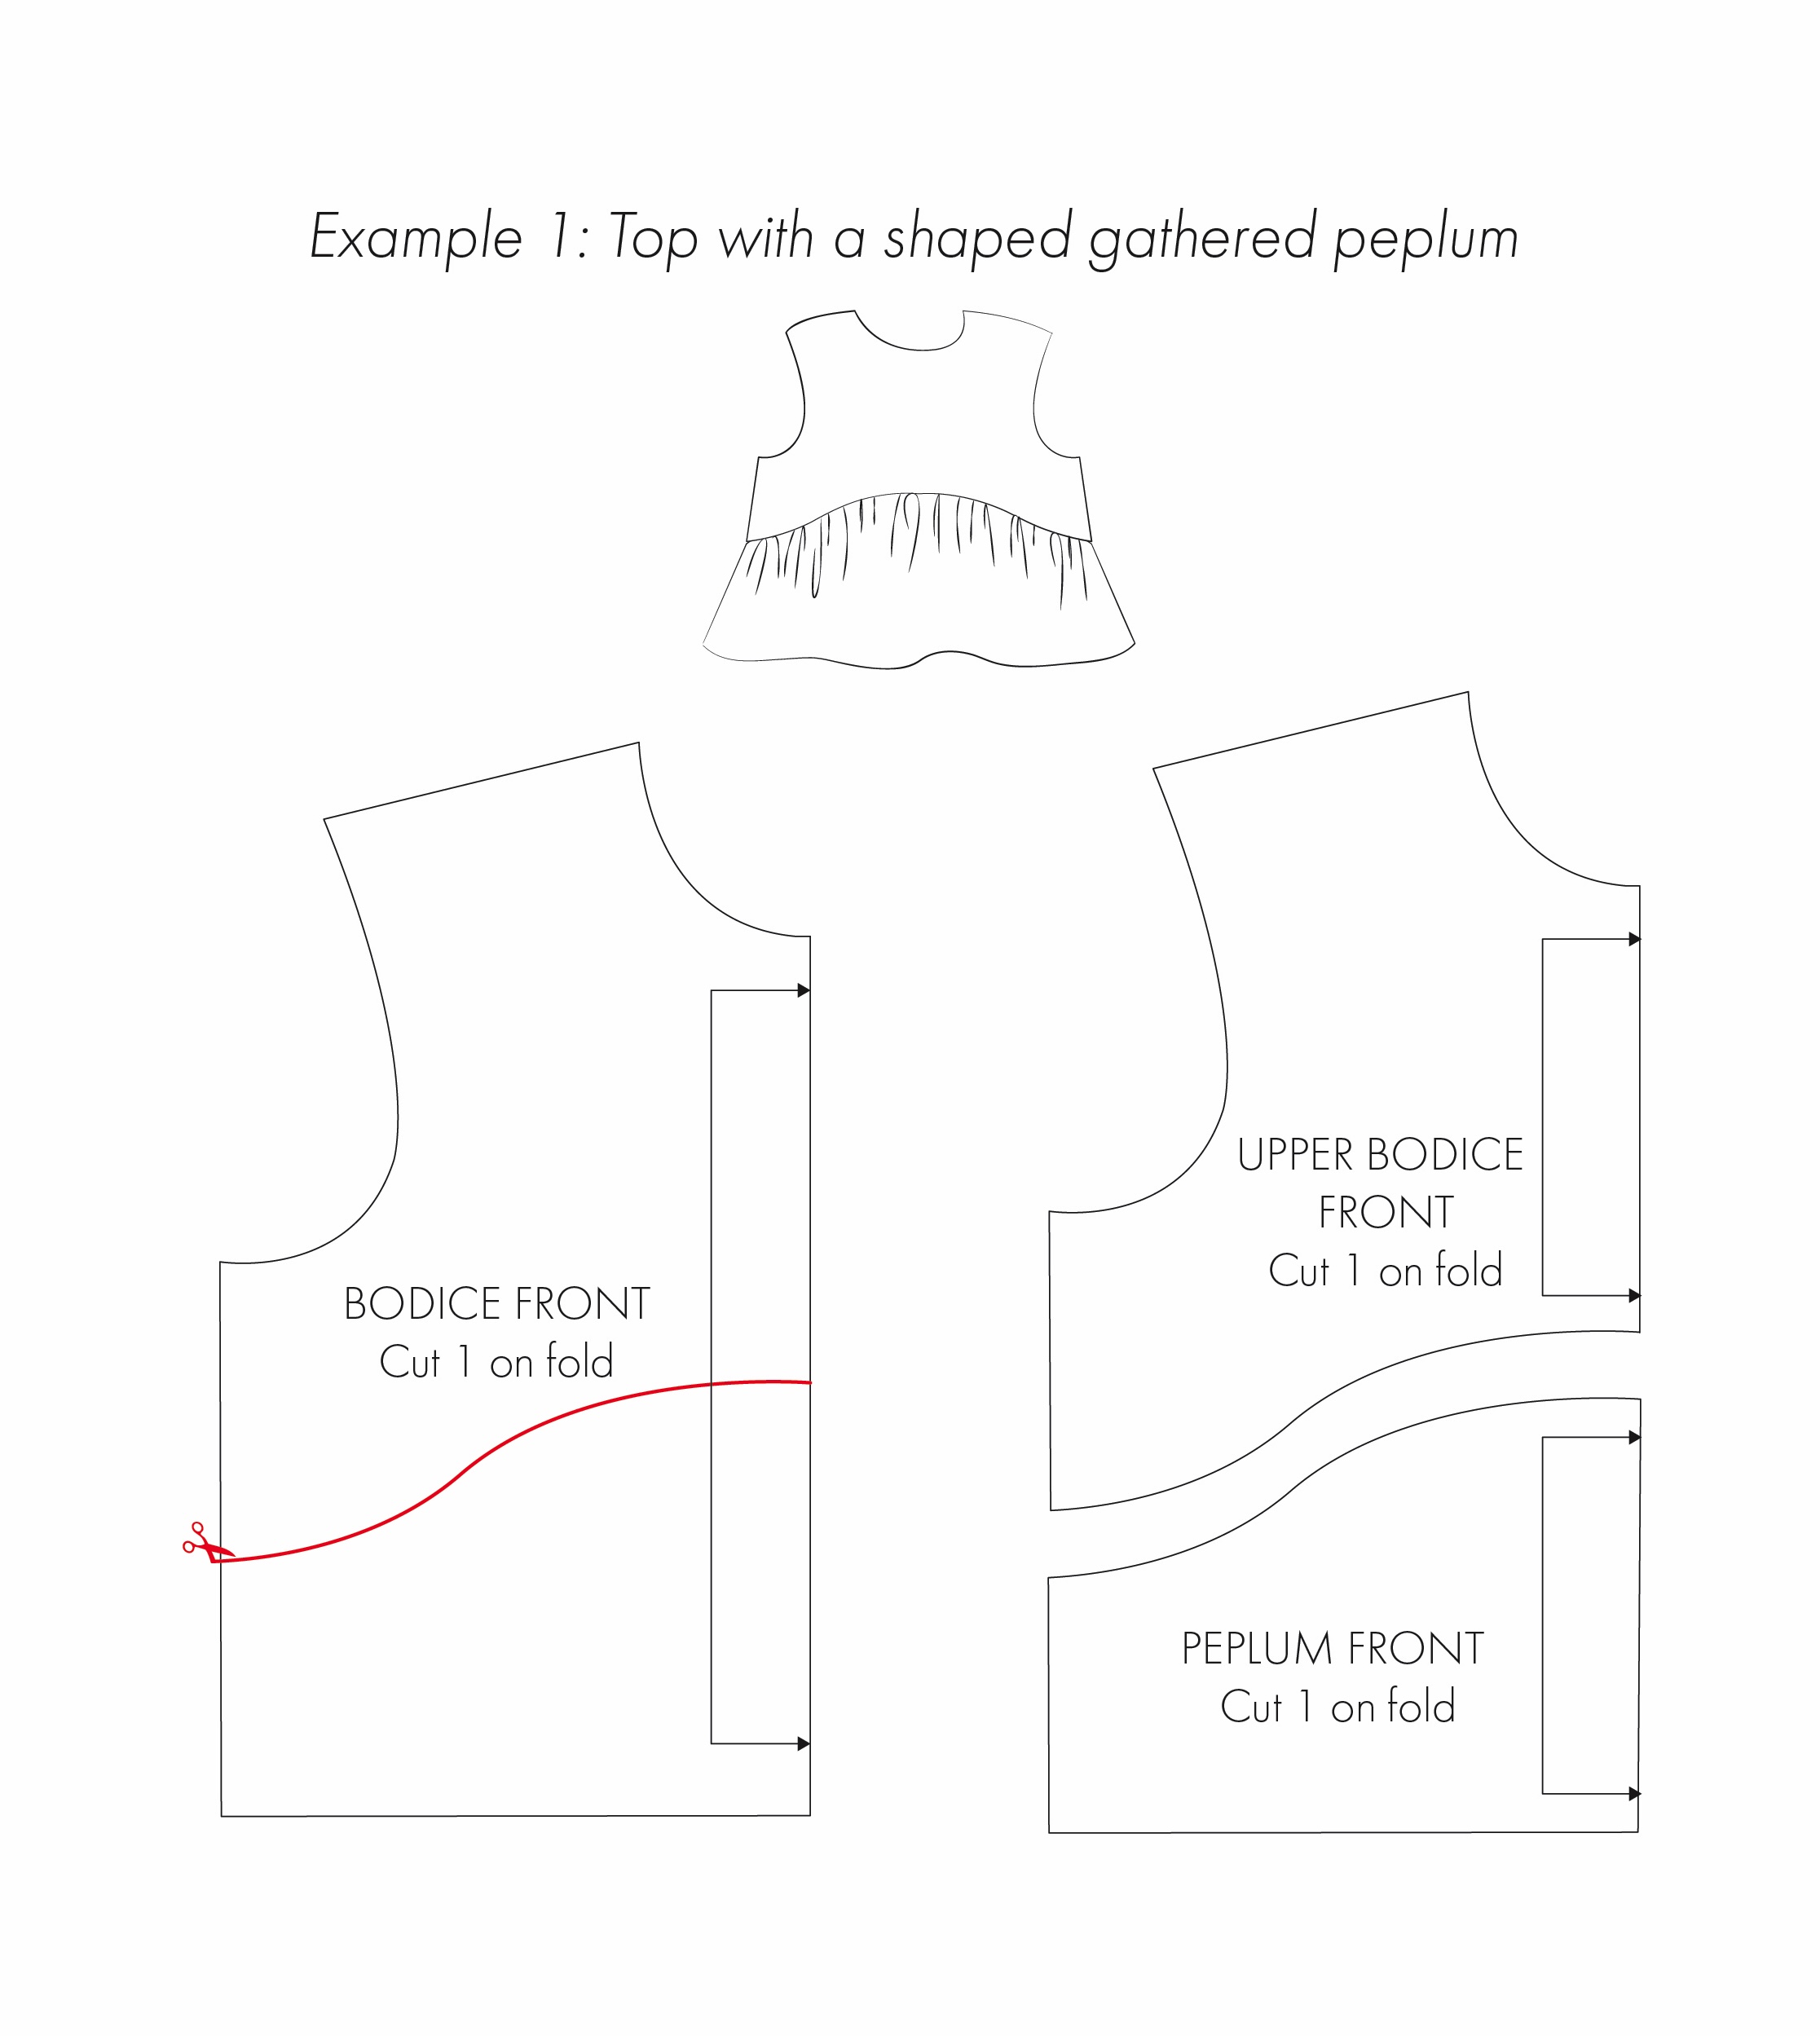
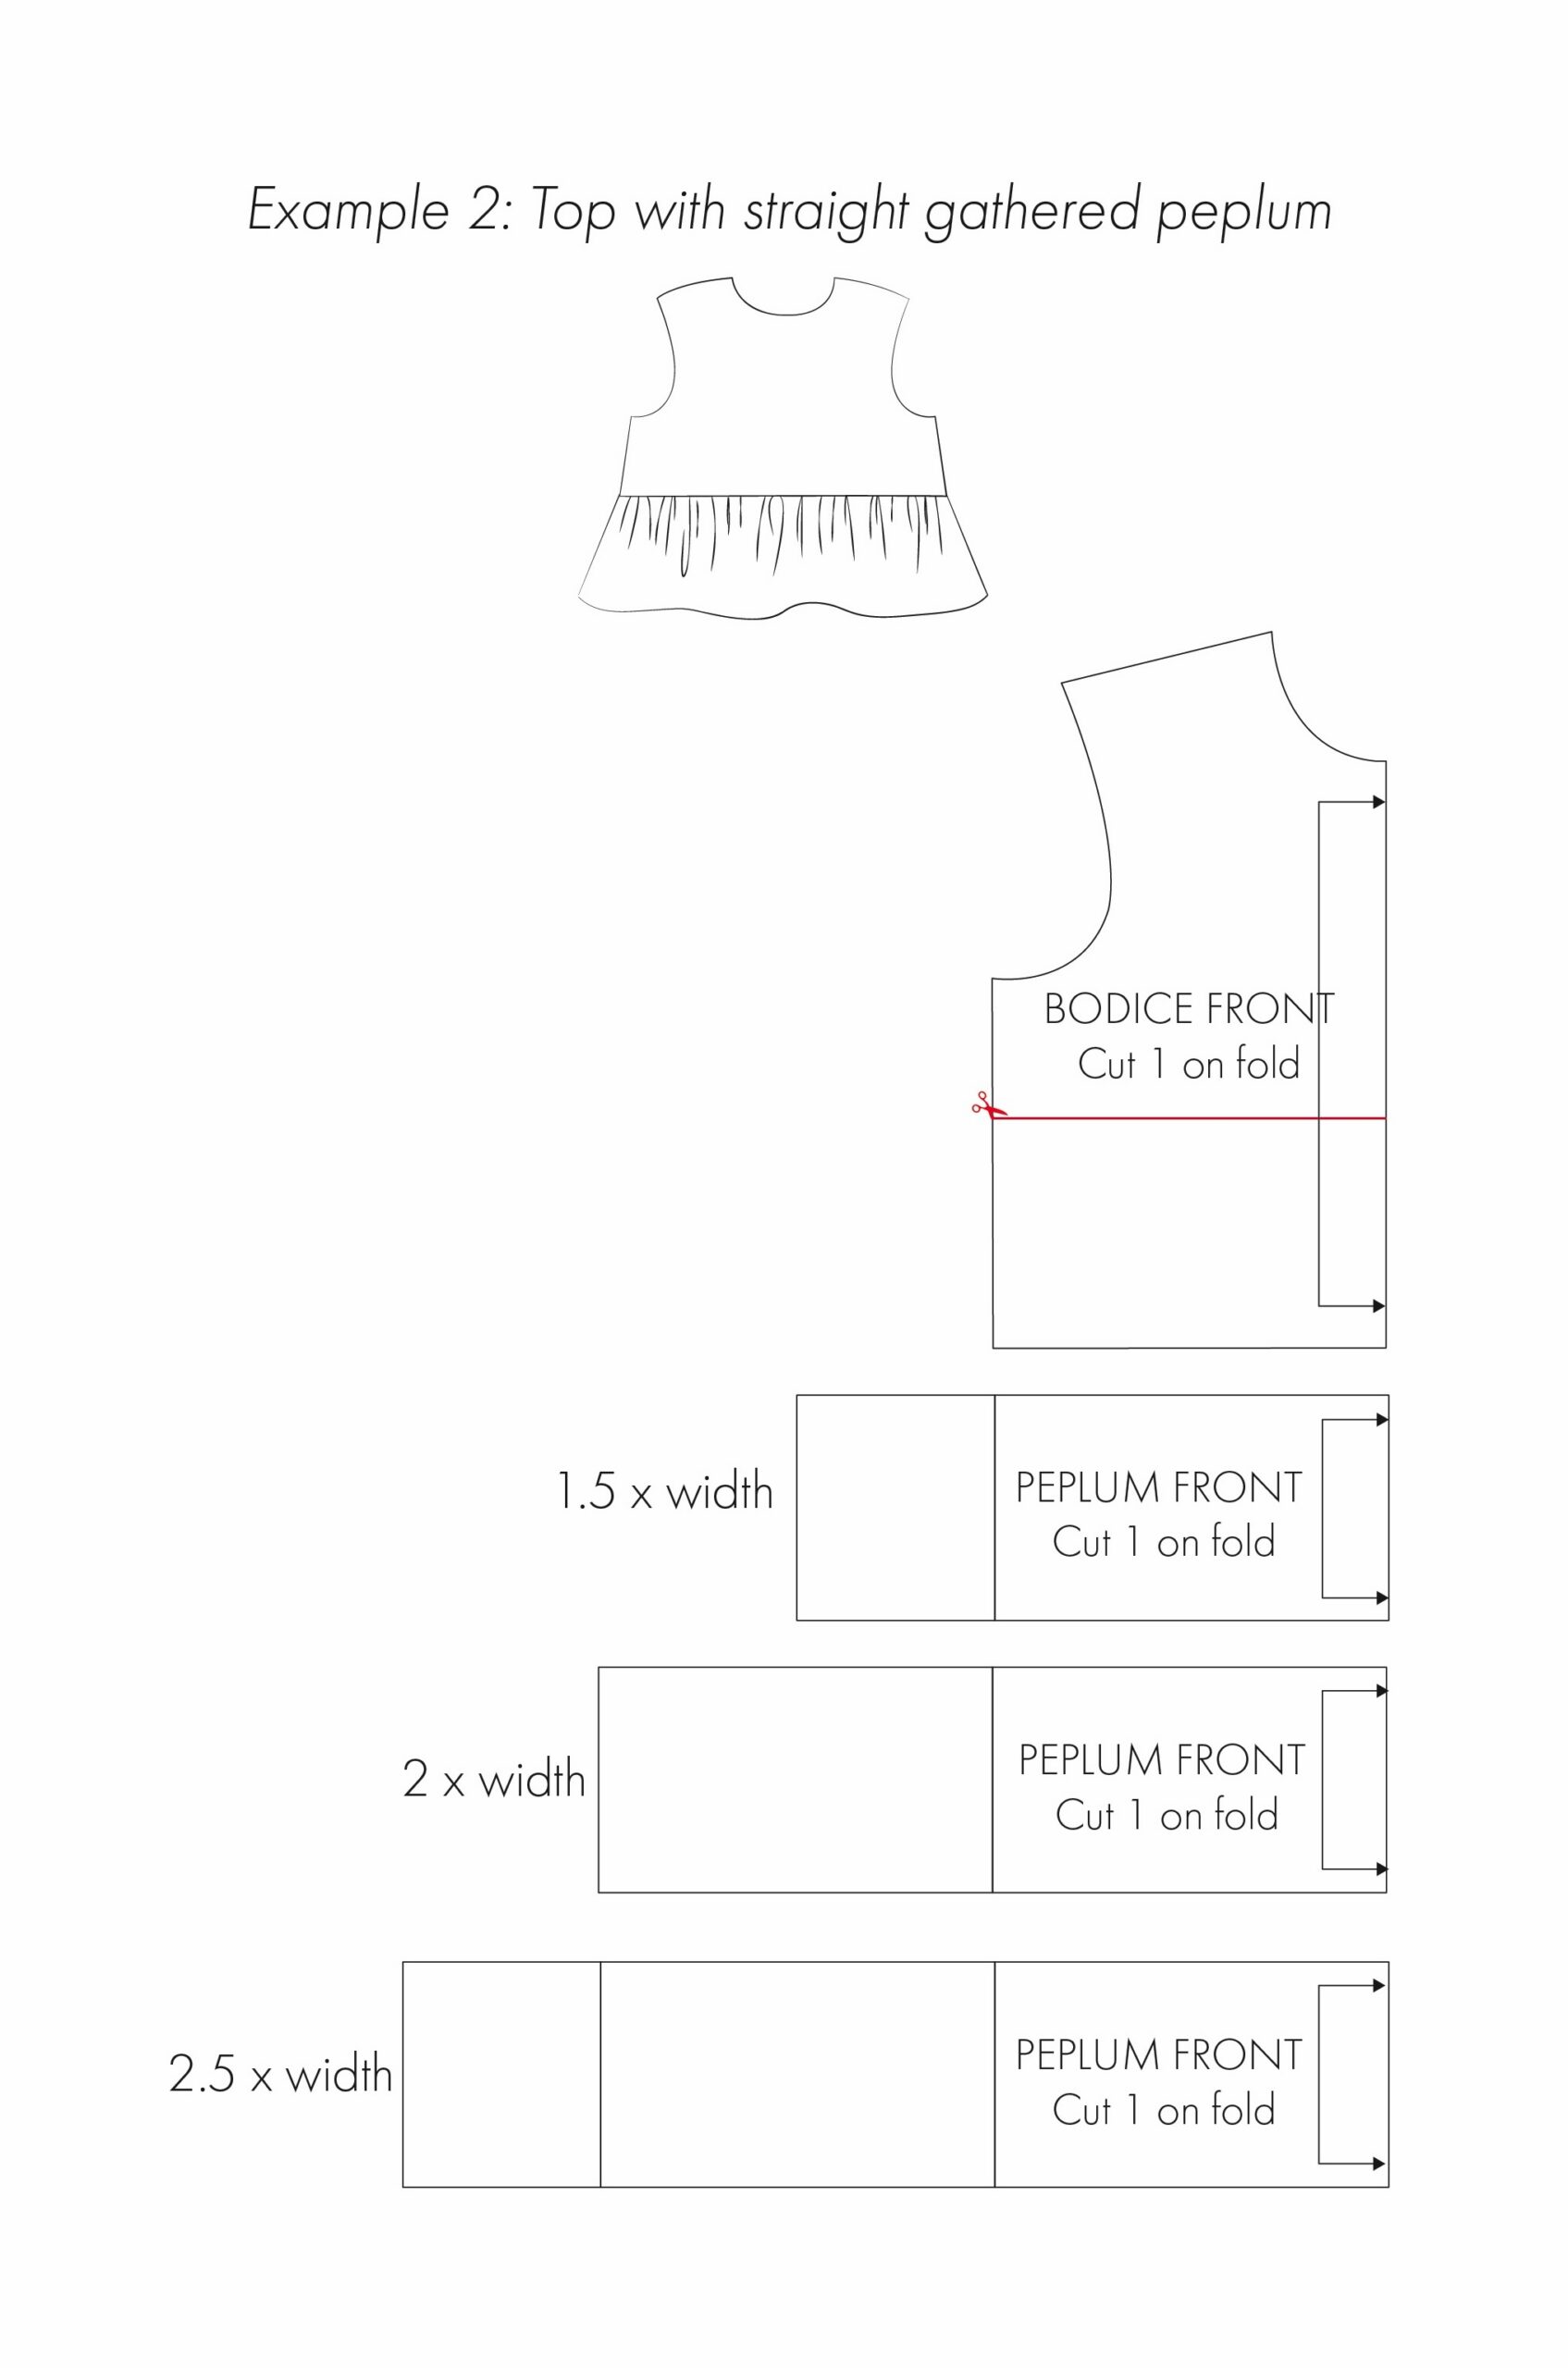
Example 1: Top with a shaped gathered peplum
In this example, the goal is to add extra width to the peplum, which will then be gathered back into the bodice seam.
1. Draw a line across the pattern where you want the peplum to begin.
2. Cut along this line, separating the pattern into the upper bodice and peplum.
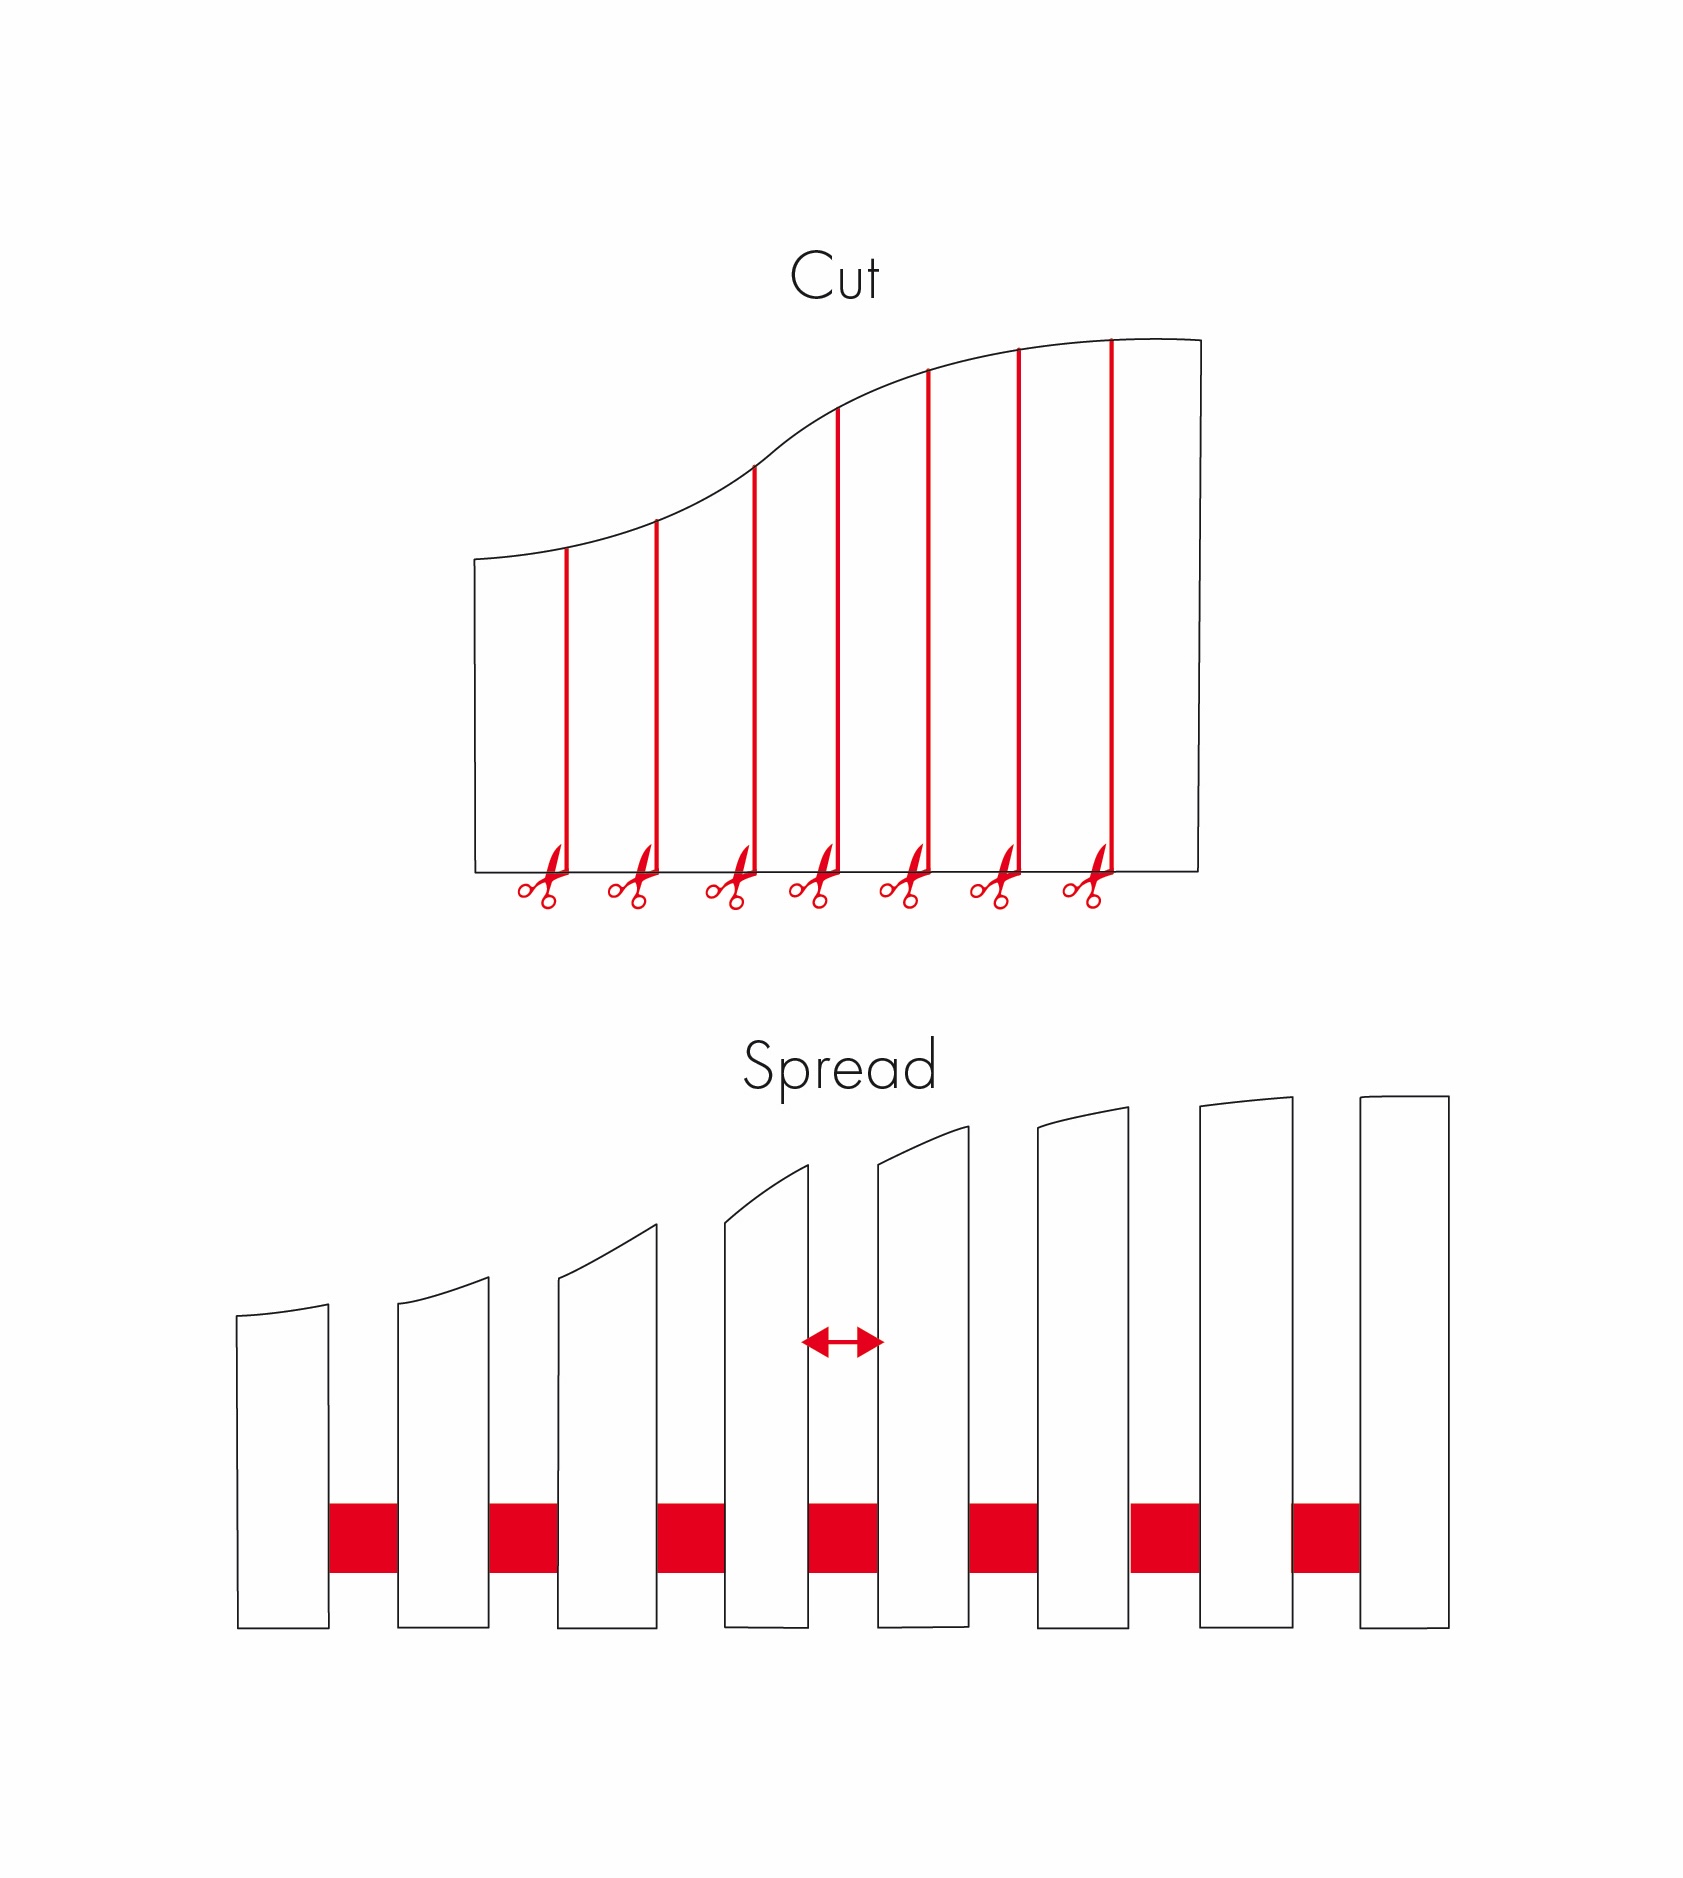
3. Divide the peplum by drawing several vertical cut and spread lines.
Tip: The number of cut and spread lines you use will depend on the shape of the pattern and your personal preference. Areas with more shaping generally benefit from additional cut lines, as this helps distribute the fullness more evenly and makes blending the pattern smoother.
4. Cut along these lines.
5. Spread the pattern pieces apart evenly to add the desired amount of fullness. To keep the spacing consistent, you can simply use a ruler if working manually or, as I have done, create small measurement squares when working digitally. Again, this is up to you!
6. Blend and smooth along the top of the peplum and the hem.
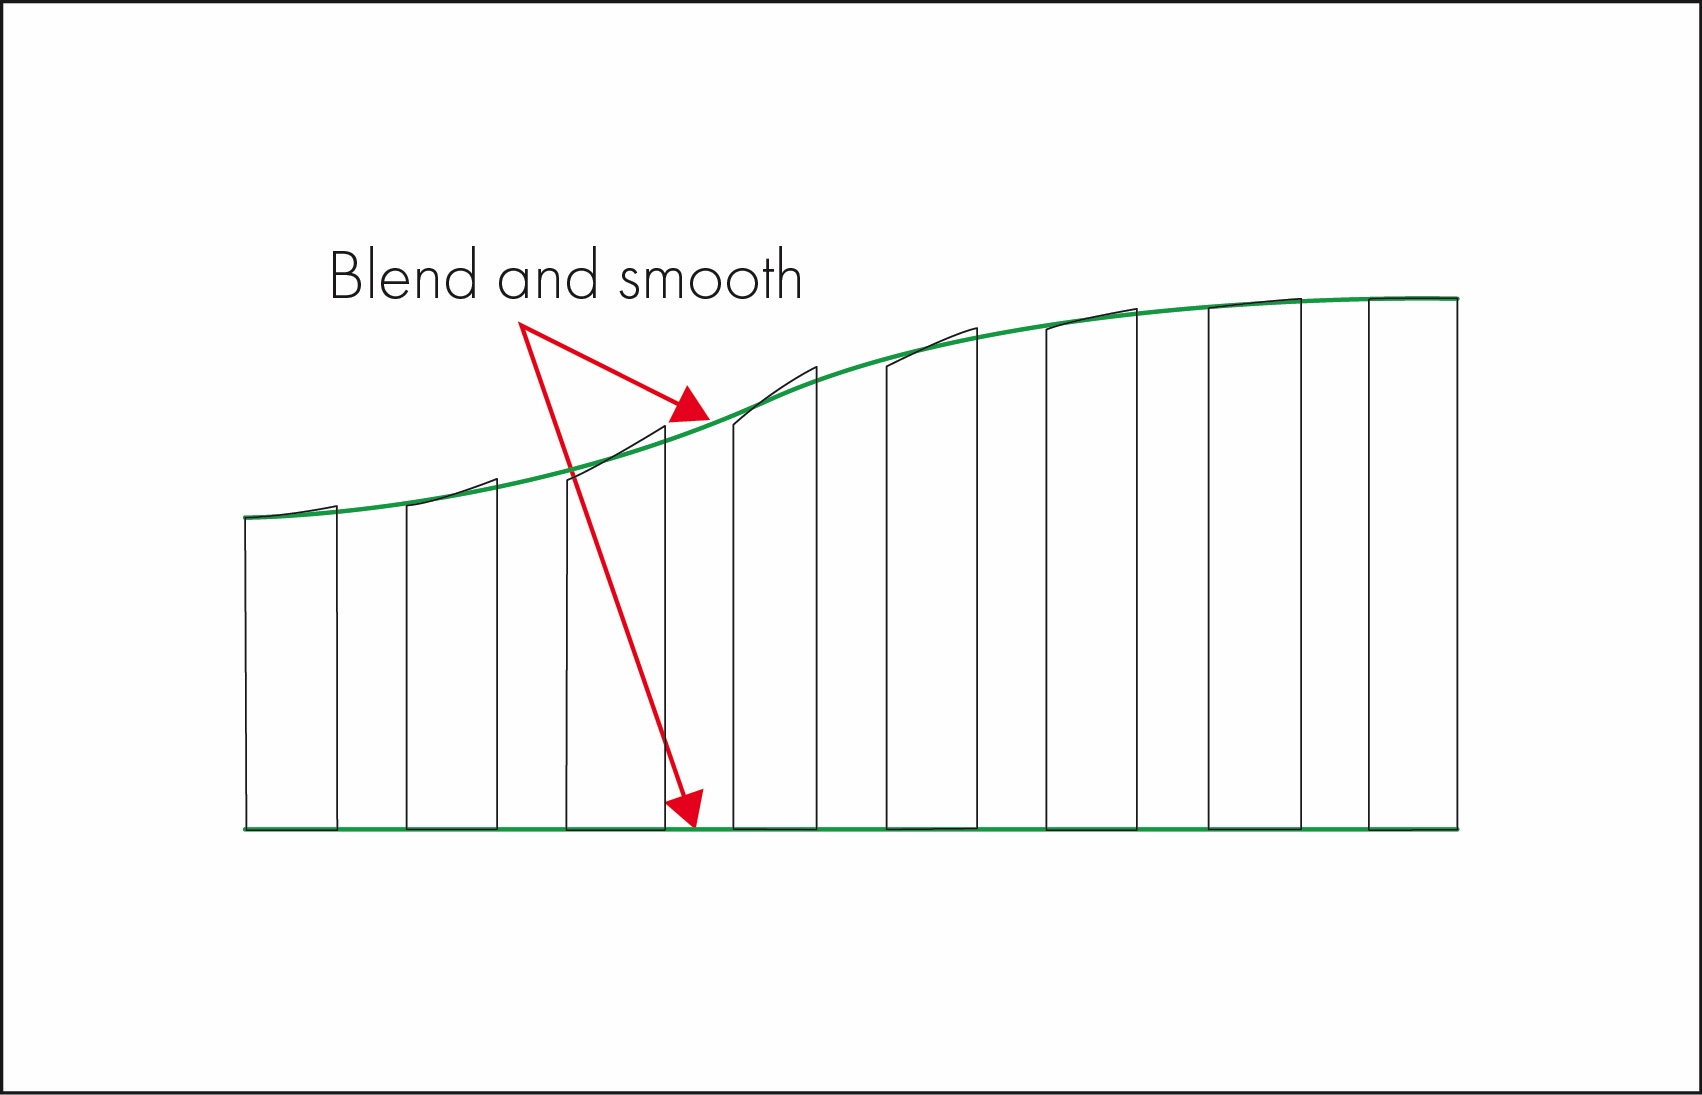
7. Add seam allowance.
8. True the pattern.
9. Add the necessary pattern markings including grainlines and notches. For a gathered pattern like this, which can become quite big, I recommend adding notches at the mid and quarter points on both the bodice and peplum. These reference points simply help distribute the gathering evenly.
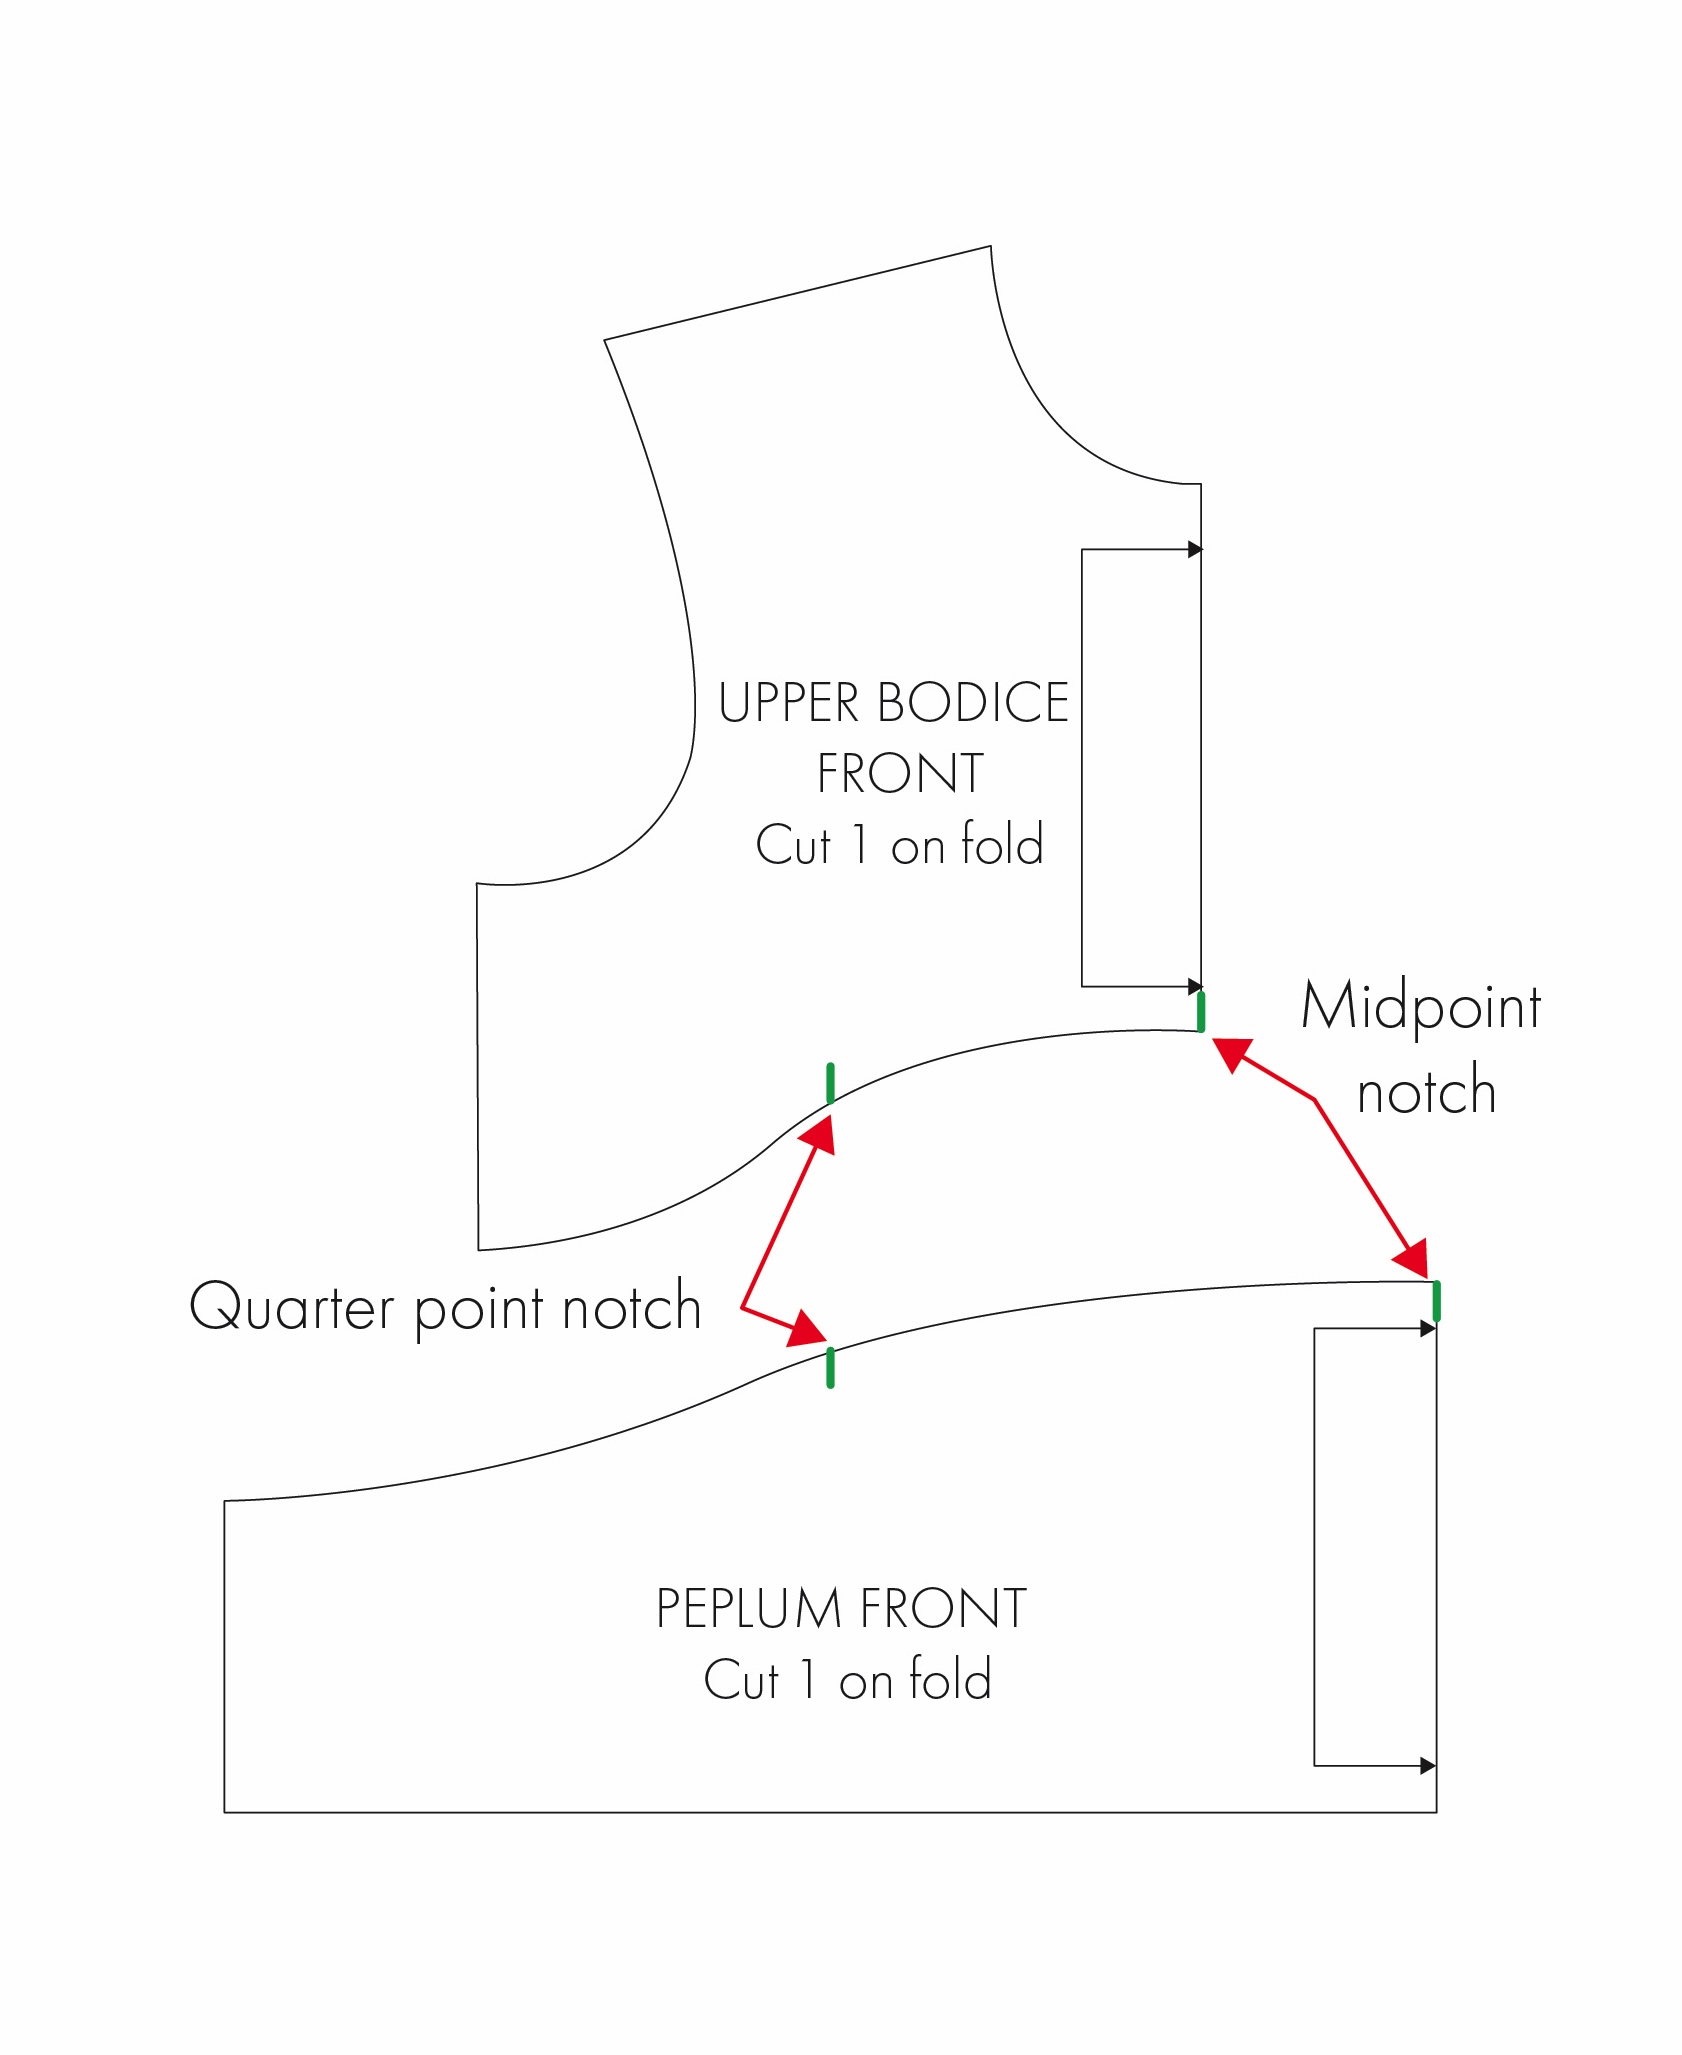
Note: In example 2 below, the peplum is straight rather than shaped. In this instance you don’t need to slash and spread it along multiple lines. Instead, simply extend the width of the pattern by the desired amount. This is where using gathering ratios such as 1.5×, 2×, or 2.5× the finished seam length is particularly useful.
Adding One Sided Fullness
Example 3: Sleeve with gathered hem
In this example, I want to add fullness to the hem of the sleeve which could then be gathered and attached to a binding or cuff. The head of the sleeve remains unchanged.
1. Draw several cut and spread lines along the length of the sleeve.
2. Cut along these lines, starting at the hem and stopping just shy of the sleeve head. You want to leave a hinge of sorts at the end that will not be spread (refer to red dots in diagram).
3. Spread the pattern pieces apart at the hem to add the desired amount of fullness. In this instance I find it helpful to use circles rather than rectangles as spacing guides when working digitally, as they make it easier to keep the spread consistent. You could also use a simple measurement line.
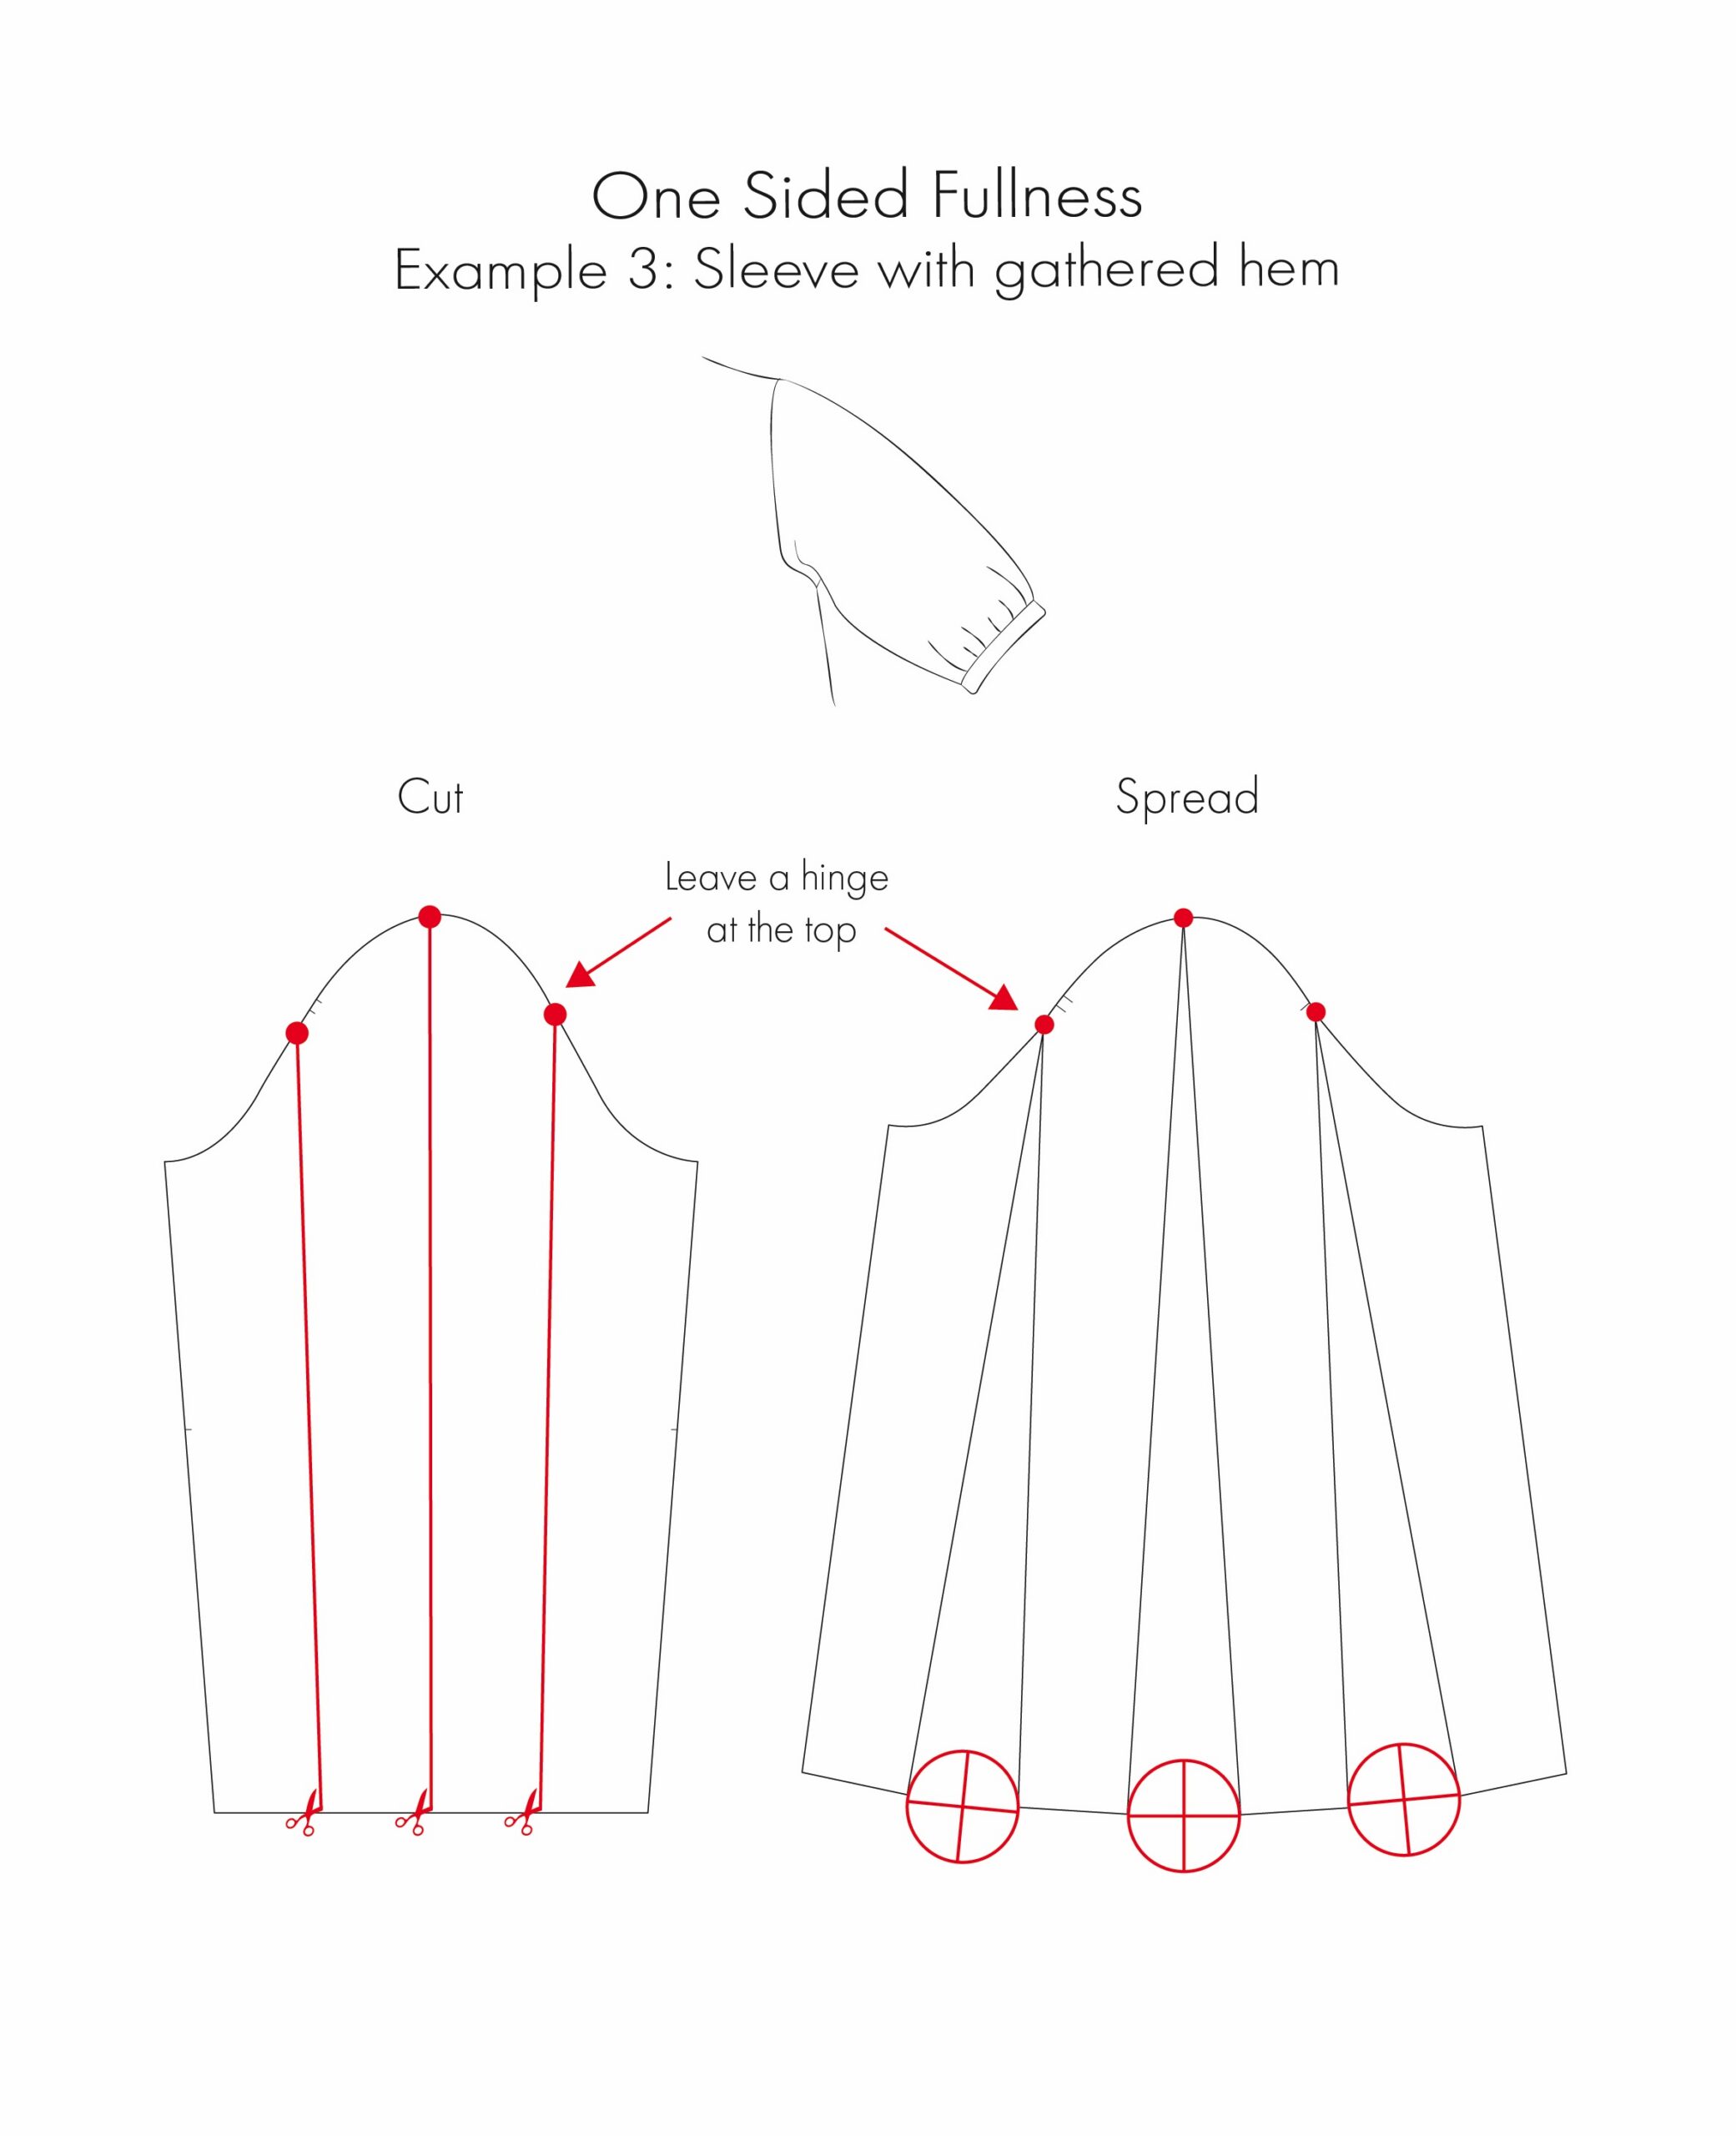
4. Blend and smooth along the new sleeve head and hem.
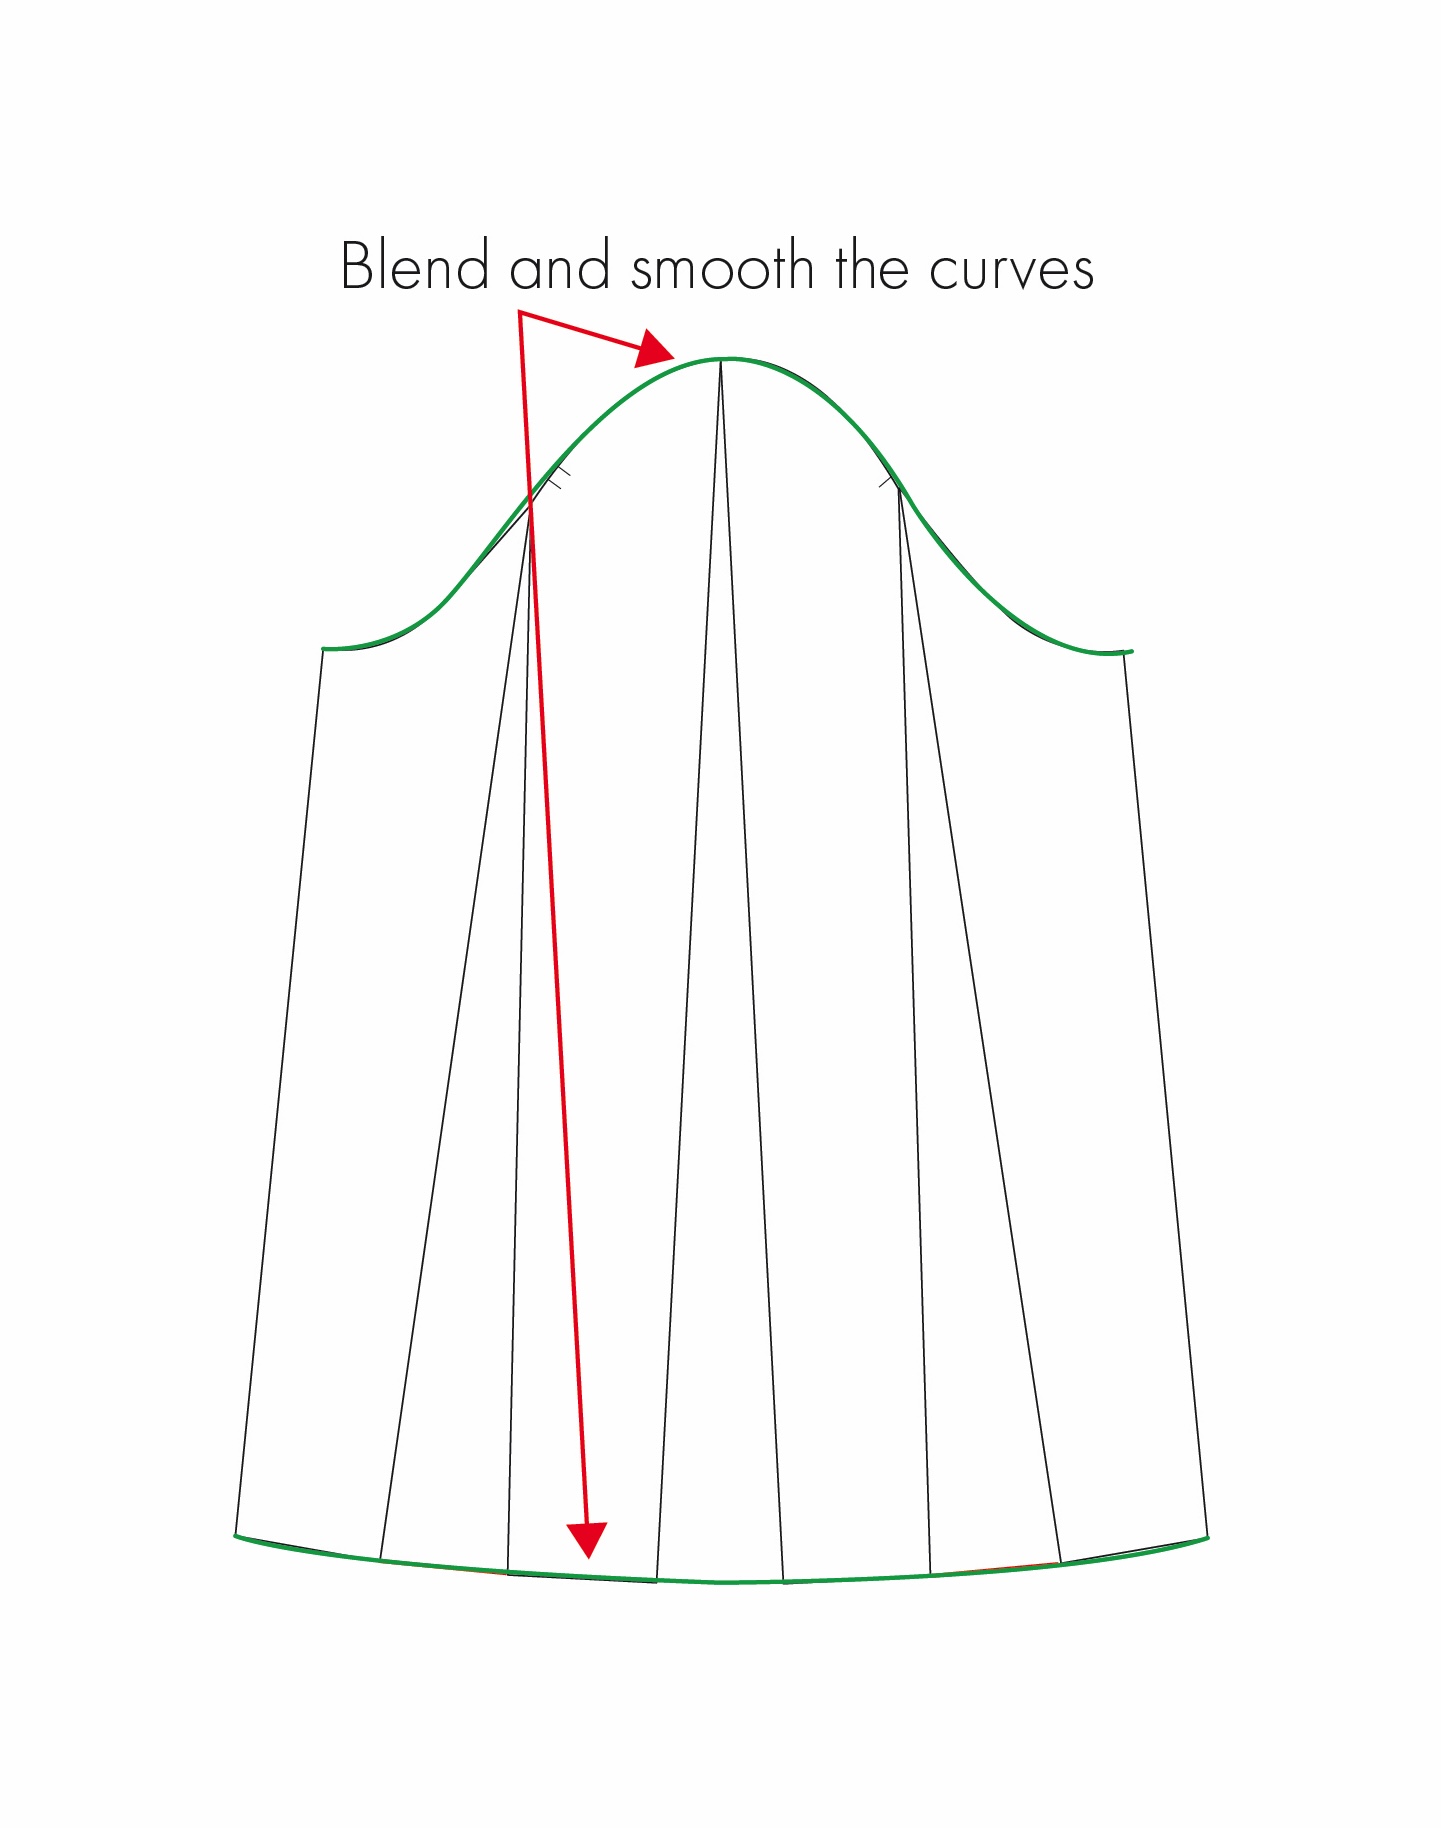
5. Add seam allowance.
6. True the pattern.
7. Add necessary pattern markings including grainlines, and notches. Depending on the size of the pattern piece, you may also want to add notches at the mid and quarter points on both the sleeve and the binding or cuff to help distribute the gathers evenly when sewing.
Adding Unequal Fullness
Example 4: Sleeve with gathered head and hem
In this example, I want to add fullness to both the sleeve head, which will be gathered into the armhole, and the hem, which again could be gathered into a binding or cuff. In this case, more fullness is being added to the hem than to the sleeve head.
1. Draw several cut and spread lines along the length of the sleeve.
2. Cut along these lines.
3. Spread the pattern pieces apart evenly at the sleeve head to add the desired amount of fullness.
4. Repeat at the sleeve hem, spreading the pattern pieces further to create the additional fullness.
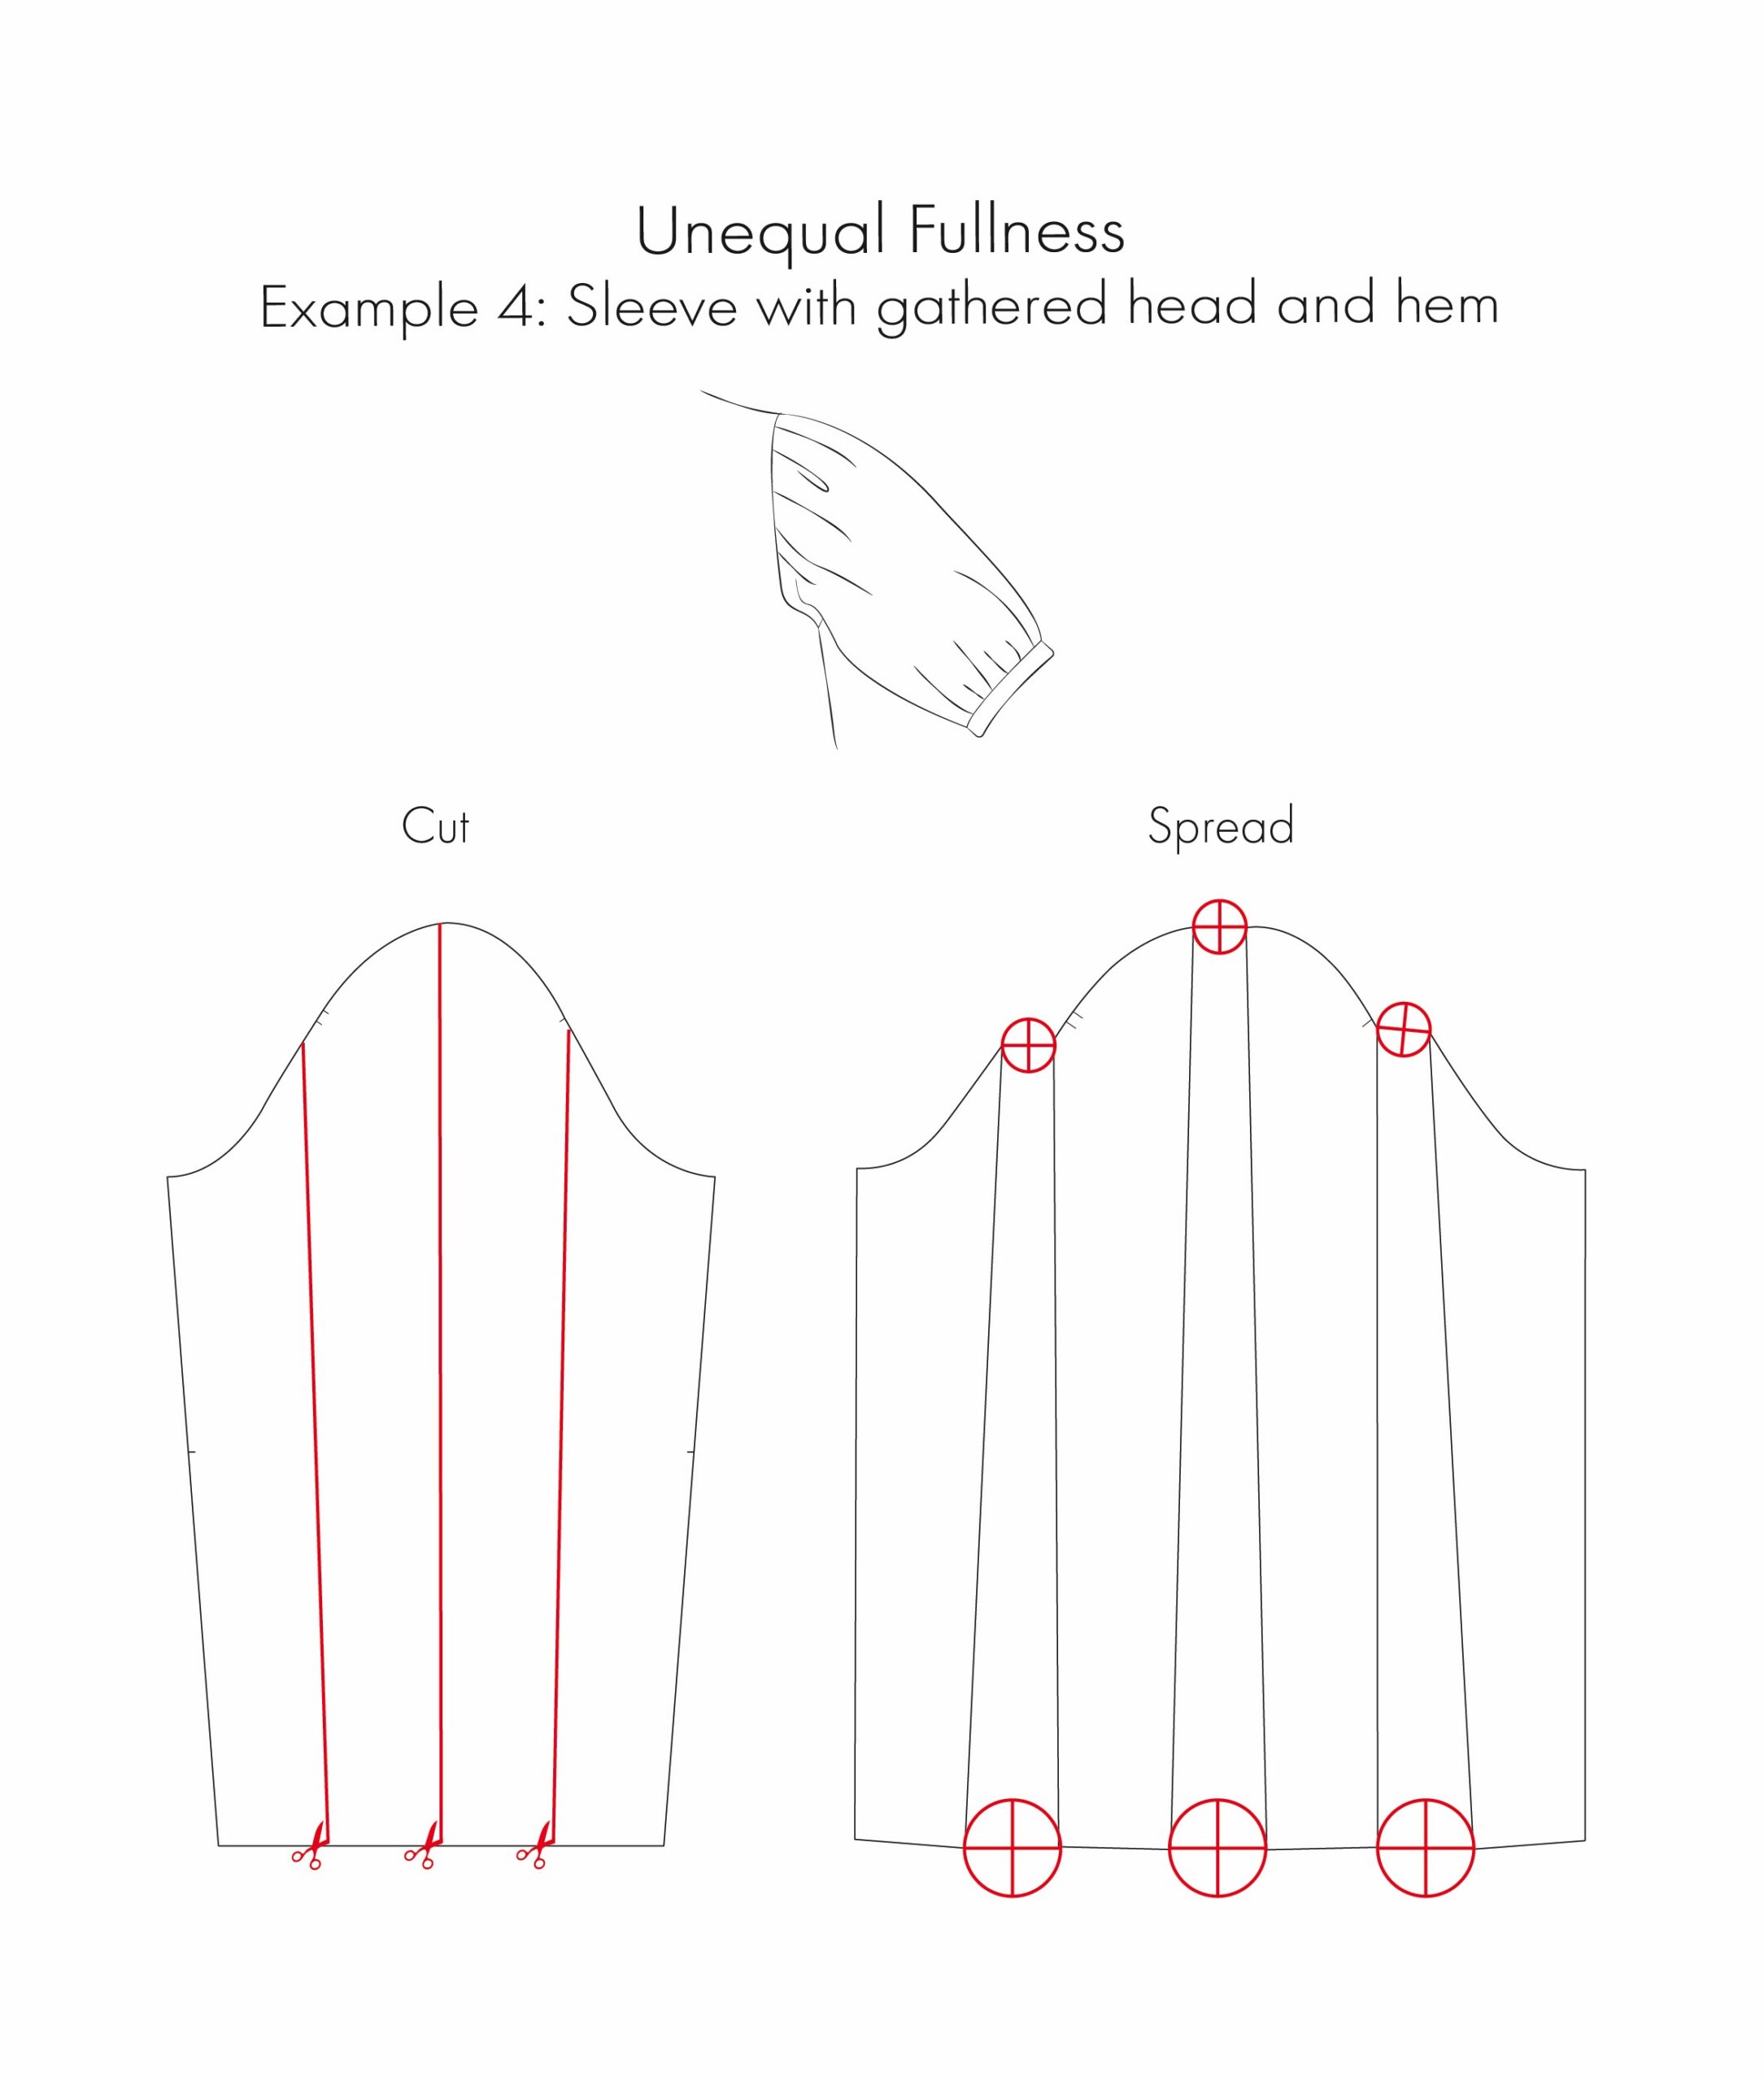
5. Blend and smooth along the new sleeve head and hem.
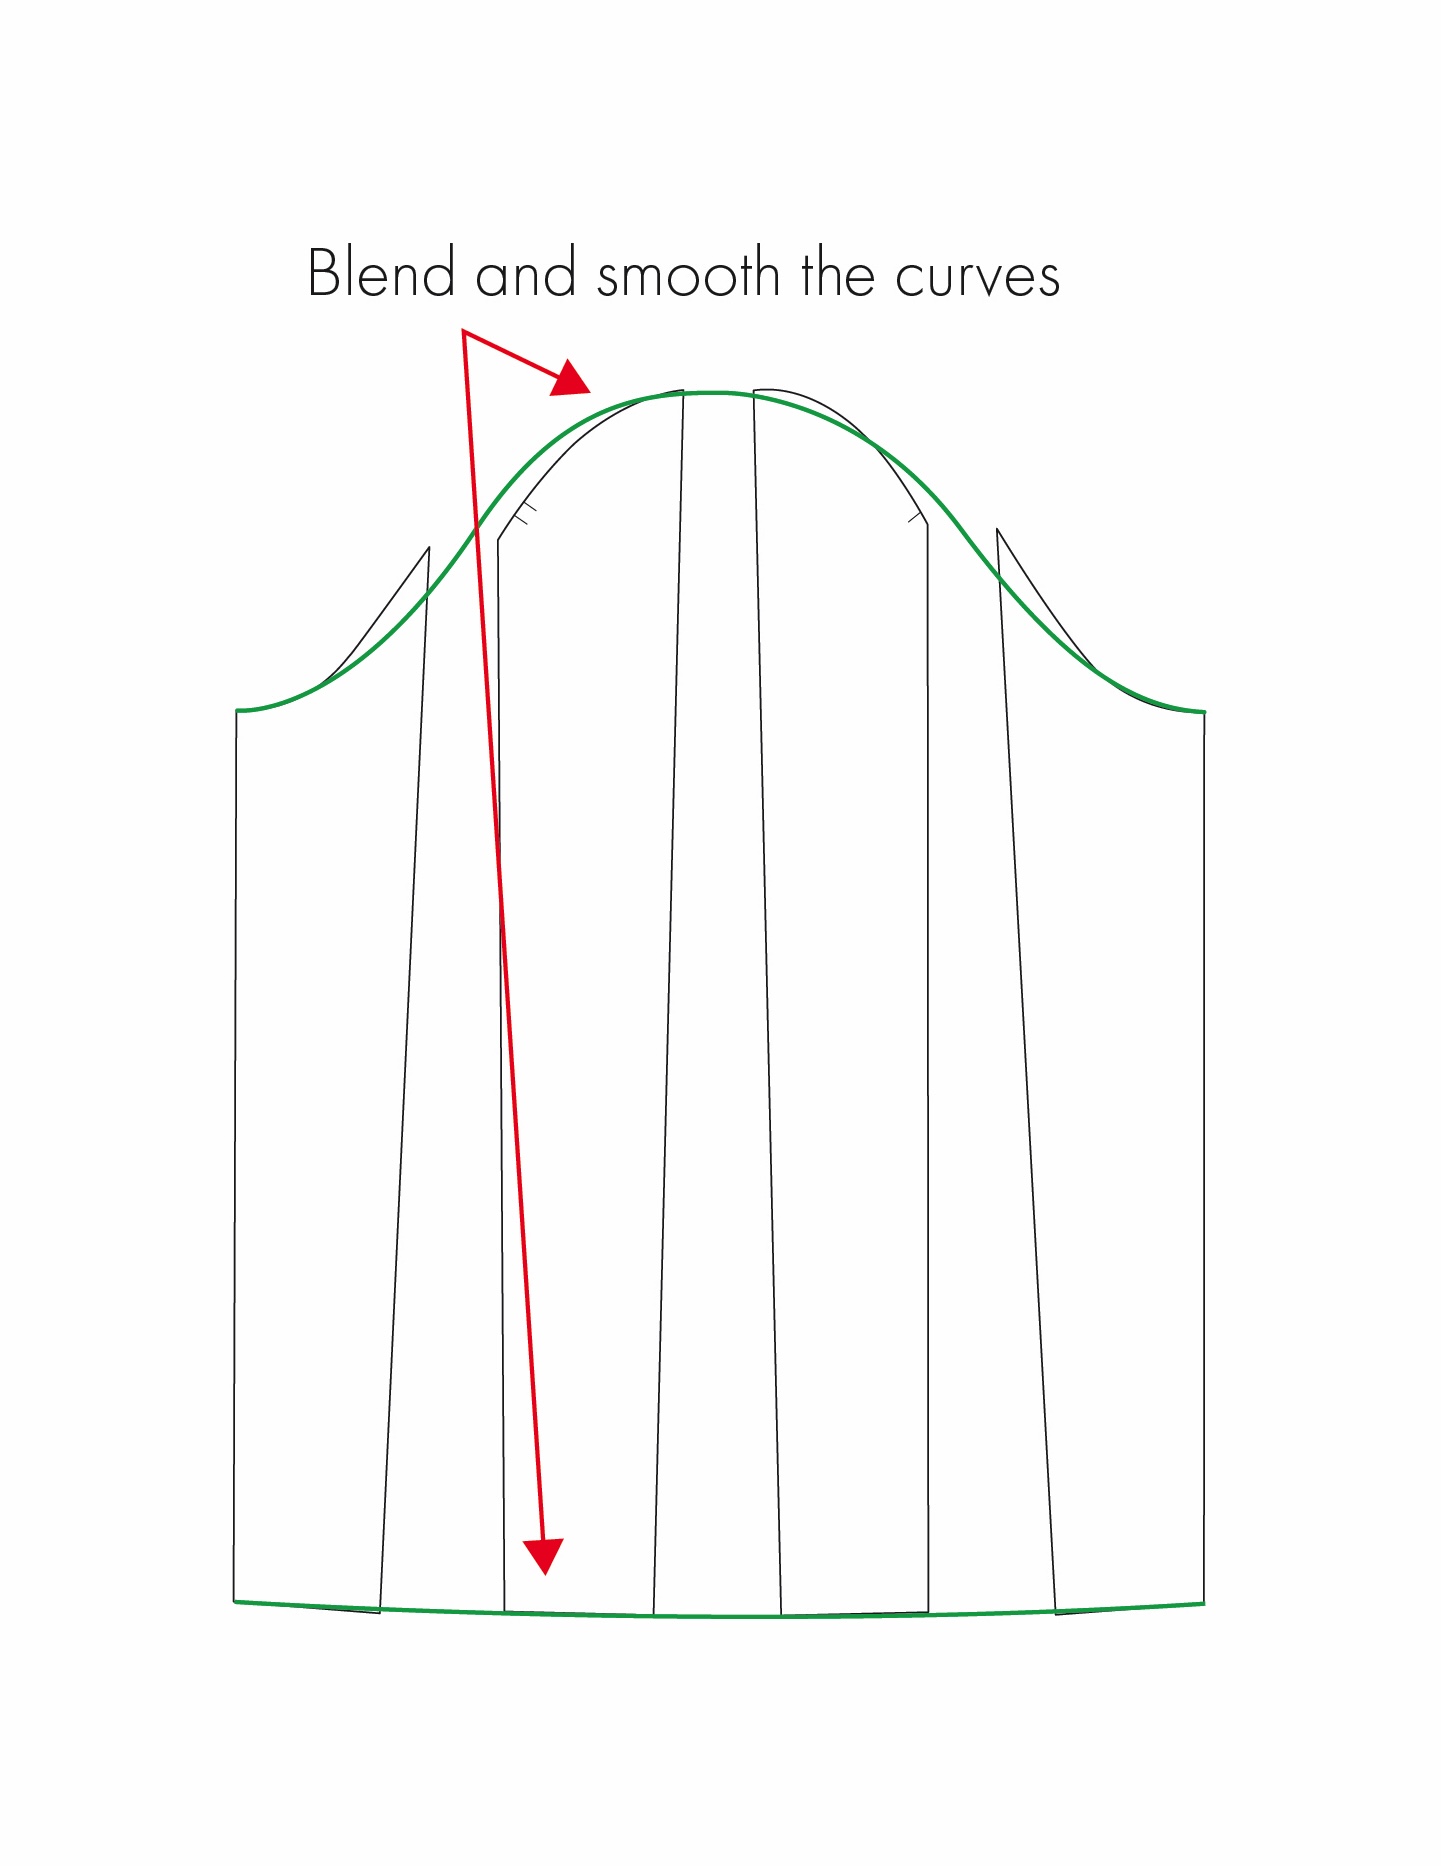
6. Add seam allowance.
7. True the pattern.
8. Add necessary pattern markings including grainlines, and notches (including those mid and quarter points).
Using Darts to Create Fullness
This is a slightly different application of the cut and spread method. Instead of adding fullness by spreading along multiple cuts, you can also manipulate existing darts to redistribute fullness elsewhere in the pattern.
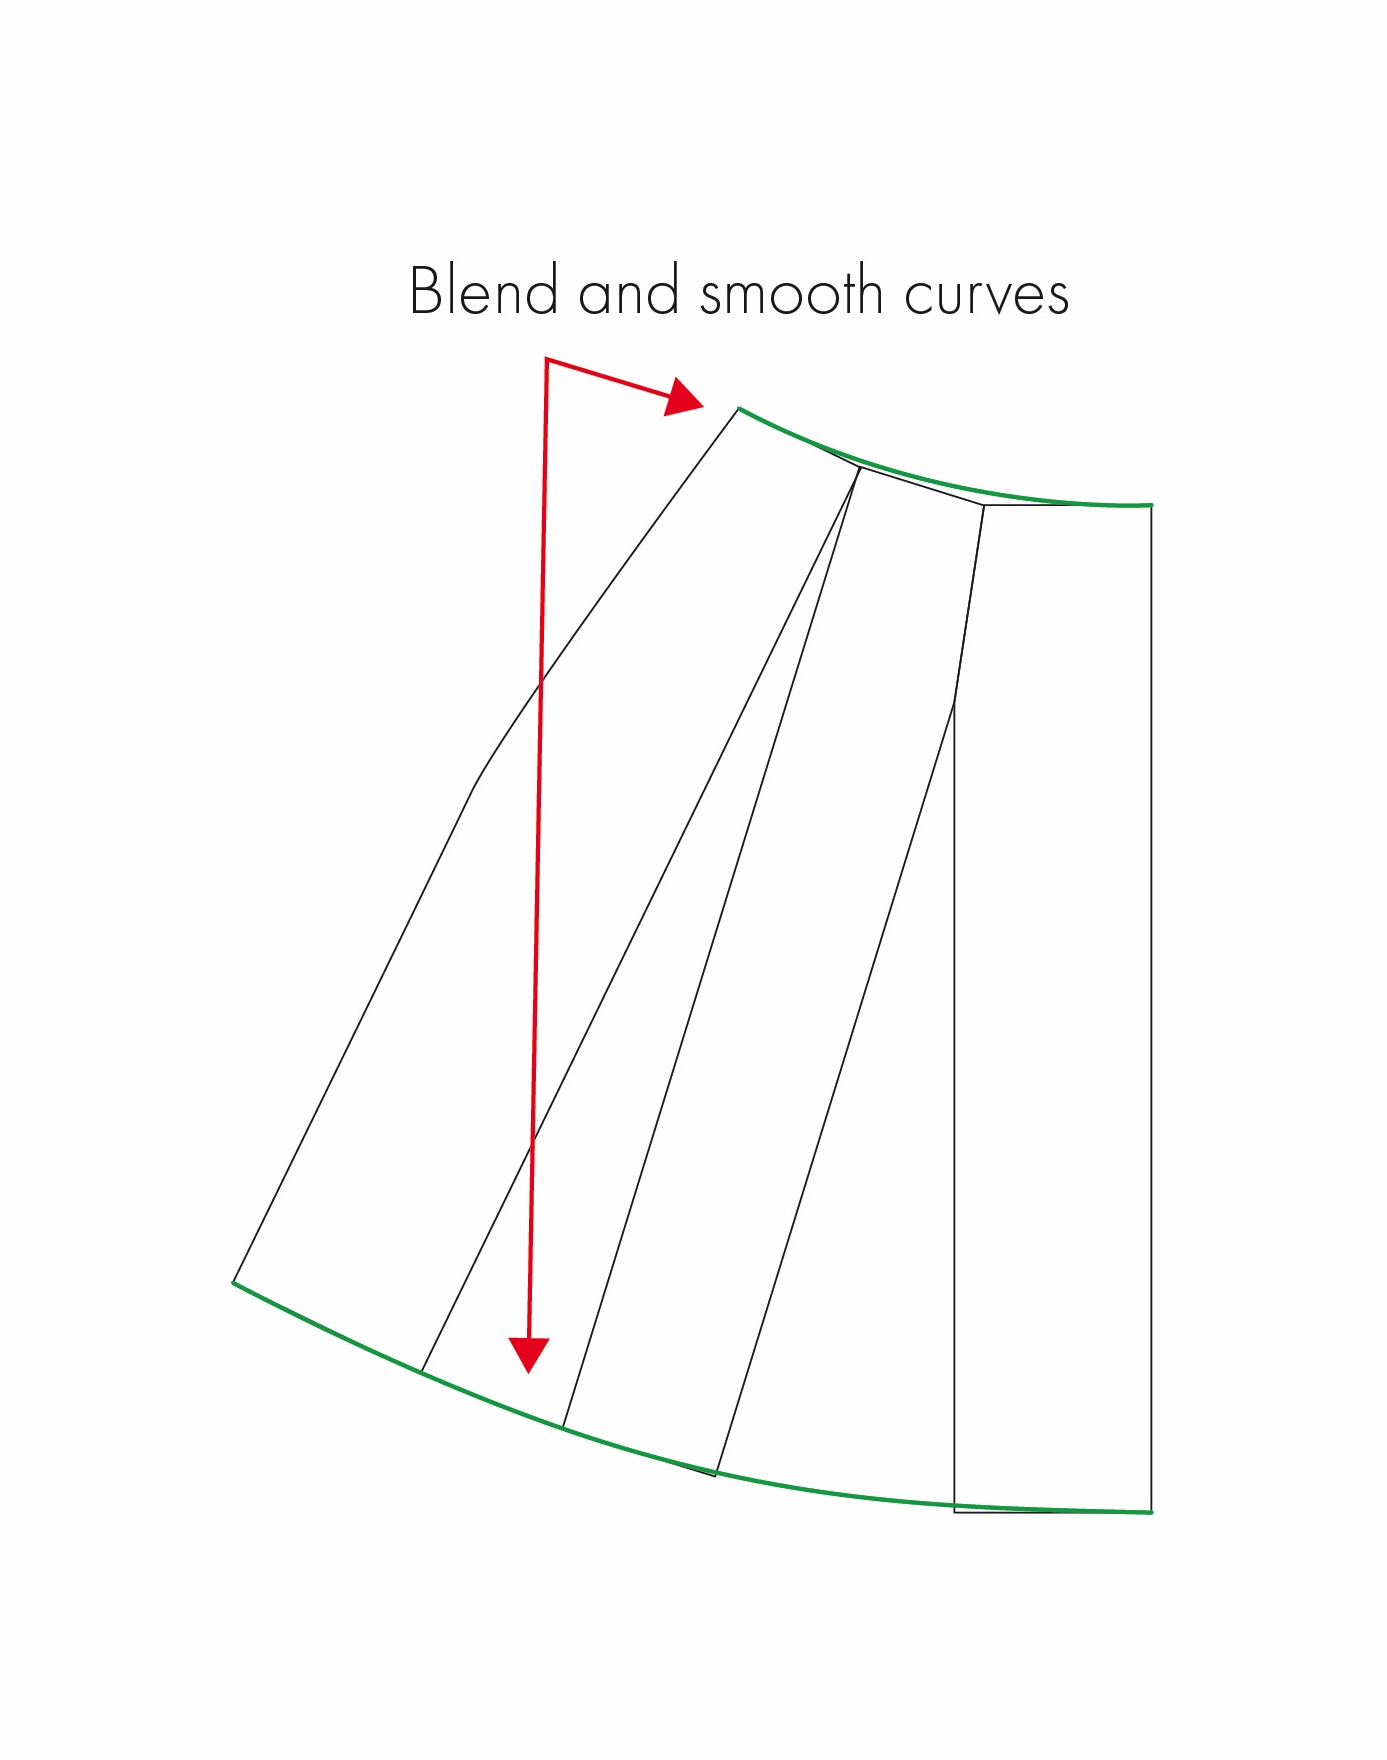
Example 5: Adding flare to a skirt by swinging the waist dart
In this example, I will close the waist dart, transferring its intake to the hem to create a more flared silhouette.
1. Draw your first cut and spread line from one dart leg, through the dart point, and down to hem.
2. Draw any additional cut and spread lines required to help distribute the fullness evenly.
3. Cut all the way along the line that passes through the dart.
4. Cut along the remaining lines, stopping just short of the waistline to leave a small hinge (shown by the red dots in the diagram).
5. Pivot and close the dart by bringing the dart legs together, allowing the pattern to swing open at the hem.
6 Spread the remaining pattern piece to achieve the desired amount of fullness.
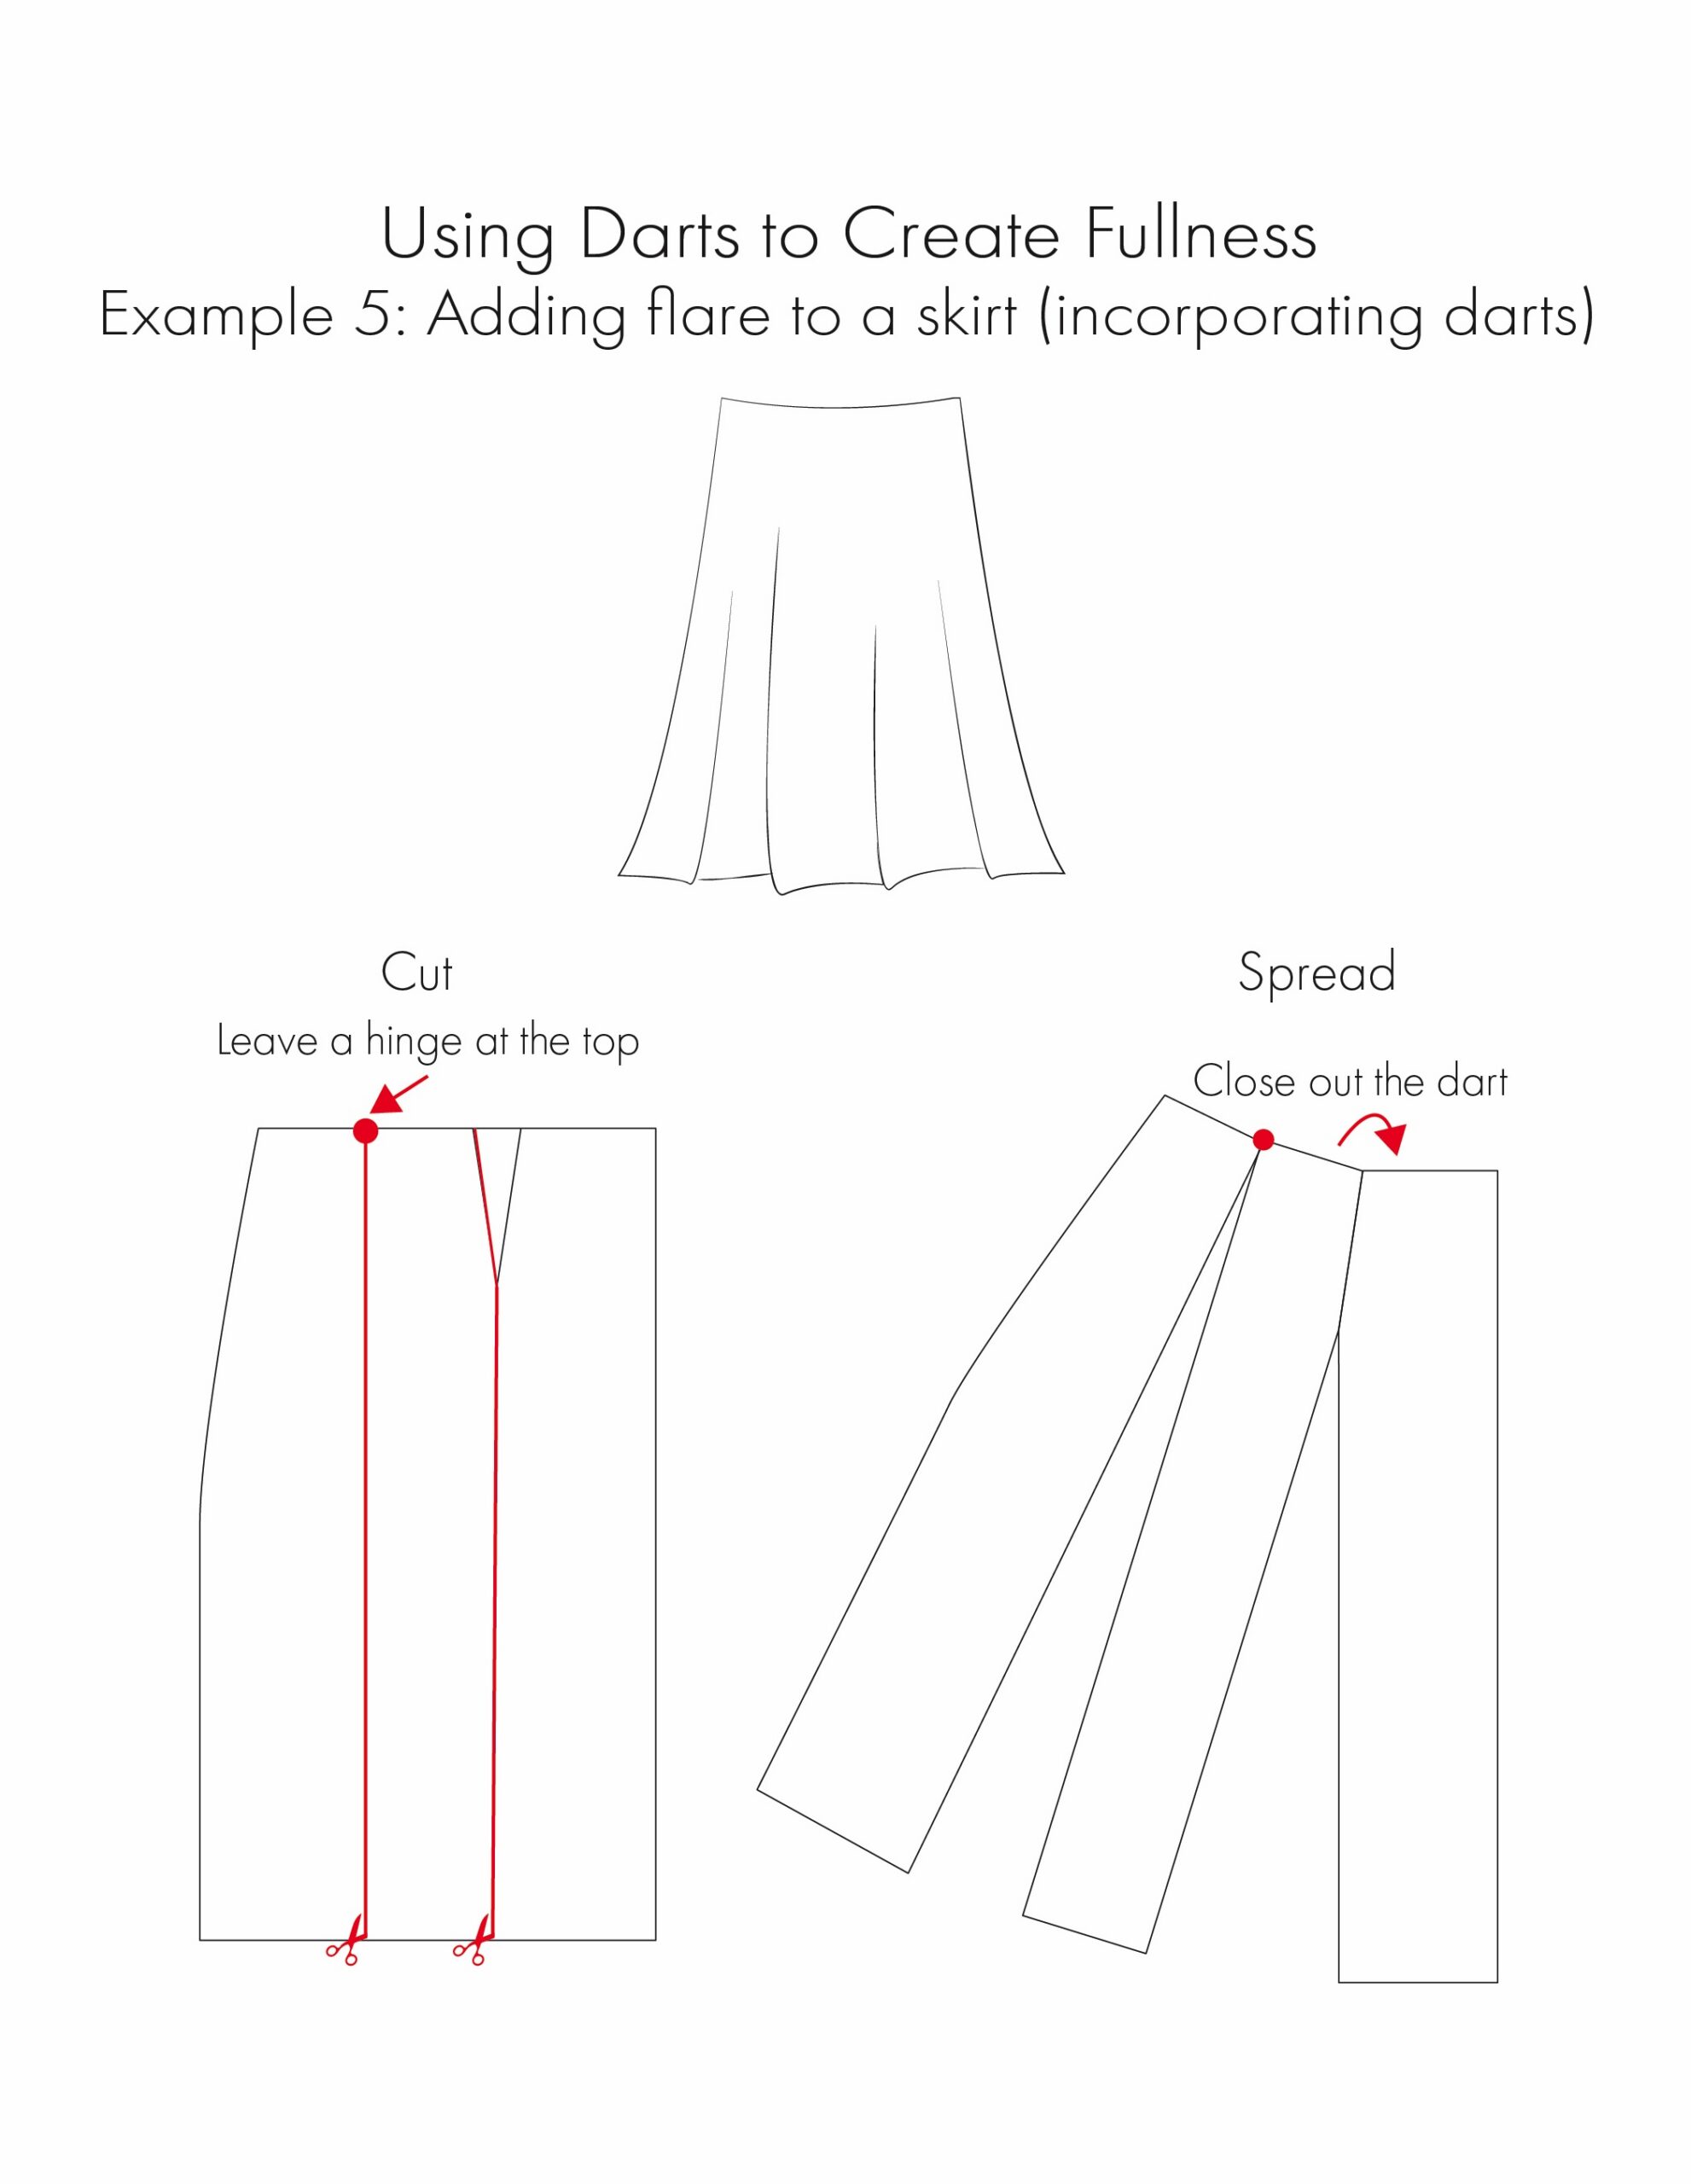
7. Blend and smooth along the new waistline and hem.
8. Add seam allowance.
9. True the pattern.
10. Add necessary pattern markings including grainlines, and notches.
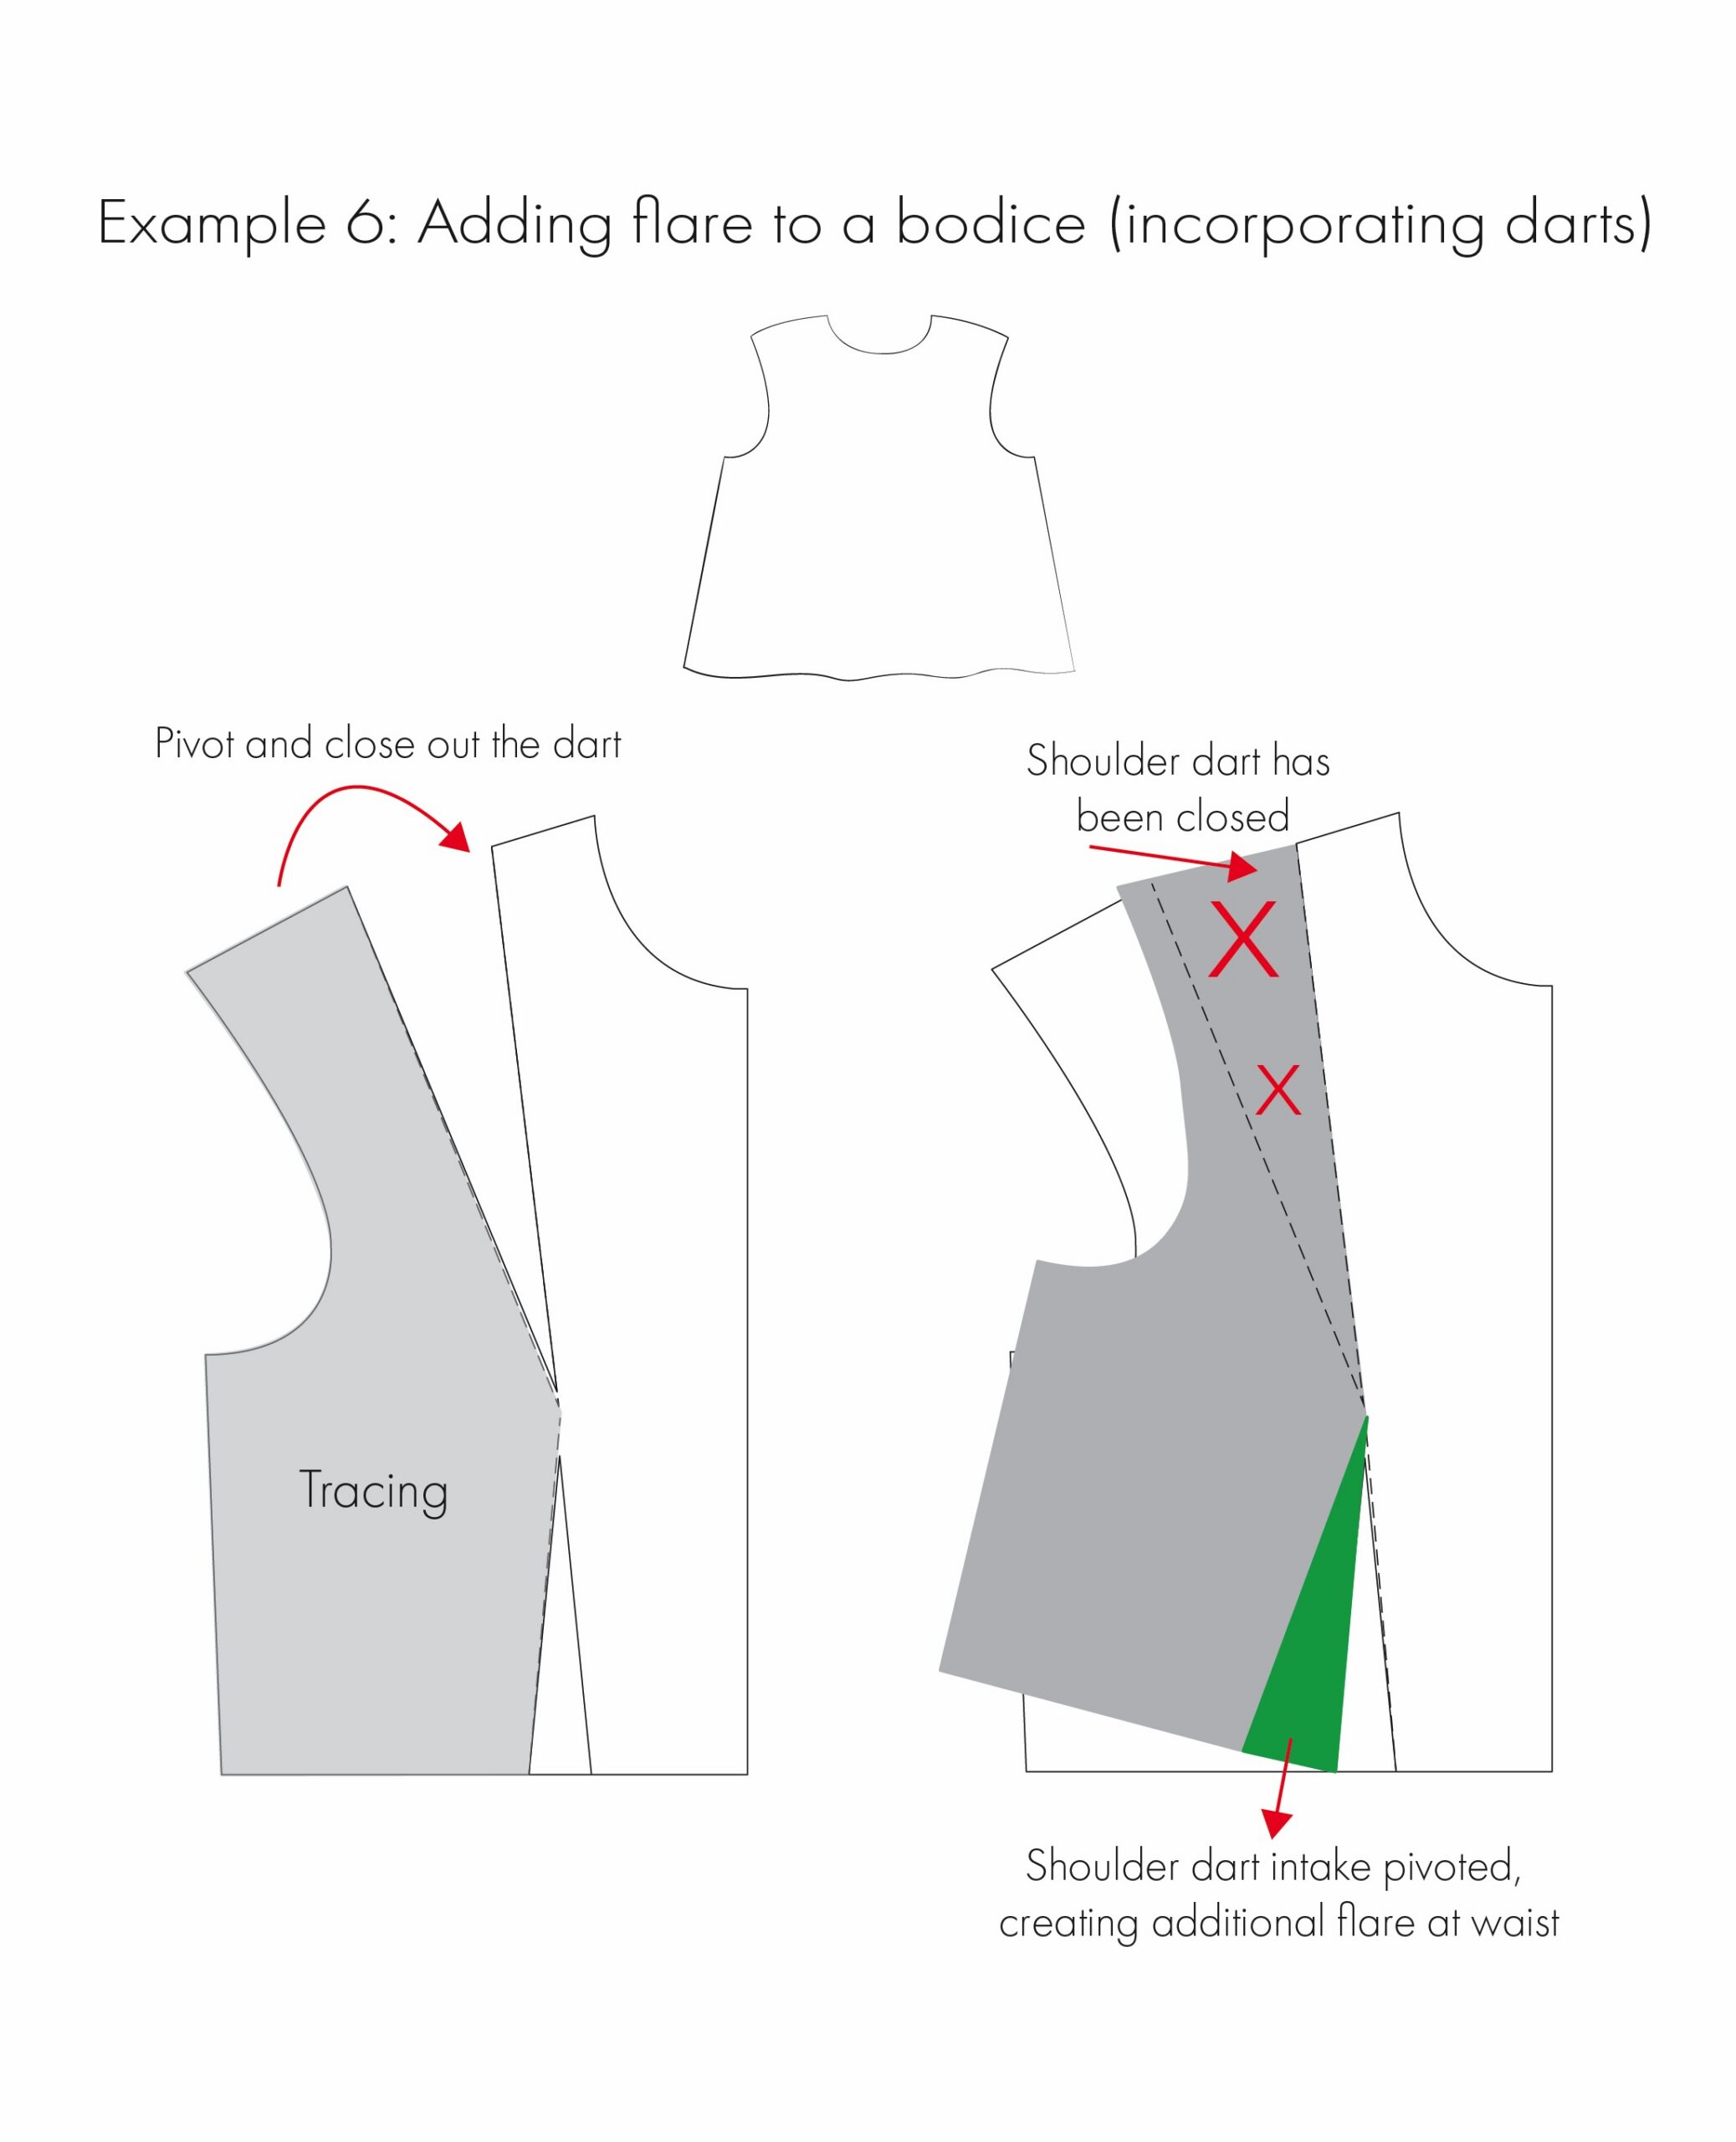
Example 6: Adding flare to a bodice by swinging the shoulder seam dart into the hem
In this example, I will close the shoulder dart, transferring its intake to the hem of the bodice to create a more flared silhouette.
1. Trace the bodice block from one leg of the shoulder dart to one side of the waist hemline.
2. Pivot the tracing, closing the shoulder dart. This will swing the dart intake into the hem, creating flare.
3. Blend and smooth along the new waistline and hem.
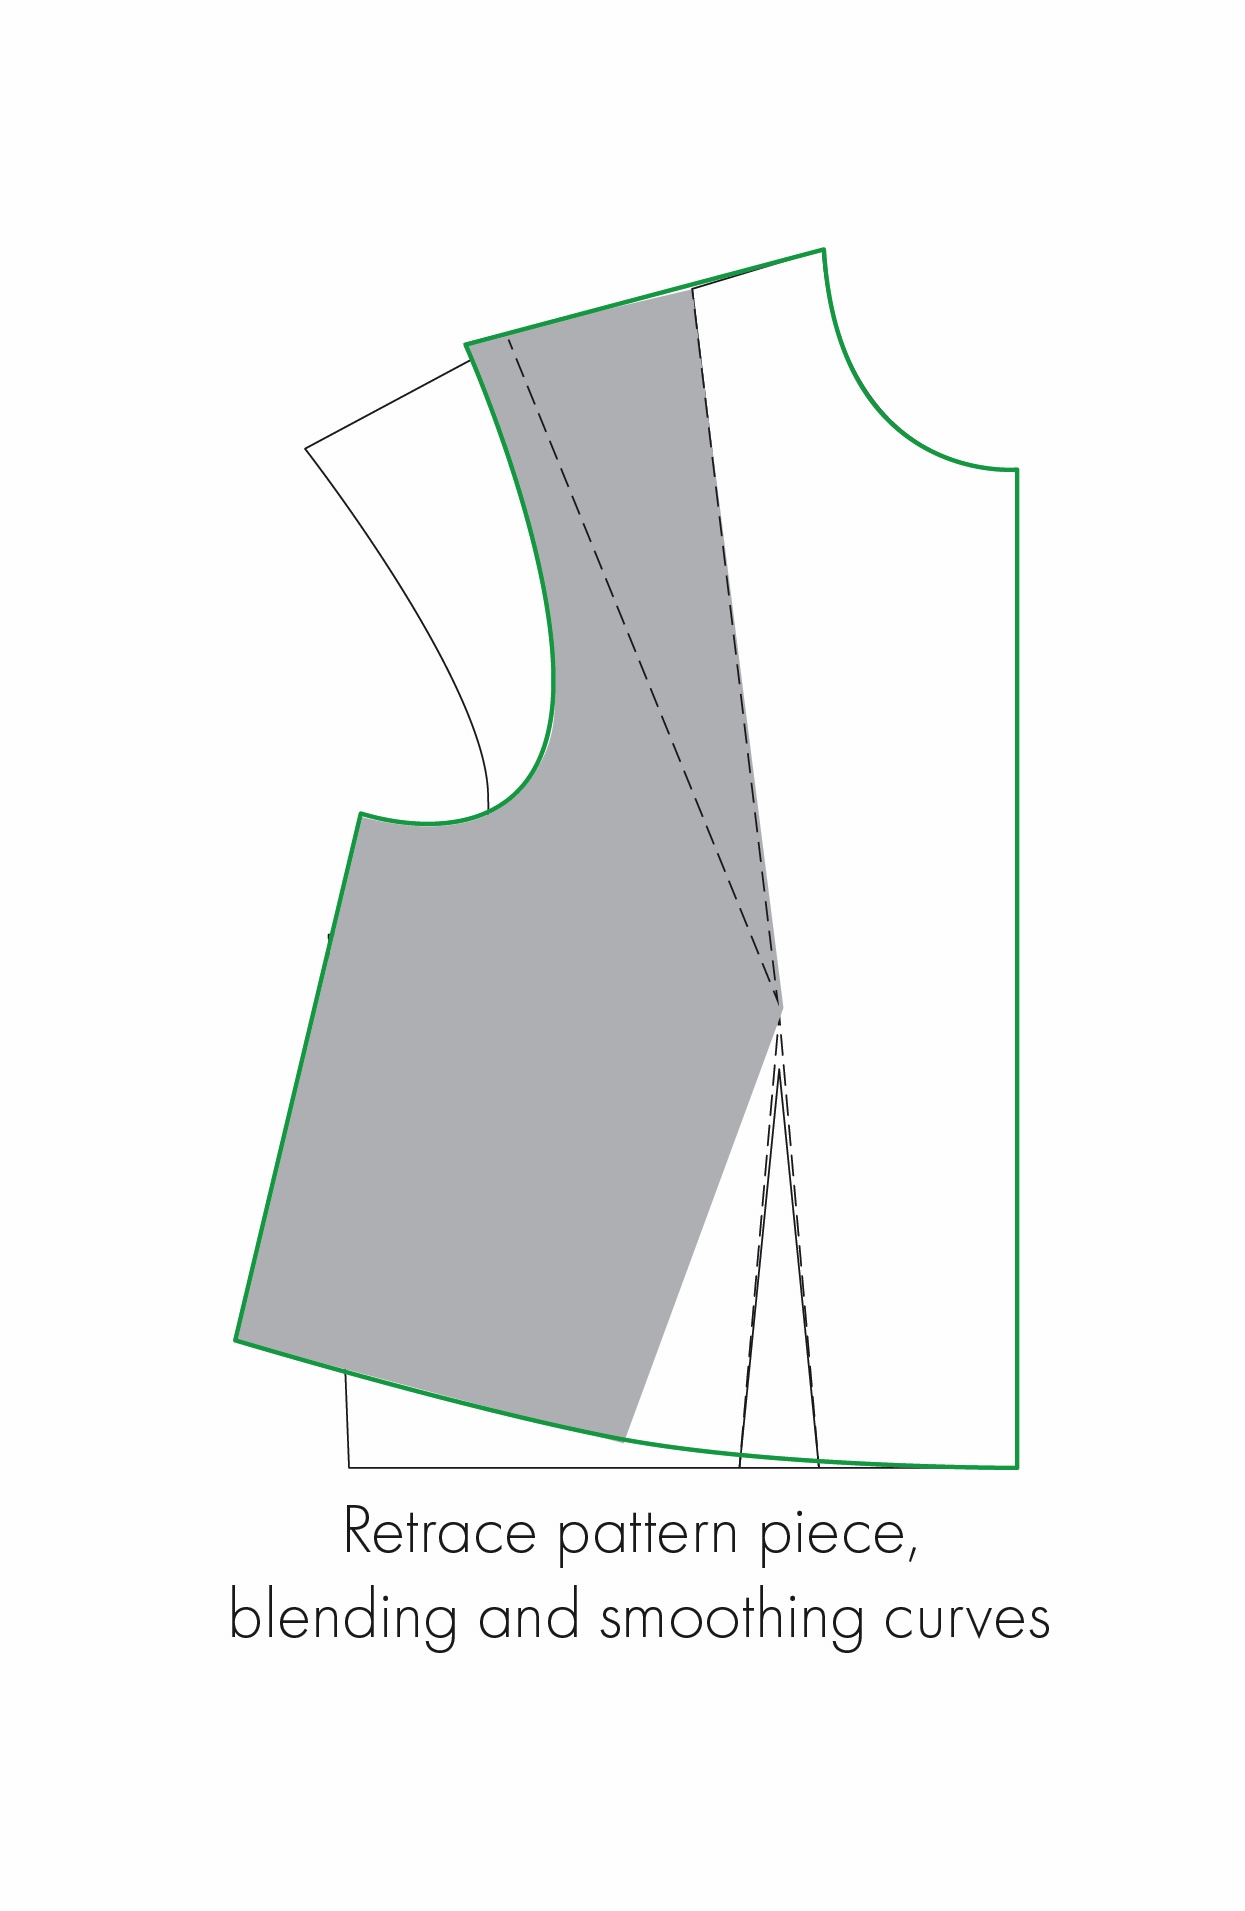
4. Add seam allowance.
5. True the pattern.
6. Add necessary pattern markings including grainlines, and notches.
Tip: For more on dart manipulation, check out my article ‘Sewing Essentials: Dart Manipulation’.
The cut and spread method for adding fullness to your patterns is such a versatile technique. It opens up endless possibilities for customising your designs.
While this article has just introduced the foundations of the technique, these basic principles can be applied in countless ways once you understand how they work. From subtle shaping to more dramatic statement details, you can use the cut and spread method in a variety of ways and locations on a pattern to create different designs. The more you play around, the more possibilities you’ll find.
Hopefully, this article has inspired you to give it a try on one of your own patterns or to experiment with a pattern you already have.


6 Comments
Wow! This is such a great tutorial, Emma. I can see using this a lot in the future. Thanks so much.?
Hi Karen, thank you! I’m so glad you found it helpful and that you’ll be giving it a go. It’s such a great method and opens up so many possibilities.
Thank you for a great tutorial. If you write these into a book, I would buy it.
Thank you so much Judith! That means a lot. I’m really glad you found the tutorial helpful. A book is definitely something I’d love to do one day!
I love this post. I learned pattern-making in college – it was my favorite part of fashion design after illustration. This gives me a yearning to create some of my own designs. Thank you for this!
Hi Lisa,
Thank you so much for your comment!
I’m so glad it brought back those pattern-making memories, and has maybe inspired you to get creative again.
Pattern making was definitely my favourite subject, and I just love methods like this. They open up so many possibilities.
I hope you get the chance to have a play with some new designs.