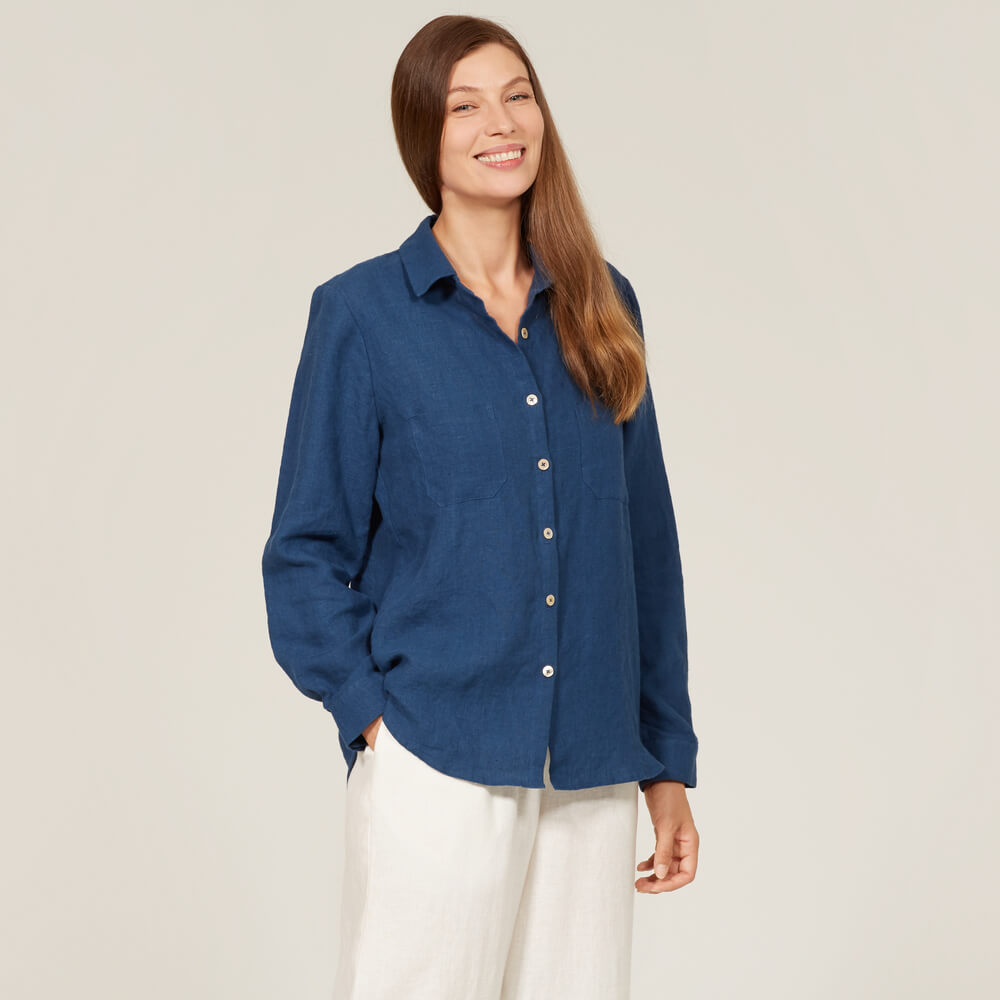
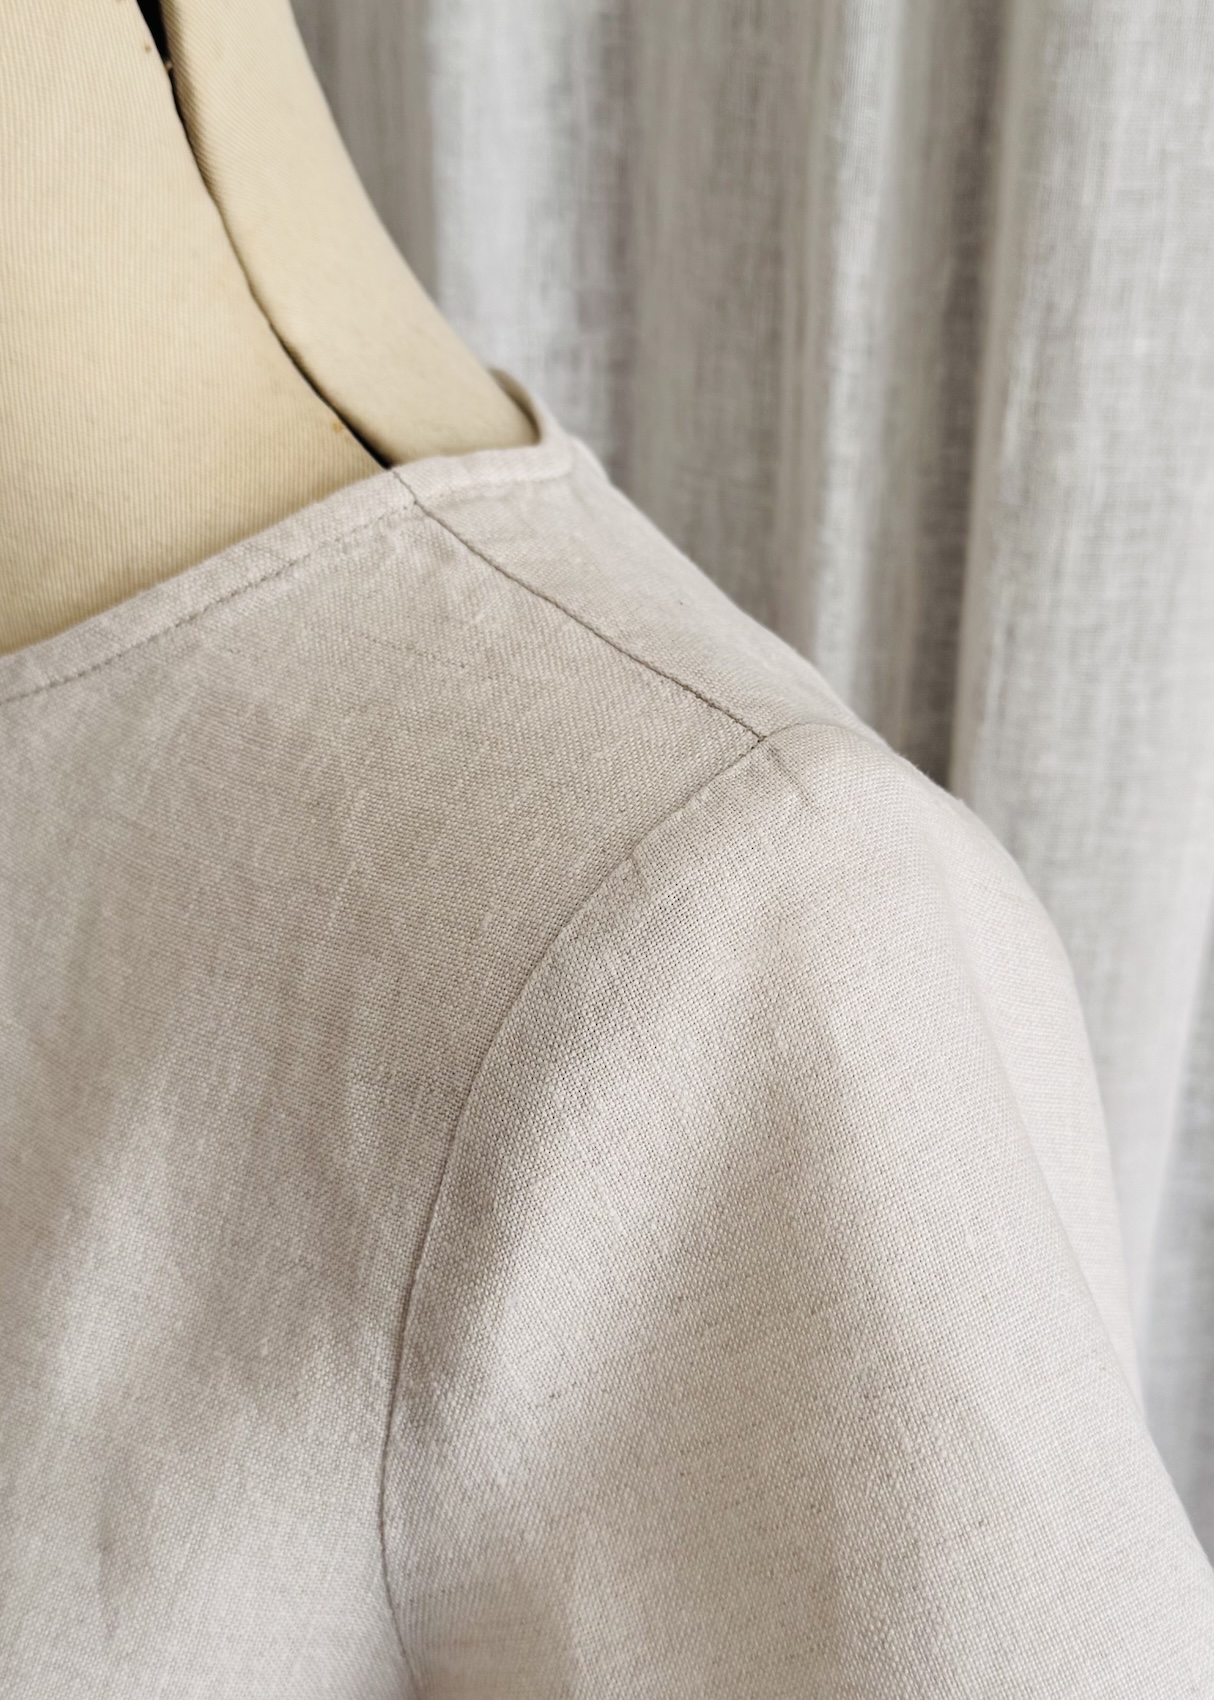
Have you ever tried on a top or dress and found that the shoulder seams just don’t sit how you thought they would? Maybe they sit too far forward or backward, feel uncomfortable, or look like they’re hanging off your shoulders.
Shoulders vary in width, position, and shape. They may be narrow or broad, forward- or backward-set, rounded, square, or sloping, and these differences affect how a shoulder seam will sit.
In this post, I’m going to cover five common reasons why the shoulder seams may not look or feel quite right. I can’t cover every possible scenario or garment style in this post, but I do hope to offer a useful introduction and overview to help you look at both your own shoulders and garments with a little more intention.
How to Diagnose the Problem
First things first. I recommend making a full toile because the shoulder area really can affect the overall fit and balance of a garment. But remember, you don’t necessarily need to include every little detail in the toile (like hems, pockets, or other finishes).
Once you have made a toile, put it on and allow it to settle and fall naturally. You can either stand in front of a mirror, or get someone to help you assess the fit.
Next, identify your natural shoulder line, including the high and low points of the shoulders. Compare these points with those on your garment, and ask yourself things like:
- Does the seam end at the shoulder point, or does it either extend beyond it or fall short?
- Does the seam sit too far forward or too far back?
- Are there drag lines or excess fabric that might help point to the source of the fit problem?
- Does the seam lie smoothly against your shoulder, or does it gape, pull, or sit away from your body?
Together, these observations should help you identify what may be affecting the fit.
Note: The shoulder seam isn’t equally as critical for every garment style. For example, it is more relevant in garments with a defined shoulder seam, like that of a set-in sleeve. However, it is generally less critical in designs with relaxed or raglan sleeves. Every pattern is designed differently, but for the purpose of this post I will demonstrate the adjustments on a basic bodice block with a standard set-in sleeve. The diagrams are also not to scale, and all seam allowances have been removed from the diagrams, as changes are generally made to the stitching lines.
Reason 1: Shoulder seam is too long, sitting too far out
What this looks and feels like:
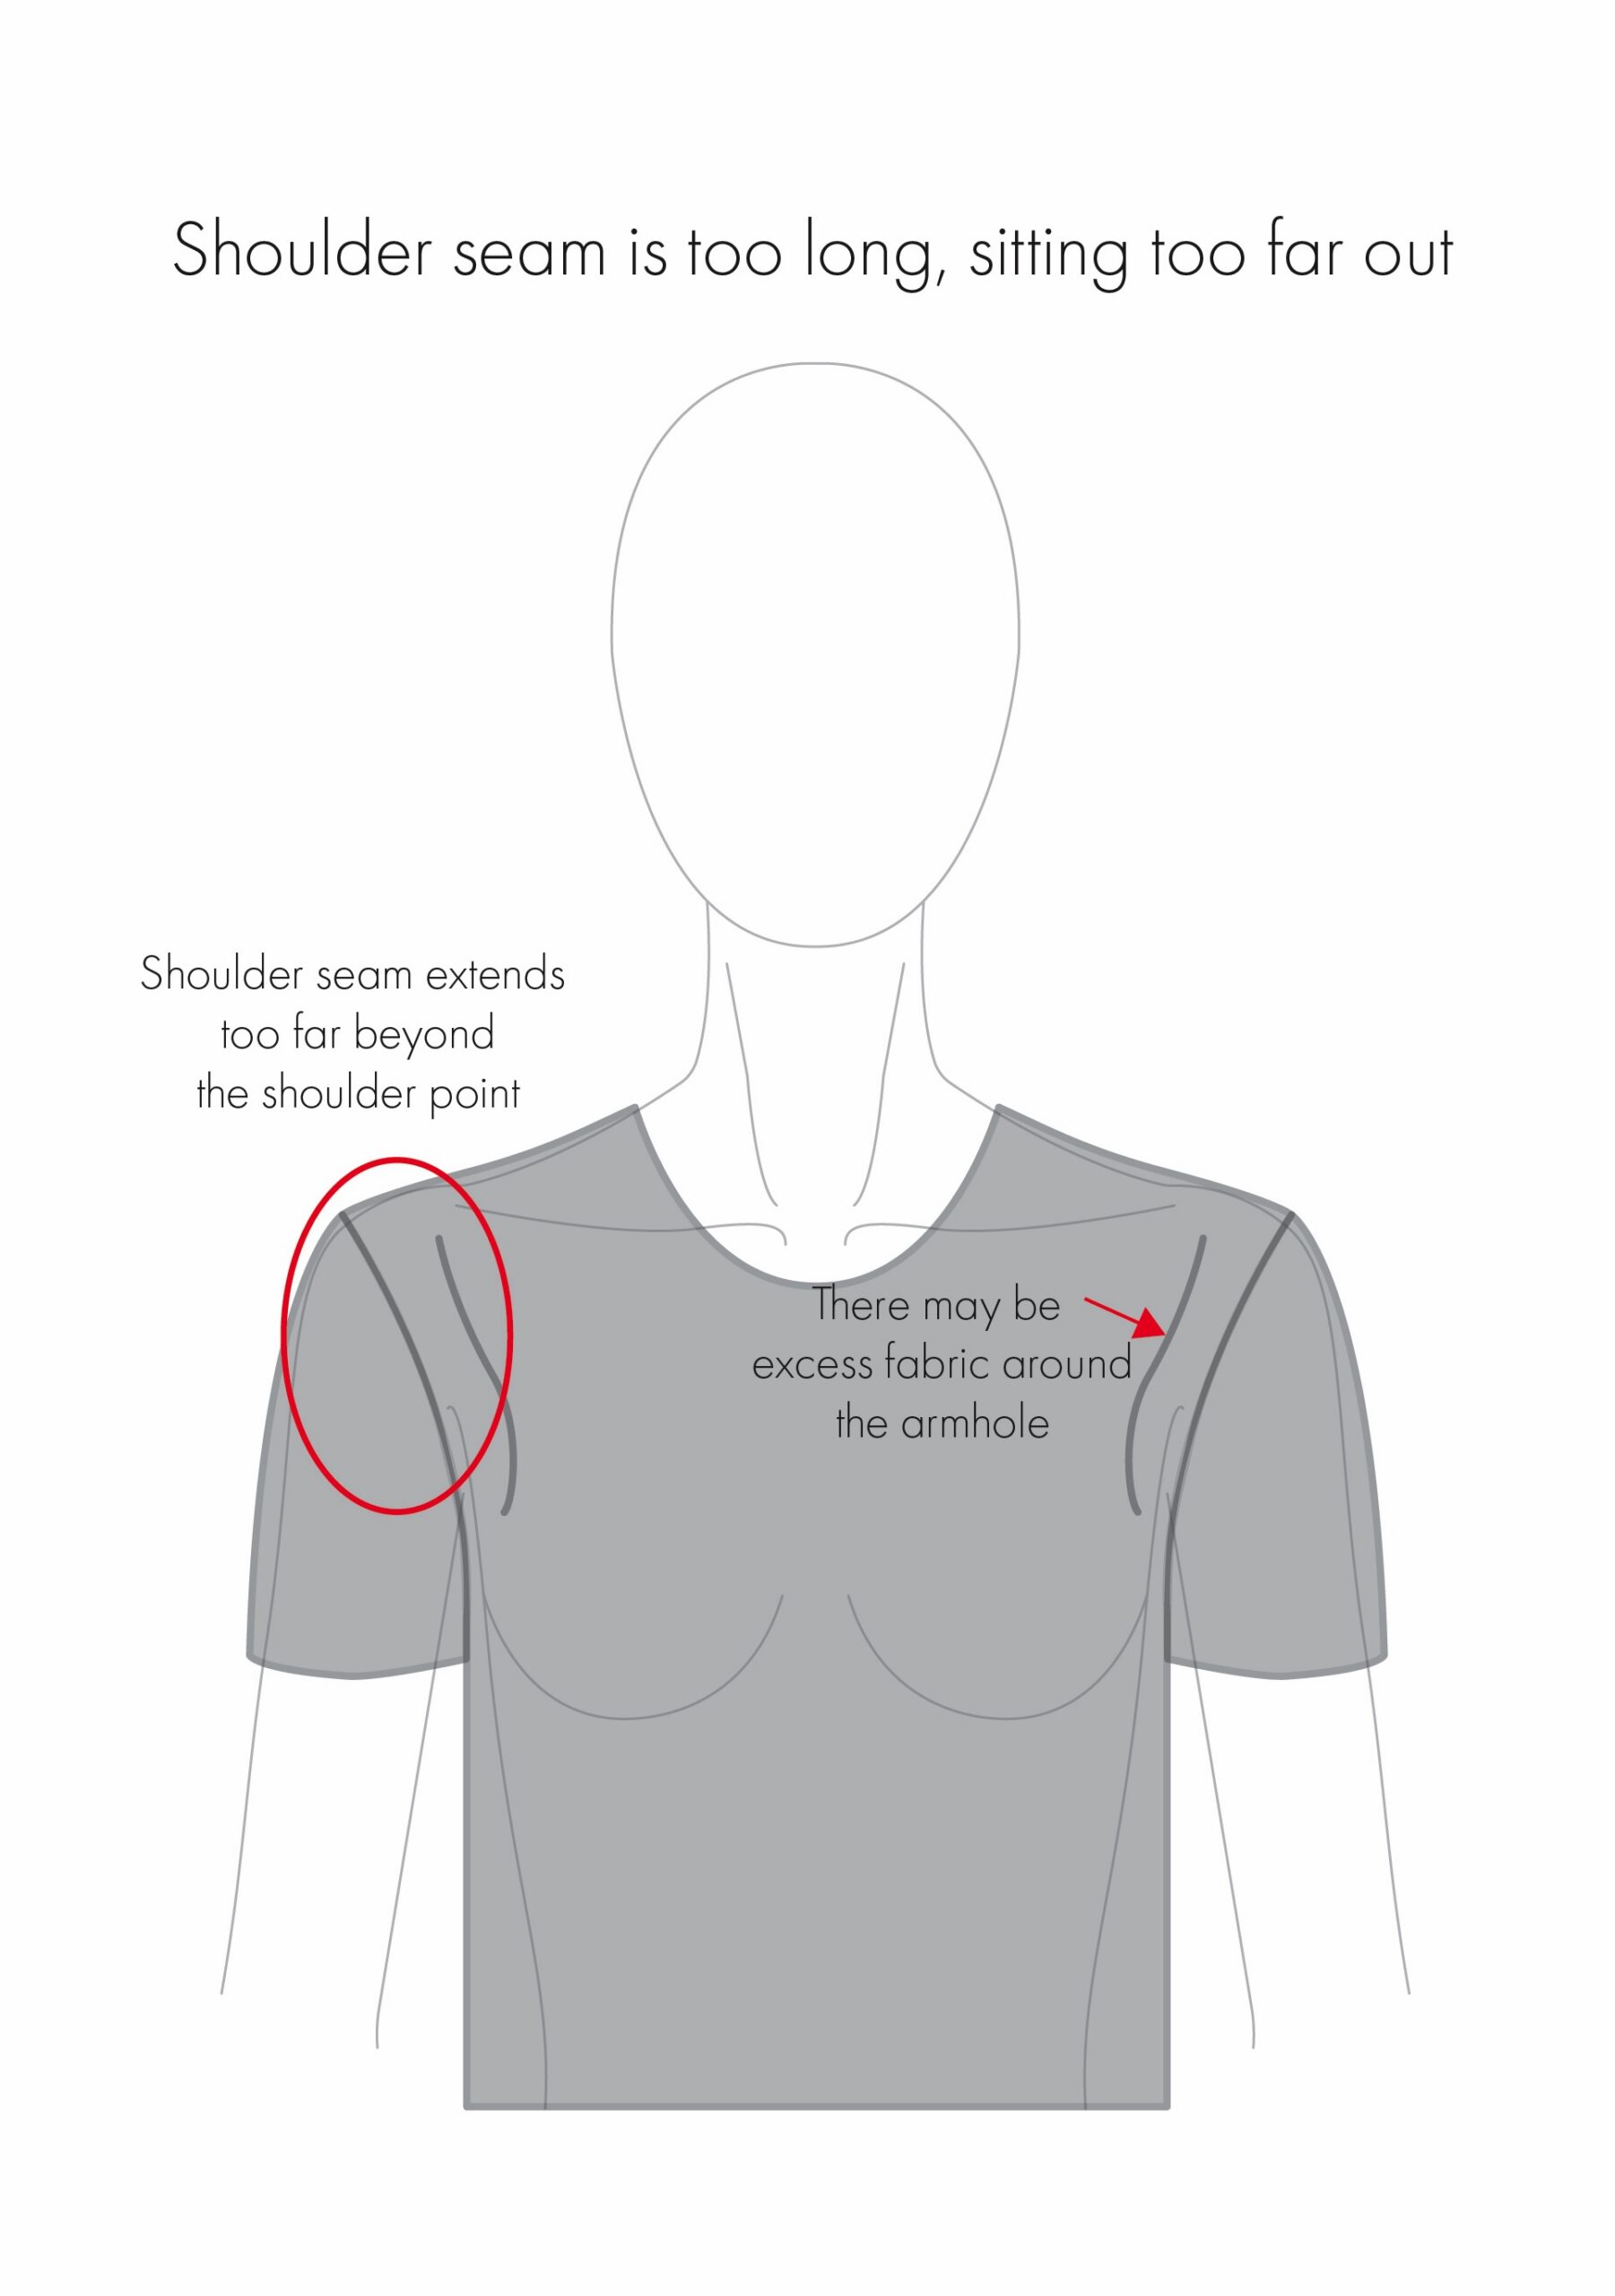
The shoulder seam extends too far beyond the shoulder point. It may appear as if the armhole or sleeve is hanging off the shoulder, looking too big. There could also be excess fabric or collapsing around the armhole, and you may find that the sleeves become longer than intended.
Why might this happen?
The shoulder seam on the pattern may simply be too long for the wearer’s actual shoulder measurement, because the wearer has narrower shoulders than the pattern was designed for.
How to adjust the toile:
1. Pinch out the excess fabric at the shoulder point, moving it inward. You will likely need to pinch some fabric away from around the armhole too.
2. Pin this adjustment at both the front and back, shortening the shoulder seam until the shoulder sits in the desired position.
3. Measure how much fabric has been pinched out.
How to adjust the pattern:
A narrow shoulder adjustment will shorten the shoulder seam.
There are two options when it comes to making this adjustment, depending on how much you need to remove.
Option 1: Adjustment of less than 1cm
This method shortens the shoulder seam, while keeping the armhole unchanged. However, a slight adjustment to the shoulder slope may result.
The same adjustment is made to both the front and back pattern pieces.
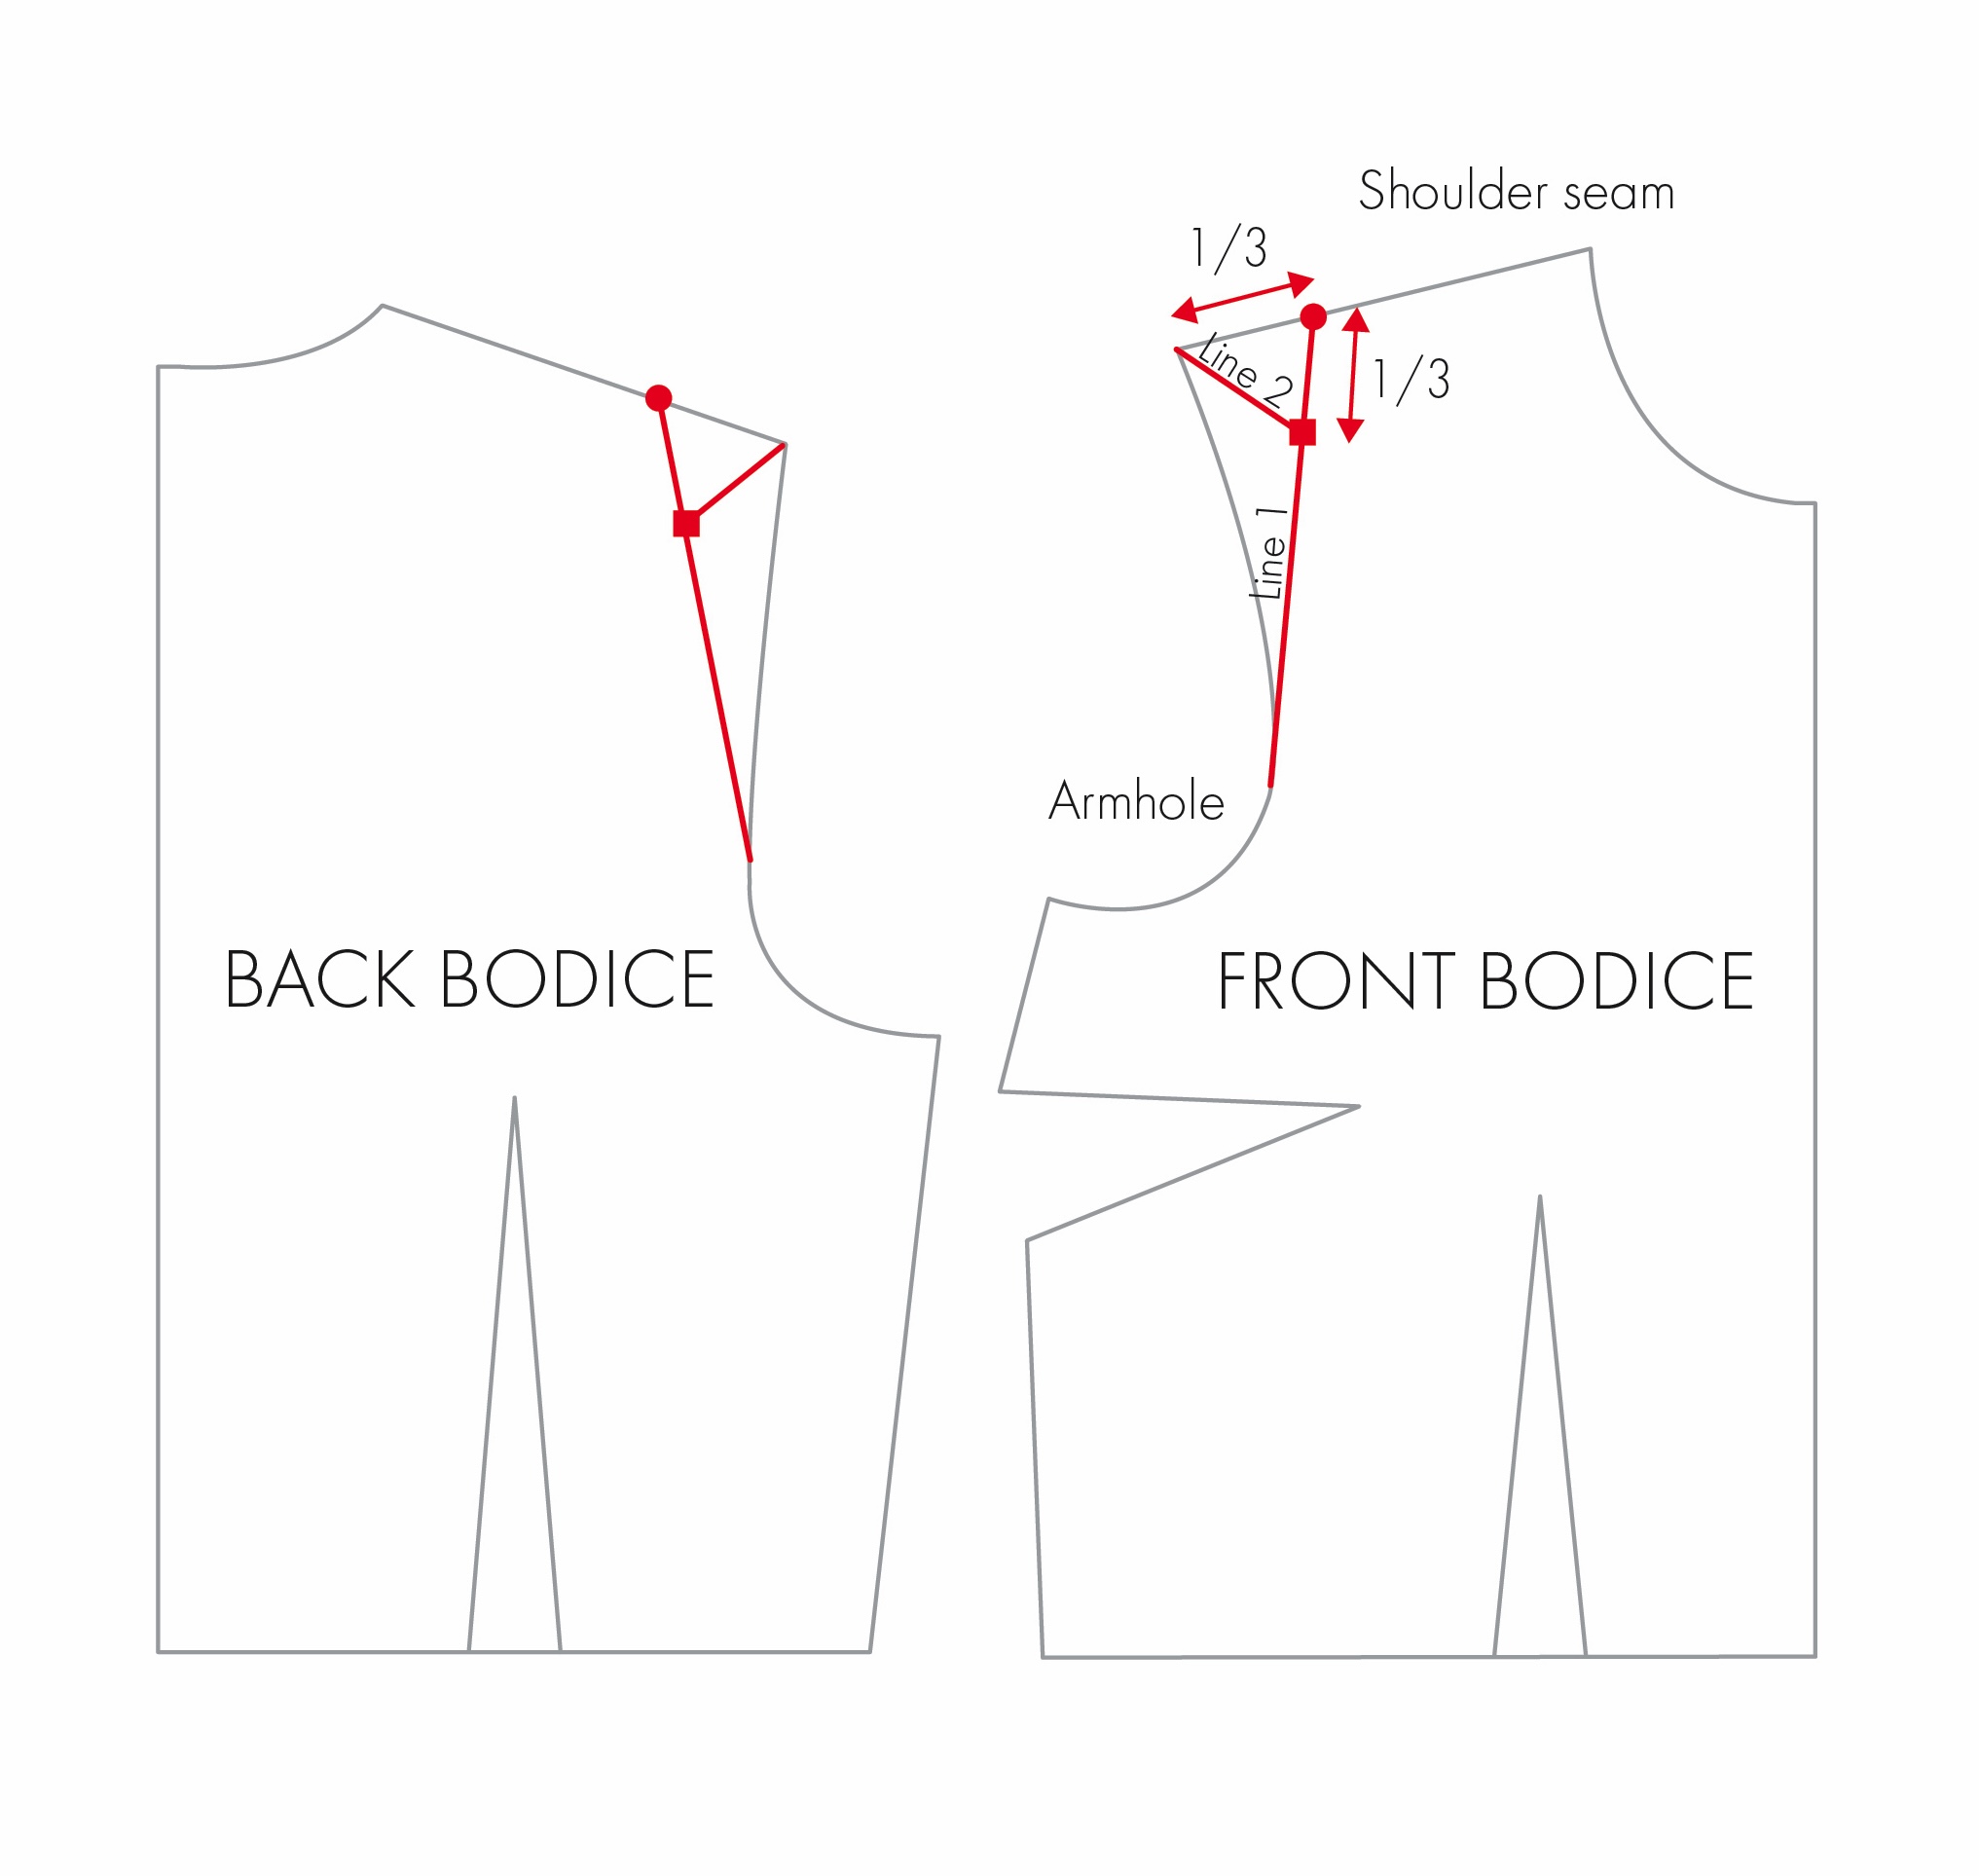
1. Divide the shoulder seam into thirds.
2. Draw a line from the shoulder seam, starting at the point marking the third that is closest to the armhole (refer to red dot), down to the armhole. I will refer to this as line 1.
3. Divide line 1 into thirds as well.
4. Draw another line, starting at the point marking the top third, closest to the shoulder seam (refer to red square), up to the shoulder point. This will be line 2.
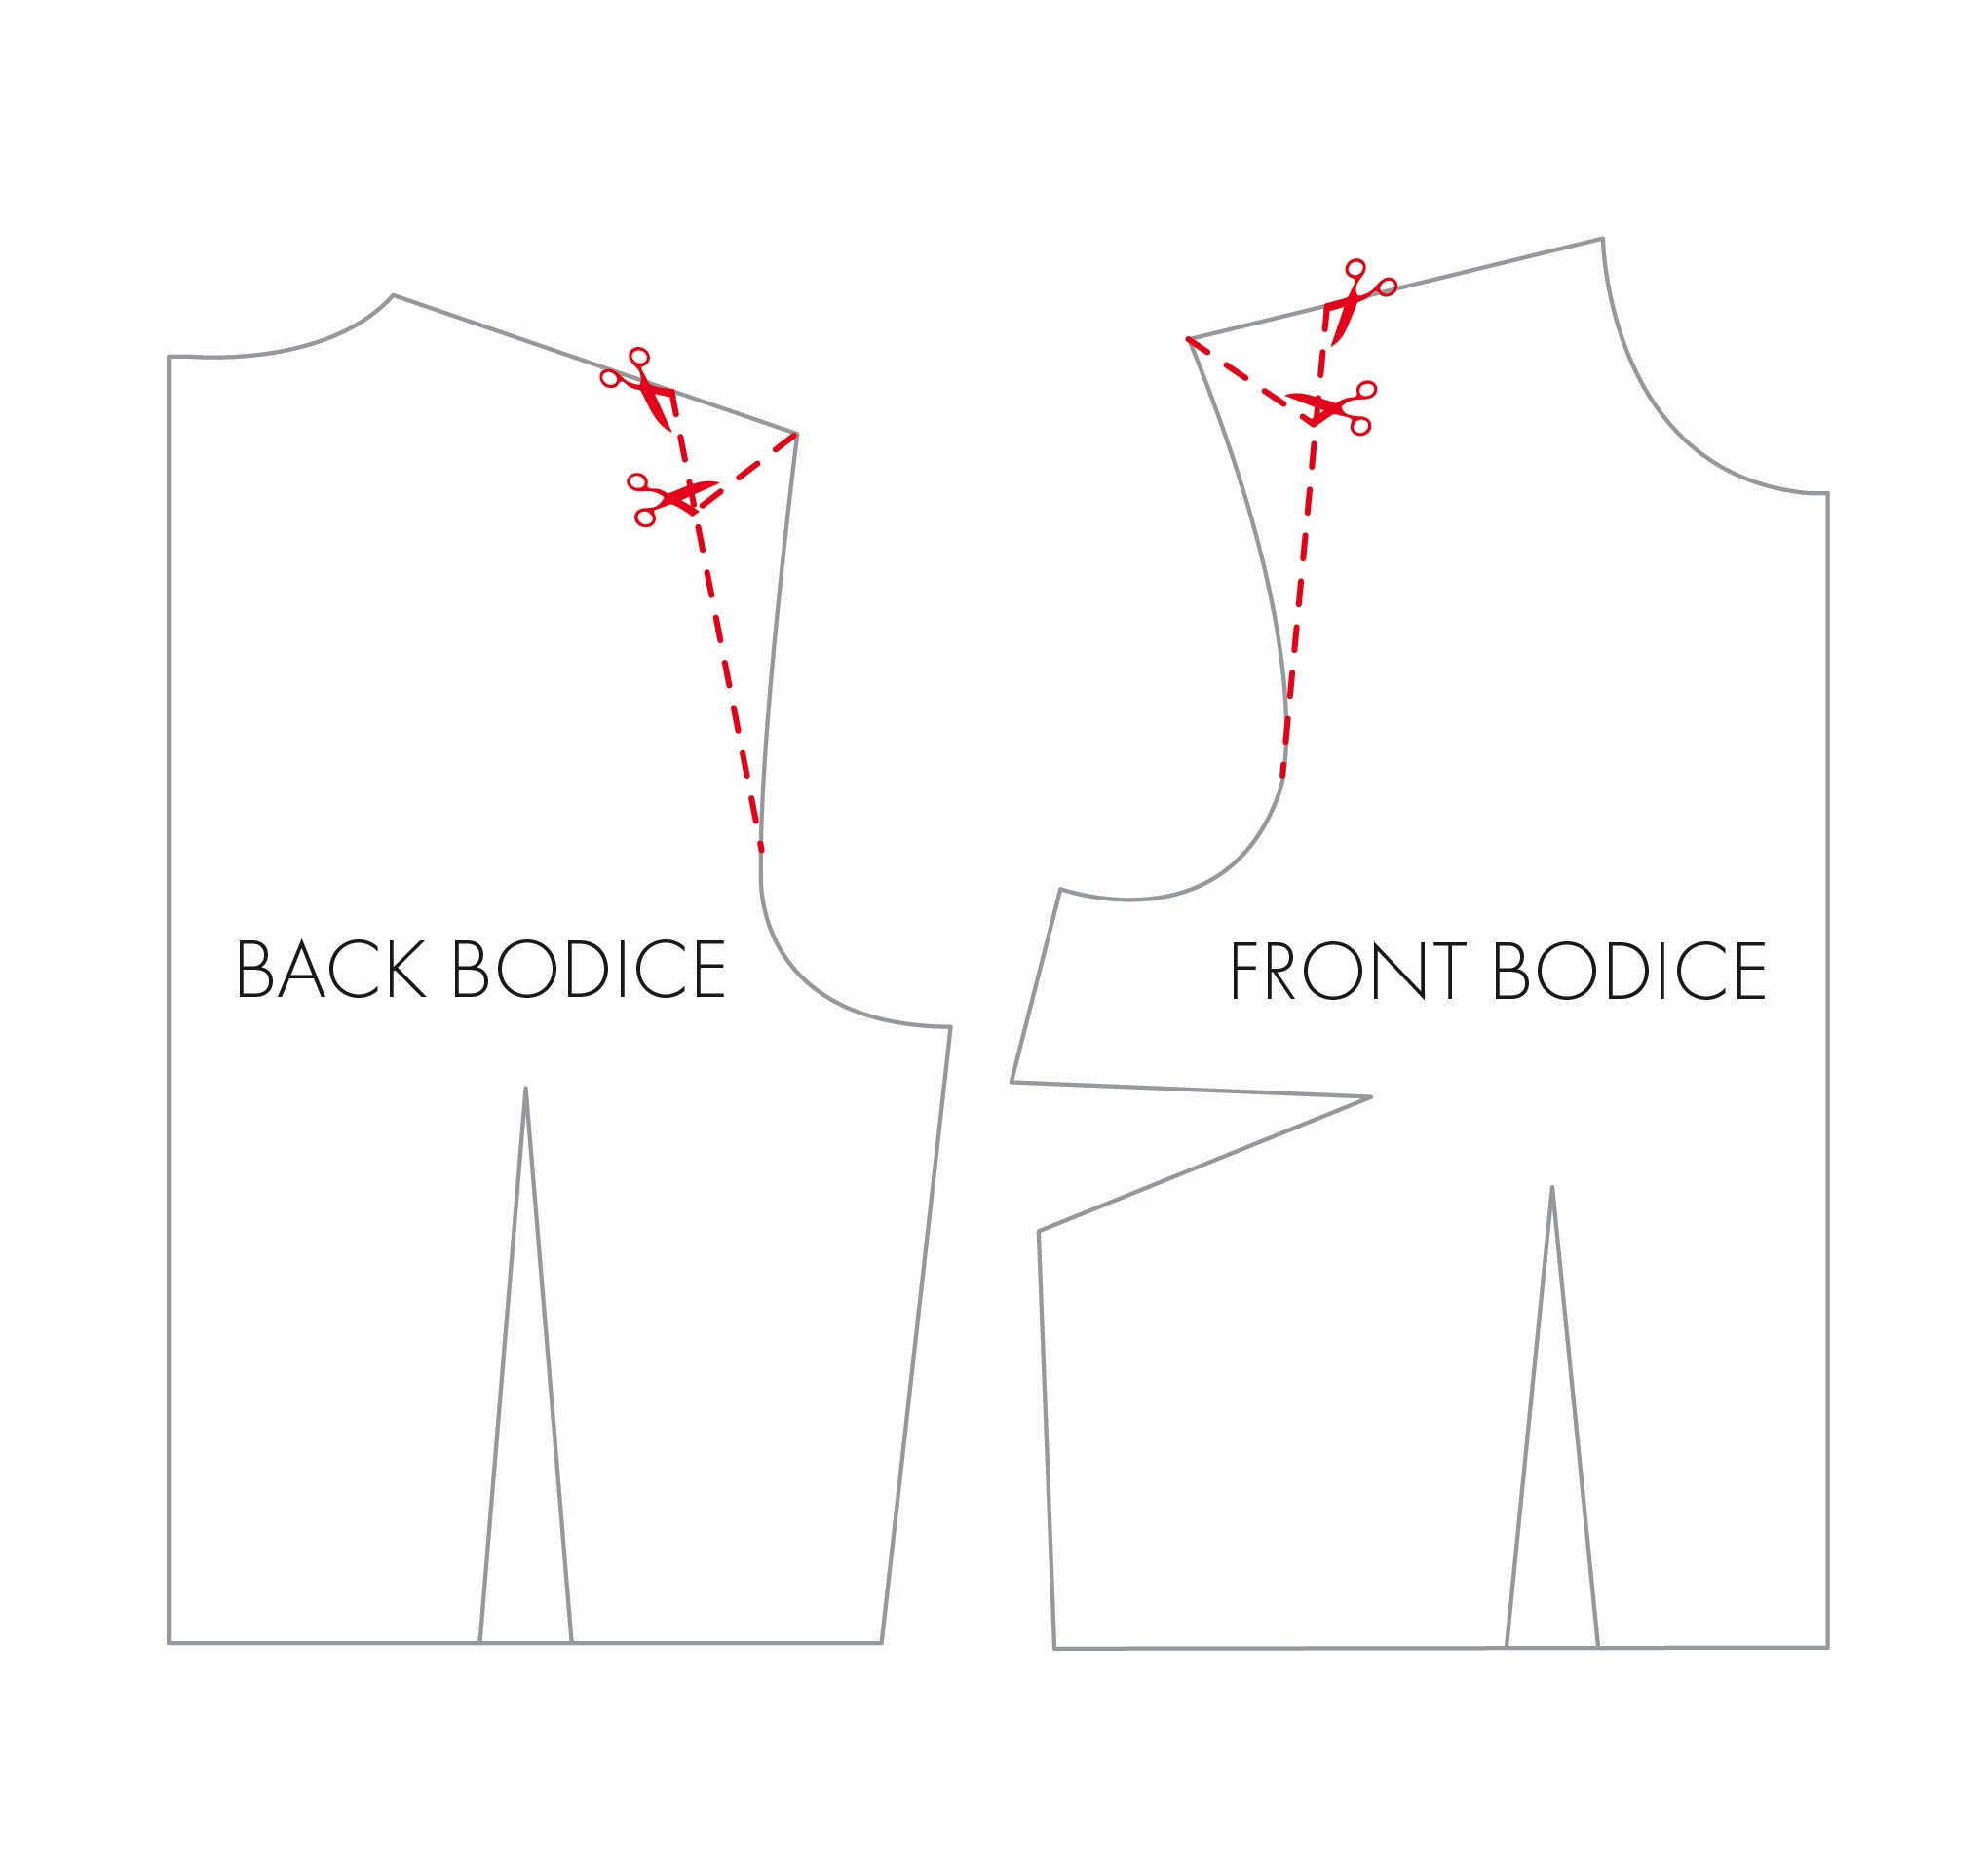
5. Cut along line 1, starting at the shoulder seam and stopping just short of the armhole, leaving a small hinge.
6. Cut along line 2, stopping just short of the shoulder point, again leaving a small hinge.
7. Overlap the shoulder seam the required amount as identified on the toile, making the shoulder seam shorter. This will likely open up line 2.
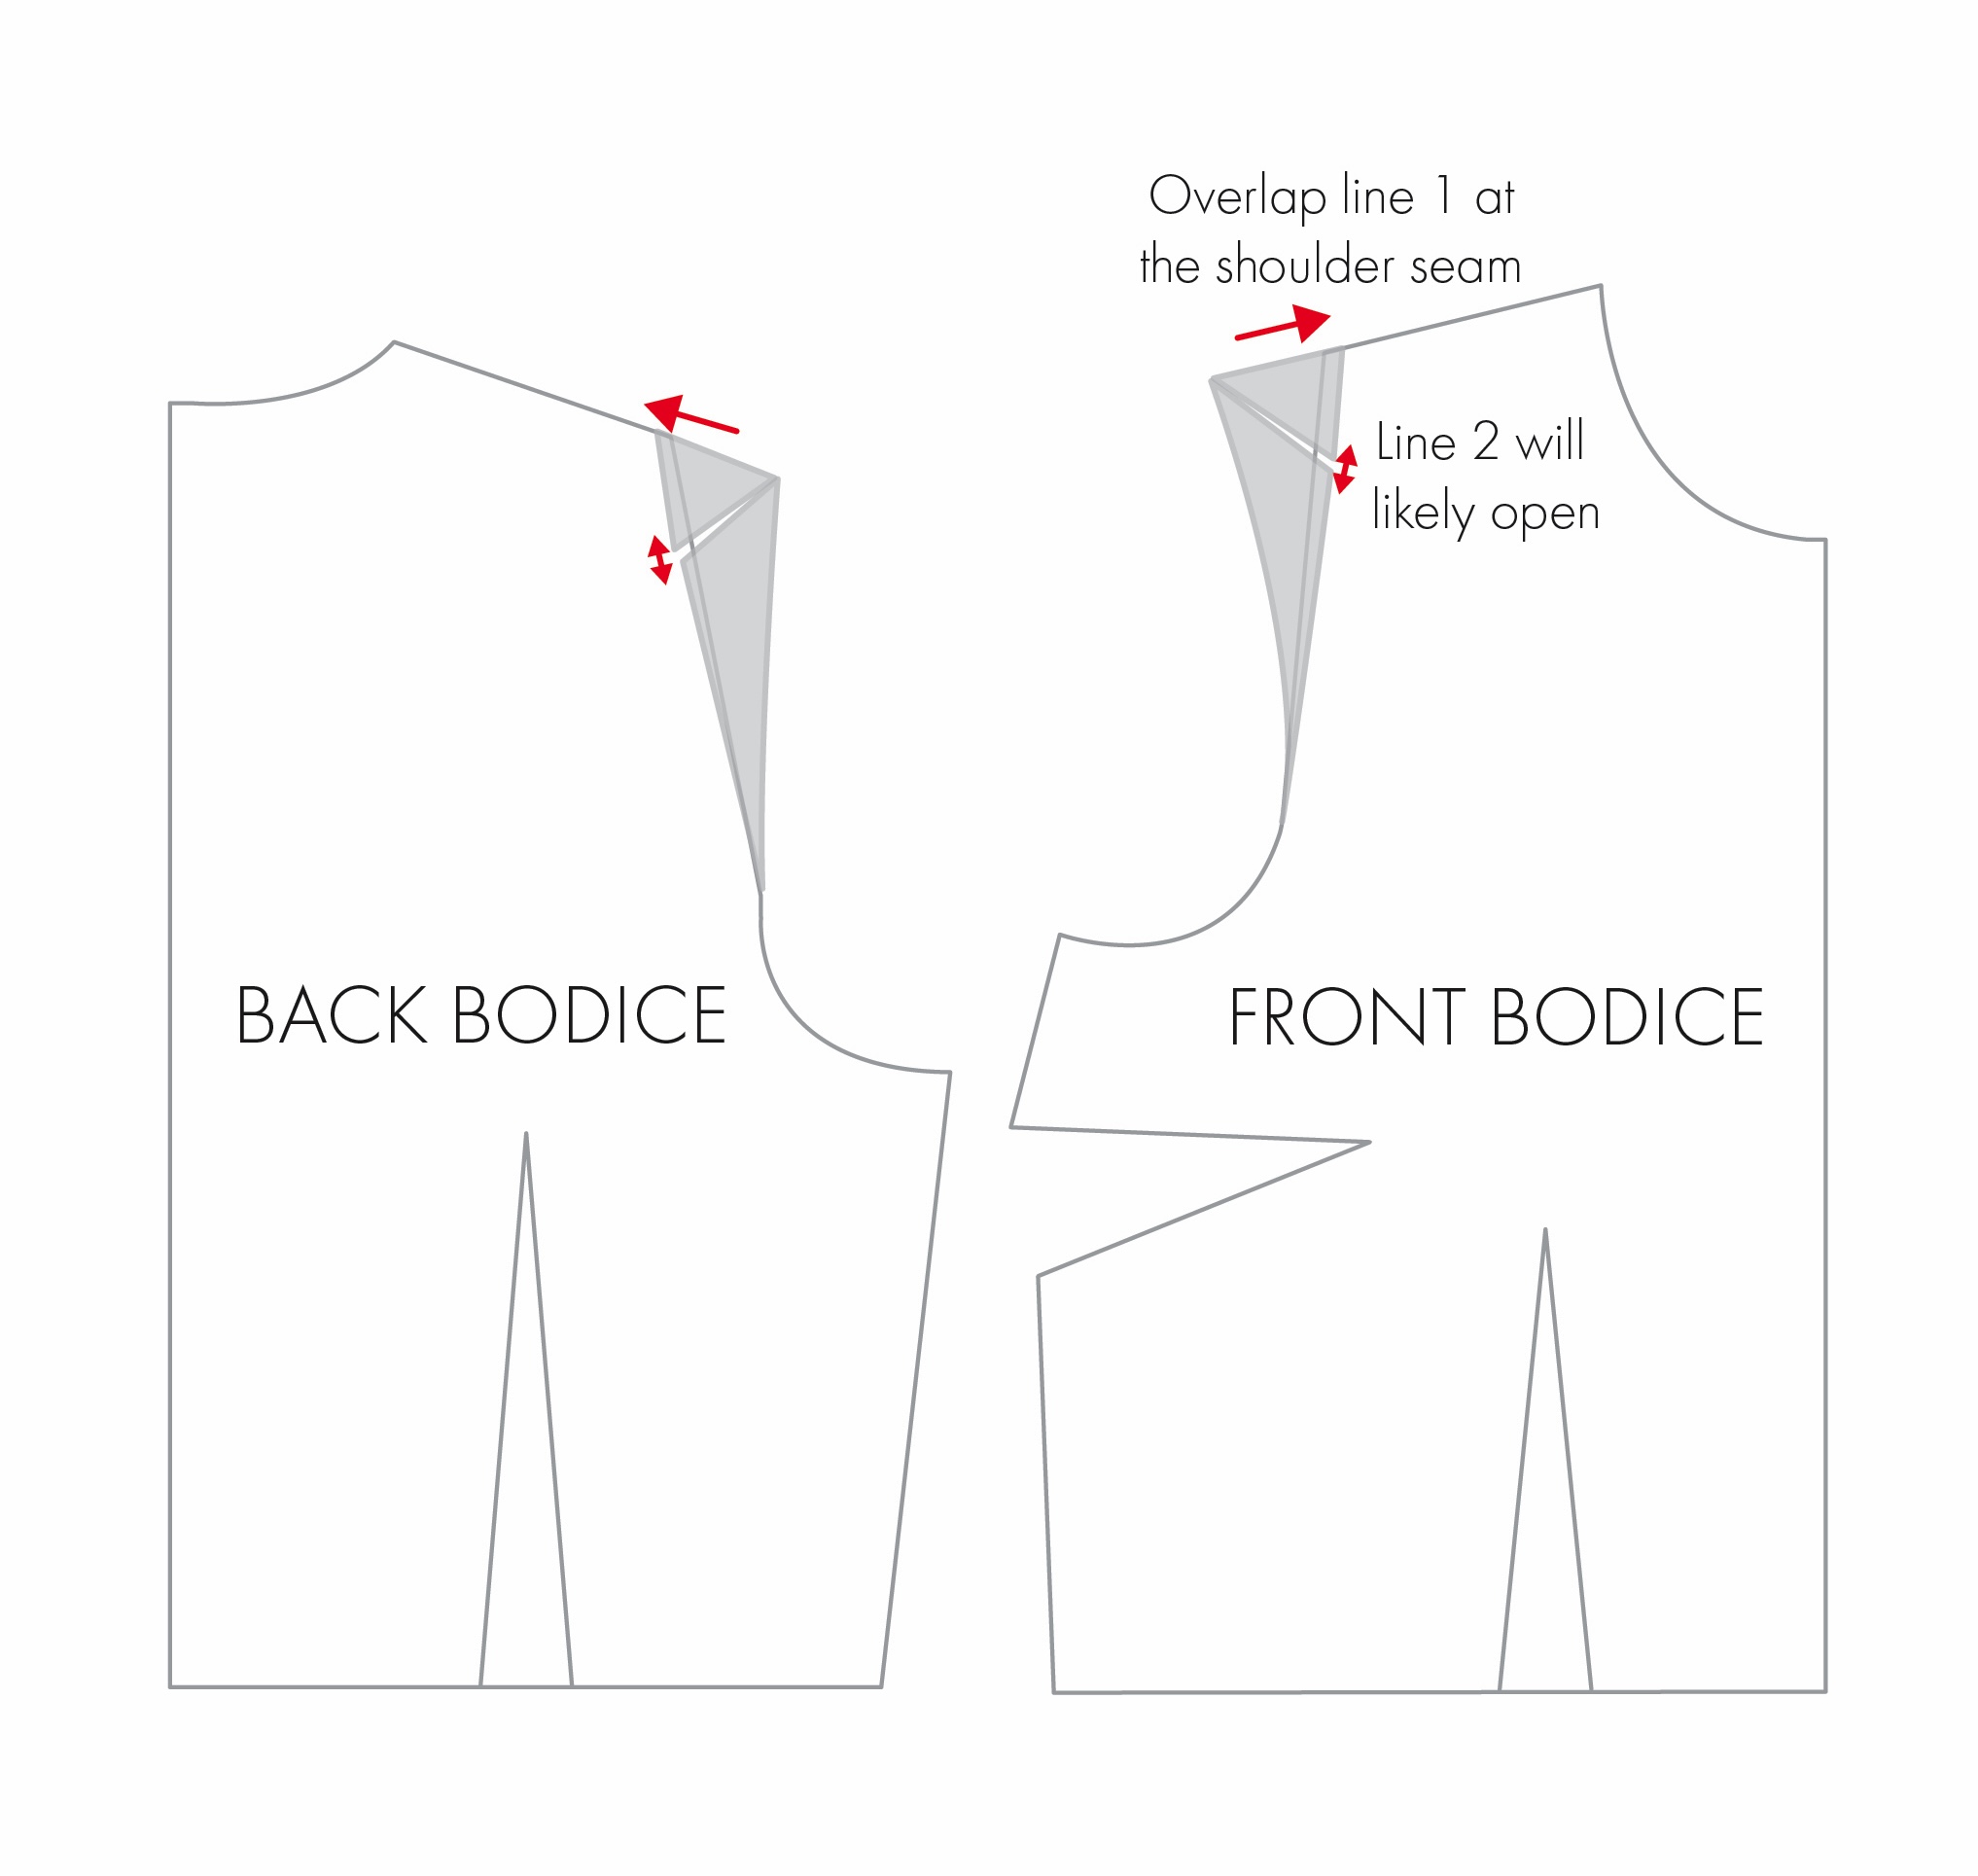
8. Blend and smooth the shoulder seam and armhole if required.
For more on blending and smoothing sewing patterns, read my articles ‘Checking, Blending, and Truing Your Sewing Patterns – Part 1’ and ‘Part 2’.
Option 2: Adjustment of more than 1cm
This method shortens the shoulder seam and maintains the original shoulder slope. However, it alters the armhole, meaning corresponding alterations will likely be needed to the sleeve head.
Again, the same adjustment is made to both the front and back pattern pieces.
I recommend reading my article ‘How to Adjust a Pattern for Sloping or Square Shoulders’ at this point. In particular, read the section about determining the original sleeve head ease, and adjusting the sleeve accordingly to maintain this amount of ease, as the same principles will need to be applied here.
1. Mark a point along the shoulder seam, in from the shoulder point, the required amount identified on the toile. Therefore, if 1.2cm was pinched out on the toile, come in from the shoulder point 1.2cm.
2. Draw a line from the point marked in step 1 down to the armhole, following a similar curve. Again, use the toile to determine how far down the armhole to come.
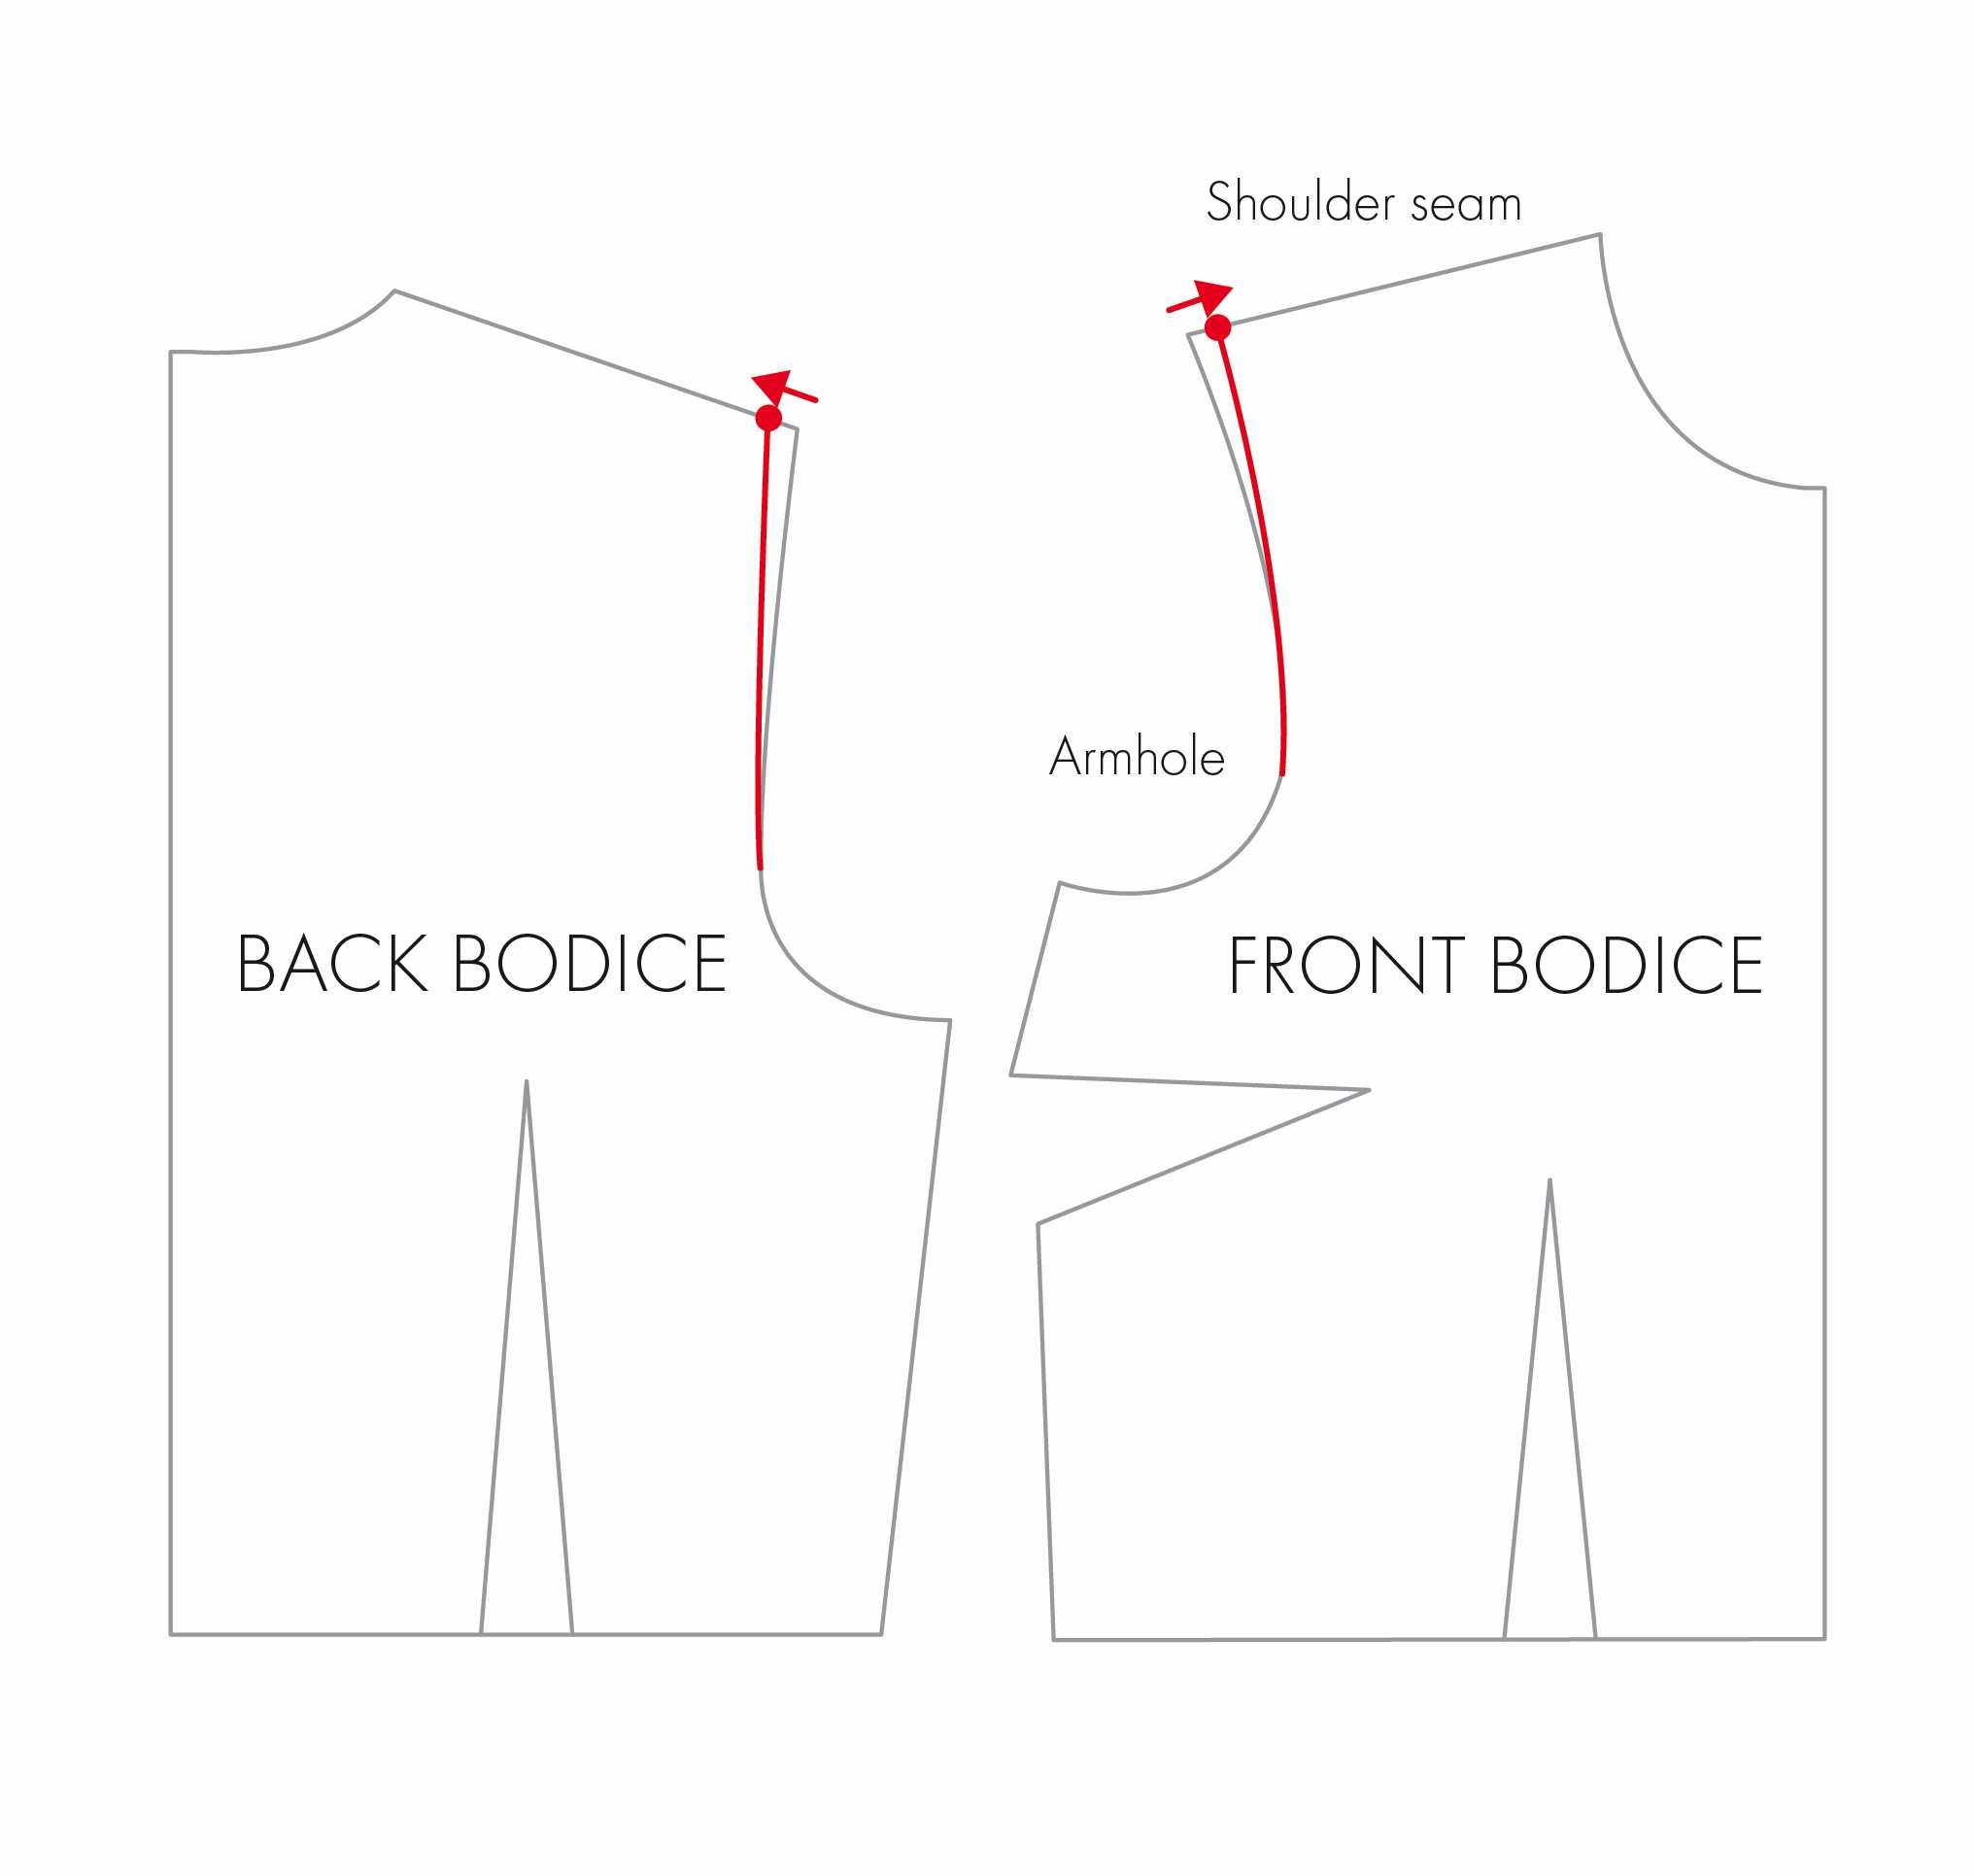
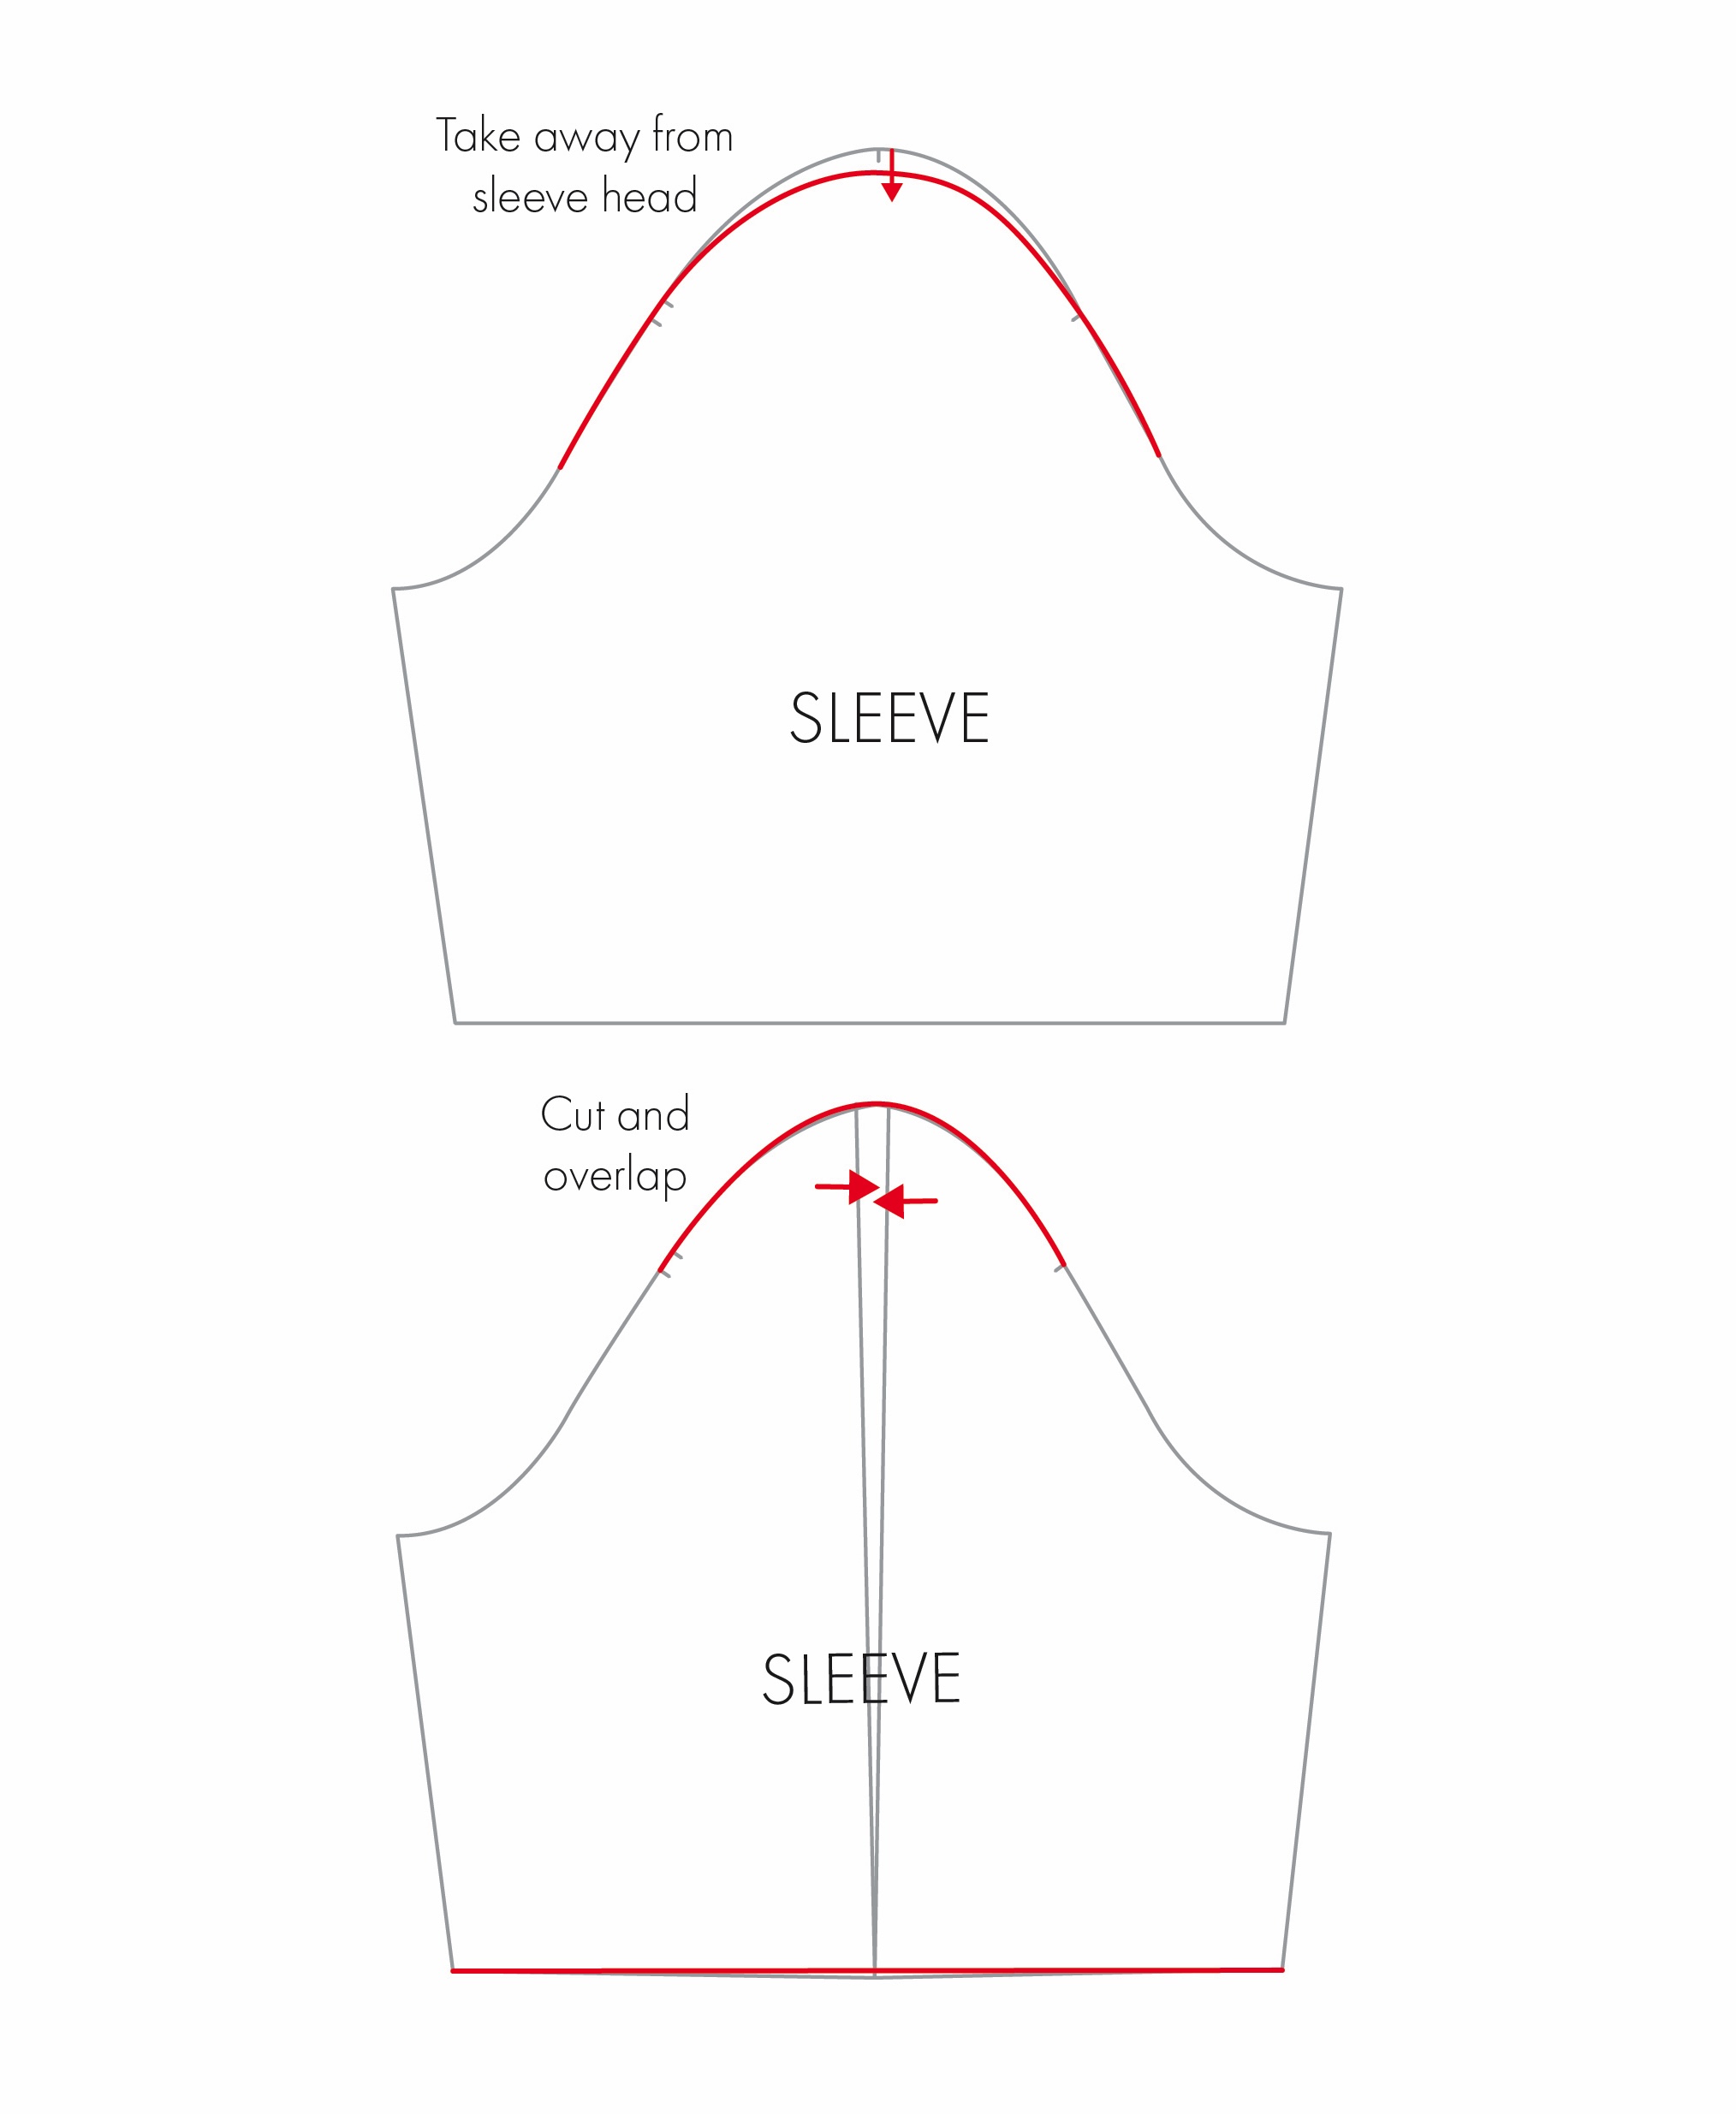
3. Adjust the sleeve head to accommodate the new armhole if necessary, maintaining the same amount of ease as the original. Depending on the fit and style of sleeve, this could be done by simply adding to the sleeve head, or cutting and spreading.
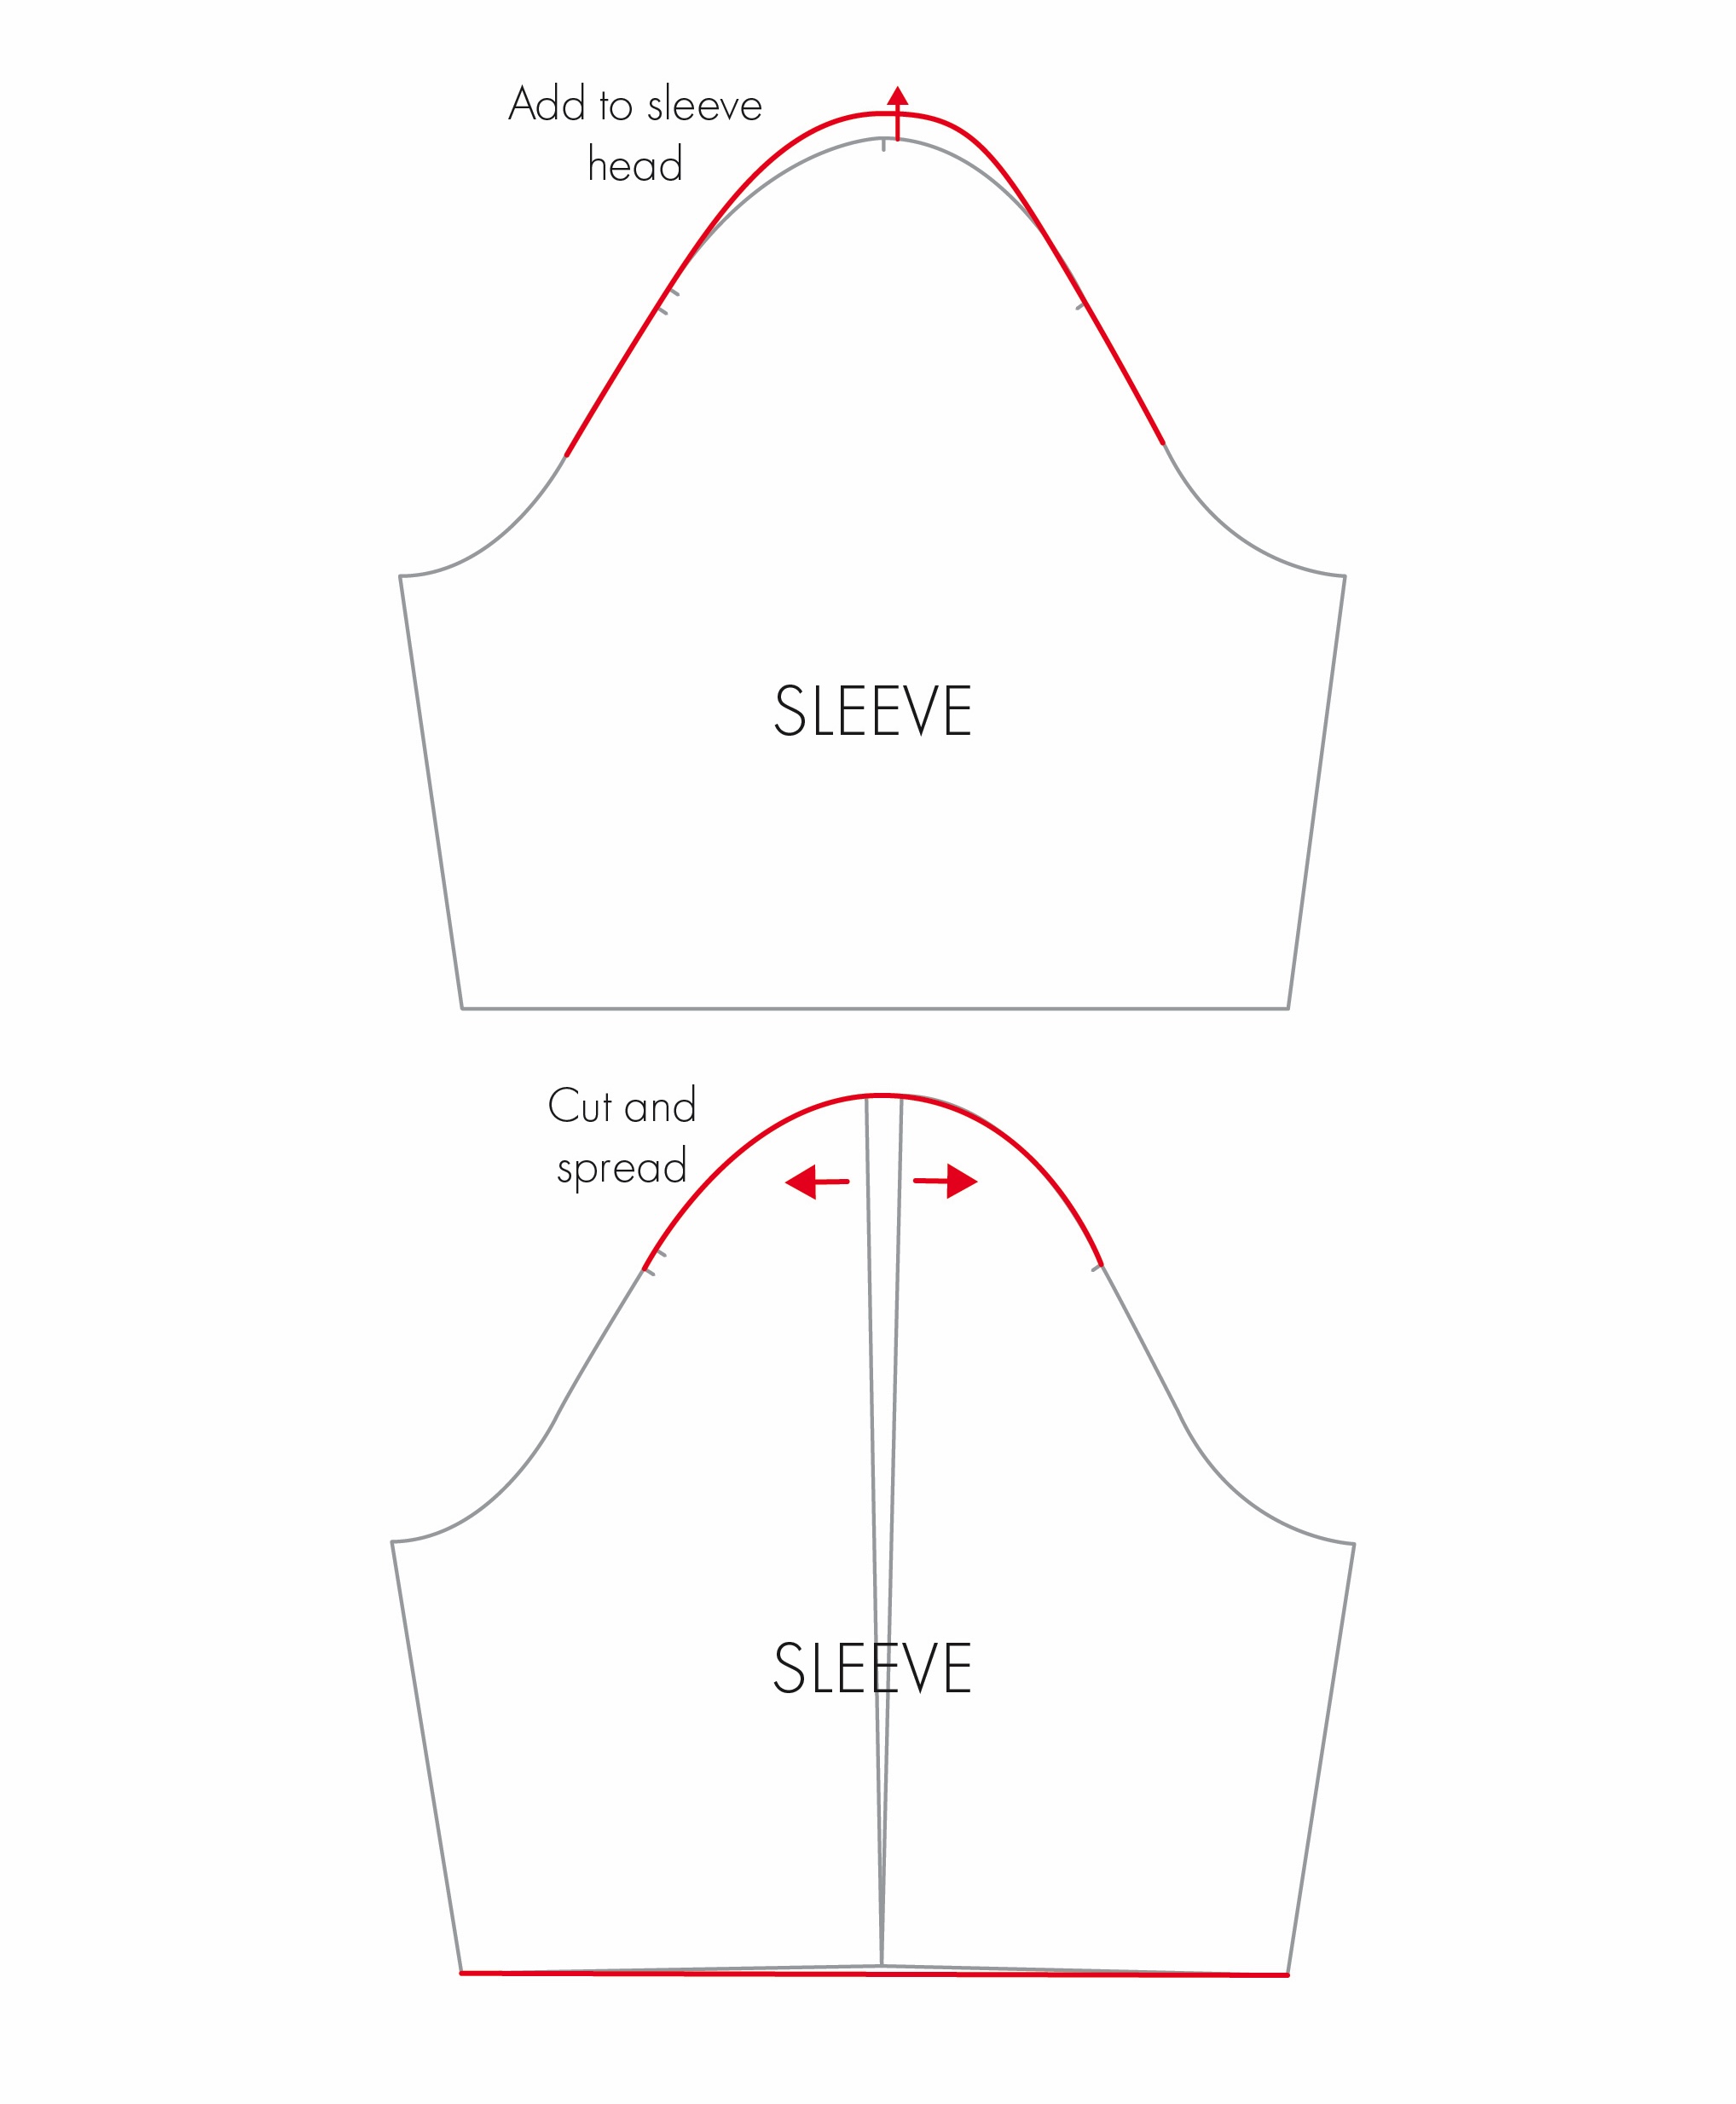
For more on the method of cutting and spreading, take a read of ‘An Introduction to the Cut and Spread Method’.
Reason 2: Shoulder seam is too short, sitting too far in
What this looks and feels like:
The shoulder seam sits inwards from the shoulder point. It may appear as if the armhole or sleeve is creeping inwards, up along the shoulder, looking too small. The garment may feel a little tight around the shoulders and armpit, and there may be draglines where the fabric is pulling. You may also find that the sleeves become a little shorter than intended.
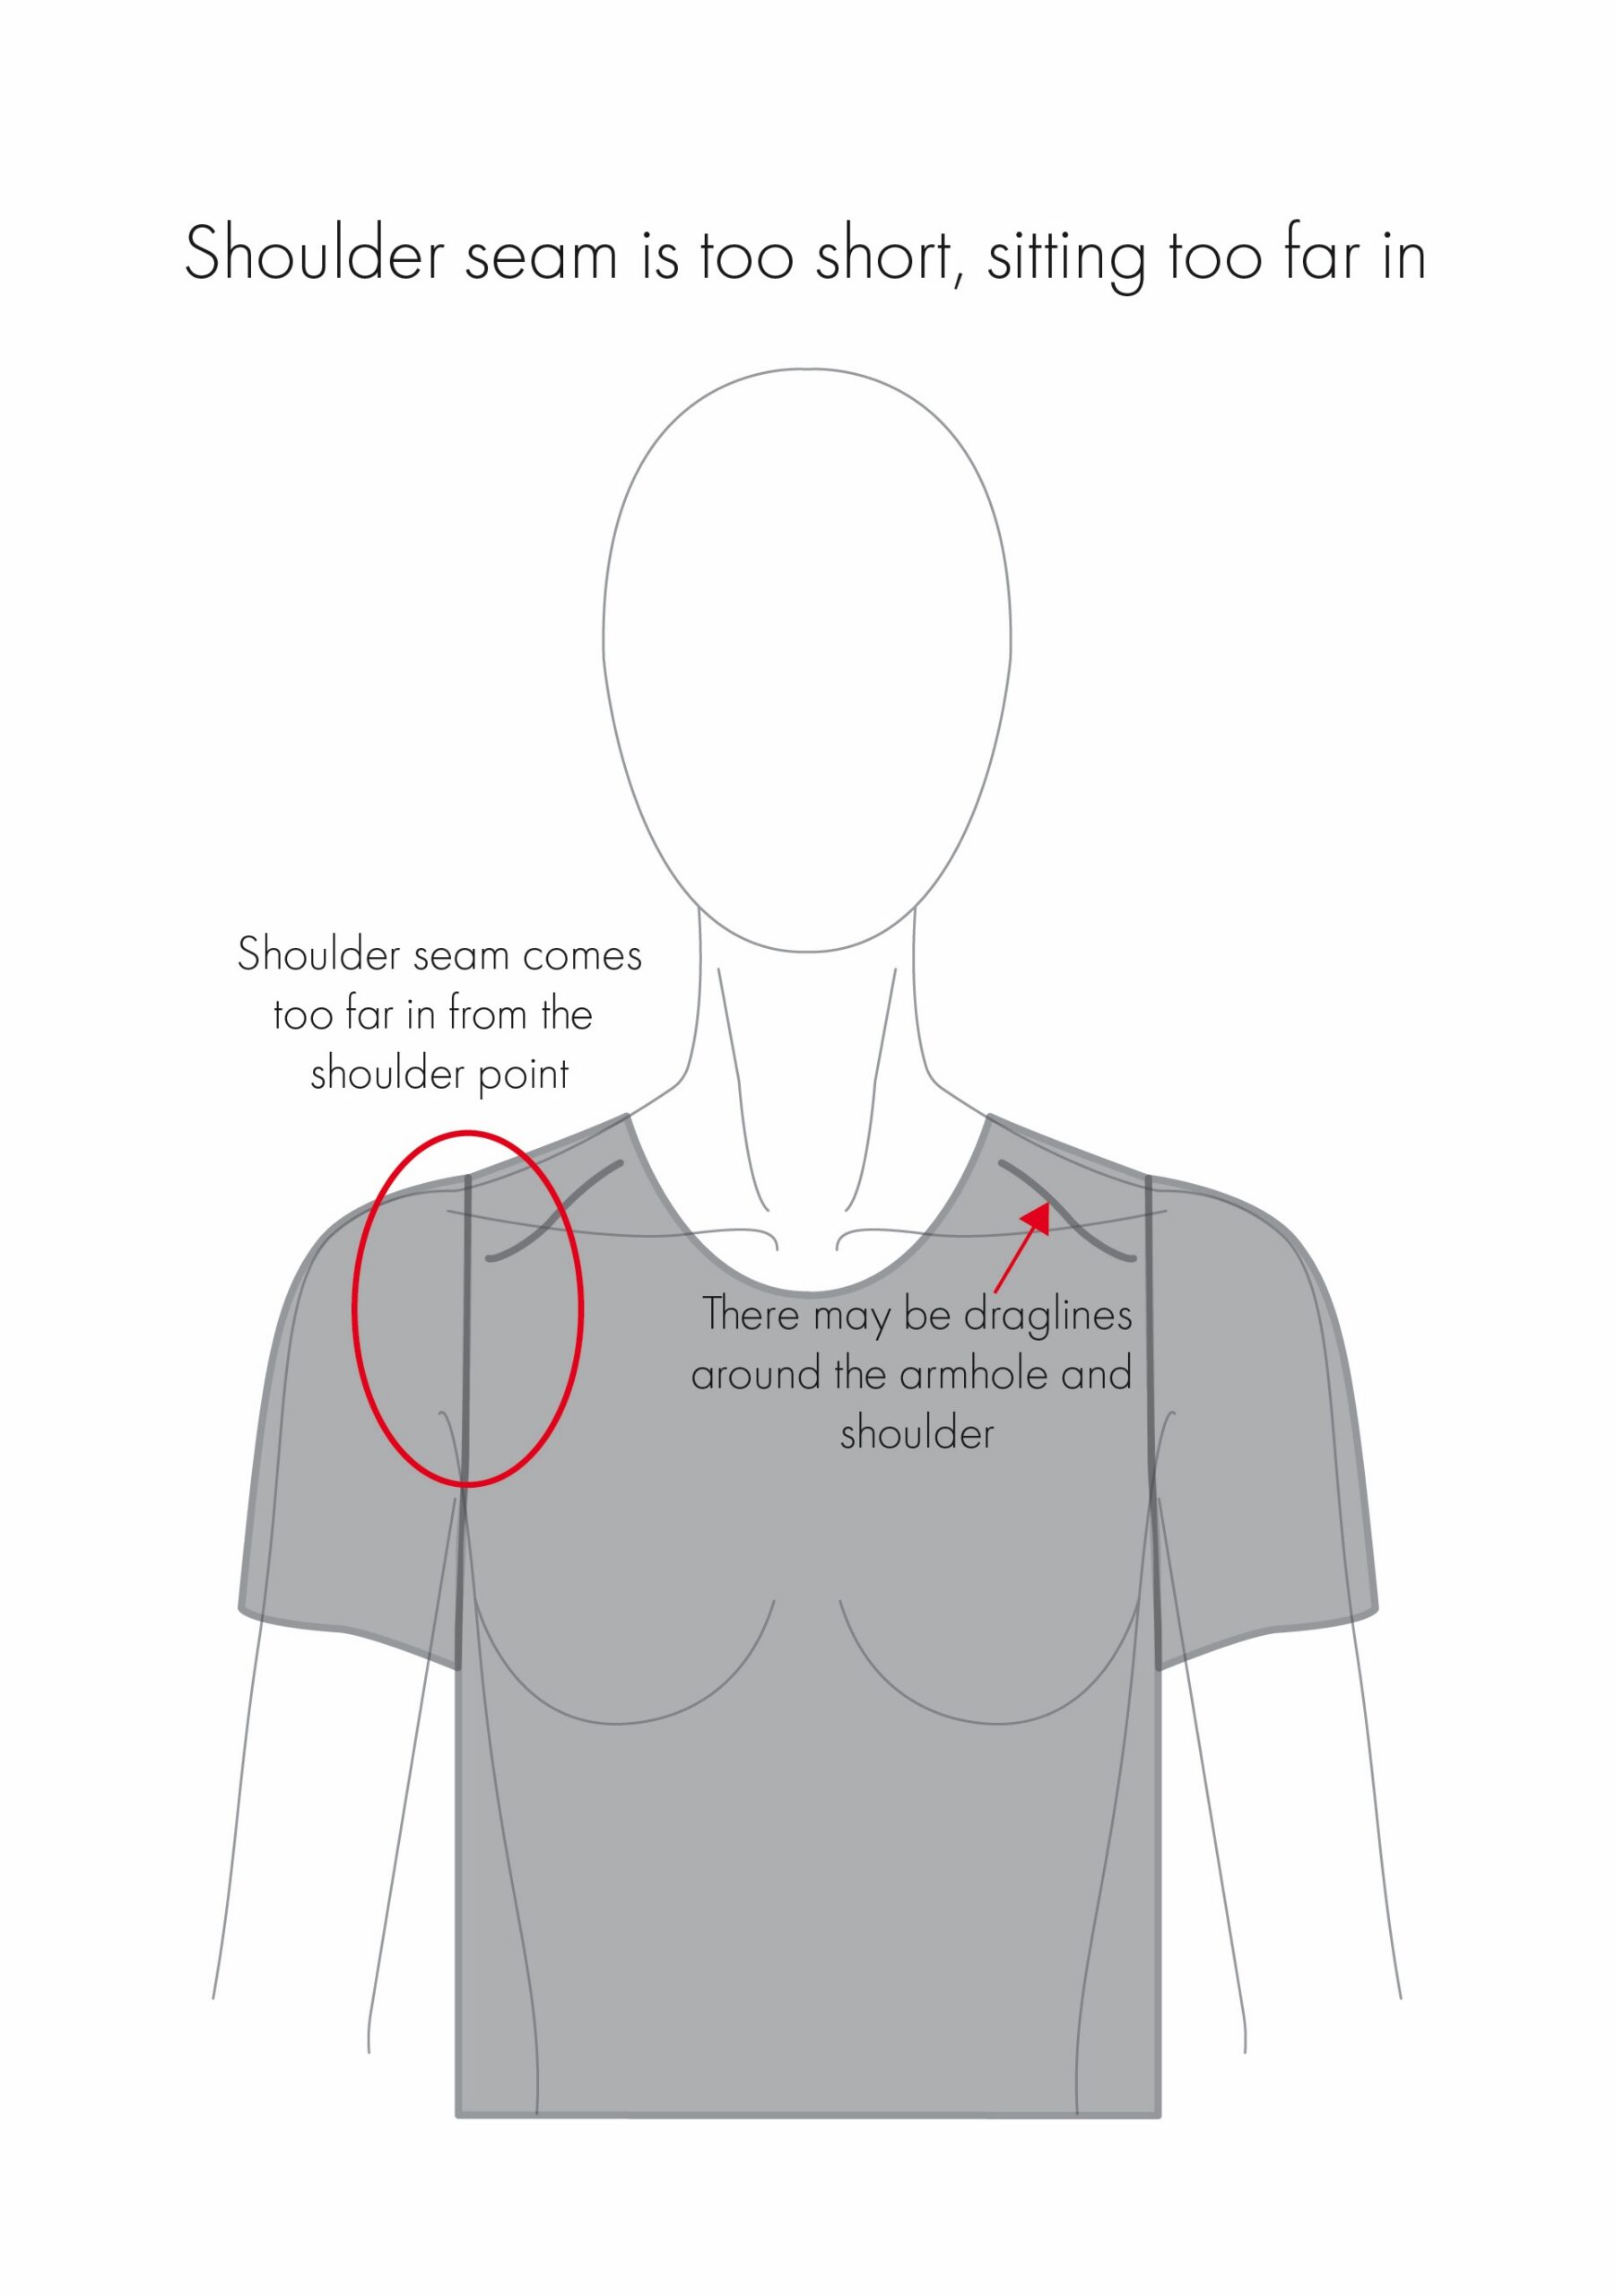
Why might this happen?
The shoulder seam on the pattern may be too short for the wearer’s actual shoulder measurement. This may be because the wearer has broader shoulders than the pattern was designed for.
How to adjust the toile:
1. Cut or unpick the toile around the top of the armhole.
2. Allow the seam to naturally separate at the armhole, lengthening the shoulder seam until the shoulder sits in the desired position.
3. Secure the opening. To do this you can either:
-
- Pin or tape a piece of fabric or paper behind the opening to bridge the gap.
- Apply tape across the opening at various points, aligning the tape on both the inside and outside of the toile, anchoring one side to the other.
4. Measure how much the seam has separated.
How to adjust the pattern:
A broad shoulder adjustment will lengthen the shoulder seam. The same two options as for a narrow shoulder adjustment can be used here but in reverse.
Option 1: Adjustment of less than 1cm
1. Repeat steps 1-6 from the narrow shoulder adjustment outlined above.
2. Open the shoulder seam the required amount as identified on the toile, making the shoulder seam longer. This will likely cause line 2 to overlap.
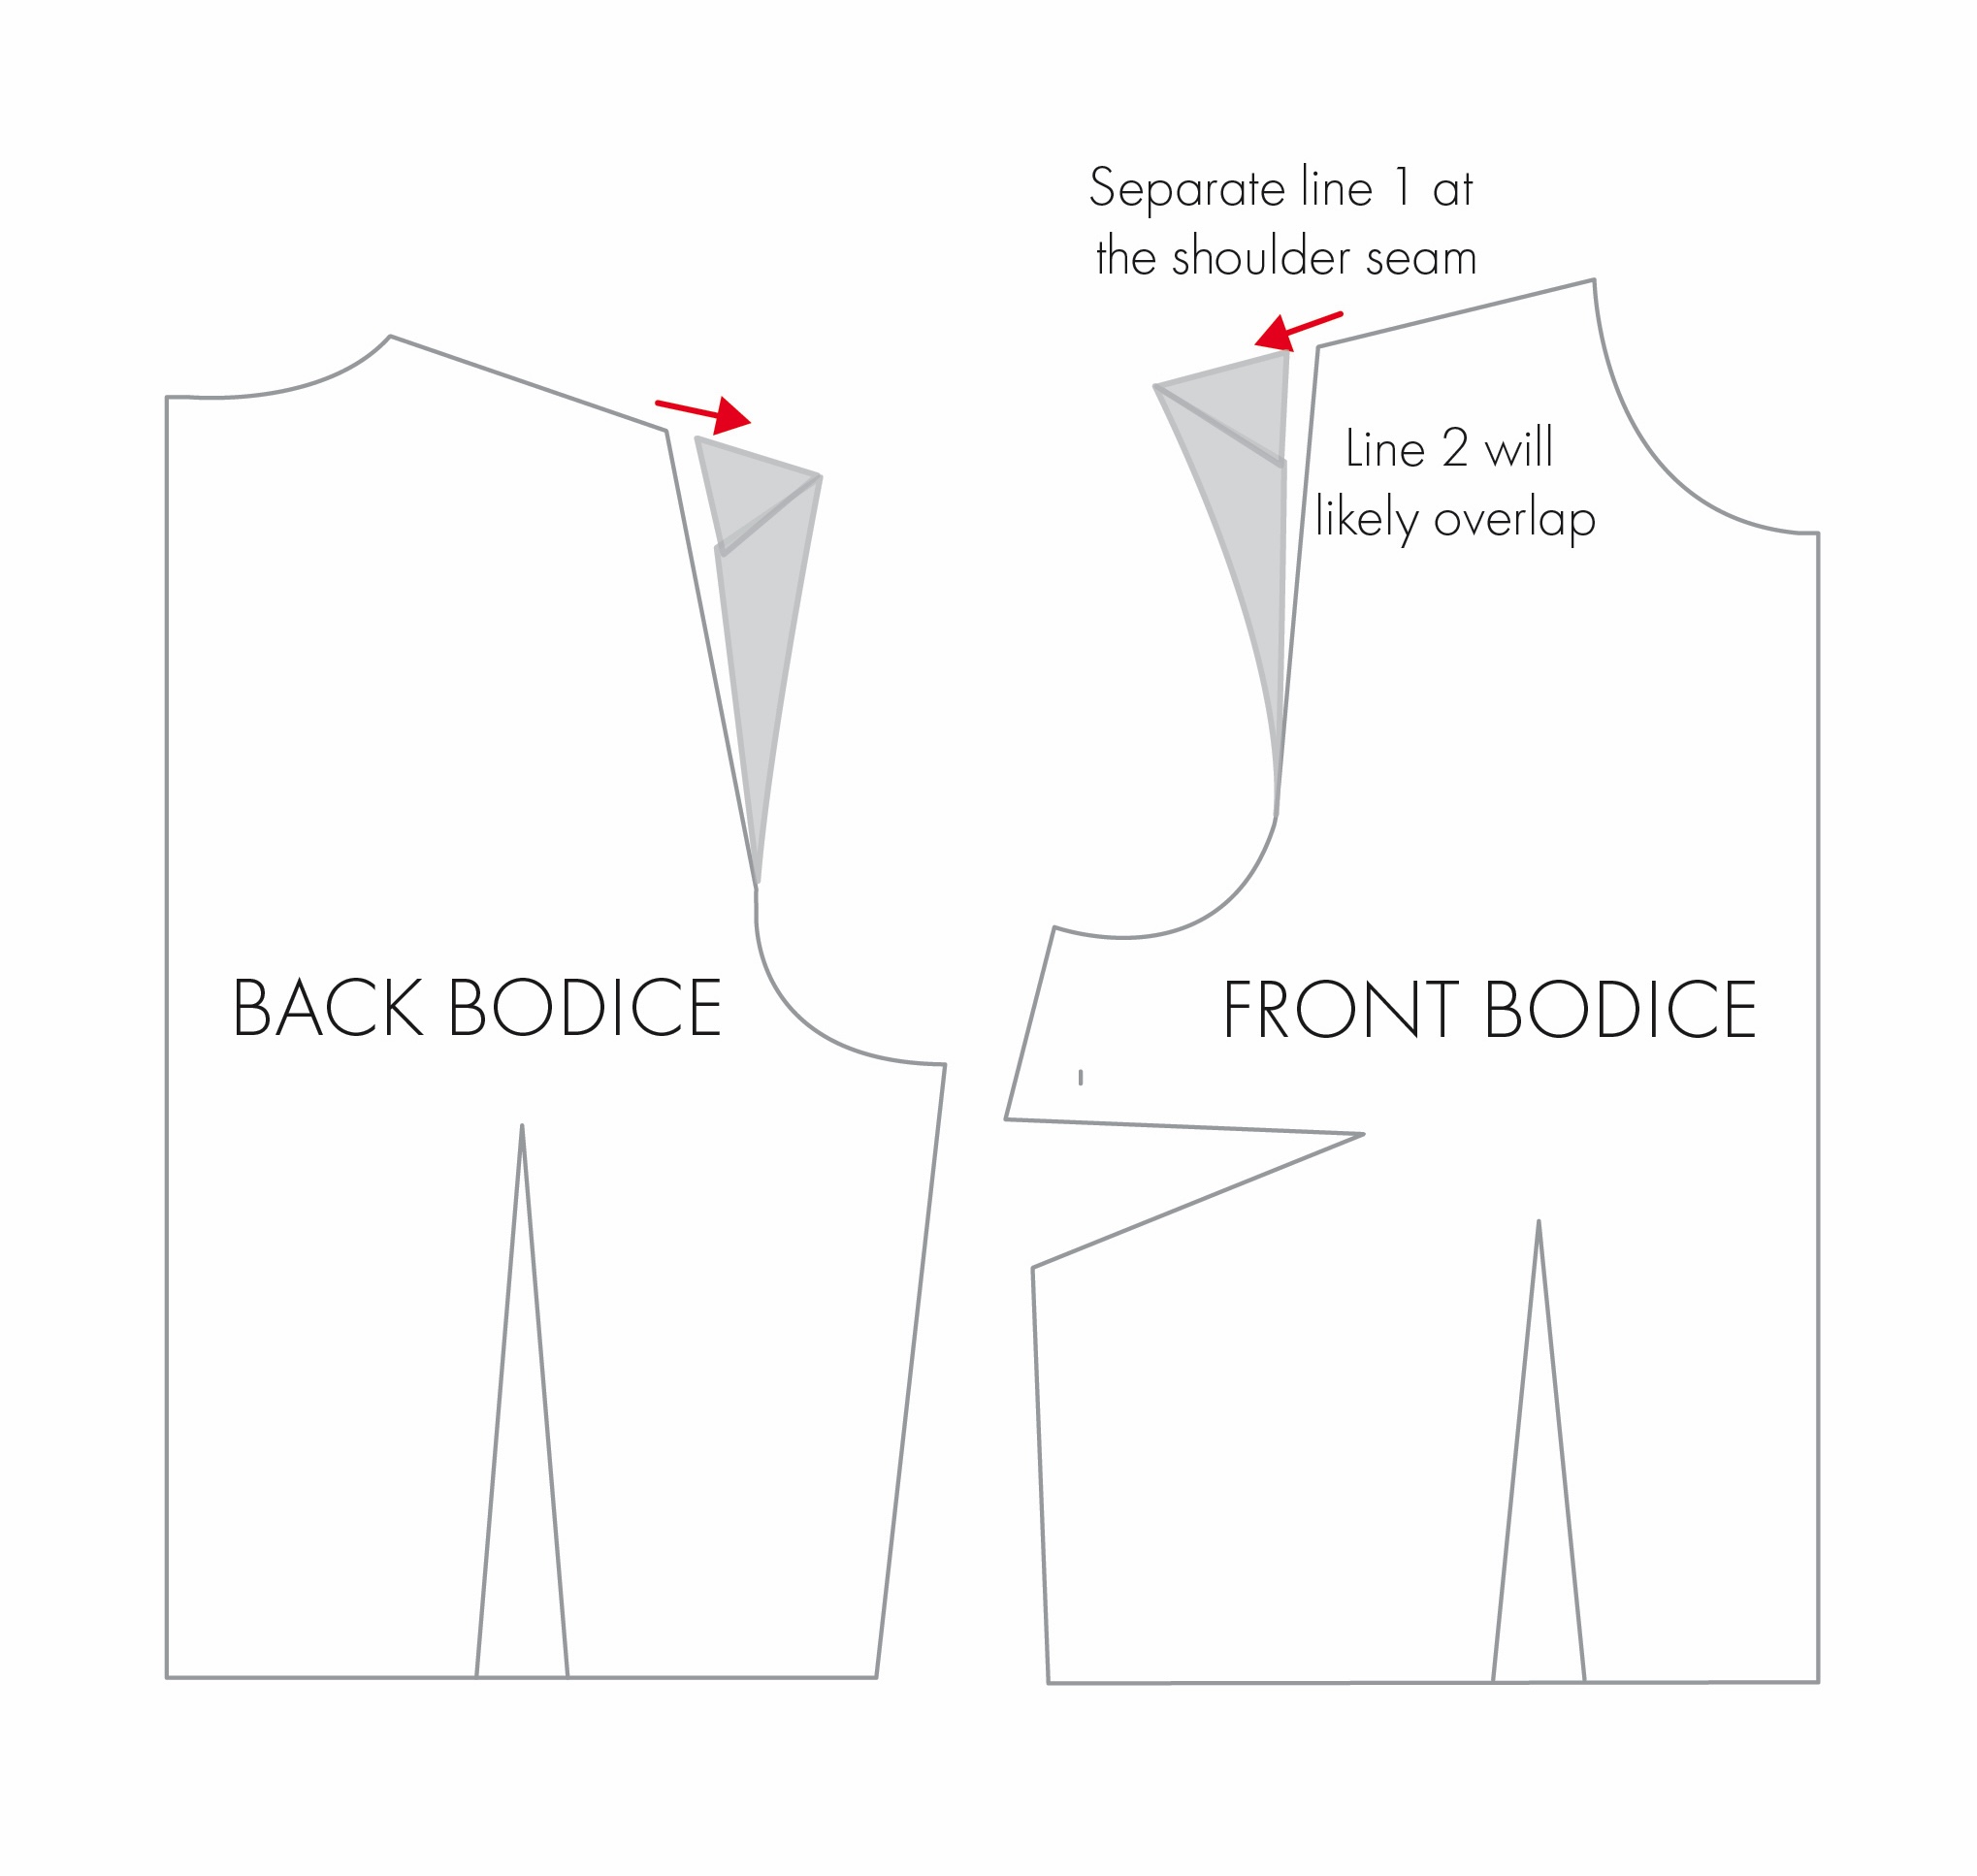
3. Blend and smooth the new shoulder seam and armhole if required.
Option 2: Adjustment of more than 1cm
1. Determining the original sleeve head ease.
2. Mark a point out from the shoulder seam the required amount identified on the toile. If the seam was separated by 1.2cm on the toile, come out from the shoulder point 1.2cm.
3. Draw a line from the point marked in step 1 down to the armhole, following a similar curve. Again, use the toile to determine how far down the armhole to come.
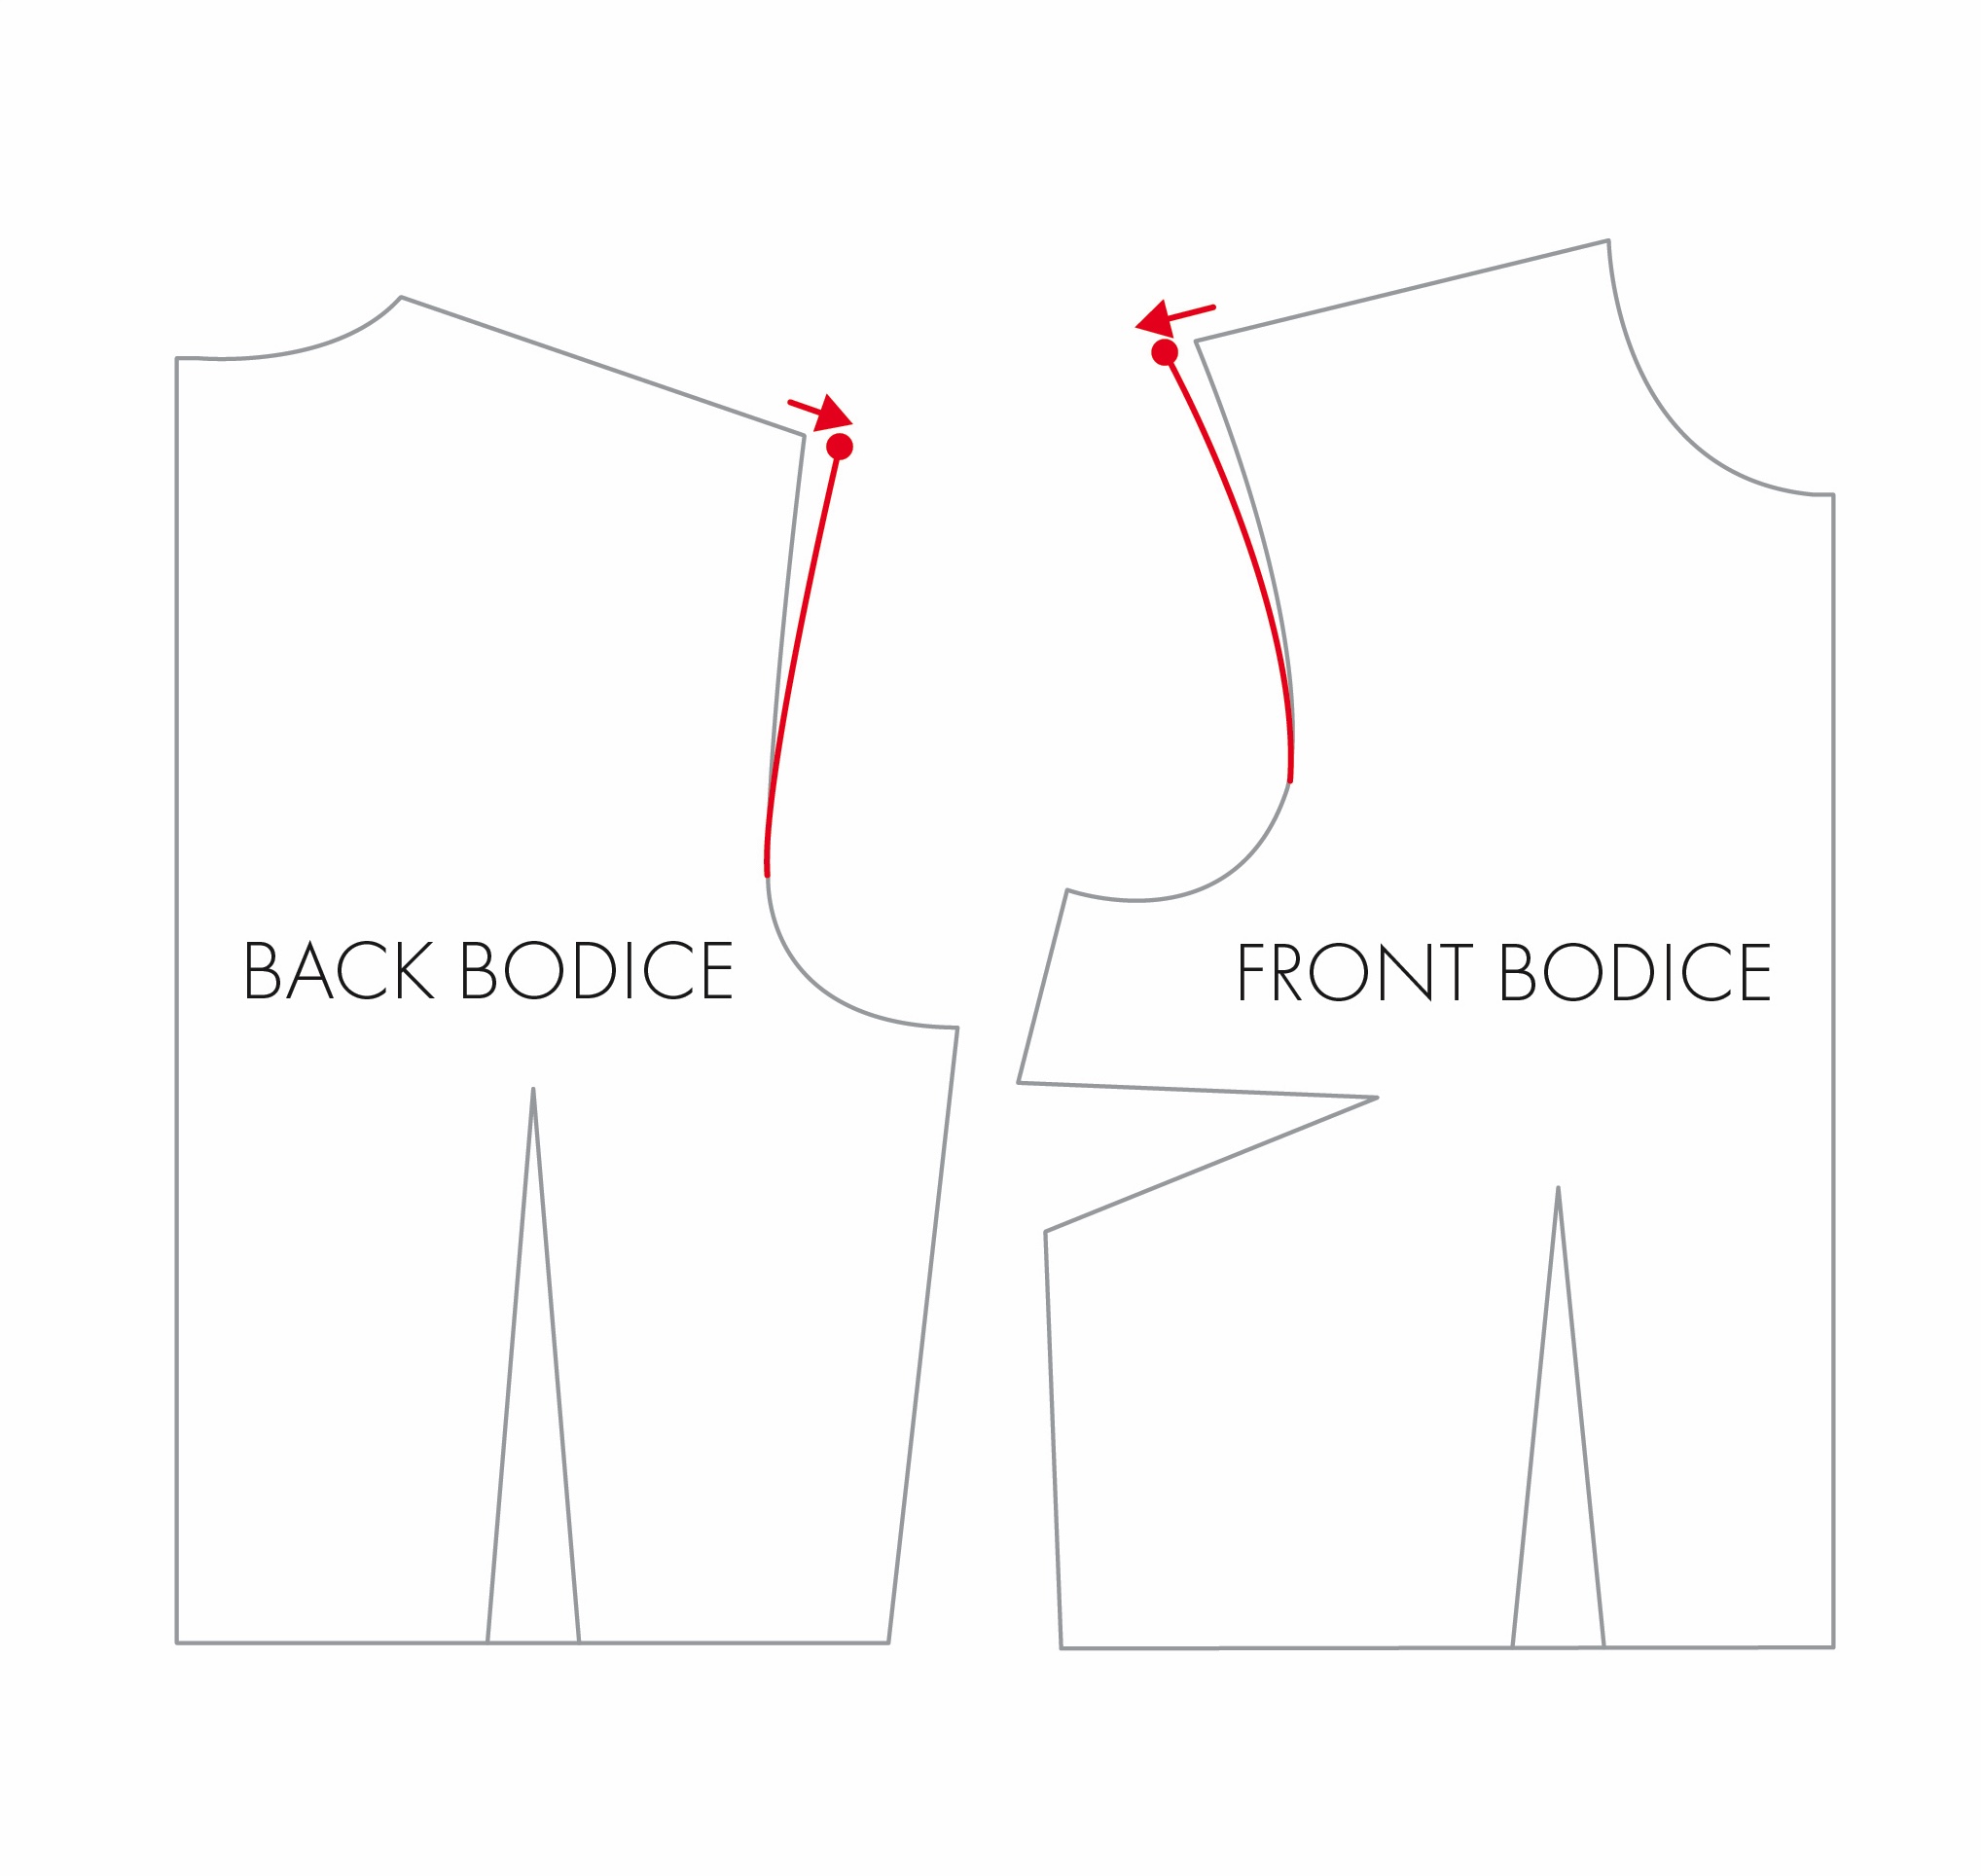
4. Adjust the sleeve head to accommodate the new armhole if necessary, maintaining the same amount of ease.
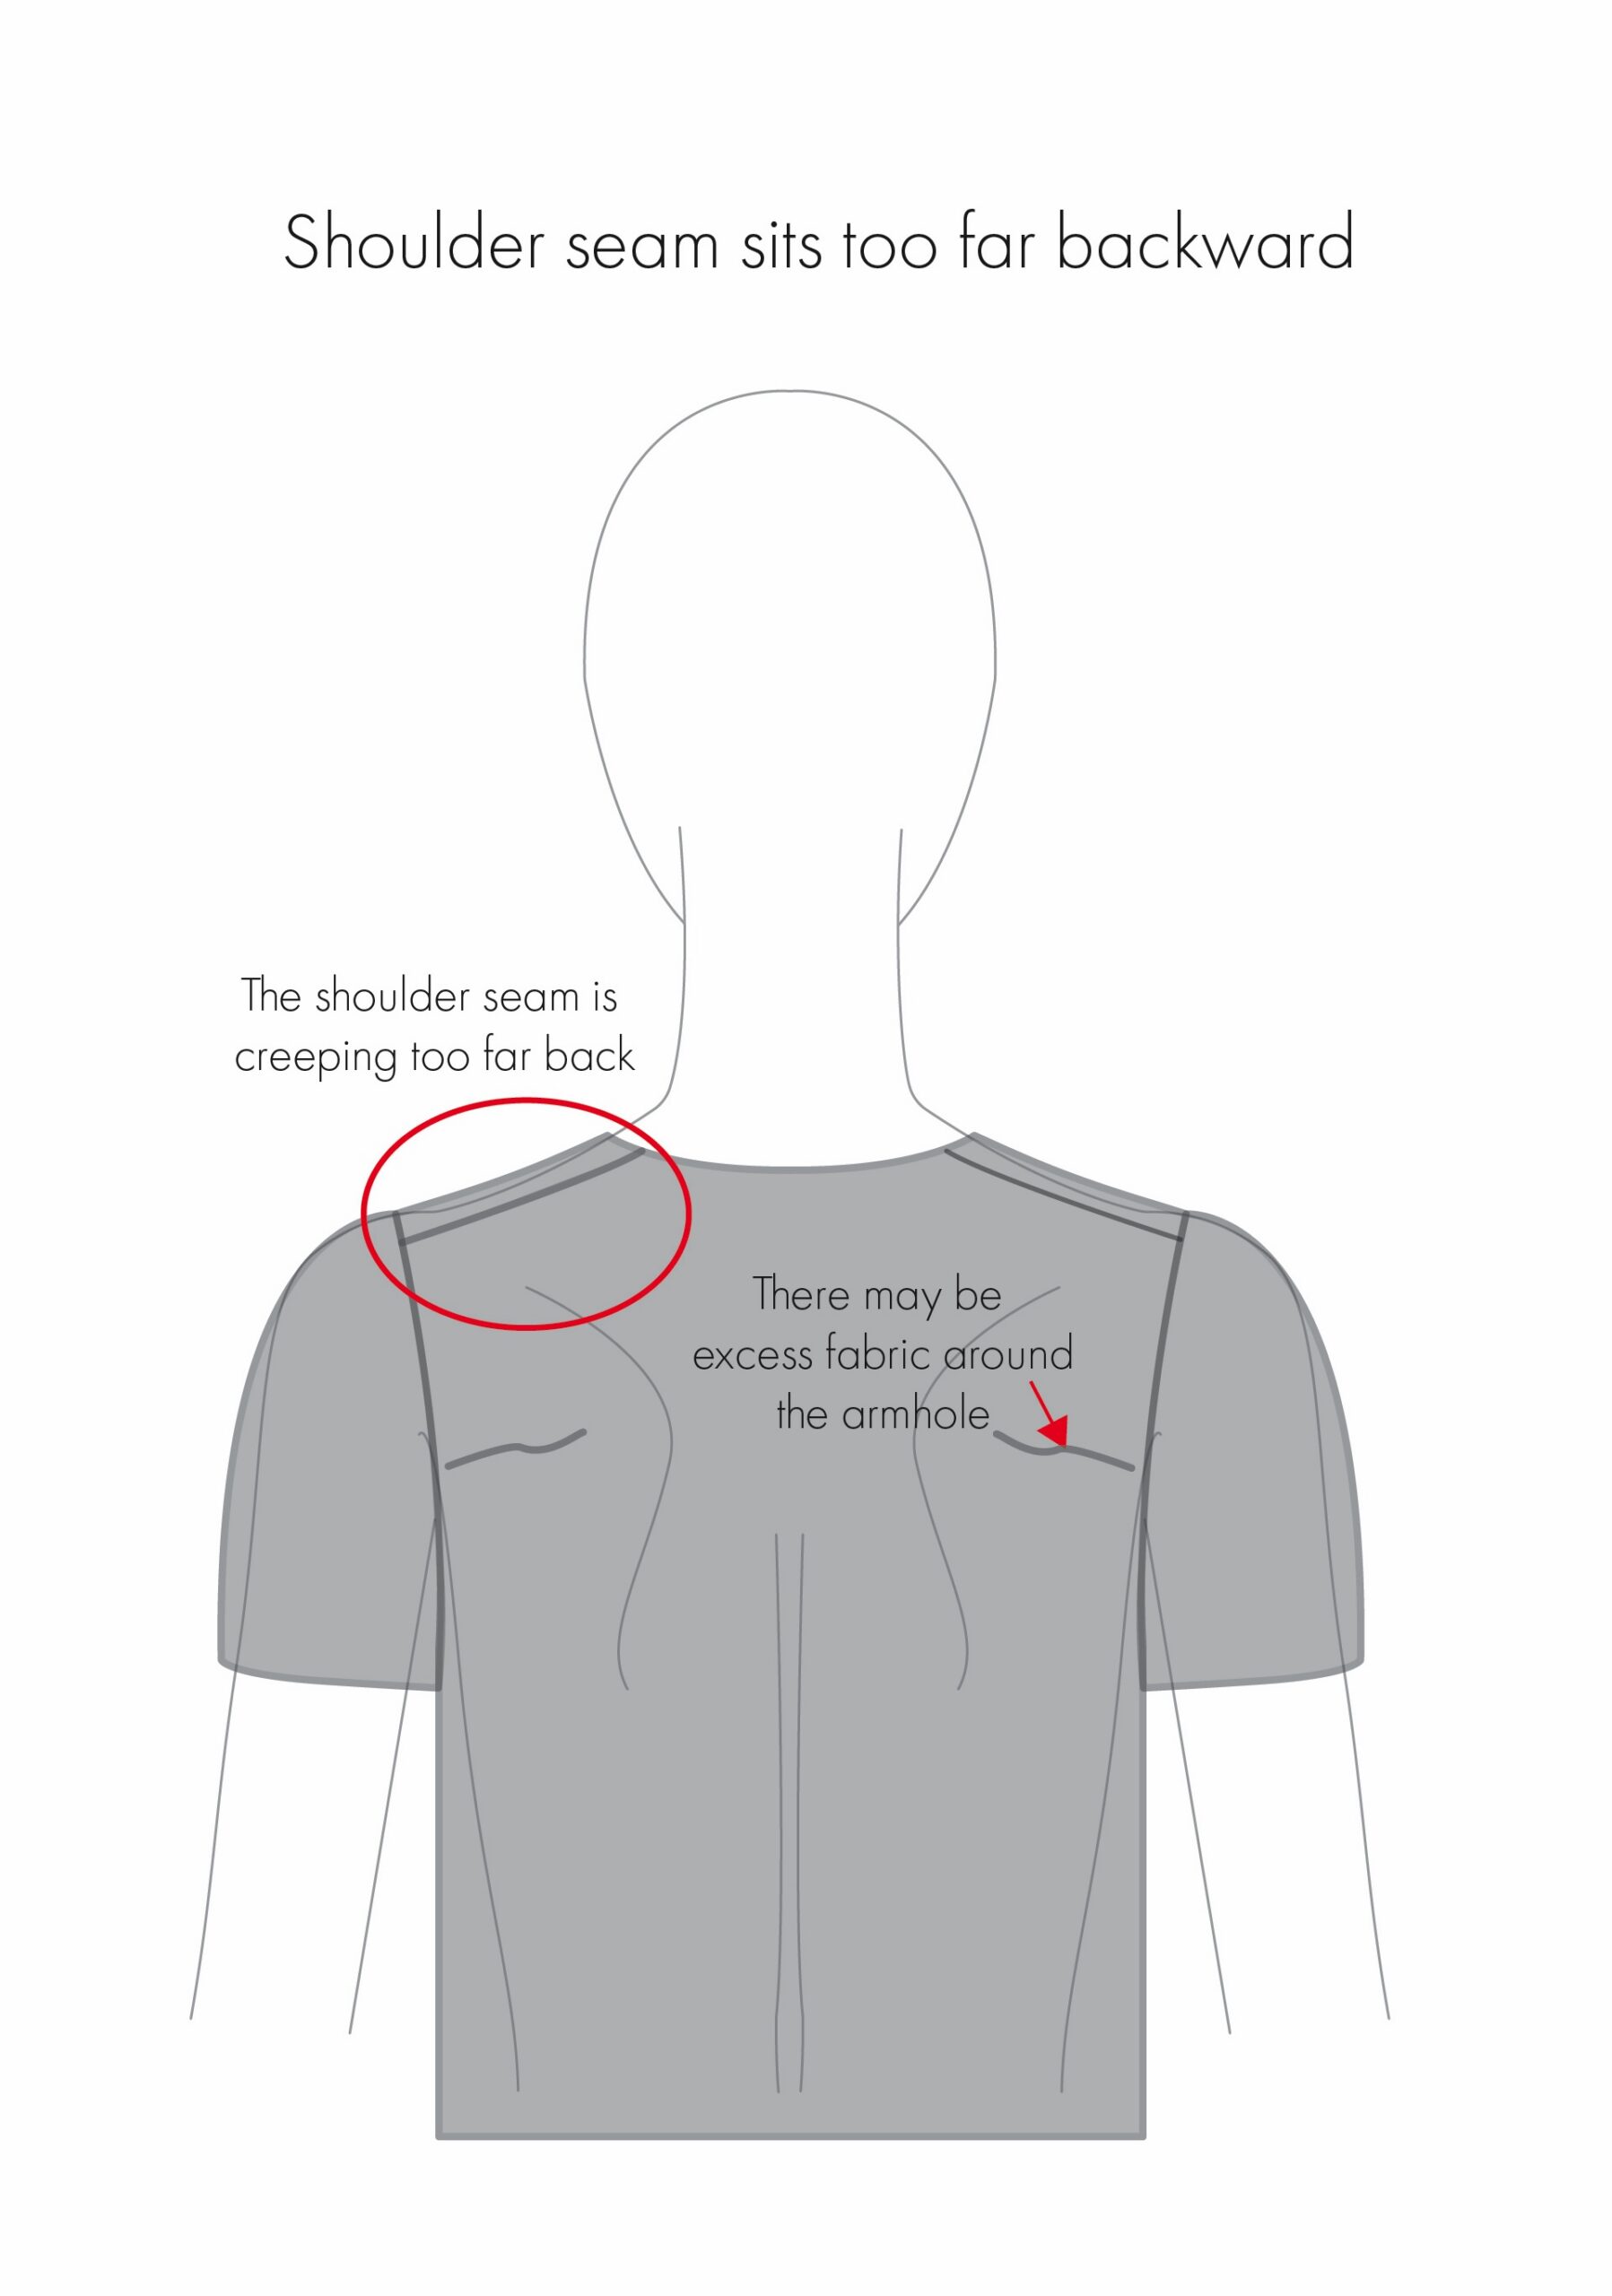
Reason 3: Shoulder seam sits too far backward
What this looks and feels like:
The shoulder seam doesn’t follow the natural shoulder line. Instead, it sits too far towards the back, creeping into the back of the garment. This may make the neckline appear higher at the front and lower at the back. You may also notice wrinkles around the back armhole and draglines around the front, or find that the garment feels as though it is falling or pulling towards the back.
Why might this happen?
This can happen if the wearer has more forward-set or rounded shoulders, causing the shoulders to sit further forward than the pattern allows for.
How to adjust the toile:
1. Mark the natural shoulder line on the toile, where you want the garment’s shoulder seam to sit, using either pins or a fabric marker.
2. Measure the difference between the existing shoulder seam and the marked shoulder line at both the neckline and armhole. These measurements may differ.
How to adjust the pattern:
A forward shoulder adjustment moves the shoulder seam towards the front of the garment, bringing it into alignment with the wearer’s natural shoulder line.
1. On the front pattern, mark the new shoulder seam position at the neckline, using the measurement taken from the toile.
2. Repeat step 1 at the armhole, using the corresponding measurement from your toile.
3. Join these two points to create the new shoulder seam line.
4. Cut along this line, separating the front bodice into two pieces.
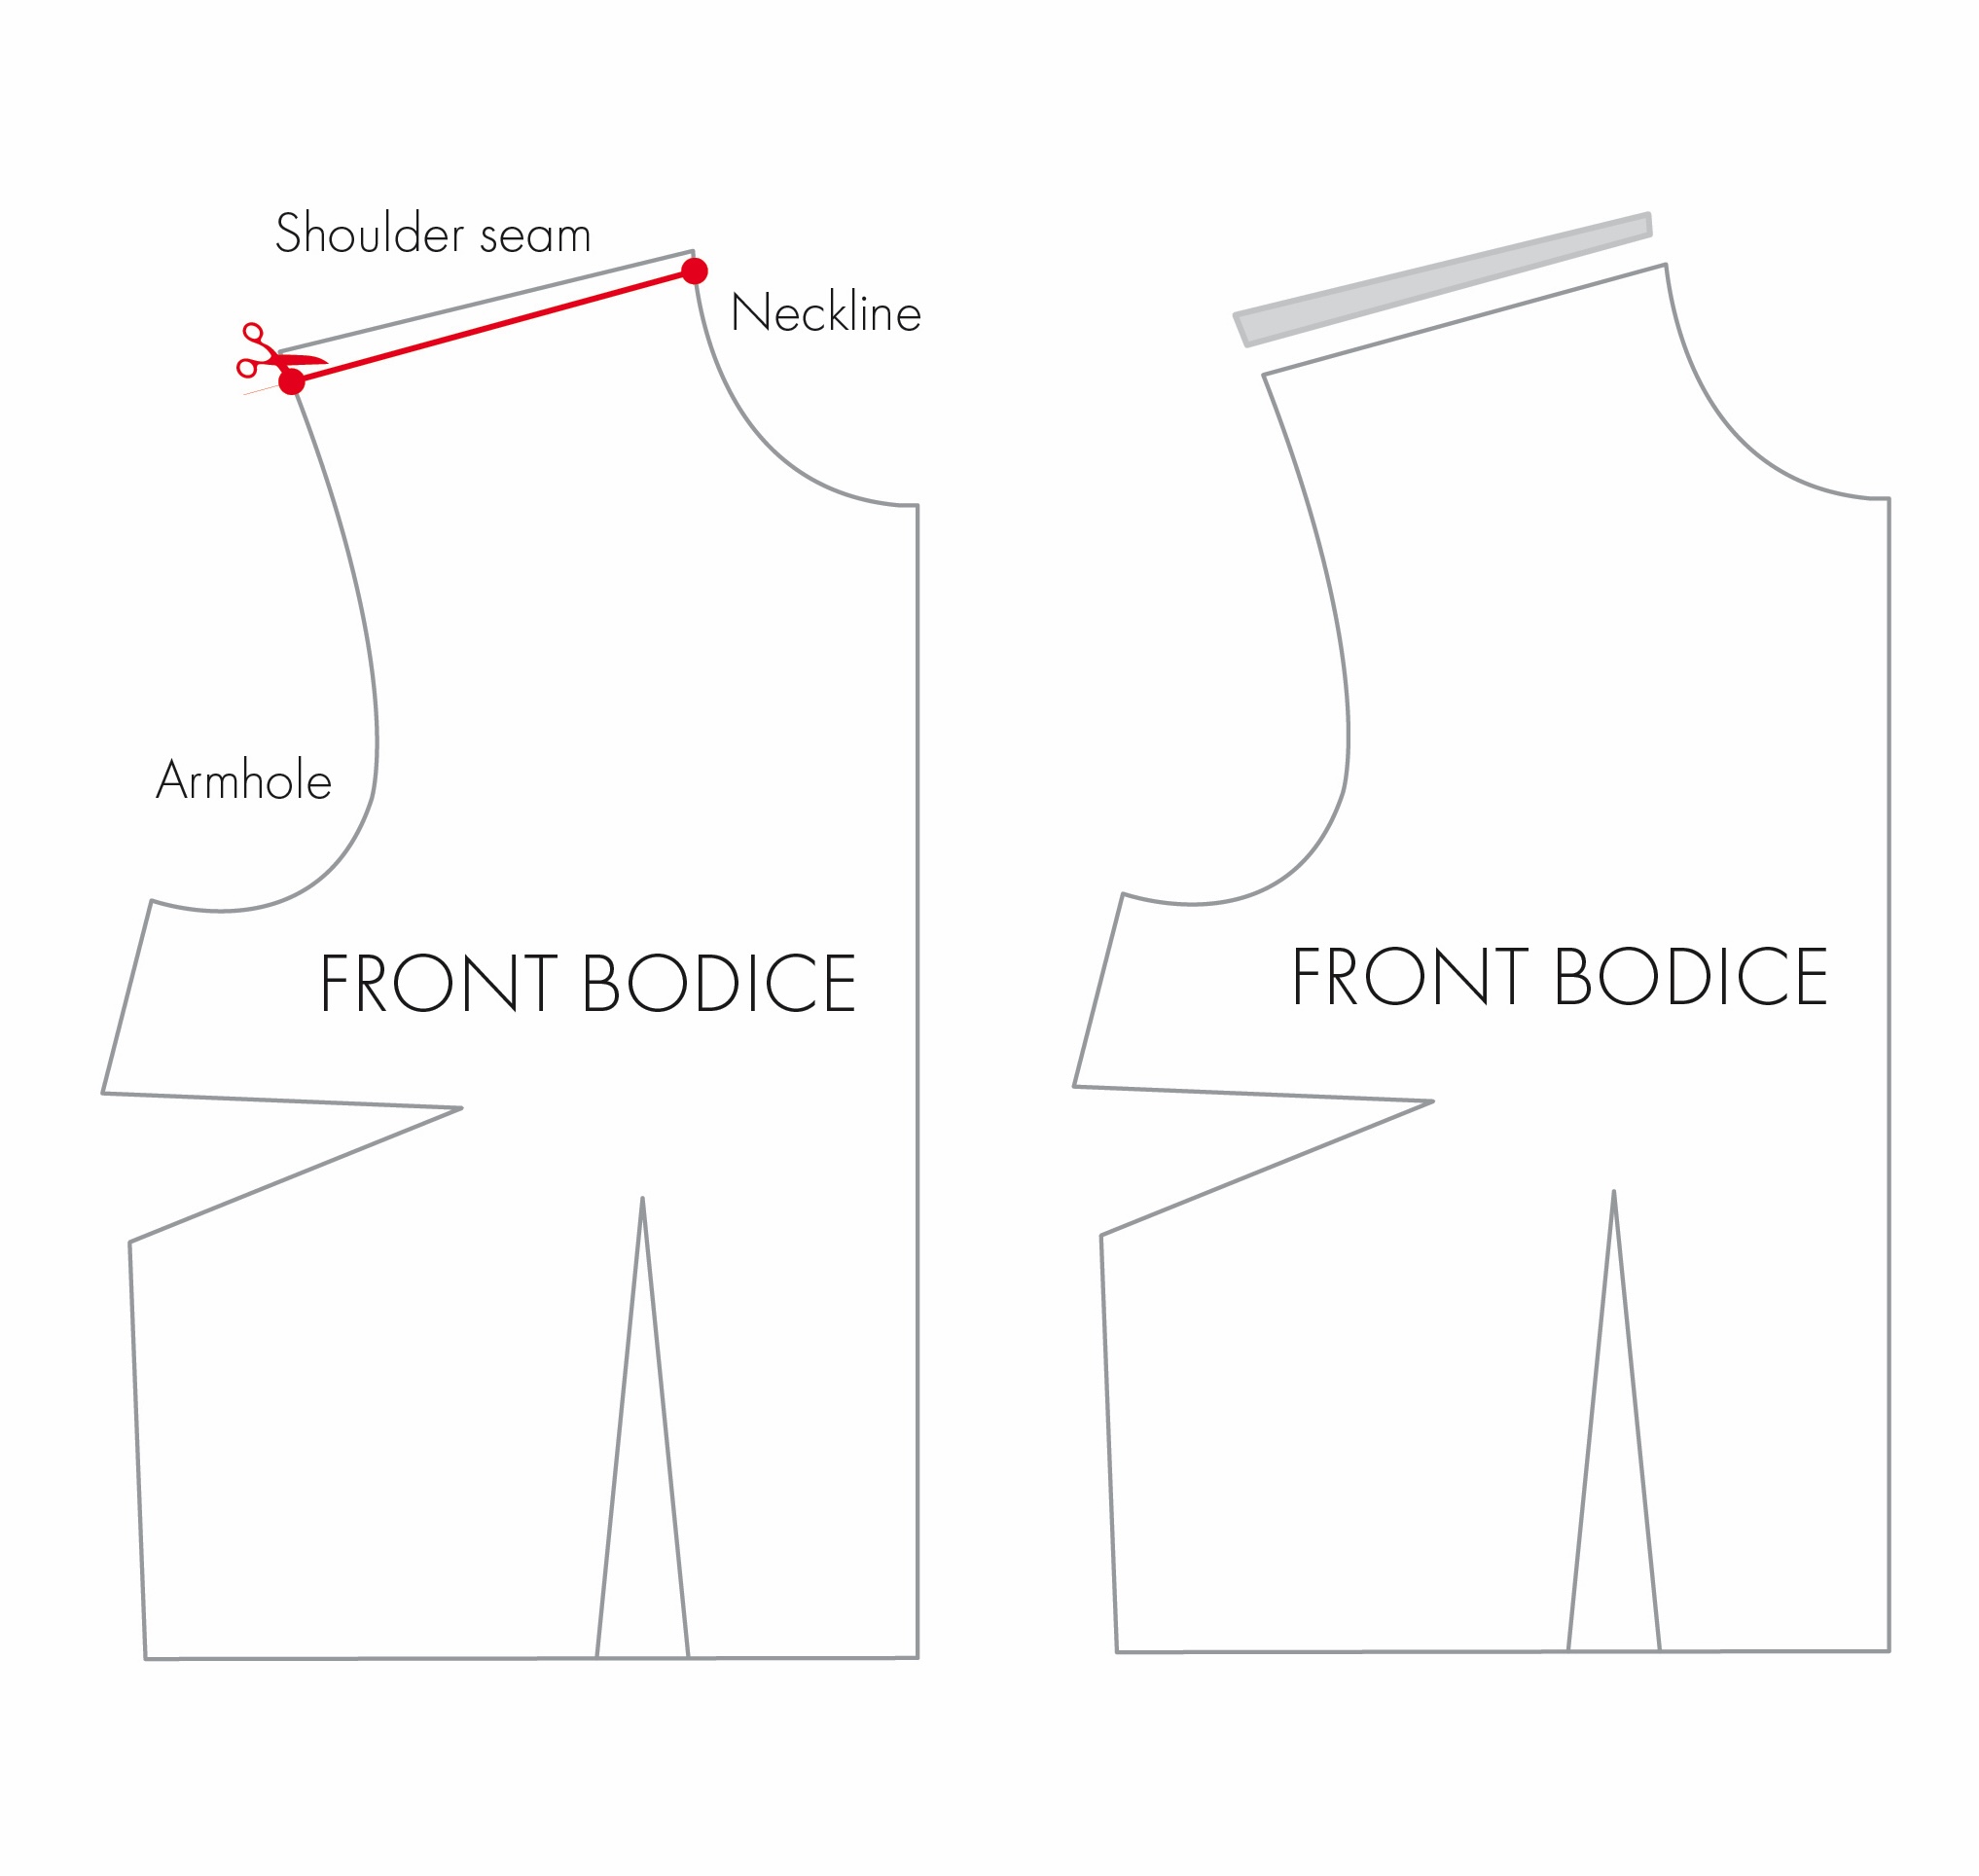
5. Transfer the excess removed from the front shoulder area to the back bodice. This essentially adds length to the back shoulder area, allowing the shoulder seam to move forwards.
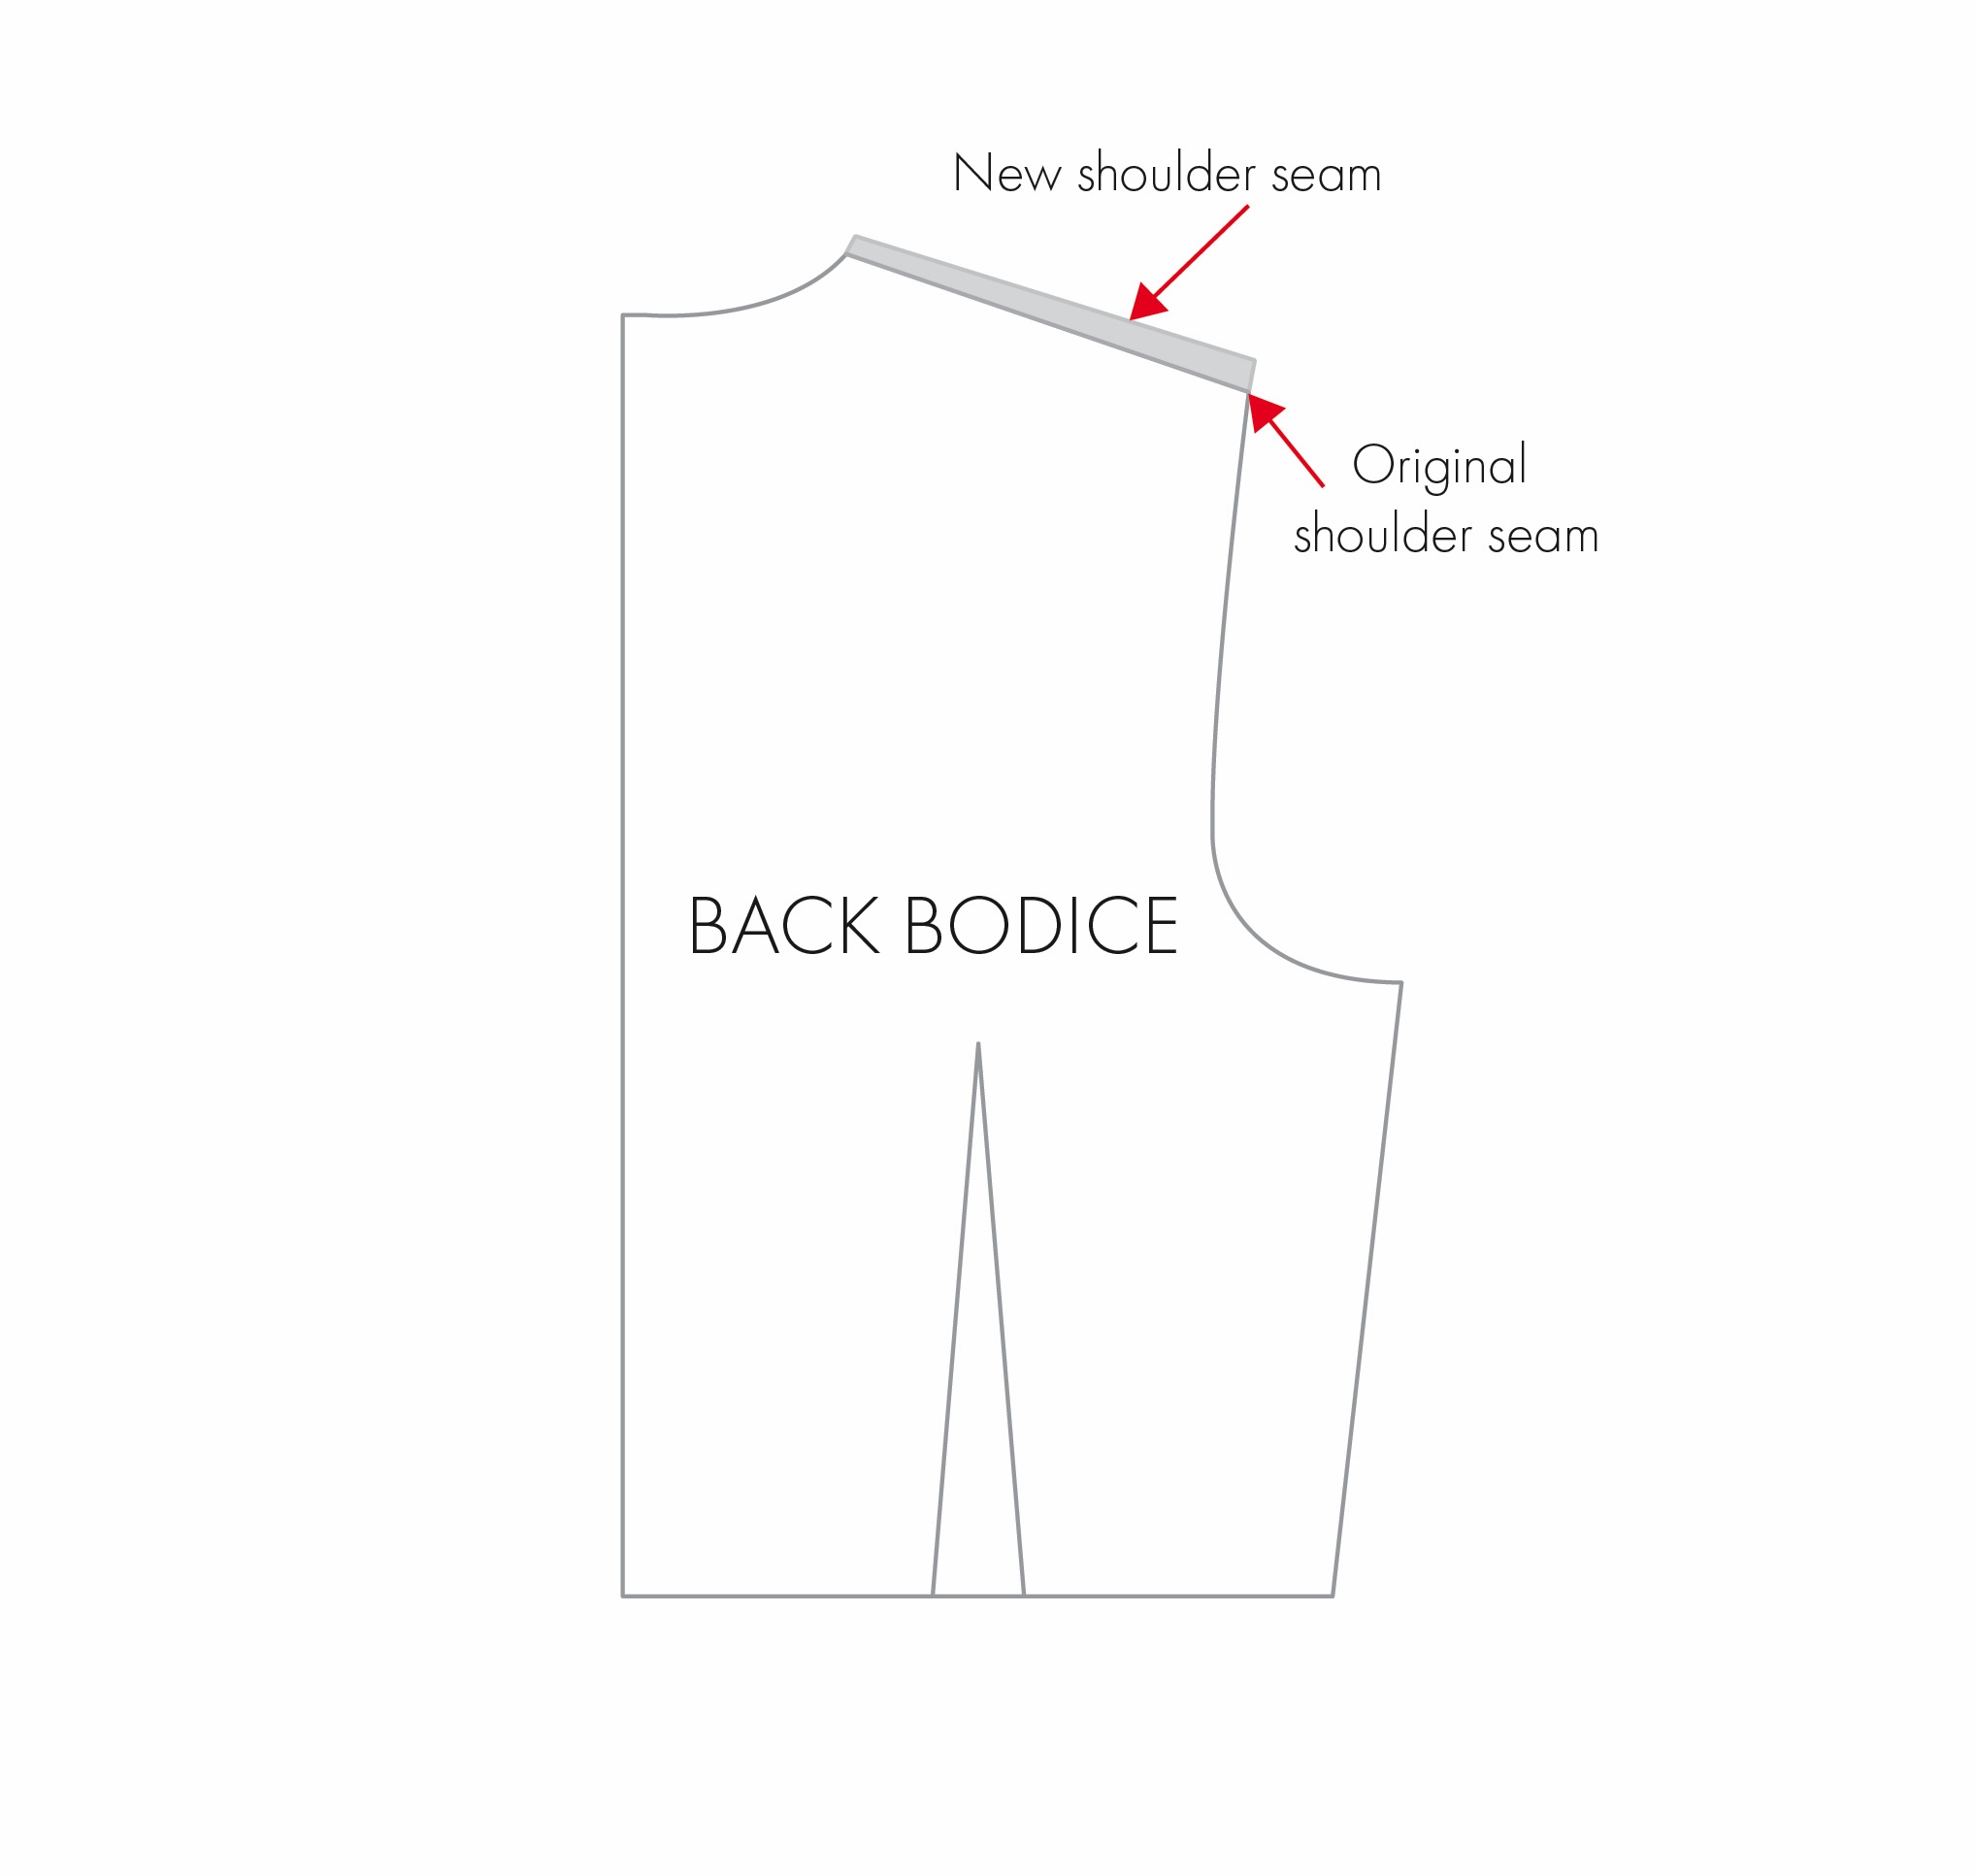
6. Blend and smooth the neckline and armhole curves.
Note: An adjustment to the sleeve pattern may not be necessary. However, you will need to reposition the sleeve head notch to correspond with the new shoulder seam position.
Reason 4: Shoulder seam sits too far forward
What this looks and feels like:
This is less common, but it may appear as if the shoulder seam sits too far towards the front, creeping into the front of the garment. This may make the neckline appear lower at the front and higher at the back. You may also notice that the garment feels as though it is falling or pulling towards the front. There may also be draglines around the back armhole or some collapsing around the front armhole.
DIAGRAM 14
Why might this happen?
This may be because the wearer has a more upright or possibly backward-sloping shoulder posture, which the pattern doesn’t account for.
How to adjust the toile:
Simply follow steps 1–2 from reason 3, marking the natural shoulder line and measuring the difference between the existing and desired shoulder seam positions.
How to adjust the pattern:
A backward shoulder adjustment moves the shoulder seam towards the back of the garment, bringing it into alignment with the wearer’s natural shoulder line.
1. Repeat steps 1-4 from the forward shoulder adjustment, but this time on the back pattern.
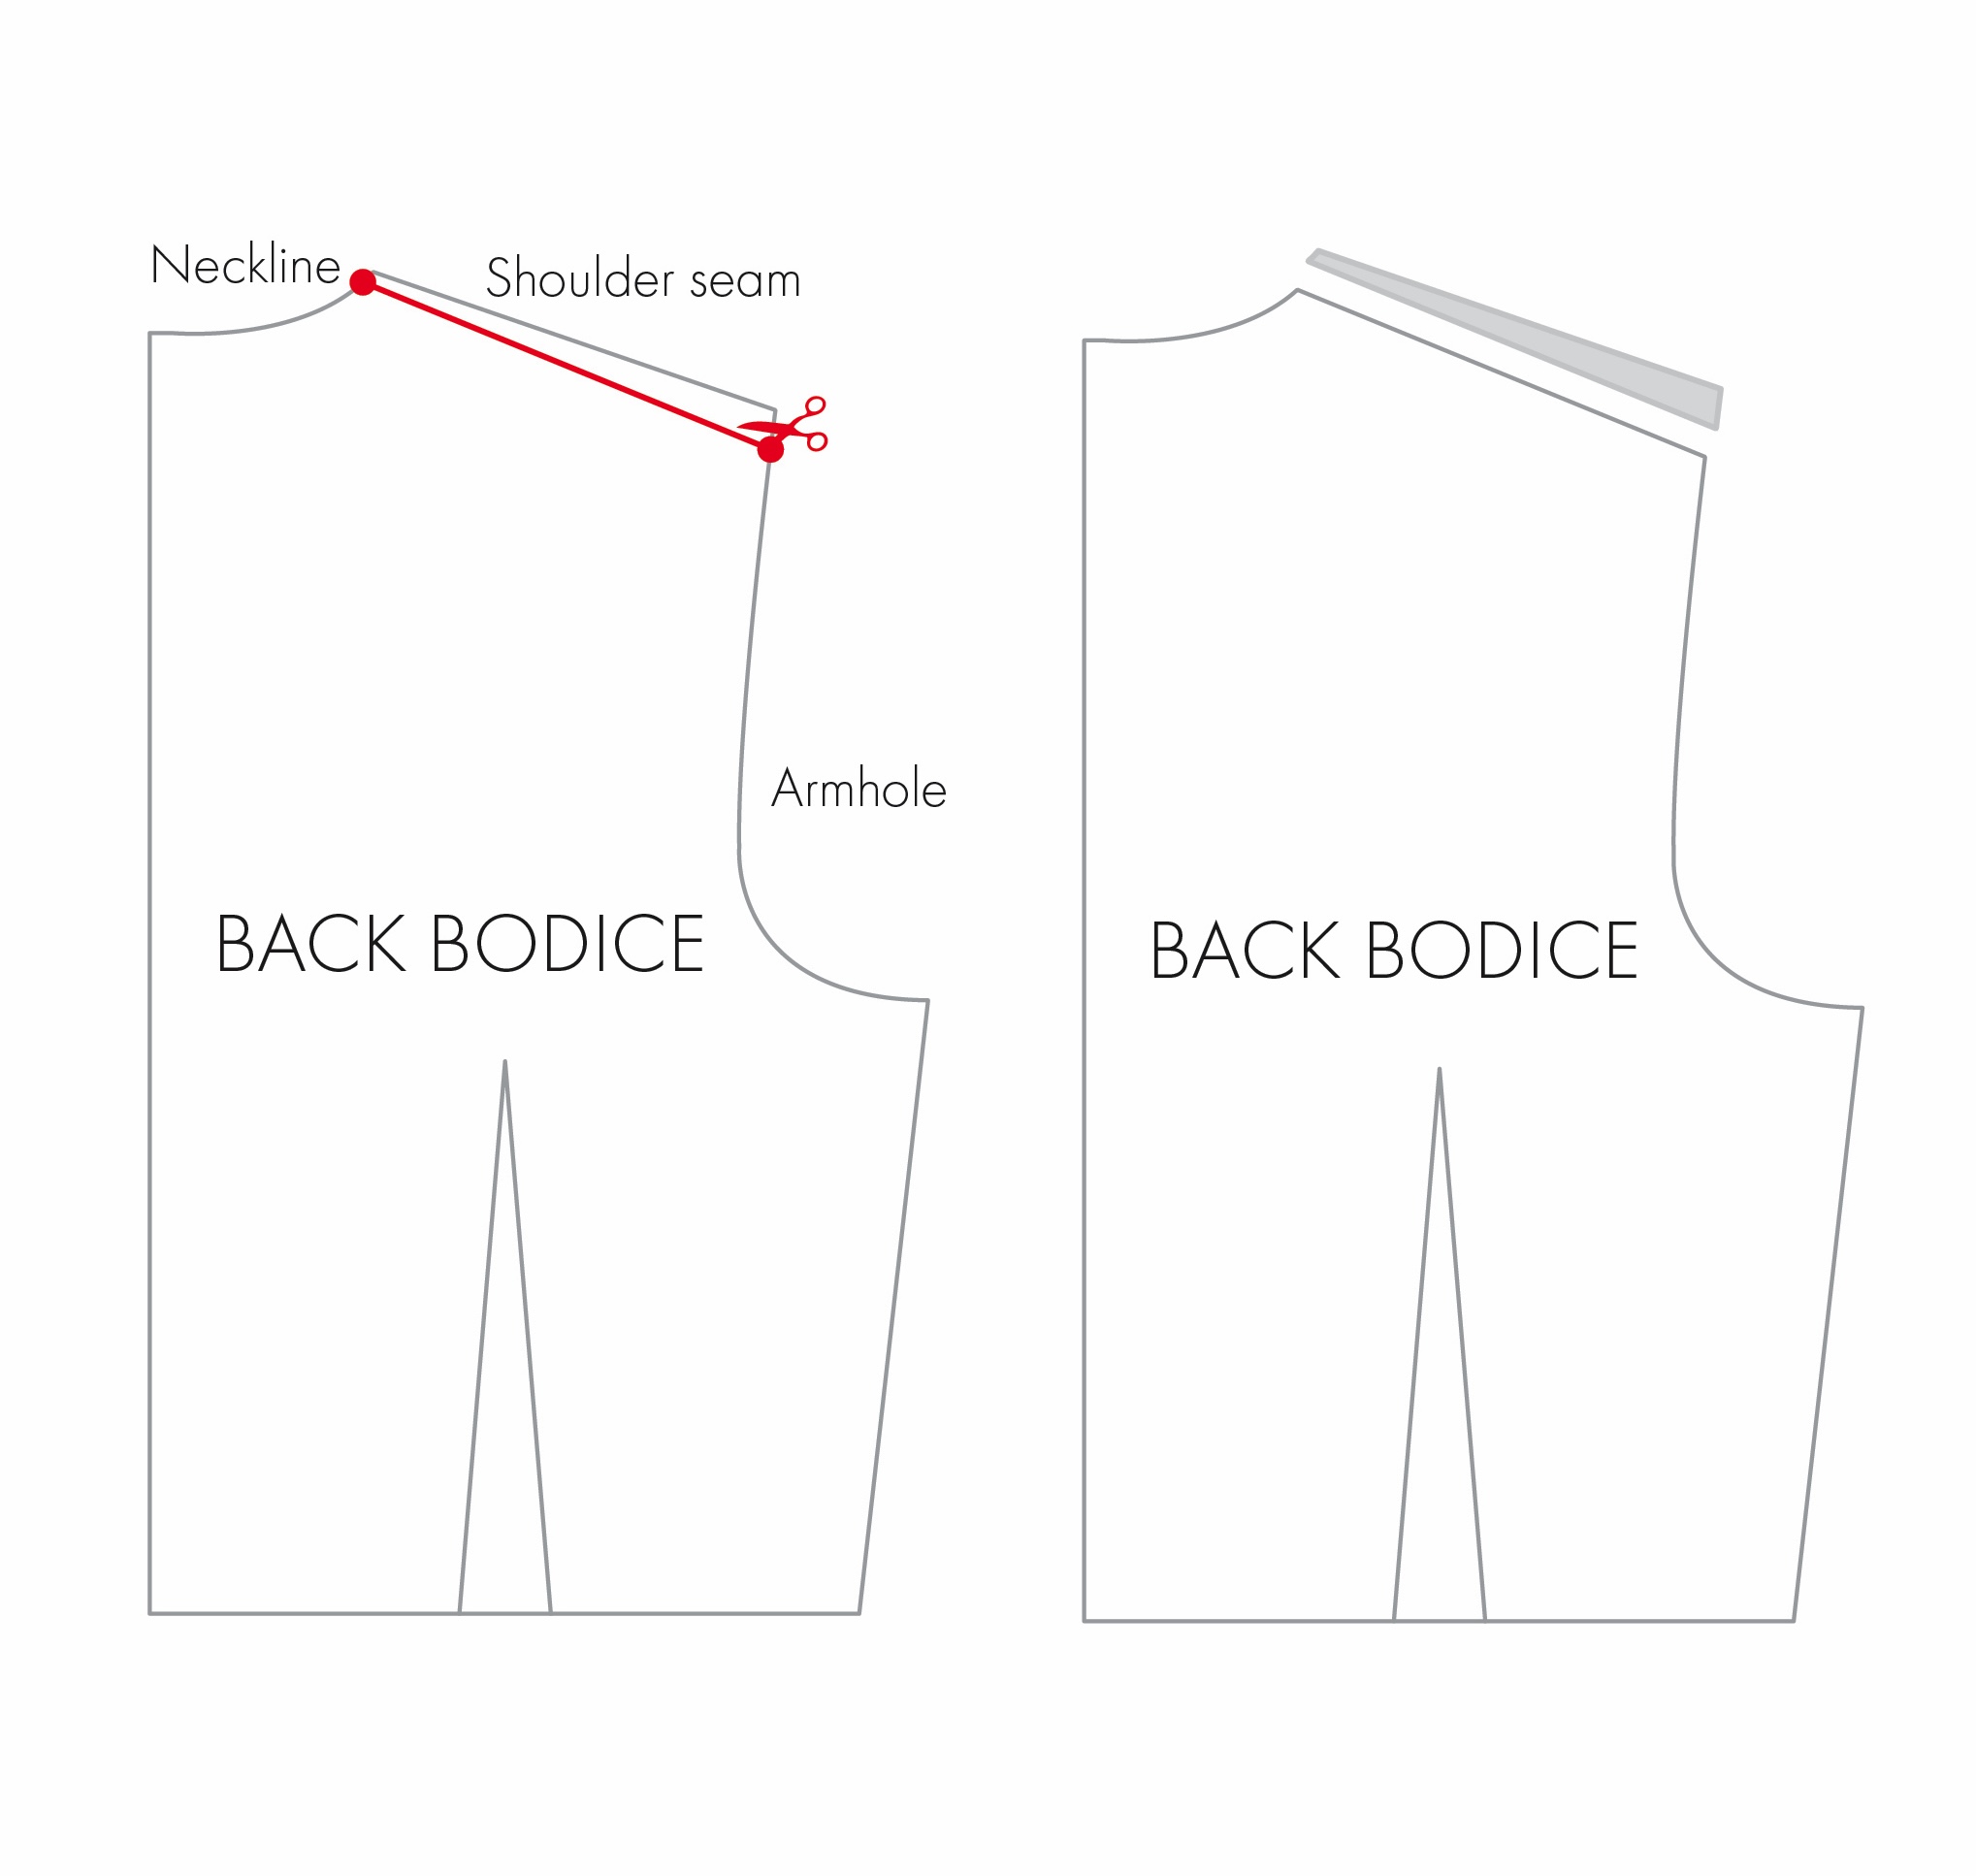
2. Transfer the excess removed from the back shoulder area to the front bodice. This essentially adds length to the front shoulder area, allowing the shoulder seam to shift backwards.
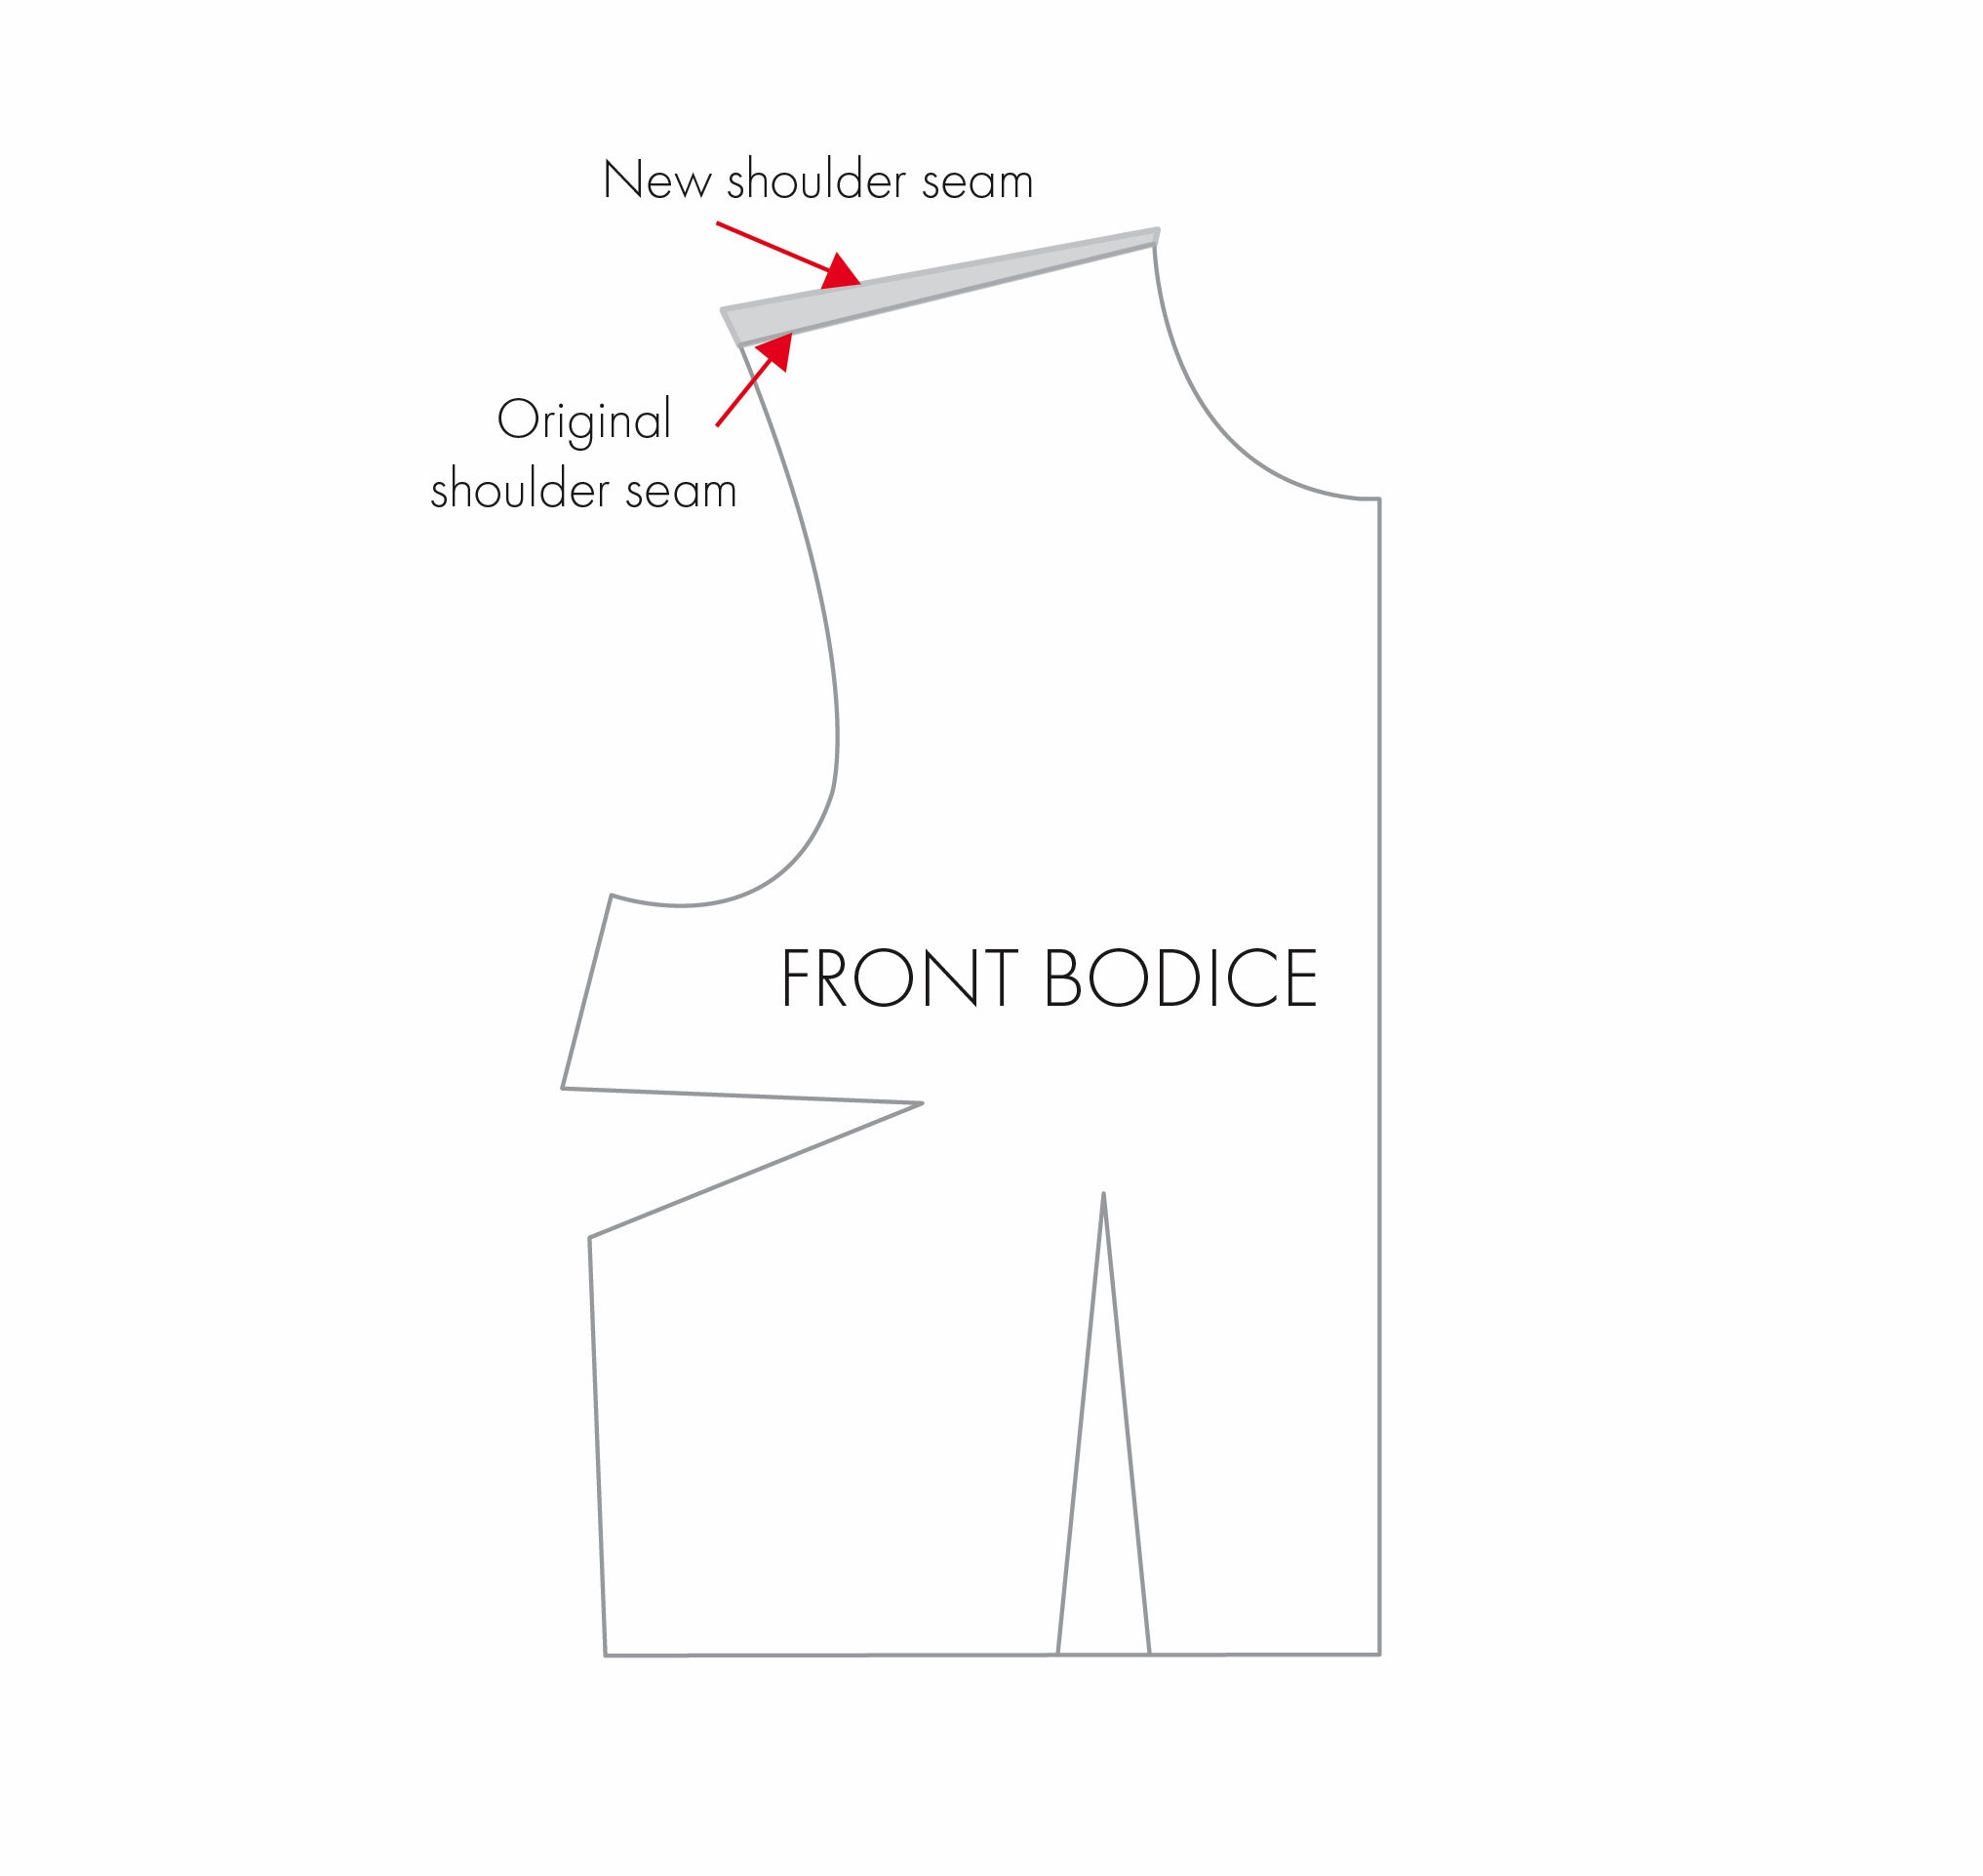
3. Blend and smooth the neckline and armhole curves.
Note: Again, an adjustment to the sleeve pattern may not be required, but you will need to reposition the sleeve head notch to correspond with the new shoulder seam position.
Reason 5: Shoulder seam sits away from the body or feels too tight
What this looks and feels like:
If you have more sloping shoulders, you may notice that the garment sits away from the shoulder at the shoulder point. You may also see excess fabric, collapsing, or gaping around the armhole, which can create folds or creases. On the other hand, if you have squarer shoulders, you may notice drag lines, or pulling across the shoulder. The shoulder may also push the fabric upwards and away from the body, or cause it to sag, creating folds at the neckline.
For a closer look at why this might happen, and how to make a shoulder slope adjustment on a toile and pattern, take a read of my earlier article ‘How to Adjust a Pattern for Sloping or Square Shoulders’.
Finish with Another Toile
Once you have made the adjustments to the pattern, I would recommend making another toile to check the fit and balance of the new shoulder, armhole, neckline and sleeves.
I know many people really dislike making toiles as they can be time consuming and a waste of fabric, but it really is the most reliable way to determine whether an adjustment has worked.
Other Possible Reasons the Shoulder Might Not be Quite Right
- The shoulder seams may not match in length: Uneven seams can cause puckering or stretching. Check that the seams align correctly, and realign or adjust them if needed.
- The front or back of the garment may be too heavy: I have a top, for instance, with a keyhole opening at the back, closed with a large fabric bow. I am forever pulling this top forward because of the bow’s weight.
- The garment may need more shaping: If the fabric doesn’t lie smoothly over the shoulder, a dart or another shaping adjustment may help it fit better.
- The grainline may be off: Check that the fabric is cut and hanging along the correct grainline, as this simple thing can affect how the garment sits.
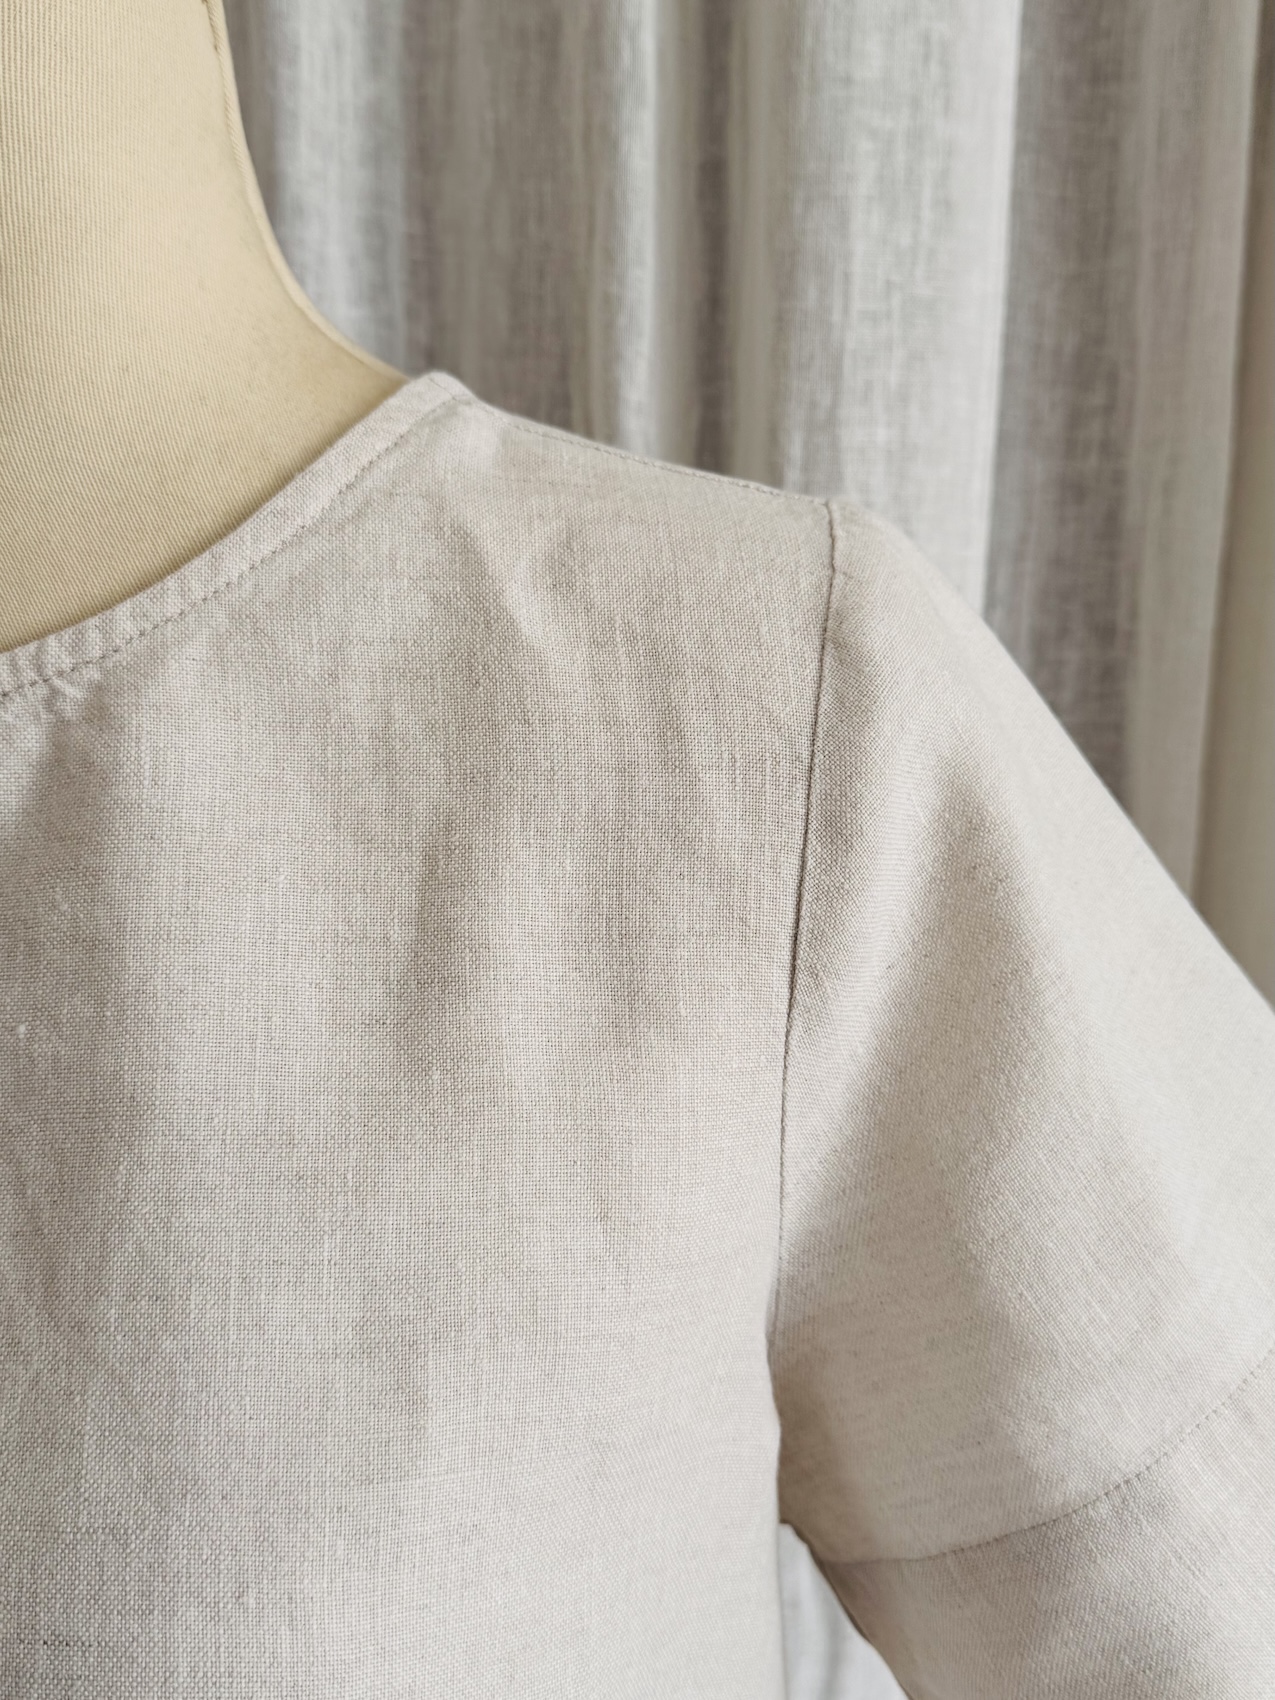
Of course there are many possible reasons why the shoulder area of a garment might not look or feel quite right. What I have covered in this post are just a few of the more common ones. Shoulder issues may also have more than one cause, so I recommend working through one adjustment at a time rather than trying to tackle everything at once.
Hopefully I have provided a useful introduction and overview to help you look at both your own shoulders and your garment’s with a little more intention. Once you start to see and identify these issues, you likely won’t be able to unsee them. You’ll start noticing them everywhere!