What is a Waistband?
As the name implies, a waistband is a band or strip of fabric that sits at or around the waist. Waistbands serve both functional and aesthetic purposes.
Functionally, waistbands help hold garments securely and comfortably at the waist, making sure they don’t fall down. They provide stability, while contributing to the overall fit of the garment and how it sits on the body. Waistbands provide a clean and structured way of finishing the top edge of the garment, and are a means to attach notions like buttons, hooks and bars, and belt loops.
From a design perspective, there are several types of waistbands, each offering a different look and shape.
Now, you might assume that a waistband always sits at the waist—the narrowest part of the torso, usually positioned between the rib cage and hips. However, a waistband can actually sit at different positions (or heights) on the body depending on the garment’s style and design. This could mean sitting above the natural waist, creating a more ‘high-waisted’ style, or even lower down, around the upper hips.
To accommodate these different waistband positions, there are a few different ways the waistline can be constructed.
Separate vs. Integrated Waistbands
Waistbands can be broadly categorised as either separate or integrated, depending on how they are constructed in relation to the garment (I will get into this more specifically with examples later).
Separate:
As the name suggests, a separate waistband is drafted as an independent pattern piece from the main body of the garment. It is cut separately and then sewn onto the body of the garment.
I find separate waistbands particularly useful when the garment requires a closure, such as a button, hook and bar, or zipper. This advantage also explains why they are commonly found on more structured garments, such as tailored pants or jeans.
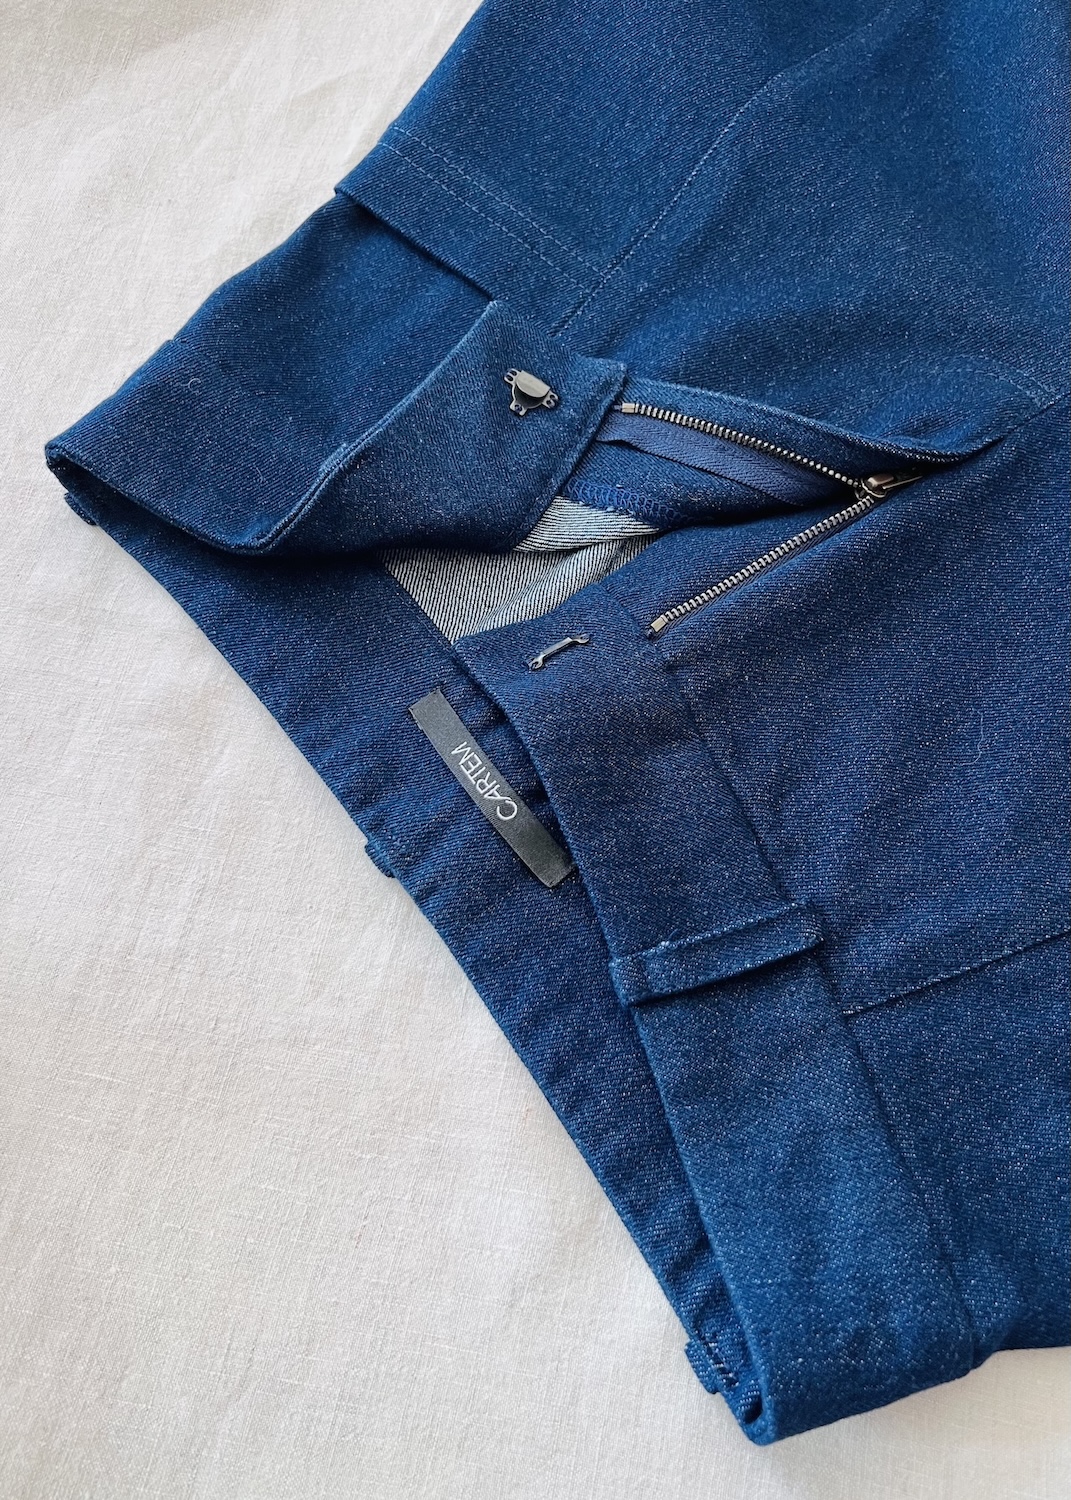
Separate Waistband
Integrated:
I like to think of an integrated waistband as an extension of the garment itself. Rather than being drafted as a separate pattern piece, the body of the main garment is simply extended up and above the intended waistline. This extension is then folded back on itself to the inside of the garment to form the waistband.
This type of waistband is commonly found on more casual garments, particularly ones with elastic or a drawstring (think pyjama bottoms or tracksuit pants).
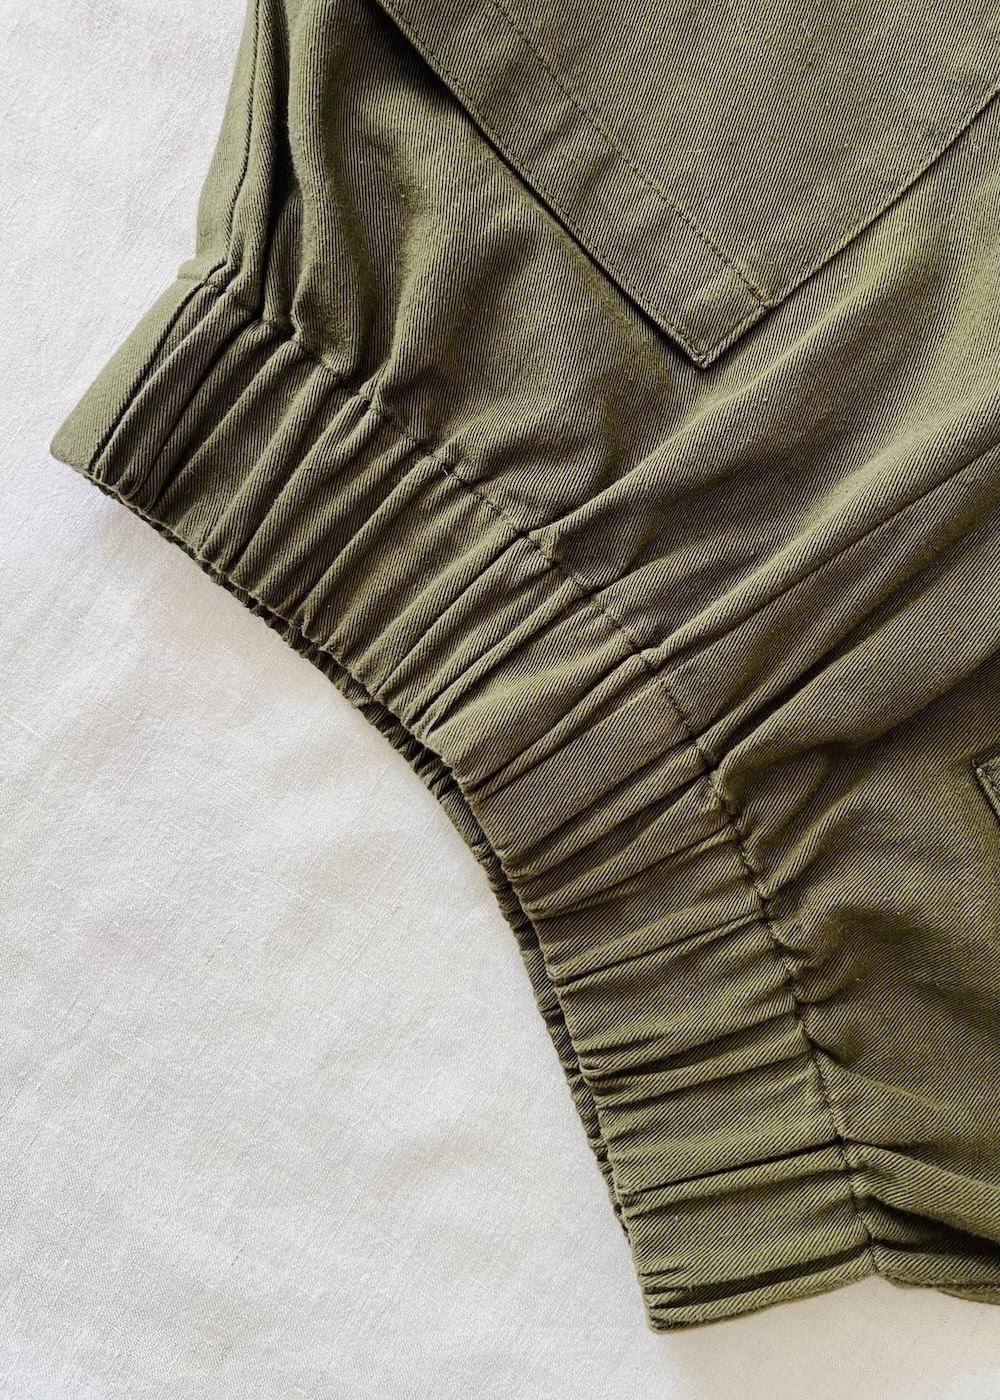
Integrated Waisband
Different Shapes of Waistbands
Waistbands can be further defined by their shape.
Note: For the following diagrams I have used the following abbreviations:
- CF = Centre front
- CB = Centre back
- SS = Side seam
Straight waistband:
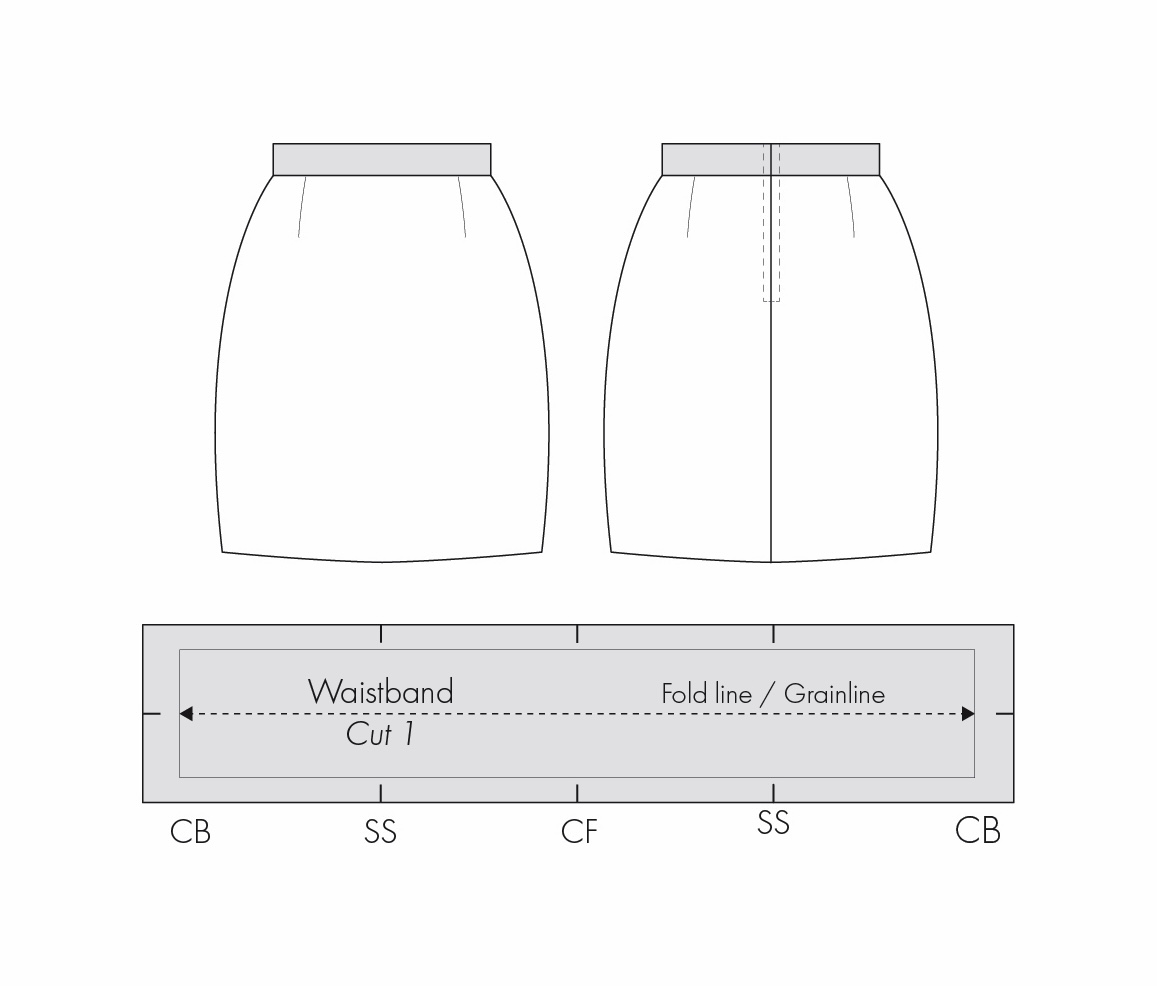
Straight waistbands are just that, straight, with the pattern piece generally being a simple rectangle. Due to their simpler shape, a straight waistband tends to be cut as one whole pattern piece (like the diagram above), but they can also be divided into multiple pattern pieces depending on the garment’s construction.
They are pretty easy to draft and sew and are common across a wide range of garments.
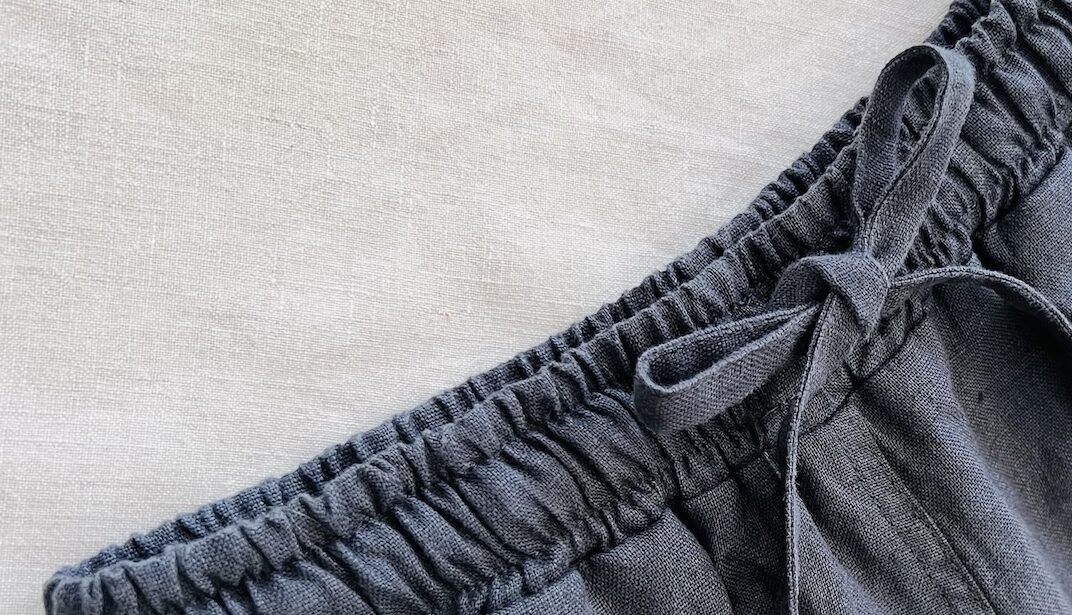
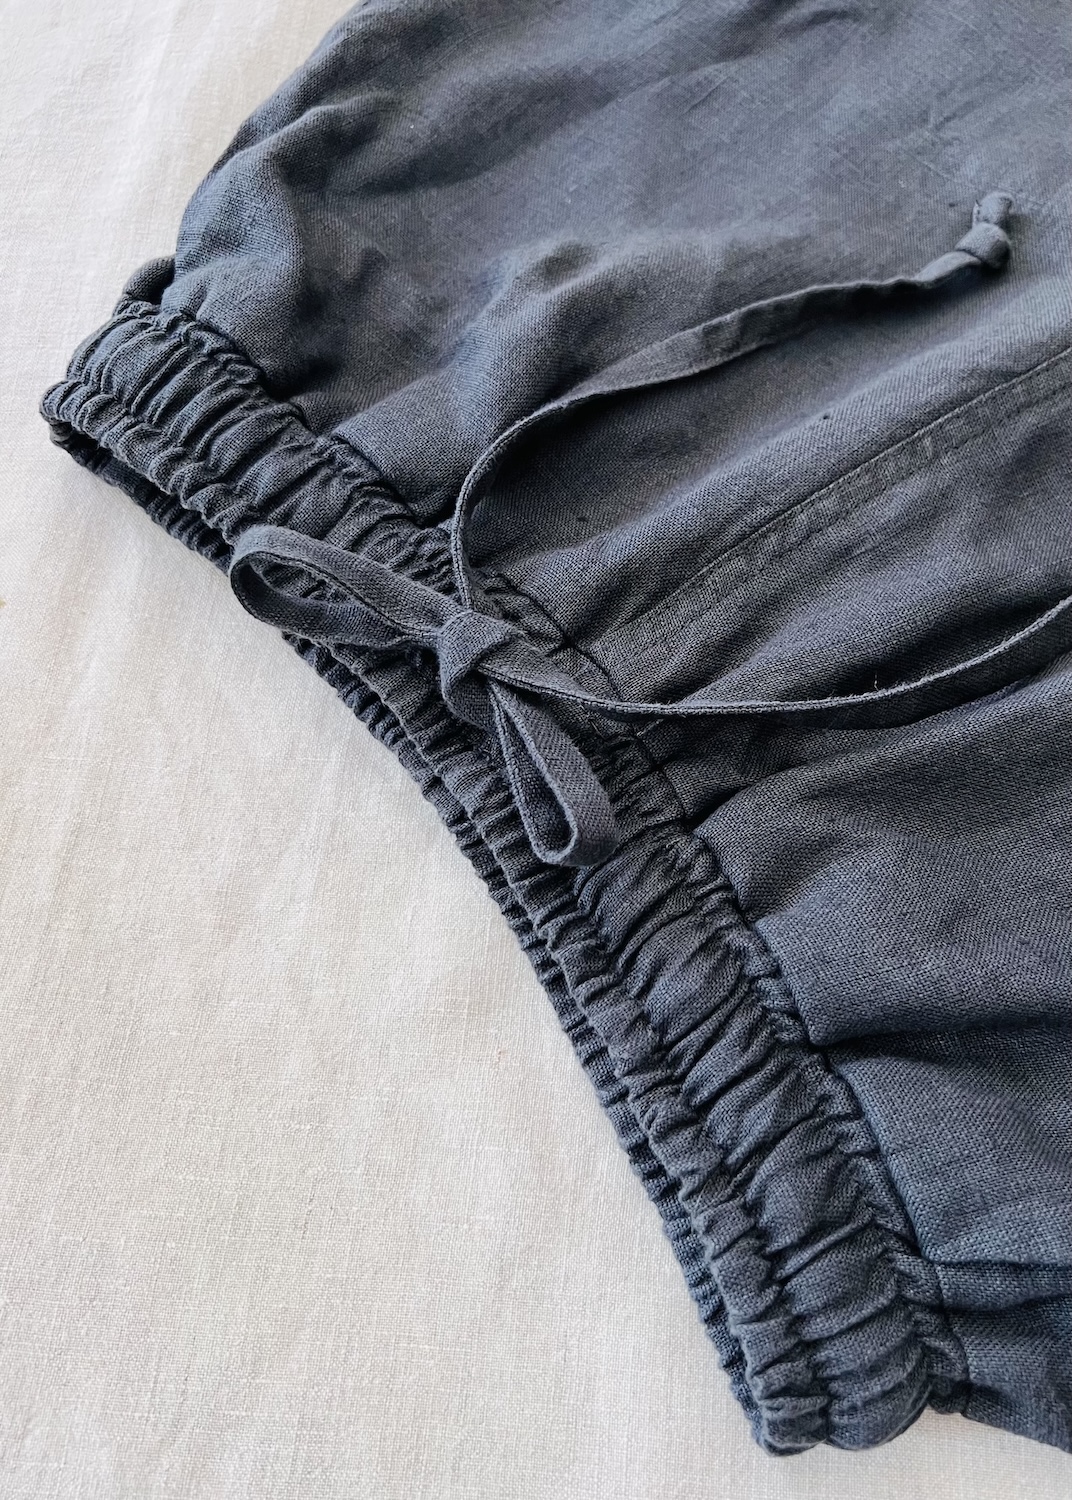
Straight waistbands have little to no shaping and therefore may not conform to the body as closely as a shaped waistband. In my experience, when they are used on more contoured areas they can be more prone to gaping. Incorporating elastic or a drawstring (like the photo below) can be an easy way to overcome this and improve the fit on some garments.
Shaped waistband:
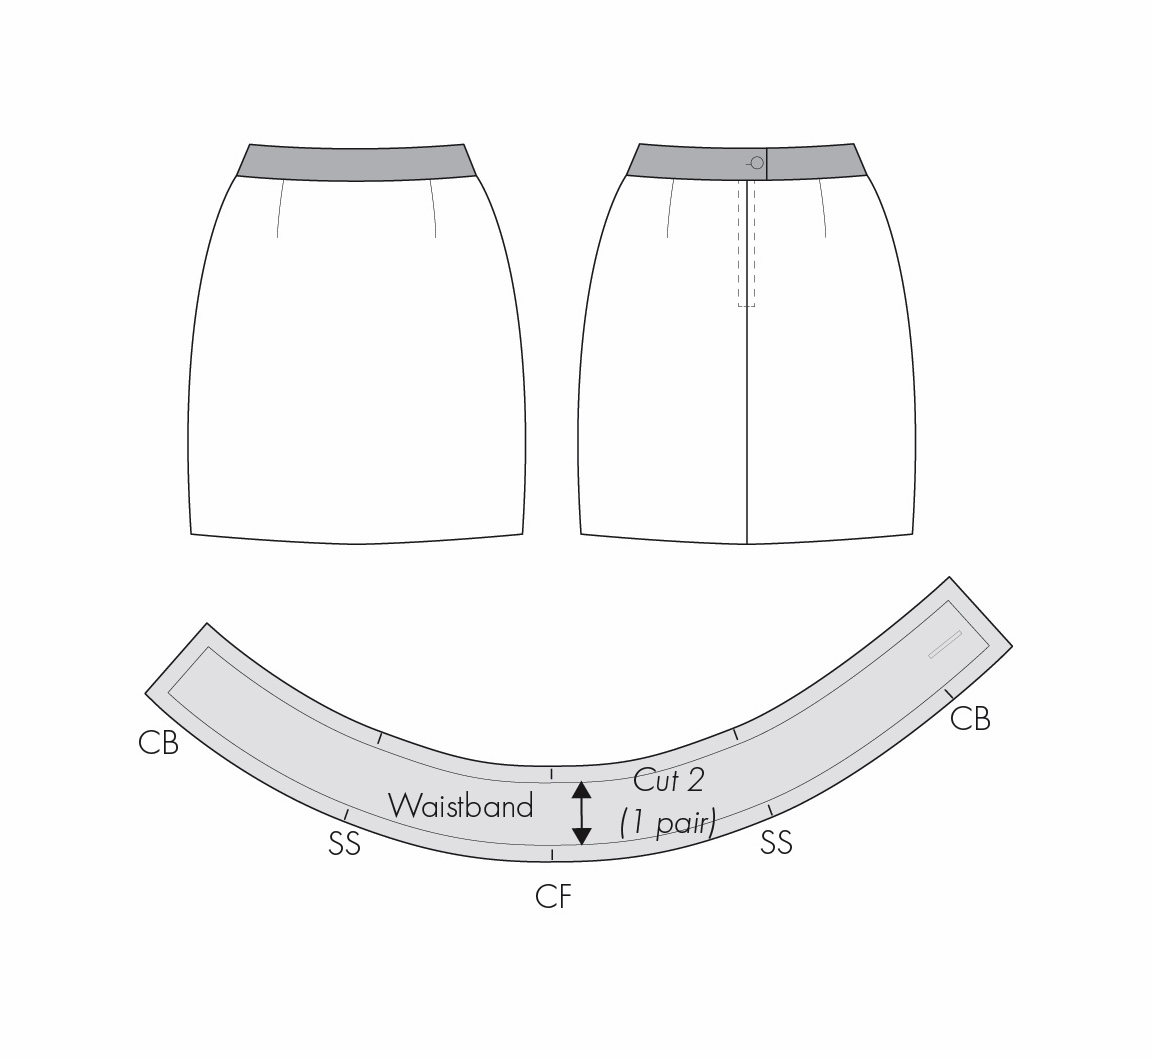
No surprise here either! Shaped waistbands are drafted to more closely follow the body’s contours, with the pattern piece being shaped or curved at the outer edges. You may also come across them being referred to as contoured or simply curved waistbands.
Shaped waistbands are particularly well suited to more fitted and tailored garments as they are able to follow the shape of the body. This means that there is less chance of gaping, providing a closer and more secure fit.
Shaped waistbands are created as a separate pattern piece to the main body of the garment. They can be drafted as one pattern piece that includes both the front and back of the garment (like the example above), or divided into separate pattern pieces. The choice will depend on the garment design, the method of construction and the type of closure being used.
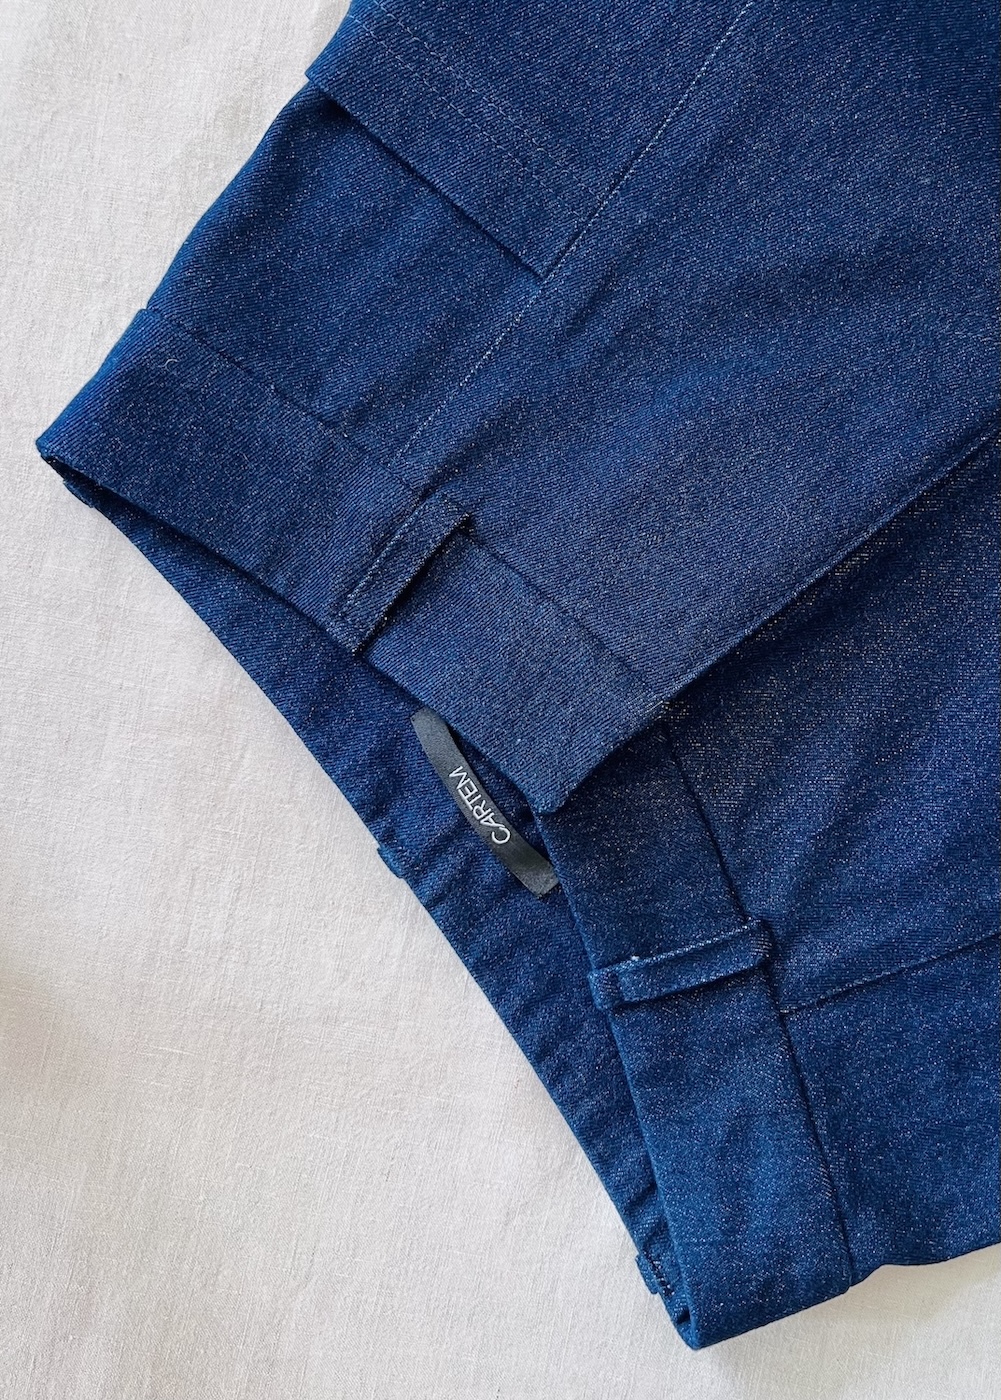
Faced waistline:
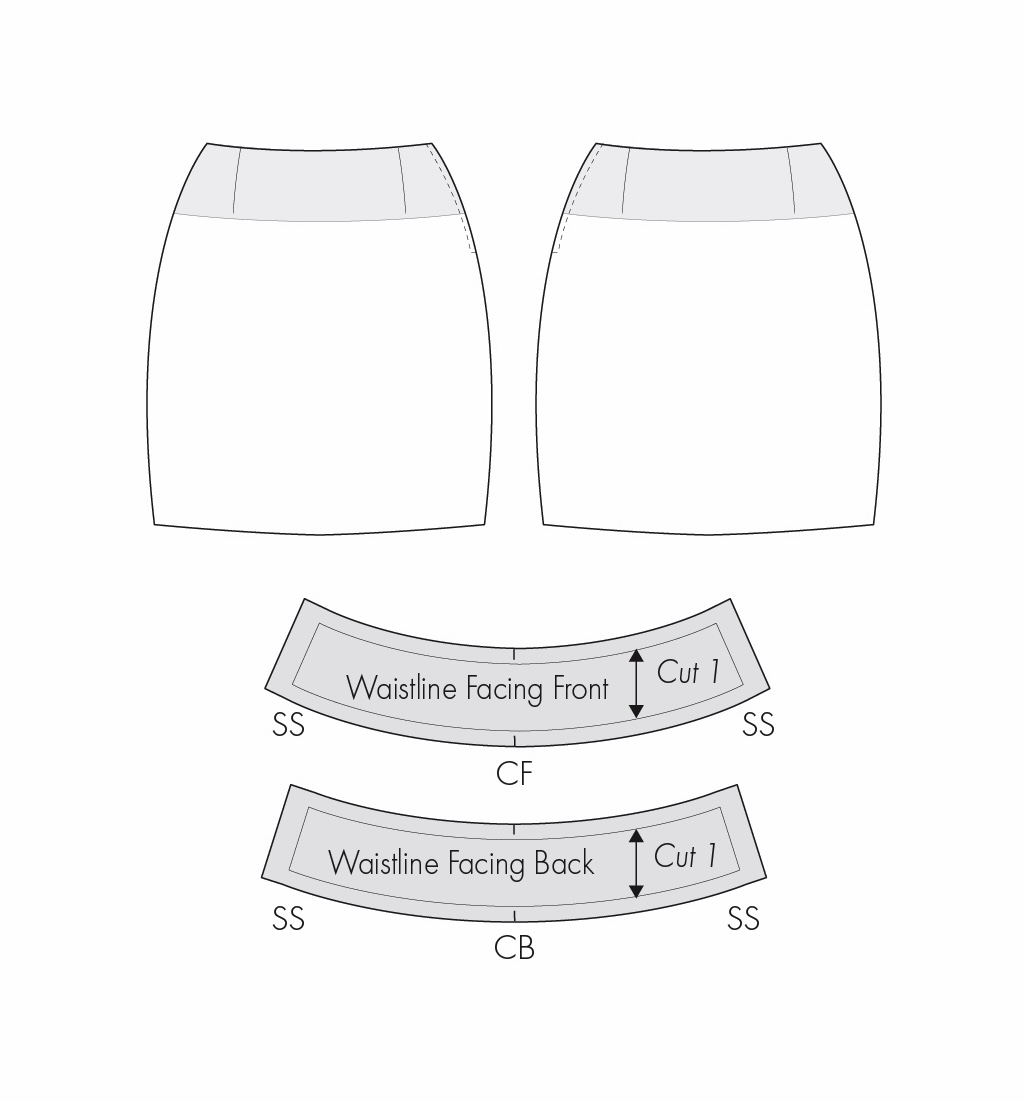
Not strictly a waistband per se, but I thought it was worth acknowledging, as a faced waistline can serve some of the same functions as a more traditional waistband. They can provide structure and support around the waist, while also helping to accommodate certain closures, such as a zipper.
Faced waistlines are similar in drafting and construction to that of a conventional garment facing. One may opt for a faced waistline as there is no separate visible “waistband” on the right side of the garment, with the facing instead sitting on the inside. They are simply attached to the top edge of the garment, right sides together, then turned to the inside, just like any regular facing. Faced waistlines also tend to be less bulky and can provide a particularly clean, more minimal finish.
Faced waistline patterns are drafted as separate pattern pieces. They can be cut as a whole pattern piece or divided (like the diagram above). Again, this depends on the garment design, construction and type of closure.
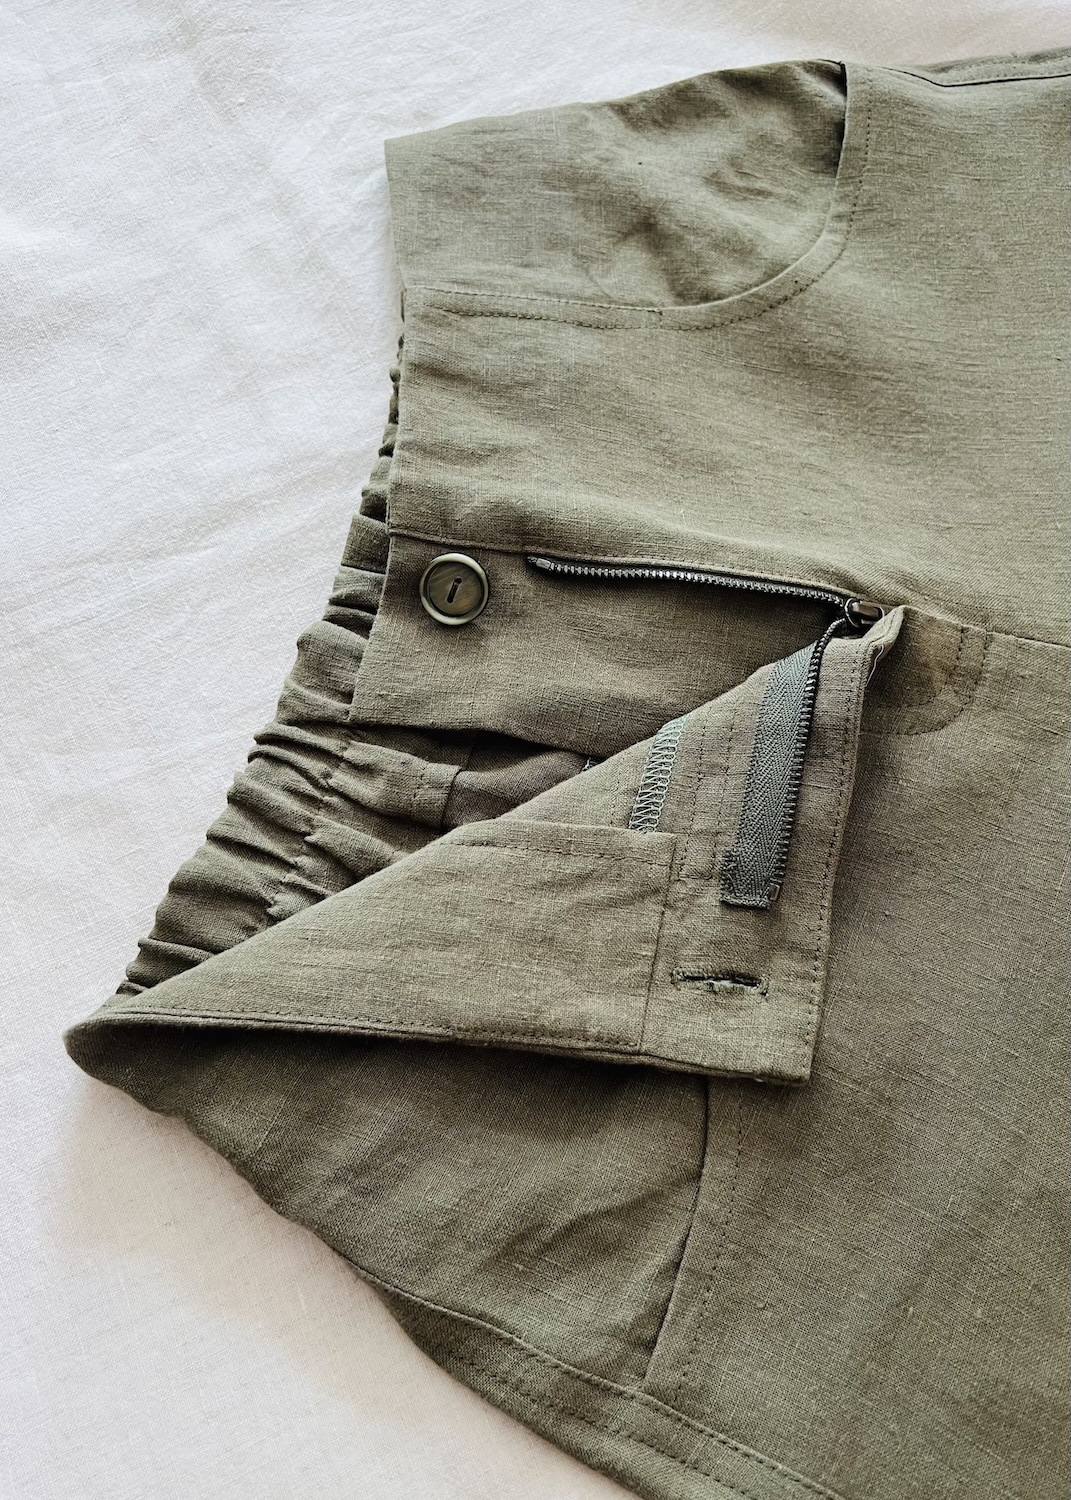
Let’s look at a few specific examples that will hopefully help clarify how these different constructions and shapes overlap.
Note: The following examples focus on drafting waistbands for a simple skirt. The diagrams are not to scale, and I have used a simplified basic skirt block with waist darts. The designs are made up and are just intended to illustrate the key processes. All seam allowances have been removed from the examples.
Example 1: Drafting a Separate, Straight Waistband
In this example, I will be drafting a separate, straight waistband for a skirt with a centre back invisible zipper. Therefore, the opening of the waistband will be at the centre back.
The skirt waistband is intended to sit a little above the natural waist, so I have ensured that the pattern is already drafted to the desired position before I get stuck in.
Step 1: Determine the finished length of the waistband
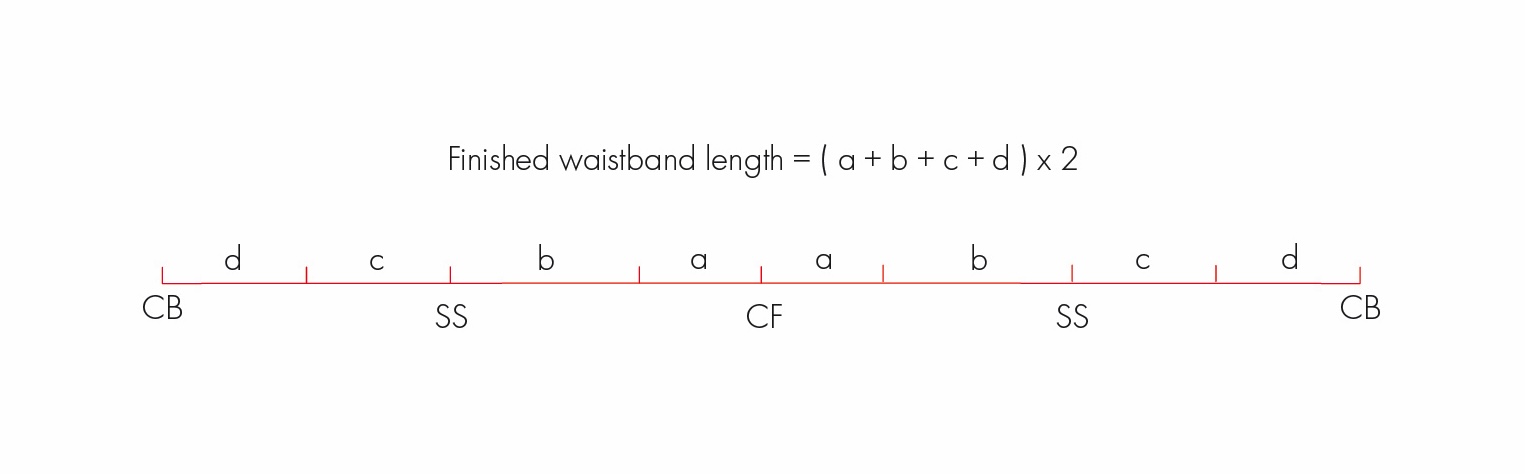
Measure the finished waistline of the skirt, in other words, the top edge of the skirt to which the waistband will eventually be attached. When taking these measurements, consider the pattern as if it has already been sewn together. Therefore, in this example I have excluded the dart intake and I am measuring:
- From the centre front of the skirt to the first dart leg (a)
- From the second dart leg to the front side seam (b)
- From the back side seam to the first dart leg (c)
- From the second dart leg to the centre back (d)
To find out the finished length of the waistband required, add these measurements together, then double the result, as you are only working with half the pattern.
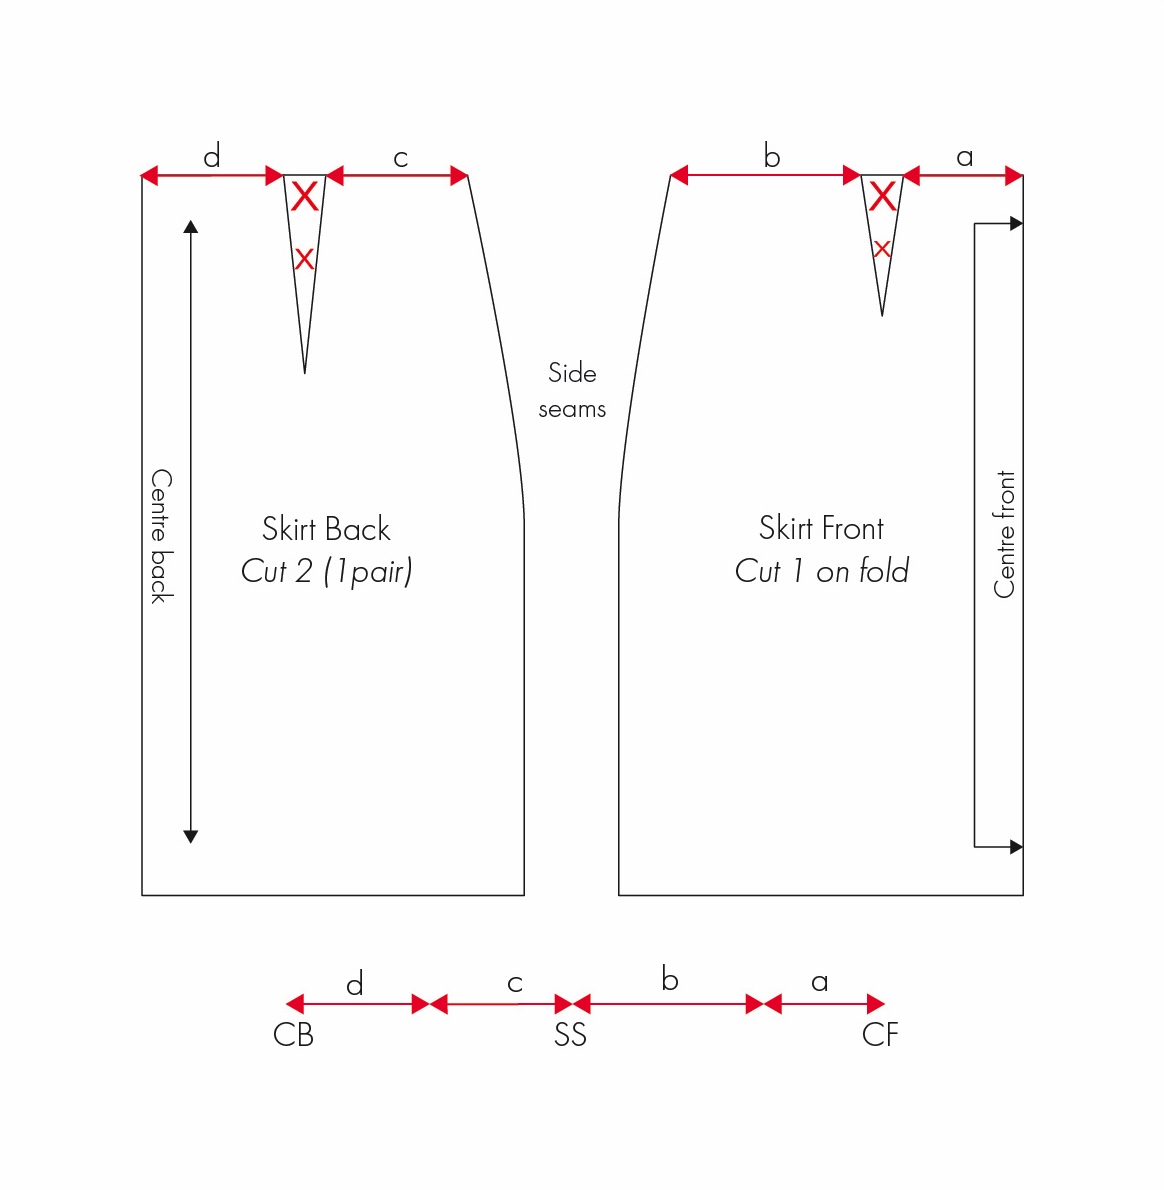
This measurement gives you the finished circumference of the skirt at the waistline, which should correspond to the finished length of the waistband. Therefore, when the two are sewn together, they should match perfectly.
Step 2: Determine the finished width of the waistband
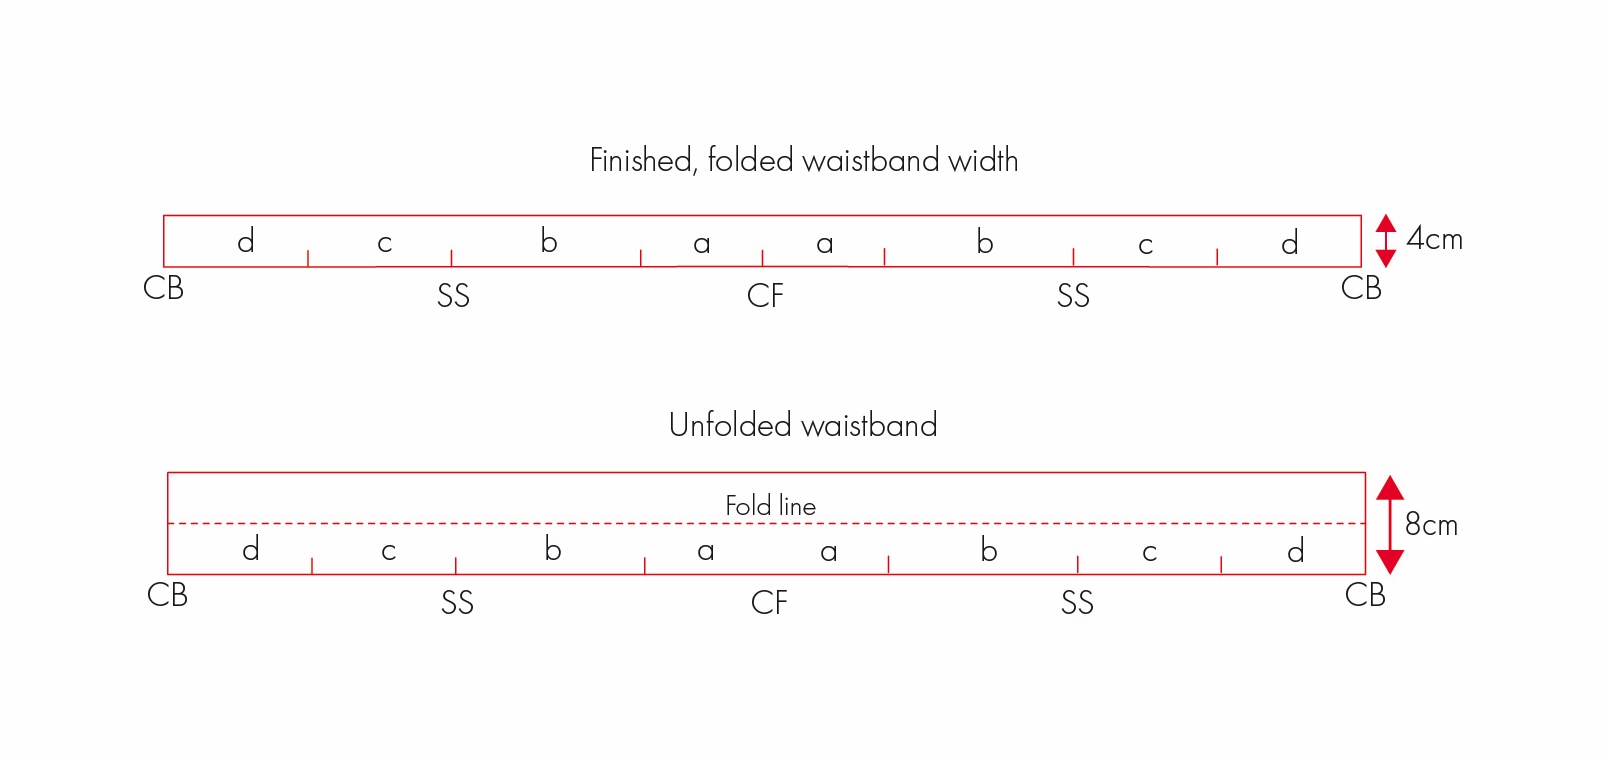
In many ways, the finished width is up to you and your personal preference.
In this example, I want the finished, folded waistband to be 4 cm wide. I also want the waistband to be cut from one single pattern piece, with no seam along the top edge. Therefore, I will need to draft the pattern piece at 8 cm wide to allow for it to be folded in half along its length. Seam allowances will be added in the next step.
Step 3: Add seam allowance
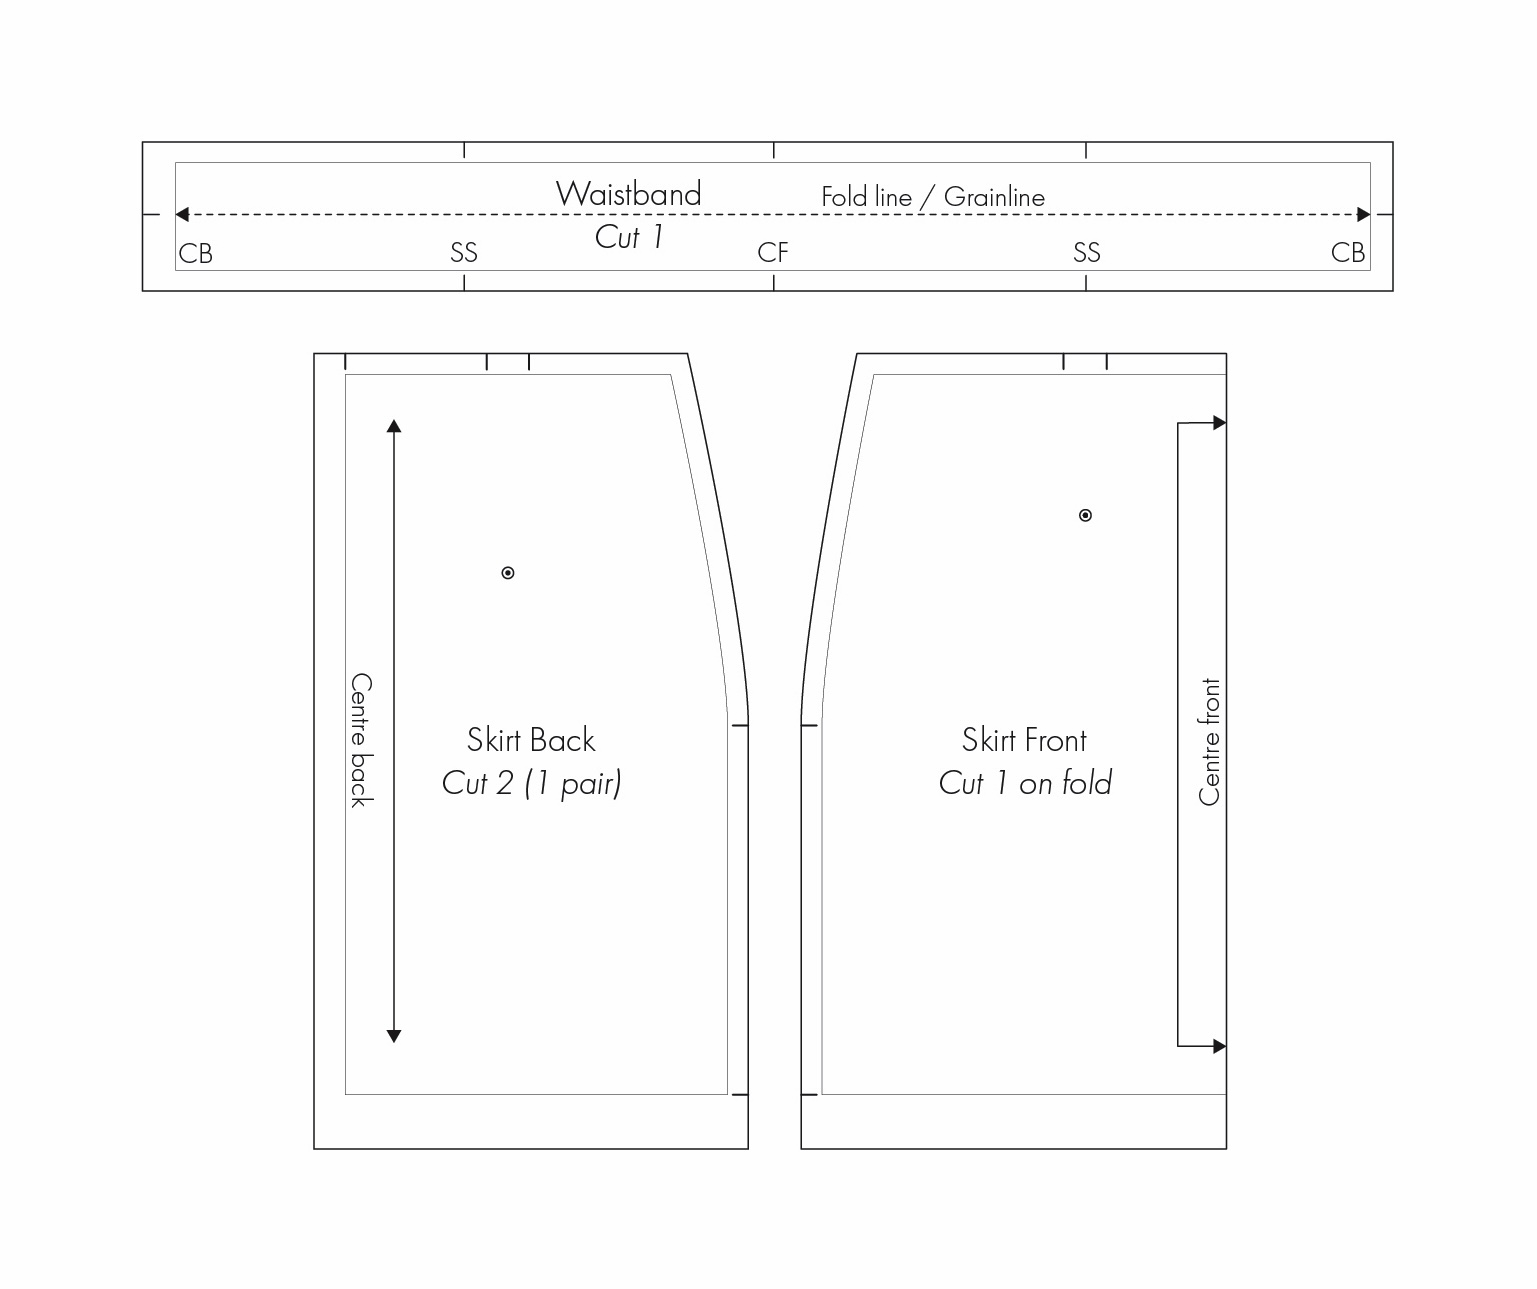
Now that I have established the finished dimensions of the waistband, I can add the appropriate seam allowance to the relevant edges.
Step 4: Add pattern markings
Add the relevant pattern markings and notches, including the centre front and back, side seams, grain and fold lines.
Step 5: Check and true the pattern piece
As always, check and true the pattern.
I recommend taking a read of ‘Checking, Blending, and Truing Your Sewing Patterns – Part 1’ and ‘Part 2’ for some tips on checking your pattern by walking the pieces together, and truing the seam allowances.
Example 2: Drafting an Integrated, Elasticised Waistband
In this example, I will be drafting an integrated, elasticised waistband for a skirt. I will be extending the skirt pattern up and above the waistline. This extension will then be folded or turned towards the inside of the garment to form the waistband.
Before I begin, I have made sure that the skirt pattern is already drafted to the desired finished waistline position. In this example, I am sticking to a higher waist.
Note: For an elasticised style like this, remember that the waist opening must be big enough to comfortably pass over the widest part of the body, which will likely be the hips. In this example, I have incorporated the dart intake and slightly widened the pattern at the hips.
Step 1: Determine the finished waistband width
Because the waistband is a continuation of the skirt pattern, its length is already determined by the existing waistline of the pattern piece. Therefore, the first step in this example is to determine the finished width of the waistband.
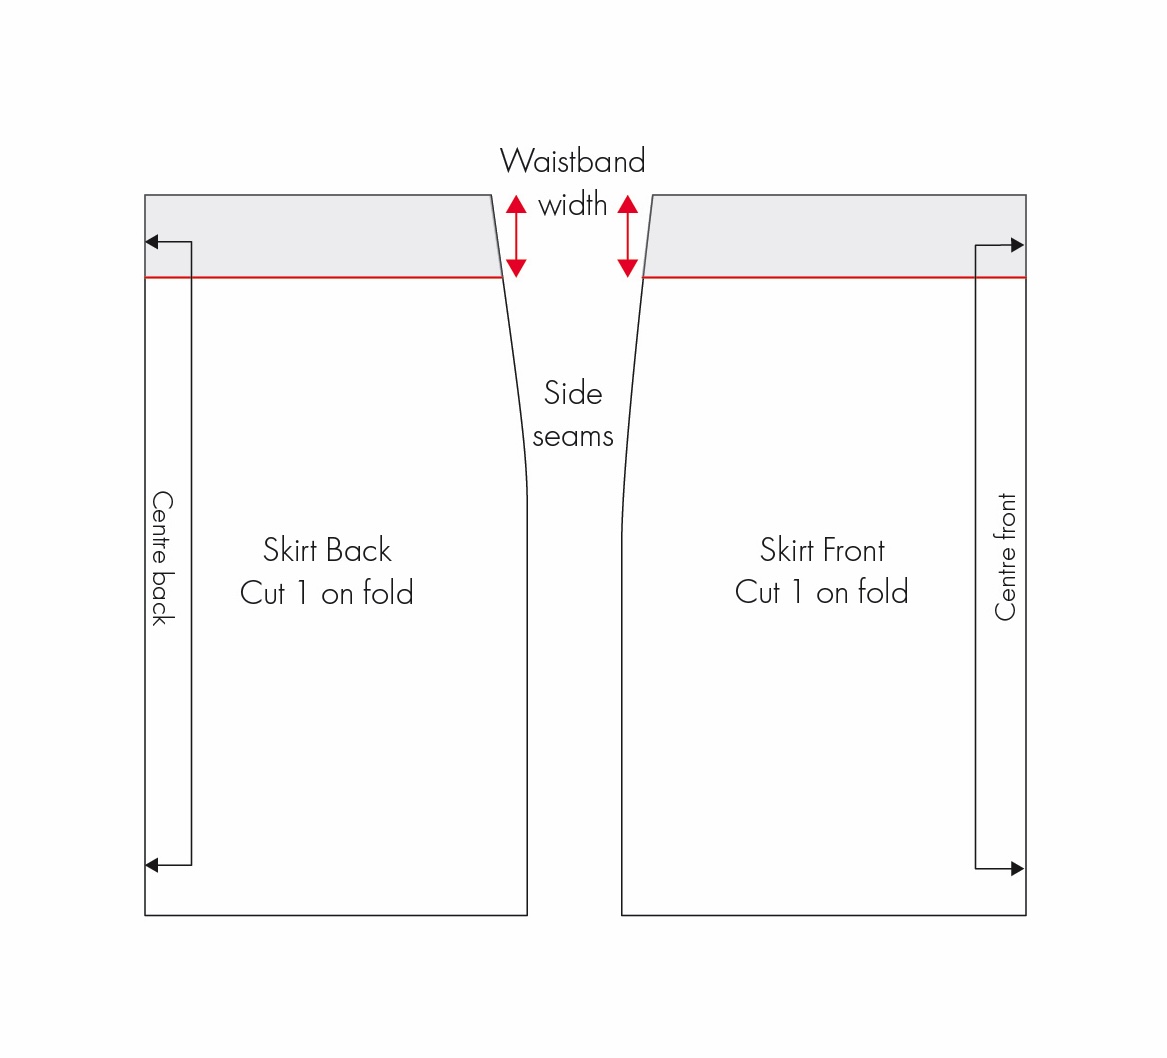
Measure down from the finished waistline by the desired finished width of the waistband to be and draw a line across the pattern. Keep this line parallel to the waistline.
As I am creating an elasticised waist, I also need to ensure the casing is wide enough to accommodate the elastic comfortably. You want enough room to allow for easy insertion of the elastic, and a little wriggle room so that it isn’t being held too tightly and is able to move and stretch freely.
A good general rule is to add an additional 6mm or ¼” to the width of the casing. Therefore, as an example, if I plan to use 40 mm elastic, I would make the finished, folded waistband approximately 46 mm wide.
Step 2: Create a working piece
create a separate working piece for both the front and back of the skirt by tracing around the original pattern stopping at the line just created in Step 1 (refer to the shaded grey area). This piece represents the part of the waistband that will be folded to sit on the inside of the skirt.
 Step 3: Flip the working piece
We now need to flip this working piece upwards along the original waistline to create a mirrored section. This mirrored section will become the additional part of the pattern needed for the integrated waistband when it is folded back on itself.
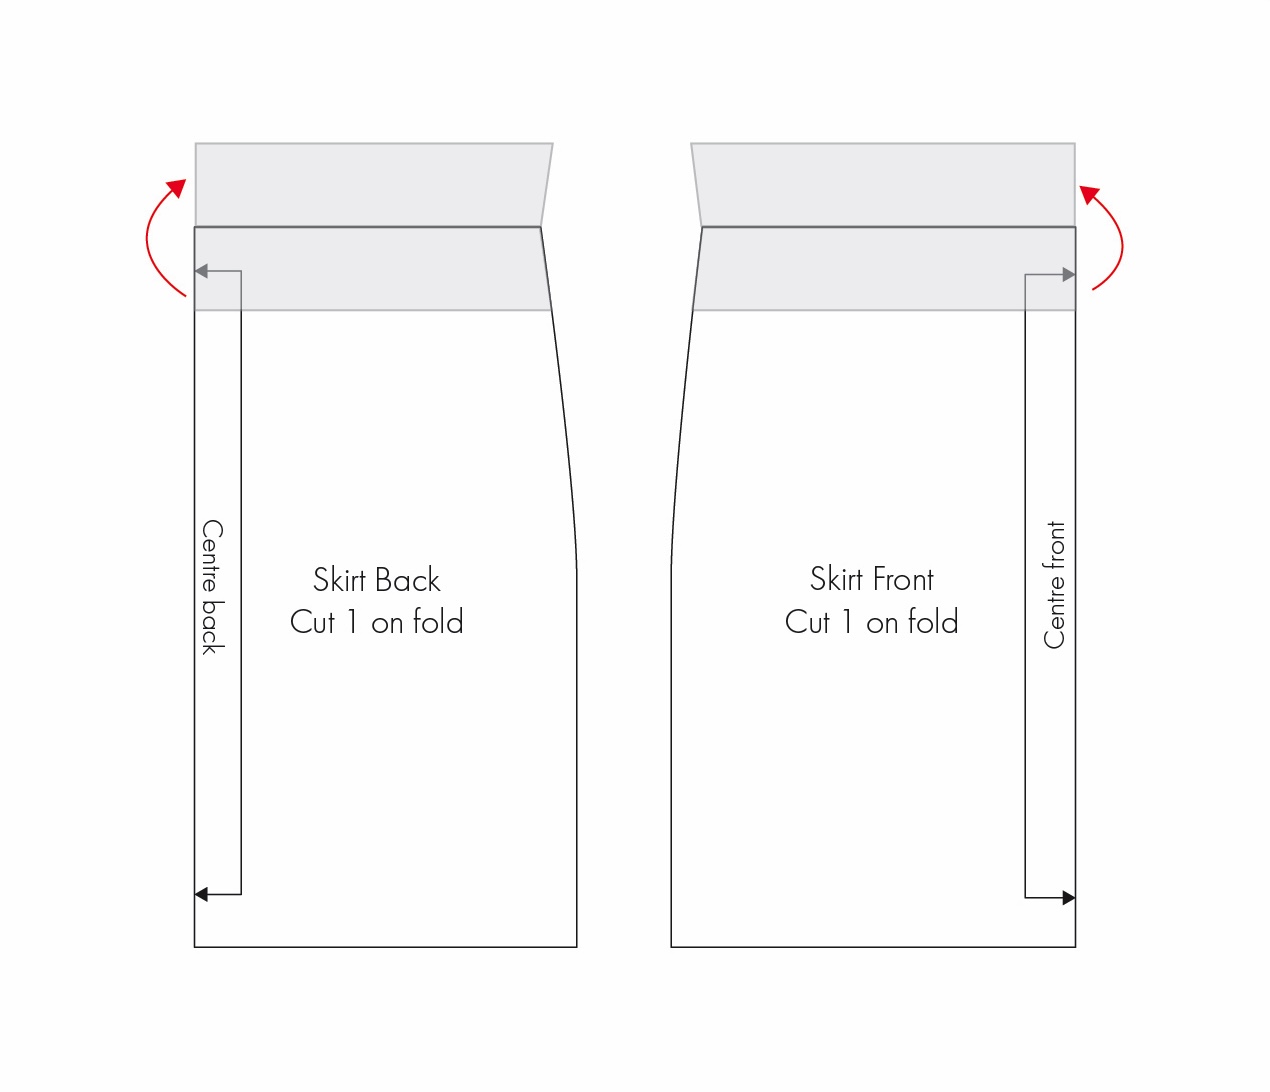 Step 4: Retrace
Retrace the entire pattern piece, incorporating the mirrored section of the waistband. This will create one continuous pattern piece.
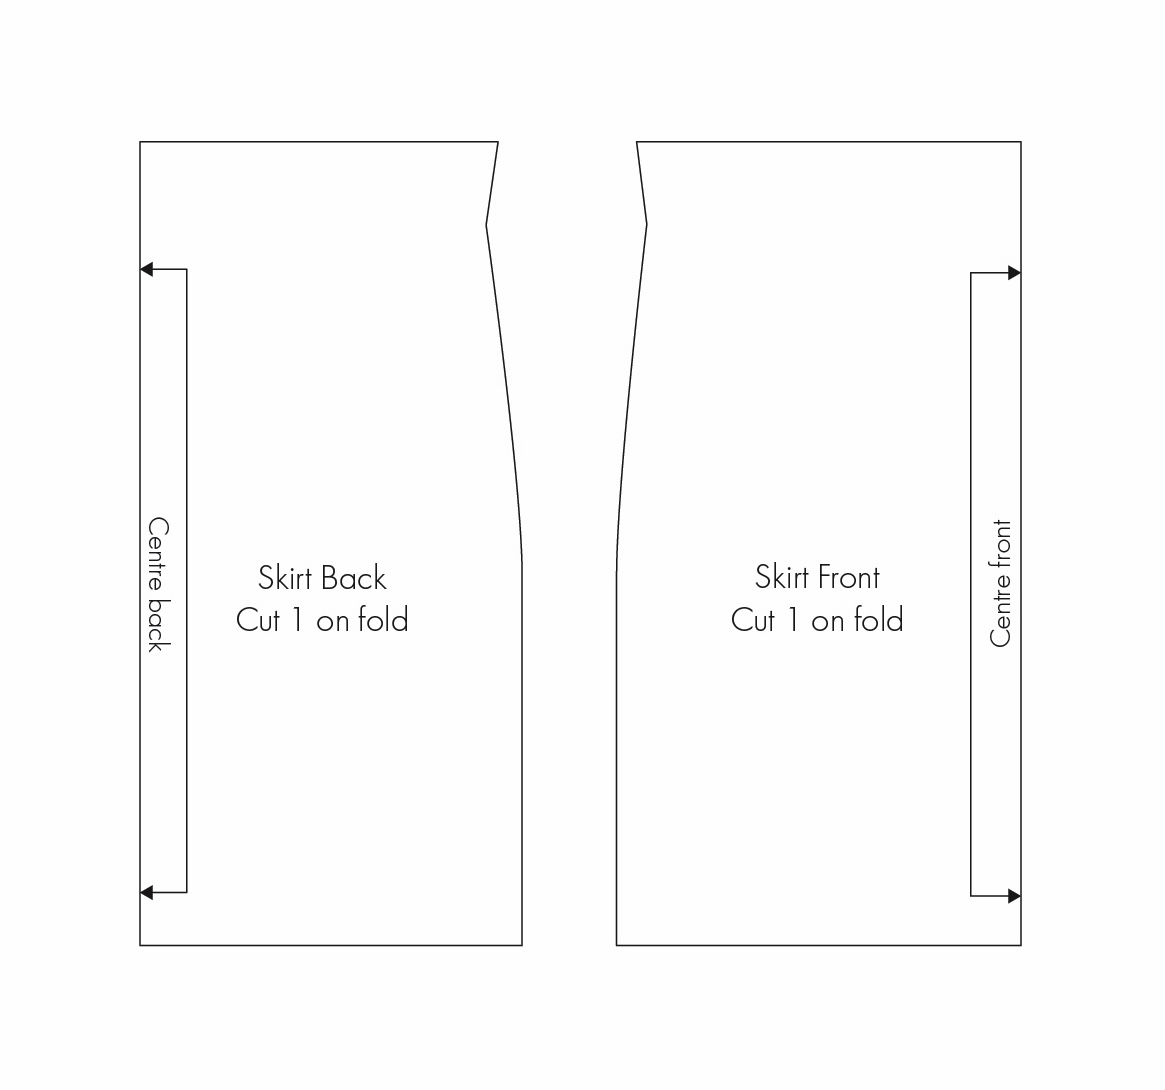 Step 5: Add seam allowance
I can now add the appropriate seam allowance to the relevant edges.
Step 6: Add pattern markings
Add the relevant pattern markings and notches, in particular the fold line for the waistband.
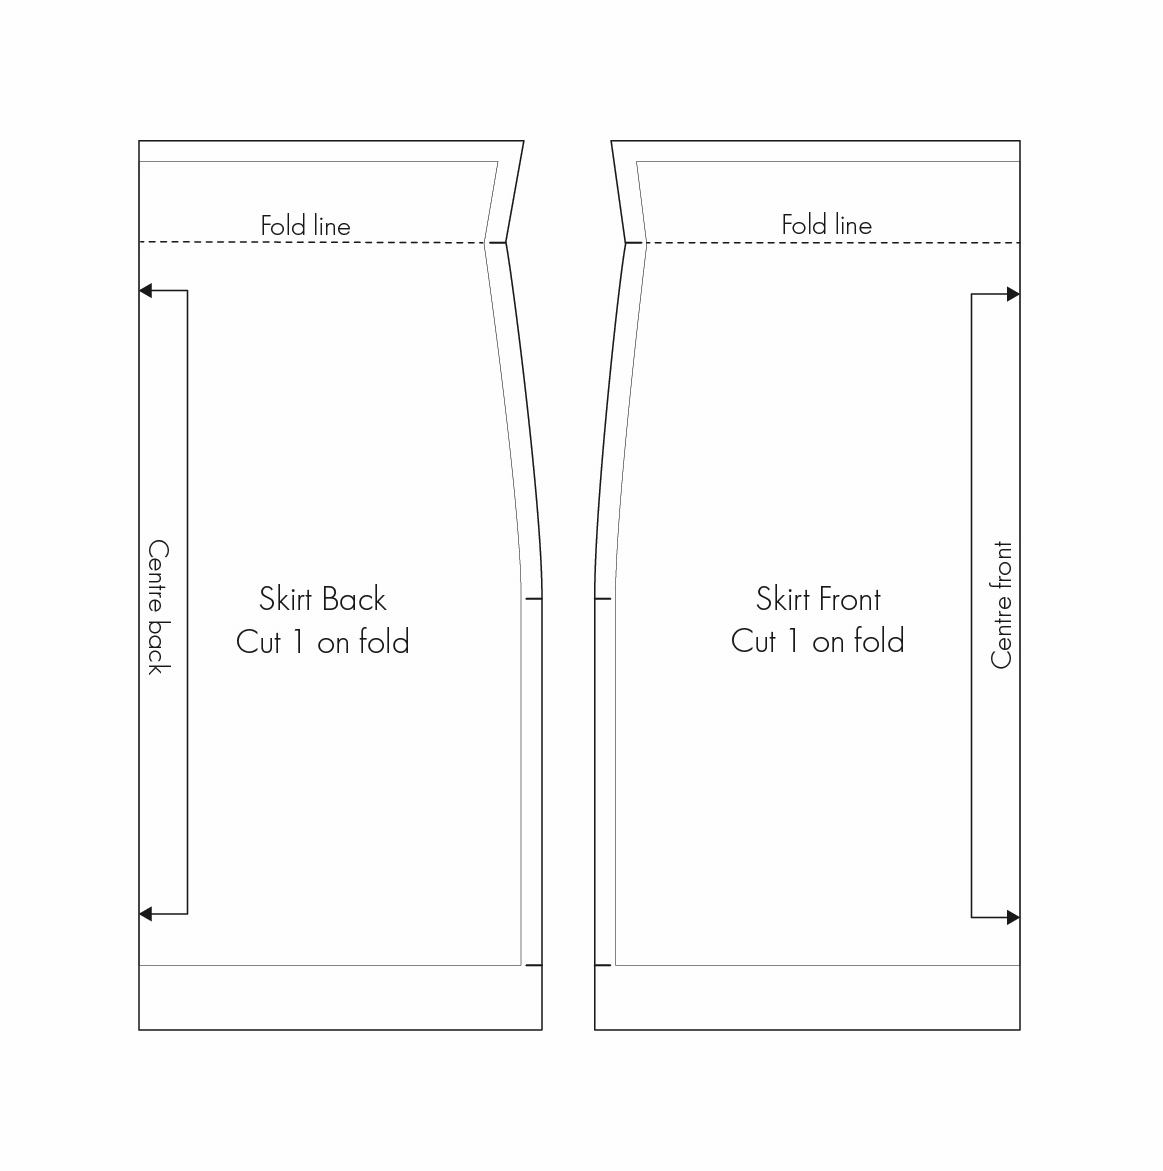
Step 7: Check and true the pattern piece
Finally, check and true the pattern.
Example 3: Drafting a Separate, Shaped Waistband
In this example I will be drafting a separate, shaped waistband for a skirt with a centre back button and zipper closure.
Again, before I begin, I have made sure that the skirt pattern is already drafted to the desired finished waistline position. This example is intended to sit around the natural waist.
Step 1: Determine the finished waistband width
The first step in this example is to determine the finished width of the waistband.
Once this has been determined, draw a cut line across the pattern, measuring down from the waistline by the desired finished width of the waistband. Keep this line parallel to the waistline. This line will eventually become the seam where the waistband will be sewn to the body of the skirt.
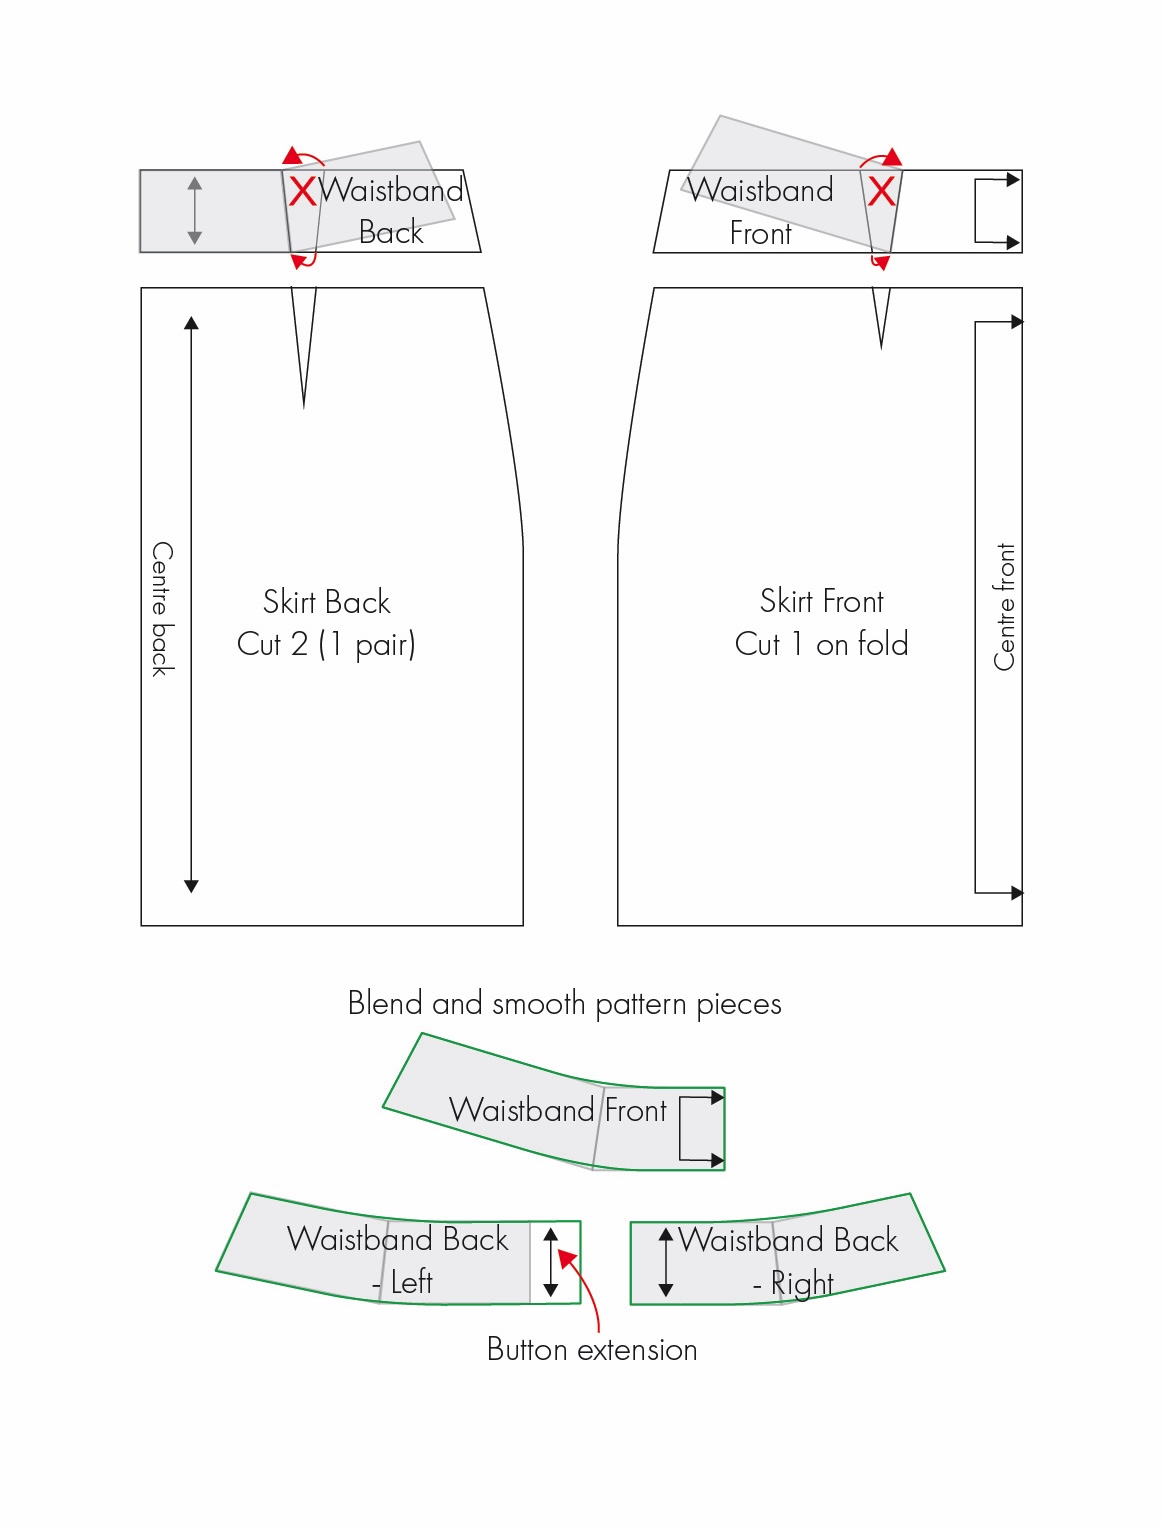
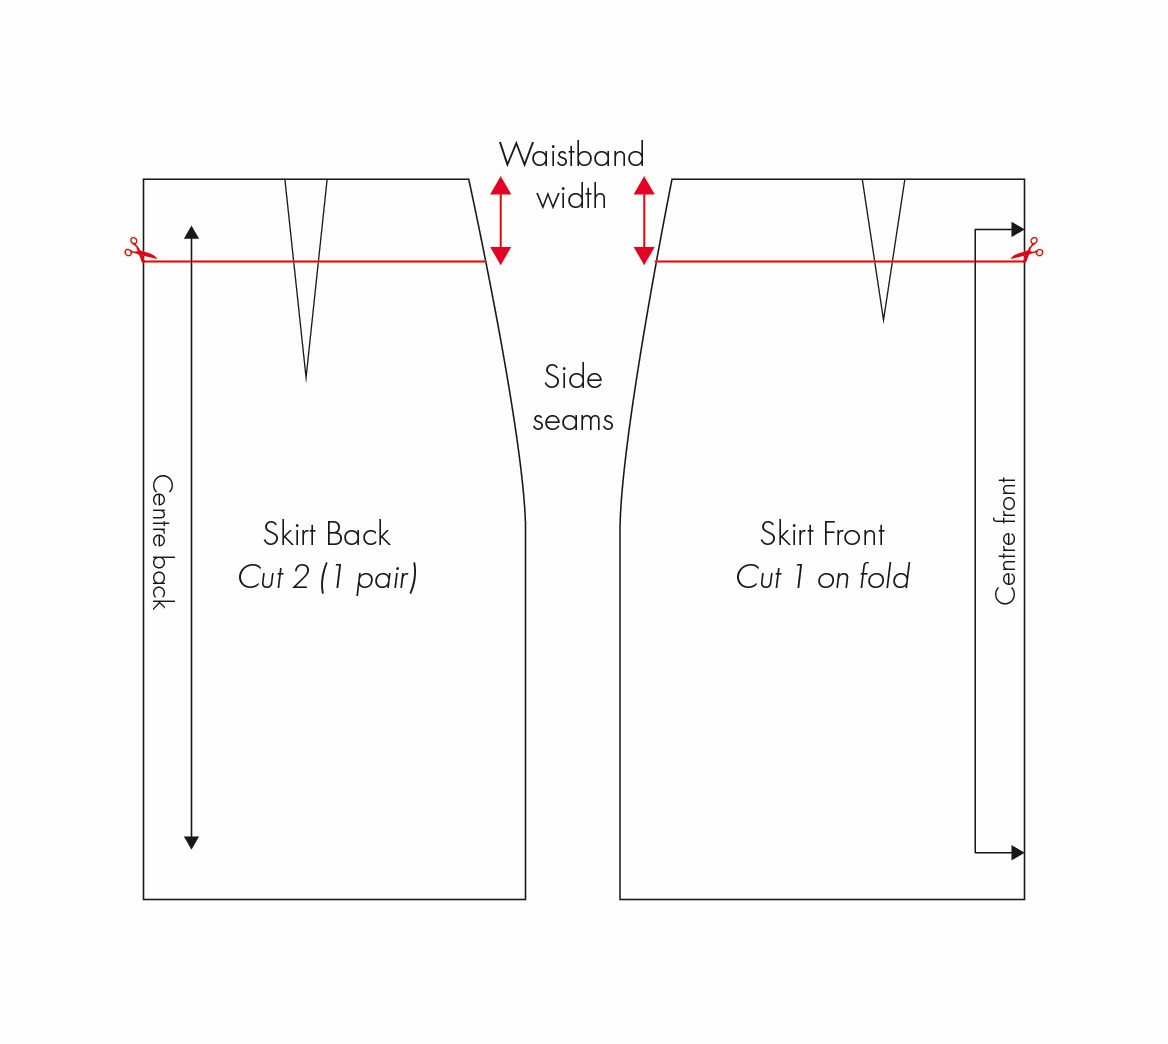 Step 2: Divide the pattern in two
Cut the pattern piece along these lines, separating the pattern into a waistband piece and the body of the skirt.
Step 3: Close out the darts
Similar to the other examples, I want to be working with finished measurements for the waistband. Therefore, I am going to close out the dart intake by either folding out the dart or simply cutting along the dart legs and bringing them together (refer to shaded grey areas).
Step 4: Blend and smooth the pattern pieces
Blend and smooth the outer edges of the waistband pattern pieces (refer to green lines).
Step 5: Add button extension
In this example I require an extension at the centre back on one side of the waistband to accommodate the button closure. As a result, there will need to be two separate back waistband pattern pieces: one for the left side with the button extension and one for the right without an extension.
 Step 6: Add seam allowance
Now that I have created separate waistband pattern pieces from the body of the skirt, I can add the appropriate seam allowance to the relevant edges.
Step 7: Add pattern markings
Add the relevant pattern markings and notches, including the centre front and centre back, side seams, and grainline.
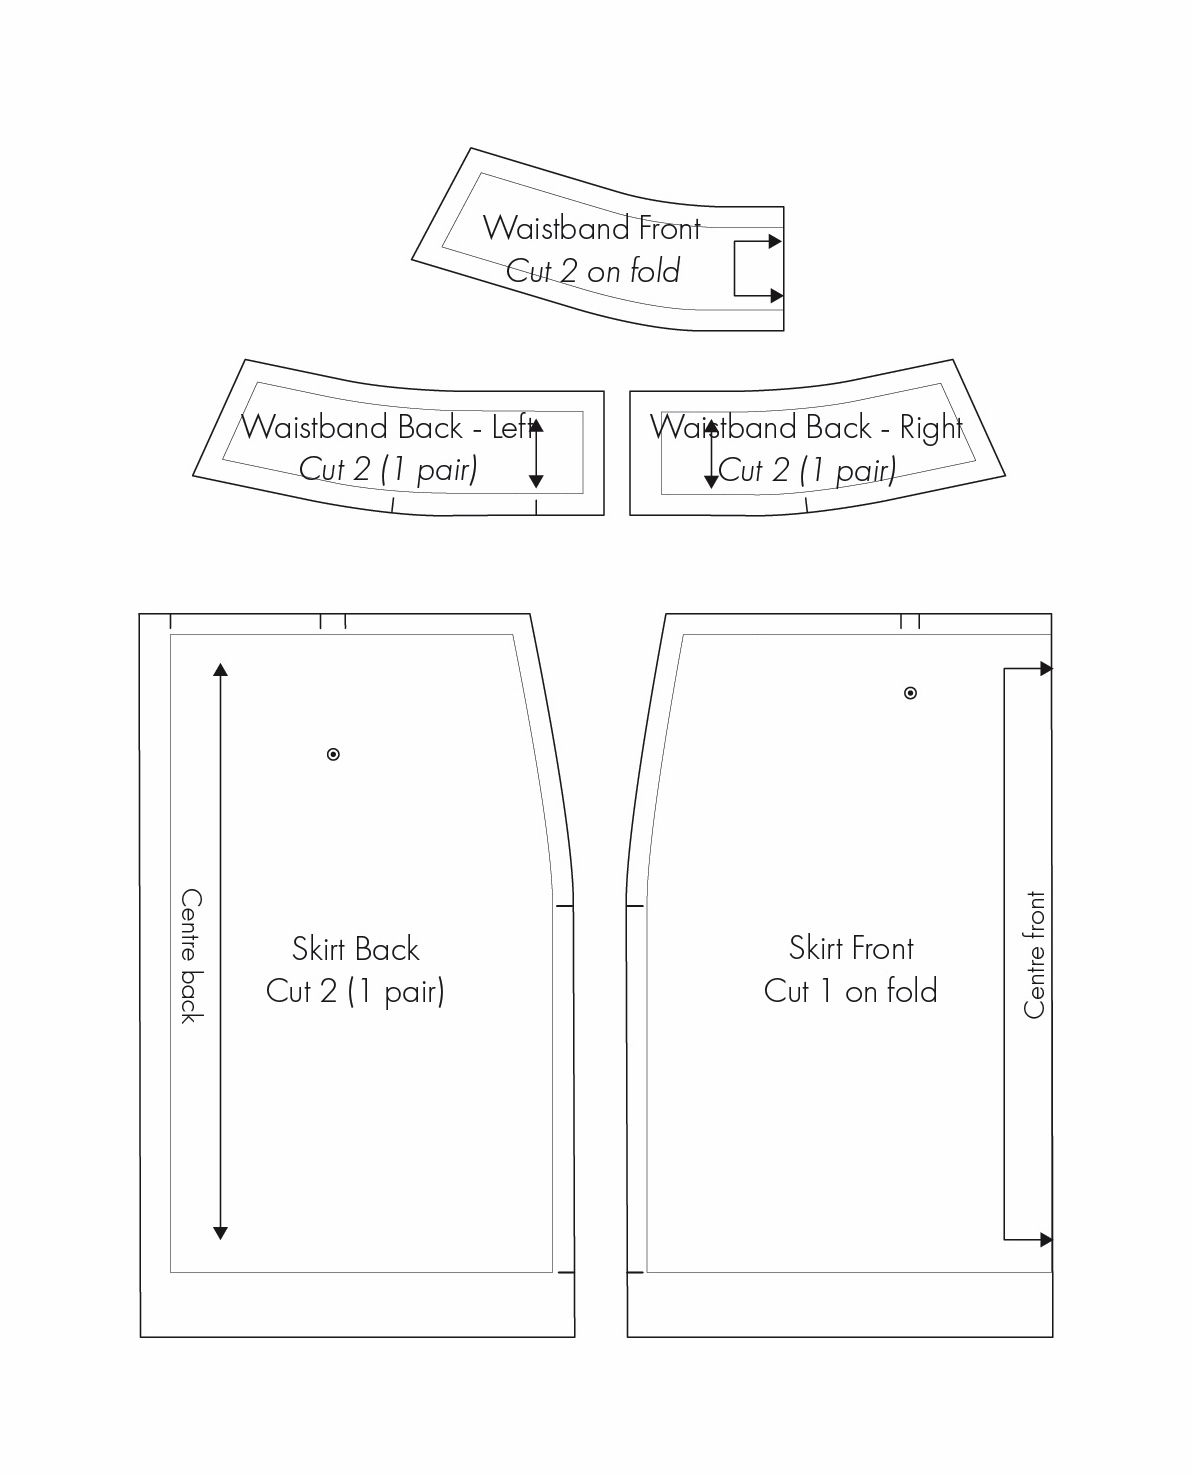 Step 8: Check and true the pattern piece
Finally, check and true the pattern.
Note: As an alternative to the method above, you could simply create a rectangle the desired width of the waistband and the length of the finished waistline. Then, cut and spread the rectangle at the centre front and side seams, distributing the required shaping along the lower edge until its total length matches the length of the top of the skirt where it will be sewn.
I tend to prefer the method above, as I find it gives a more accurate shape, but this alternative can work just as well and may be a good option depending on your preference.
For more on cutting and spreading a pattern, see ‘An Introduction to the Cut and Spread Method’.
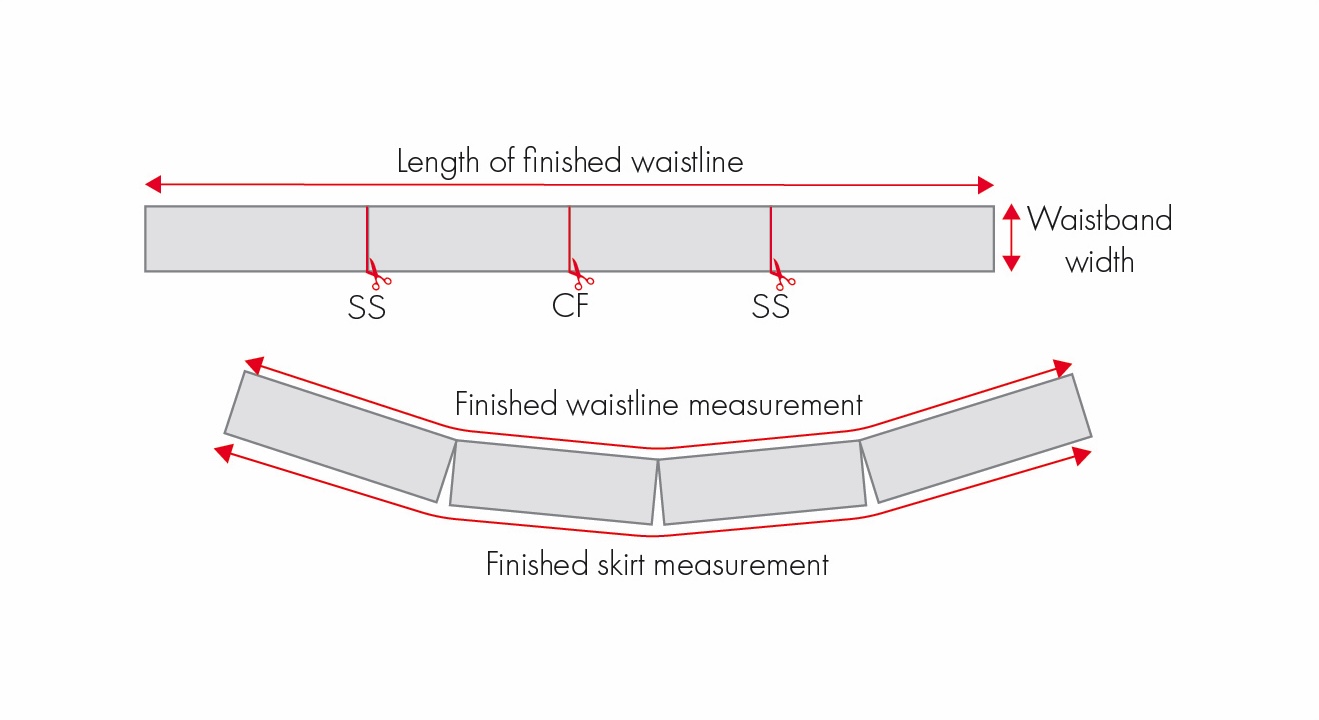
Tip: As you can see in this example, after I have removed the depth of the waistband, I am left with a very small dart at the front of the skirt. If the dart ends up really small like this and not really worth sewing, you could consider moving it to the side seam and blending back into the original side seam.
 Example 4: Drafting a Faced Waistline
In this example, I will be drafting a facing for the waistline of a simple skirt with an invisible zipper closure at the left side. The facing will be attached to the inside of the garment, so it will be invisible from the outside.
The skirt pattern is already drafted to sit at the natural waist.
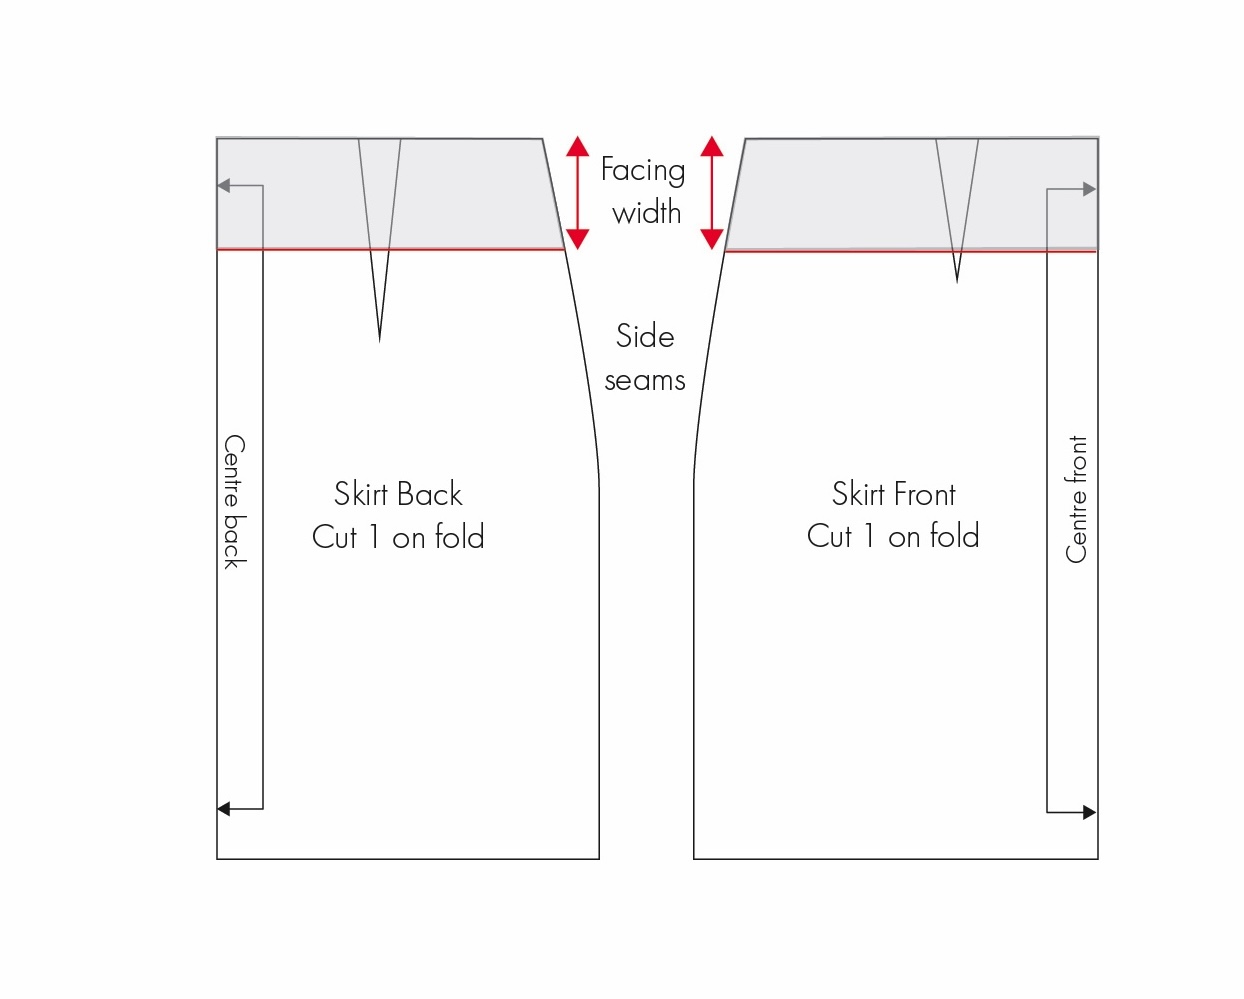
Step 1: Determine the width of the facing
As with the previous example, first determine the finished width of the facing. A good rule of thumb for this style of waistline facing is a finished width of around 5-10cm.
Once this has been decided, draw a line across the pattern, measuring down from the waistline by the desired finished width of the facing. Keep this line parallel to the waistline.
Step 2: Create a working piece
Create a separate working piece for both the front and back of the skirt by tracing around the original pattern stopping at the line created in Step 1 (refer to shaded grey area). This piece represents the facing that will be on the inside of the skirt.
 Step 3: Close out the darts
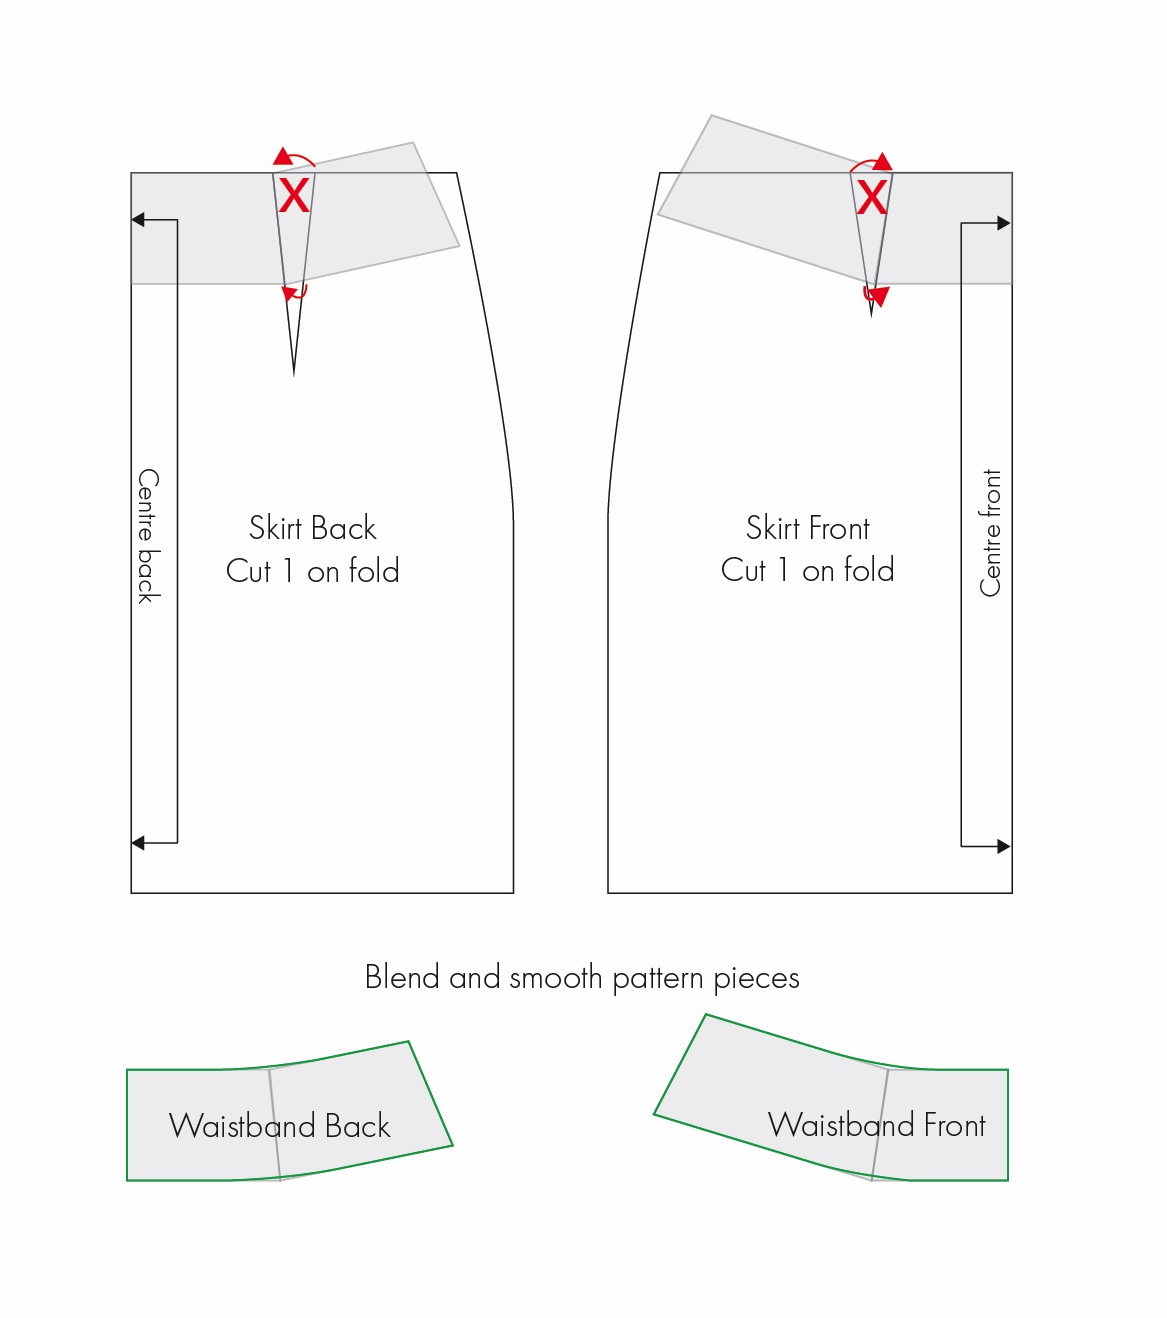
In this example, I will be attaching the waistline facing to the skirt after the skirt darts have been sewn. So, again I am going to close out the dart intakes by simply folding out the dart or cutting along the dart legs and bringing them together (refer to shaded grey areas).
Step 4: Blend and smooth the pattern pieces
Blend and smooth the outer edges of the facing pieces (refer to the green lines).
 Step 5: Add seam allowance
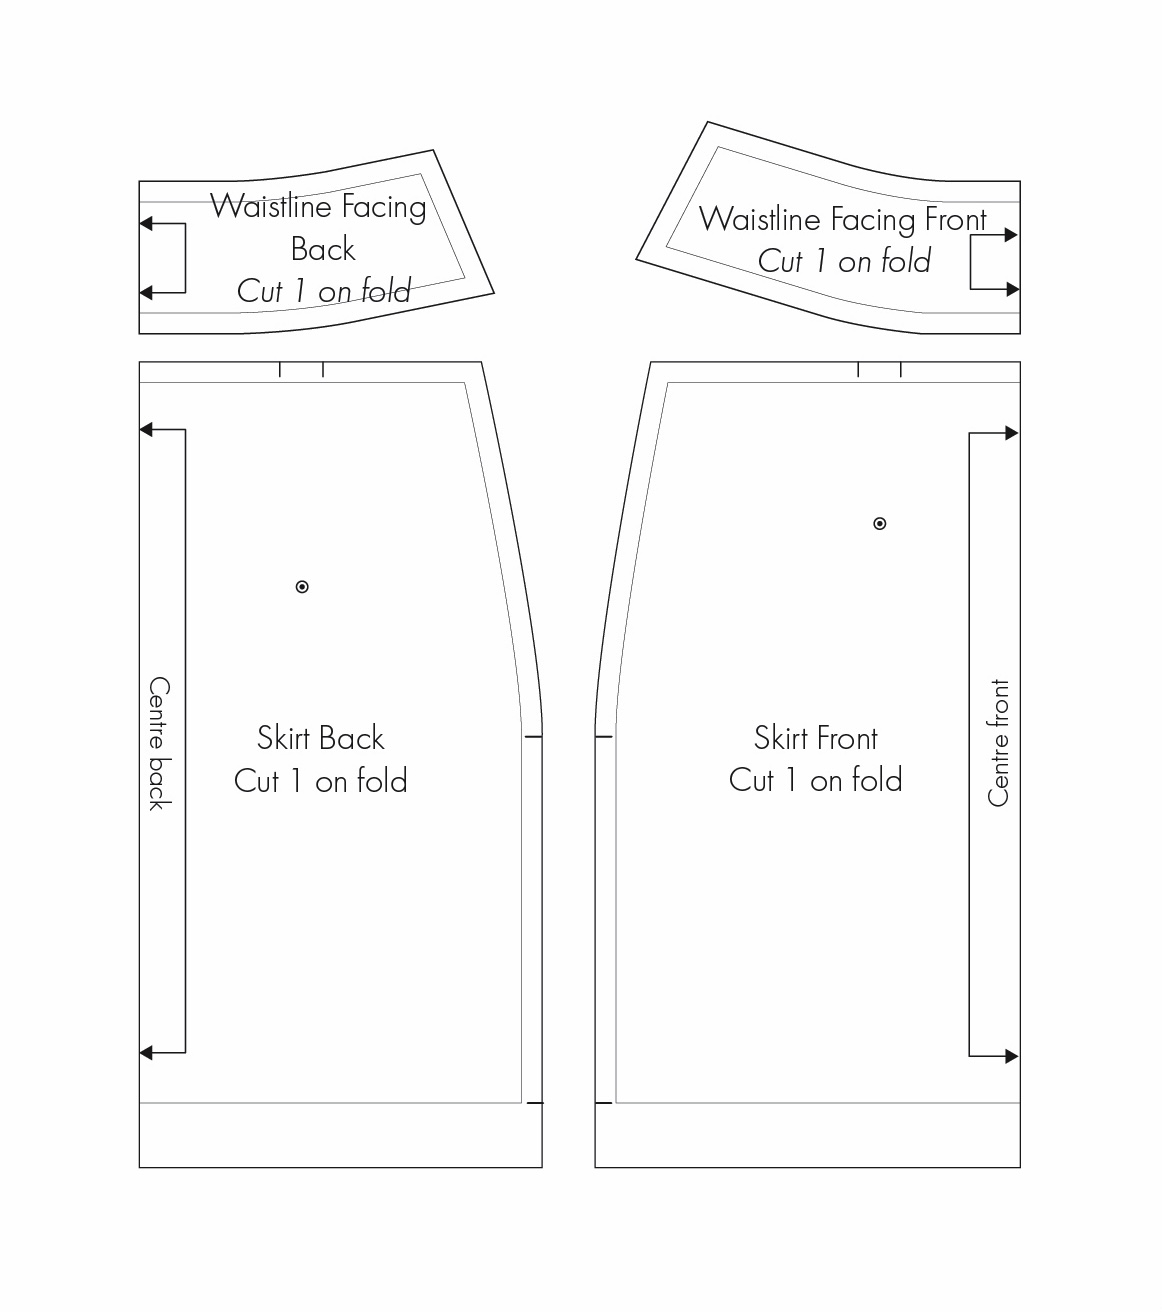
Now that I have created separate facing pattern pieces from the body of the skirt, I can add the appropriate seam allowance to the relevant edges.
Step 6: Add pattern markings
Add the relevant pattern markings and notches, including the centre front and back, side seams, and grainline.
 Step 7: Check and true the pattern piece
Finally, check and true the pattern.
There is of course, a lot more to waistbands than I have covered here. There are countless shapes and designs, from simple straight waistbands to more complex asymmetrical styles. But hopefully this article has given you a good starting point and provided a basic understanding of waistband pattern making, and you can go on and experiment with these common shapes and types in your own pattern making, or when trying to adapt an existing pattern!