
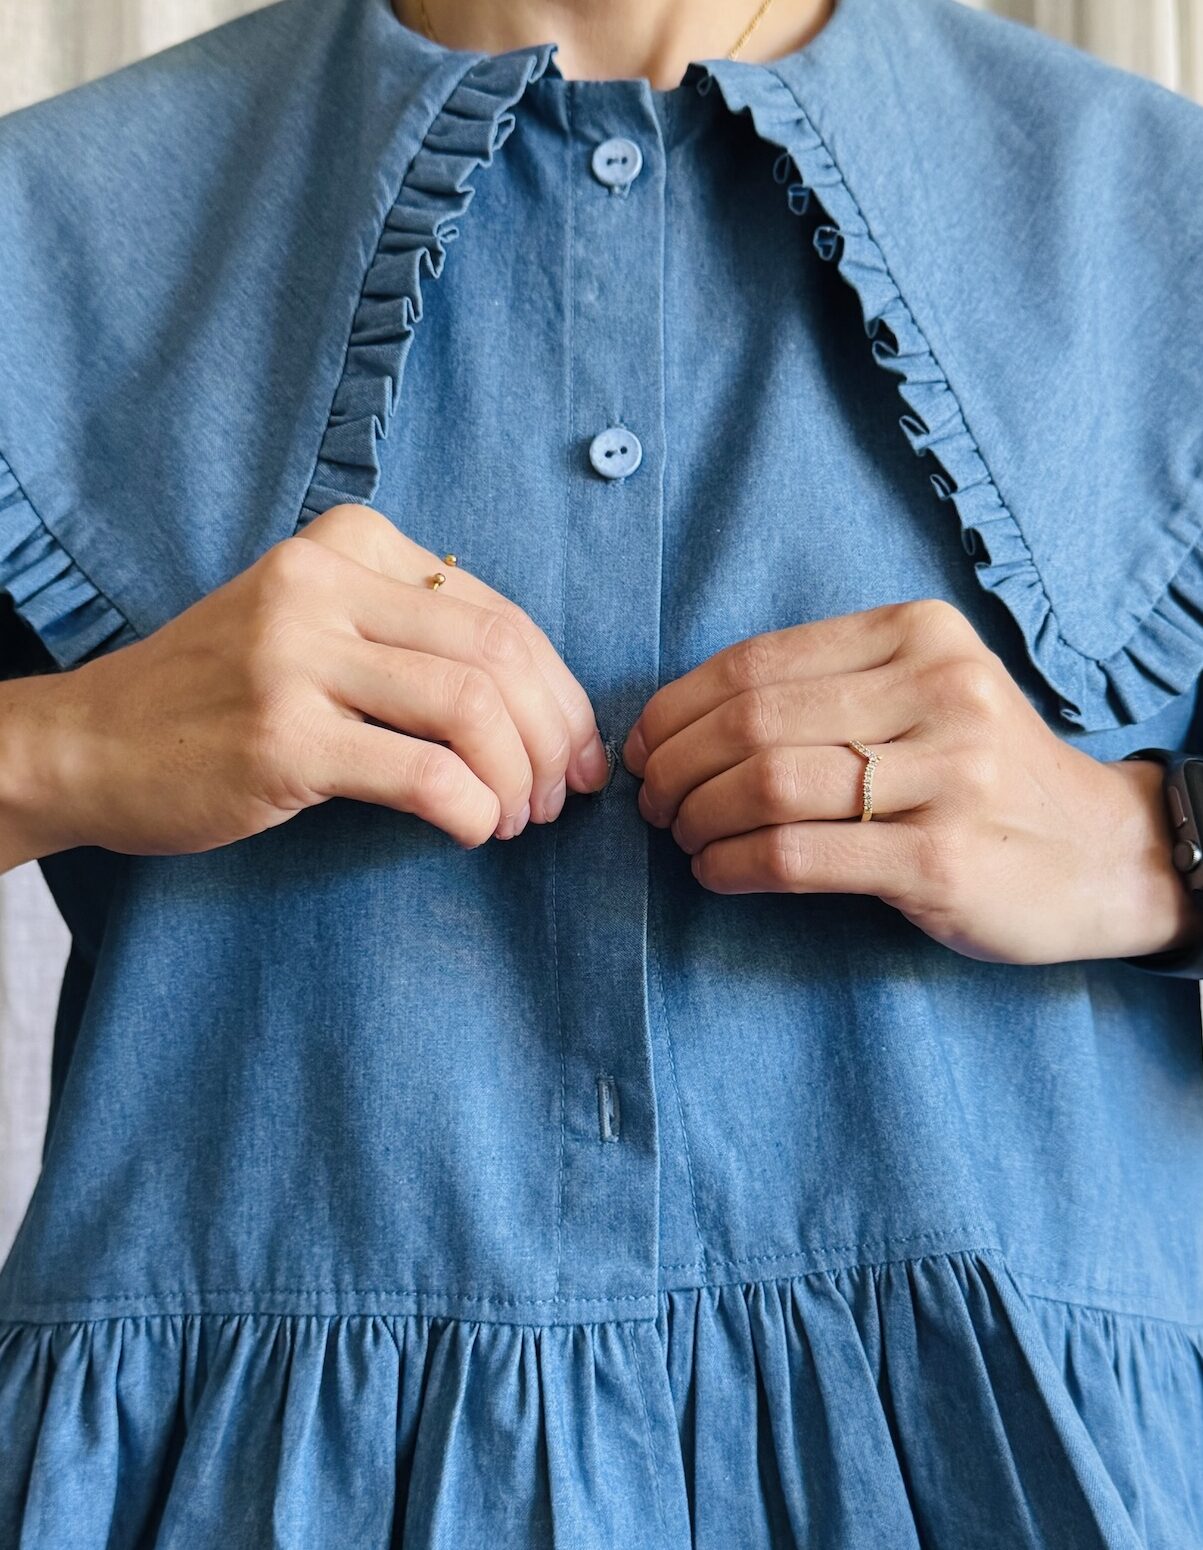
I recently wrote about buttons, covering the different types, materials, sizes, and how to sew them on by hand. So here is the other half of the story: buttonholes.
Now there is more to buttonholes than just cutting a hole in fabric to fit a button. Their size, position, direction, spacing, and stabilisation will all affect how the finished garment looks, fits, and functions.
So in this tutorial I am going to look at the basic anatomy and different types of buttonholes, before jumping into a few key considerations worth thinking about when planning buttonholes.
Anatomy of a Buttonhole
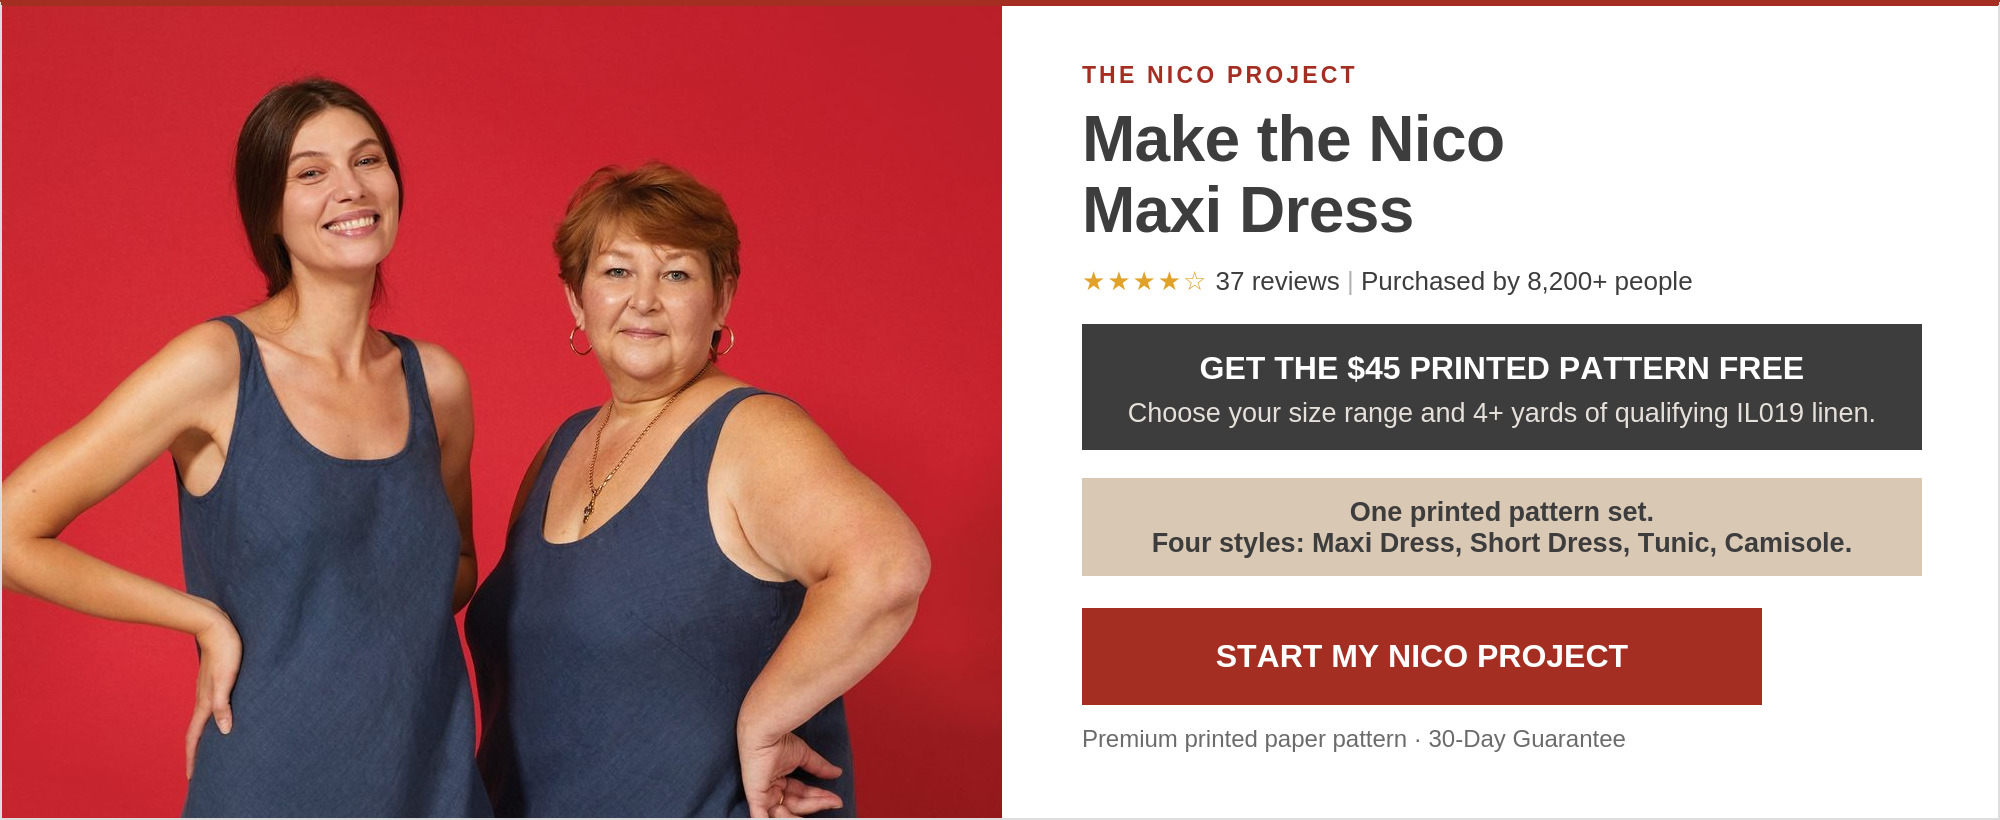
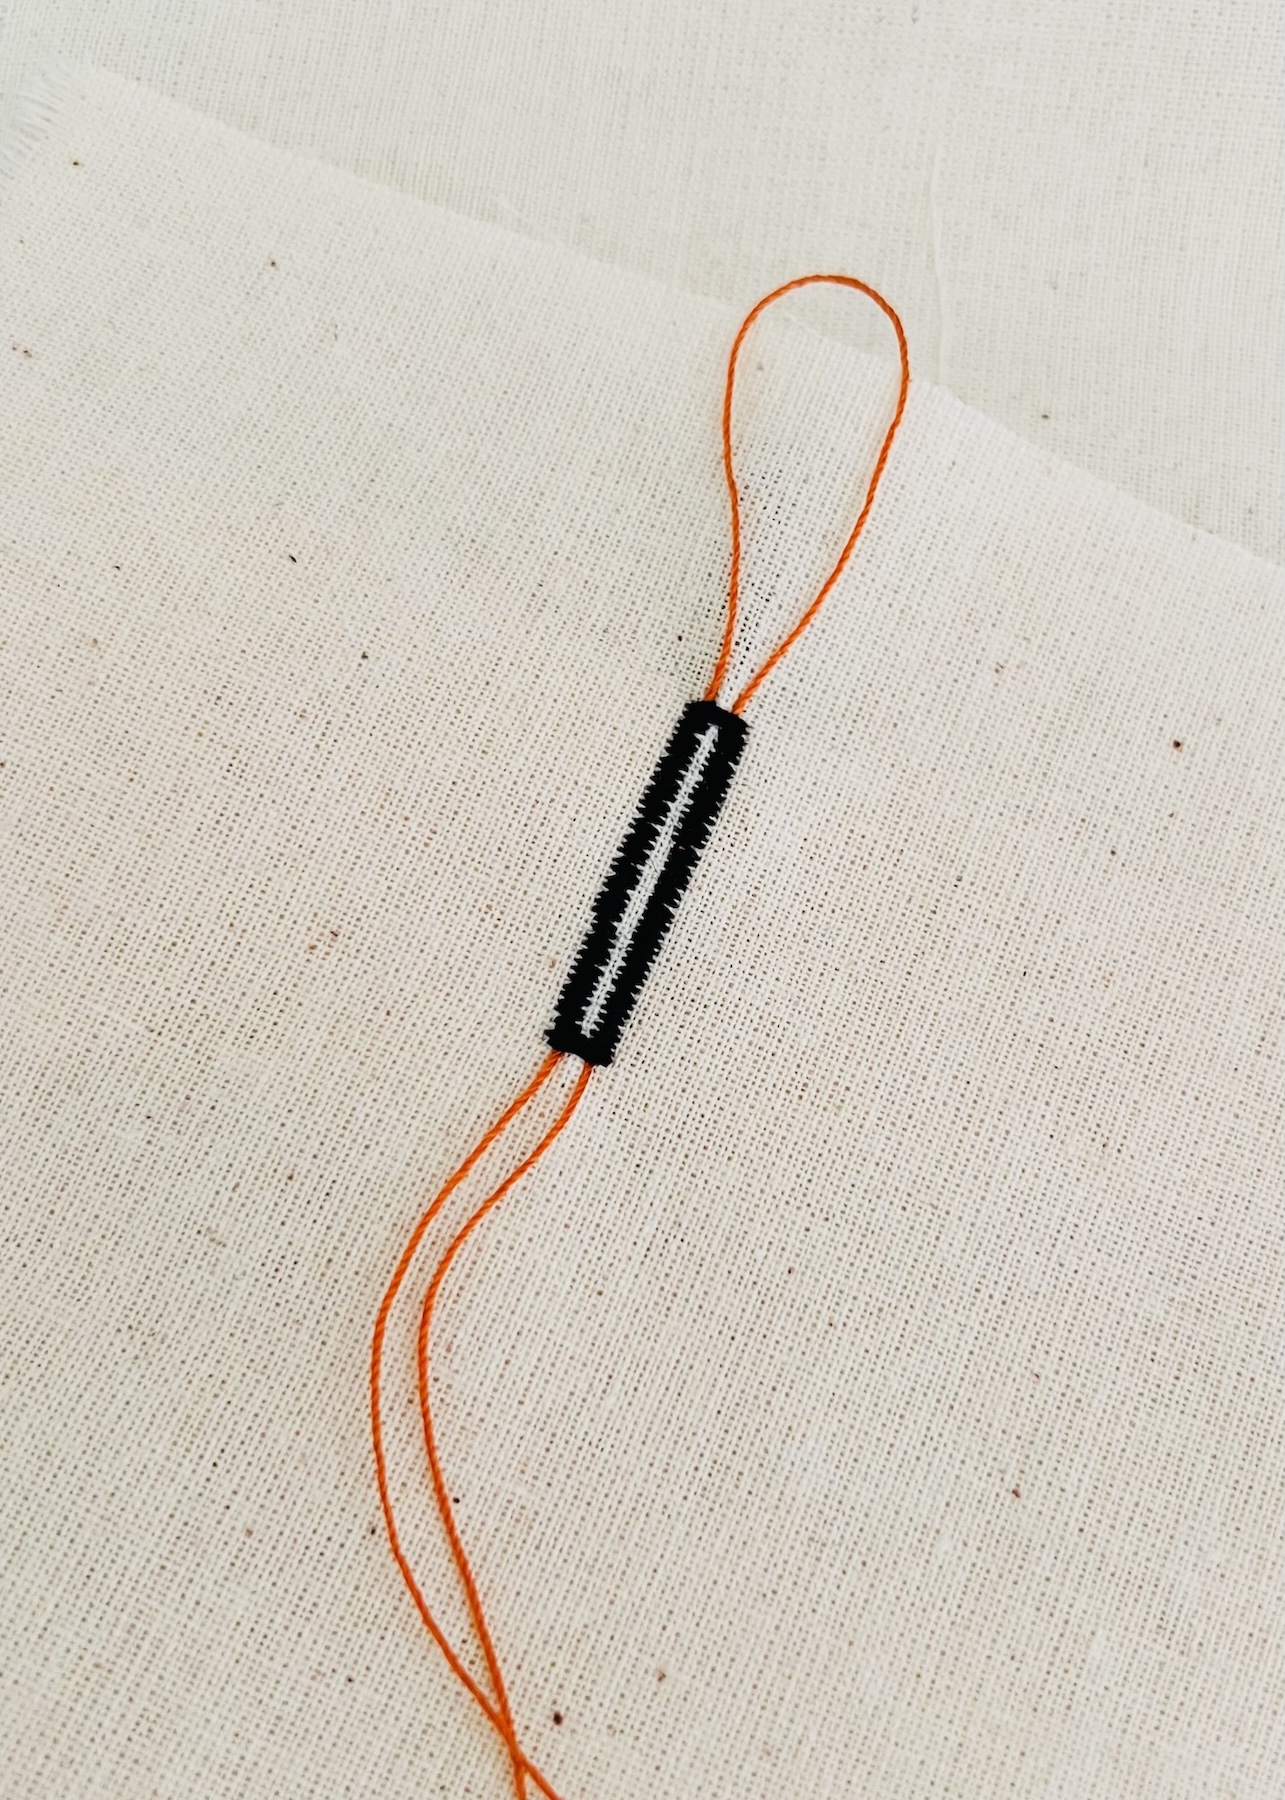
Although there are different types of buttonholes (which I get to next), they all share pretty much the same basic structure.
- Beads: These are the two parallel rows of very tight zig-zag or satin stitching that form the long edges of the buttonhole.
- Bar tacks (ends): These are the short, dense rows of zig-zag or satin stitching at each end of the buttonhole connecting the beads. They can be straight or rounded depending on the type of buttonhole.
- Centre slit: The channel between the beads which is cut to allow for the button to pass through.
Different Types of Buttonholes
Just as there are different types of buttons, there are also several different types of buttonholes. The right choice for you depends on the fabric, type of button, style of the garment and the kind of finish you are after.
Let’s look at some of the different types.
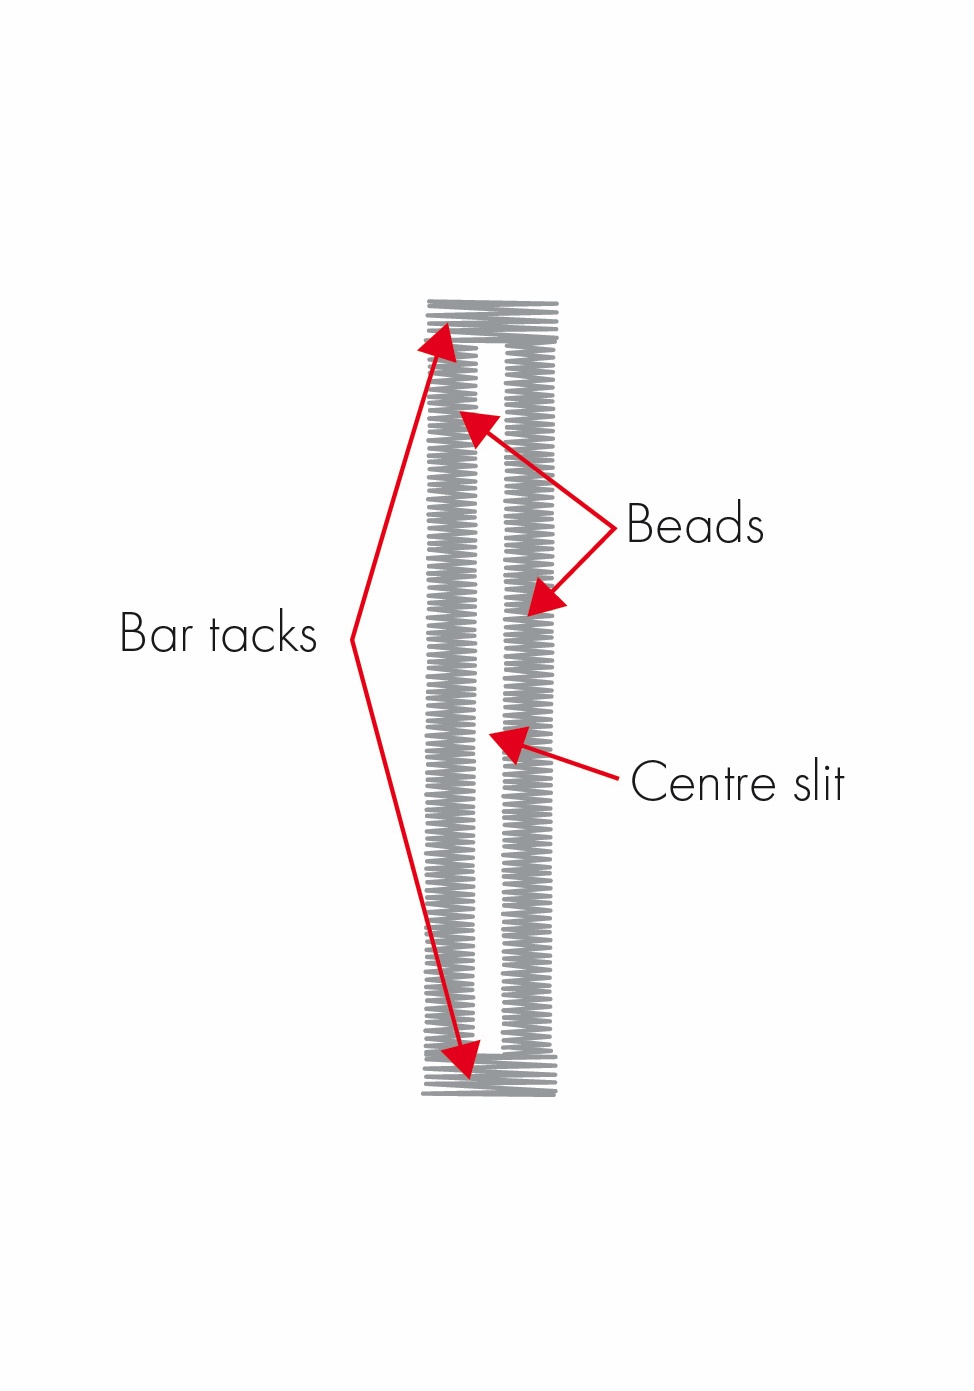
- Standard: This is the most common type of buttonhole. It has a simple rectangular shape and is suitable for light to medium-weight woven fabrics.
- Narrow: This is a slimmer, rectangular version, used for lighter fabrics or more delicate designs.
- Rounded: This style has one rounded end and one straight bar tack end. It is suitable for medium- to heavyweight fabrics.
- Keyhole: As the name suggests, this buttonhole resembles a keyhole. It has two straight sides, a bar tack at one end, and a rounded, almost bulbous end at the other. The keyhole is great for accomodating shank buttons, and works well on thicker fabrics.
Specialised buttonholes:
- Corded: A corded buttonhole is made by stitching over a cord, creating a strong and reinforced finish. These can be purely decorative, creating a raised edge, or functional offering stability and strength.
Alternative methods:
- Fabric or cord loops: Instead of cutting an opening into the fabric, a loop made from fabric or cord is sewn onto the garment, and the button simply passes through the loop.
- Bound (welt): Just like a welt pocket, the edges of the buttonhole are finished with strips of fabric. This is a really clean and professional finish, and is more commonly used in tailoring.
- Hand-sewn buttonholes: These are made by hand using a buttonhole or blanket stitch. These are typically used on fine or more customised garments, providing a more traditional and bespoke finish.
5 Key Considerations When Planning Buttonholes
1. Size: How long should the buttonhole opening be?
When I refer to the length of a buttonhole opening in this instance, I am referring to the length of the central slit that I mentioned above (excluding the bar tacks). It is the length of the opening that will be cut to accommodate the passing through of a button.
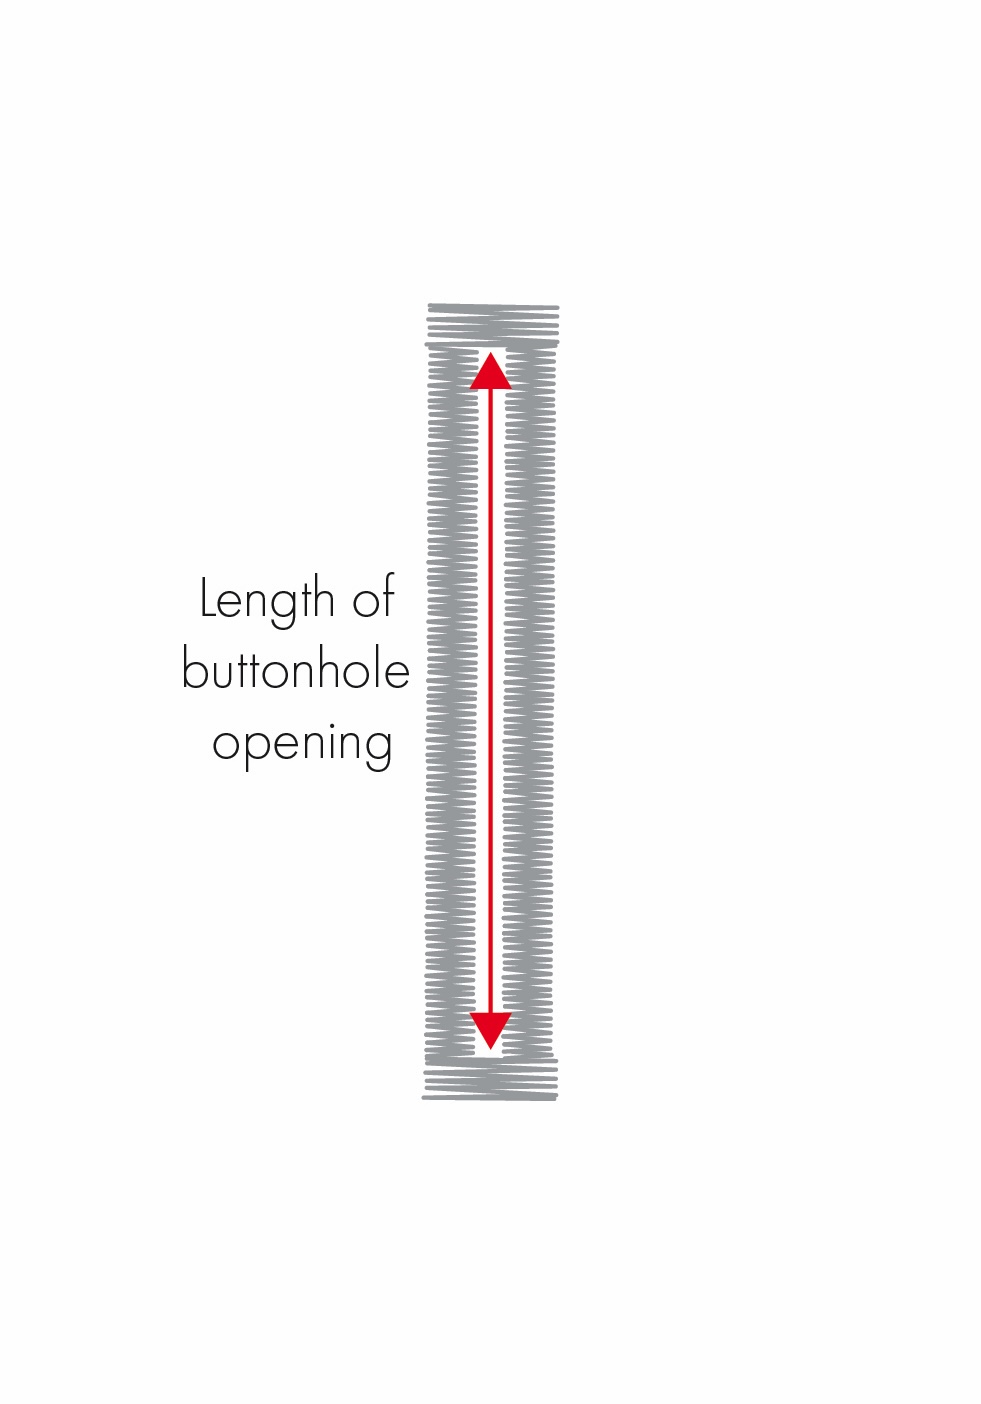
This length is dictated by the size and thickness of the button.
A good general rule for standard, flat buttons is measuring the button across its diameter and adding approximately 3 mm. Therefore, a 20 mm flat button would have a buttonhole of approximately 23 mm long.
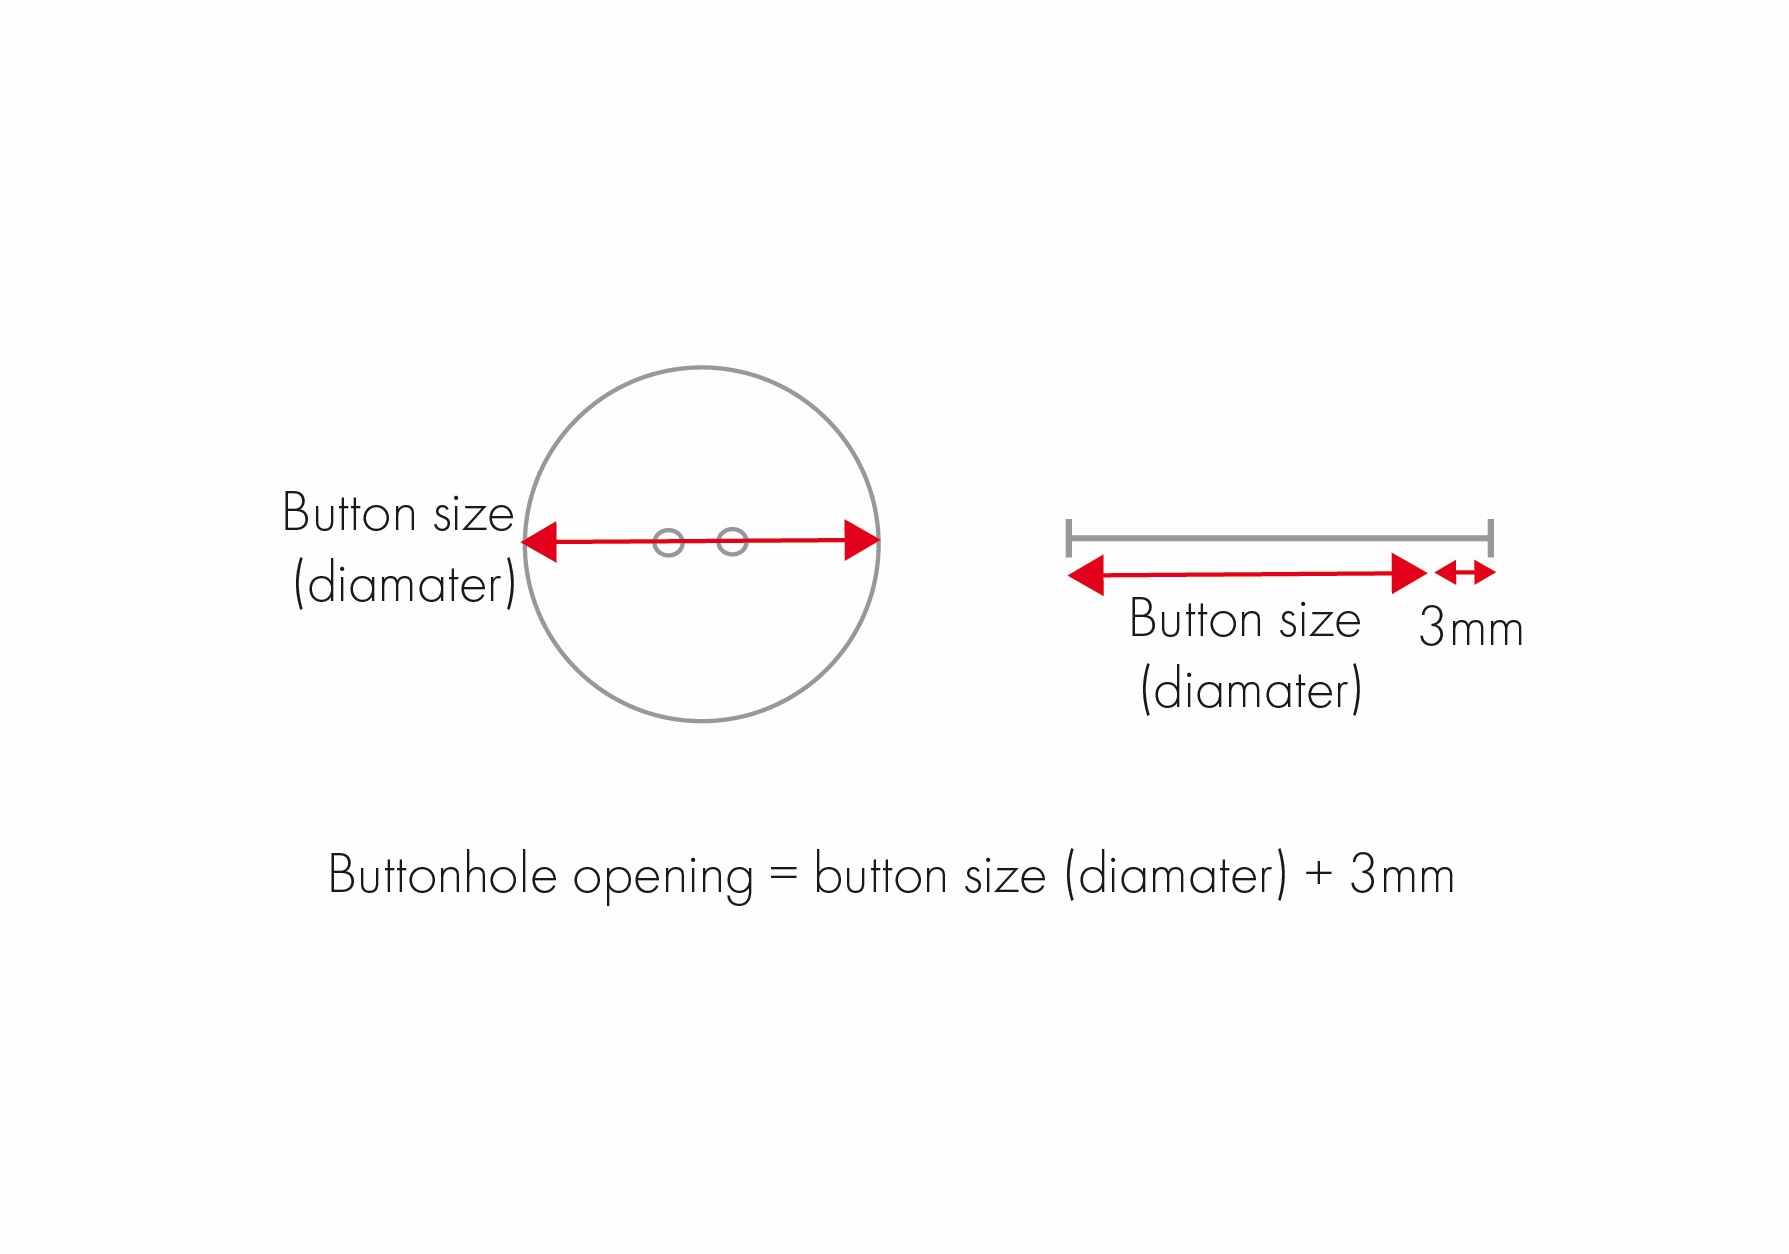
Thicker buttons will likely require a little extra length to allow the button to pass through comfortably. Unfortunately, there is no hard and fast rule for these sorts of buttons, it really depends on its thickness and shape.
I highly recommend testing the buttonhole size and style on a scrap of fabric before working on the actual garment. Prepare the test in the same way as the garment, including any interfacing or additional layers.
You are wanting to the check that:
- The buttonhole is the correct length and width.
- The button can pass through the hole comfortably, without being too loose or too tight.
- The fabric sits nicely when the garment is closed, without puckering, pulling or distorting.
- The buttonhole feels secure and stable enough in the fabric for day to day wear.
2. Horizontal vs vertical: Which direction should the buttonholes run?
Buttonholes can run either vertically, horizontally, or a combination of both. So how do you know which way to position them?
There are no specific rules, but there are a couple of things I like to consider when deciding.
I like to imagine wearing the finished garment and thinking about where the tension is coming from. For example, a waistband or fly with a button closure is generally positioned in a more fitted area of the garment. The fabric is likely to be pulled from side to side (horizontally). If you were to position the buttonholes vertically, this tension could cause the buttonhole to gape open, and the button to pop out.
Conversely, if there is less strain on the button opening, such as on a loose or oversized shirt, vertical buttonholes would work.
Some garments have a combination of both. Business shirts, for example, often have a horizontal buttonhole at the top near the collar, and for the last button, with vertical buttonholes in between. This just provides a little extra stability at those key areas.
It’s not just about tension though. The garments design and construction also need to be considered. For example, a narrow centre placket may mean vertical buttons will be your only practical option. Alternatively, if you have quite a lot of buttons grouped together, there may not be enough room to position buttons vertically without placing them too close together. In that case, horizontal buttonholes may be a better choice.
3. Positioning: Where should the buttonholes sit in relation to the garment?
Button and buttonhole closures are used on so many different parts of a garment, including cuffs, waistbands and front openings. As a result, the position of the buttons and buttonholes will depend on both the location of the closure, and the type of opening.
Plackets and extensions:
Generally speaking, button and buttonhole closures require some form of overlap or extension so that one side of the garment can pass over the other. This is often created with a placket.
A placket is essentially fabric that reinforces and finishes an opening, such as the centre front of a shirt or the opening of a cuff. They can be full or partial and can be constructed in a few different ways, including:
- A separate piece of fabric sewn onto the garment and stitched along the edge.
- An integrated extension of the garment, which is then folded back on itself.
- A flap that folds over the buttons to conceal them.
The width of the extension is usually related to the size of the button. As a general guide, the finished extension should be approximately the same width as the button’s diameter, with the aim being for the button to sit on the garment’s centre line once the garment is fastened and there being enough fabric between the button and the edge of the fabric.
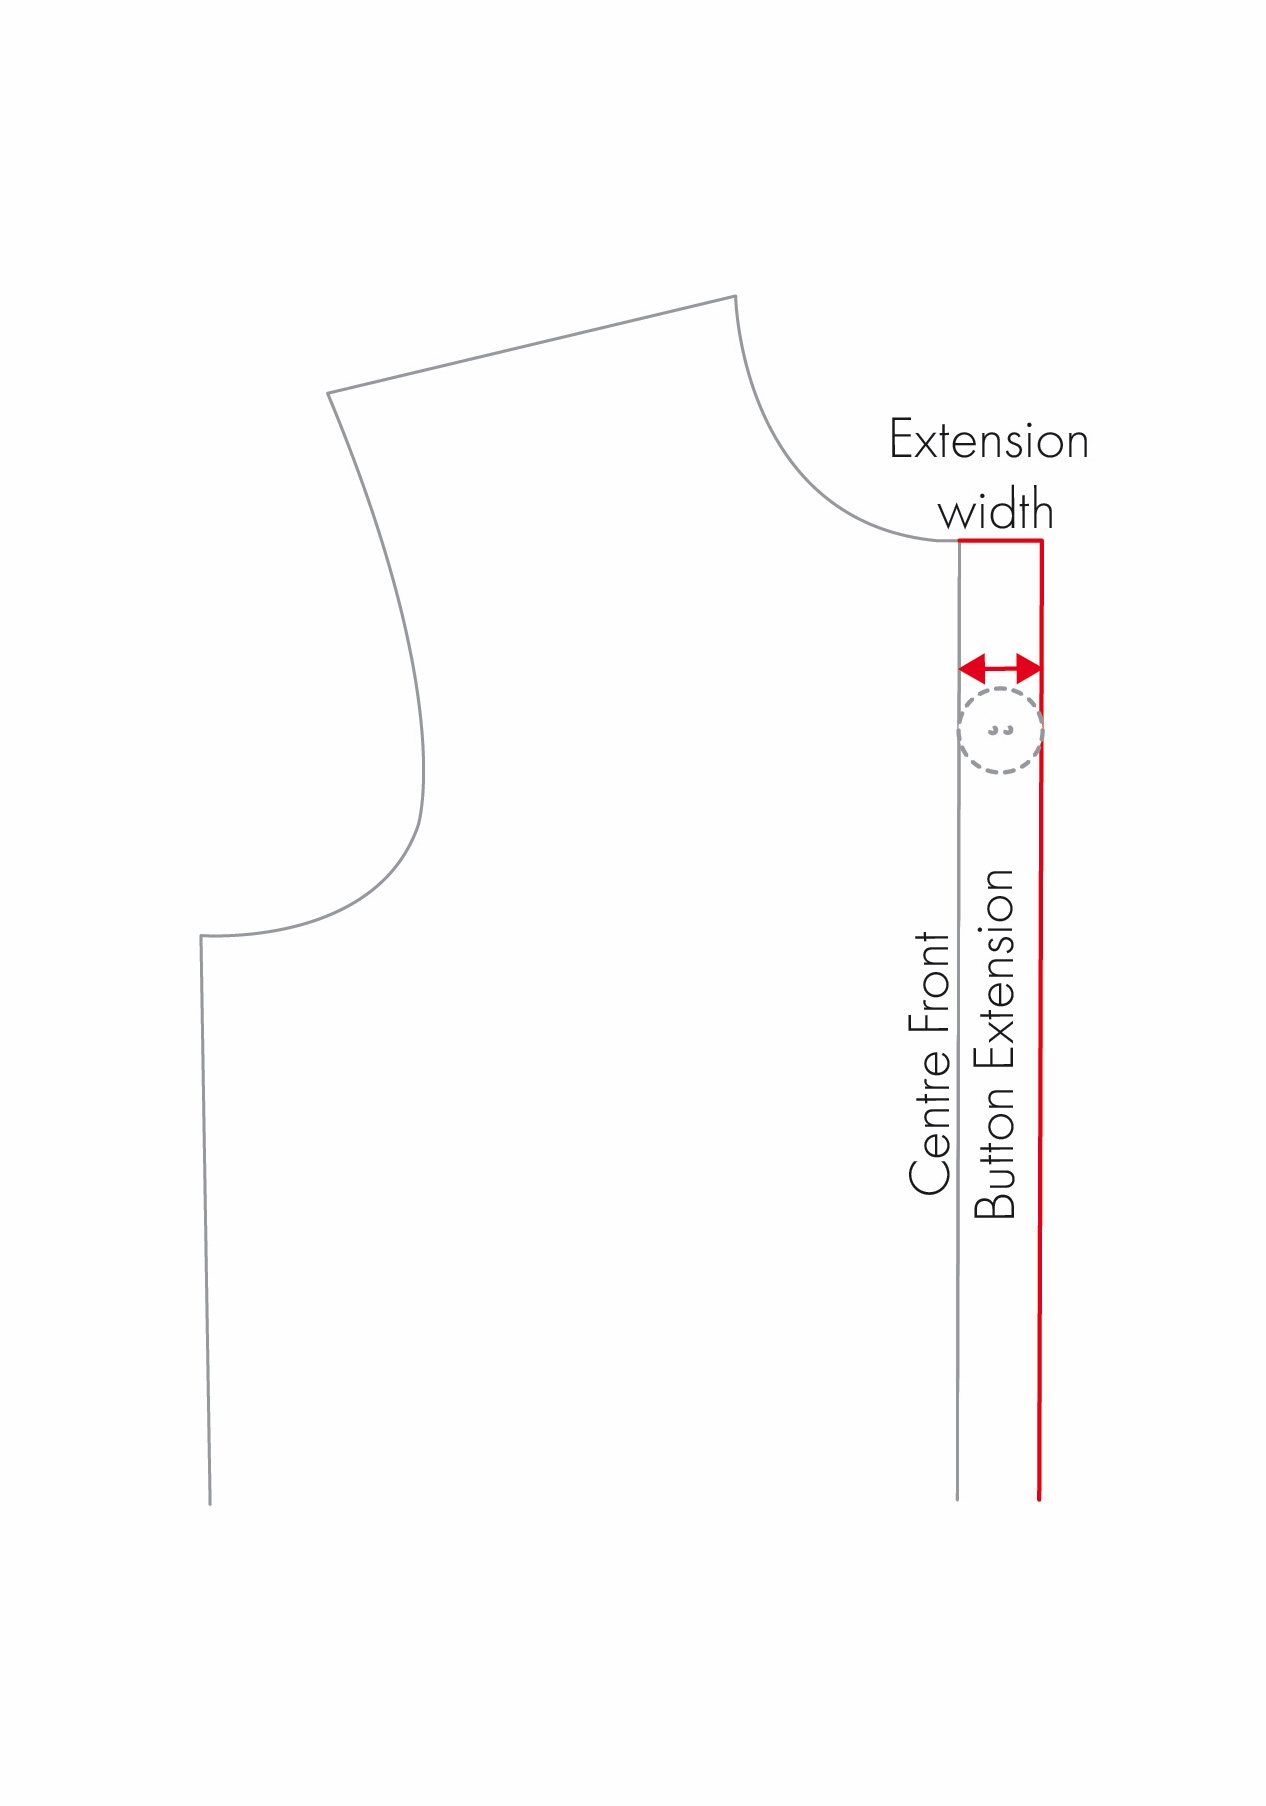
Traditionally, women’s garments are arranged with the right overlapping the left. I was taught that “right over left because women are always right”. Horrible saying I know, but this has stuck with me to this day, and does help me with positioning.
In practical terms, this means that womenswear generally has the buttons on the wearer’s left and the buttonholes on the wearer’s right, with the right side overlapping the left. Men’s garments are generally arranged in the opposite direction. This is just one of those weird customs that of course doesn’t have to be followed, which is the beauty of drafting your own patterns. You may have become accustomed to fastening garments on one particular side, so clothing made for the opposite sex can feel unfamiliar or awkward to do up.
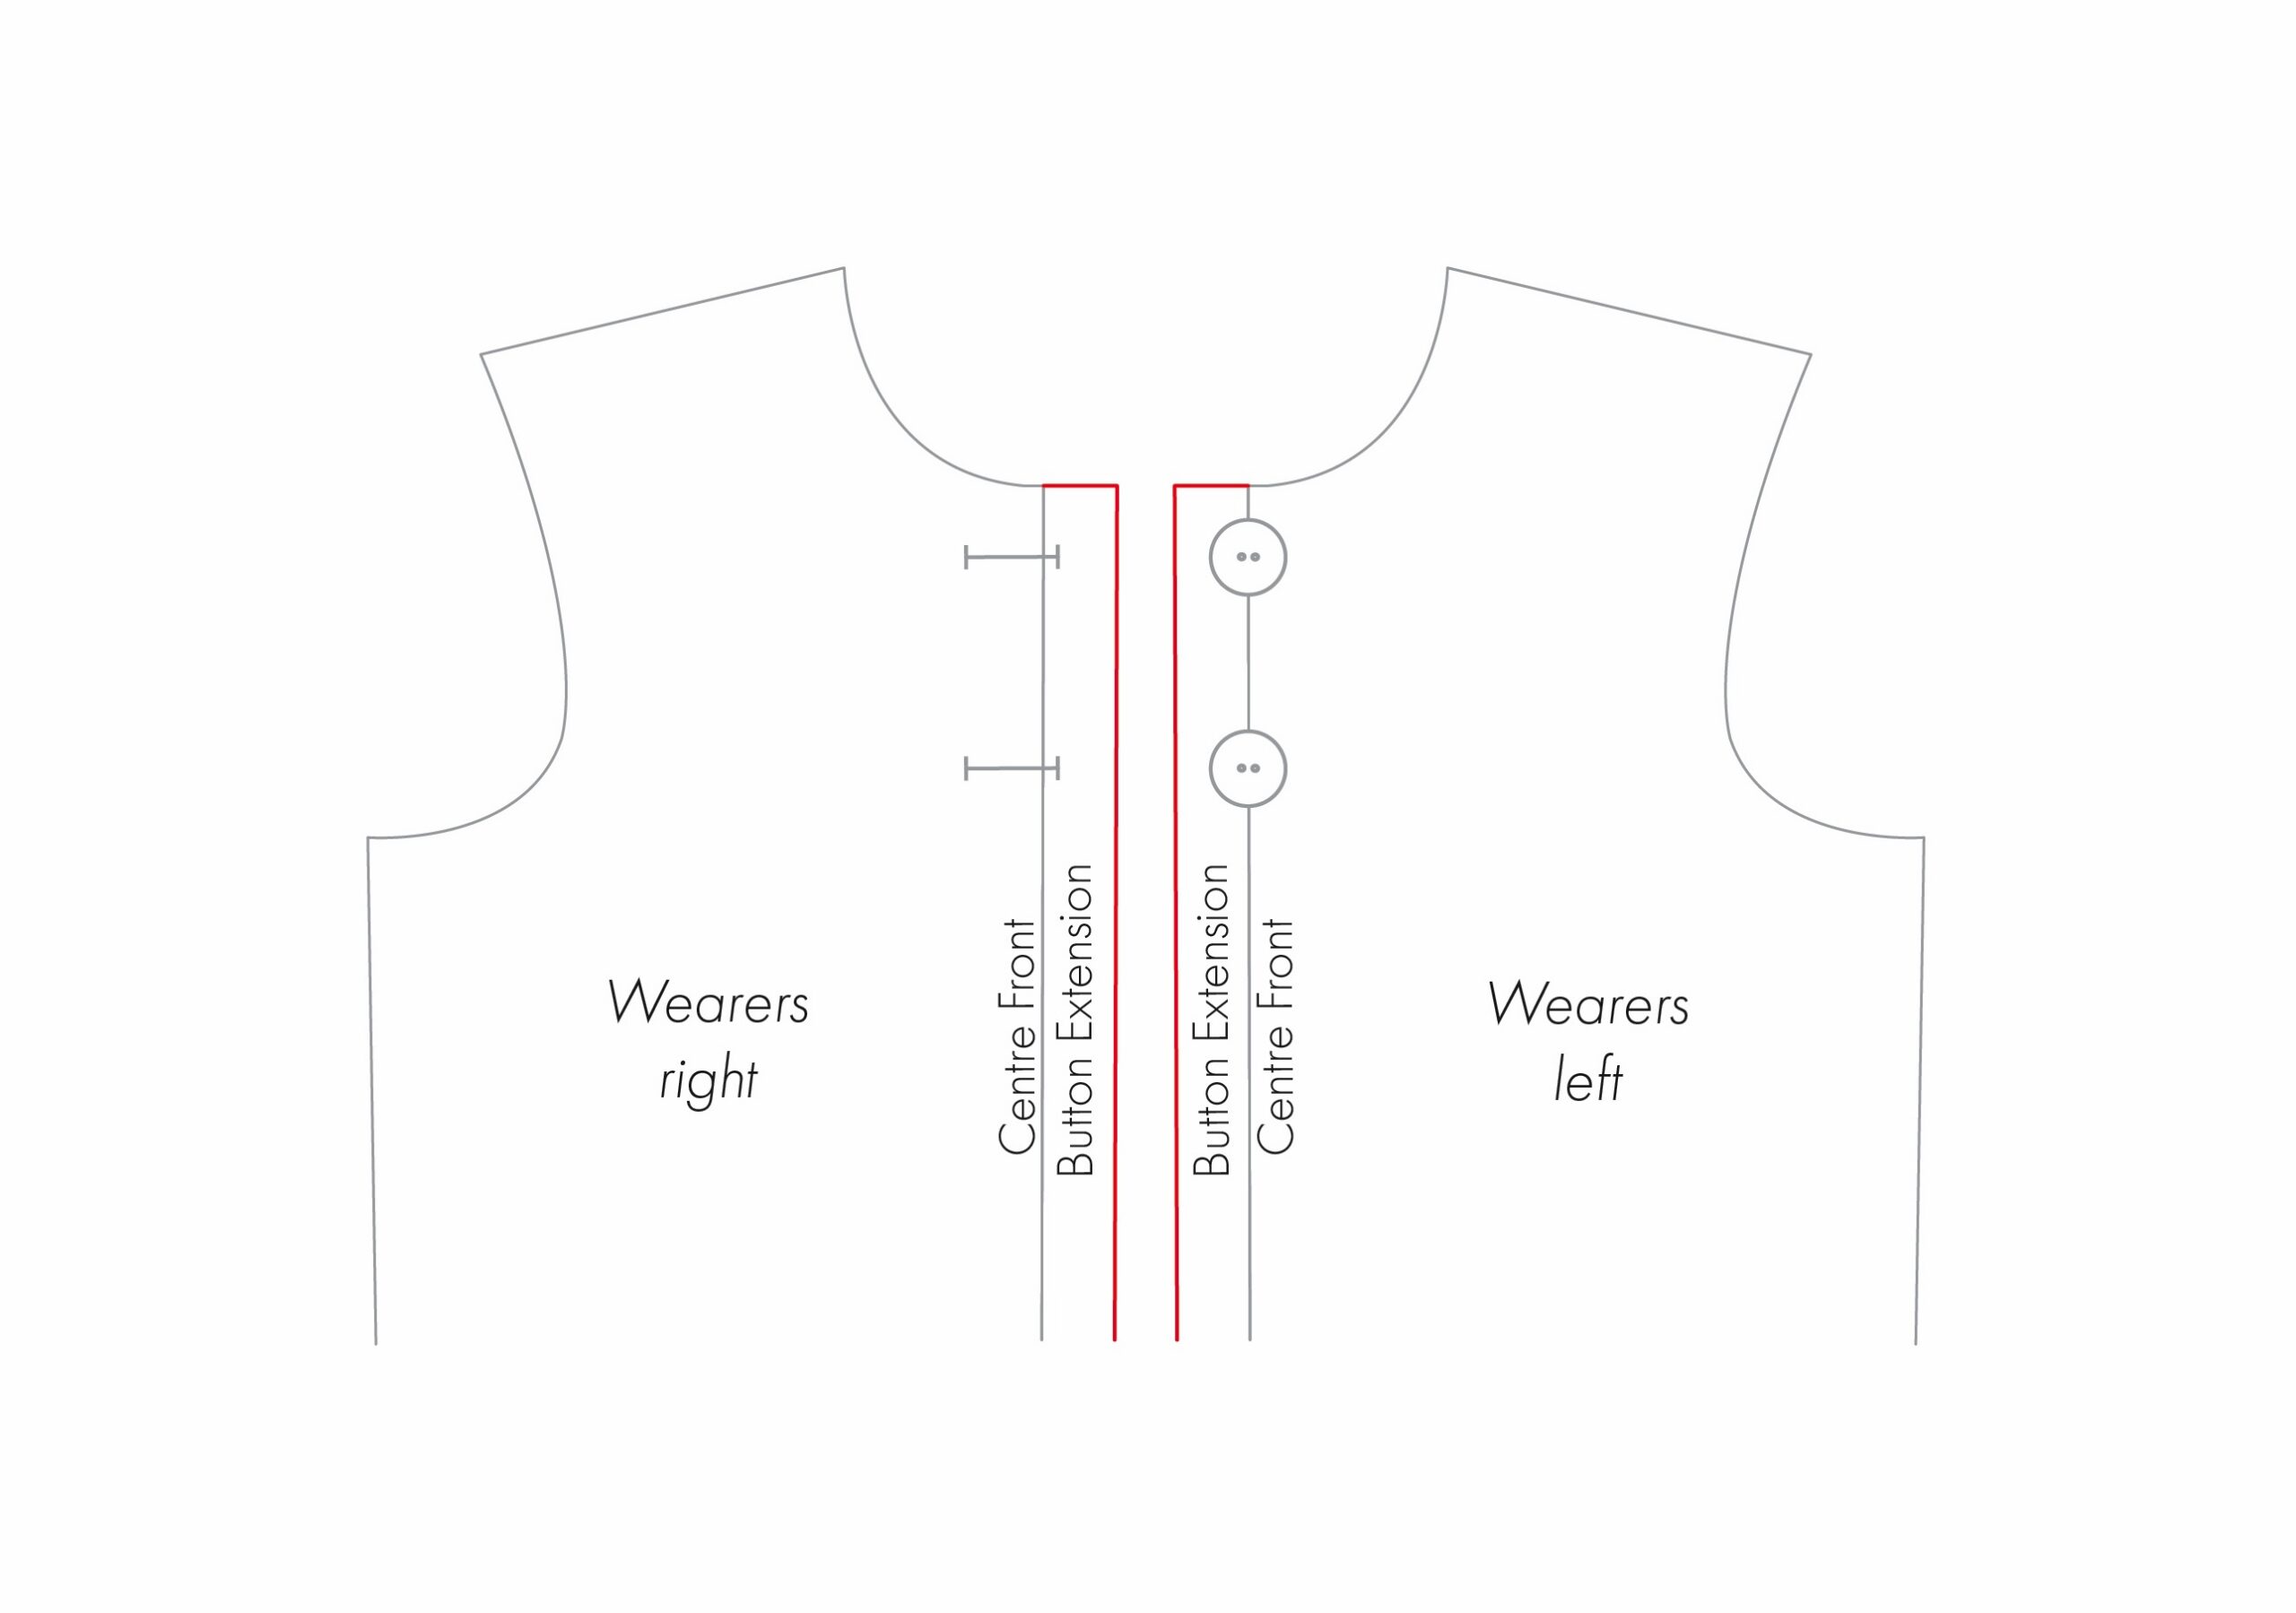
Horizontal buttonholes:
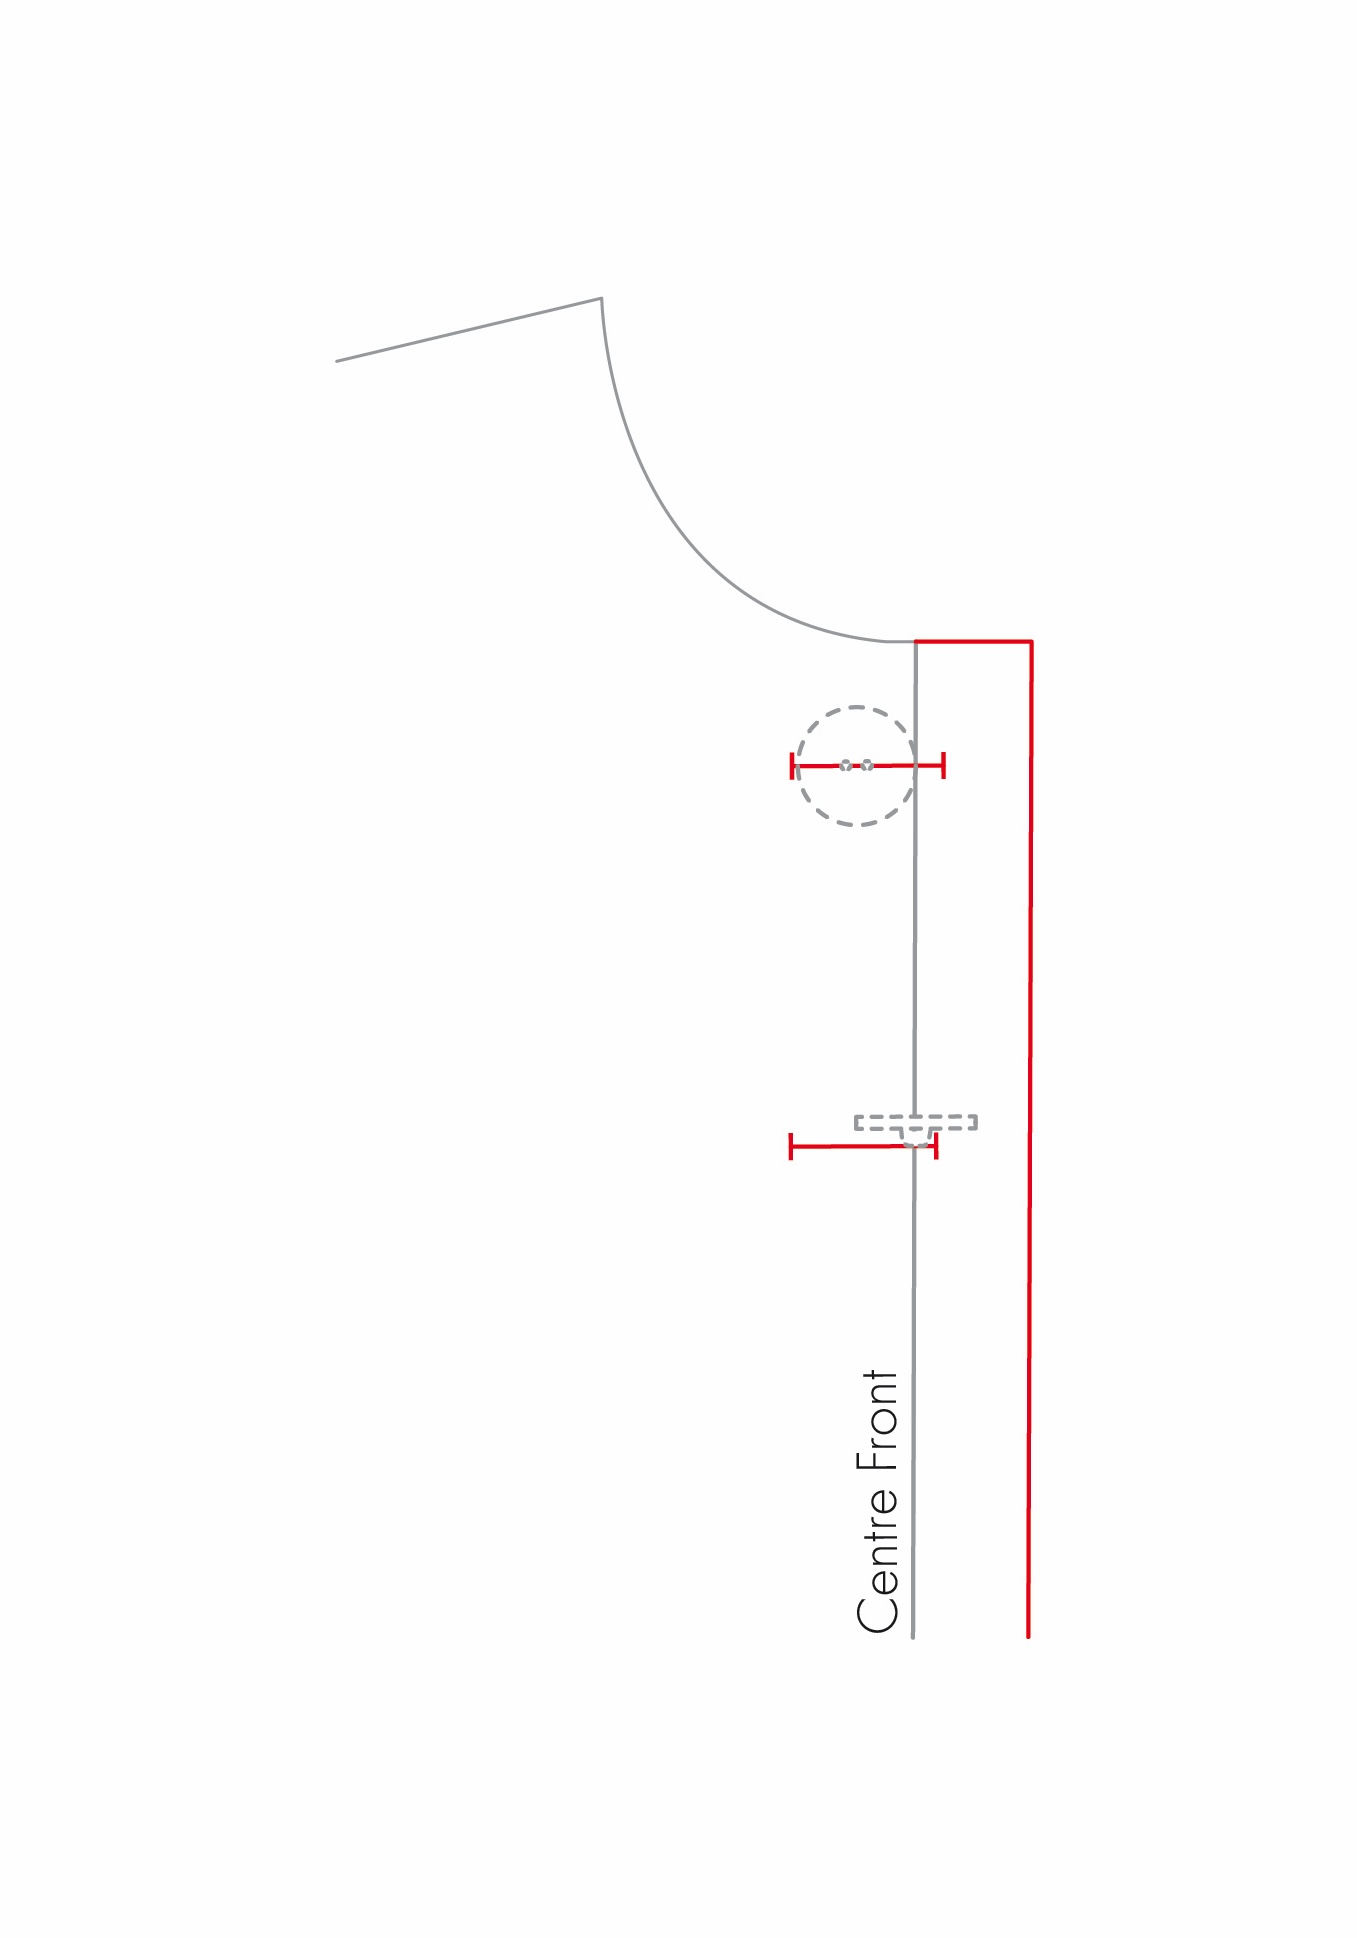
When positioning a horizontal buttonhole, I like to start at the centre line, extend out towards the button extension the additional length beyond the size of the button, then come back towards the garment the size of the buttonhole. The goal is for the button to sit on the centre line once the garment is done up.
Buttons with shanks or with holes that are wider apart may alter this slightly. A useful guide in these instances, is to measure the width of the shank or distance between the holes, halve it, and use this as the extension beyond the centre line.
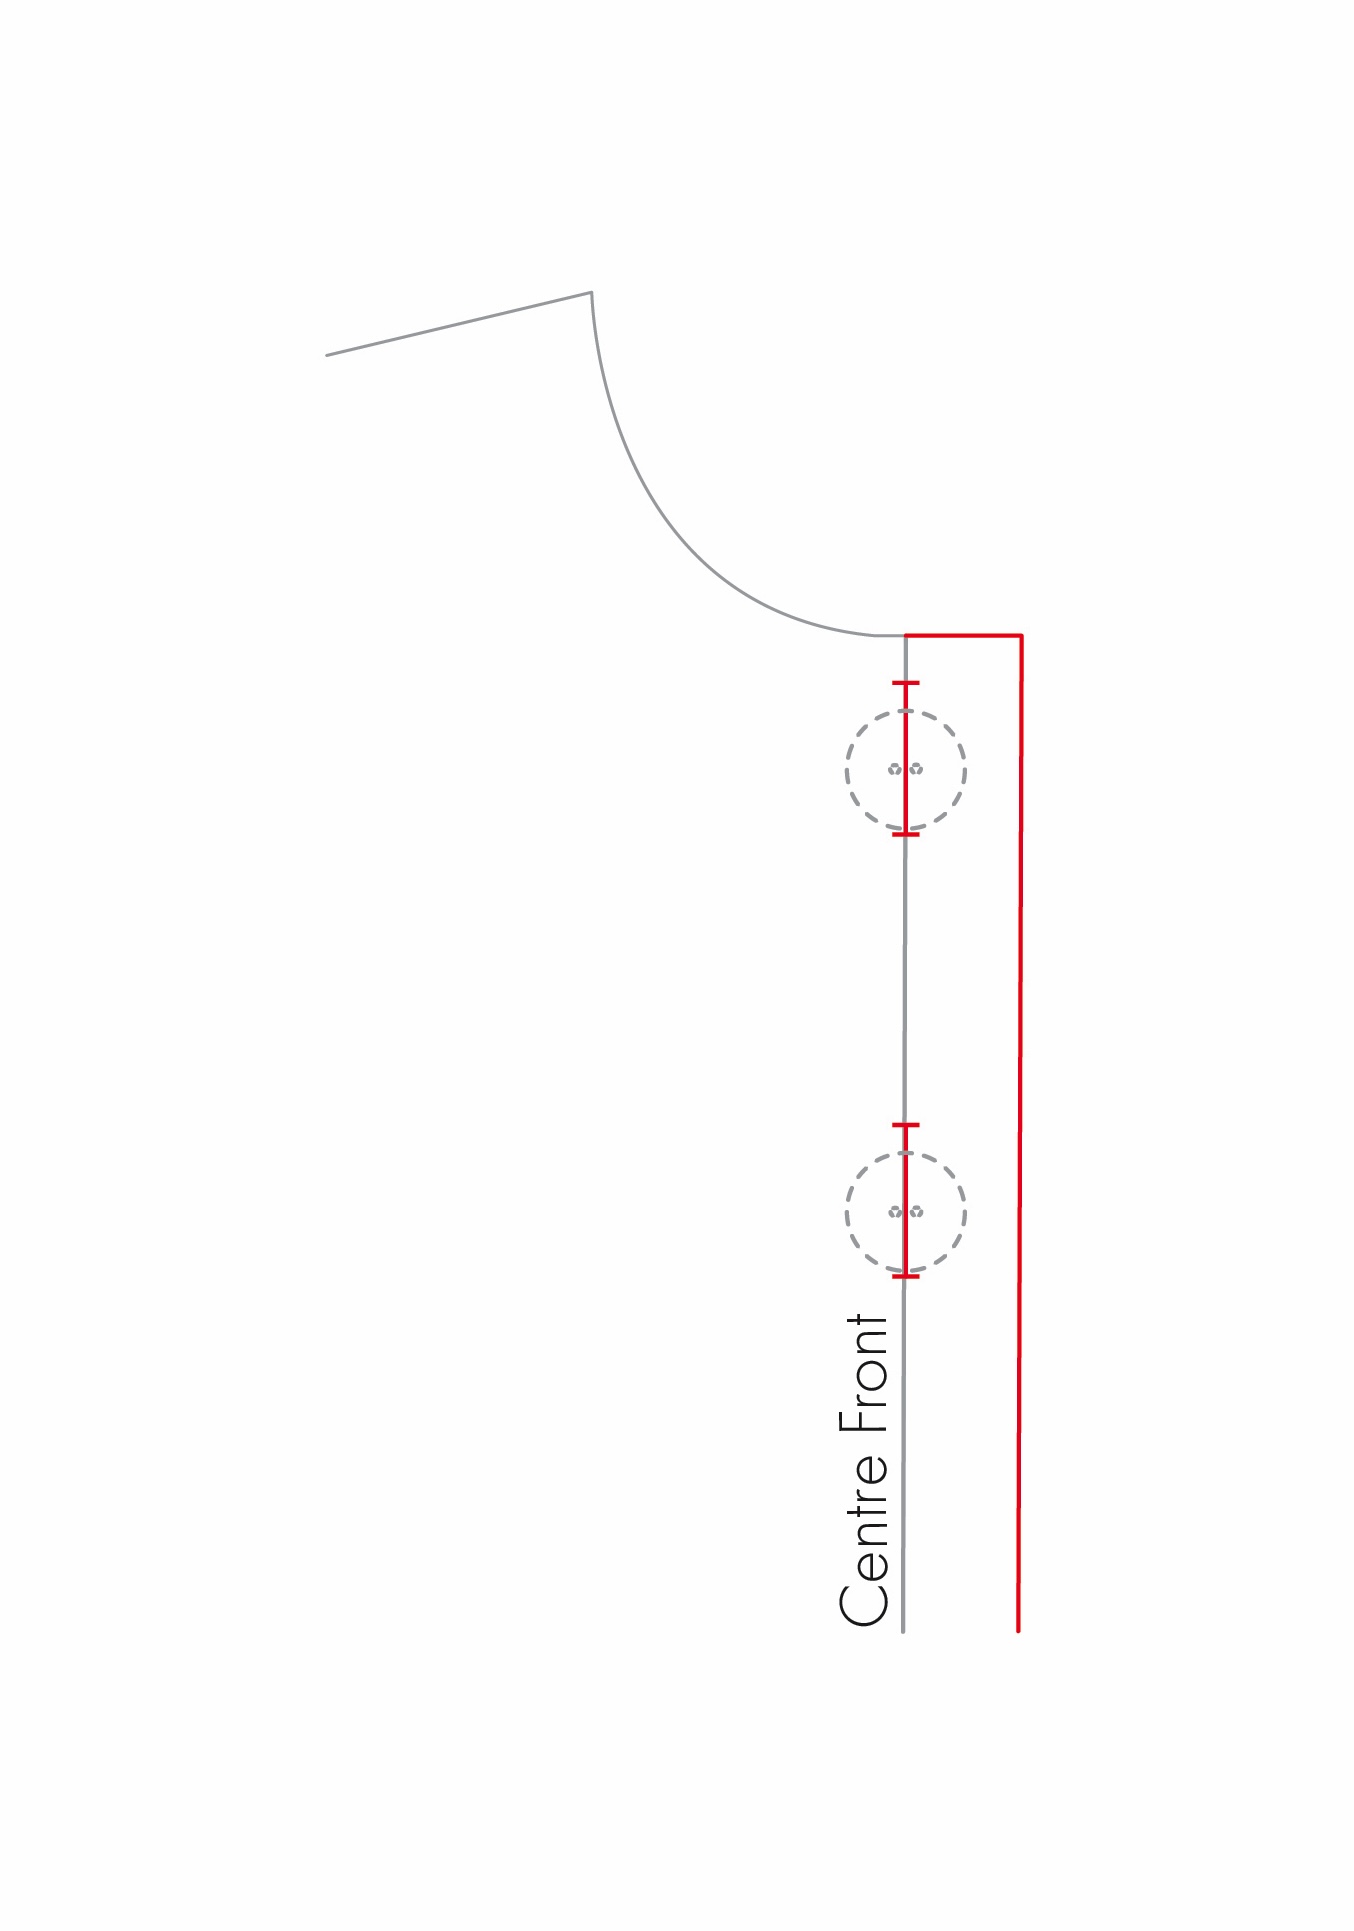
Vertical buttonholes:
Vertical buttonholes are in some ways easier to position, generally being positioned along the centre line or centre of the placket extension. Any additional length added to the buttonhole should be placed towards the top of the buttonhole as when the garment is worn, the button will naturally shift towards the bottom of the buttonhole. So placing the extra length at the top allows the button to naturally settle but still keeping it in the correct position.
4. Quantity and spacing: How many buttons and buttonholes are needed, and how far apart should they be?
The number and spacing of buttons and buttonholes depends on several factors, including the garment’s design, the length of the opening, the fabric, and the amount of tension placed on the closure.
It can also simply be a matter of aesthetics. You want the buttons to look balanced, being not too far apart, but also not so close together that they look crowded.
Don’t rely solely on even spacing
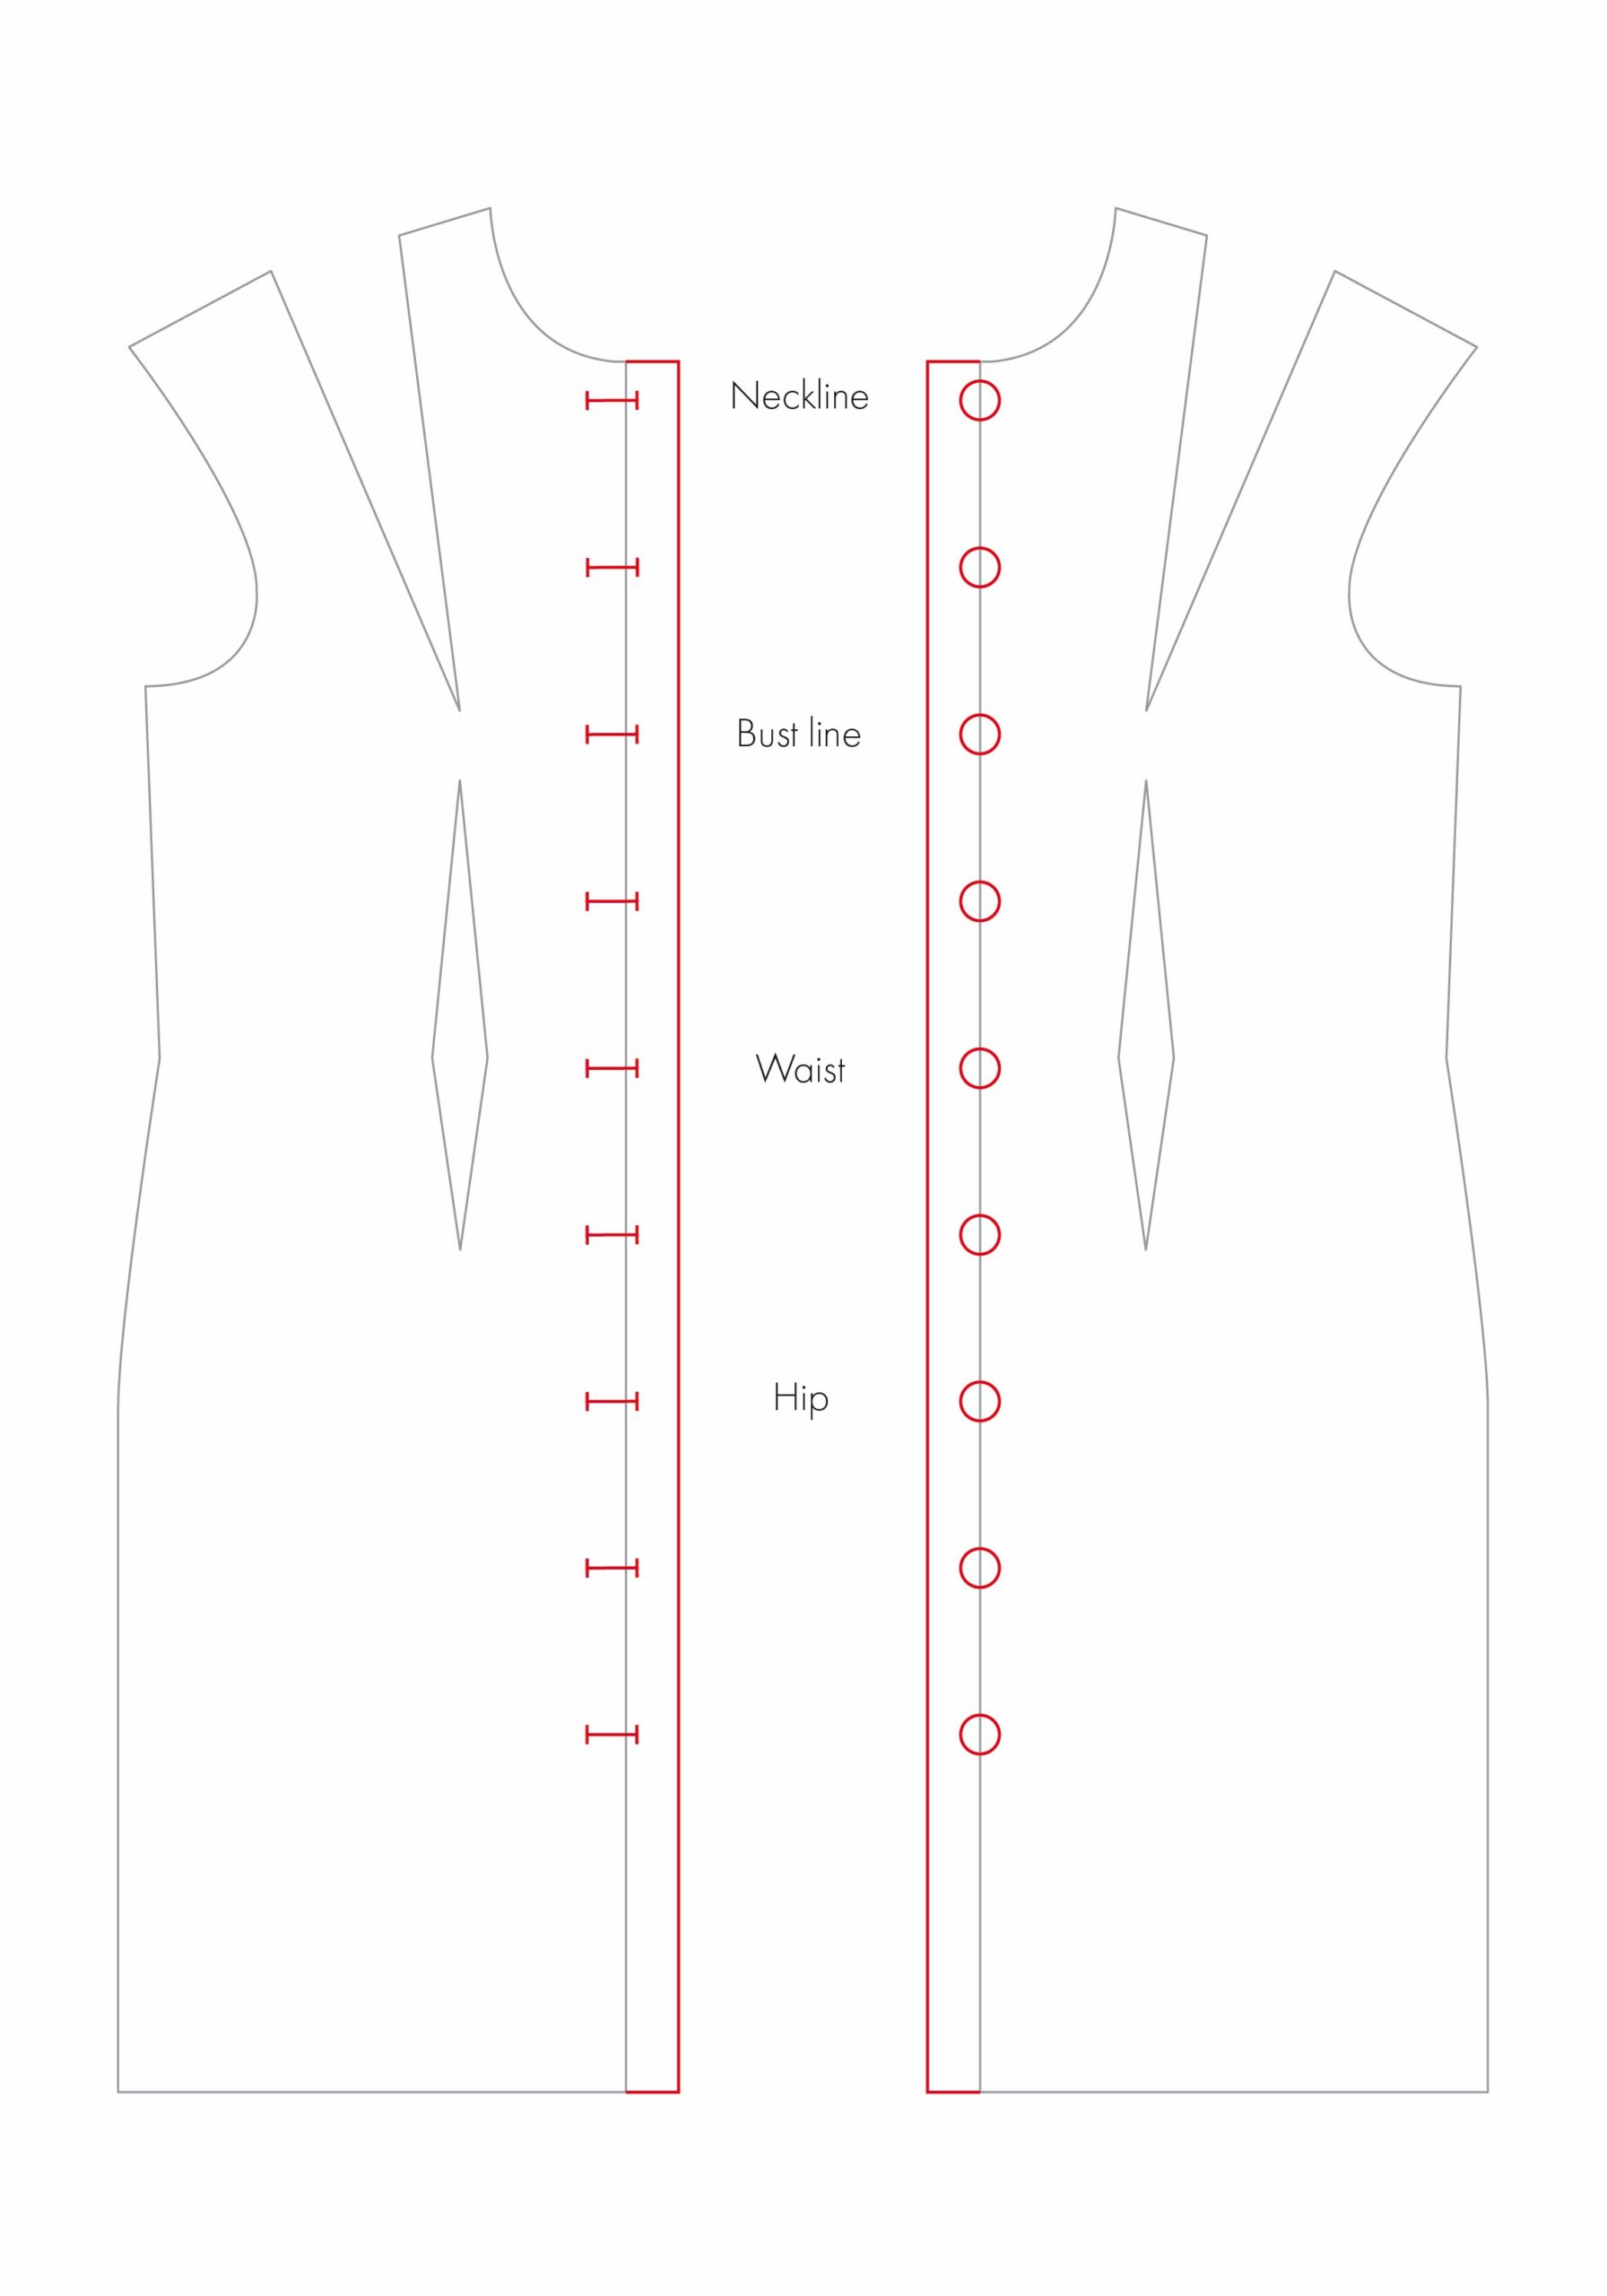
When deciding how many buttons to use and how far apart to place them, it is tempting to just measure the opening and divide the space evenly. Sure, sometimes this may work, and you may be able to position the first and last buttons, then divide the remaining space between them. However, oftentimes this isn’t the best approach, and you need a bit more planning and consideration.
Mark the positions that need more functional support first
Button and buttonhole placement should accommodate the shape of the body, and the areas in which the garment is likely to pull.
I like to begin by identifying the key positions, marking the points that need a button for functional reasons, and then experimenting with the remaining space. These points often include:
- The neckline, being sure to leave enough of a space between the top edge of the fabric and the top of the button when closed.
- The bust line.
- The waist.
- The crotch area.
- The high hip.
- The first button on an opening that may be worn undone.
- For belted garments, consider placing a button at or near the point where the belt will sit, particularly if the belt helps hold the garment closed.
Space the remaining buttons
Once the key functional positions have been marked, space the remaining buttons and buttonholes between them.
As a general guide, buttons often work well when spaced approximately 7–10 cm apart. Also, leave some space at the bottom of the opening, by avoiding placing the final button directly at the hem or lower edge.
Tip: An expandable gauge is a great tool for accurately spacing multiple buttons.
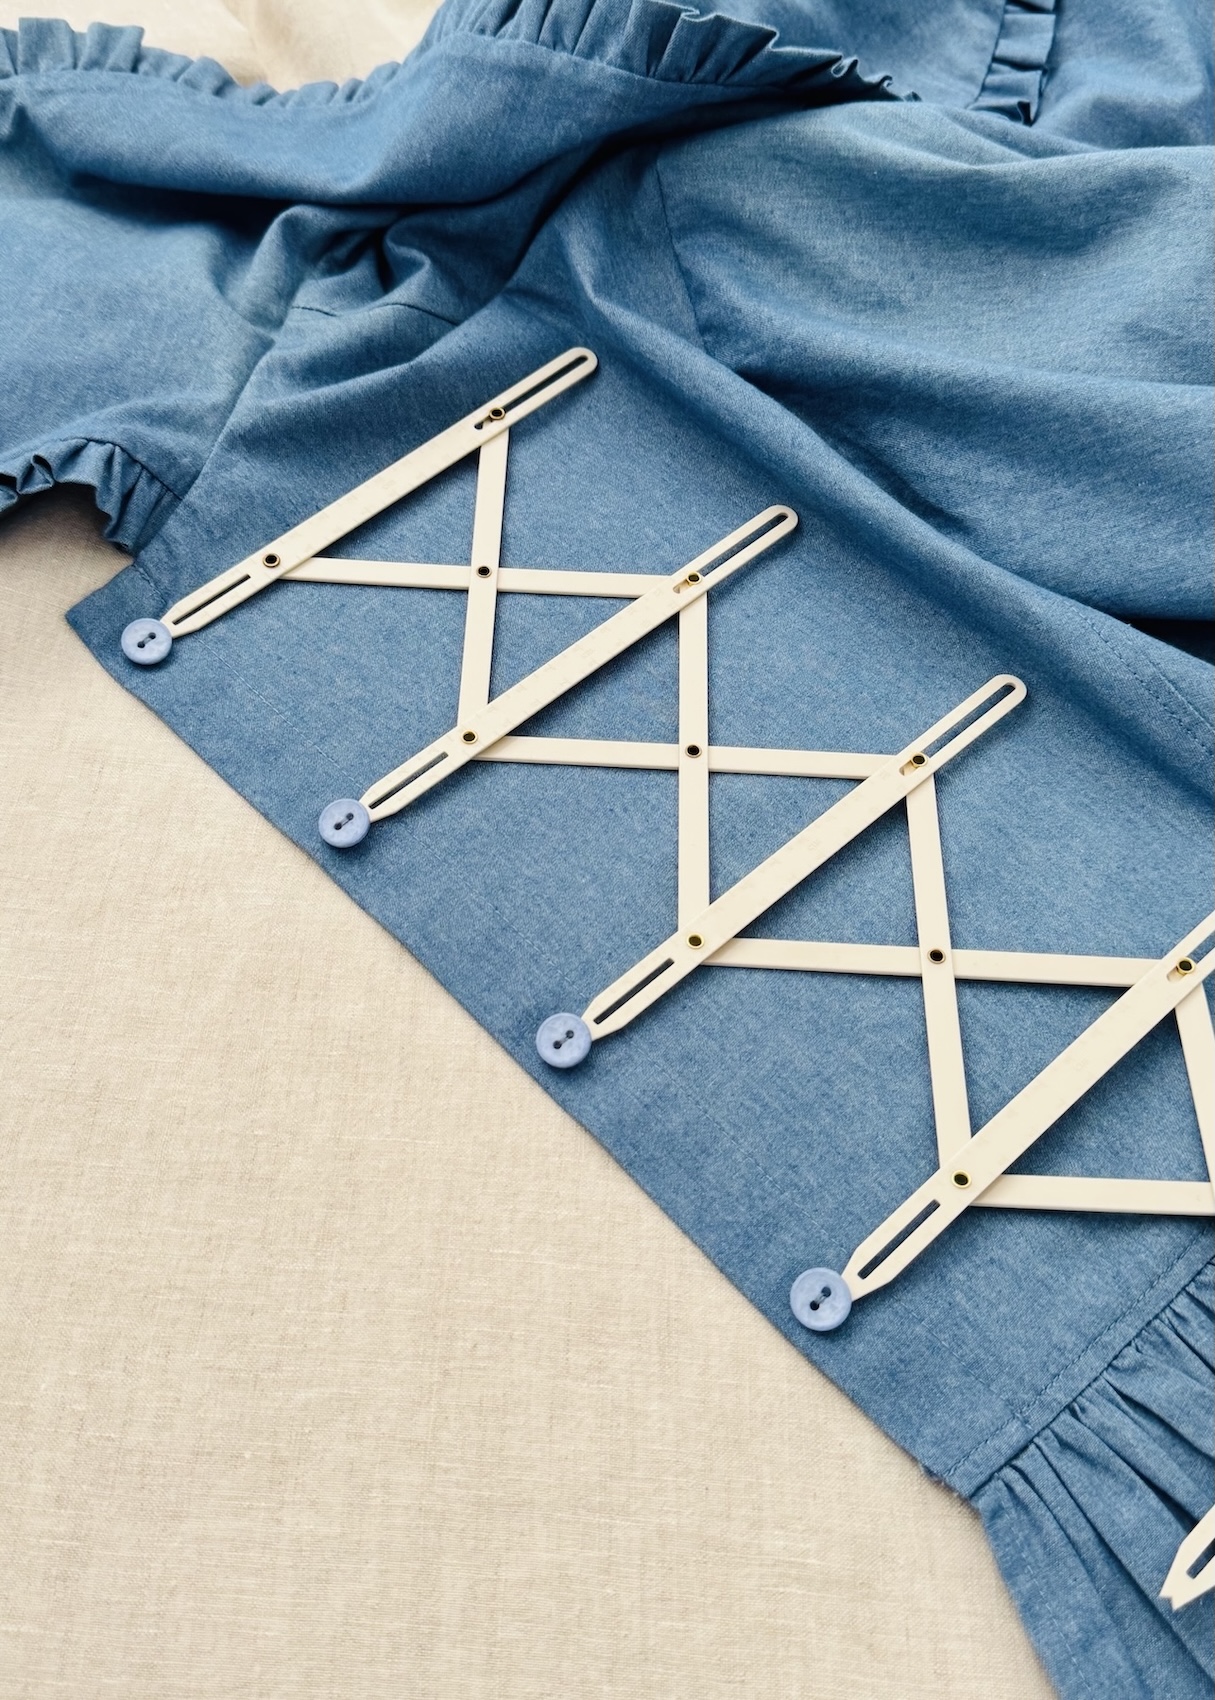
Check the overall layout
Sit the buttons on the garment or pattern and step back to look at the overall balance. This will help you decide whether the buttons feel too close together, too far apart, or appropriately spaced.
Tip: Odd numbers of buttons often look better visually than even numbers!
5. Stabilisation and reinforcement: How do you support the fabric around the buttonhole?
Buttonholes are often under a lot of stress during wear, being repeatedly stretched and pulled, so adding stabilisation is important for strength and durability.
Stabilise the fabric:
Applying interfacing to the fabric behind the buttonholes will help prevent stretching, distorting or weakening over time. The type and weight of interfacing should suit the fabric and garment. It should provide support without making the area unnecessarily stiff or bulky. For more information about choosing and applying interfacing, see ‘How to Select and Use Interfacing: A Simple Guide’.
Reinforce the finished buttonhole:
On delicate, loosely woven or fabrics prone to fraying, you can add further reinforcement after sewing and pressing the buttonhole by applying a small amount of fray stop to the cut edges. This helps prevent the threads from unravelling. Always test this though on a scrap of fabric first, particularly when working with delicate or lighter coloured fabrics.
Additional Tips and Tricks
- Get your buttons sorted first: Personally, I always like to decide on my buttons before I start marking or sewing buttonholes as the size and style directly influences the buttonhole placement and spacing.
- Buttonholes have a right and wrong side: Always sew them from the right side of the garment.
- If in doubt, look in your wardrobe: It’s also helpful to look at garments in your wardrobe, or patterns you already own, for guidance on spacing and placement.
- Avoid unpicking buttonholes: Yes, buttonholes can be unpicked, but the tight zig-zag stitching often leaves visible marks in the fabric, especially on delicate materials. I have almost ruined garments after having to unpick and shift buttonholes. So triple checking your positioning and settings is key!
- Test, test, test! Always test your buttonhole first to ensure that your machine settings are correct and the buttonhole is as expected.
Buttonholes are much more than simple openings cut into fabric. Their type, size, position, direction, spacing, and stabilisation all contribute to the appearance, fit, and function of a finished garment. By keeping a few key considerations in mind, planning and creating buttonholes will hopefully become a less daunting part of the sewing process!






4 Comments
Really good overview and great advice. Thoughtful content.
Thank you.
Hi Jan, thank you for your kind comment. I’m really glad you found it useful.
Buttonholes are my nemesis. This guide is very helpful!
Hi Laura,
I totally understand. Buttonholes still make me nervous too, and I’ve definitely avoided projects in the past with too many of them.
I’m glad you found this article helpful.