Understanding how to alter the neckline on a pattern is one of those super useful skills to have. Whether you’re altering or hacking an existing pattern, or working with a basic block to create your own pattern from scratch, knowing how to manipulate a neckline gives you so many more options.
Necklines are also one of those design details that can really come down to individual preference. Personally, I don’t love or feel particularly comfortable in V-necks, preferring a more rounded neckline.
With a few simple steps, you can adapt patterns to suit what you want. Rather than trying to find that perfect pattern with all the design and fit details you’re after, your pattern can really just act as the starting point.
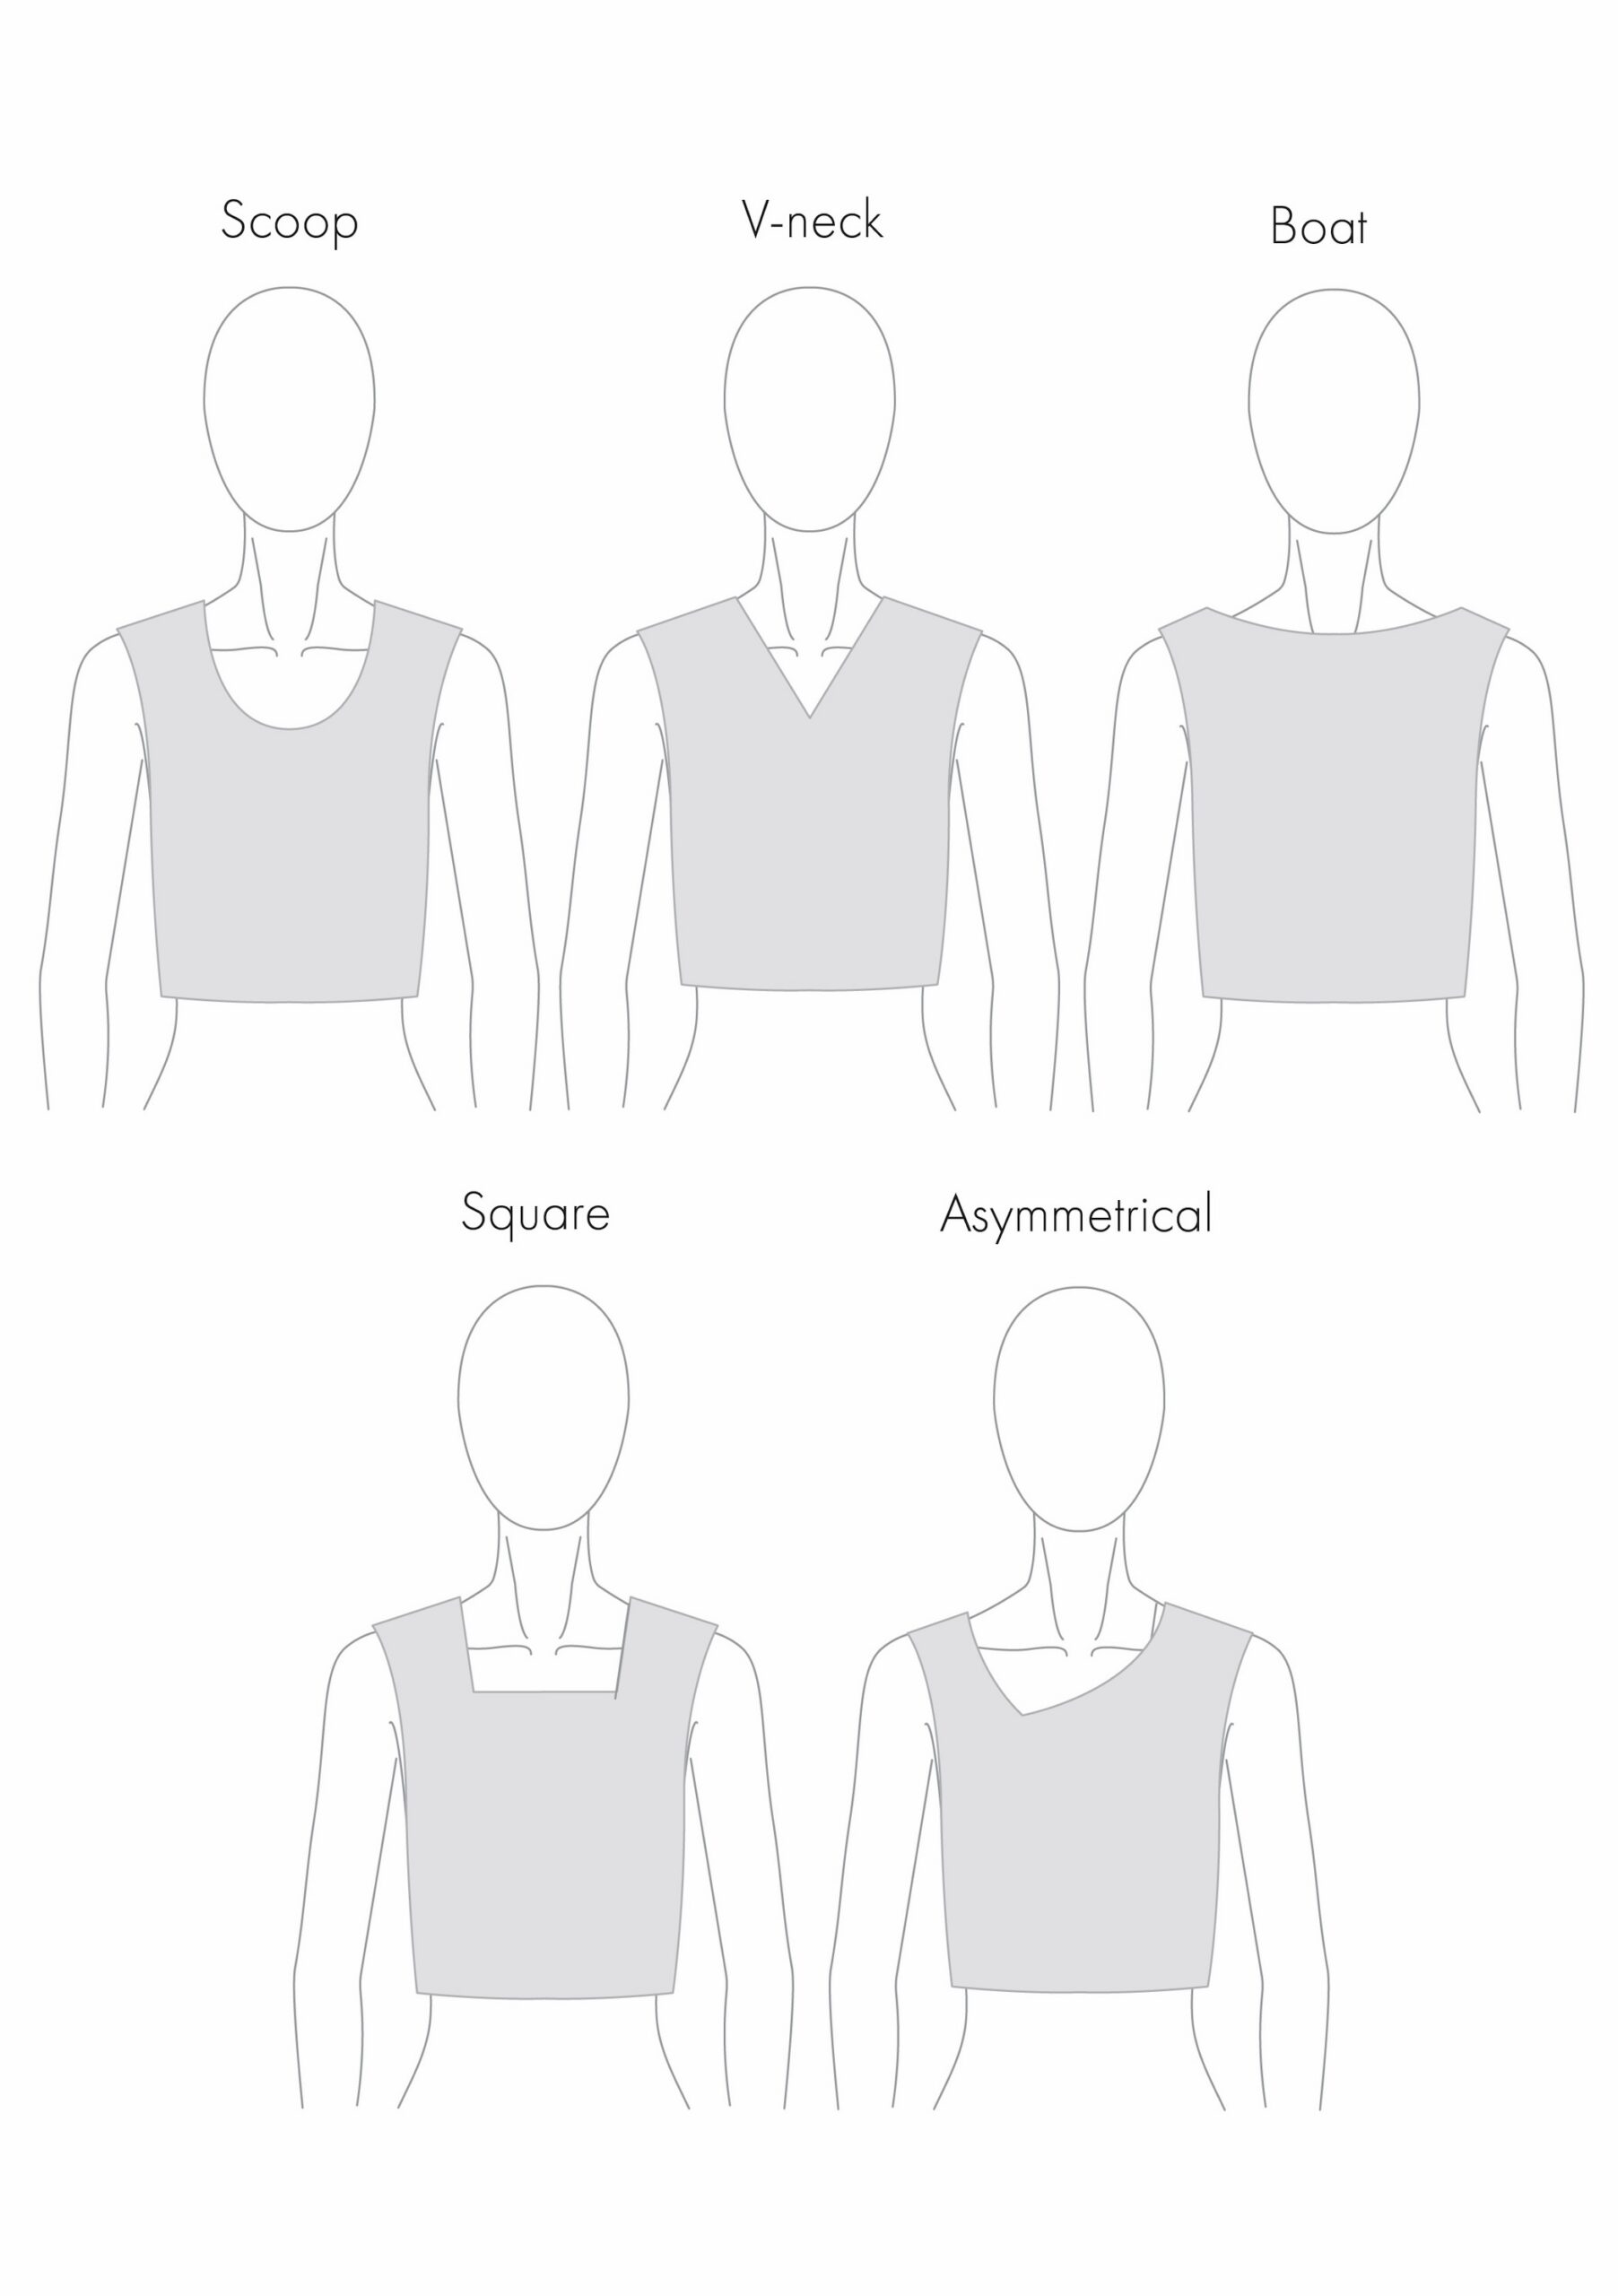
In this tutorial, I’m going to introduce a few different pattern making techniques and considerations that can help you alter the neckline on most basic patterns to create the shape you want. I’ll be demonstrating these techniques using a basic bodice block and transforming it into five different necklines.
Reference Points
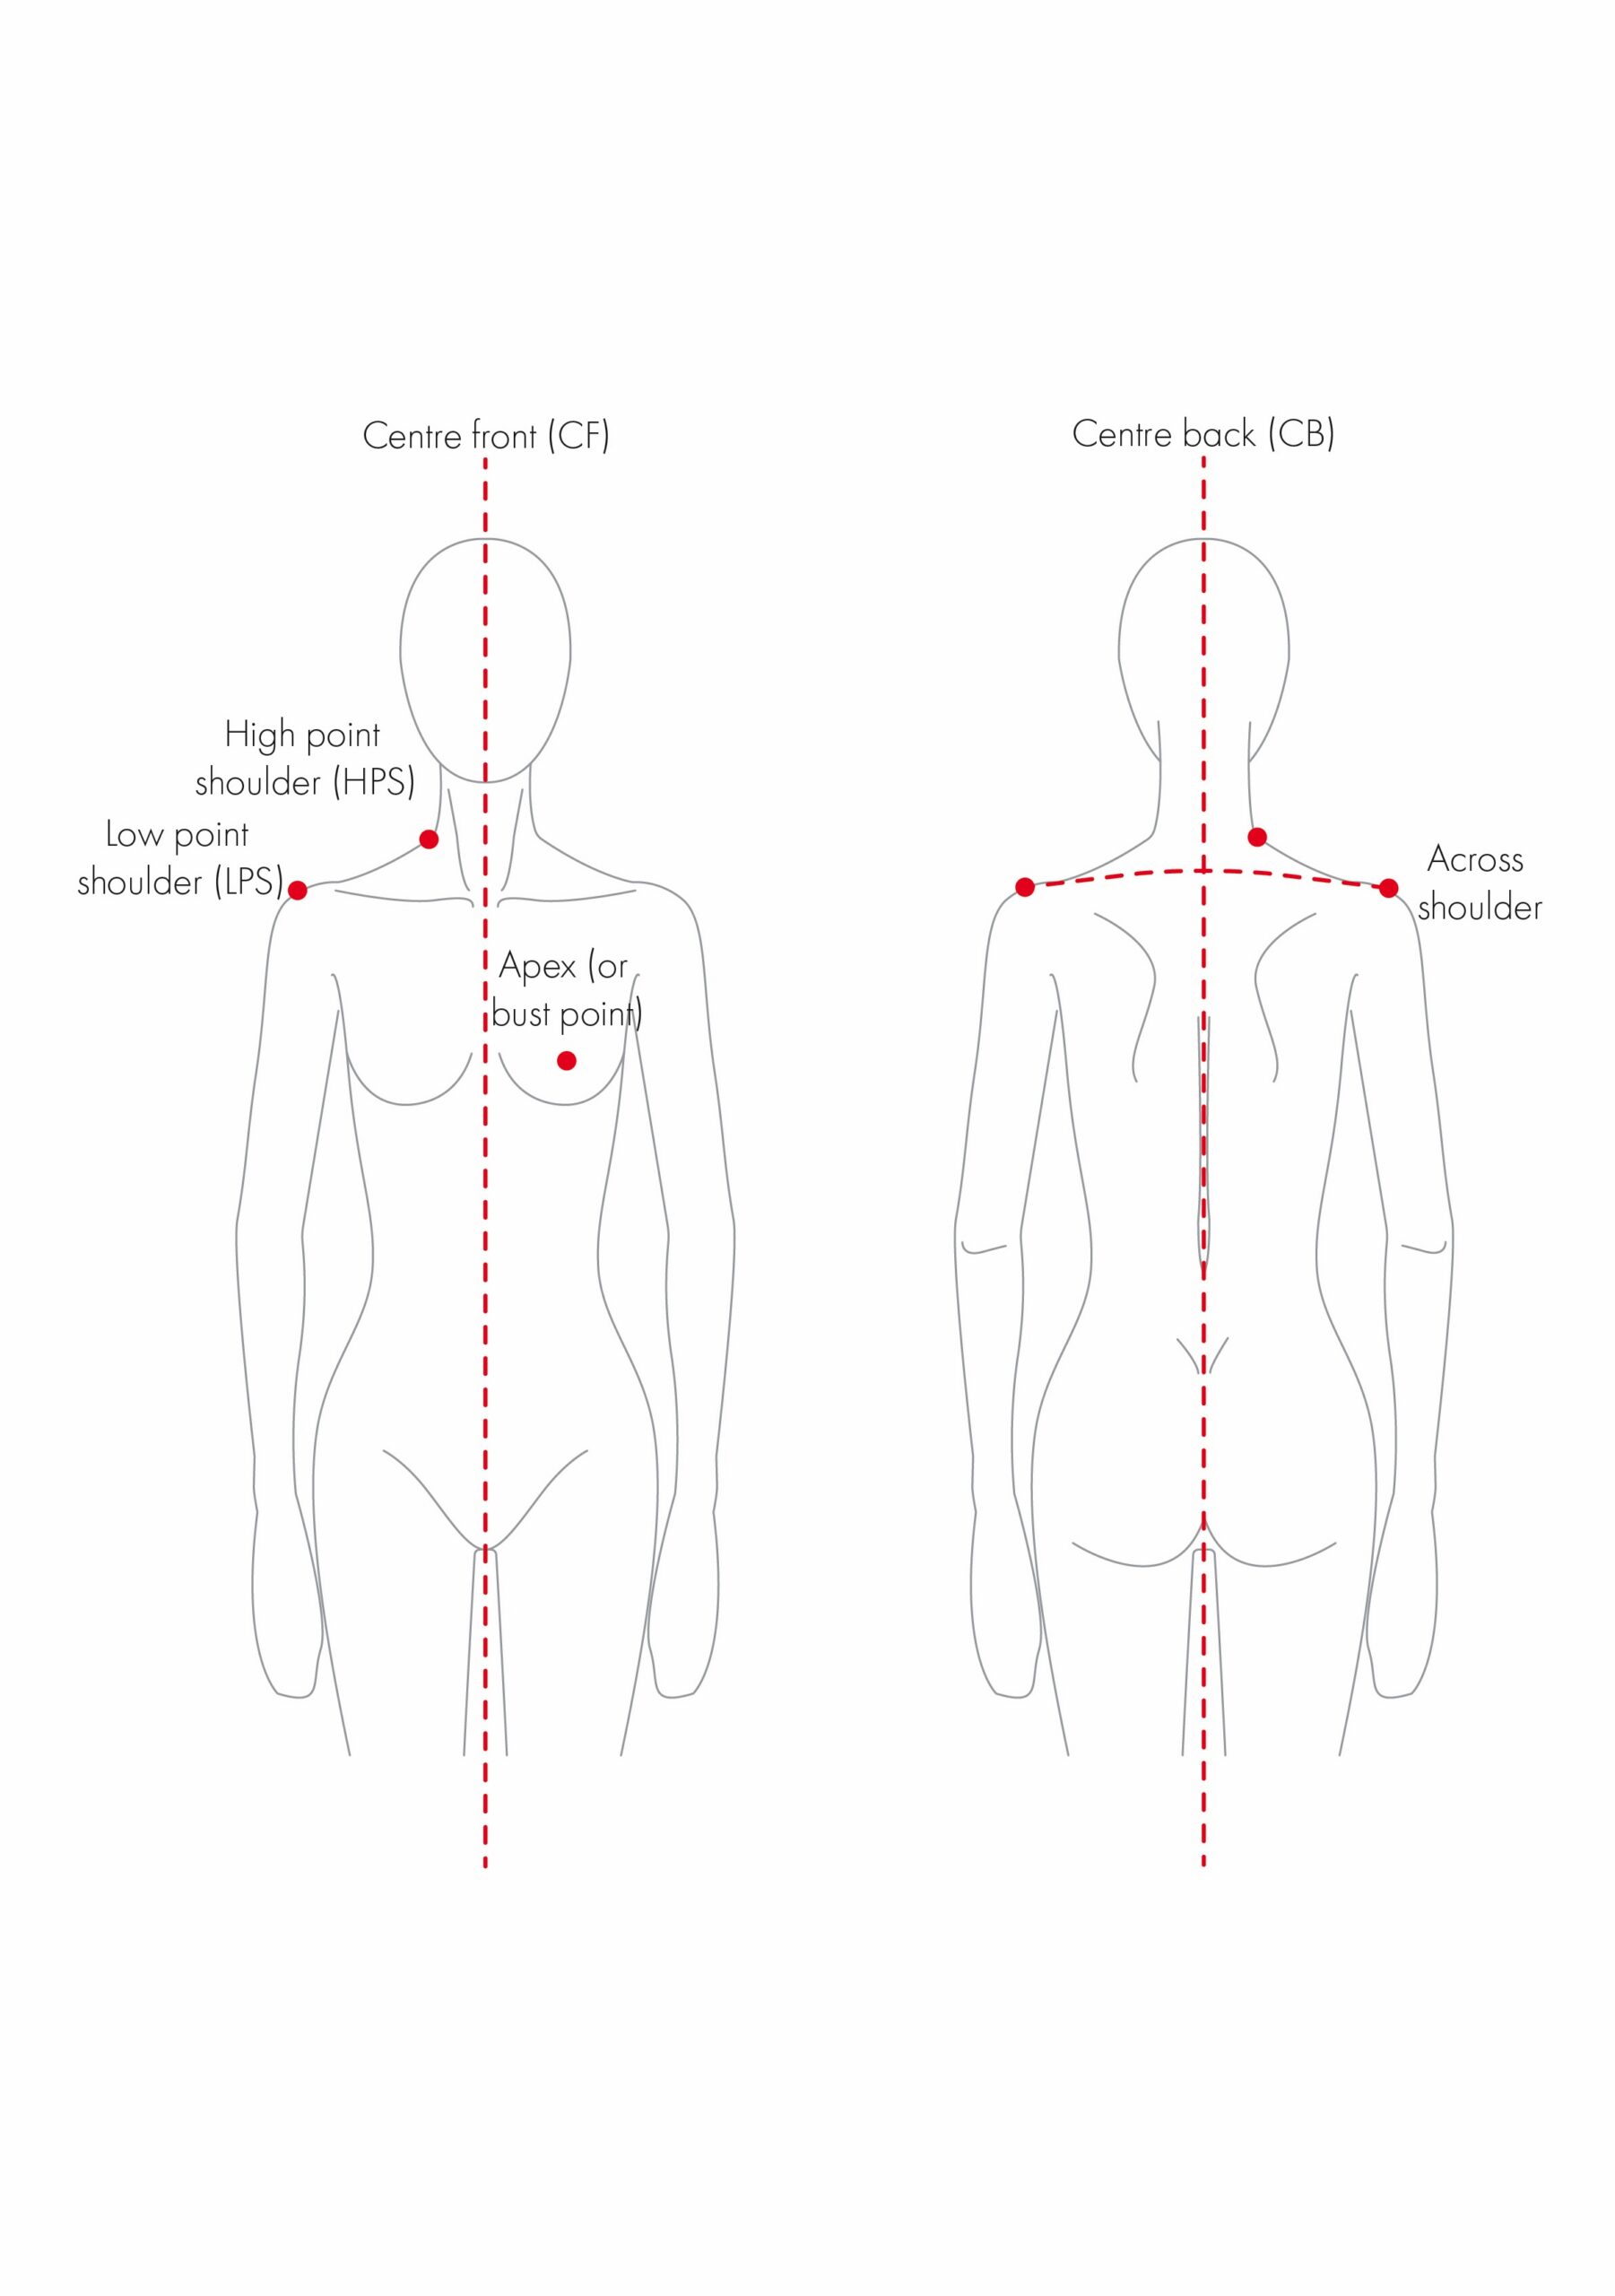
Before I dive into making alterations, let’s take a look at some of the key reference points and language on both the body and pattern when working with the neckline. Every body is different so these reference points will vary from person to person.
On the body:
- Centre front (CF): Imagine an invisible line running vertically down the centre of the front body, dividing it essentially into a left and right side.
- High point shoulder (HPS): The point where the shoulder line meets the neckline at the base of the neck. It’s generally (not always) considered the highest point of the shoulder.
- Low point shoulder (LPS): The point at the outer edge of the shoulder where the shoulder ends and the arm essentially begins. You can usually feel this, being the bony point or edge of the shoulder.
- Apex (or bust point): This is the point that identifies the most prominent and protruding part of the bust. Typically around the nipple, but again not always.
- Centre back (CB): An invisible line running vertically down the centre of the back body, again dividing the back into two halves.
- Across shoulder: An imaginary line running across the shoulders from one LPS to the other LPS.
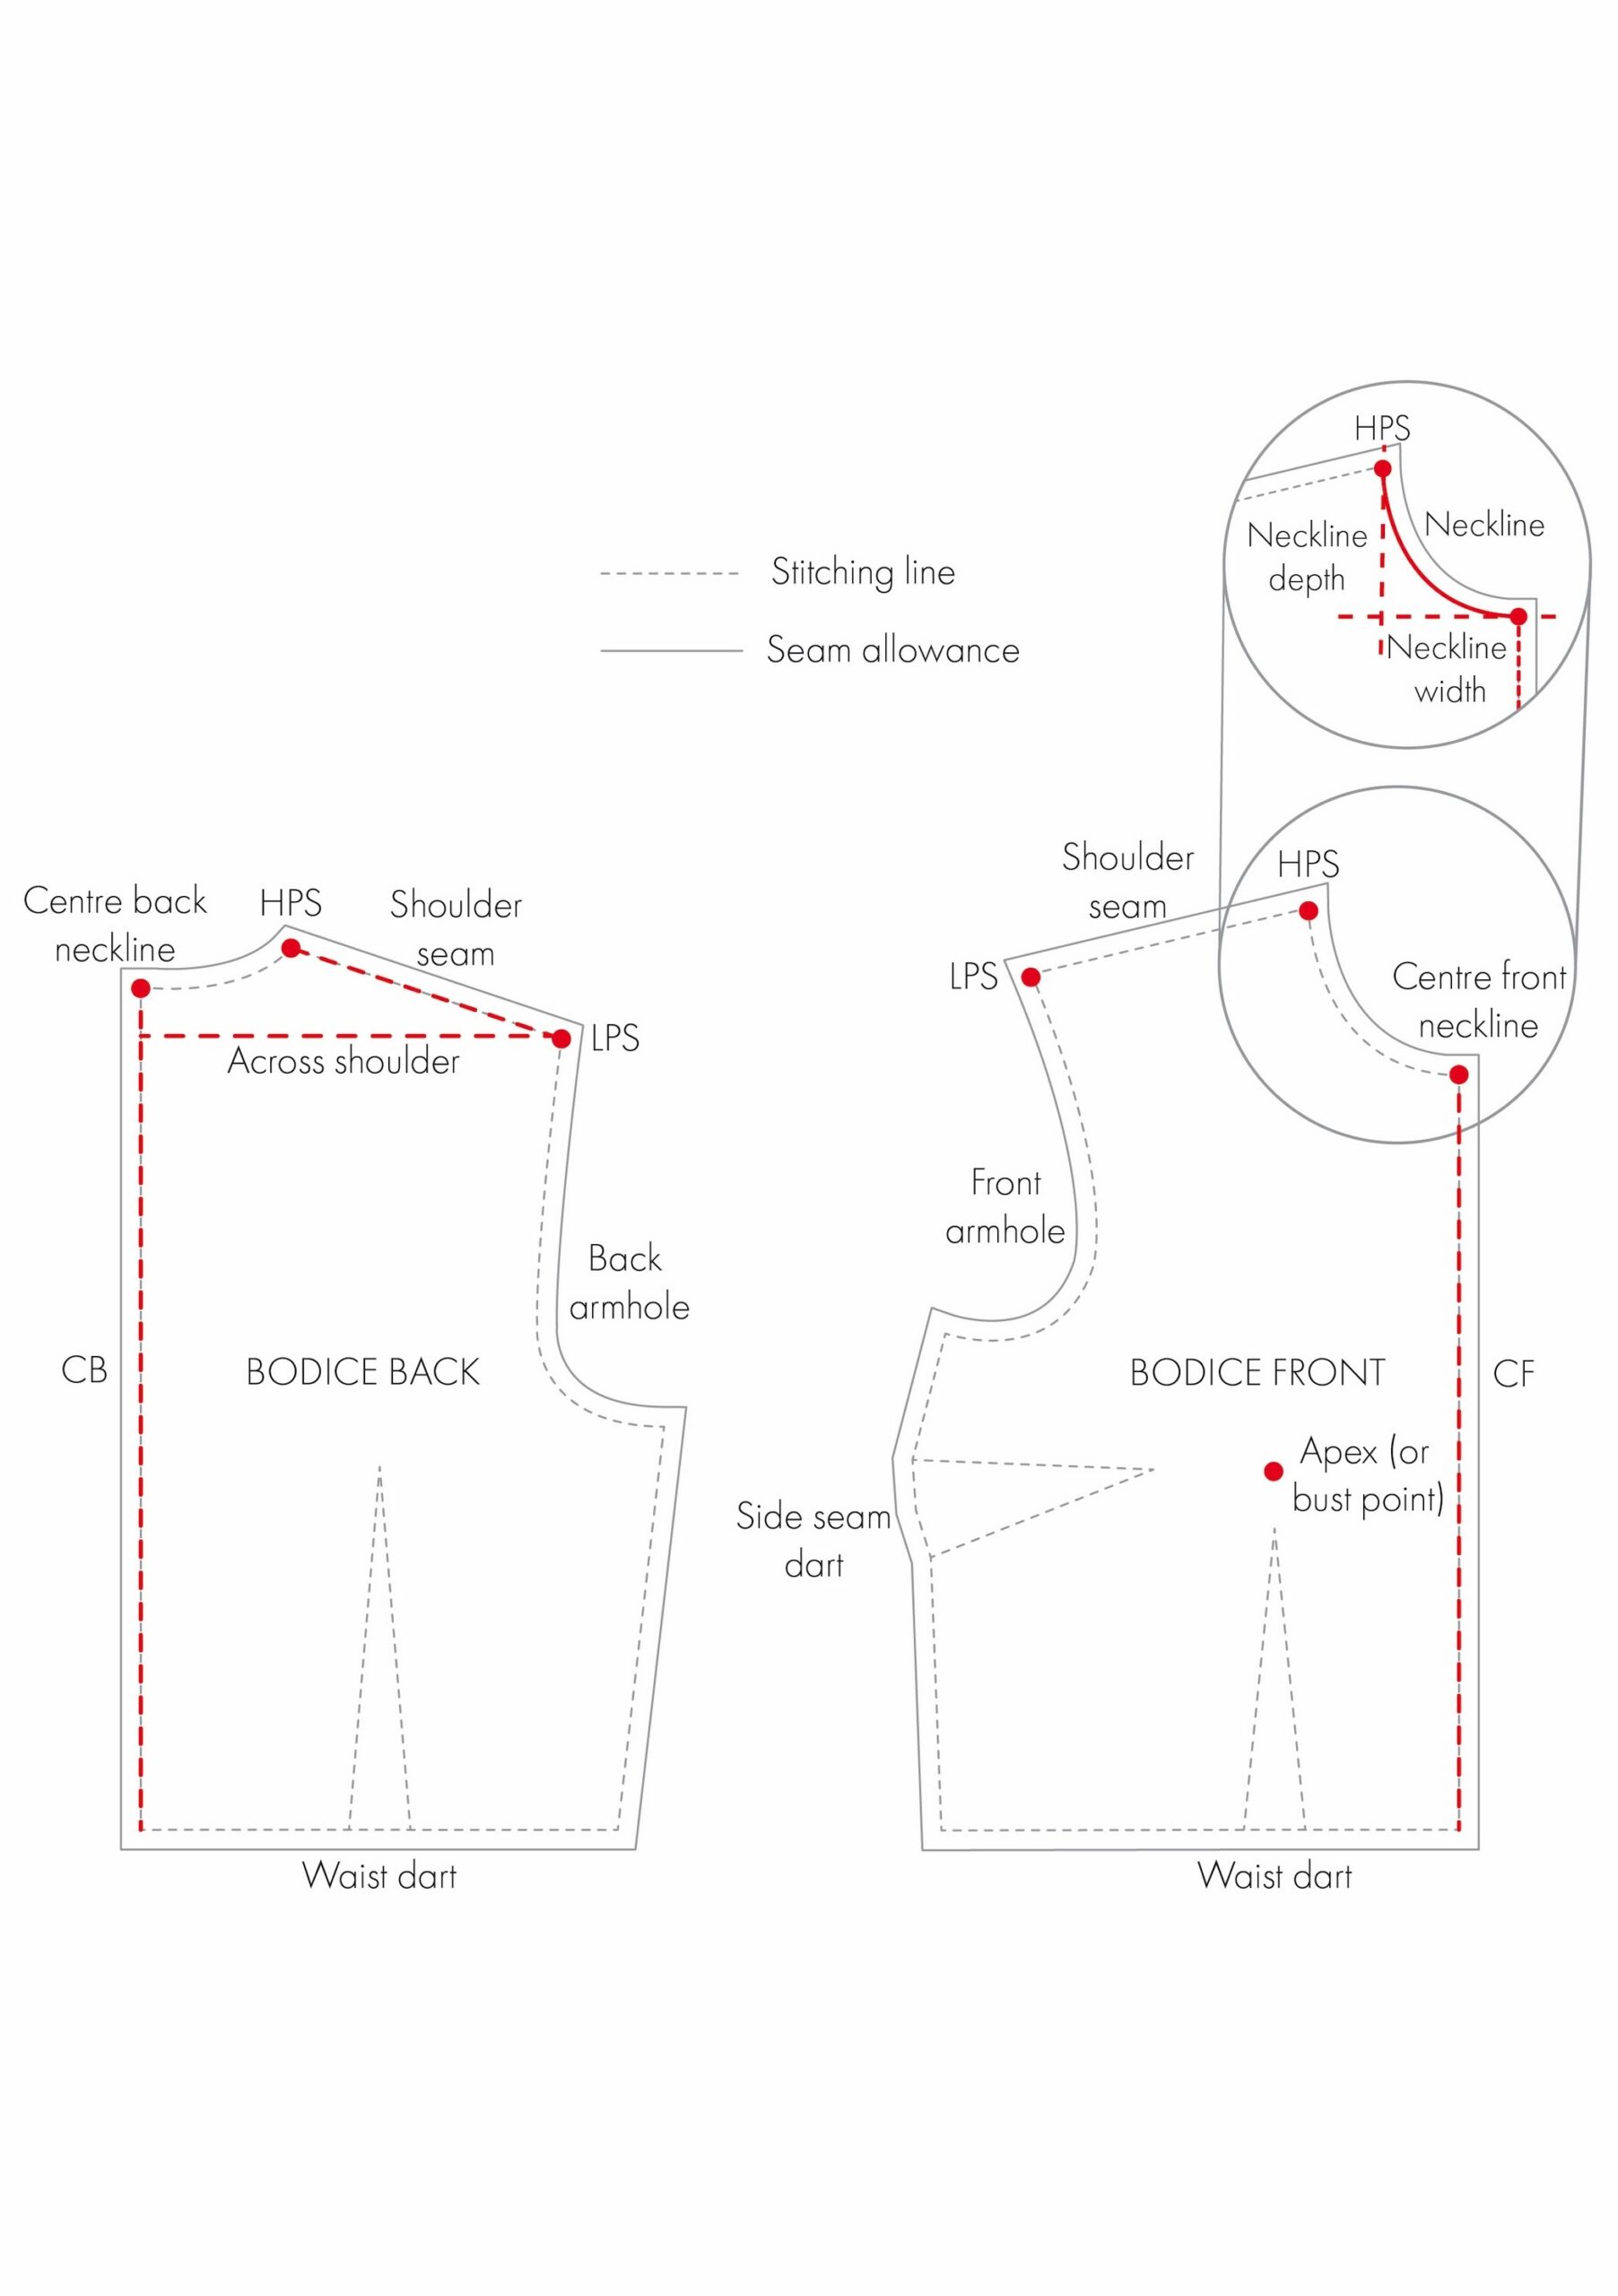
On the pattern:
- Centre front (CF): The vertical line of the pattern that will sit at the centre front of the body.
- Centre front neckline (CF neckline): The point where the front neckline meets the centre front line.
- Centre back (CB): The vertical line of the pattern that will sit at the centre back of the body.
- Centre back neckline (CB neckline): The point where the back neckline meets the centre back line.
- Shoulder seam: The seam joining the front to the back of the garment at the shoulder, running from the neckline to the end of the shoulder. On this block, that seam runs from HPS to LPS:
- High point shoulder (HPS): The point where the neckline and shoulder seam meet.
- Low point shoulder (LPS): The point at the outer edge of the shoulder, where the shoulder seam meets the armhole.
- Apex (or bust point): Same as above.
- Armhole: The curved opening on the bodice to which the sleeve will be attached.
- Neckline: The line defining the edge of the neck opening at the front and back of a garment.
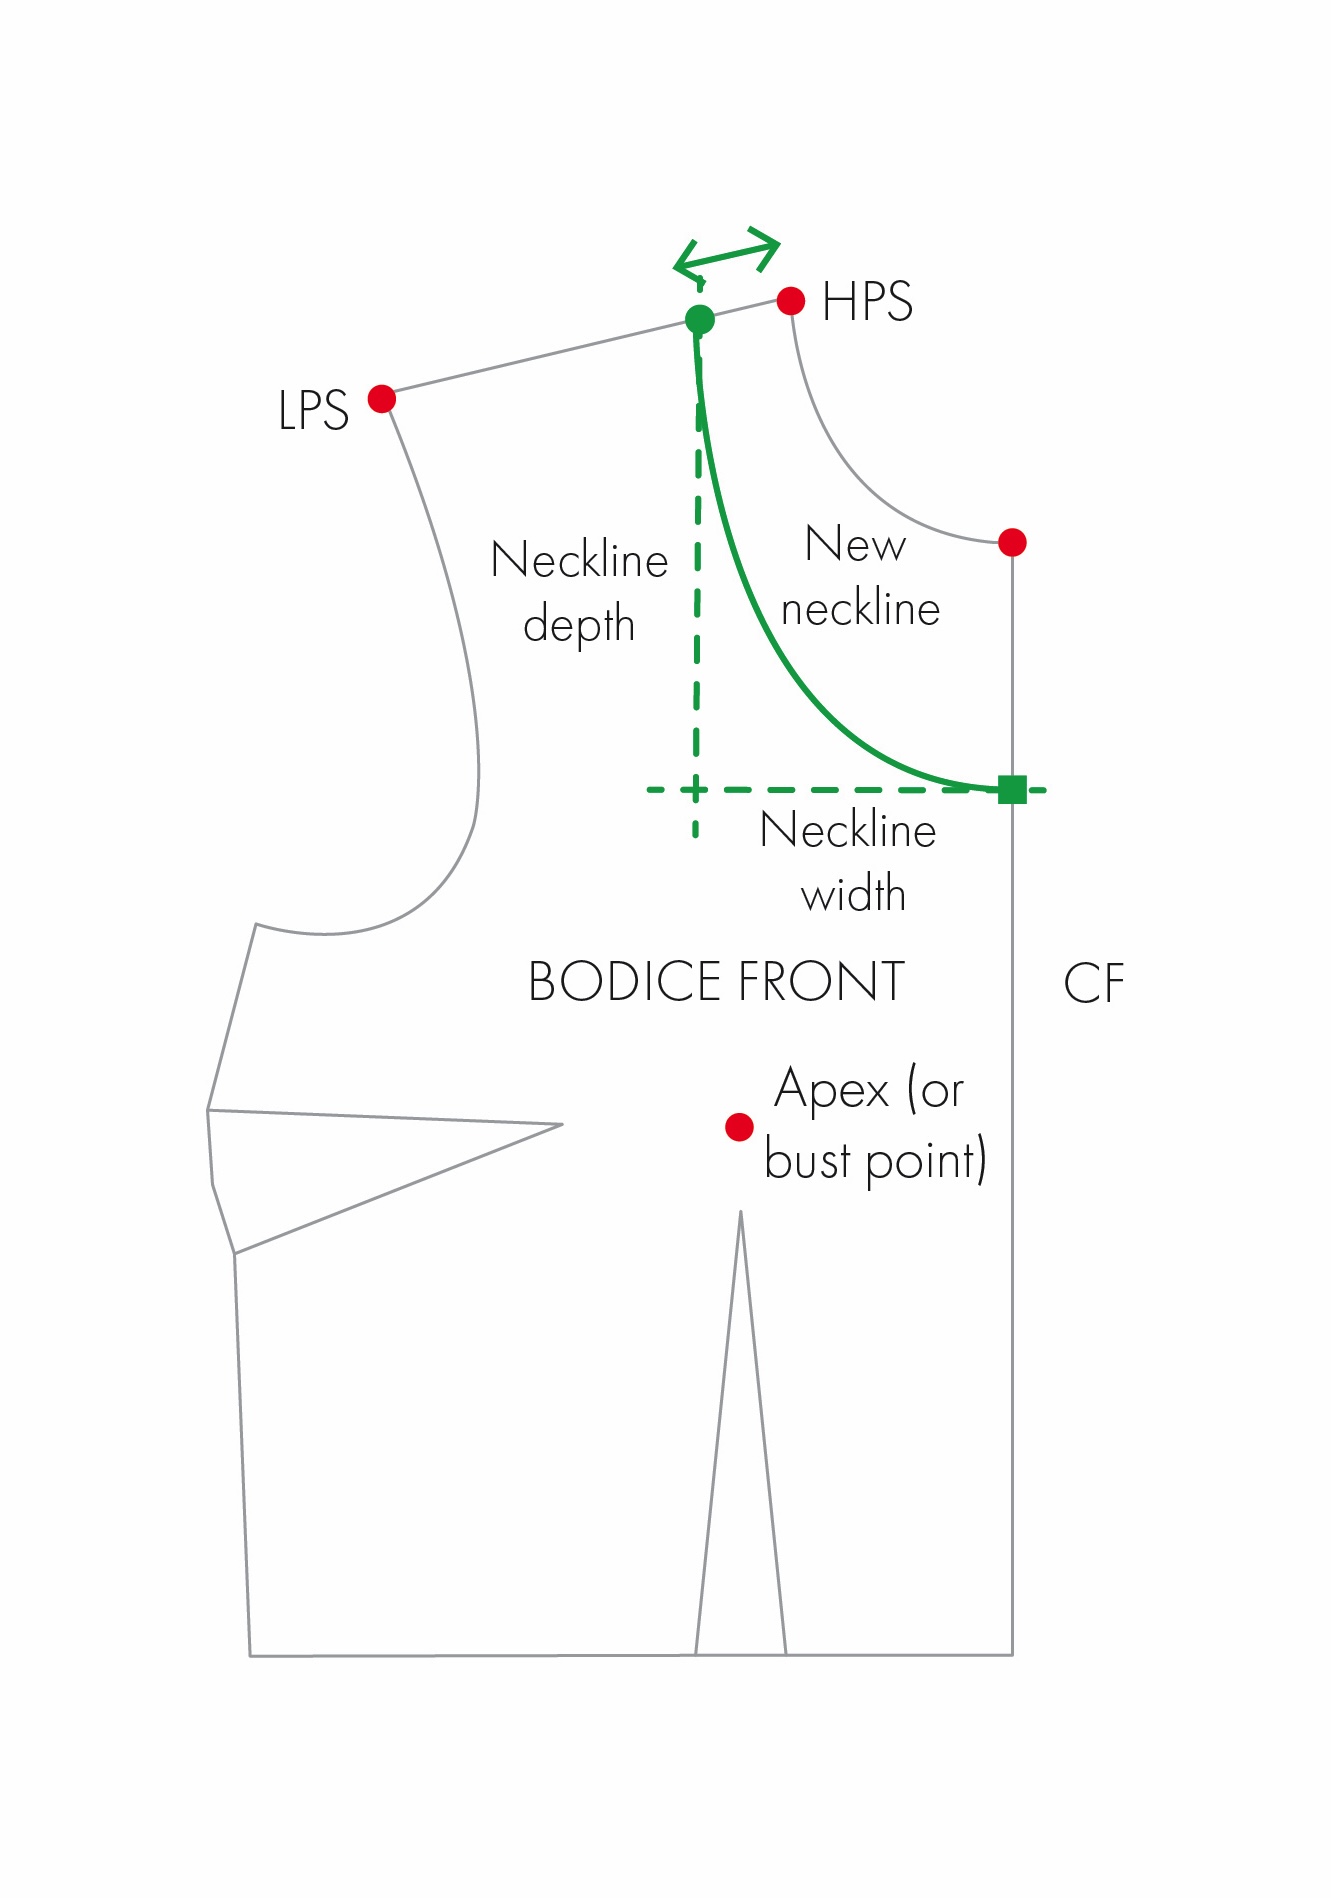
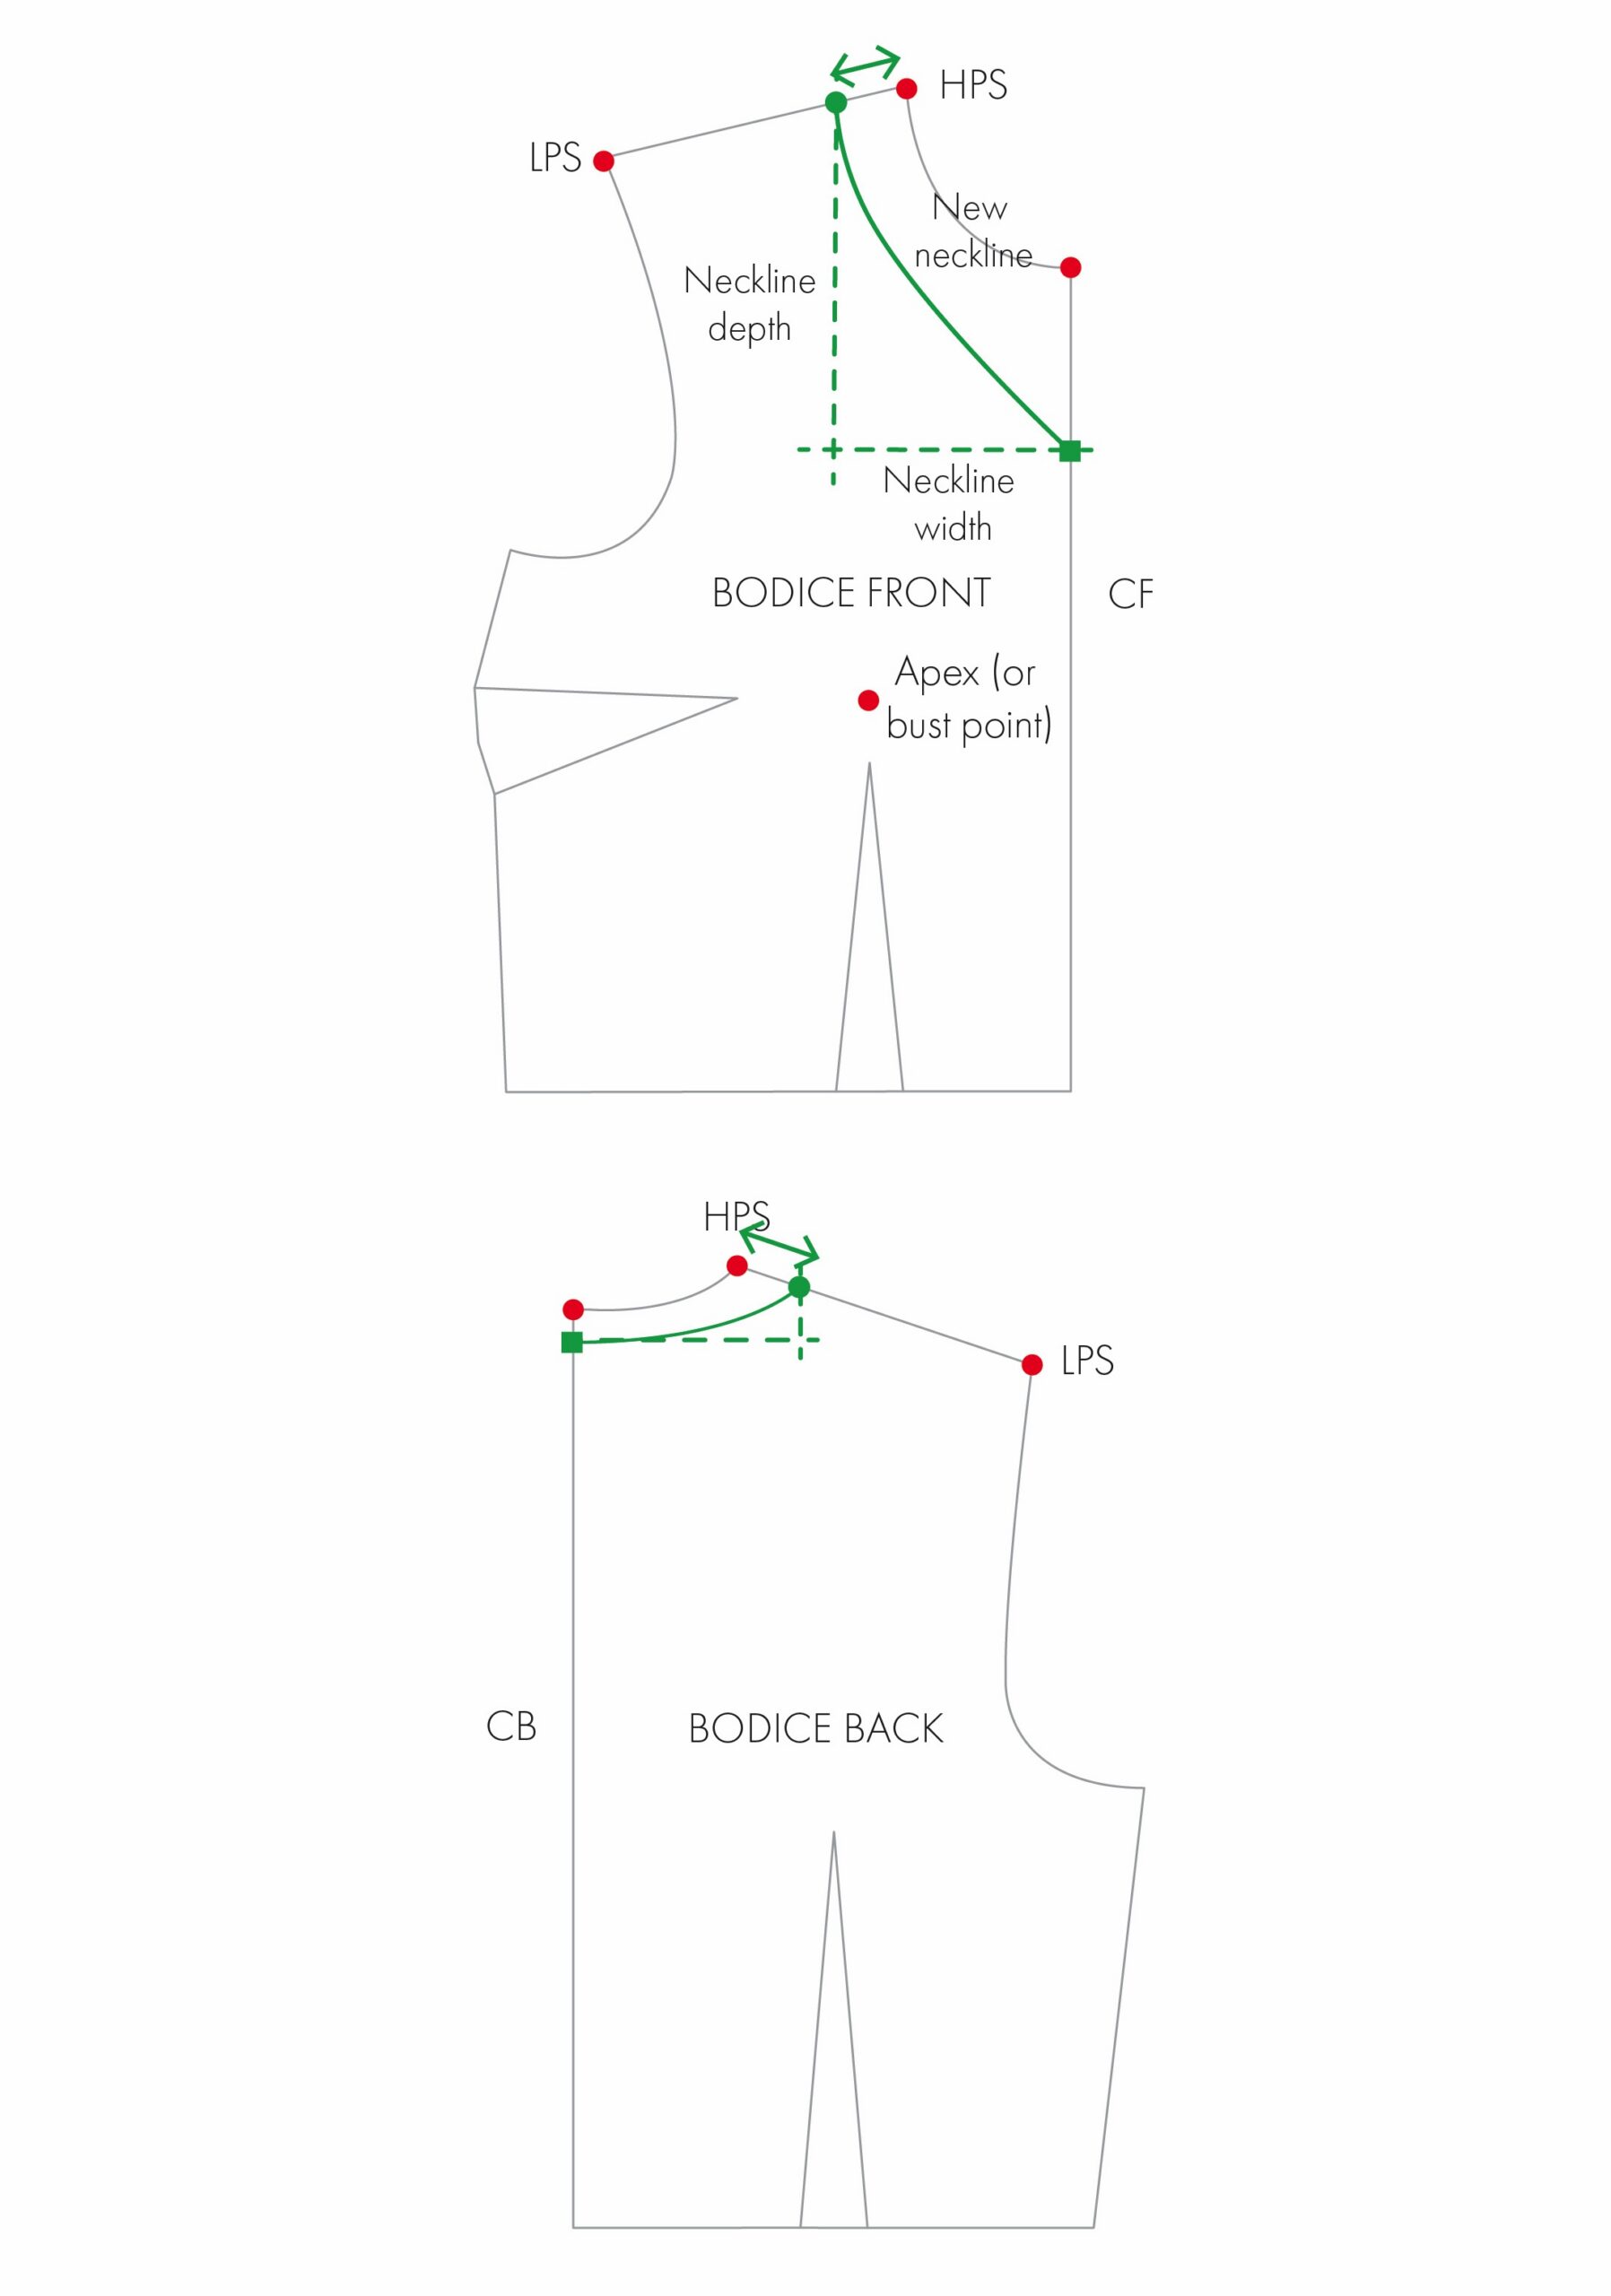
- Neckline depth: The distance the neckline extends vertically down from a reference point, in this case the HPS, to the lowest point of the neckline.
- Neckline width: The distance the neckline extends horizontally from the centre front or back toward the shoulder, in this example, again that’s the HPS.
Tools and Equipment
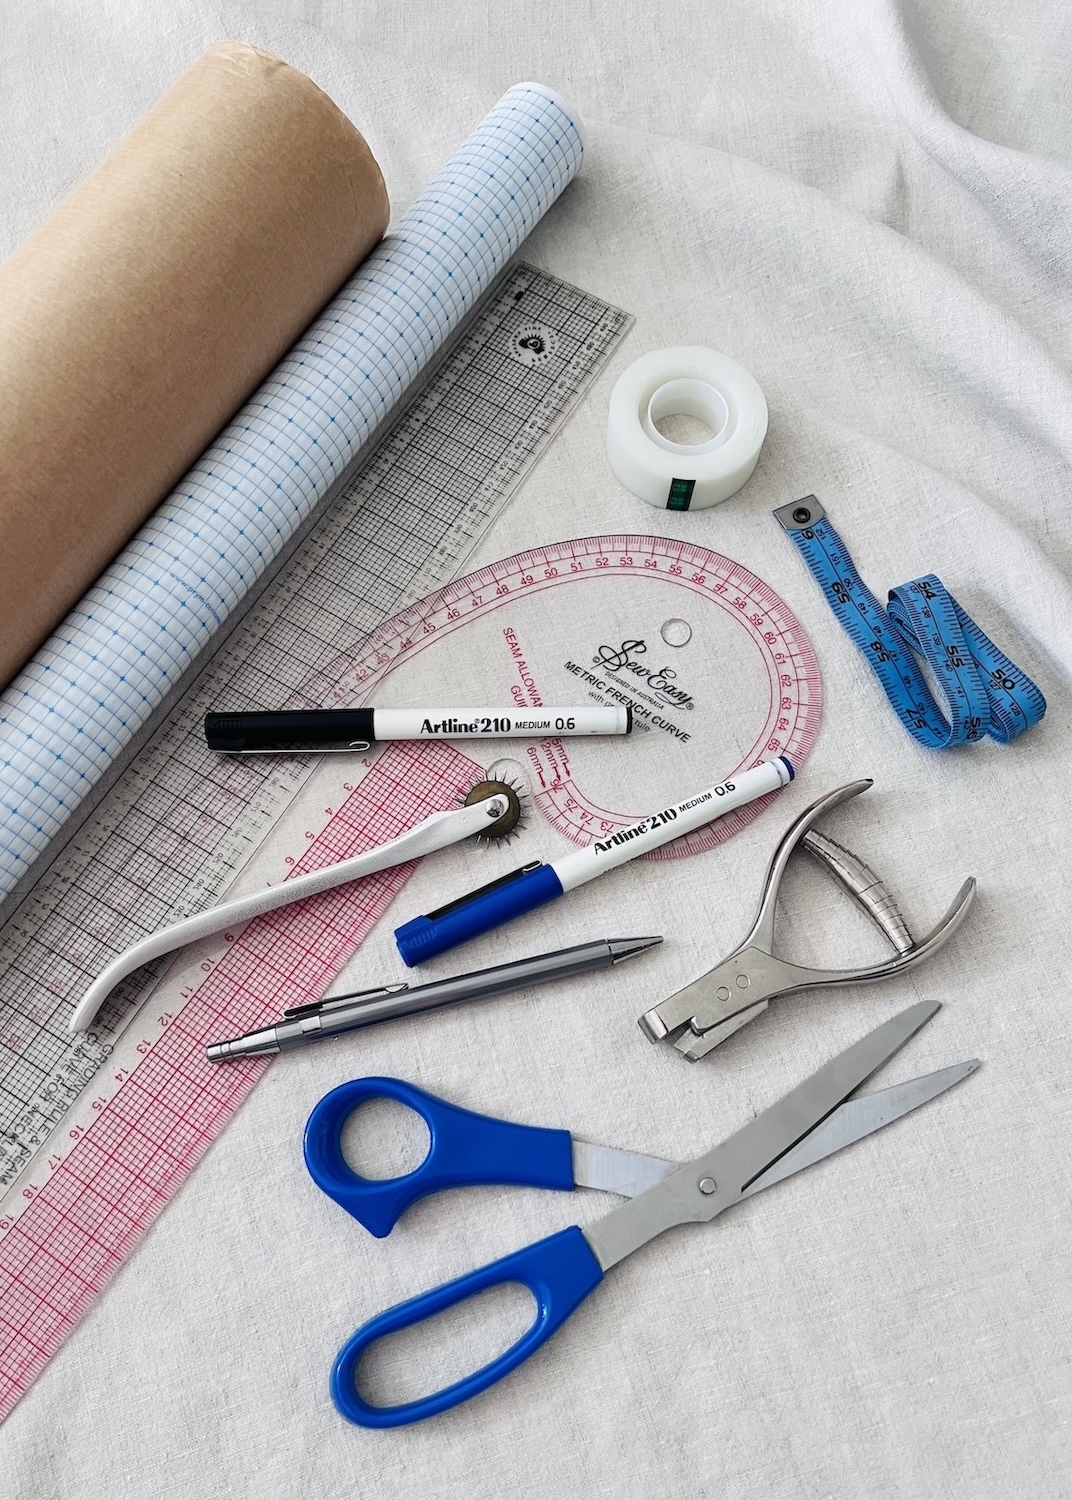
Although I will be working digitally to demonstrate these neckline alterations, the process is easily transferable to manual pattern making. Here is a list of equipment that will be useful when working manually:
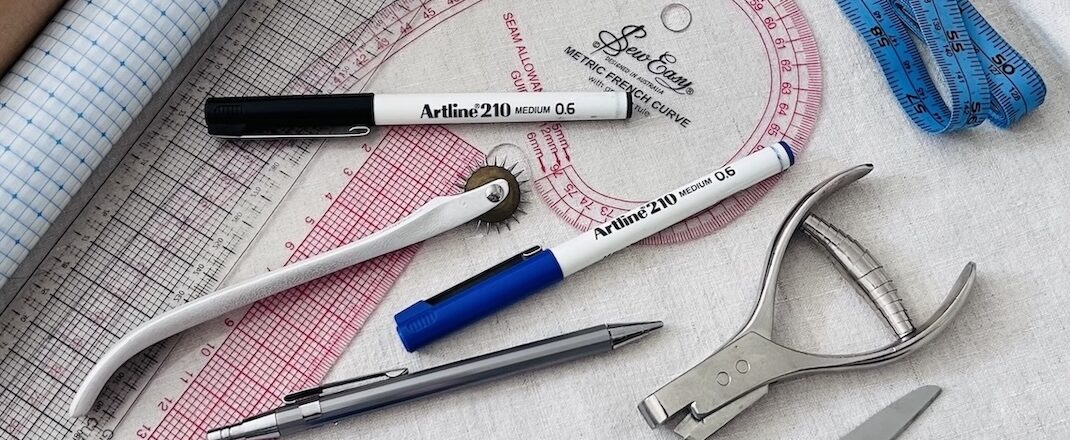
- Pencil: I love a mechanical one to avoid having to sharpen the pencil all the time. One with an eraser on top is also useful.
- Pens: I recommend having different colours to add different pattern markings and to distinguish between different changes (i.e. alteration 1, alteration 2).
- Paper scissors.
- Rulers: A straight and curved ruler is always handy.
- Measuring tape: Good for measuring curved lines.
- Paper: Both pattern and tracing.
Tip: If you don’t have large sheets of paper for pattern making, brown gift wrap and moving packing paper work really well. See-through baking paper also works well for tracings and working pieces.
- Tape: I love Scotch Magic Tape because you can move and re-stick it, and write on it.
- Tracing wheel (optional).
- Notcher (optional).
Before You Start
Before making any alterations to the neckline, I recommend taking some time to get to know your pattern, your vision, and do a little prep work.
- Identify the stitch line vs. the seam allowance: Pattern alterations are typically made on the stitching line, rather than the cutting edge. If your pattern or block includes seam allowance, remove it and add back once you have made your alterations, or simply disregard it.
- Make a working copy of the pattern: Creating a tracing of the pattern allows you to experiment without altering your original pattern.
- Identify what you want to change about the existing neckline: Are you changing the width, depth, shape, or a combination of these? I recommend looking at garments you own (and like) and making a note of things like the neckline shape, width and depth. I always look to my wardrobe when designing anything as I know what pieces I like the best. Alternatively, consider marking some of the reference points on your body (a small dot with a washable pen works fine), and then visualising and measuring where you may want the new neckline to sit.
- Consider how the neckline will be finished: Does the pattern have a facing, lining, binding, or another neckline finish? You’ll likely need to adjust for this as well once you change the neckline.
- Check for darts and other design features that are incorporated in the neckline: Look at the neckline and its surroundings for things like darts or pleats that may be affected by the alteration. If, for example, you don’t want a dart in its existing position, you can often pivot the dart intake to a different location or eliminate it altogether, depending on the design. In my example, the original block had a shoulder dart, so I simply pivoted it to the side seam.
Tip: For more on moving, combining, or removing darts, take a look at the guide ‘Sewing Essentials: Dart Manipulation’.
- The front and back neckline can be altered independently: The front and back neckline can be different shapes, and usually are. The key thing is that the front and back shoulder seams starts and finishes at the same point. You want the width of the front and back shoulder seam to be the same so that they fit back together when sewn.
- More dramatic neckline changes will likely need additional alterations: More substantial changes will likely require extra fitting to help with possible gaping. Also, you don’t want to make the front and back neckline too deep or wide, as the garment will likely just fall off your shoulders (yes I have done this before).
- Symmetry: For symmetrical alterations, you can simply work with half the pattern. However, if the design is asymmetrical, I recommend working on a full pattern piece (I have included an example of this below).
5 Common Neckline Alterations
Now, let’s get into the pattern making!
I’ll be demonstrating how to alter a basic bodice block to create five different necklines. I’ve chosen these examples simply to show a variety of shapes and considerations. All seam allowances have been removed from the following examples.
Example 1: Scoop neckline
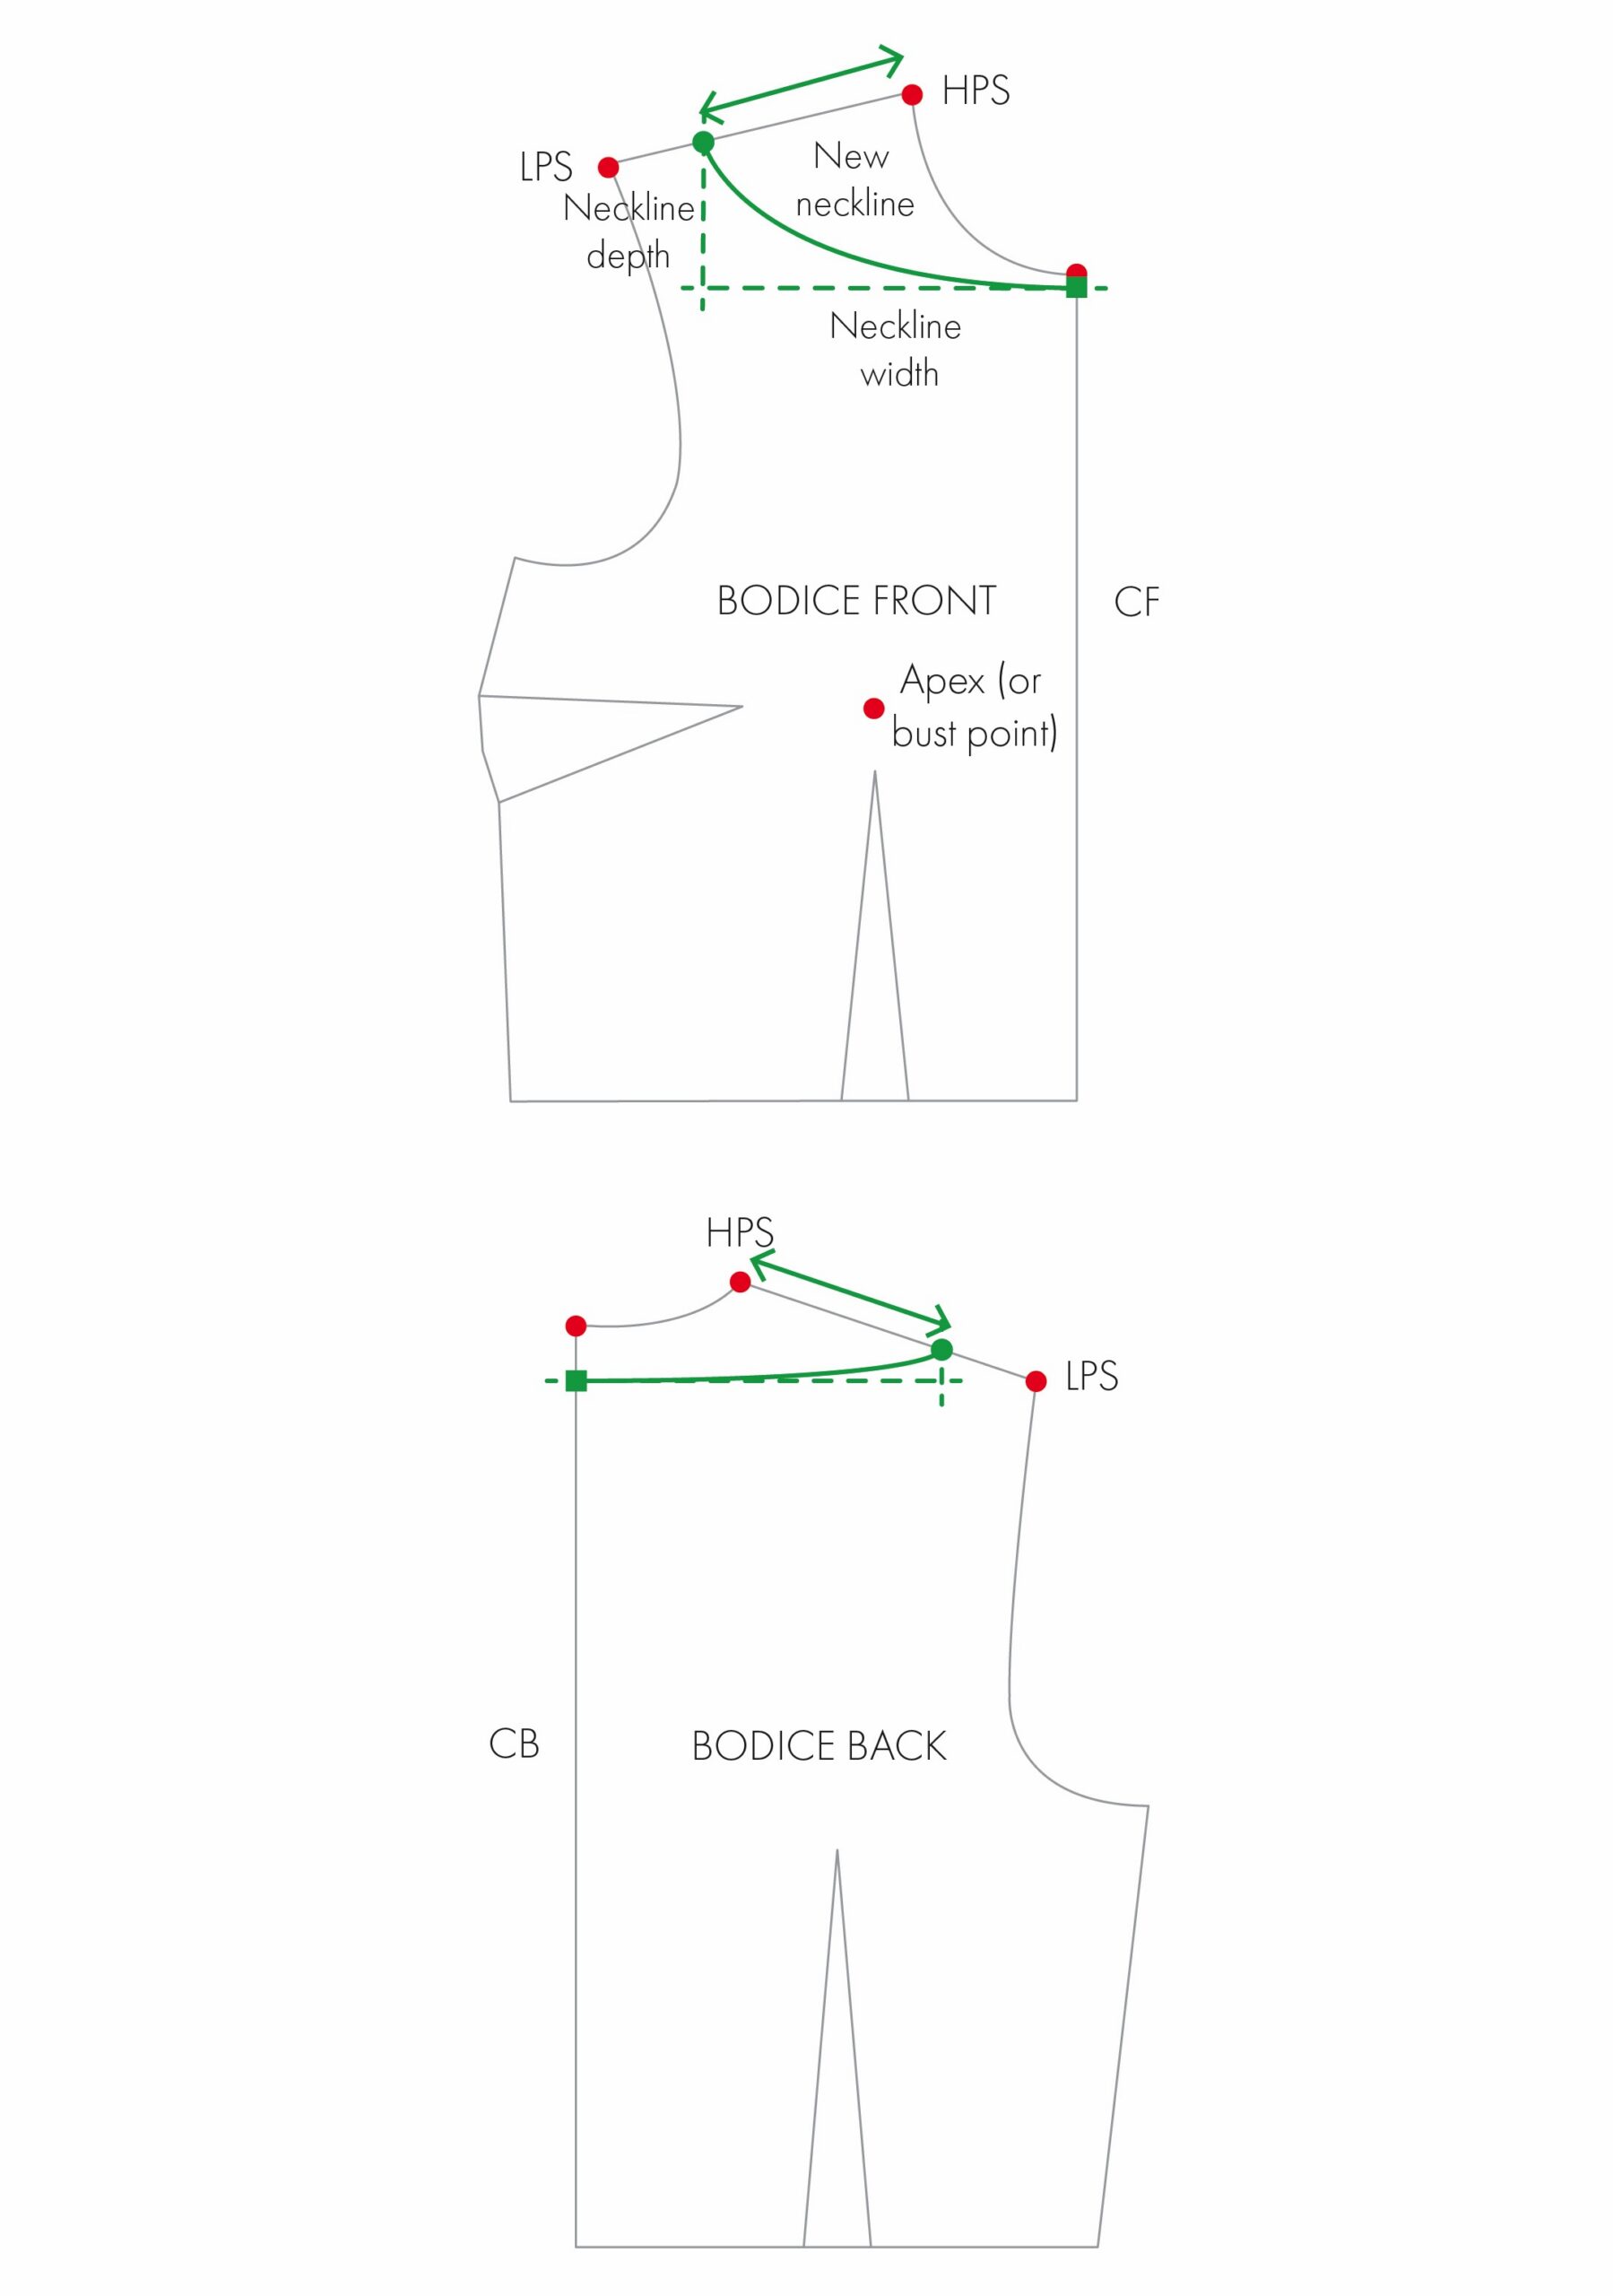
A scoop neckline is moderately low, rounded, and U-shaped. Therefore, to create a scoop neckline, we want to alter both the width and depth of the existing neckline while maintaining a smooth, continuous U-shaped curve.
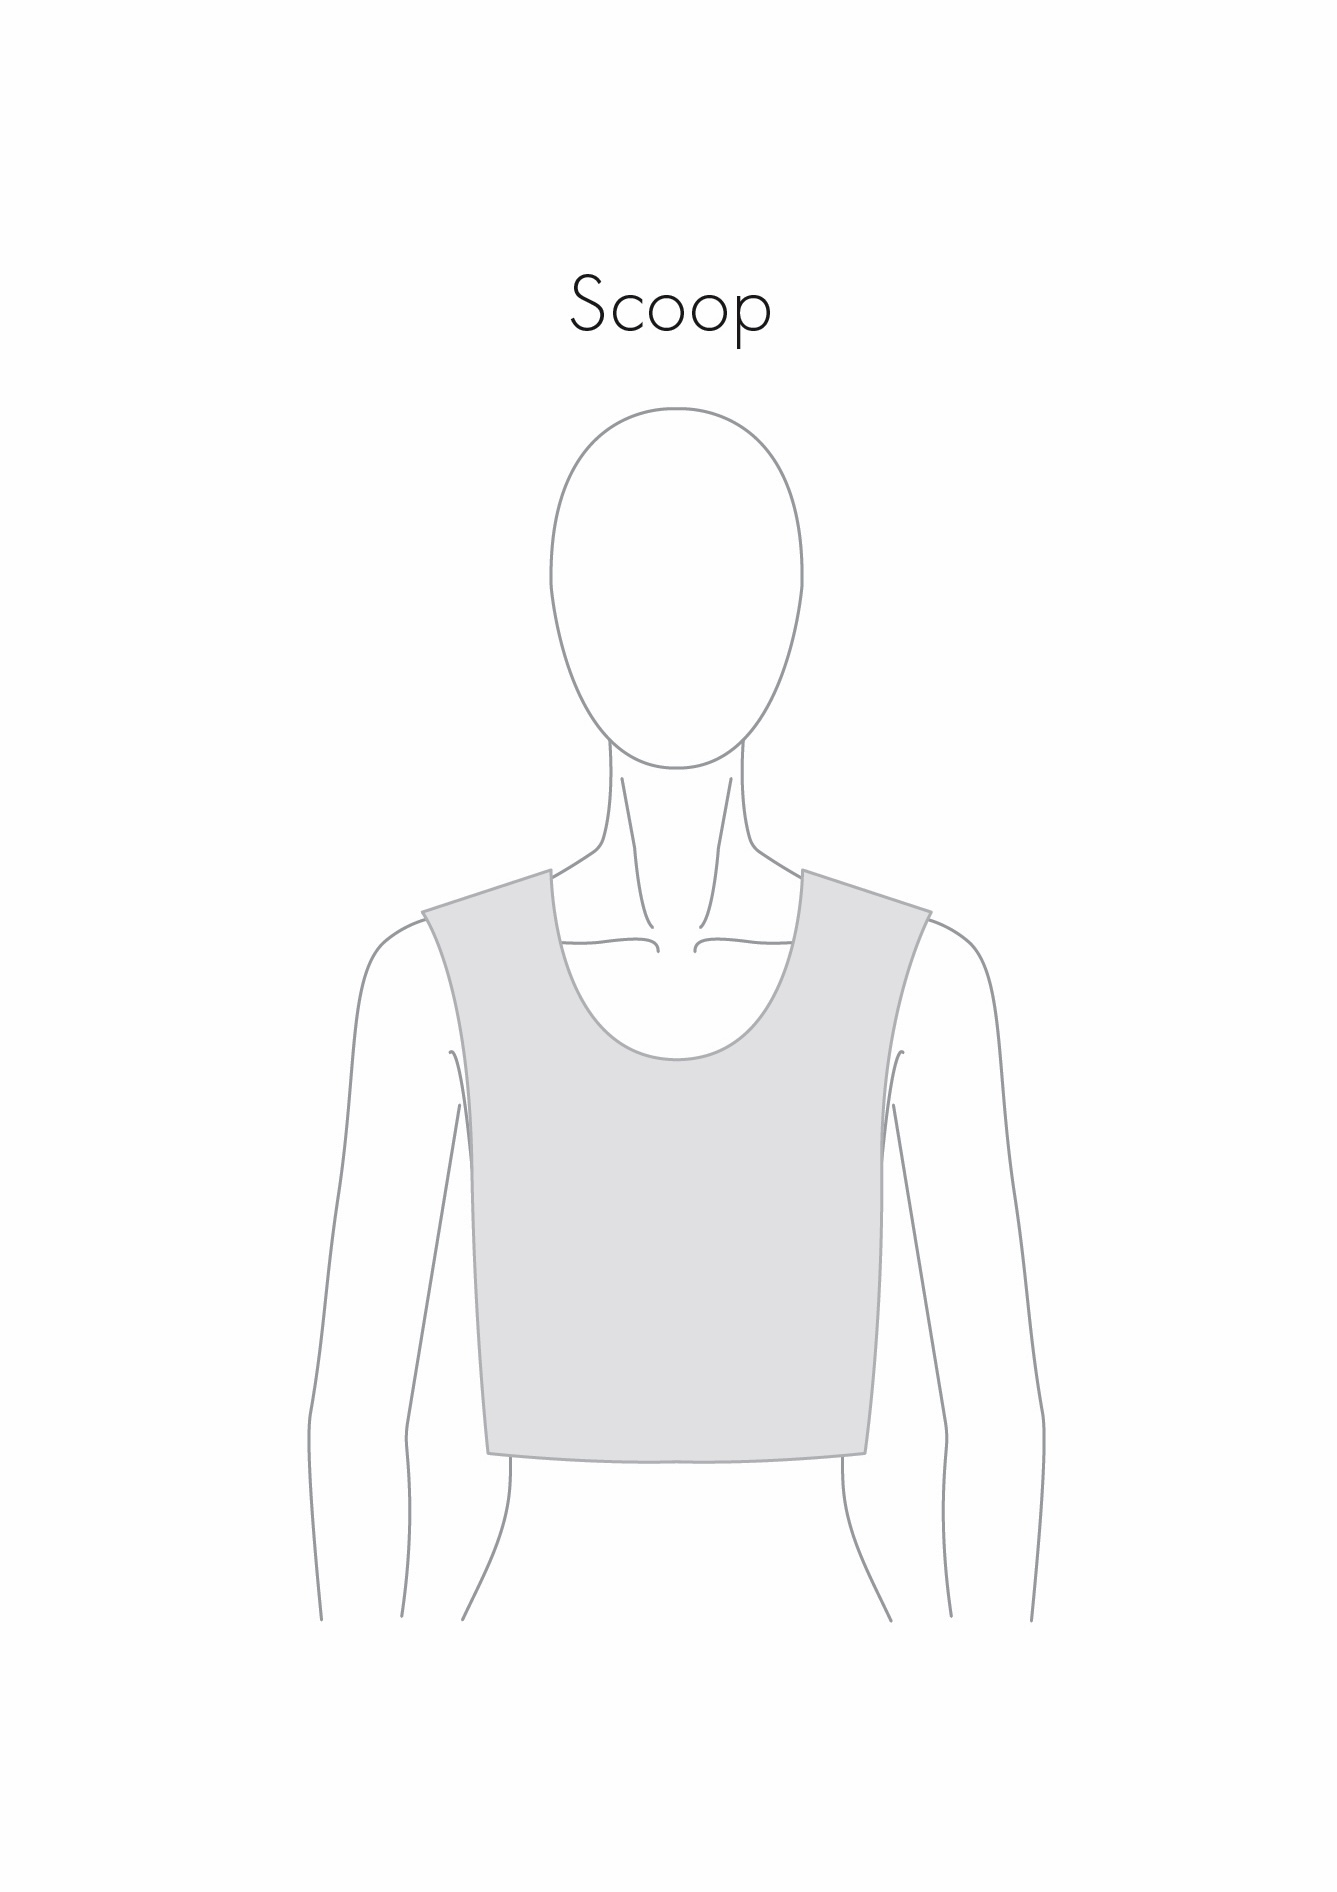
How much of a ‘scoop’ should you make? The width and depth of any neckline really depends on the look and coverage of the chest you are after.
- Depth: A deeper scoop will expose more of the upper chest, while a shallower scoop will provide more coverage.
- Width: A wider scoop will create a larger neck opening and move the neckline further along the shoulder seam, shortening its length. A narrower scoop will create a smaller neck opening and leave a longer shoulder seam.
Steps:
1. Mark the desired width of the new neckline along the front shoulder seam (refer to green dot).
2. Mark the desired depth of the new neckline on the centre front line (refer to green square).
3. Draw a smooth curve between the points to create the new front neckline.
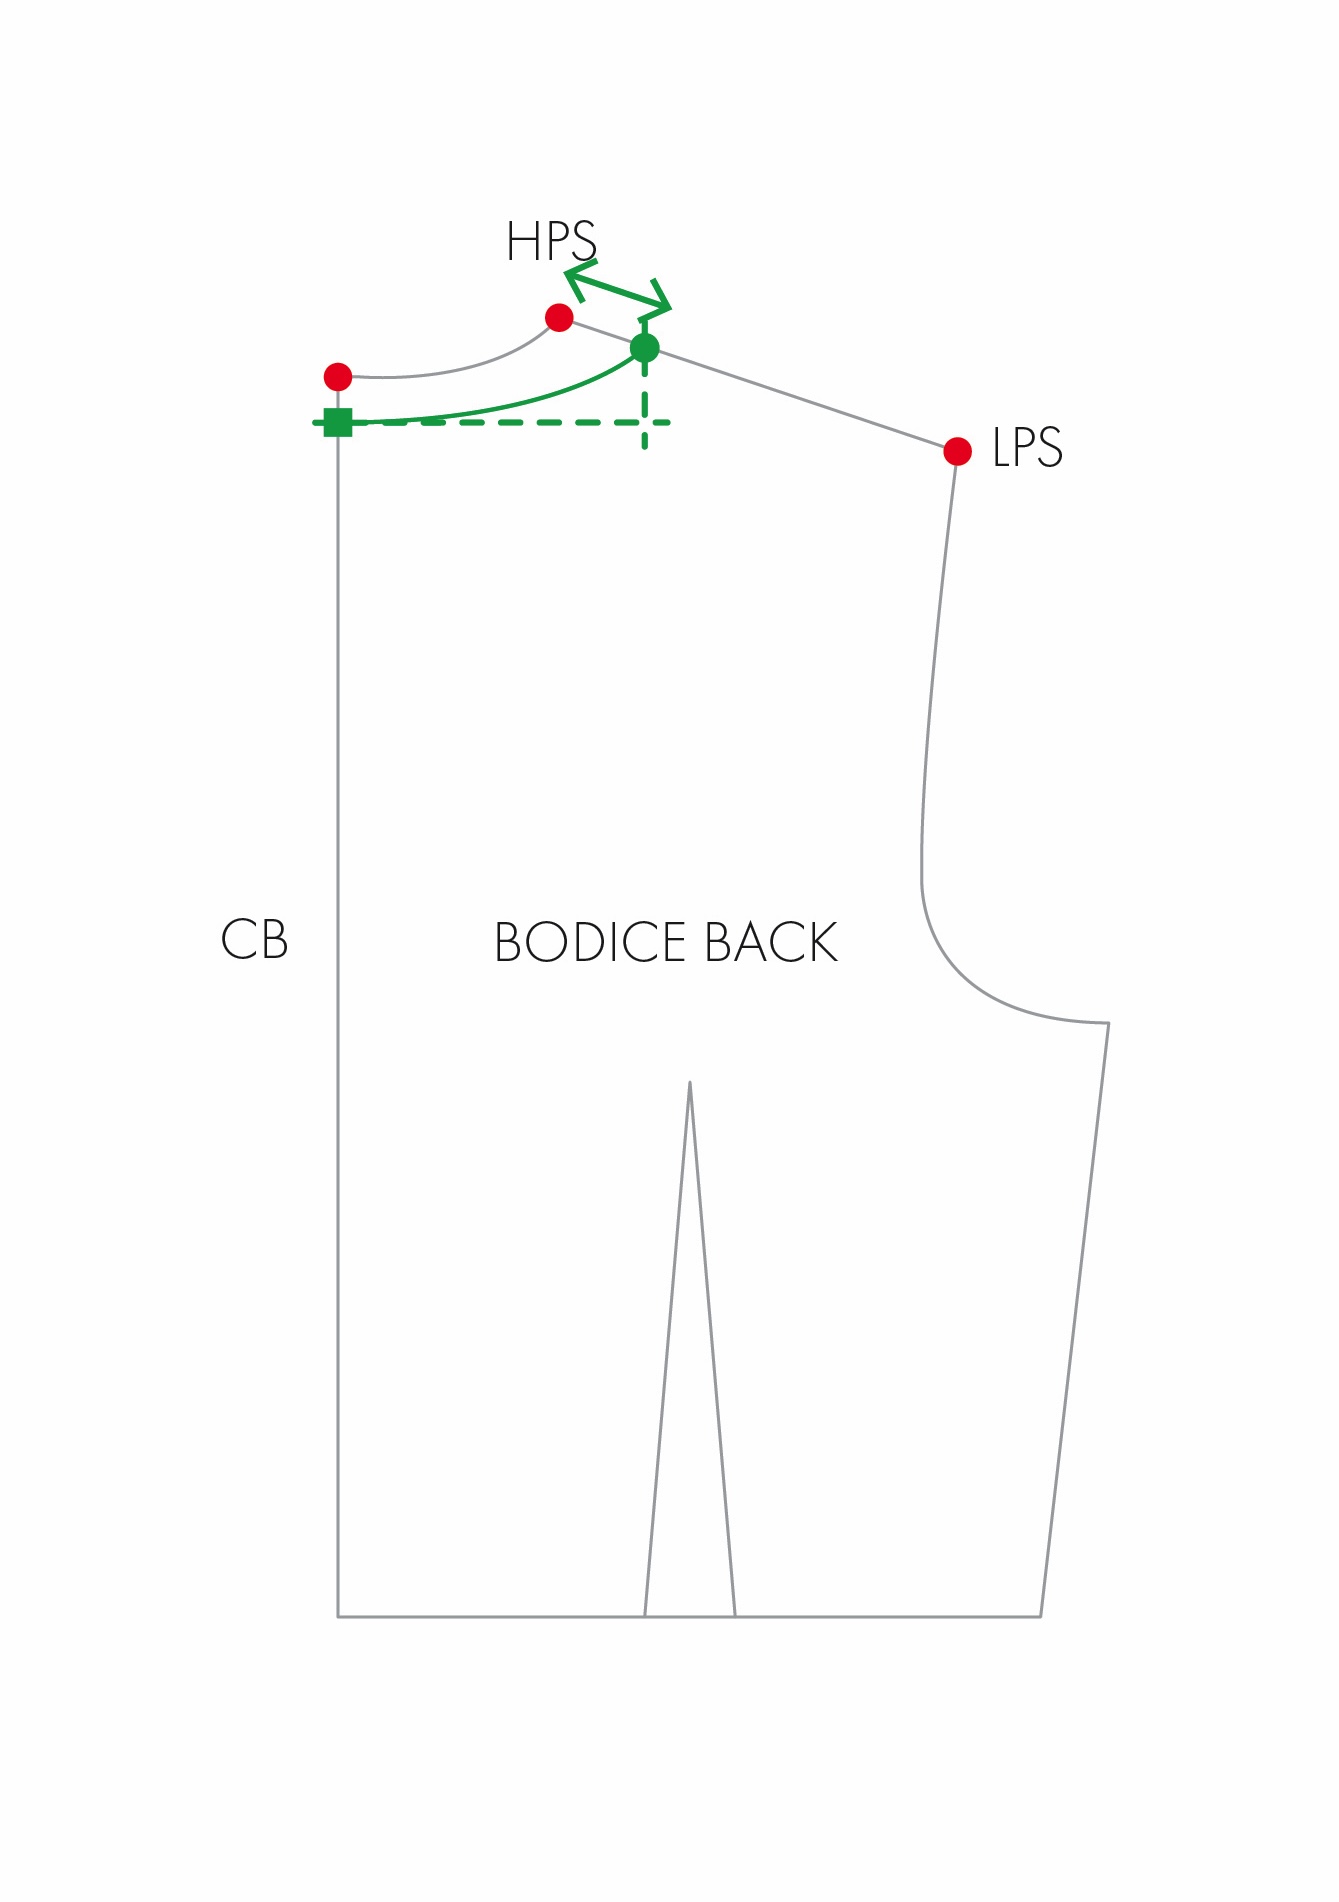
4. Transfer the new front neckline width to the back neckline (green dot). On this example, I simply measured from the front HPS to the new point on the shoulder seam and transferred this measurement to the back (refer to green arrows).
5. Mark the desired depth of the new neckline on the centre back line (green square).
6. Draw a smooth curve between the points to create the new back neckline.
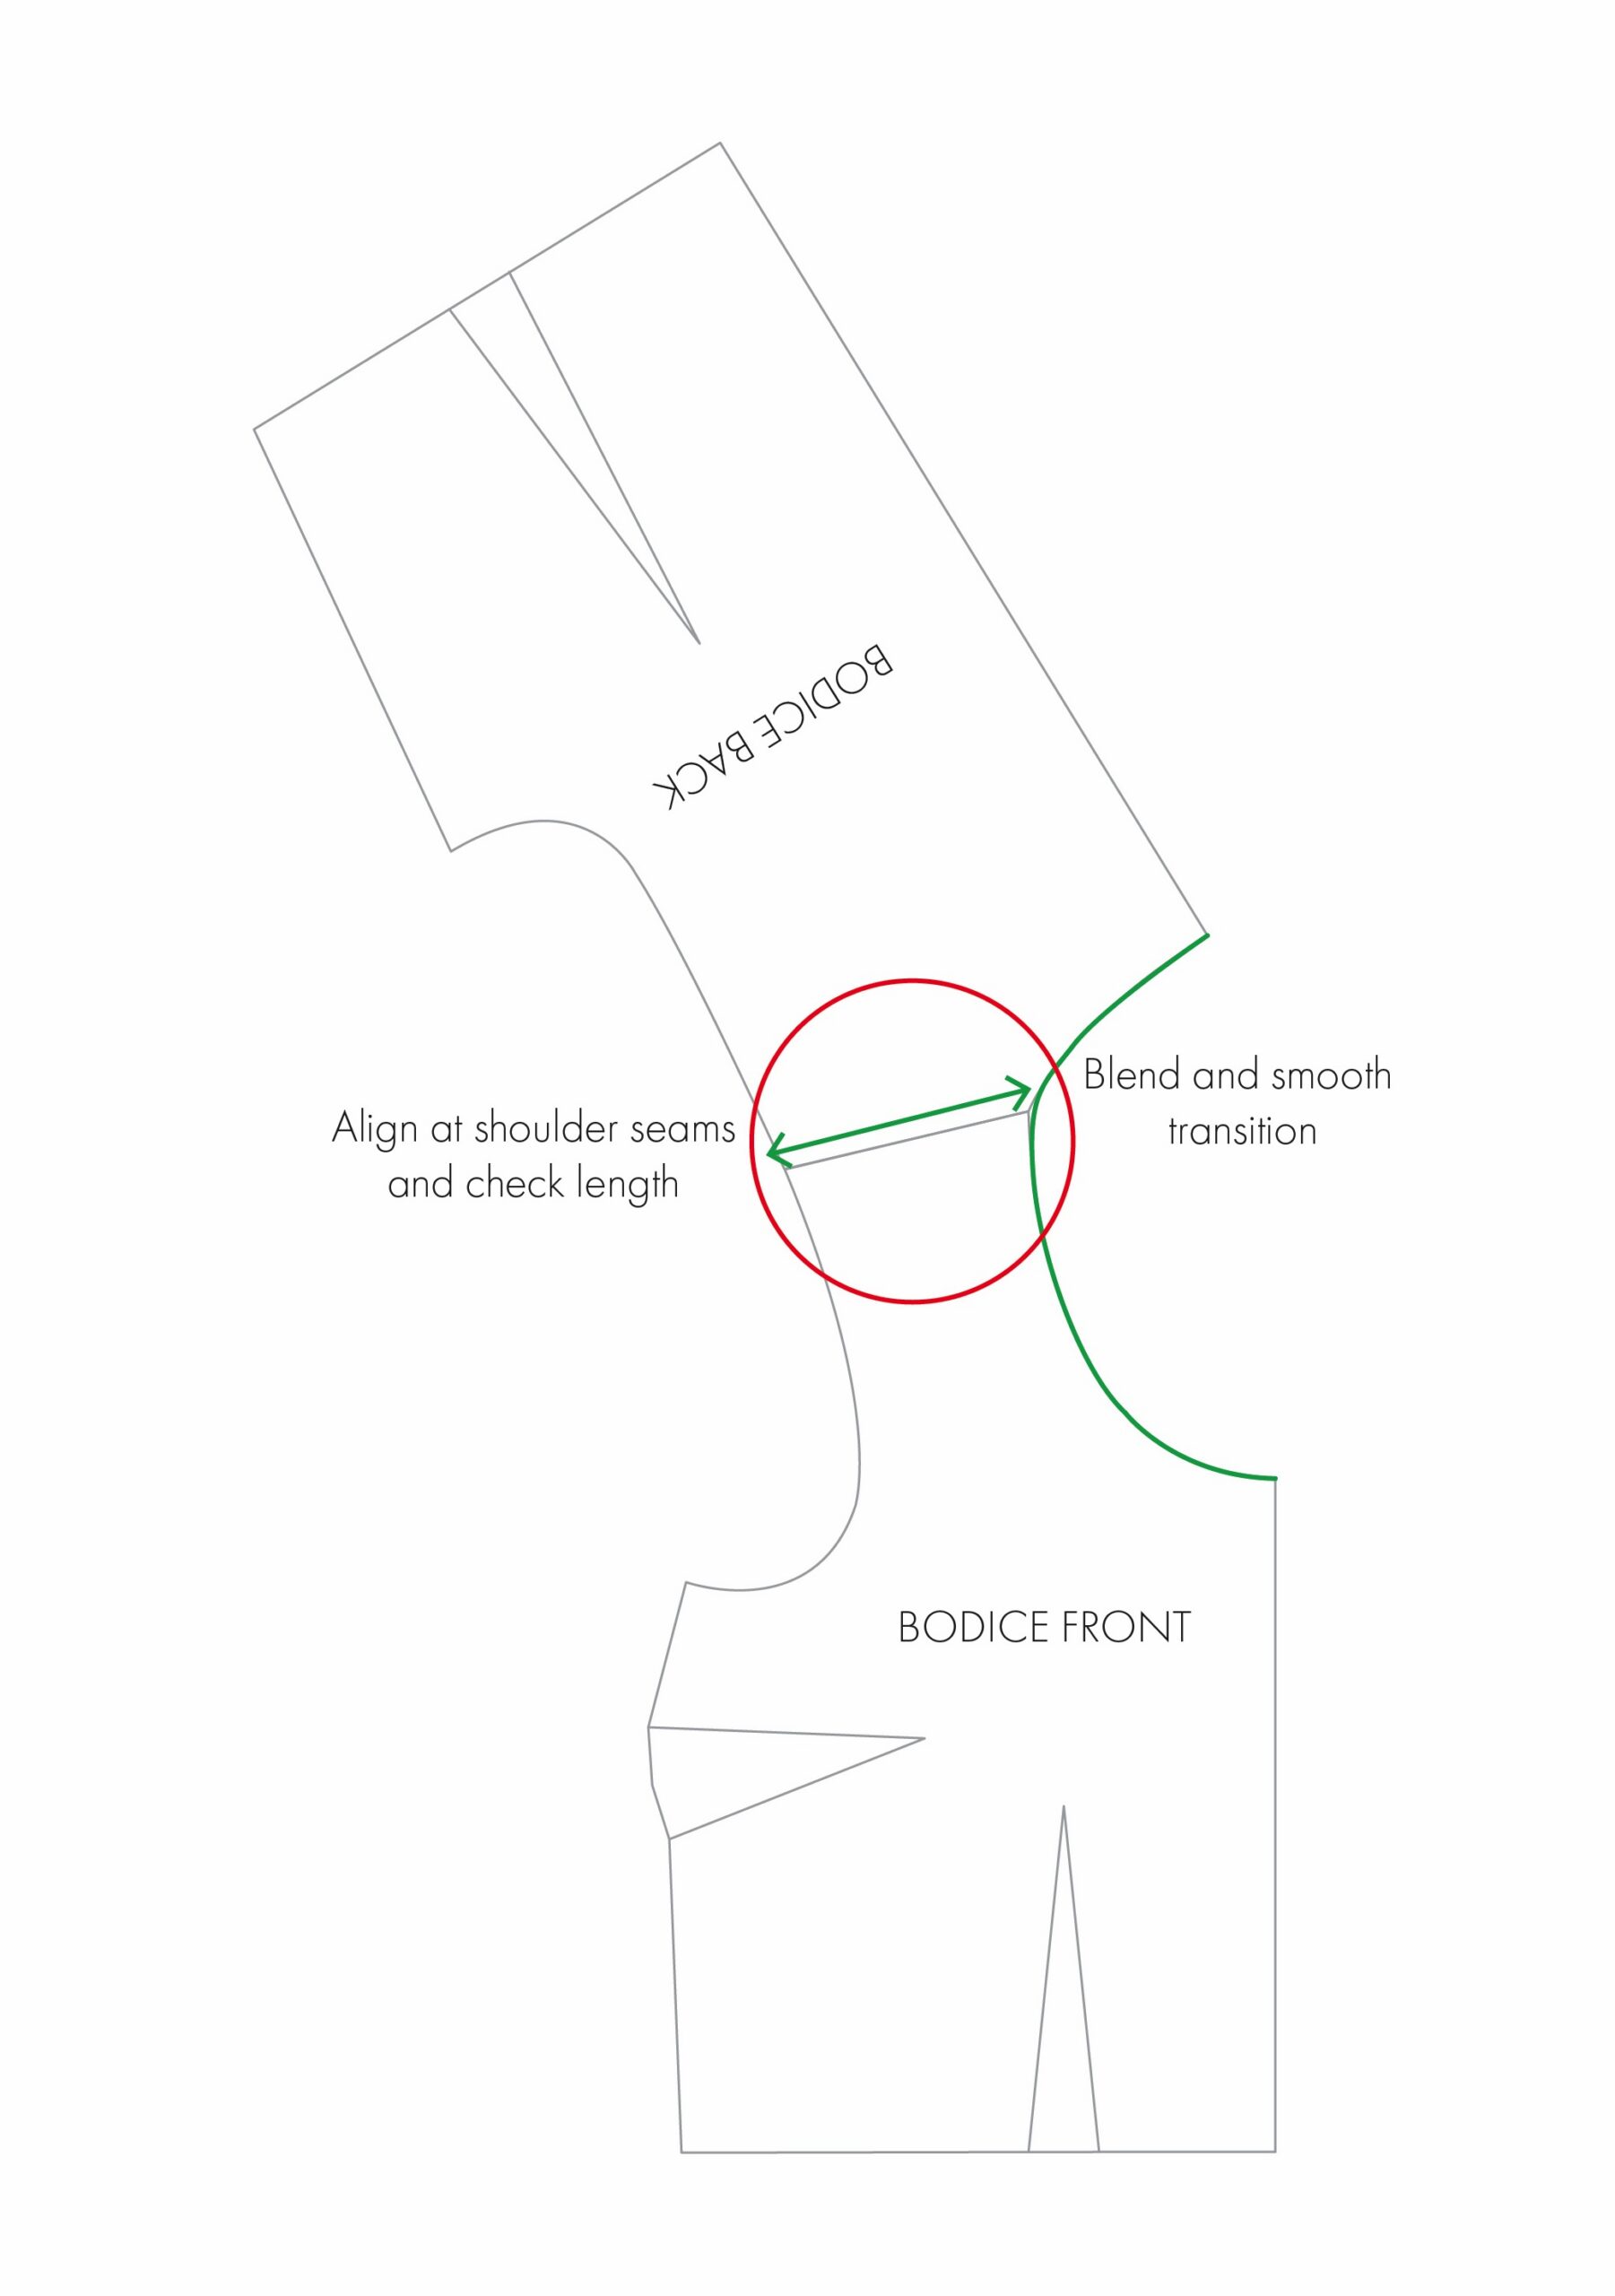
 7. Align the front and back pattern pieces together at the shoulder seam to ensure they are the same length (green arrow).
8. Check the transition between the front and back necklines, and blend if needed to form a smooth, continuous line (green line).
9. Add seam allowances and markings, and true the pattern.
Note: For more on blending and smoothing, and truing sewing patterns take a read of ‘Blending Between Sizes On a Sewing Pattern– Part 1: When to Blend’, and ‘Part 2: How to Blend’.
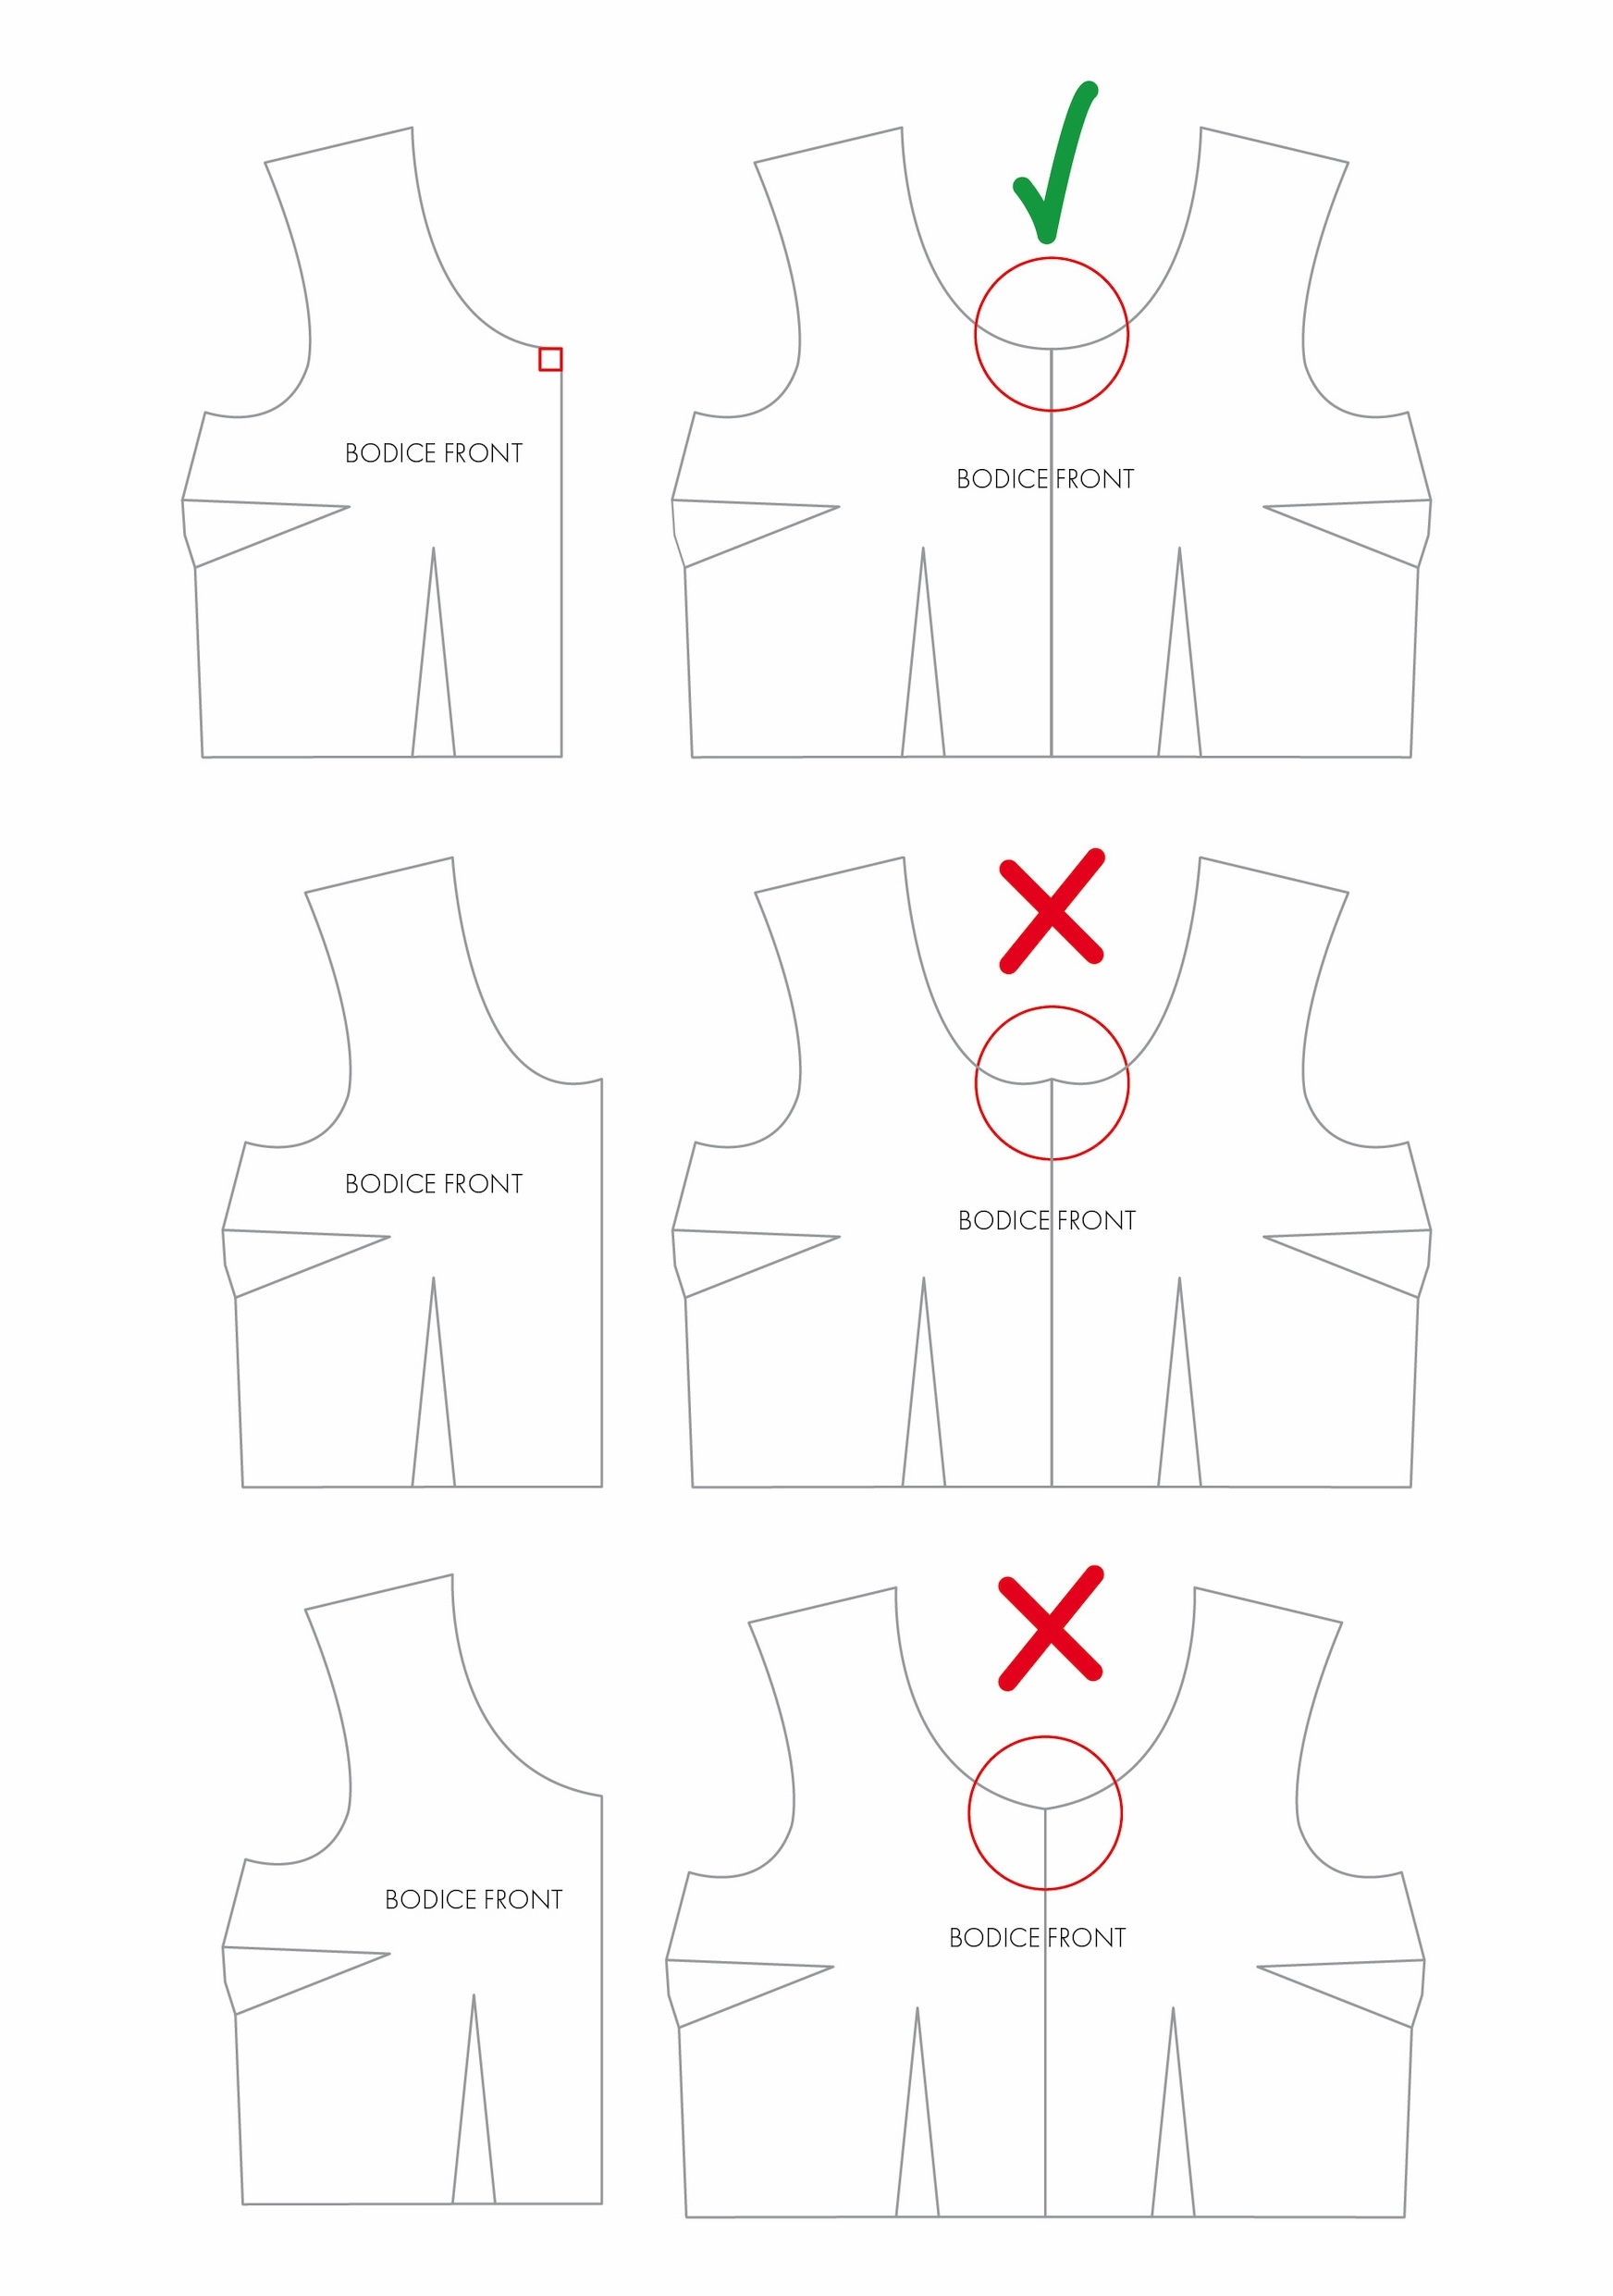
When working with half a pattern piece, you want to ensure, for many shapes, that the new neckline meets the CF and CB line at a right angle (just a little one) to ensure a smooth transition when unfolded.
In the examples below, you can see that if they don’t meet at a right angle, it can create a point, or more of a V-shape.
Note: For the V-neck and boat neckline examples, I am only going to show the first couple of steps involved in drawing the new neckline shape, as the process of transferring it to the back pattern piece, ensuring that it aligns and transitions smoothly, remains pretty much the same.
Example 2: V-neck
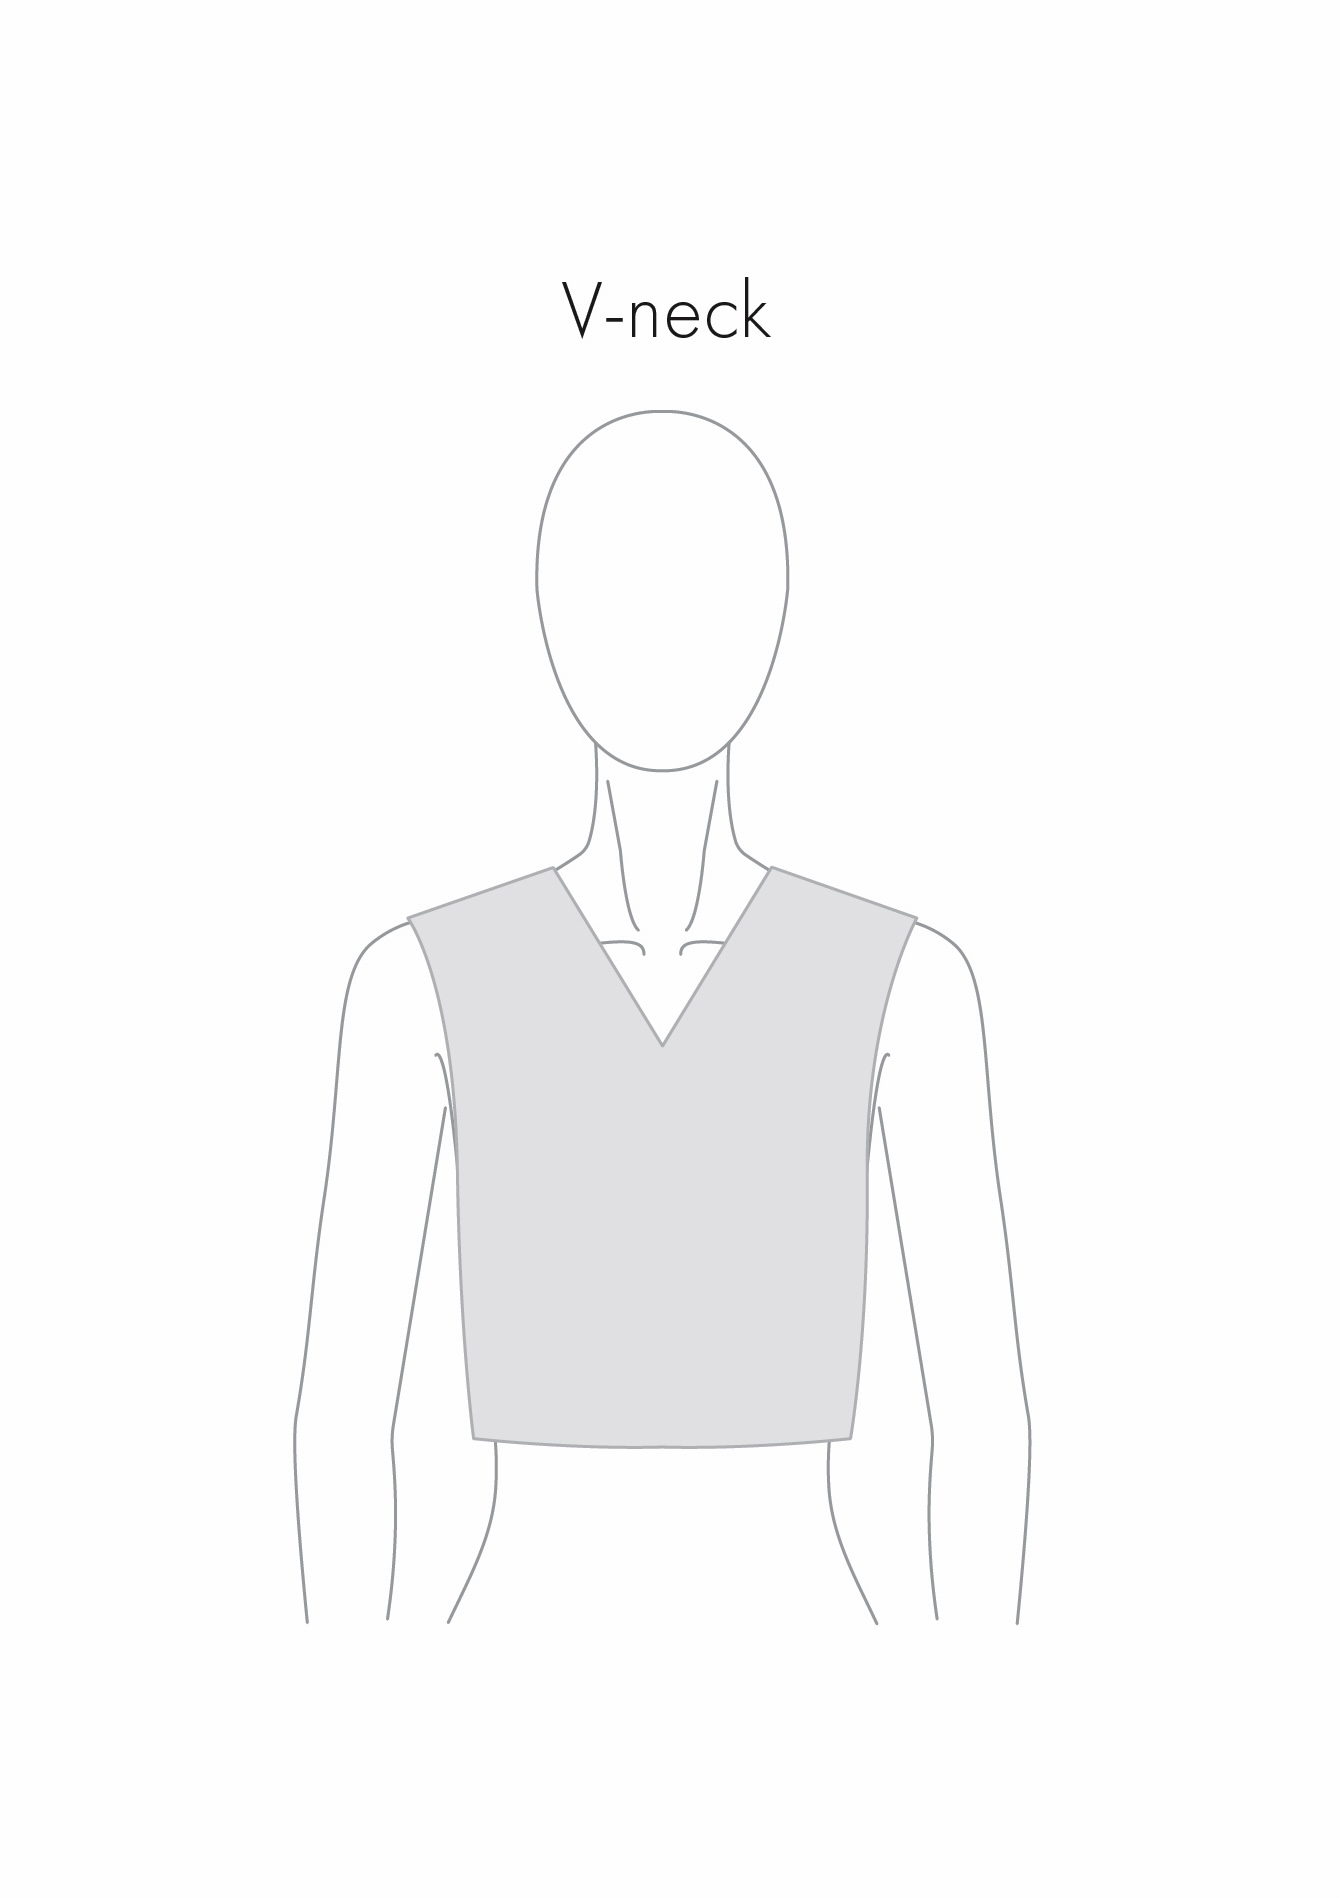
A V-neck slopes down from the shoulders, meeting in a point at the centre, creating a “V” shape. To create a V-neck, we will be widening the neckline a little, and increasing the depth.
 Steps:
1. Mark the desired width of the new neckline along the front shoulder seam (green dot).
2. Mark the desired depth of the new neckline on the centre front line (green square).
3. Draw a line, connecting the two points. I like to start with a slightly curved line coming down from the shoulder, becoming straighter towards the centre front. This makes for a smooth transition from the front to back neckline.
Example 3: Boat
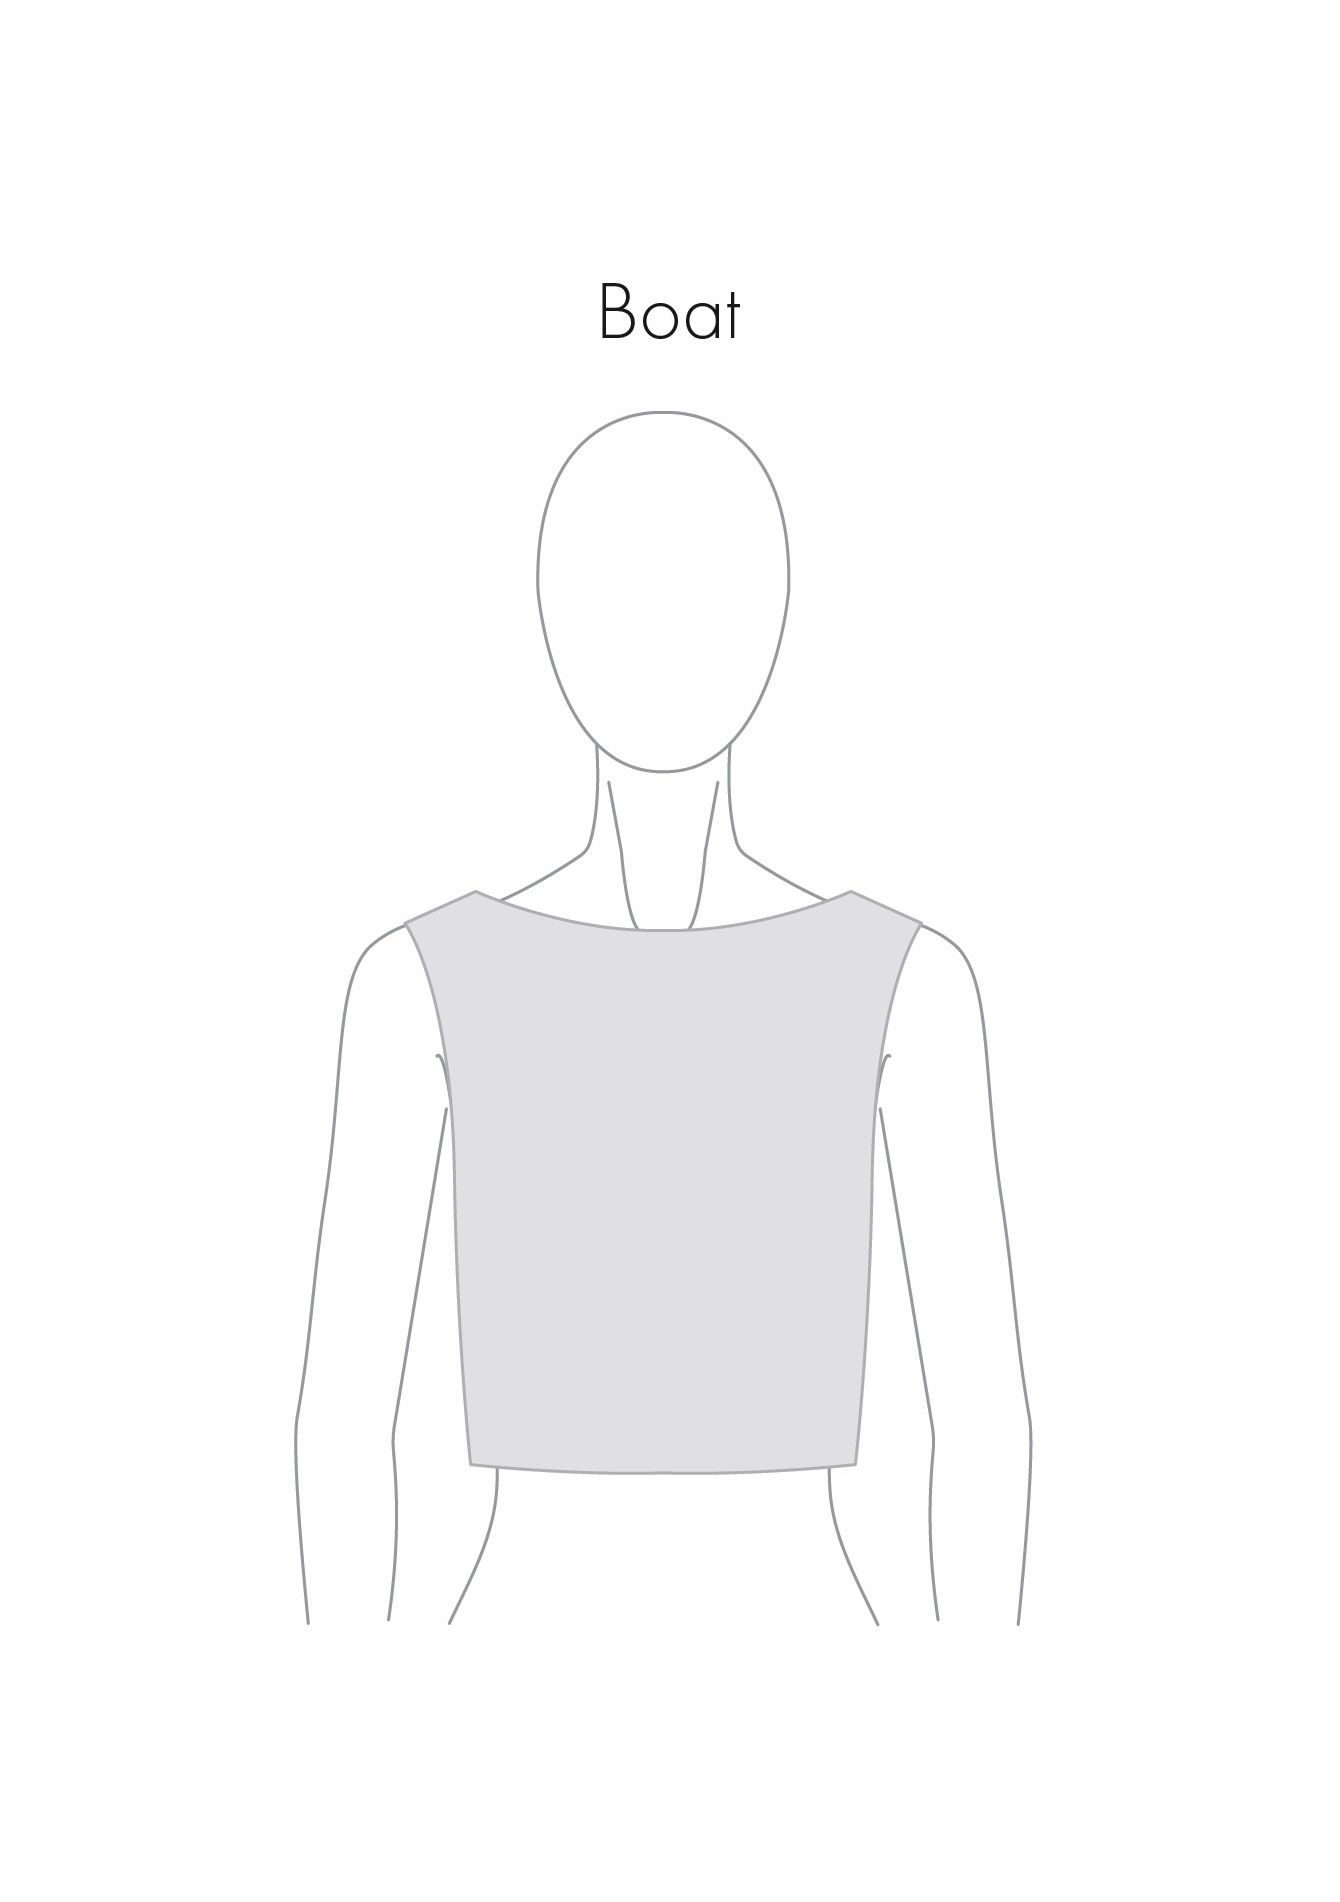
A boat neckline is wide and high, usually sitting across the collarbone area. To create a boat neckline, we want to create a wide but gentle line from shoulder seam to shoulder seam (like the hull of a boat, hence the name). We won’t be altering the depth of the existing neckline too much as we want this to stay quite high.
Steps:
1. Mark the desired width of the new neckline along the front shoulder seam (green dot).
2. Mark the desired depth of the new neckline on the centre front line (green square).
3. Draw a smooth curve between the points to create the new front neckline.
Example 4: Square
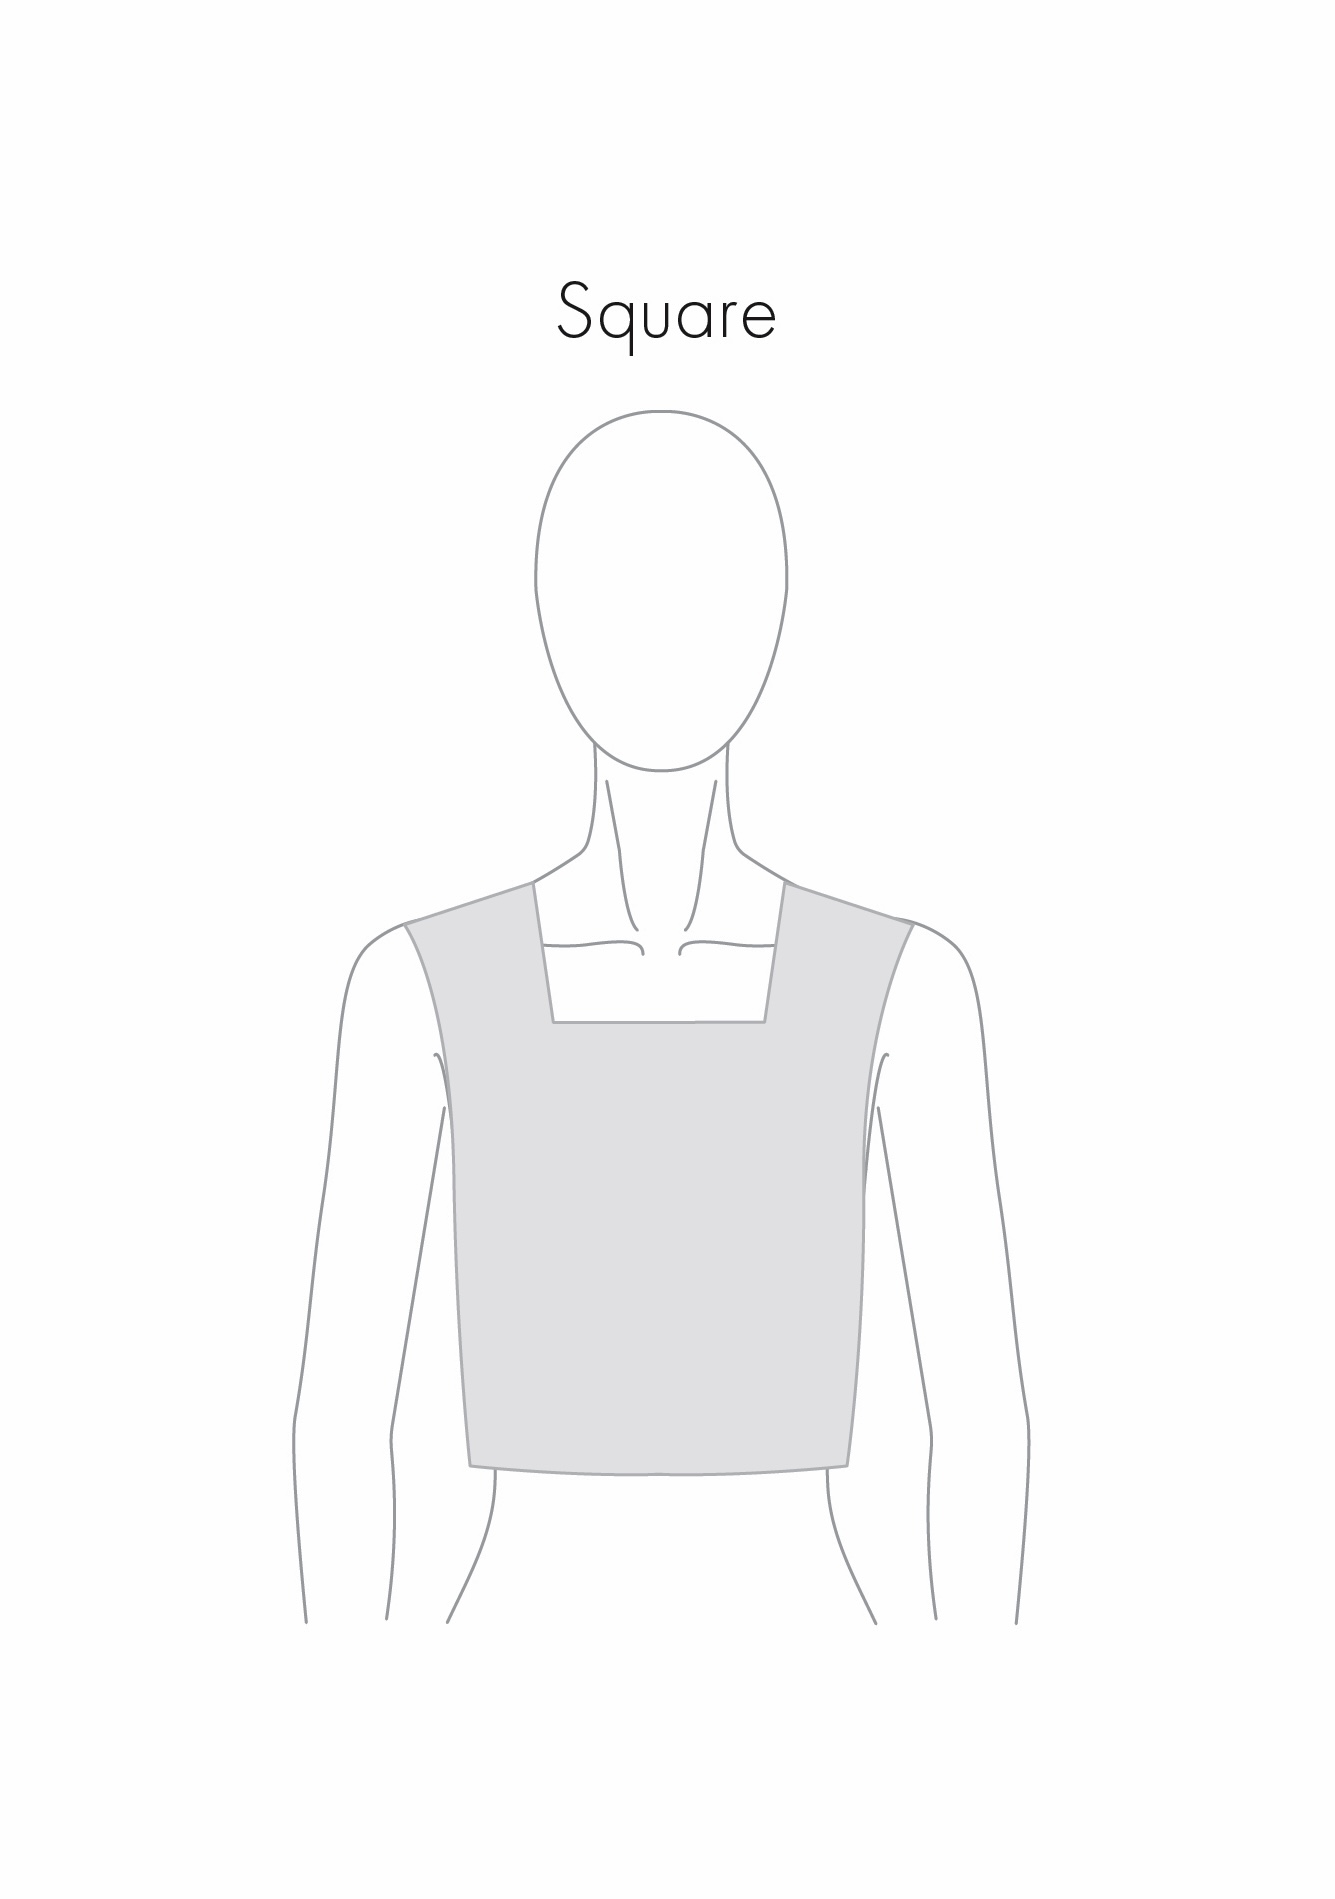
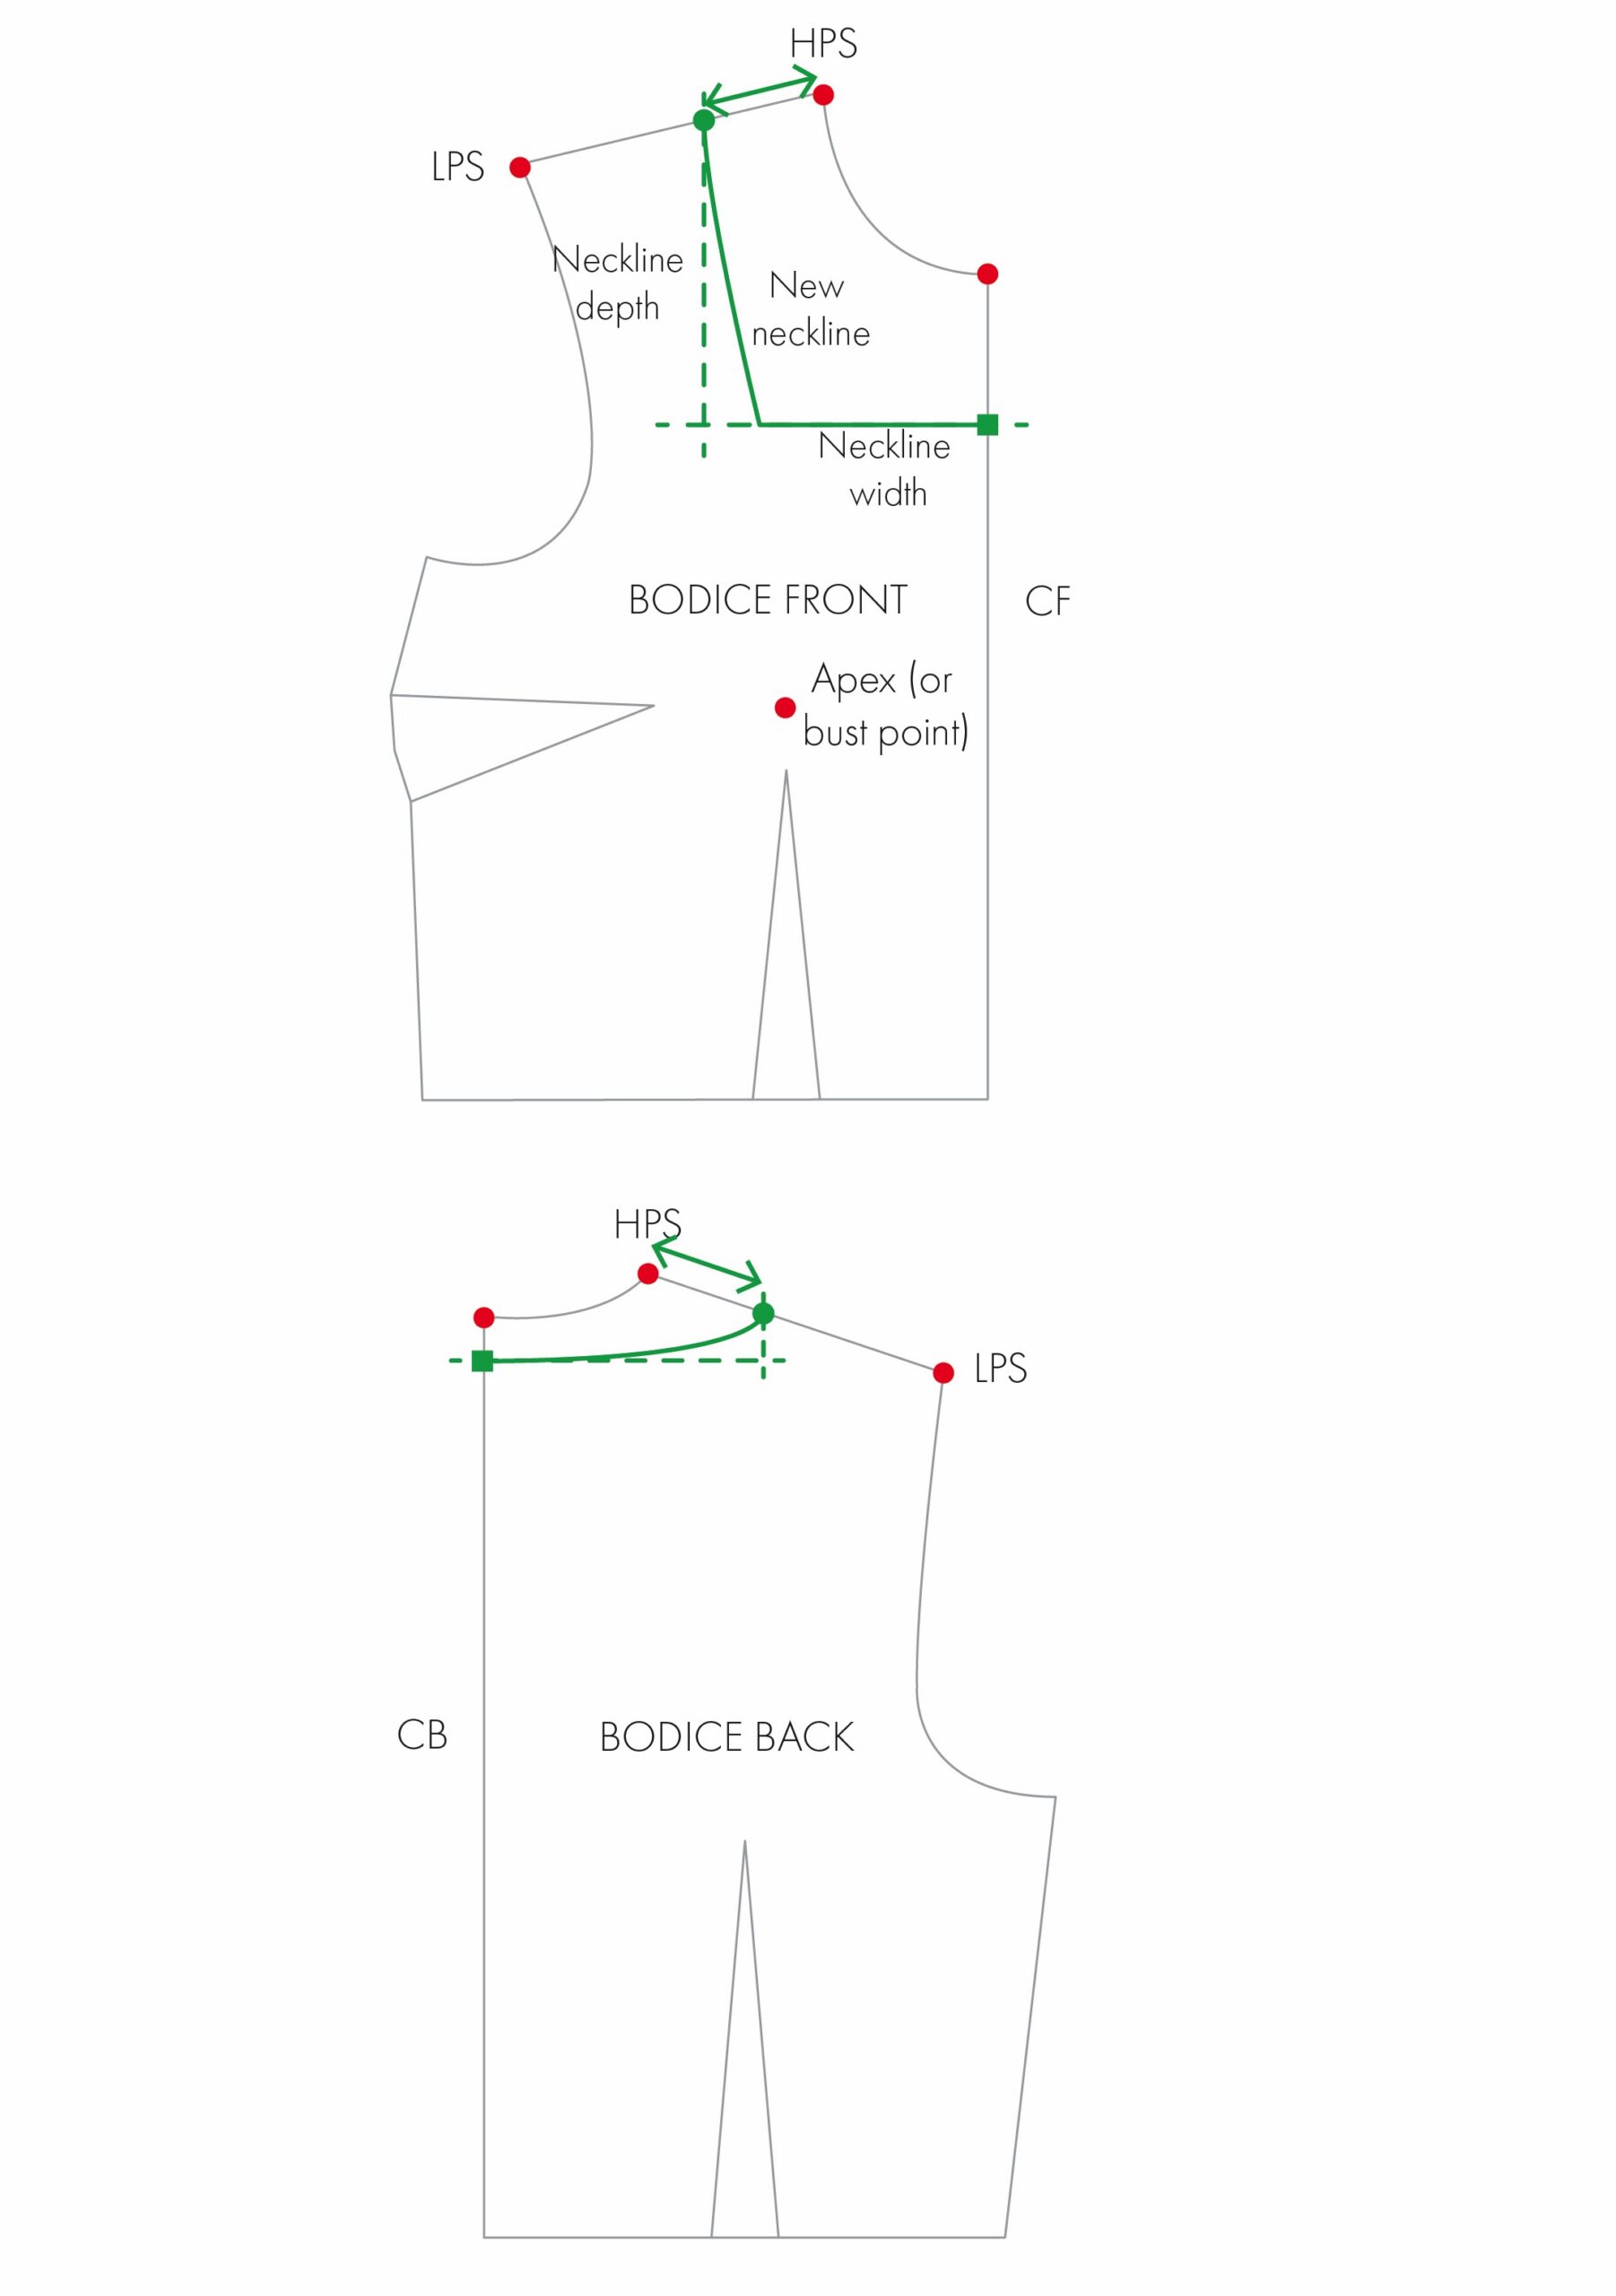
A square neckline is made up of a horizontal line across the chest and two vertical lines that extend down from the shoulders. Therefore, to create a square neckline, we will be altering both the width and depth of the existing neckline, while introducing straight lines and corners.
Steps:
1. Mark the desired width of the new neckline along the front shoulder seam (green dot).
2. Mark the desired depth of the new neckline on the centre front line (green square). I like to then draw a line across the bodice at this point, as this will form part of the actual neckline.
3. Draw a line that extends down from the shoulder seam, at the new width, until it hits the depth line you drew in Step 2. Again, I recommend starting with a slightly curved line extending down from the shoulder seam, gradually becoming straighter as it approaches the depth line.
Example 5: Asymmetrical
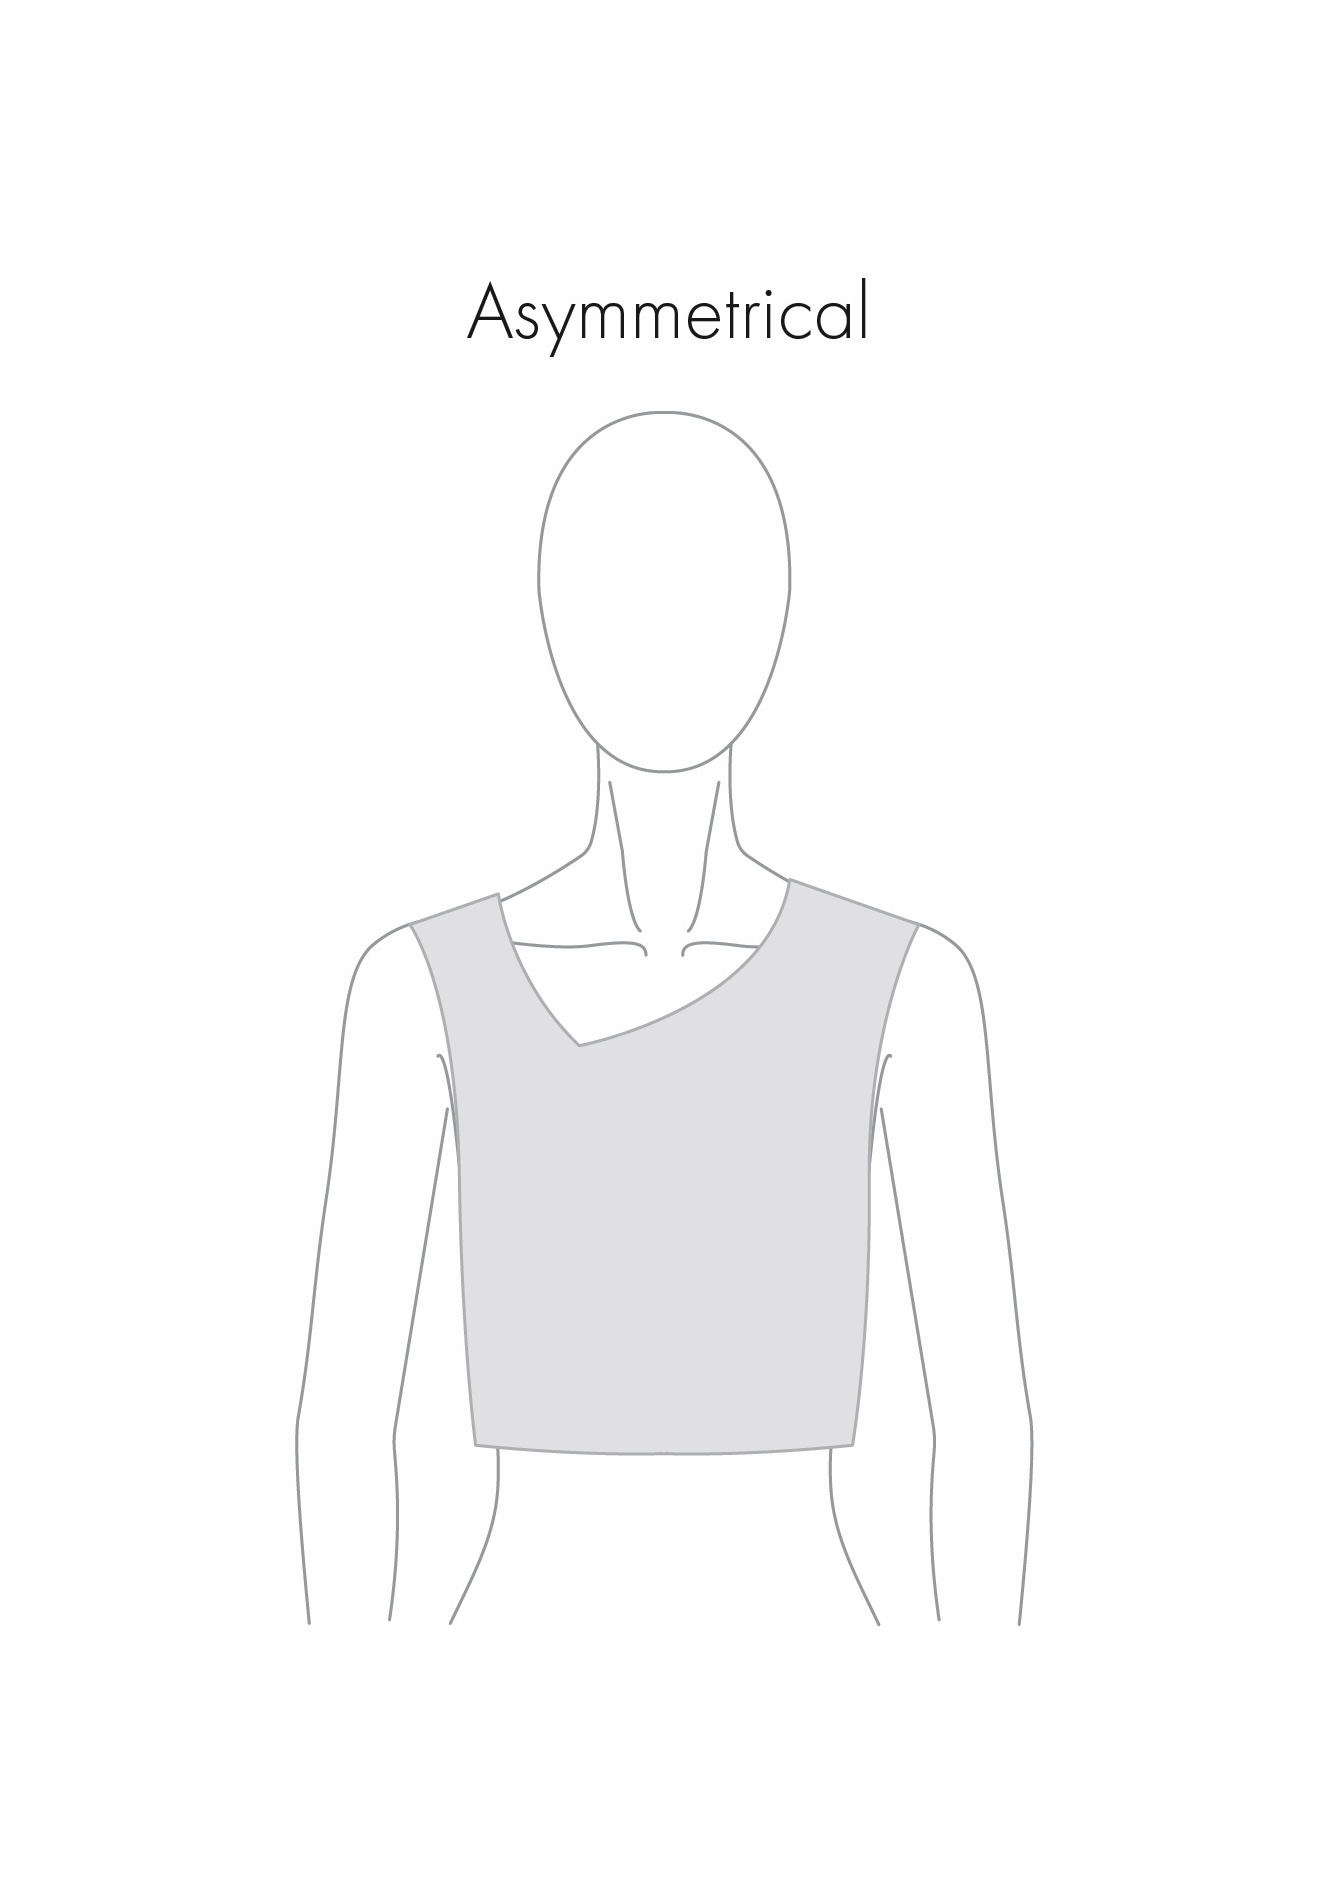
An asymmetrical neckline is essentially uneven, with each side or half being different. In the example below, I have kind of morphed a V-neck with a scoop neck, with the centre of the neckline shifted slightly toward the right side of the body. The shoulder seams are also different widths.
Steps:
1. Create a full pattern piece for the front bodice, as the left and right halves of the garment will be different. You will need to cut this out as a full pattern piece anyway, rather than on the fold.
2. Mark the desired width of the new neckline on the left-hand side (LHS) of the garment along the front shoulder seam (green dot).
3. Mark the desired width of the new neckline on the right-hand side of the garment along the front shoulder seam (green triangle).
4. Mark the desired depth of the new neckline. Draw a line horizontally across the bodice, then identify a point on this line where you want the sides of the neckline to meet. On this example, I have marked this point more toward the right hand side of the garment (green square).
5. Draw a line from the right shoulder seam to the meeting point (green square), and another from the left shoulder seam to this same point. Again, start with a slightly curved line coming down from the shoulder seam, becoming straighter as you approach the meeting point.
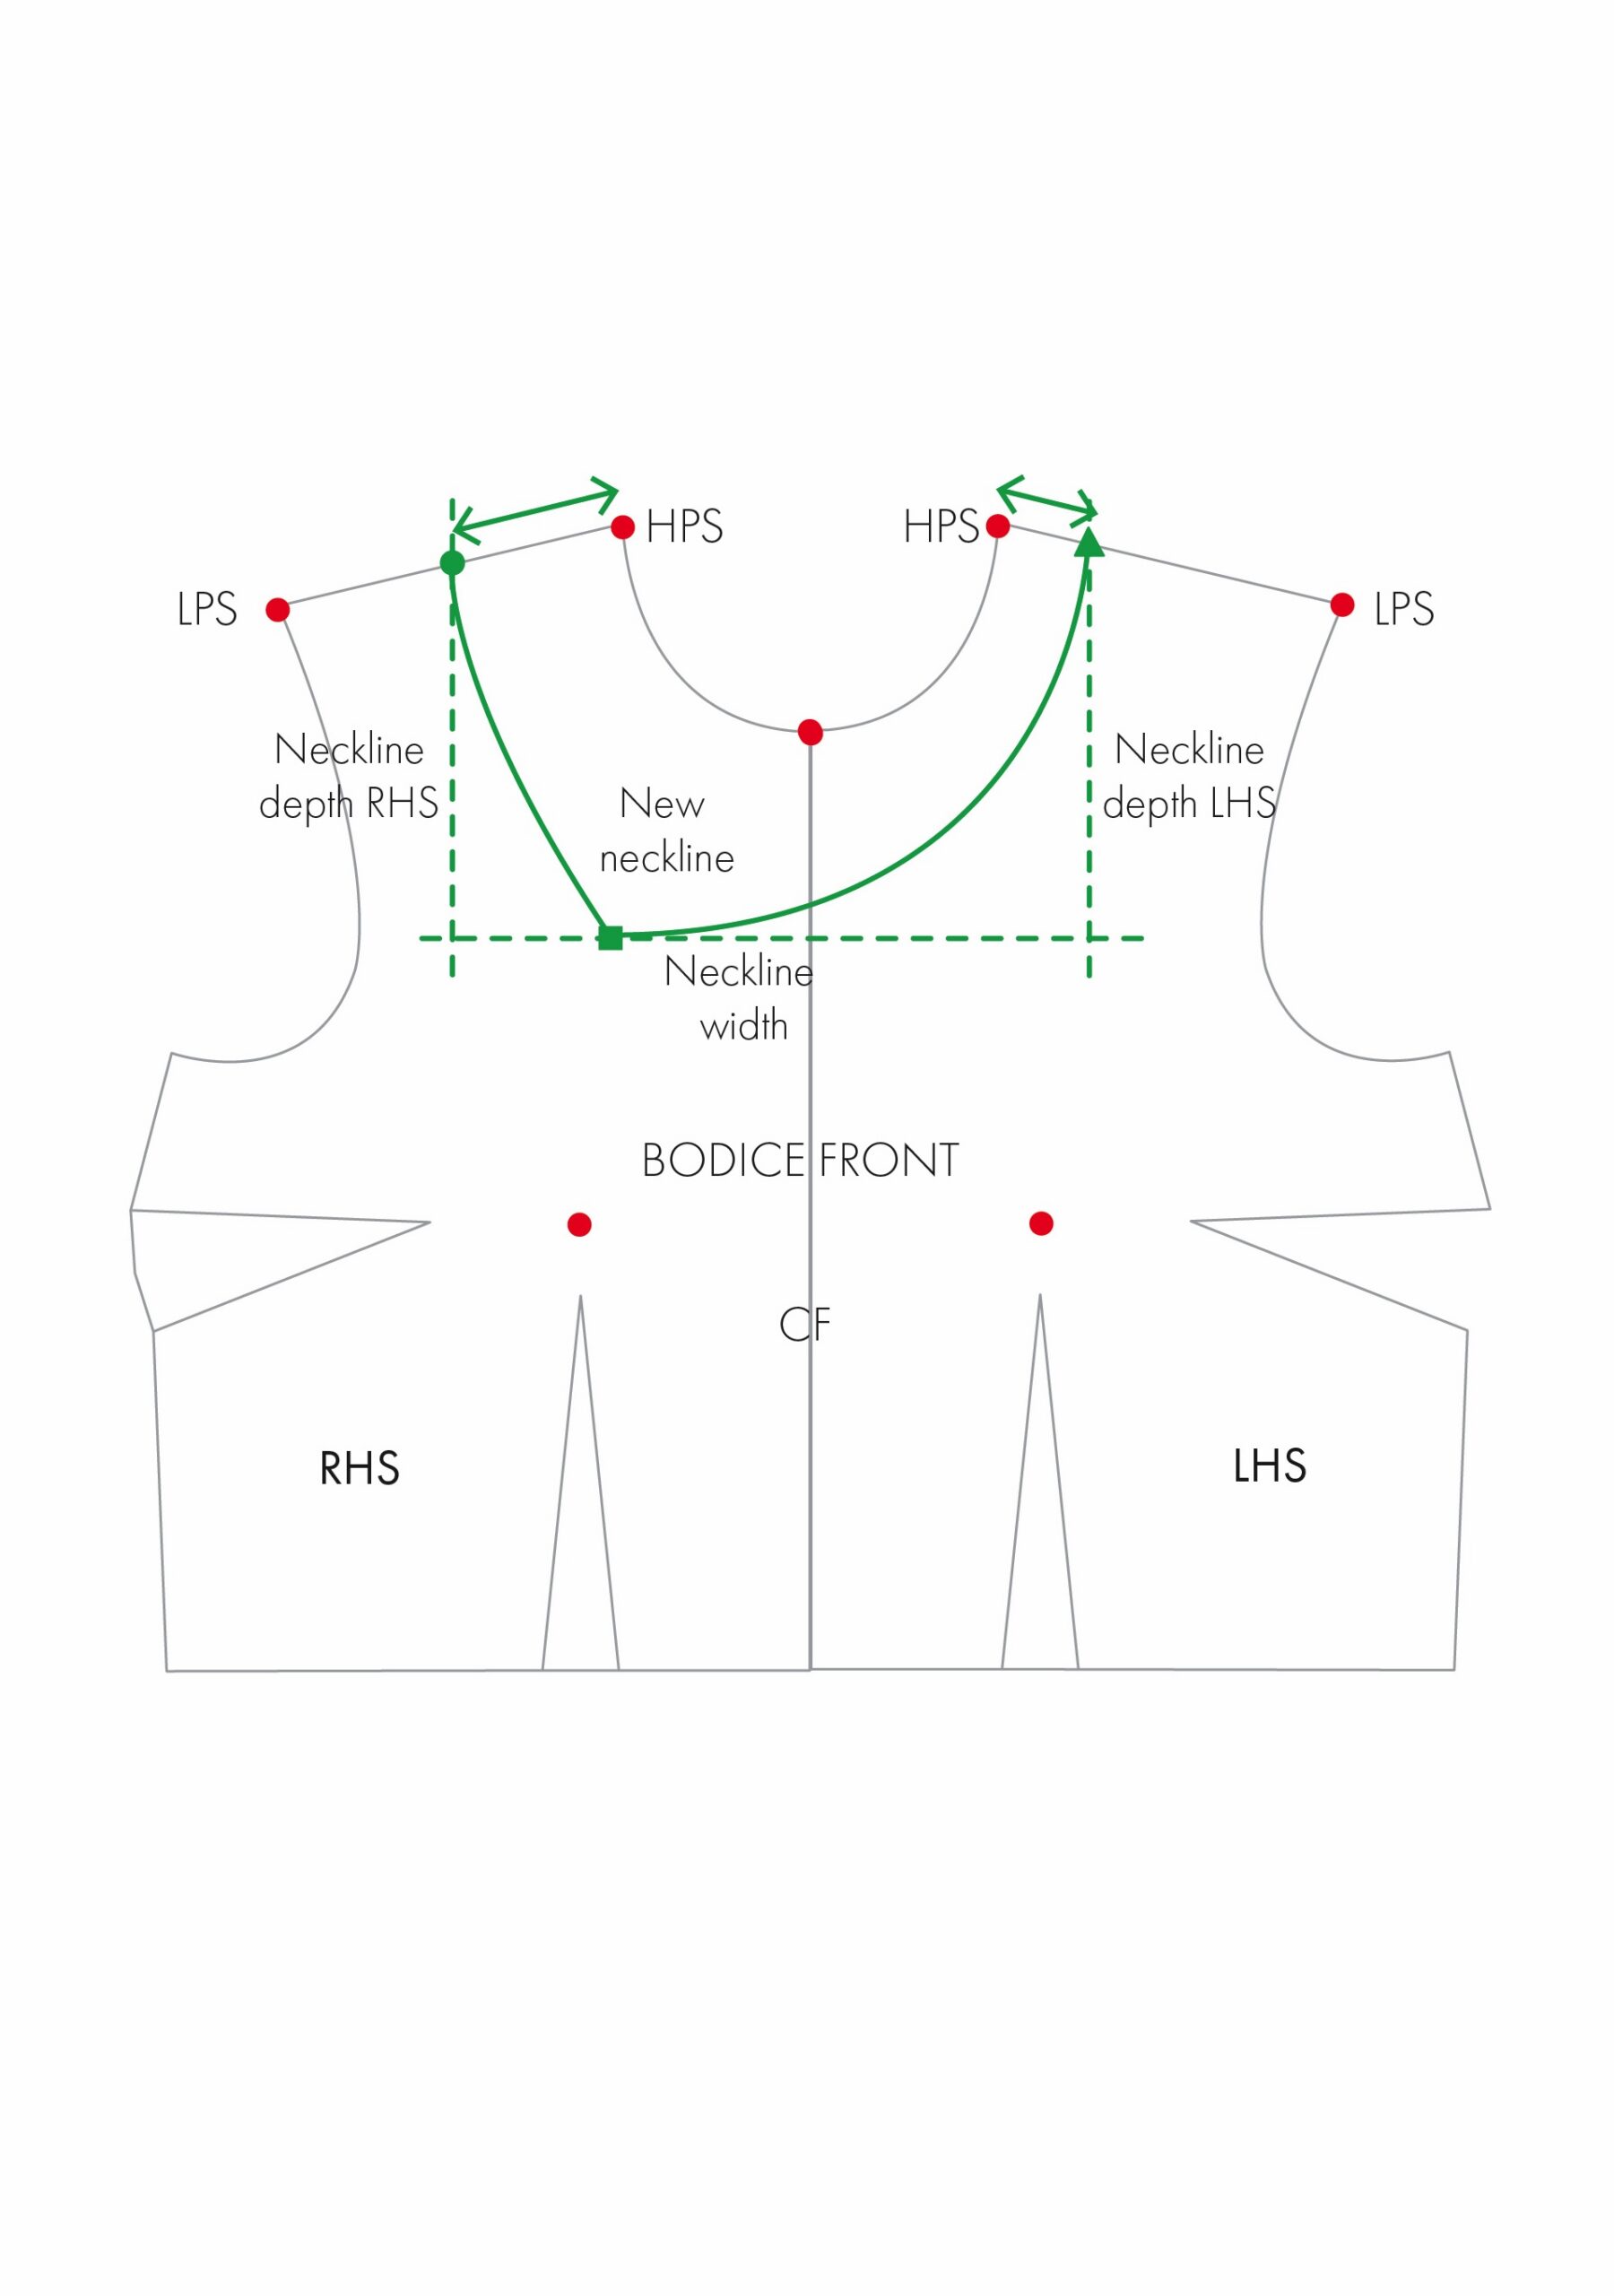
6. Transfer the new front neckline widths (LHS and RHS) to the back neckline. I am working with a full pattern piece for the back also.
7. Mark the desired depth of the new neckline on the centre back line (green square).
8. Draw a smooth curve between the points to create the new back neckline.
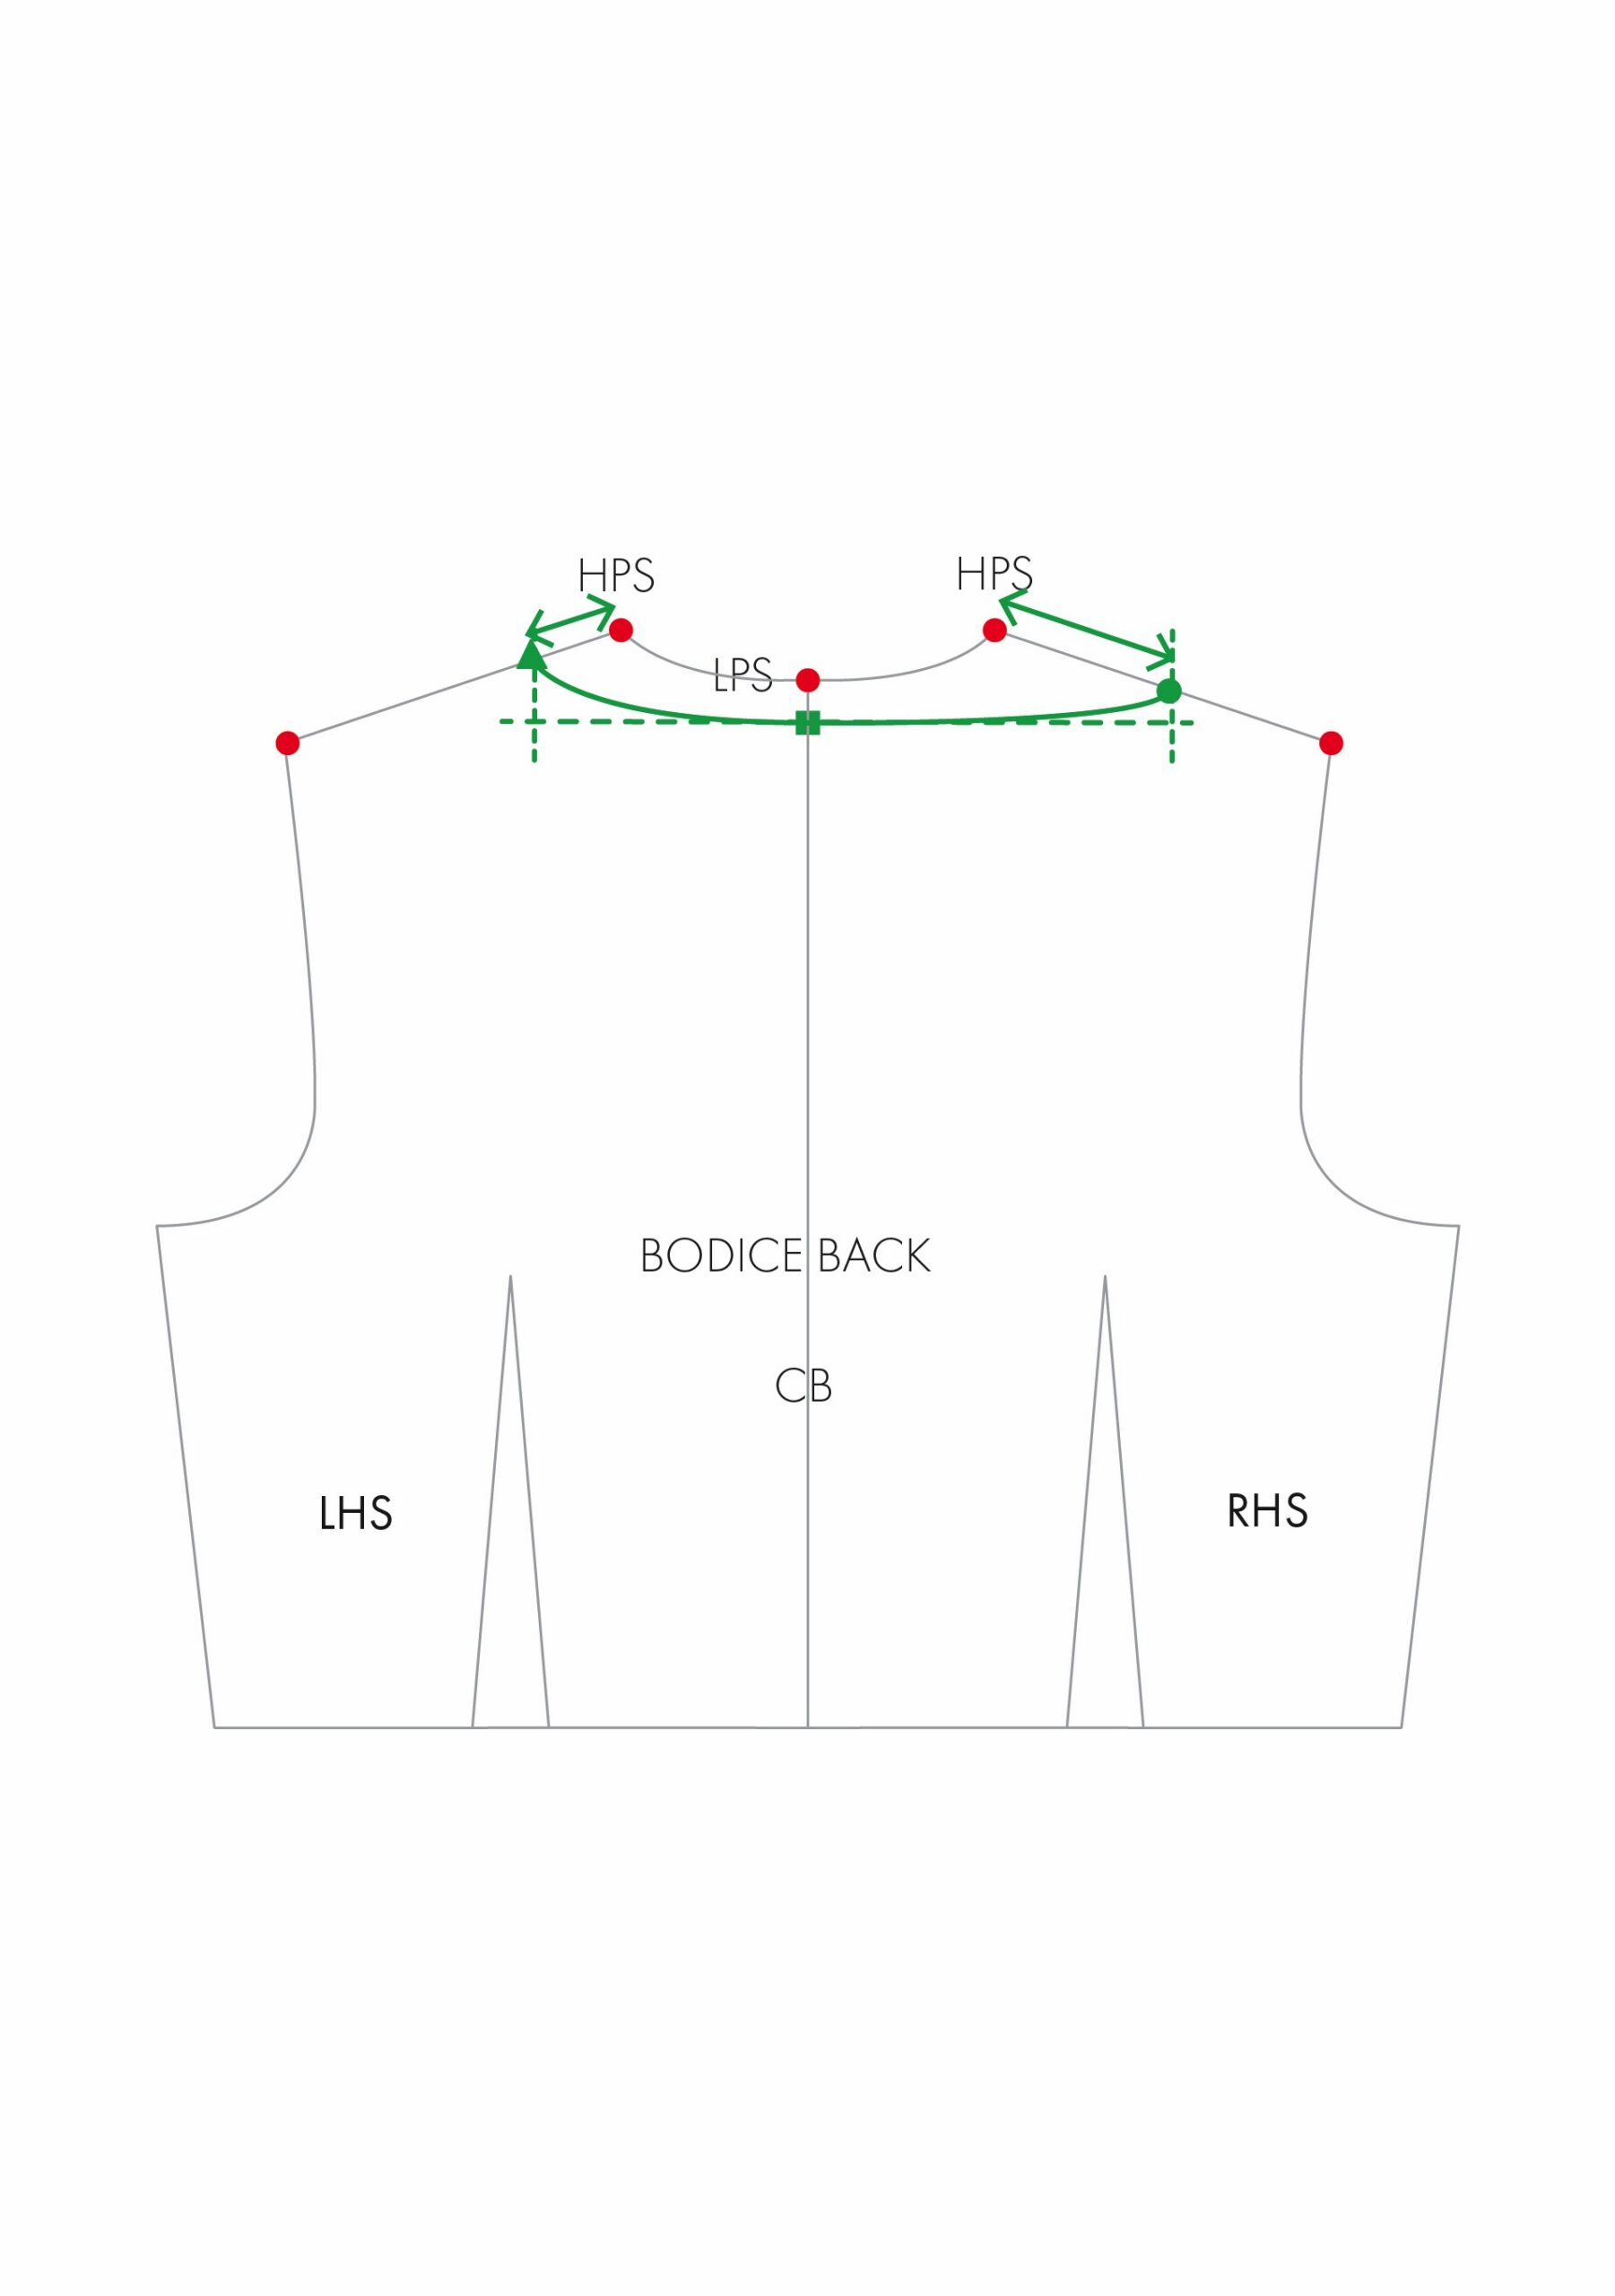 9. Align the front and back pattern pieces together at each shoulder seams to ensure they are the same length (green arrows). You will need to do each side separately in this example.
10. Check the transition between the front and back necklines, and blend if needed to form a smooth, continuous line (green line).
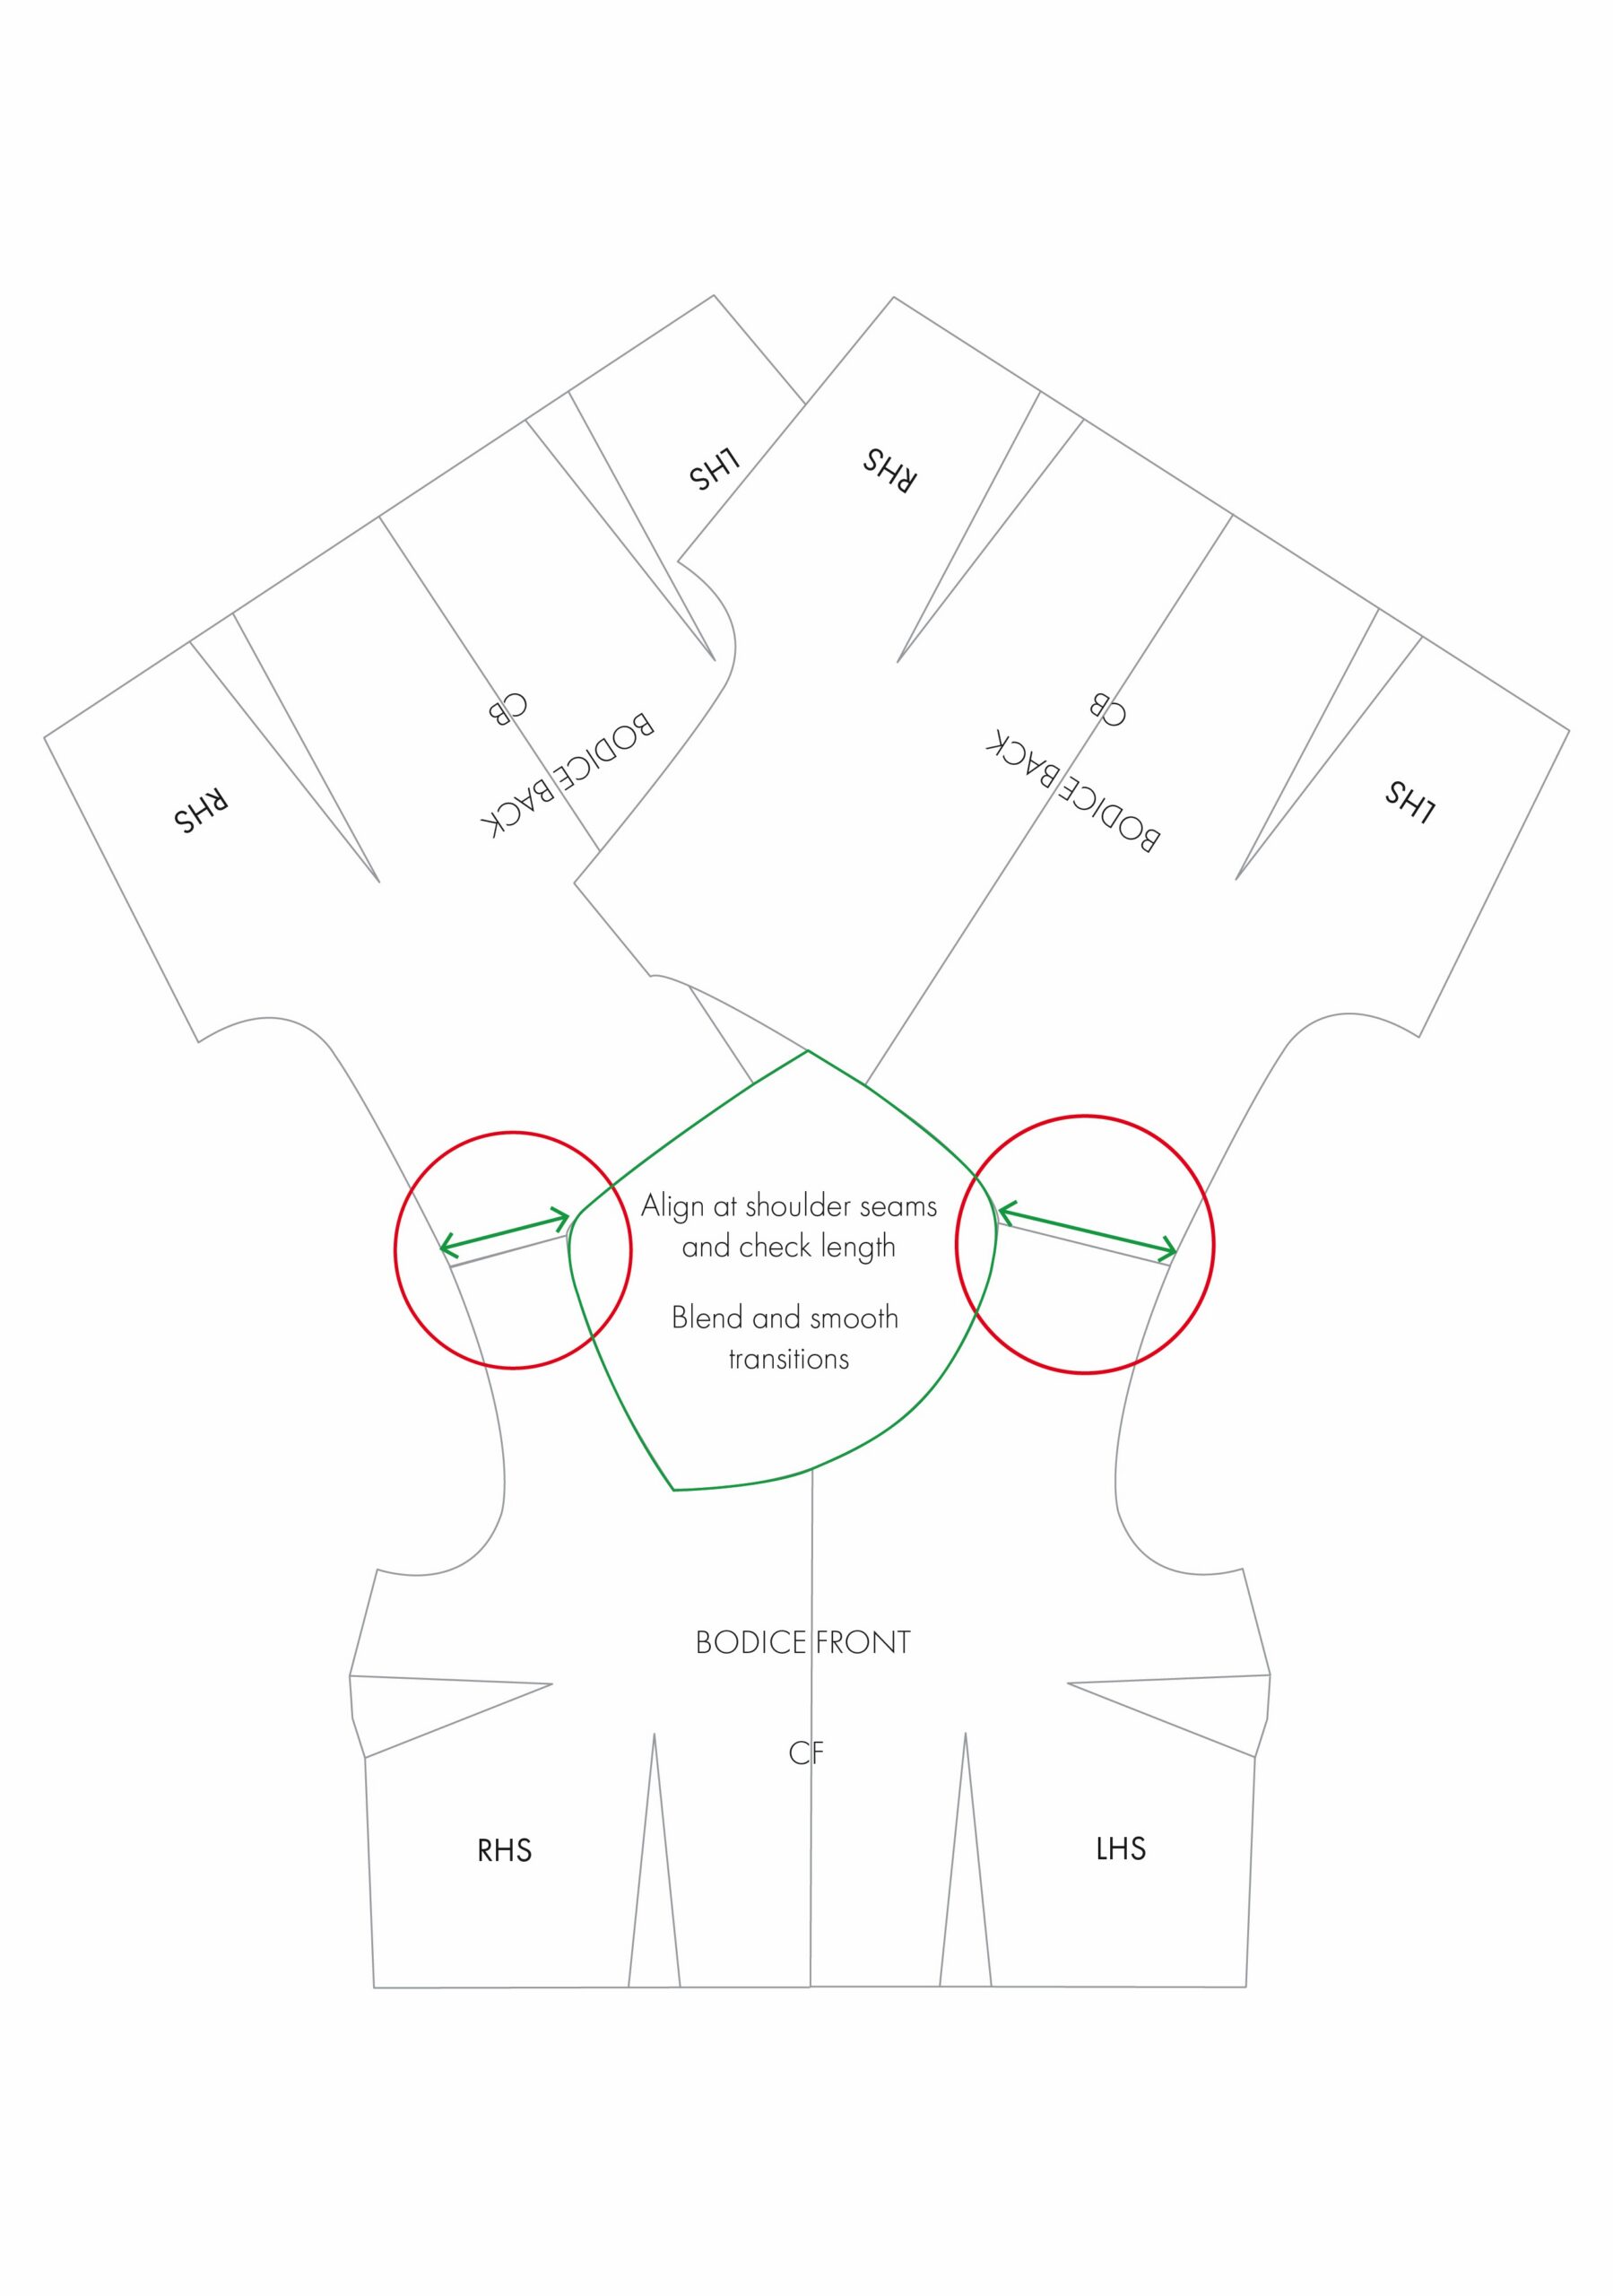
11. Add seam allowances and markings, and true the pattern.
Make a Toile
I cannot stress this enough! As with anything in pattern making, things can look very different on paper than they do when sewn up and worn on the body. Making a toile out of inexpensive fabric just gives you the chance to check proportions, fit, and shape before cutting into your good fabric.
I know this takes more time, but you don’t need to make a full toile. For these types of alterations, a simple cropped bodice would be more than sufficient, provided you already know the fit of the garment is OK beyond this.
Once you have finished your toile, pop it on and stand in front of a mirror. Look out for things like:
- Is the neckline sitting flat? Is it pulling, or gaping, or standing away from the body?
- Is the neckline sitting where you want it to? Have a look at the depth and width. Do you like its position on the body?
- Is the neckline smooth? Check the neckline itself, as well as any transitions into the shoulders or the centre front and back. They should flow smoothly without any bumps or points.
- Are the shoulder seams sitting in the right place? Are they comfortable and sitting nicely on the shoulders, or are they shifting forwards or backwards?
- Does the neckline work with your fabric choice? Different fabrics behave differently. A particular neckline may work in a more stable fabric, but not in something that is softer and has more drape. This goes for printed fabrics too. Check whether the shape of the neckline works with the print, or whether it cuts through an important or prominent part of the design.
- Can you get it over your head comfortably? This seems obvious, I know, but it can be easily overlooked. If it is too tight, consider whether you need to add a closure, such as a zip or keyhole opening.
Tips to fix a gaping neckline
This is a really common problem when altering necklines because the shape of this area of the body can vary significantly, taking into account the shoulders, collarbones, chest, etc.
Let’s first establish what I mean by neckline gaping. This is when the fabric sits away from the body instead of lying flat against it.
How do we fix it?
If you have made a toile, tried it on, and found that the neckline is gaping, pin out the excess fabric where it is standing away from the body. Transfer the position and amount of the adjustment to the pattern piece. Now, you have a few options to correct this:
1. Swing the excess fabric into an existing dart.
2. If there wasn’t already a dart, you could simply create one now, pivoting this excess fabric to another location in the pattern.
3. Alternatively, depending on where it is gaping, leave it where it is and turn it into an intentional new dart.
Just remember that a small amount of adjustment can make a big difference. You may only need to remove a few millimetres at the neckline to help it sit and fit better.
Tip: Again, I recommend reading ‘Sewing Essentials: Dart Manipulation’ for more on moving, combining, or removing darts.
And how do we prevent it?
One of the best ways to prevent a neckline from stretching or becoming distorted is to reinforce it.
The first step should always be to stay-stitch the neckline right after you have cut it out. This helps prevent any stretching or distorting, particularly on bias cut areas.
For additional reinforcement, depending on the fabric, things like seam tape stitched into the seam allowance, or strips of iron-on interfacing can be useful.
Understanding how to alter a neckline opens up so many possibilities, giving you a lot of freedom to adapt patterns to suit your personal preferences. I hope this tutorial has given you the confidence to experiment with a few different neckline shapes and create designs that work for you!