


Paola Workwear Jacket Tutorial and Pattern
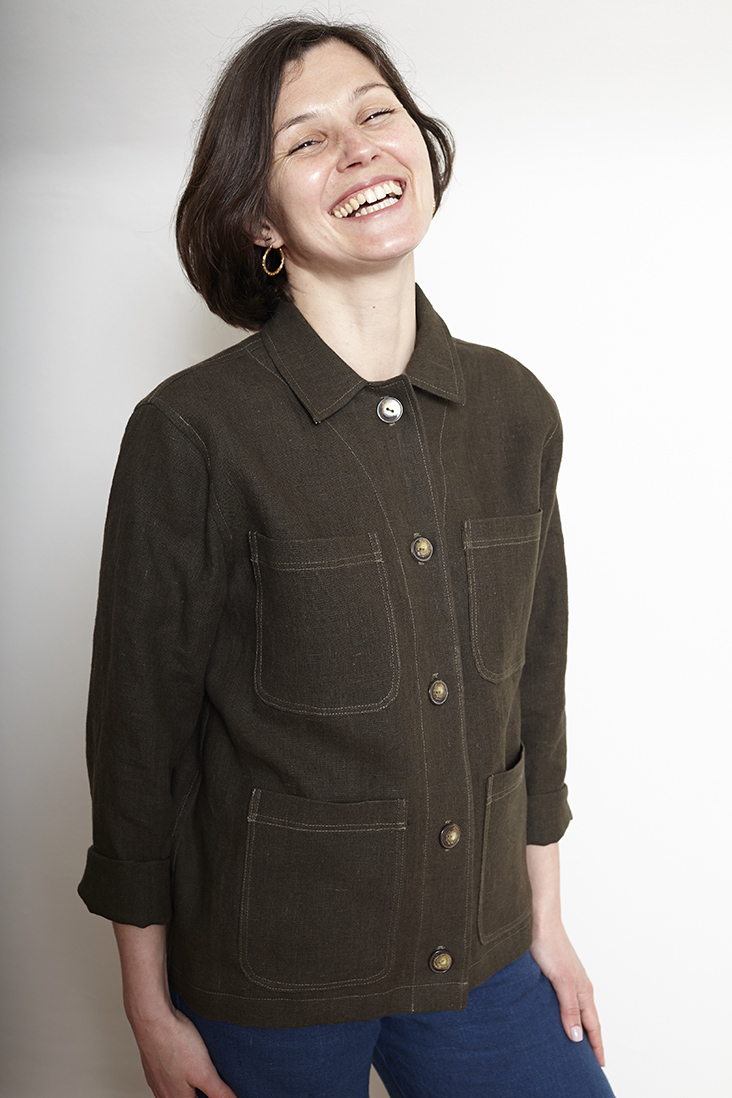
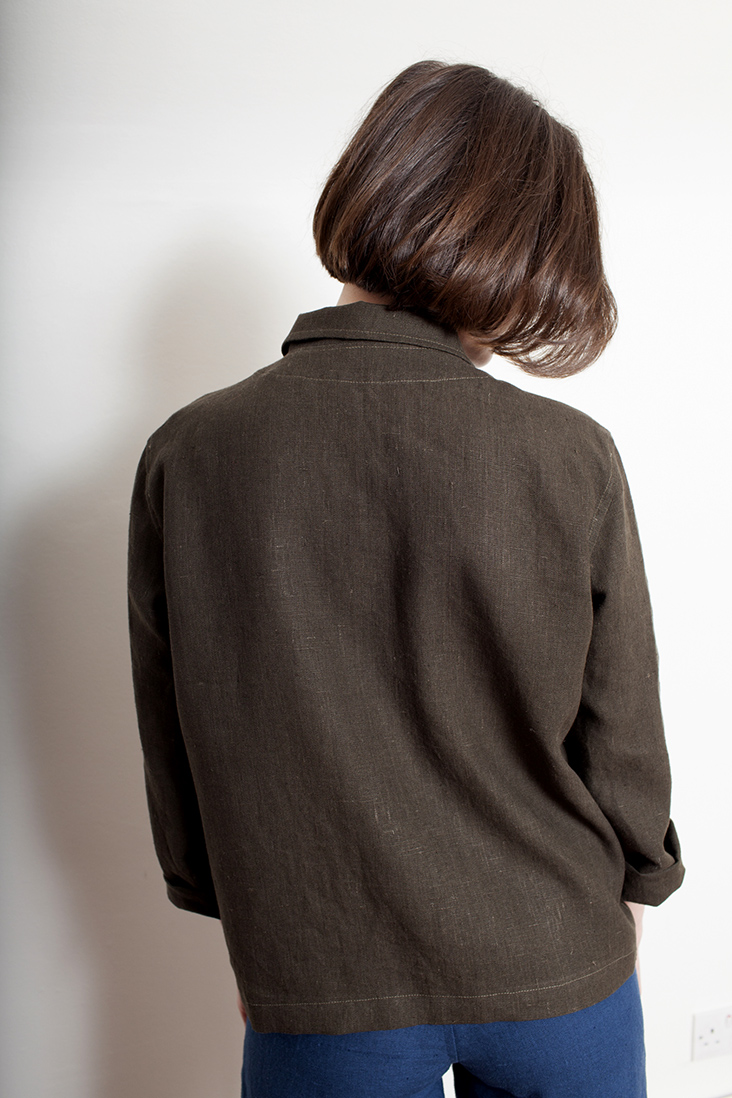

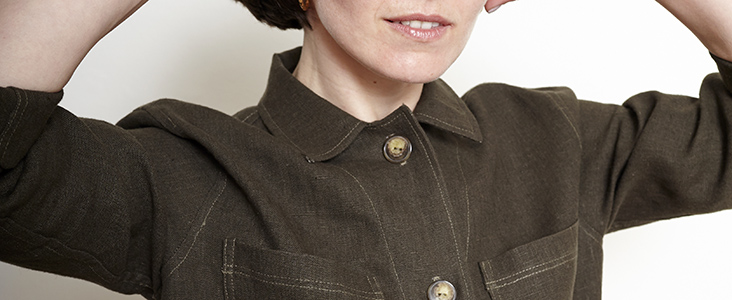
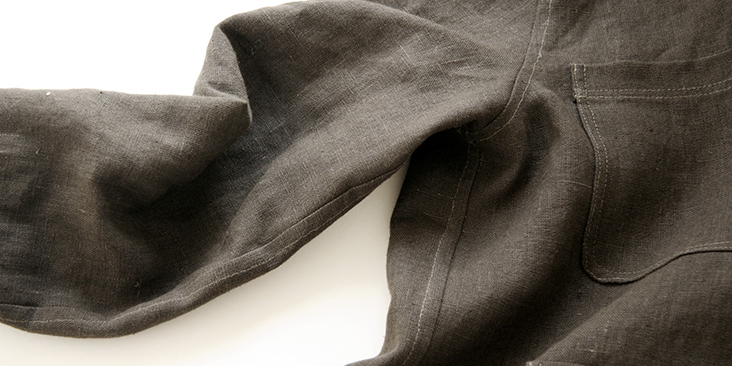
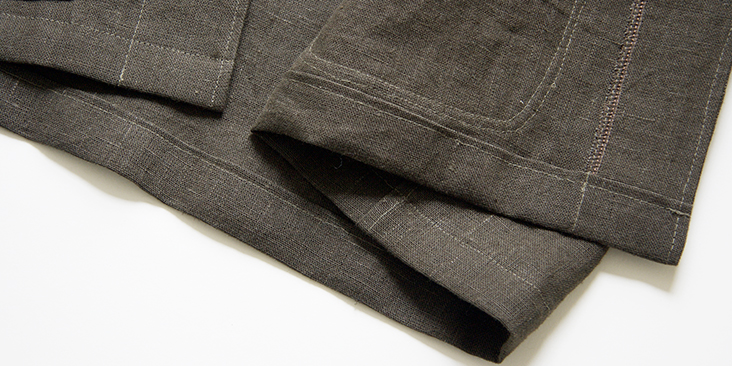
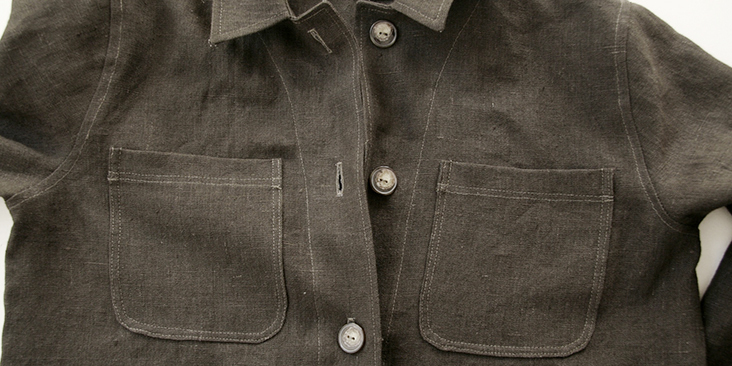
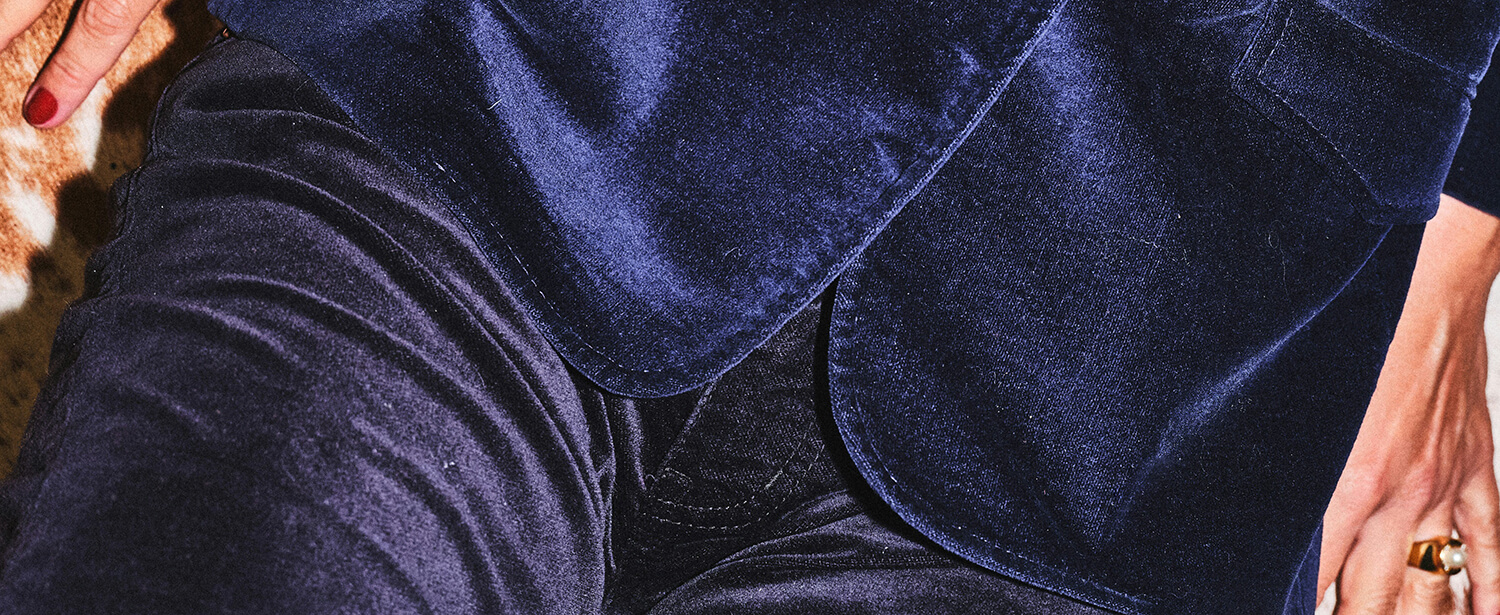
Meet spring in style with this super trendy jacket! Workwear-inspired, the Paola jacket combines fashion with practical, everyday wear. Featuring straight boxy fit, four large patch pockets and flat-felled seams for sturdiness, it pairs well with just about everything. Made from our textured heavy-weight linen, it has that lived-in feel from the very first wear.
All the coolest brands have it, but the price tag can sometimes be too high. With this free multi-sized pattern, a couple of yards of our heavy-weight linen and a few hours of intensive sewing you can now make one yourself!
Materials

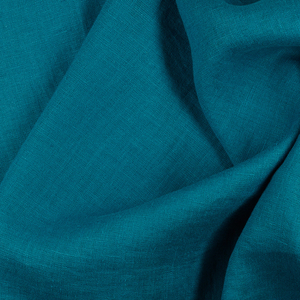
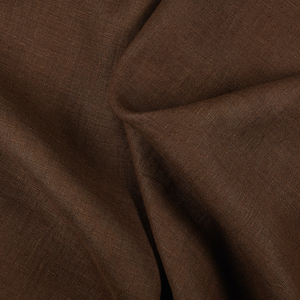
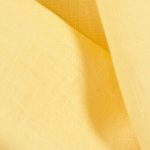
For our sample size S pictured in this tutorial: 2 yards of 4C22 TEAK Softened Heavy Weight Linen
Refer to the yardage table in the PDF pattern to determine the exact amount of fabric you will need to make this jacket.
Matching sewing thread, fusible interfacing, five 1”-wide buttons
Tools
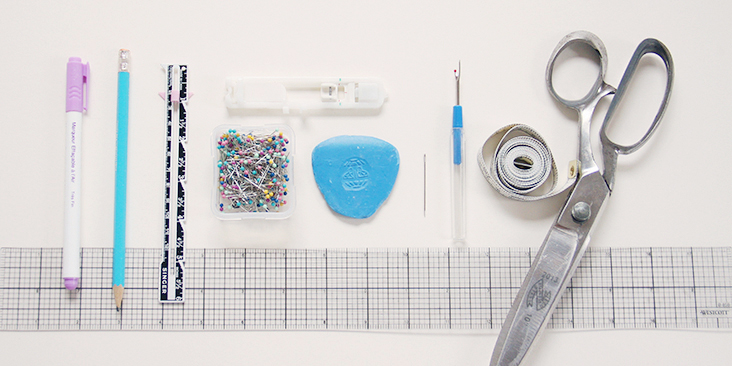
Scissors, pins, ruler, chalk, measuring tape, fabric marker, buttonhole foot, seam ripper, needle, sewing machine
Difficulty
Advanced Beginner
Sewing Time
4-5 hours
Pattern
You can access the multi-sized printable PDF pattern by following this link HERE. All seam allowances are included. The model is wearing size S.
Remember to transfer all the notches onto your fabric.
Steps
Note: Prewash your fabric and tumble dry it until it is still slightly moist, dry at room temperature. Iron the fabric so it is easier to work with.
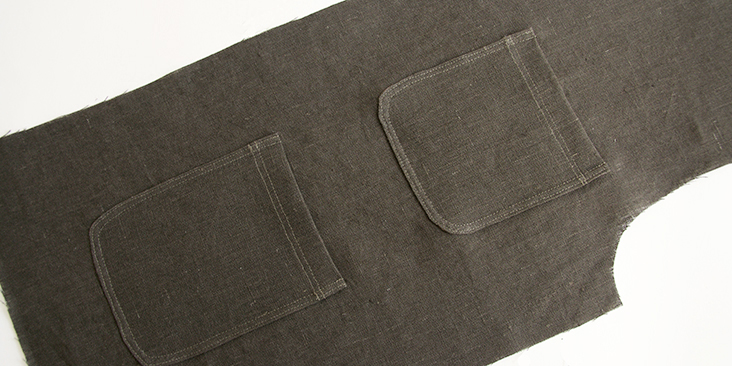
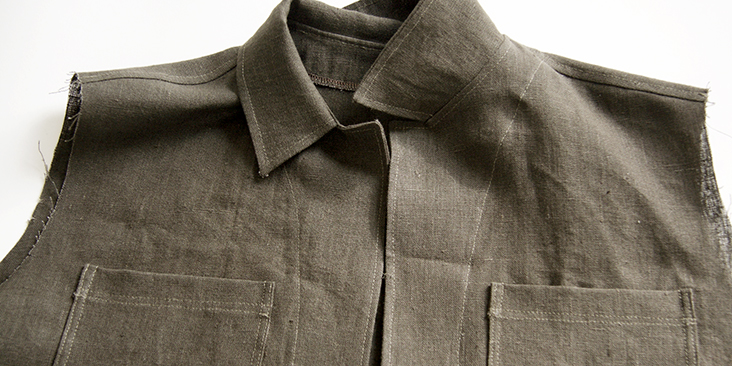
1. Start by attaching the patch pockets to your front bodices. Follow the instructions in this step-by-step tutorial (the first method) and place the pockets at the dots indicated in the pattern (smaller pockets are attached at the bust level, and the bigger one – at the waist level).
Run two lines of topstitching ¼” apart.

2. Pin the two fronts to the back right sides together at the shoulders.
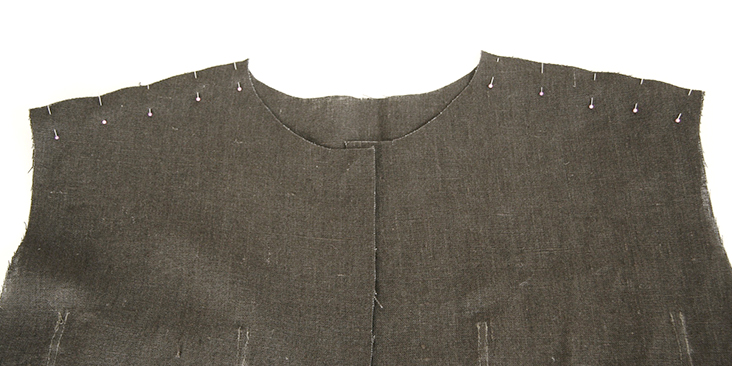
3. Sew at a 5/8” seam allowance then finish with a flat-felled seam as explained in this tutorial. Fold the extension towards the back.
All major seams (shoulder, sides and sleeves) are sewn using this technique for a neat and sturdy finish.
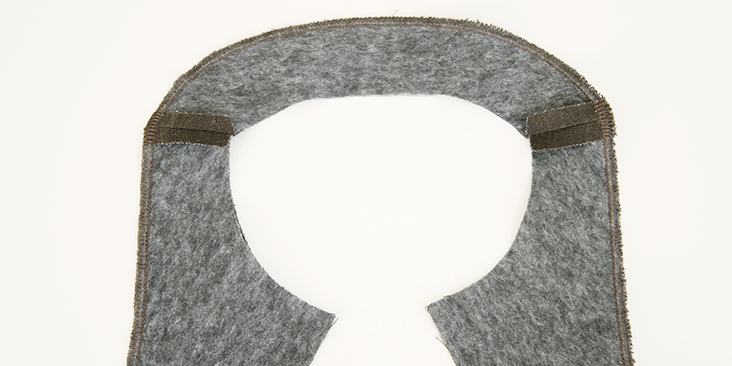
4. Now pin and stitch your interfaced front and back facing pieces right sides together at the shoulders with the standard 3/8” seam allowance. Press the seams open.
Finish the outer edges with your preferred method (using a serger or a zigzag stitch) to prevent the fabric from fraying.
5. Take your upper and under collar pieces and pin the two right sides together along the outer edges. The upper collar is slightly larger to allow for the turn of the cloth so try your best to spread the excess amount of fabric of the upper collar evenly. It’s not much and shouldn’t be a problem. Make sure the center back notches match up.
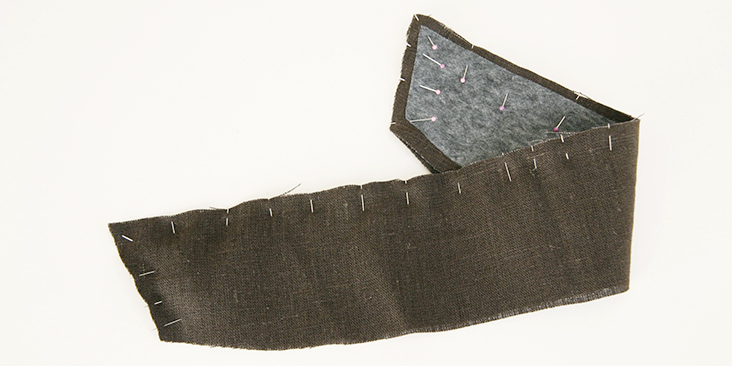
6. Stitch the collar together at a 3/8” (1 cm) seam allowance, grade the edges down to ¼”, snip the corners to reduce bulk.
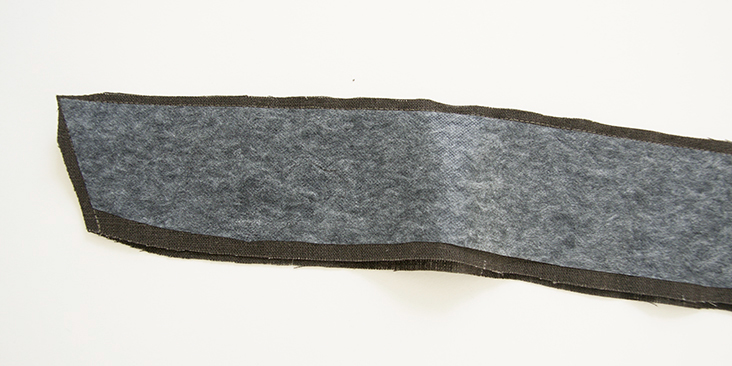
7. Turn the collar right side out, pop out the corners and press making sure the upper collar juts out a bit making your seam invisible.
Run a line of topstitching ¼” from the edge.

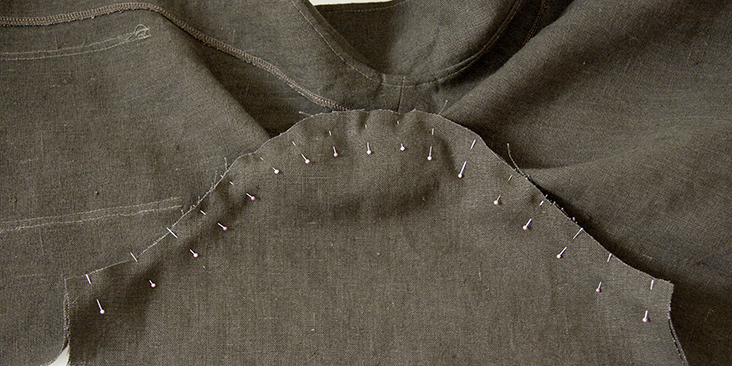
8. Pin the finished collar between the right sides of the bodice and the facing along the neckline from one notch to the other. The upper collar should be touching the right side of the facing. Make sure the center back and shoulder notches are aligned.

9. Now pin the facing to the jacket along the front opening. You’ll notice that the facing is missing the bottom seam allowance. This is intentional as it would allow to reduce bulk when hemming.

10. Stitch the pinned edges at a 3/8” (1 cm) seam allowance. Trim the seams down to ¼”, clip along curves to release the tension and turn right side out. Topstitch ¼” from the edge along the front opening and neckline.
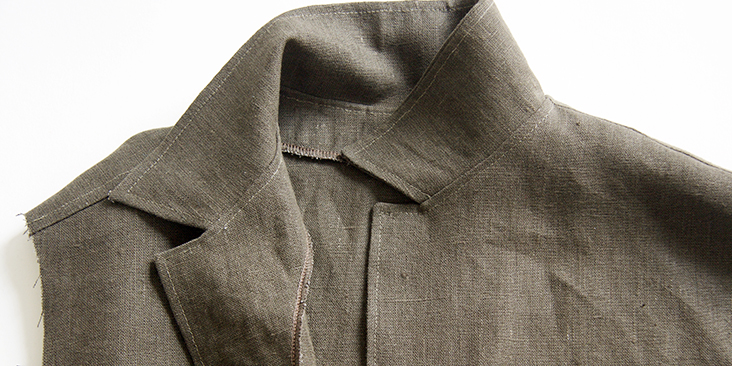
11. Stitch the facing to the bodice along the outer edge to secure it in place and create a decorative detail.
Next up – the sleeves!
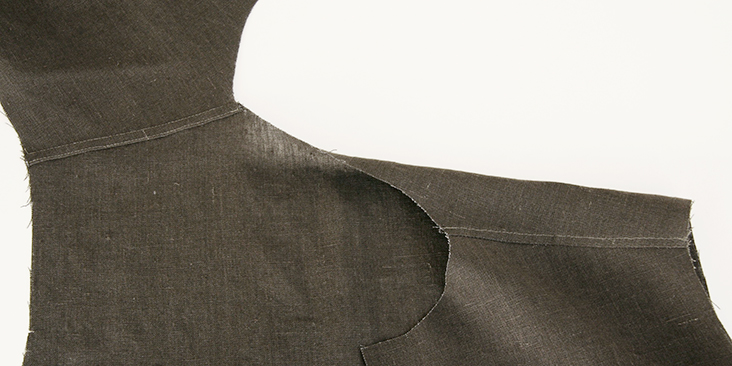
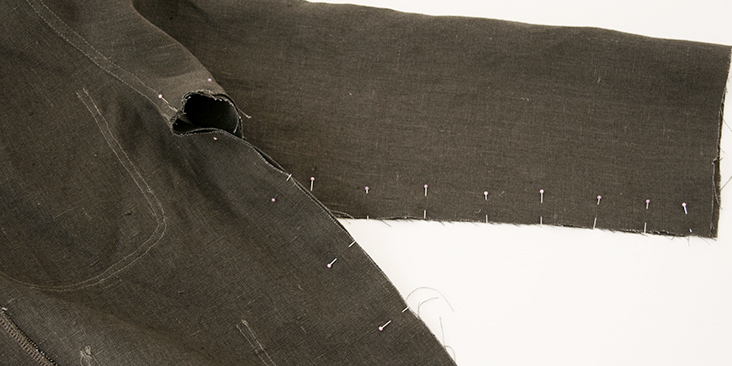
12. Pin and stitch (at a 5/8” seam allowance) the sleeves to the armholes right sides together matching the notches.
13. Finish the seams with flat felled seams. Fold the seam towards bodice.

14. Pin (matching underarm seams) and stitch the side seams and the underarms all in one seam at a 5/8? (1,6 cm) seam allowance then finish with flat-felled seams folding the extension towards the back.
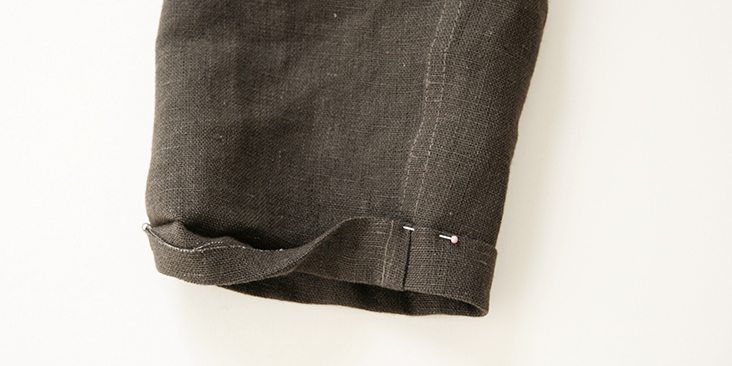
15. Finish the sleeve opening with a rolled hem. Fold the fabric twice to the wrong side (3/8” to 1”). Press, pin and edgestitch.

16. Fold the hem twice to the wrong side (3/8” to 1”), folding your hem over the facing. Press, pin and edgestitch.
17. Lastly, sew the buttonholes and attach the buttons. Remember, that the buttonholes are sewn on the right front, whereas the buttons – on the left front.
For the buttonholes, you can follow our detailed tutorial HERE. As for the buttons, check our tutorial HERE for instructions. Overlap the button bands and place a pin into the center of each buttonhole. This is where you’ll need to attach the button.
We love seeing what you make! Don’t forget to share your pictures and tag your creations with #FabricsStorePaolaPattern hashtag.
To make this jacket, opt for one of our heavy-weight linens. We have a large variety of colors in our store. Browse our selection of linen fabrics and find the fabric that inspires you for this project!
Leave a Reply to Laura Matthews Cancel reply
Related posts

Sewing Essentials: Stitch Width, Stitch Length & Needle Position
Thinking back to my high school textiles days, I remember having to test stitch settings on every fabric we planned to use for our projects. We would cut out little squares of fabric and experiment with different stitch lengths and widths, and edge-finishing techniques. At the time, it felt unnecessary, not to mention tedious….

Sewing Essentials: A Simple Guide to Notches
I love a notch, so much so that I’ve decided to dedicate this article to these small but important markings. Here, I’ll explain why they’re so helpful, when to use them, and how to add them to your own patterns or adapt them for existing ones. What exactly are notches? Notches are small markings found…

How to Select and Use Interfacing: A Simple Guide
Iron-on or sew-in, woven or non-woven, lightweight or heavyweight. With so many different types, weaves, and weights to choose from, how do you know which interfacing is best for your project? In this article, I will explain the two main types of interfacing before diving into the differences in weave and weight. Hopefully by the…

Sewing Essentials: A Simple Method for Reversible Seams
There are so many ways to finish a seam, from good old overlocking to French seams and binding. I recently stumbled across another method that’s pretty nifty, and honestly, I kind of wish I had known about it sooner. It is a bit like binding, but topstitched in place so it doesn’t move or flap…

An Introduction to Common Crotch Adjustments
Recently, I drafted a pattern and made a toile of a pair of drop-crotch pants. When I tried them on, I straight away noticed (and felt) they weren’t quite right. The most obvious issue was that the back crotch felt tight and pulled uncomfortably, especially when bending over. Walking also felt a little restricted, with…


SEW THIS LOOK


Latest Posts


93 Comments
Pingback:
Paola Workwear Jacket – Free Pattern by FabricStore.com - Hungry ScissorsHelene Kimmerle
Hi 🙂
I’m planning to sew a woolen version of the jacket, with a quilted lining.
Would you recommend to do it a size bigger ?
What would be your advice to sew the lining ? (should I keep the facing ? I still wanna have the outter decorative detail of it 🙂 !)
Thanks for your help !
Lovely greetings from France.
Helene
Val Kings
For those having trouble fitting the collar, I found sewing the collar to the facing with a narrow seam and then pinning this combined unit onto the neckline of the bodice really helped ease it into place.
Philippa McInnes
I have just finished making this jacket in navy linen and I love it! I haven’t sewn curved pockets before but after watching a YouTube tutorial I found that a gather stitch at the bottom edge helped get the curve smooth. I also had to use a row of gathering when sewing the sleeve in place to get the right ease with no puckers. Overall I loved sewing this and I’m certain I’ll make more! I am so please I chose a matching thread and not a contrasting one (I will have to practice my neat sewing before doing that). Thank you for this free pattern.
mirre adriaanse
At point 10. Would you do the topstitching at de right side of the bodice of from de right side of the facing?
Which part is on top when you do the topstitch ?
Sara Eriksson
I saw several people had trouble with the collar extending beyond the notches, and instead matching the edges of the jacket front. Me too, and I figured it out. I looked but never saw a reply on this in the comments, so posting in the hope that it can help someone else.
After step 7, the open edge of the collar is supposed to be the short one, the topstitched edge the long one. I had made it the other way around, which wont work… (I think I made the wrong assumption due to the slight curvature of the pattern piece).
Sara Eriksson
Hello, thanks for the pattern! Is it the upper or under collar that gets interfacing? Thanks!
Carol Haueter
How do I down load the tutorial?
Pingback:
The Cost of Dry Cleaning a Jacket: Factors, Prices, and Tips - Let's Clean TogetherSusan Lee
For those struggling with the sleeves (I was one of you!)-
(Problem #1) When I was pinning the sleeve to the bodice, I had 1″ of sleeve fabric left.
Solution- When you are pinning the sleeves to the bodice, make sure you are pinning at the ?” seam and not right against the edge. By pinning at the ?” seam (or even below), the fabric of the sleeve will spread out at the perfect length to meet the edge of bodice. I pinned the two ends where the two fabrics align and the middle. Then, I pinned around ½” mark below the edge and was able to spread the fabric out evenly.
(Problem #2) I was confused to how to flat felled seam the sleeves.
Solution- Trim the bodice seam allowance by half and not the sleeves. Then fold the sleeve seam allowance and sew it to the bodice fabric. You’ll also notice in the instruction pictures that they sewed it to the bodice fabric.
This was my first time following a clothing pattern. It wasn’t too difficult overall, but a more detailed instruction would have been helpful at times.
Jill Turner
Hello, I am making this garment at the moment and find the collar attachment and interfacing all very confusing with only the one picture in your blog tutorial. Usually I attach the collar first then blind stitch the collar hem to the shirt. I’ve not made a shirt before with your type of construction. I am keeping positive as so many people on here say it is an easy pattern. Do you have some extra photos showing the different stages or a video perhaps with the construction. Please let me know thanks
Joana Coutinho
Hi,
I am about to start. sewing my Paola Jacket and I cannot find how much interfacing I need. I only see the yardage of for the main fabric and if I look at the tutorial, I see that only some pieces require interfacing. Can you help me with this? Thank you!
Ann Cook
Great pattern ! I made it out of dark blue denim. I added length to hit mid thigh as I wanted a longer jacket. I had no issues easing in the collar (had about a scant 1/4 inch which might have been due to me not quite sewing a true 3/8 seam allowance) or with the sleeves which had less than half inch total ease in the cap. I will sew this again in a heavier weight linen. Thanks
Lauren Linen
We’re so glad you loved the pattern Ann! Thanks for sharing your experience 🙂
Claire Buet
Hello,
Thank you for this nice pattern!
I’m trying to pin the sleeves to the bust fabric but I have a problem.. I have more fabric in the sleeves than in the bust… I’ve reread everything and checked my pattern but I don’t understand why this is happening. Do you have an idea? Thank you.
Lauren Linen
Hello Claire, you may need to ease the sleeve into the armscye. We have a great tutorial to help here is the link:
https://blog.fabrics-store.com/2021/03/14/sewing-glossary-how-to-sew-set-in-sleeves/
Jessie MacLeod
Hi, I’m also having a terrible time with the sleeves. If I start pinning from the shoulder seam down, I’m left with about 1” extra fabric length on either side of the unfinished side edges. If I pin from the front and back notches, I’m left with a lot of ease along the shoulder curve. I’ve tried the ease in method but it only created gathers for me because there was so much ease.
Could you advise me on what to do? I’m so excited about this pattern but I’m scratching my head wondering what I’m doing wrong.
Thanks so much.
Charlotte Whitcomb
Hi, I’m another one who can’t get the collar to fit 🙁 I’ve tried at least 4 times now – even double-checked measurements of both bodice & collar pattern pieces. To make the seam look nice, the collar ends up all the way at the edge of the front panel (making the collar about 1 3/8″ too long on each side). Please halp!
Lauren Linen
Hi Charlotte,
Please send me an email with photos to our main customer service email address and I’d be happy to take a look for you. Email: ask[at]fabrics-store[dot]com
doina rusu
I just finished making this in 10 oz cotton canvas and it’s one of my favourite pieces. The instructions were straightforward and easy to follow for a confident beginner. This was my first attempt at a jacket, and I would encourage anyone in the same position to try it. Thank you for sharing this as a free pattern! Will be making this again!
perrine heurdier
hey there!
I’m currently on the collar attaching step and having a really hard time… I don’t understand, it seams like it’s 7cm to long (3,5 cm each side)?? It doesn’t match the notches but the sides of front. I can’t figure out what to do, I followed every mesurement:(
Lauren Gates
Hello Perrine,
I’m going to send you an email to help out. Please look out for it.
Lauren
Kirsten Young
@lauren can I also be forwarded this email, really struggling with the collar
Lauren Linen
hello Kirsten,
Please send me an email with the part of the collar you are having trouble with so I can assist better. Ask@fabrics-store.com
Holly Smith
Hi,
I’m also having an issue with the size 0/2 collar, seems to large for the neckline – and doesn’t leave space for the notch in the collar.
Was also wondering if its right that the neckline facing is sewn with 1cm allowance, and bodice shoulders with 1.5cm?
Sara Nelson
Hi – thank you for this pattern! I had some of the same problems noted in some of the comments above, but in particular, I don’t see any info in the pattern or tutorial on the button placket overlap. How big should the overlap be? I’m using a quilt and may do horizontal button holes, so want to make sure I’m placing these for the right fit. And just to confirm; are the crossed circles on the front pattern piece indicating button placement? The top one seems low compared to the picture. Thank you!
Lauren Gates
Hello Sara,
There are button and buttonhole markings on the pattern, so the overlap will be equal to the distance from the edge of the fabric to the button holes. If you would like to adjust the buttonholes to your liking, lay out your Paola jacket flat, and your front should overlap nicely. Alternatively you could try on the jacket, and pin the jacket closed to your preferred fit, and mark your desired buttonholes 🙂
Valerija Plazonic
Hello! I’d like to ask for advice about sizing.
My bust and waist measurements put me in the size S range. I normally size up to M because I like more ease. However, my waist measurement is 31.5- size L. Would you recommend sewing the whole jacket in size M or L? I think M would be a better choice since 44in in the finished measurement is generous, but I’m not certain.
If it helps, I intend to sew this in a mid-weight, non stretchy denim. Thank you so much from your help.
Lauren Gates
Hello Valerija,
We would recommend choosing a size that fits both your bust and hip measurements. Check the finished garment measurements for your desired ease, and you can even measure a similar item you already own, that you like the fit of to help you visualize the ease.
It will really come down to your personal preferences here.
Fritz Longue
This is wonderful, thank you – just was sent this by a friend! Would you recommend a way/tutorial/pattern to make a cardigan style shawl collar instead of the current collar? Thank you!
Lauren Gates
Hello Fritz, Unfortunately, we don’t have a tutorial for converting this collar into a shawl collar I did find a Youtube tutorial that may help though:
https://www.youtube.com/watch?v=F8mEE8UNxCs
Fritz Longue
Thank you!
Eva Stulberg
Hi! I love this pattern and I’m nearly finished making my jacket out of an old quilt I thrifted, but I am totally stumped on how to do the flat felled seam on the sleeves? Maybe it’s too late at night and my brain can’t compute anymore but I seriously can’t figure it out.. Do you think you could help me out?
Lauren Gates
Hello Eva,
We have a tutorial for flat-felled seams on narrow areas like sleeves. Here is the link:
https://blog.fabrics-store.com/2021/02/11/sewing-glossary-how-to-sew-flat-felled-seams-on-sleeve/
Nuu Art
Seems like in order to do the flat-felled seams on the sleeves is to not attach the sleeves to the bodice before working on the seams on the sleeves. I have the same problem. The instruction should probably best to do in that order.
Monica Rodriguez
Hello! If I wanted to add a lining what should I do? Should I cut part of the front panel to accommodate the collar on the lining fabric?
Lauren Gates
Hello Monica, When creating your lining, you will attach it to the existing linen facing. Keeping the facing in your linen fabric will provide the support your collar, neckline, and center front areas need. So when you draft up your lining pattern cut away the sections taken up by the facing, and just add seam allowance.
I hope this makes sense. If you’d like extra clarification, please email me: Ask@fabrics-store.com
-Lauren
Martha Daly
Is there a reason that the buttonholes are placed vertically, or is this just a matter of style? It seems that they would be stronger, and less likely to get stretched out/come undone if placed horizontally.
BTW, I love this pattern, and is pretty easy to follow for folks with some sewing experience. I love the collar design where the upper collar is slightly larger – you didn’t cut corners.
Martha
Lauren Gates
Hello Martha,
The buttonholes are placed vertically so the shirt sits straight when buttoned up. If the buttons were placed horizontally, the buttons could shift along the hole since the shirt is loose-fitting, and there isn’t a lot of strain on the buttons.
susan mitchell
First time making this jacket. I’m using quilted fabric, so attaching the collar is extra bulky! I want to double check something before I sew…when attaching the collar and facing, the instructions say: Pin the finished collar between the right sides of the bodice and the facing along the neckline from one notch to the other. The upper collar should be touching the right side of the facing. Make sure the center back and shoulder notches are aligned. My question….when it says the upper collar should be touching the right side of the facing – do you mean the right side of the facing that I will place on top of the collar? Meaning, the “under collar” will touch the jacket and the “upper collar” will touch the right side of the facing. Thank you. Susan
Lauren Gates
Hello Susan,
Yes, you are correct!
Jo Dc
Hi, I wanted to check if there’s any video tutorial? I find it easier to follow as I am not an expert sewer. This is my first time to sew this. Thanks
Lauren Gates
Hello, Sorry we don’t have video tutorials but if you do need additional help, please reach out to me, Lauren, the patterns and sewing consultant, about any issues you may encounter along the way and I would be delighted to help out.
email: ask@fabrics-store.com
Mary Powell
Are the front facing and back facing to be stitched together with a 3/8ths or 5/8th seam allowance. The instructions say “the standard 3/8ths”, but 5/8ths is used as much, if not more than 3/8ths. The picture looks like more than 3/8ths.
Lauren Gates
Hi Mary, this pattern and tutorial use a 3/8″ seam allowance for seaming the front and back facings. the 5/8″ seam allowance is used for seams which will be finished by flat-felling 🙂
susan mitchell
Any suggestions on what to do if my 2″ square does not measure at 2″? Mine is at 2-1/16″. Is that close enough?
Thank you!
Lauren Gates
Hello I’ve sent you an email Susan 🙂
Rachel Guymon
For anyone else reading the comments and struggling with this…I had this issue repeatedly when trying to print from a pdf of the pattern that I downloaded to my desktop. Then I remembered you have to open the pattern through Adobe Acrobat in order for it to print correctly. You can also select which sizes you want to print when you download and open the pattern through Adobe.
J Rivers
I too am having trouble with fitting the interfacing and the collar. There is a lot of bunching. Can you help please?
Lauren Gates
The trick to inserting it is to ensure the fabric around the neckline seam allowance is laying flat. When pinning the facing along the neckline, beginning by pinning at the shoulder seams and the center back. The fabric will ruffle at the ends but should lay flat along the neckline once it has been turned the right side out.
If you’d like to send through a photo of your Paola I’d be happy to take a look and give any pointers or tips I can. just email me: ask@fabrics-store.com
Sandra Bibace
I have a few suggestions that would be helpful for inexperienced sewers. I got these suggestions from a friend, after I was lamenting having trouble with this pattern. First, staystitch around the neckline on both the body and the facings. Then make small snips around those necklines being sure not to snip through the staystiching. This will enable the round areas to lay flat, so the shape will more closely match the edge of the collar. I also found it helpful to machine baste the collar to the body before adding the facing. Once the collar is nicely basted in, then add the facing and do the final stitching.
Hailey Brown
I am attempting to make the size 8/10 and there is SO much extra fabric to ease in during the neckline facing I’m afraid I made a mistake somewhere prior to this. If the shoulder seams are lined up there is no way to make the seamline flat to attach the facing given how much fabric I have. Is there a trick to this?
Lauren Gates
Hello Hailey, I’d be happy to help.
I’ll be sending you an email, please look out for it.
Genevieve Wall
Hi,
Is there a video turorial available anywhere? I’m a beginner and the collar and sleeves are giving me a really hard time. My collar is on and looks ok from the outside but the inside facing is an actual ruffle, haha! Also, I’m staring at the sleeve and the armhole and have no idea how these two shapes are supposed to fit together… halp!
Lauren Gates
Hi Genevieve, I’m going to send you an email. 🙂
Sew Midwest
Love this jacket! But am wondering why the instructions show the front pattern piece laid out on the crossgrain while the back piece is laid out on the grain? It saves fabric but will the pieces hang/drape the same?
Lauren Gates
hello, The diagram you are referring to is actually the printing page layout, not the fabric layout. The grainlines on the pattern for all body pieces are showing they should be laid on the grain. I hope this clears it up for you 🙂
Sew Midwest
Ahhh, makes sense now. I did assume that was the layout. But one isn’t really needed; 2 yds gives plenty of room to lay it out on the grainline. Thanks for your quick response Lauren!
Patty Gale
Button placement? I have finished construction of the jacket and am ready to place the buttons. I shortened the length a bit to suit my smaller frame. I assume that I evenly space the 5 buttons along the front placket, but how far above the bottom edge and below the top edge do I start to place them? Thank you.
Patty Gale
And how much room do I leave between the edge of the placket and the button?
Lauren Gates
Hello Patty, This is a personal preference really.
I place my first button at the point I’d like the top edge/collar to flare out when worn buttoned up, and I like my last button to be about 3″ from the hem.
Patty Gale
Which pieces get interfacing? I don’t see it in the instructions. My guess is Front Facing, Back Facing, Upper Collar, and Under Collar. Is that correct? Anything else? Please advise.
Lauren Gates
Hi Patty, the interfaced pattern pieces are the front and back facing and just the undercollar. No need to interface the upper collar, but you can if you desire an extra crisp collar.
Caroline O'Reilly
Hi Please add this to the pattern pieces as I have also spent ages looking up this information!
Toni Jenkins
Me too, it would be a helpful pattern addition!
mirre adriaanse
you should interface the UPPER collar right?
Lauren Gates
Yes, that’s correct Mirre 🙂
Laura Matthews
Hello there! I love this jacket but am having difficulty with the pattern. There are a couple of inches of difference between the neckline opening and the facing. Why the difference? How is it possible to incorporate the extra fabric at the neckline and not have a bundled up mess when it’s turned? Any help would be appreciated.
Lauren Gates
Hi Laura, Applying facings can be tricky since you’re sewing something which will be sitting on the curve of the neck and shoulders. My tips are to pin the facing to the neckline beginning with the notches. Then go ahead and pin the remainder. Remember the only section that needs to sit flat here is the fabric along the seamline, so if your fabric is bunched up like pictured in step 8, that’s OK as long as the seamline is flat. When you sew your seam, and flip your facing to the inside of your jacket, all of that excess fabric will sit nicely with the rest of the shirt.
If you’d like some extra help, feel free to send us an email.
Carrie Sloane
Hi there! I just had this issue, and I put the pattern piece for the facing up against the jacket front – it WAS an inch or two too small, but I realized this was because I didn’t cut the jacket front correctly (I left about 1″ to the edge of the paper). If you were also having this problem, maybe that’s why!
Nancy Pike
Has anyone left the sleeves off to make a vest from this pattern? I’m thinking I can make sleeve facings by using the armhole curves of the the front and back pattern pieces.
James Varga
This is my first garment I’ve sewn with long sleeves, and I’m having some trouble with the flat felled seams, my machine having a flat base rather than the more modern narrow arm with removable base. Going to give it a go anyway and just make sure to be as sturdy as possible on the arms. Otherwise very doable pattern even with my limited experience and straight stitching Kenmore. Thanks!
Sabrina Kahn
I’m in the final stages of making my jacket. I took this project on because it said “beginner” but I’m having some trouble! First the facing was very difficult to attach as it had a lot of extra to ease in. I’m assuming that’s what we’re supposed to do with the excess. I wondered why it wasn’t just a smaller pattern piece so there wouldn’t be the bulk of the excess. Now I’m trying to do a flat felled finish on the side/sleeve seam – how do you get back into the sleeve to do the flat felled finish???? I took off the sewing machine piece that makes the skinnier arm, but I can’t get all the way through the sleeve. I wonder if it wouldn’t also work to set the sleeves in after finishing the sleeve seam. I think I’m going to have to finish the sleeve seam with my serger because I don’t see how to get it done with a flat felled. Unless you can please tell me how!!! Why is this all so hard for me???
Lauren Gates
Hi Sabrina,
I’m happy to help out here. Yes the facing does have some extra ease so it sits nicely over the curves of your shoulders and neckline. They are a bit tricky the first time you do them, but once the garment is finished you’ll see why you needed all that extra fabric.
The flat-felled seam finishing does take a bit of maneuvering, and I would recommend starting your stitching from the side seams and work your way towards the sleeve cuff.
If you’d prefer, you can always opt for a french seam instead.
Emmy Beber
Hello,
I can’t seem to get the link to the pdf to work. Is there another way of accessing it?
Thanks!
Emmy
Pingback:
Paola Workwear Jacket – Free Pattern by FabricStore.com – The Sewing Room / ŠivaonaCaitlin Bant
Is there a suggested fabric layout for this pattern?
nicole glaberman
I would also love if you guys gave pictures of how you lay this out!
Celia Mitchell
Hello, what type of interfacing does this project use? Thanks!
Rima Khusainova
Hi Celia, you can use medium weight fusible interfacing.
Mary Lilledahl
Are the pattern size measurements given anywhere? i.e. bust, hip, length, etc… for each of the size options? I see the pattern pages but nowhere do I see the various measurements to know which size is best to cut out for me. Thanks for your help…
Zoey Duncan
I’m hoping for this info on sizing too, please.
Zoey Duncan
Oh, I figured it out! When you download the PDF, the pattern is packaged as a separate attachment from the sizing and yardage information. When I first open the pattern in Adobe Acrobat Reader, the sizing is on that portion of the PDF. Then I have to open a separate attachment within the PDF for the sizing. Hope this helps!
Leann Runge
I found the actual pattern! Download the tutorial at the end of this page, then on page 6 of the tutorial, it has a highlighted “HERE”, for the pattern.
Leann Runge
I love this pattern, how do I get it? It appears the download is the tutorial and not the pattern. Any help would be appreciated! It’s exactly what I was looking for.
Pingback:
Fall-Winter Sewing Plans – sooz.madeAne Isusi
Hello.
I can’t find the PDF pattern for this jacket. Is it available somewhere?
Thanks.
Lisa Bates
I would really like to make this jacket but I cannot find the actual printable pattern anywhere – got the tutorial but nothing else. What am i doing wrong? thanks
Jorien Hofman
Did you find it? Because I can’t :’)
Fanne Fernow
Hi. This is my first time at using a PDF pattern, and I found it to be somewhat daunting. I have been looking for a boxy jacket for a while, and I love this one. BUT IT TOOK ME FOREVER to find the actual pattern pieces.. When I figured it out, I felt somewhat stupid. But the answer isn’t about just clicking the attachment icon. After you click the attachment icon, you will see a reference to the pattern in the left had column. Click on that, and the pattern pieces will appear. Also, there is a direct link to the very good instructions on the pattern. have
Once you have the pieces, you can un-select the sizes you don’t want. and just have the lines for the size you want.
Sheralyn Franks
Maybe I’m just missing it but I can’t find anything on the pattern which marks out the pocket placement? Step 1 says to position pockets on the dots but the only dots I see are the button placements
Aunty M Flammatory
Where do I find PDF pattern in your new format?
Aunty M Flammatory
I found it at the very end of the tutorial.