


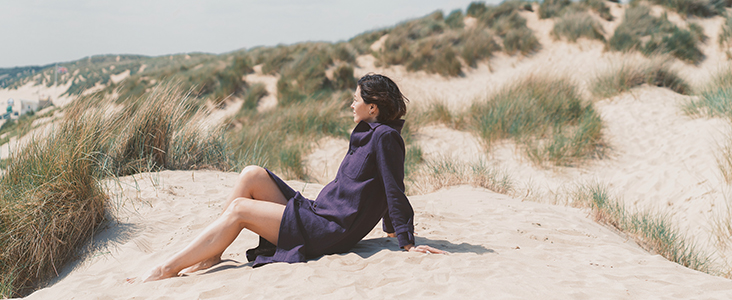
Mara Painter’s Coat Tutorial and Pattern
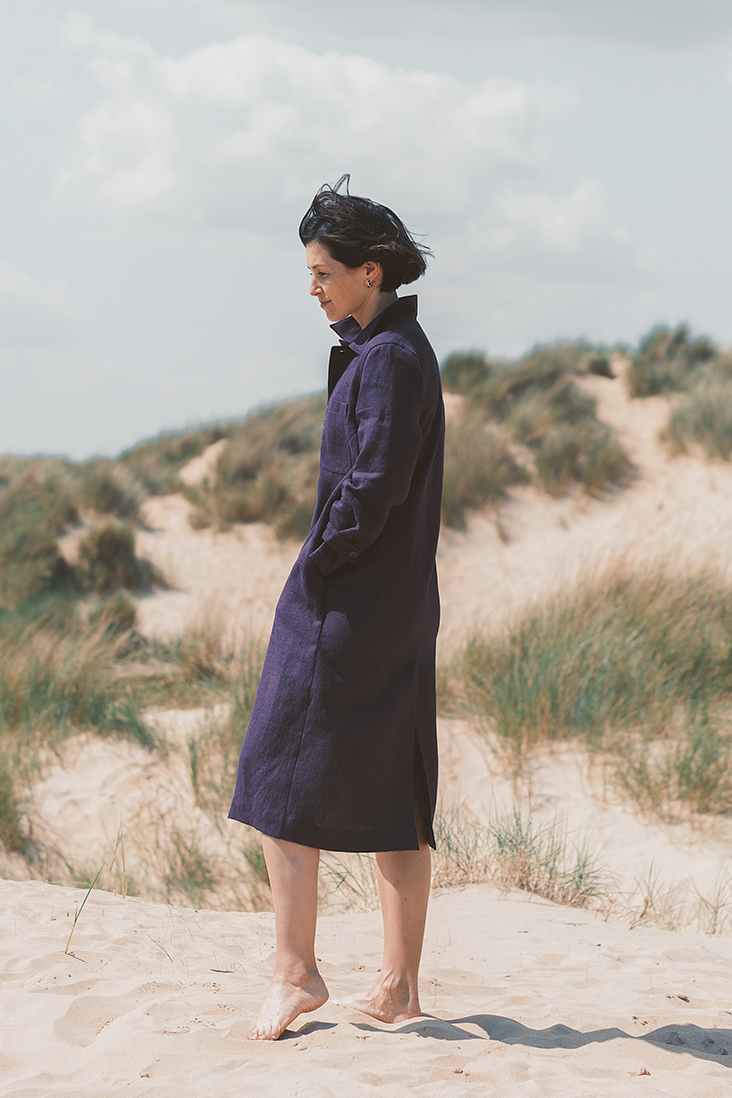

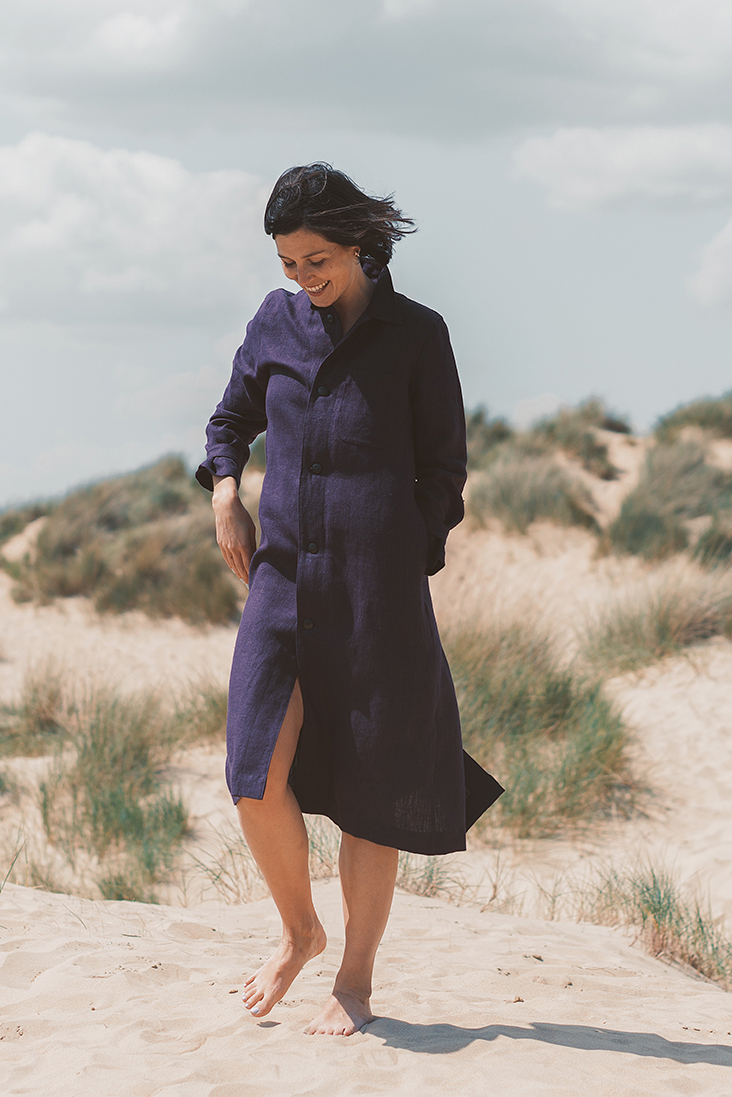
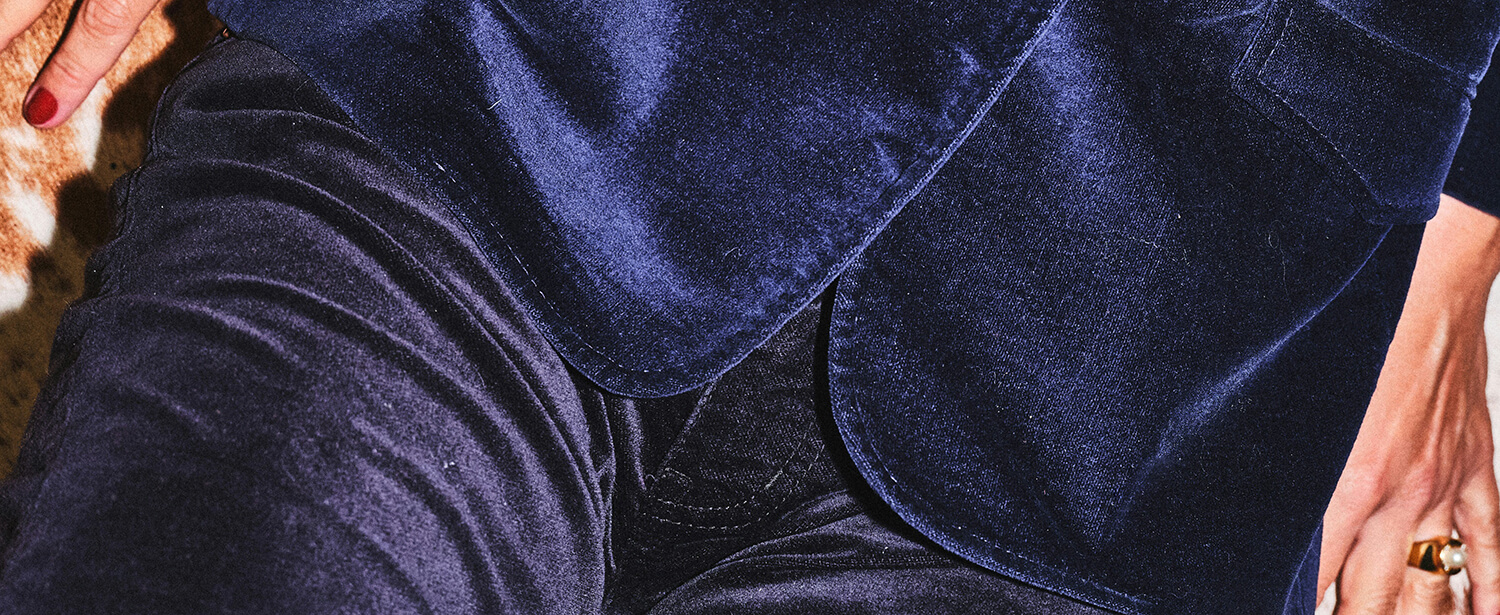
Inspired by the relaxed elegance of a classic painter’s coat silhouette, Mara is a loose-fitting A-line coat with a collar, sleeve tabs, pockets and a back vent for movement. Crafted from our gorgeous textured heavy-weight linen, it is an ideal piece to transition the seasons. Simple yet elegant, Mara is that one coat in your closet that will go with everything.
Materials
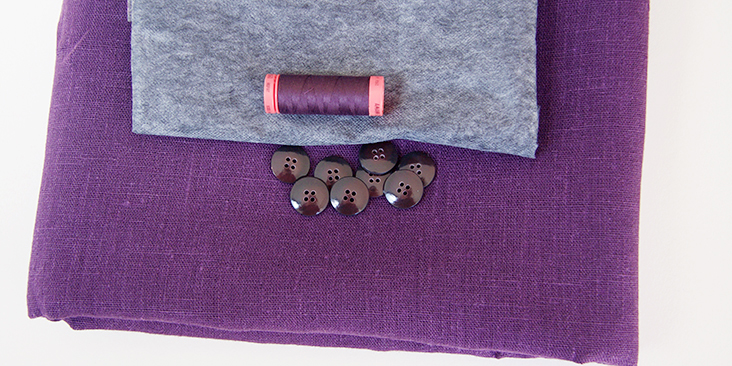
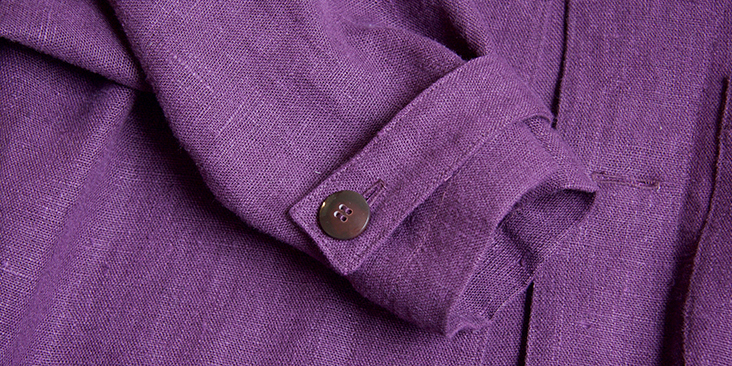
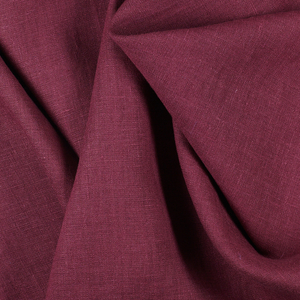
For our sample US size 6 pictured in this tutorial we used 4 yards of IL090 ROYAL PURPLE Softened Canvas Linen. For other sizes, please refer to the yardage table in the PDF pattern to determine the required amount of fabric.
Matching sewing thread, 7 big buttons (3/4”- 1”), fusible interfacing
Tools
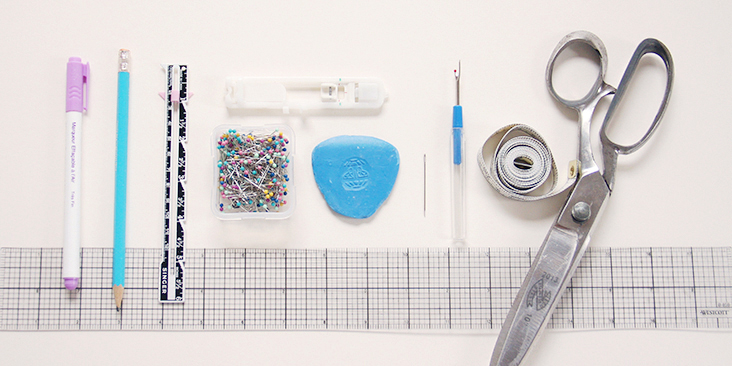
Scissors, pins, ruler, chalk, measuring tape, fabric marker, buttonhole foot, seam ripper, needle, sewing machine
Difficulty
Advanced Beginner
Sewing Time
6-7 hours
Pattern
You can access the multi-sized printable PDF pattern by following this link HERE. All seam allowances are included and are 3/8” (1 cm) unless otherwise specified. The model is wearing US size 6.
Remember to transfer all the notches onto your fabric.
Steps
Note: Prewash your fabric and tumble dry it until it is still slightly moist, dry at room temperature. Iron the fabric so it is easier to work with.
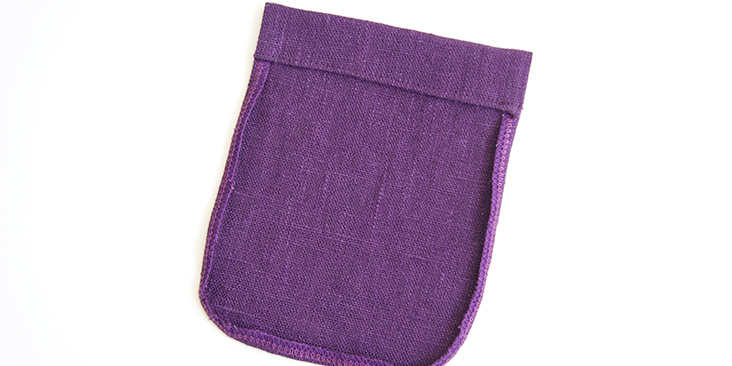
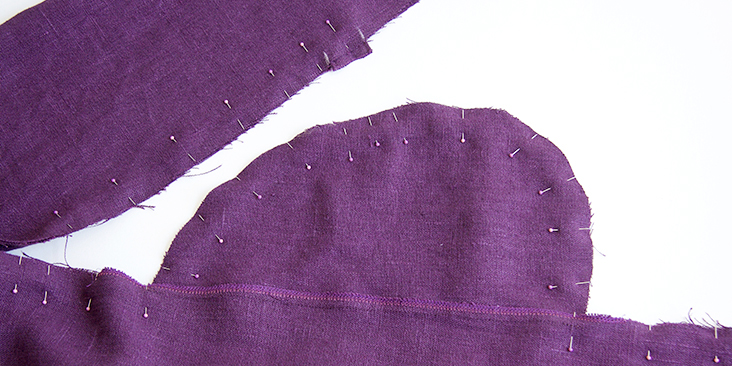
1. Let’s start with the patch pocket. Follow the instructions in this detailed tutorial (the first method) and sew and attach your patch pocket to the left front. Refer to the placement marks on the pattern and topstitch the pocket in place.

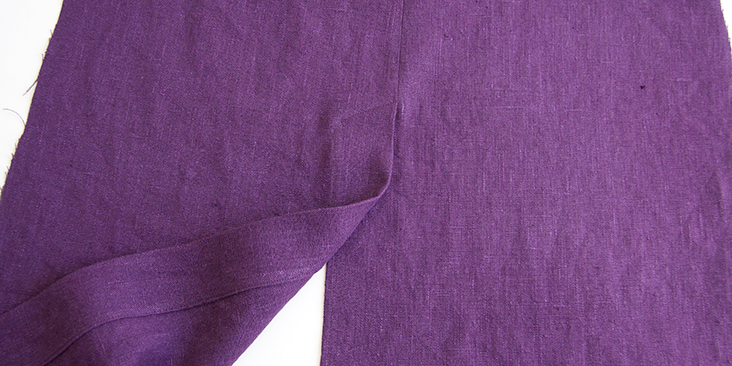
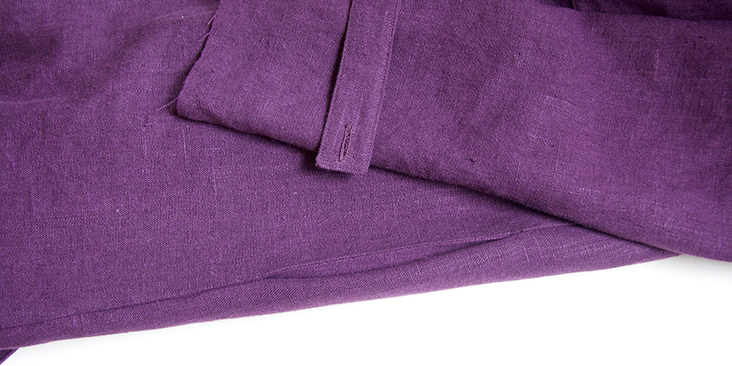
2. Pin the two backs right sides together and sew the center back and the vent as explained in this step-by-step tutorial. Do not hem the coat yet (skip steps 2 and 3), we’ll show you how to do it later.
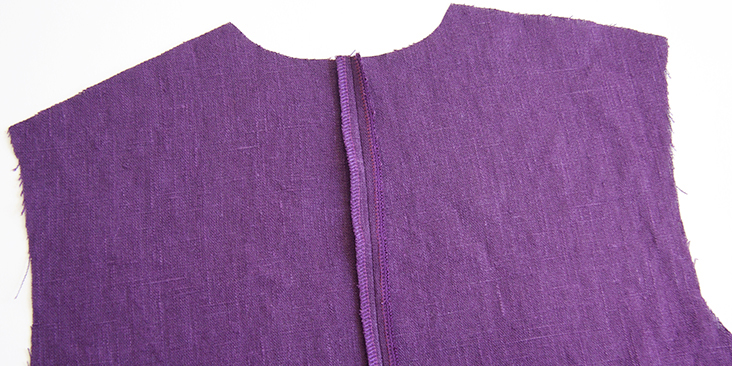
3. Pin and stitch the two fronts to the back right sides together at the shoulders using a 3/8” seam allowance. Finish the seams together with a serger or a zigzag stitch to prevent the fabric from fraying in the future, then press the seam towards the back.
4. Now pin and stitch your interfaced front and back facing pieces right sides together at the shoulders with the standard 3/8” seam allowance. Press the seams open. Finish the outer edges with your preferred method (using a serger or a zigzag stitch) to prevent the fabric from fraying.
Optional: to reduce bulk, you can trim off the interfacing seam allowances along the center front and neckline edges.
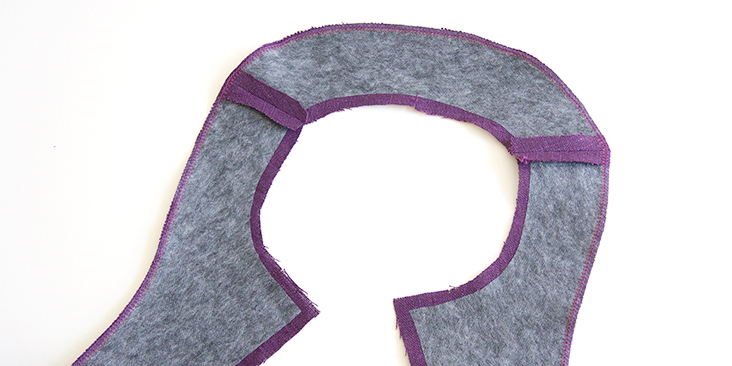
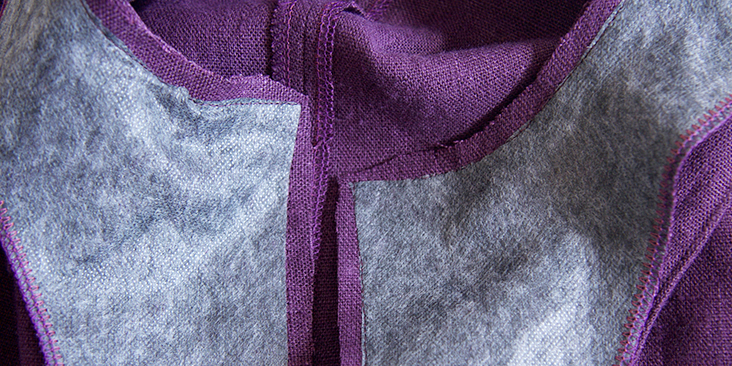
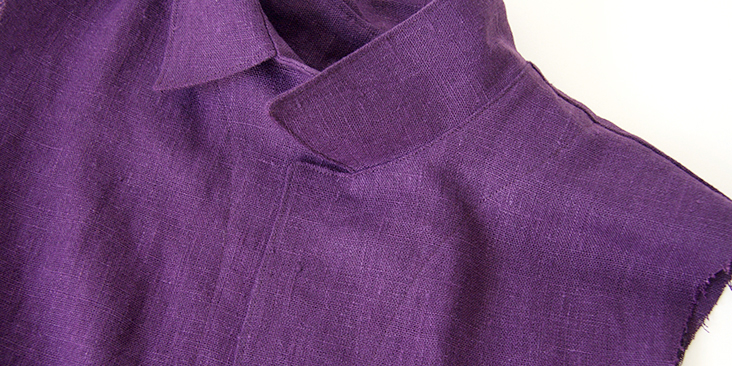
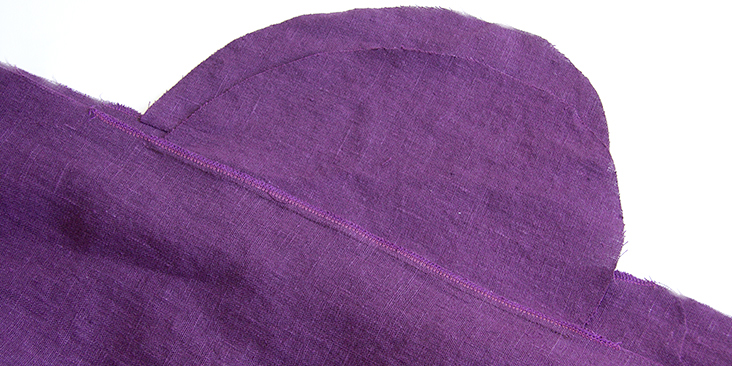
5. Apply fusible interfacing to the wrong side of your collar pieces. Pin the upper and the under collars right sides together along the outer edges. Make sure the center back and shoulder notches match up. Stitch the collars together at a 3/8” (1 cm) seam allowance, grade the edges down to ¼”, snip the corners to reduce bulk.

6. Turn the collar right side out, pop out the corners and press making sure the upper collar juts out a bit making your seam invisible. Run a line of topstitching 1/8” from the edge.
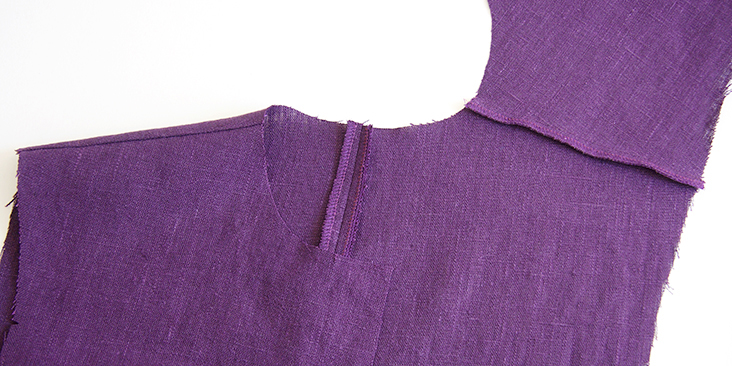
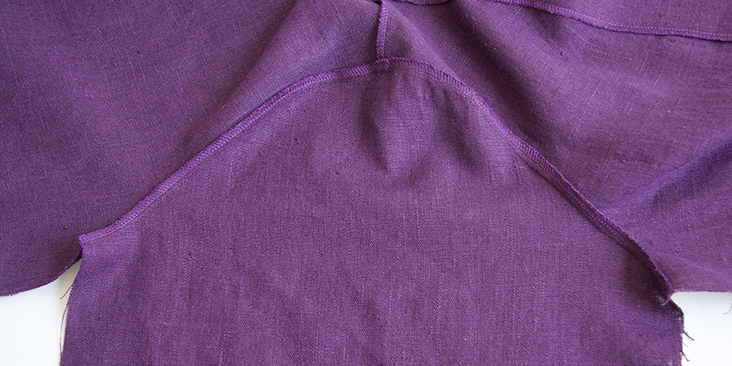
7. Pin the finished collar between the right sides of the bodice and the facing along the neckline from one notch to the other. The upper collar should be touching the right side of the facing. Make sure the center back and shoulder notches are aligned.

Now pin the facing to the jacket along the front opening. You’ll notice that the facing is missing the bottom seam allowance. This is intentional as it would allow to reduce bulk when hemming.

8. Stitch the pinned edges at a 3/8” (1 cm) seam allowance. Trim the seams down to ¼”, clip along curves to release the tension.
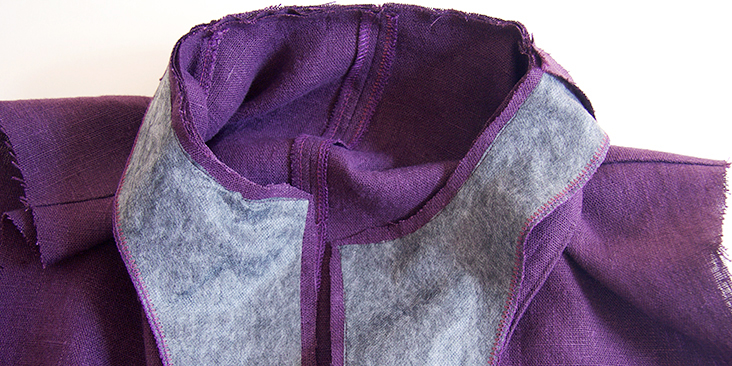
9. Turn the facing to the inside and press along seam. Topstitch 1/8” from the edge along the front opening and neckline. Stitch the facing to the bodice along the outer edge to secure it in place and create a decorative detail.
Next up – the sleeves!
10. Pin and stitch (at a 3/8” seam allowance) the sleeves to the armholes right sides together matching the notches.
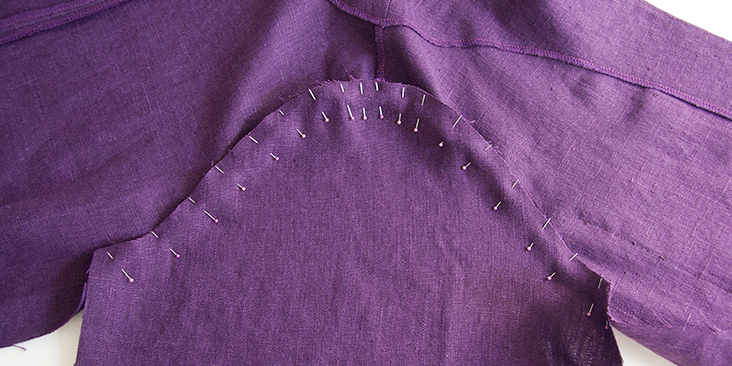
11. Finish the raw edges using your preferred method and press the seam allowance towards bodice.
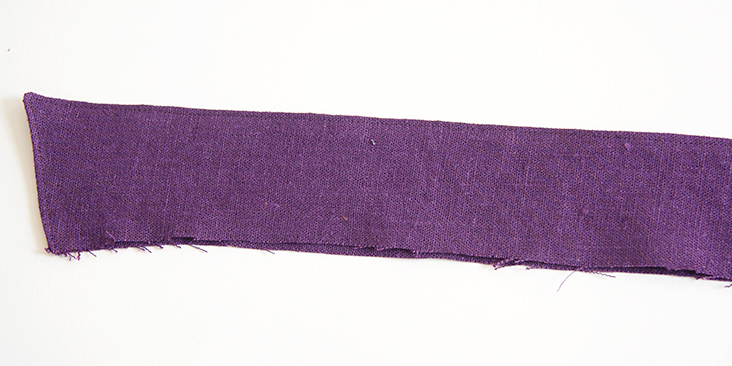
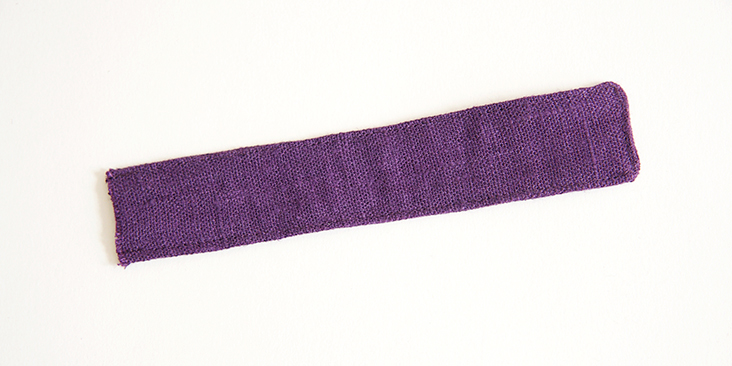
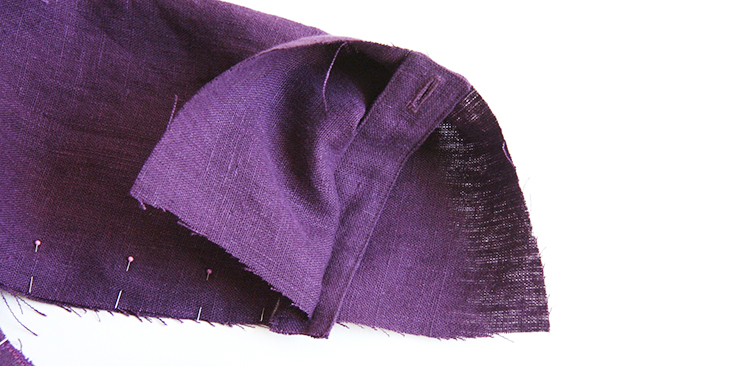
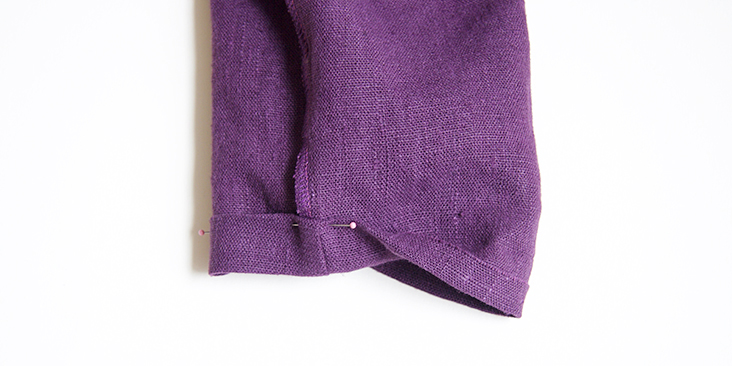
12. Sew the sleeve tabs. Pin the two tab rectangles right sides together and stitch along the edges at a 3/8” seam allowance leaving one short end open. Trim the seam down to ¼” and clip the corners.

13. Turn the fabric right side and press. Topstitch along the sewn edges 1/8” from the edge.
14. Clip on your buttonhole foot and sew a buttonhole at the finished end of your tab.
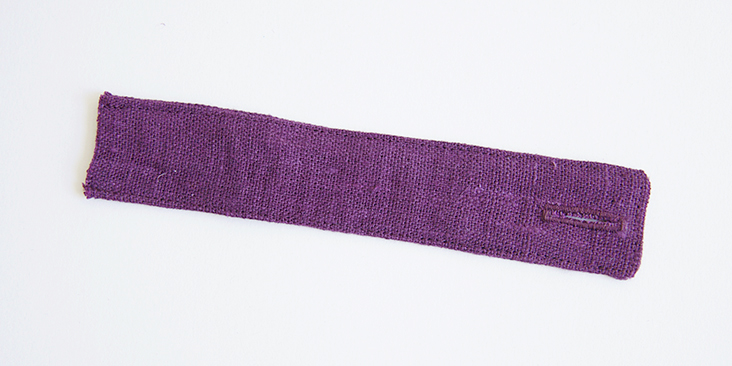
Repeat for the other sleeve tab.
The coat has two inseam pockets on each side seam. The placement is indicated in the pattern. We have a detailed tutorial about sewing inseam pockets HERE if you are not familiar with the process.
15. Attach the pocket bags to the front and back pieces right sides touching. Serge/zigzag along the pocket edge. Press pocket away from the main fabric.
16. Pin the front and the corresponding back of your garment right sides together. Match up the underarms, the side seams and the pockets edges.
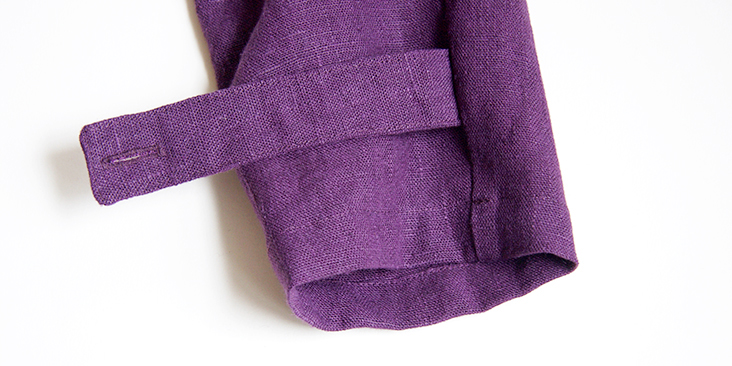
17. Insert the tab into the sleeve between the two notches indicated in the pattern. Align the raw edges and pin.
18. Stitch the side seams, the pocket bags and the underarms all in one seam at a 3/8” (1 cm) seam allowance then finish with a serger or a zigzag stitch.
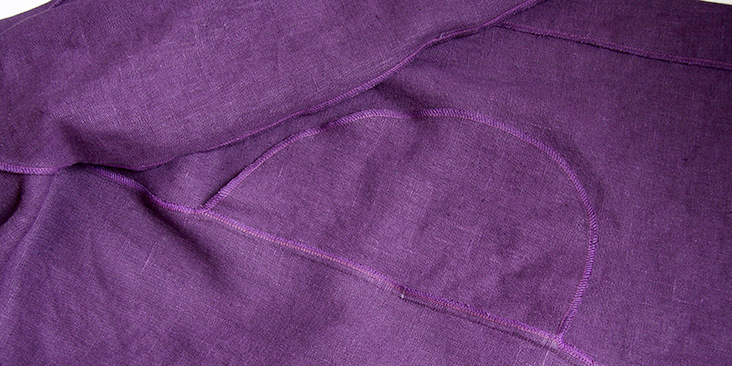
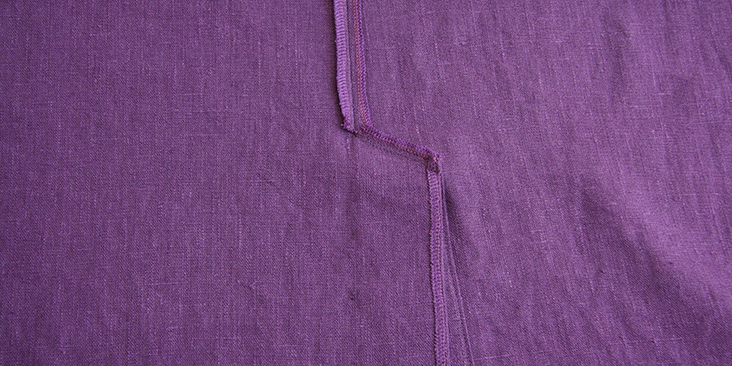
19. Pin the lower portion of the front/back pocket bags from the bottom to the pocket opening notch matching the seamlines. You can check if your seams match up perfectly by watching where the pin comes through on the other side. Stitch from the notch down to the bottom of the pocket bags in the crease of your seam. Remember to backstitch at both ends of your seam.
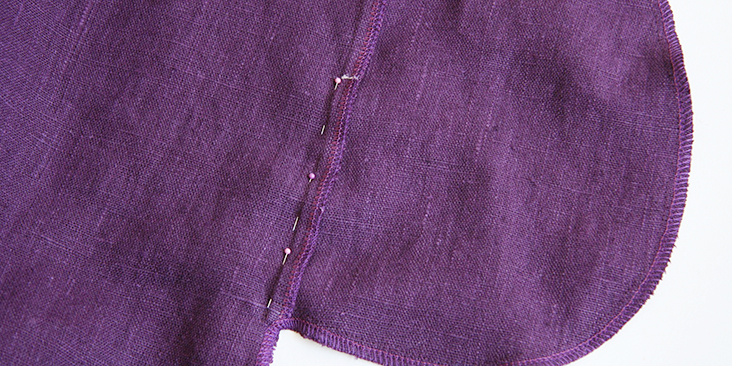
20. Press the seam allowance and the tab towards the front.
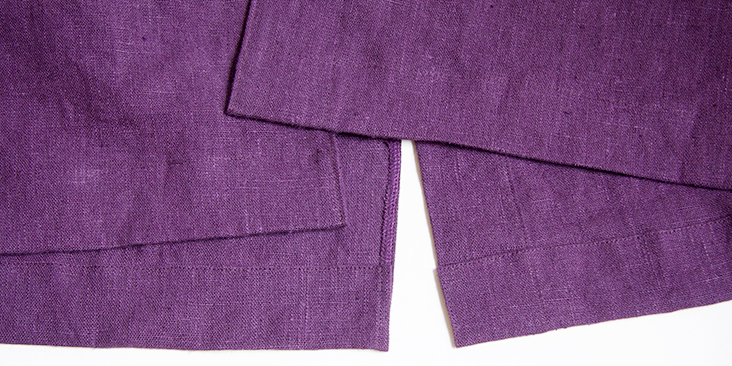
21. Finish the sleeve opening with a rolled hem. Fold the fabric twice to the wrong side (3/8” to 1”). Press, pin and edgestitch.
22. Fold the hem twice to the wrong side (1/2” to 1.5”), folding your hem over the facing. Press, pin and edgestitch.
23. Lastly, sew the buttonholes and attach the buttons. The buttonholes are sewn on the left front (the one with the patch pocket), and the buttons – on the right front.
For the buttonholes, you can follow our detailed tutorial HERE. As for the buttons, check our tutorial HERE for instructions. Overlap the button bands and place a pin into the center of each buttonhole. This is where you’ll need to attach the button.

24. Attach tab buttons on the sleeves at the spot indicated on the pattern.
25. Give your coat a good last press and you are all done!
We love seeing what you make! Don’t forget to share your pictures and tag your creations with #FabricsStoreMaraPattern hashtag.
Whether you are looking for natural or bright colors, heavier or lighter linen, we have something for everyone. Browse our selection of linen fabrics and find the color that inspires you for this project!
Leave a comment
Related posts

Sewing Essentials: Stitch Width, Stitch Length & Needle Position
Thinking back to my high school textiles days, I remember having to test stitch settings on every fabric we planned to use for our projects. We would cut out little squares of fabric and experiment with different stitch lengths and widths, and edge-finishing techniques. At the time, it felt unnecessary, not to mention tedious….

Sewing Essentials: A Simple Guide to Notches
I love a notch, so much so that I’ve decided to dedicate this article to these small but important markings. Here, I’ll explain why they’re so helpful, when to use them, and how to add them to your own patterns or adapt them for existing ones. What exactly are notches? Notches are small markings found…

How to Select and Use Interfacing: A Simple Guide
Iron-on or sew-in, woven or non-woven, lightweight or heavyweight. With so many different types, weaves, and weights to choose from, how do you know which interfacing is best for your project? In this article, I will explain the two main types of interfacing before diving into the differences in weave and weight. Hopefully by the…

Sewing Essentials: A Simple Method for Reversible Seams
There are so many ways to finish a seam, from good old overlocking to French seams and binding. I recently stumbled across another method that’s pretty nifty, and honestly, I kind of wish I had known about it sooner. It is a bit like binding, but topstitched in place so it doesn’t move or flap…

An Introduction to Common Crotch Adjustments
Recently, I drafted a pattern and made a toile of a pair of drop-crotch pants. When I tried them on, I straight away noticed (and felt) they weren’t quite right. The most obvious issue was that the back crotch felt tight and pulled uncomfortably, especially when bending over. Walking also felt a little restricted, with…


SEW THIS LOOK


Latest Posts


23 Comments
Wendi Micklich
It says this pattern is a layered pdf. How do I print only the size that I need?
Thank you.
Lorraine Hutton
I wanted to express my gratitude for this fantastic free pattern. The patterns are very much appreciated by many I’m sure (even if that’s not reflected in the comments section!)
Judy B
I can’t see the download button
Lauren Linen
Hello Judy, You can download all of our free .pdf patterns from our website. here is the link to the Mara pattern:
https://fabrics-store.com/sewing-patterns/mara-painter-coat-pattern-type-pdf
Stacy Dougan
How come we cannot download the tutorial in PDF format? I would always scroll down to the end of the instructions and I was able to download them? Do you not offer this feature anymore?
Elise Villemaire
l’ve found I can copy a “print” file. I make a full selection from any allowable internet page, right-click print and choose the save option to the same folder I save the patterns in. I use the same name + “directions” as the pattern itself, so they are obviously together, for later use.
Lina Chabrol
Hi! I can’t seem to find the size chart or yardage chart anywhere for the pattern… could someone help please? Thanks heaps!
Lauren Gates
Hello, this pattern is one of our older ones before we added in full-size charts and yardage information. These are slowly being added in but will take some time ( we have over 100 free patterns!)
Please choose your size based on the finished garment measurements, which is calculated by measuring the pattern, and removing seam allowance.
Emydee Hannon
wondering how this coat would work with a medium weight linen and lined? has anyone done it with a lining?
Debi Sheridan
would it be possible to make this pattern available for real. I have wasted 45 minutes today trying to download the PDF. I have adobe acrobat and have worked with it for years. however, no pdf with pattern in it appears no matter how many times i download the instructions for uploading Adobe reader. What a let down! Shame on you. I see from the comments above that i am not alone in my frustration and the fabric i bought for this patter will sit unused until i can find something that deserves it.
Lauren Gates
Hi Debi, I’m sending you an email now. In the meantime, we have this article that covers how to access your pattern with step-by-step instructions.
https://support.fabrics-store.com/hc/en-us/articles/360057105032-Downloading-and-Opening-Free-pdf-Patterns-on-a-Computer-PC-and-Mac-
Beth Perry
It works for some patterns and doesn’t for others. I too have wasted about 45 minutes attempting to download Harley Placket Tunic pattern. Mara has downloaded fine, just need to print it out.
Elizabeth Hafner
Hello,
Would it be possible to make this with a mandarin collar instead of the classic collar? If so, at which step would I make the change?
Thanks!
E D
I have the same question! I’d love to make this coat with a band or mandarin collar – I might just ‘go rogue’ and try it I hope FS responds to this query 🙂
Elissa Wright
Has anyone actually managed to download this pattern? Every time I click the link it goes into an endless loop of making me sign in but I never get to anywhere that allows me to download the pattern. It isn’t on the Patterns page, and a search returns 0 results.
And shame on you FS for showing it in a gorgeous fabric that hasn’t been in stock for months! Please bring back more colours, especially purple, in 1L090.
Deborah Dean
I tried for two hours to load the Mara Coat pattern and it the instructions on how to download would open in my Adobe but I could never get to the pattern. Saddened by this.
Lori Dendy-Molz
The pattern is in the same Adobe file. It is a bit complicated (and I’m not sure why they set these files up like this) but you will need to click on the paper clip or layer symbol in your reader software. Then you should see the pattern.
Elisabeth Feher
same story here endless looping and just not getting there to down load. I would like to make it in softened black.
Lauren Gates
Hi Elisabeth. I’m sorry you’re having trouble downloading the pattern. I’ll send you an email so we can figure out what’s going on. 🙂
Evonne Woycitzky
I had no problem. Be sure that you are opening the file in Adobe, then click on the icon that indicates ‘layers’.
It didd take me awhile to figure out the steps to get these patterns open, but once you remember to click on the adobe, then its a breeze.
Claudi Neff
Hi, I have really enjoyed receiving emails with the specials and the patterns. I would like to try one but I am waiting and hoping that you can model one on a model who has a more realistic figure. Like a size 12 or 14. It would help to see how it fits.
Thanks
Kelly m. Jackson
Me too! Thanks Claudi for bringing up the topic. I so appreciate that the patterns are size-inclusive. Thank you Fabric-store for such wonderful inspiration and beautiful linen.
sha hen
All sizes are realistic – the pictured model is a real human being, no? In an effort to advocate for a variety of model sizes and shapes, beware of language that demeans.