Easy Scarf with Tassels Tutorial
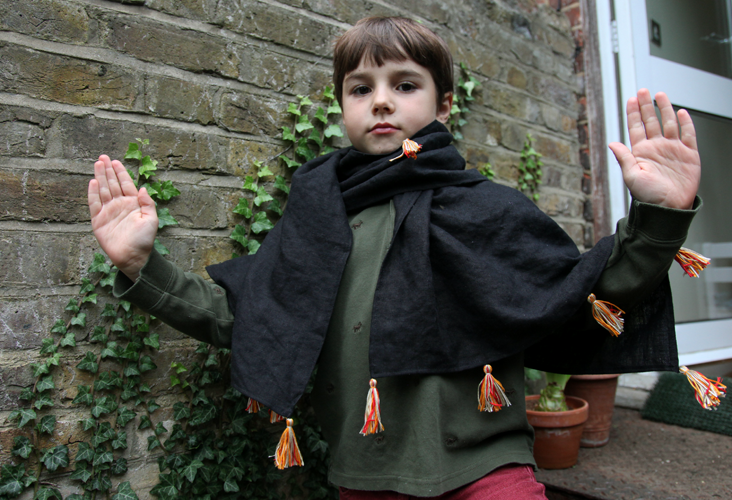
Tassels are a little bit of fun sometimes. This is exactly why I have decided to pair them up with a very plain’ piece of’ black’ linen to make something very simple and perhaps that little bit special for the colder months to come. It is also a really easy way to introduce colour to either white/black/neutral fabric. I am personally taking this opportunity to send this one to a dear friend of time. What will you do with yours?
Materials:
23″ by 55″ of IL019 Softened Black
5/6 shades of cotton thread (I used Anchor)
Pins, Scissors, Needle, Sewing machine
Time: 5/6 hours (tassels are time consuming)
Difficulty: Beginner
1. Prewash your fabric. Tumble dry so that there’s still a little bit of moisture left in the fabric, is should look fluffy and feel soft to the touch.
2. Cut your fabric to the right size.
3. Initially I was going to use long tassels so my method of making them was slightly on the cheeky side. In the end I ended up cutting about an inch off each, so if you are going for the same length as in the photos which is about 2 inches long, I suggest you use another method, unless you want to end up with wastage. This way of making tassels does save you alot of time, so there are merits. So, take the thread out of the paper packaging, fold it in half and cut down the middle.
4. Repeat for all 5/6 shades of your cotton threads. Straighten them out. Equally disperse all five/six shades over 12 neat piles which are to be your future tassels.
5. Take the first pile of threads and mix them up. Tie a string in the middle, make a double knot to secure.
6.’ Take both sides and wrap them around the knot, so the knot is on the inside. Tie another piece of string around the little ball of thread that has formed at the top. Secure with double knot. It should look like the photo below. Repeat for all 12 piles of thread. Once all tied- cut the bottoms to the desired length.
7. Back to the fabric:’ Hem all four sides with a double turned ‘¼” hem. To do this, fold under each raw edge ‘¼” and press, then fold under another ‘¼” and press again. Finally, stitch close to the folded edge around four sides, pivoting at each corner. This technique will make simple square corners.
8. Arrange 5 tassels at equal distance along the short edge of the scarf. To make this easy and without using a ruler, fold this edge’ in half- make a mark on the crease. This is your middle tassle position. Fold again- you now have two creases, make two marks- these are your ‘side kick’ tassel positions. Your last two are either end. Repeat for the opposite side of scarf.
9. Attach each tassel carefully to scarf by going from the back of the scarf through the hem and out right at the edge of the crease so that you hide the knots of the thread you are attaching your tassels with. (Shown below) I used black thread to match the fabric.
Repeat for 9 remaining’ tassels. I also attached the last two tassels’ in the middle of the longer sides.












8 Comments
Bunny
Thank you for replying. I’m sorry that I upset you or your follower Darcy with my questions and thoughts. When I look at an item I might want to sew for myself, it helps me tremendously to see it modeled by woman. It is really cute on your child. I just can’t picture how it might hang on a woman when worn for work or to go out. I guess I am looking at it from a business point of view. I was thinking of the marketing aspect of helping you sell more material by modeling the end product in the most flattering possible way for the buyer. My apologies for upsetting anyone. I will unsubscribe now.
Masha Karpushina
Bunny, hey! You didn’t upset me at all)) Any opinion is interesting, and I agree that it would have been great to see it on a woman, but this time round, we decided to do it differently. It seems that the comments have upset you in turn though, and I’m sorry about that. )) You can see this time round, I took your advice and wore the dress myself. Have a lovely day. And again, thank you!
d'Arcy
Masha, thank you for providing the tutorial and a great idea!!! I don’t really understand the question “who is it intended for?” As you said, if you like the idea, make it and you decide how and who and where will wear it. I applaud your ingenuity with the tassel making, perhaps it is not so new out there but is way, way new for me…thank you again for the info and your creation!
Susana
This is a very nice idea. The measurements you give are just a little short of the crosswise measurement of the fabric by almost 2/3 of a yard. I was thinking that one could also use 1-1/4 yards of fabric, fold once on the crosswise grain, hem the two ends (perhaps after making and attaching the tassels so as to catch this sewing inside the seam), and leaving 6-8″ along the seam opposite the fold for turning, which would then be hand-stitched closed.
This should make the shawl a bit warmer with the double layer of fabric. In fact, one could just trim the selvages on the two sides—or not if it doesn’t pucker after washing—and instead of cutting to 55″, just use the full width of the fabric. Ergo, no waste!
Masha Karpushina
Great idea )) this is what its all about, provoking ideas. ))) Thank you Susana.
Bunny
While I appreciate the time you took to write a detailed tutorial and take photos of the project, I’m left puzzled about the actual age of the person this scarf is intended for. Is it really for a child?
The photos would indicate that maybe it is. The fact you mentioned it goes well with a halloween costume indicates that it is intended to a light-hearted children’s scarf.
If it is for an adult – maybe some pictures showing it in a more flattering way? It isn’t easy to see what the finished scarf might look like when worn properly. Consider showing a photo of it either draped over a table to show more of the scarf, hung on a clothes line, draped over a sewing mannequin, or on a real adult in the way they might really wear it.
I’m sorry to have negative things to say when you’ve worked hard on providing info for us, but as the reader and potential buyer of linen fabric your email is aimed at, my advice is aimed to be constructive. Your child is quite adorable, puctures are cute, and your tutorial is thorough, but the purpose of the scarf is unclear.
Thank you.
Masha Karpushina
Hey Bunny, the scarf will fit an adult as you will notice by the measurements, yet my son would have happily worn it to school, so really, the use is not so important. It is up to you how you style it, and who gets to wear it. This is more about the idea of taking a piece of fabric and with very minimal effort giving it character. Hope this helps.
d'Arcy
it is…a scarf? you decide its purpose….and pictures…Imagine it on an adult. I think these comments are very negative…show us what you would do or have done. Congrats to Masha for stepping out to show us her creation!