Checking, Blending, and Truing Your Sewing Patterns – Part 1
Truing is all about ensuring that the edges, curves, and seam lines of a pattern come together seamlessly during sewing. This important step helps prevent common issues like mismatched seams, uneven hems, and awkward transitions. By smoothing out sharp points and irregular lines, the garment will have a more polished, and professional finish.
Since there is a lot to unpack about truing, I have divided this tutorial into two parts. Part 1 focuses on the basics of truing, breaking down the key concepts to help you get started. Part 2 will cover more specific techniques, including truing darts, hems, and seam allowances. The examples included will hopefully enable you to apply these methods to a variety of patterns.
Gather some tools
Before beginning, it can be helpful to have the following items on hand when working manually:
- Ruler (straight and curved)
- Craft and tracing paper
- Paper scissors
- Pencil or pen
- Tape
- Pattern weights (optional)
- A tracing wheel (optional)
- Notcher (optional)
Key points to remember
To make the most accurate adjustments while checking and truing a pattern, keep these tips in mind:
- Focus on the stitching line first: Always true and adjust the stitching line before moving to the cutting line. Cutting lines should be checked and trued separately, only after the stitching lines are perfected (I will cover this in Part 2).
- Order matters: True the pattern pieces in the same order they will be sewn. For example, since shoulder seams are sewn before inserting a sleeve, true the shoulder seams first before moving on to the sleeve.
Checking straight seams
Start by checking that the length of the stitching lines are equal in areas where pattern pieces will be sewn together (e.g. side seams, shoulder seams, and dart legs). This ensures proper alignment and helps prevent construction issues.
There are two methods that can be used to do this:
Method 1: Measure
Use a ruler or tape measure to check the length of the stitching lines. These should match.
For areas where fabric will be removed (e.g., darts, tucks, or pleats), exclude the fabric intake from the measurement.
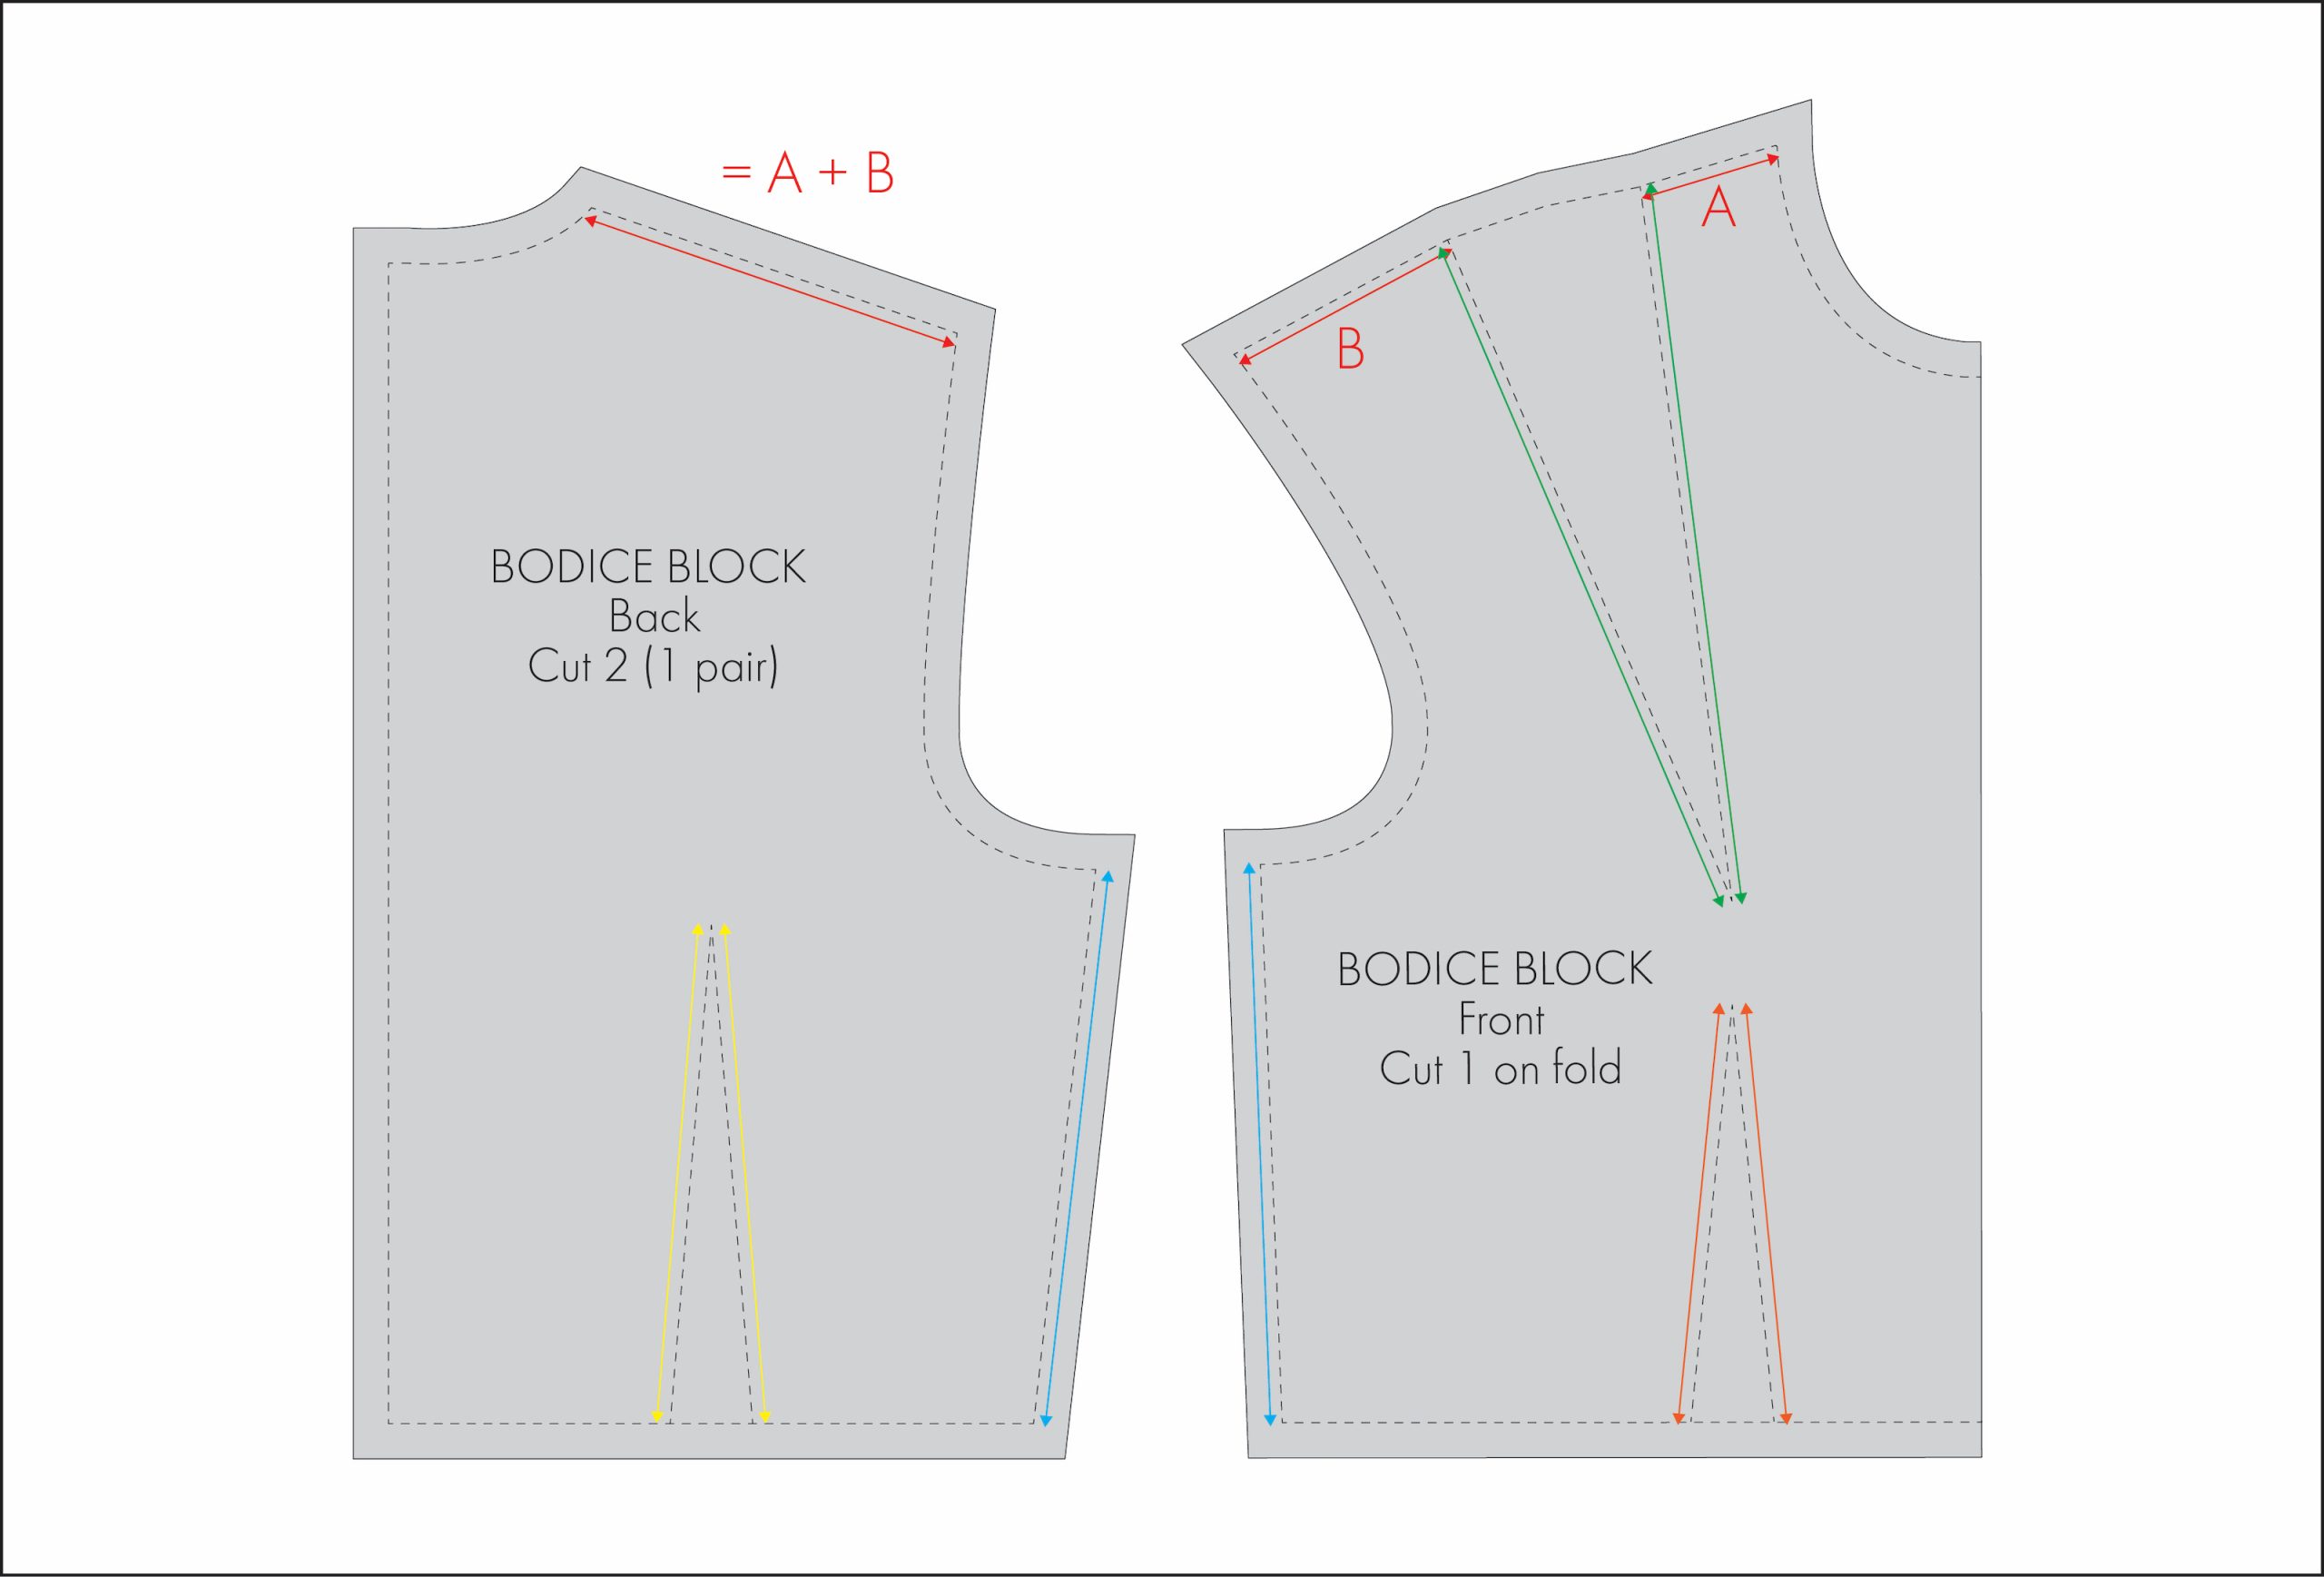
In Diagram 1 below, I demonstrate how to measure and compare the shoulder seam of a basic bodice block with a front mid-shoulder dart.
- Measure segment A: From the neckline to the first dart leg.
- Measure segment B: From the second dart leg to the shoulder point.
- Add A and B together. The total (A + B) should match the length of the shoulder seam of the back bodice.
Method 2: Overlay and compare
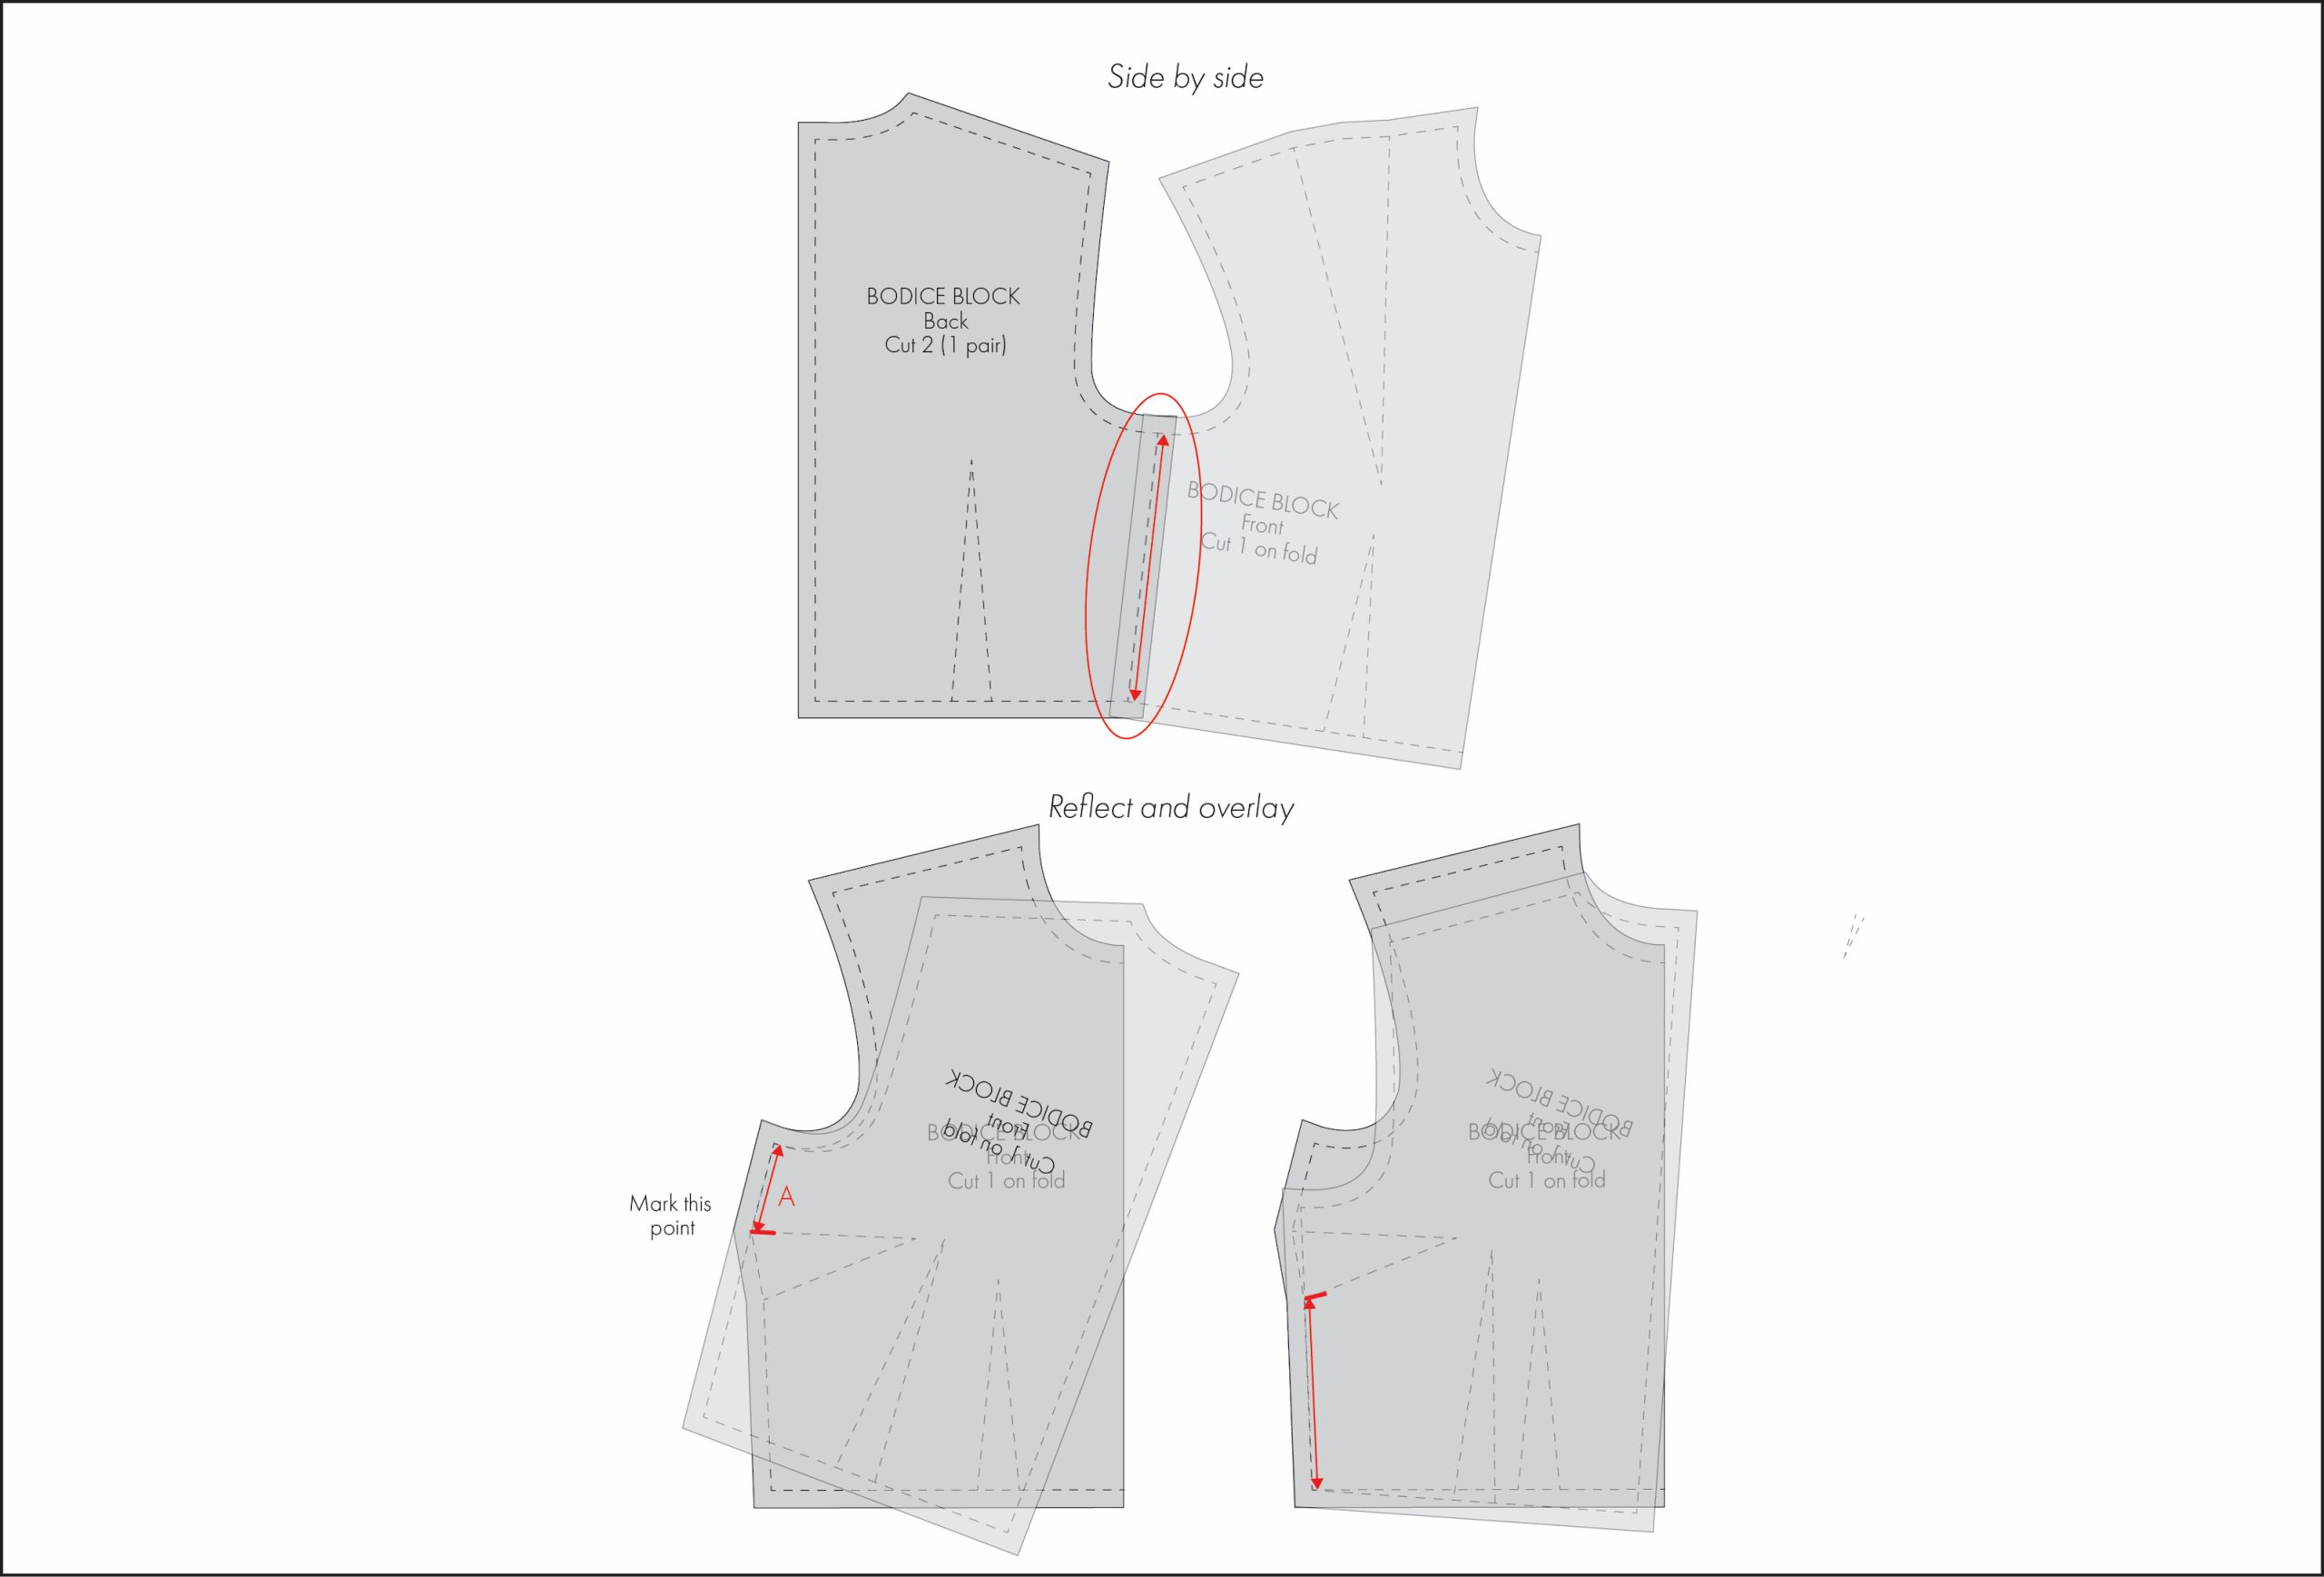
Place the pattern pieces on top of each other, aligning the stitching lines as they will be sewn. This can be done by placing the pattern pieces side by side or by reflecting and overlaying them. Again, for areas where fabric will be removed, exclude the fabric intake from the measurement.
In Diagram 2 below, I demonstrate how to overlay and compare the side seams of the front and back basic bodice block with a side dart.
- Start by overlaying the seam lines of the front and back bodices, starting alignment at the underarm, and finishing at the first dart leg.
- Mark the point of the first dart leg on the back bodice. This mark becomes important for the next step.
- Slide the back bodice piece down along the front bodice, aligning the mark created in Step 2 with the second dart leg of the front bodice, and continue to the bottom.
Checking curved seams
Curved seams, such as those found in princess seams or sleeve heads, require a slightly different approach than straight seams. To align curved seams the process called “walking the seams” together can be used.
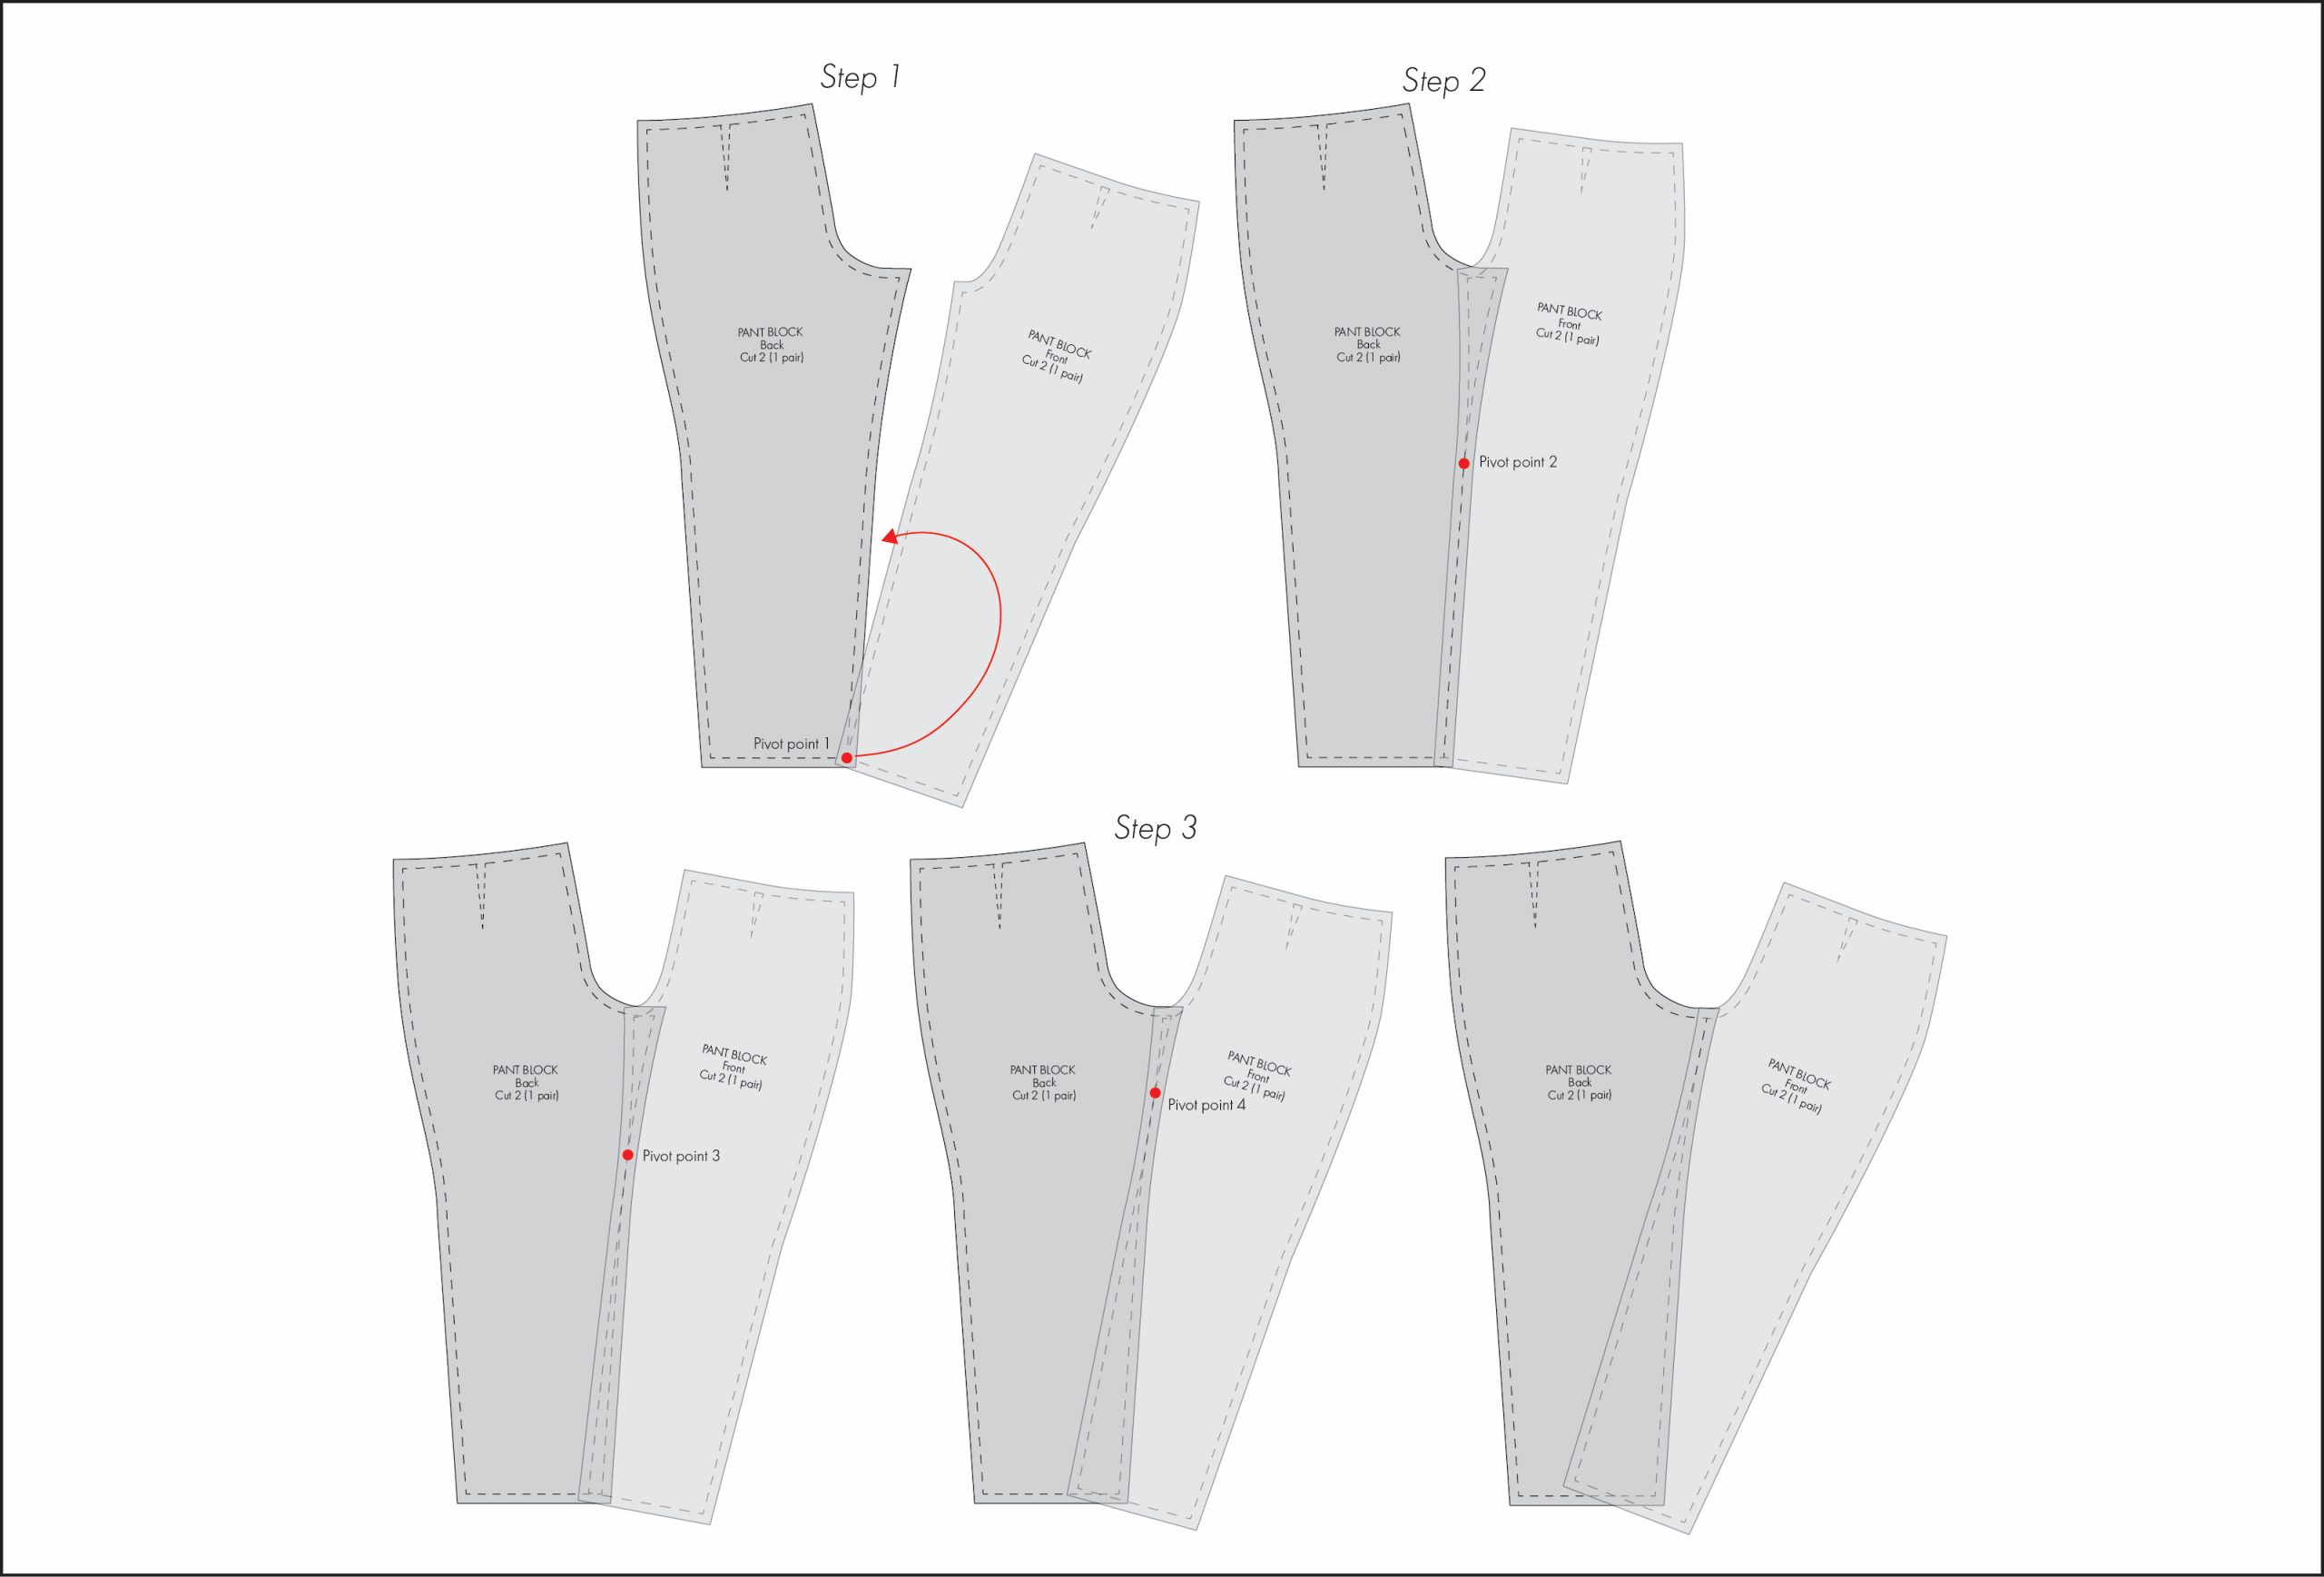
In Diagram 3 below, I will demonstrate how to walk the inner leg seams together of a basic pant block.
- Align the front pant leg with the back pant leg at the hem (pivot point 1). The back pant block will remain stationary while pivoting and walking the front pant leg.
- Pivot the front leg piece using a sharp pencil or awl at the pivot point, walking the stitching lines together as they would be sewn. The point at which the stitching lines diverge will become the next pivot point.
- Continue pivoting and walking the stitching line of the front pant leg along the back pant leg until reaching the top of the seam (i.e., the crotch).
Note: Some pattern pieces may include an allowance for additional ease, so the pattern pieces may not align perfectly (e.g. the sleeve head or crotch). The amount of ease depends on the desired fit of the garment and the choice of fabric. Generally speaking, the more fitted the garment, the less ease is required, while for looser styles, more ease may be added. Additionally, more ease is often needed in stiffer fabrics compared to stretchier ones.
Addressing mismatched seams
Once the length of the stitching lines has been checked, the obvious next question is “What do I do if they don’t match?”. The approach needed to address mismatched seams will depend on how mismatched the seams are.
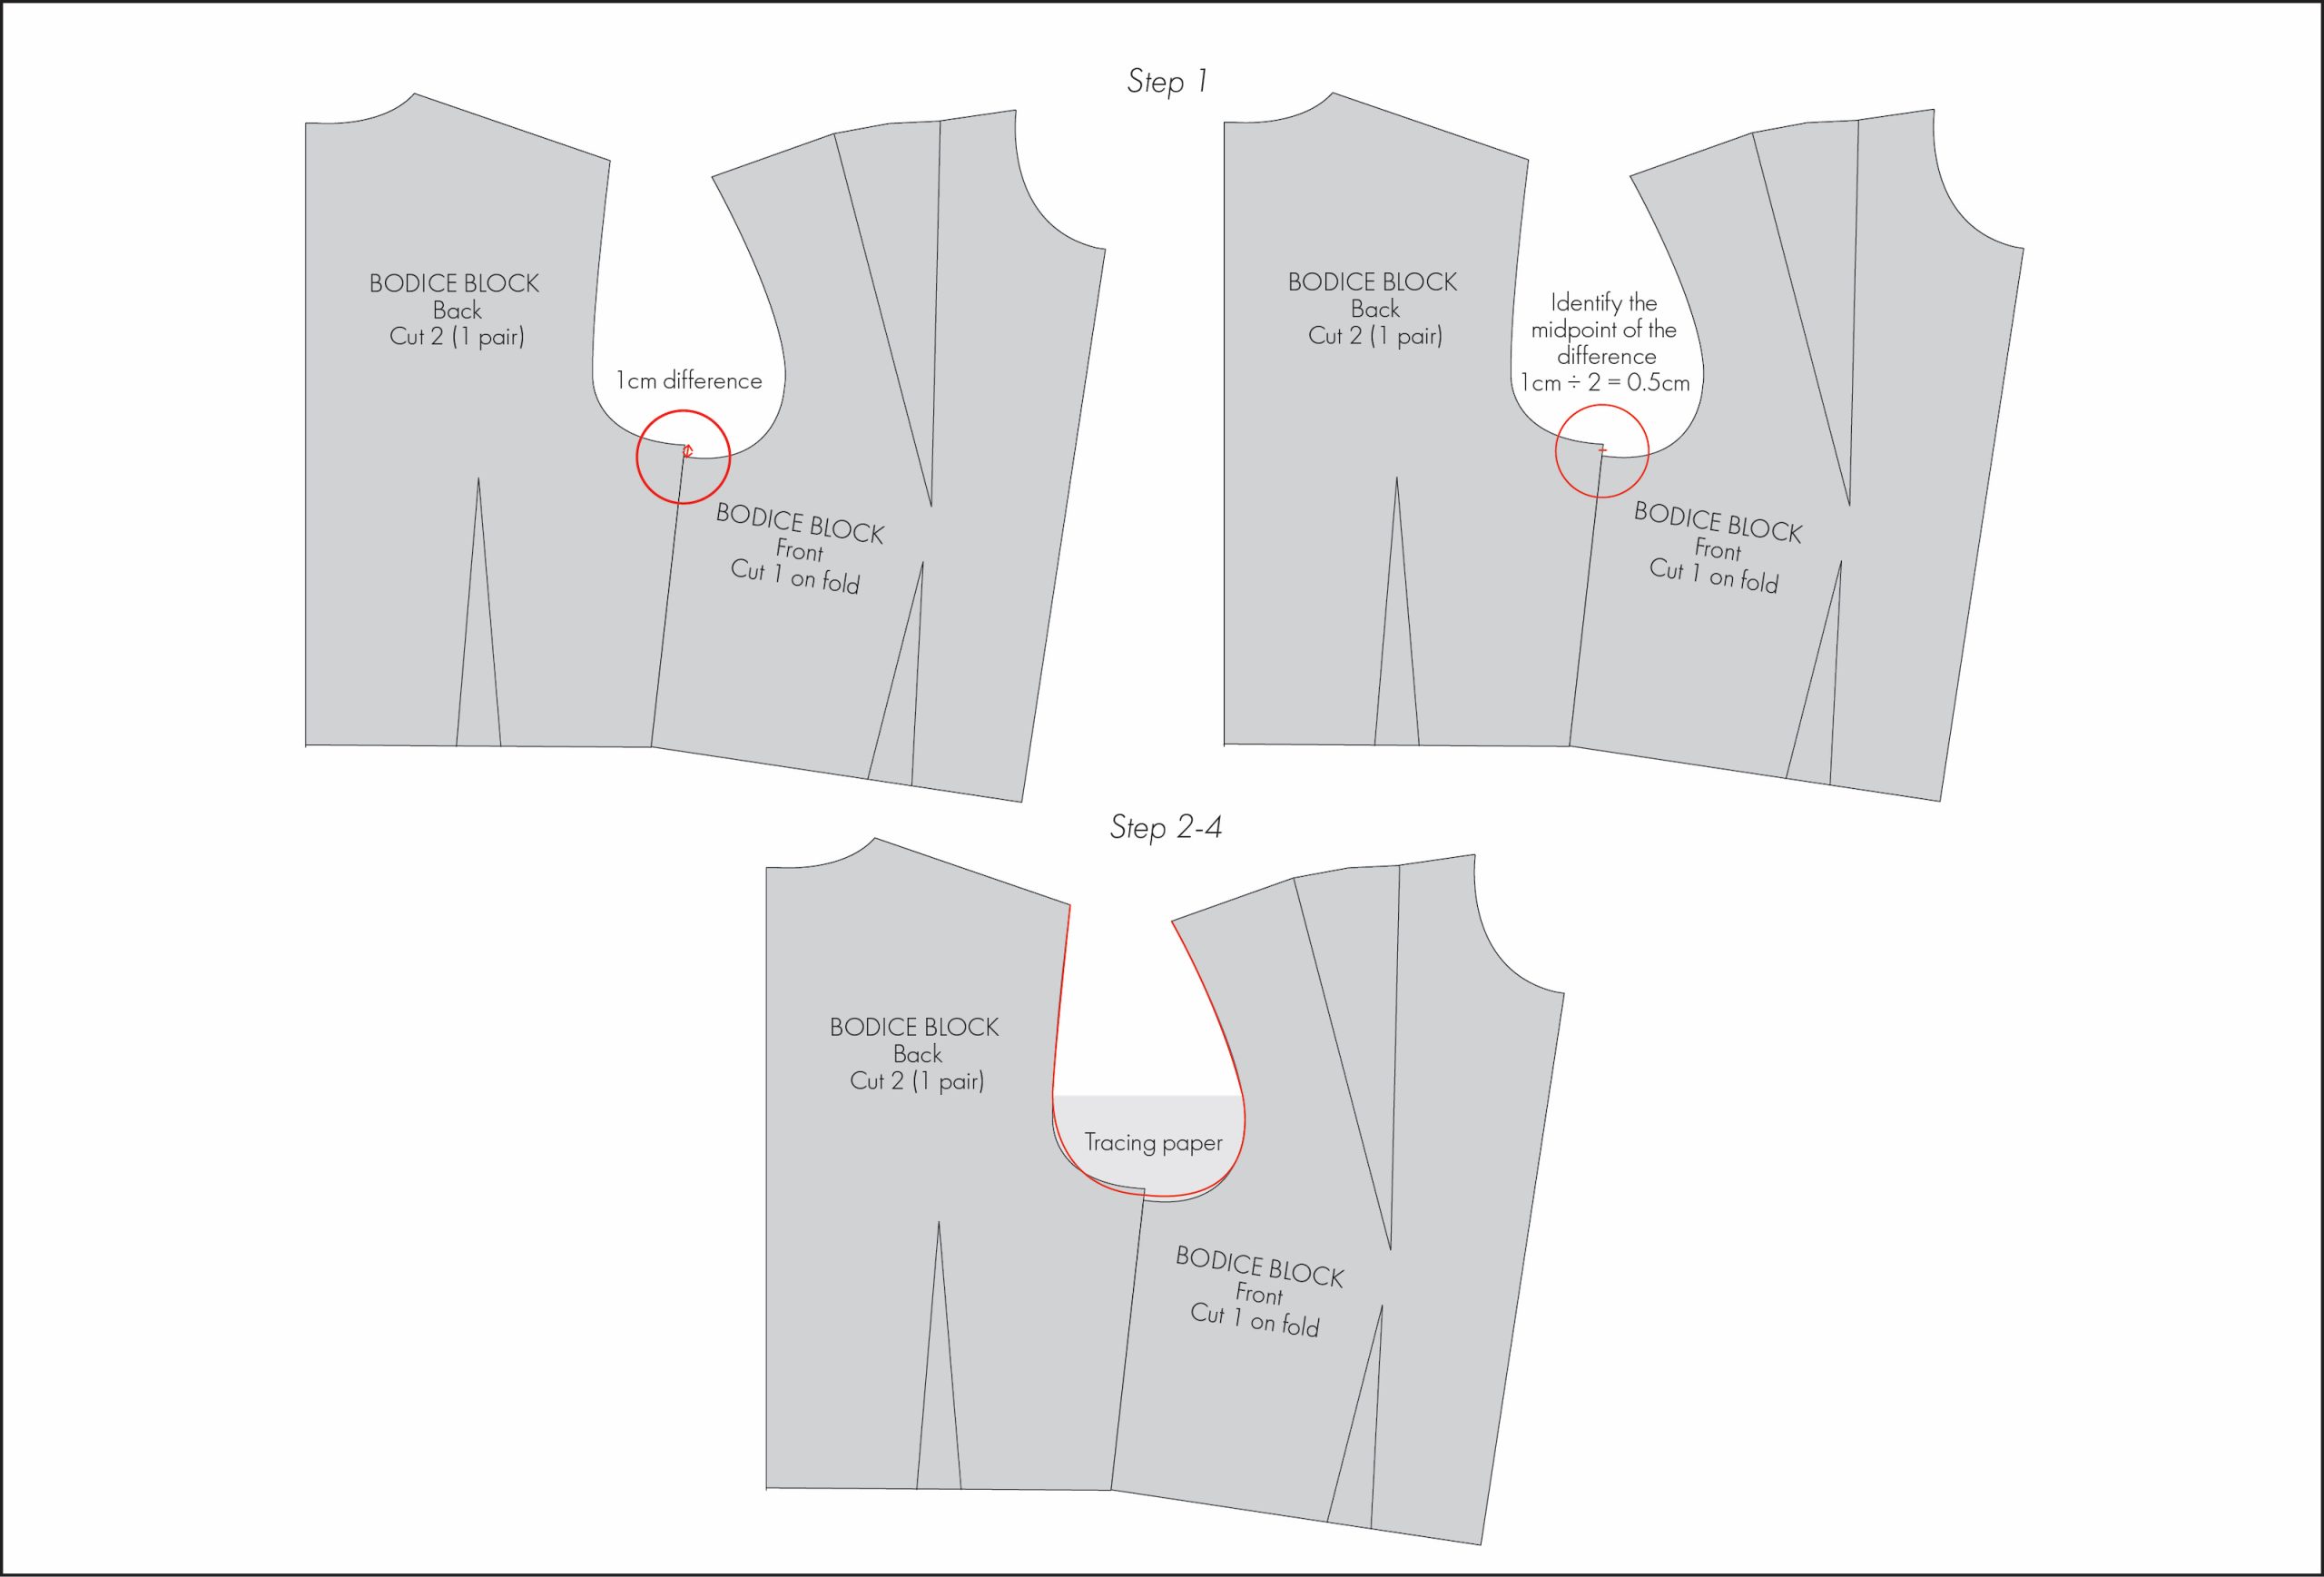
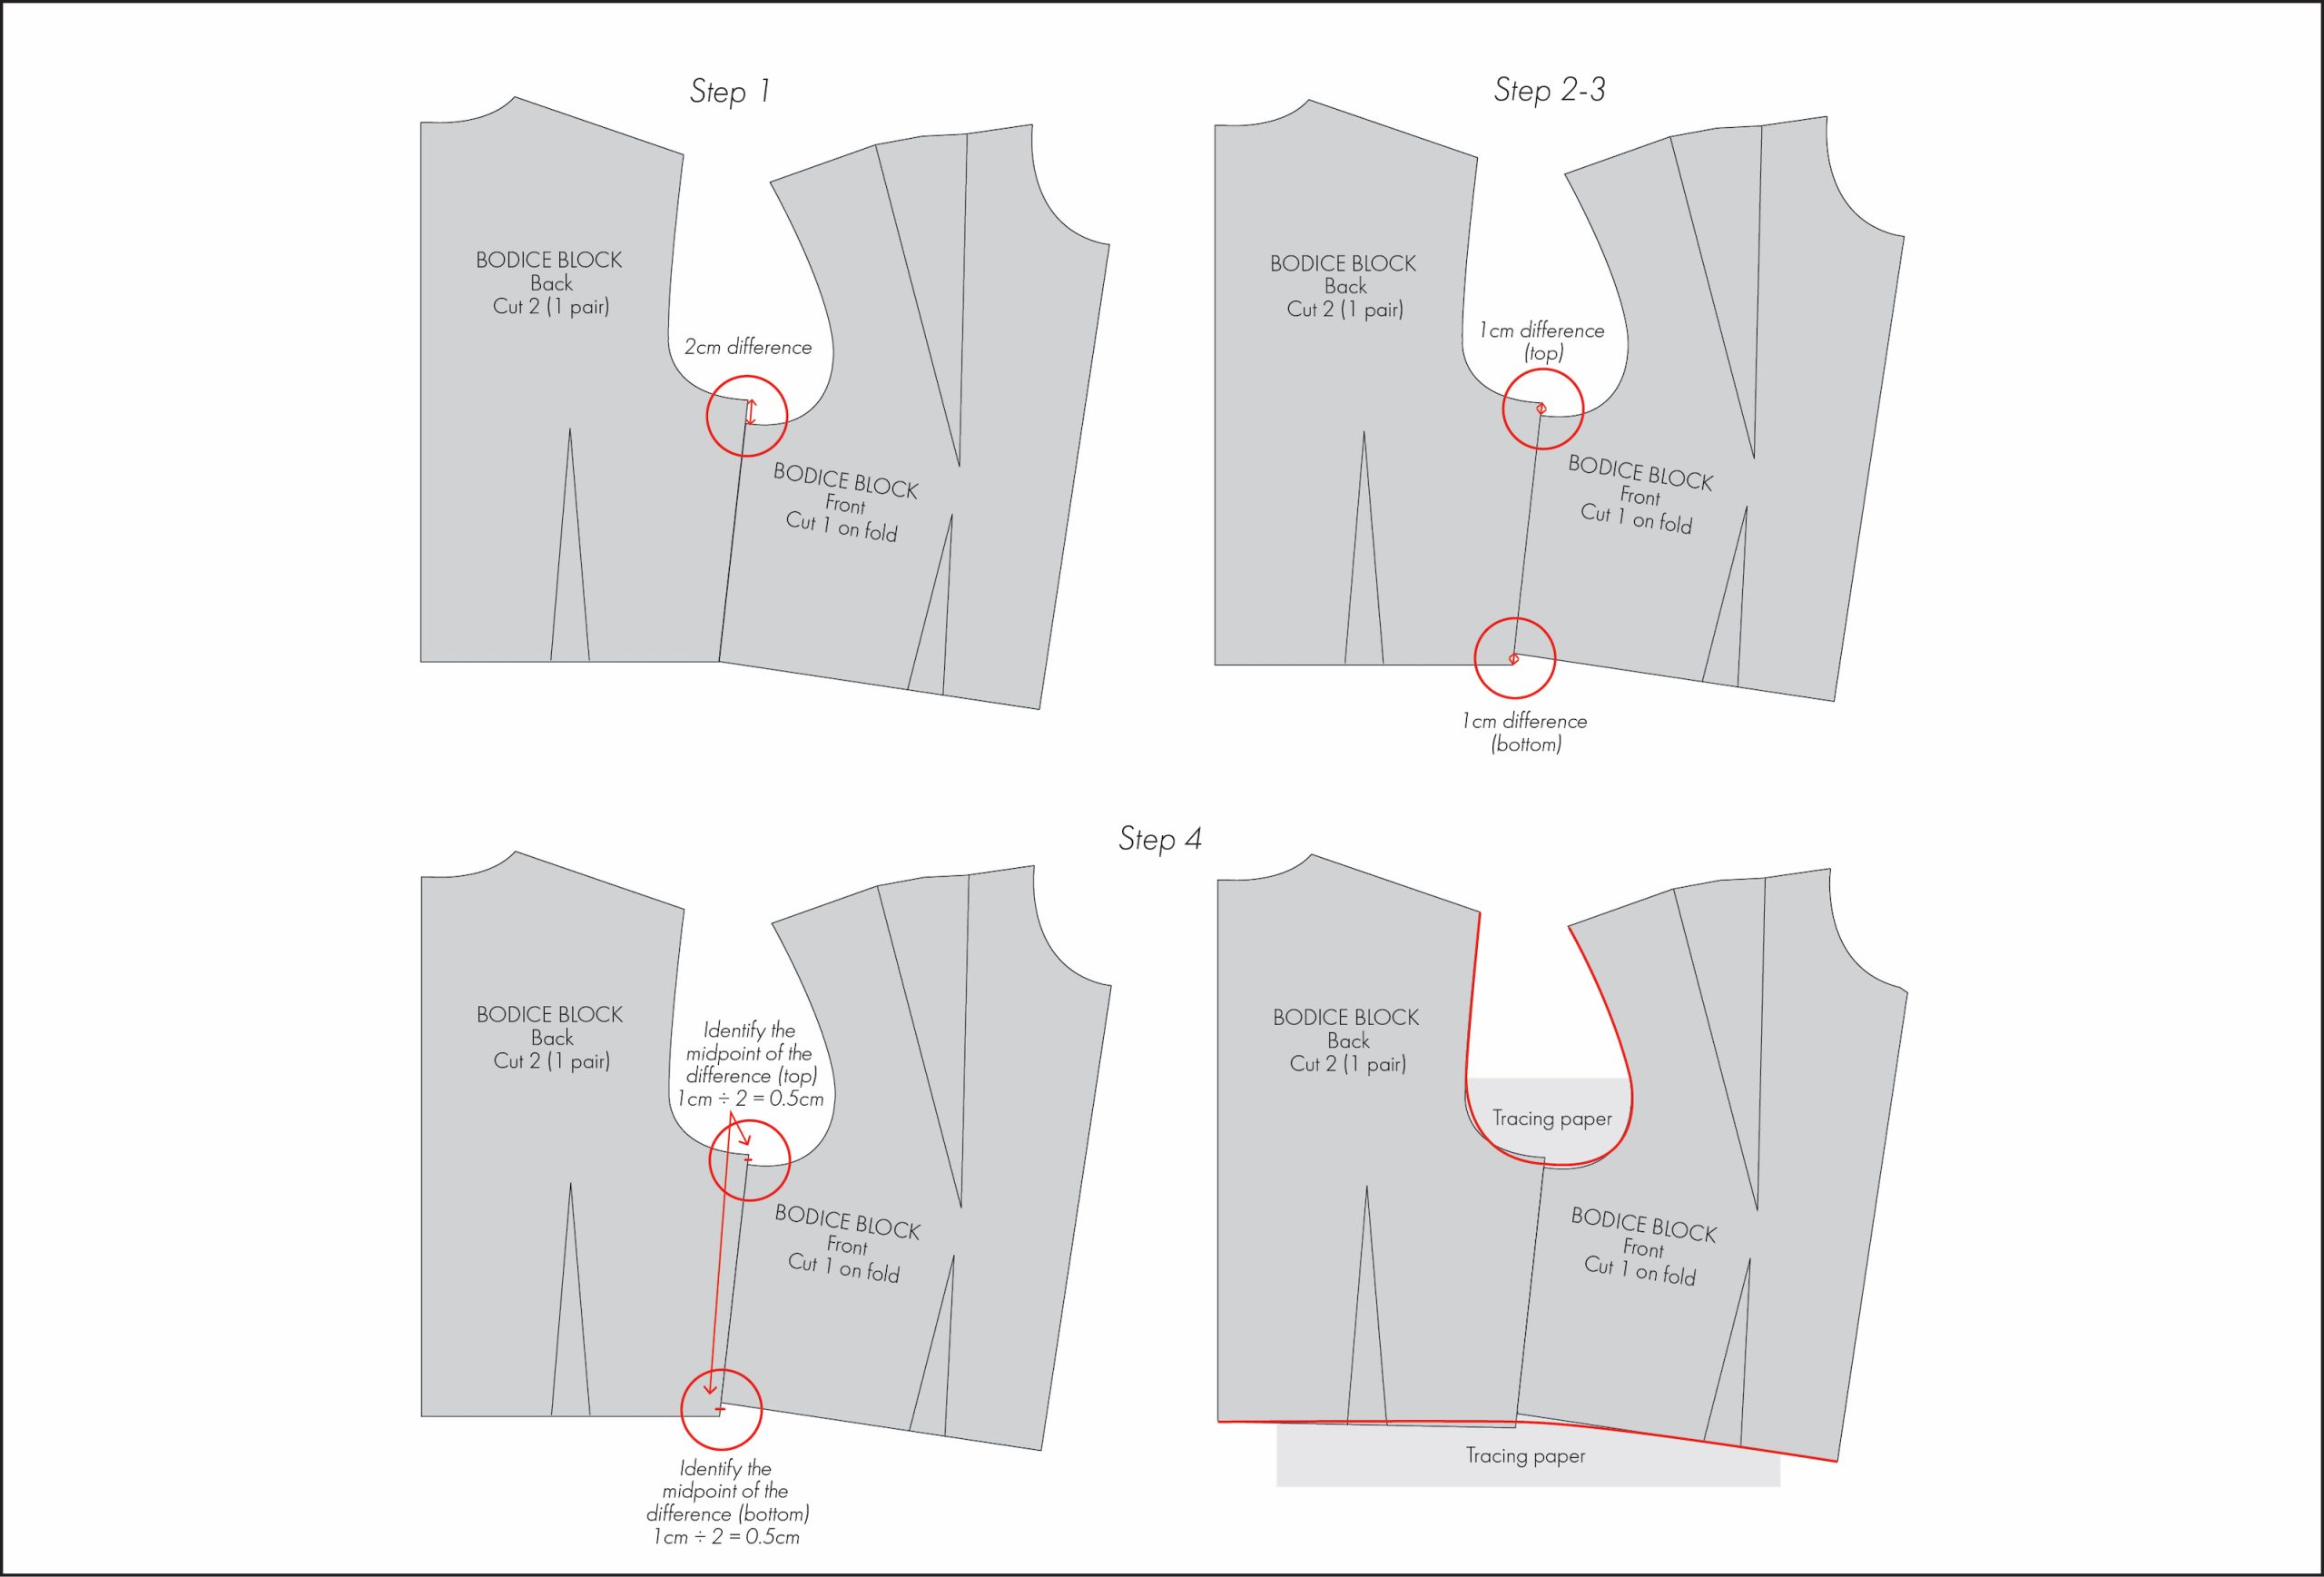
In Diagram 4 and 5 below, I focus only on the side seams of the basic bodice block. For clarity, I have removed the seam allowances from the pattern pieces.
Small differences (less than 2cm)
- Measure the discrepancy between the two seam lengths and divide the difference equally. In this example, the difference is 1cm, and the midpoint of this is 0.5cm. Mark this point on the pattern pieces. This means essentially adding 0.5cm to the front underarm and removing 0.5cm from the back underarm.
- Slip a piece of paper behind the pattern pieces to help with the next step.
- Draw a new stitching line, blending the original stitching lines into the midpoint.
- Add any necessary adjustments using the paper from Step 2.
Significant differences (2+ cm):
- Measure the discrepancy between the two seam lengths. In this example, the difference is 2cm.
- Divide the above difference equally between the top and bottom of the side seam. This will create a difference in seam length of 1cm at the top of the side seam, and 1cm difference at the bottom of the side seam.
- Realign the pattern pieces accordingly.
- Repeat Steps 2-4 from the “Small Differences” section, applying the adjustments to both the top and bottom of the side seam.
Tip: French curves are super handy for blending and achieve that smooth transition between pattern pieces.
Smoothing transitions
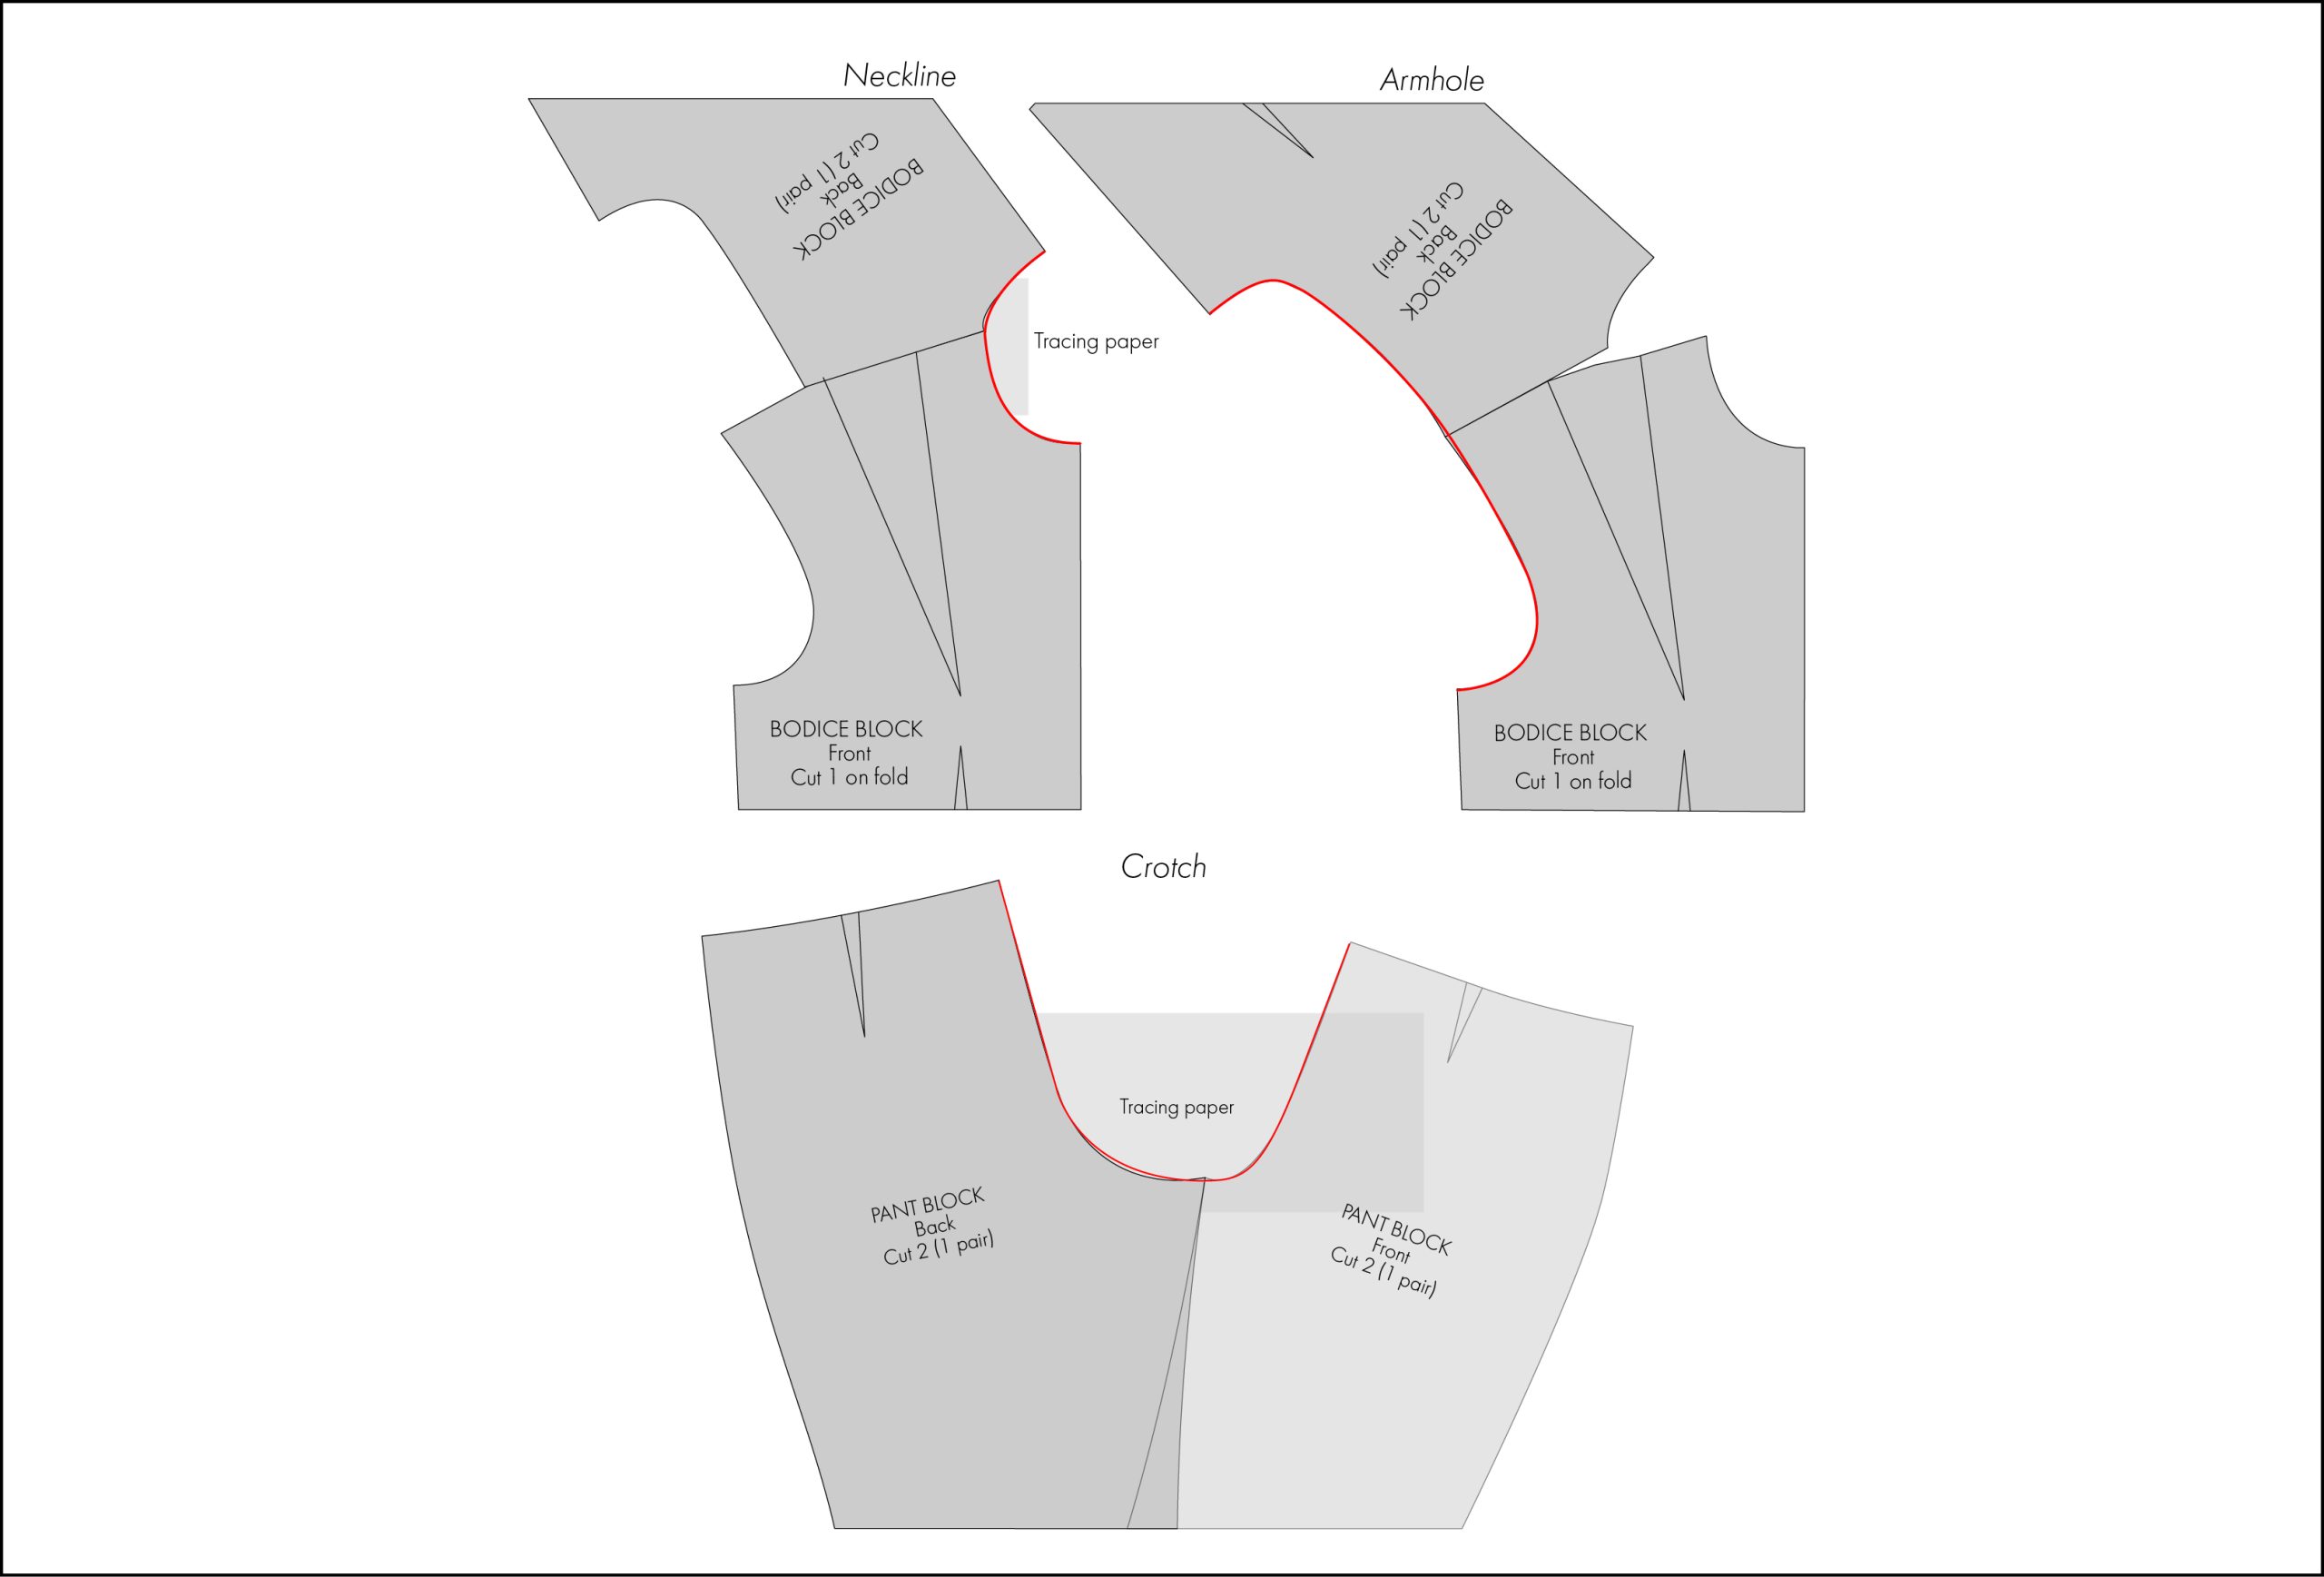
Blending involves smoothing the transition between two stitching lines. This is a simple but valuable process that helps identify any irregular lines or angles, and refining them for a smoother result.
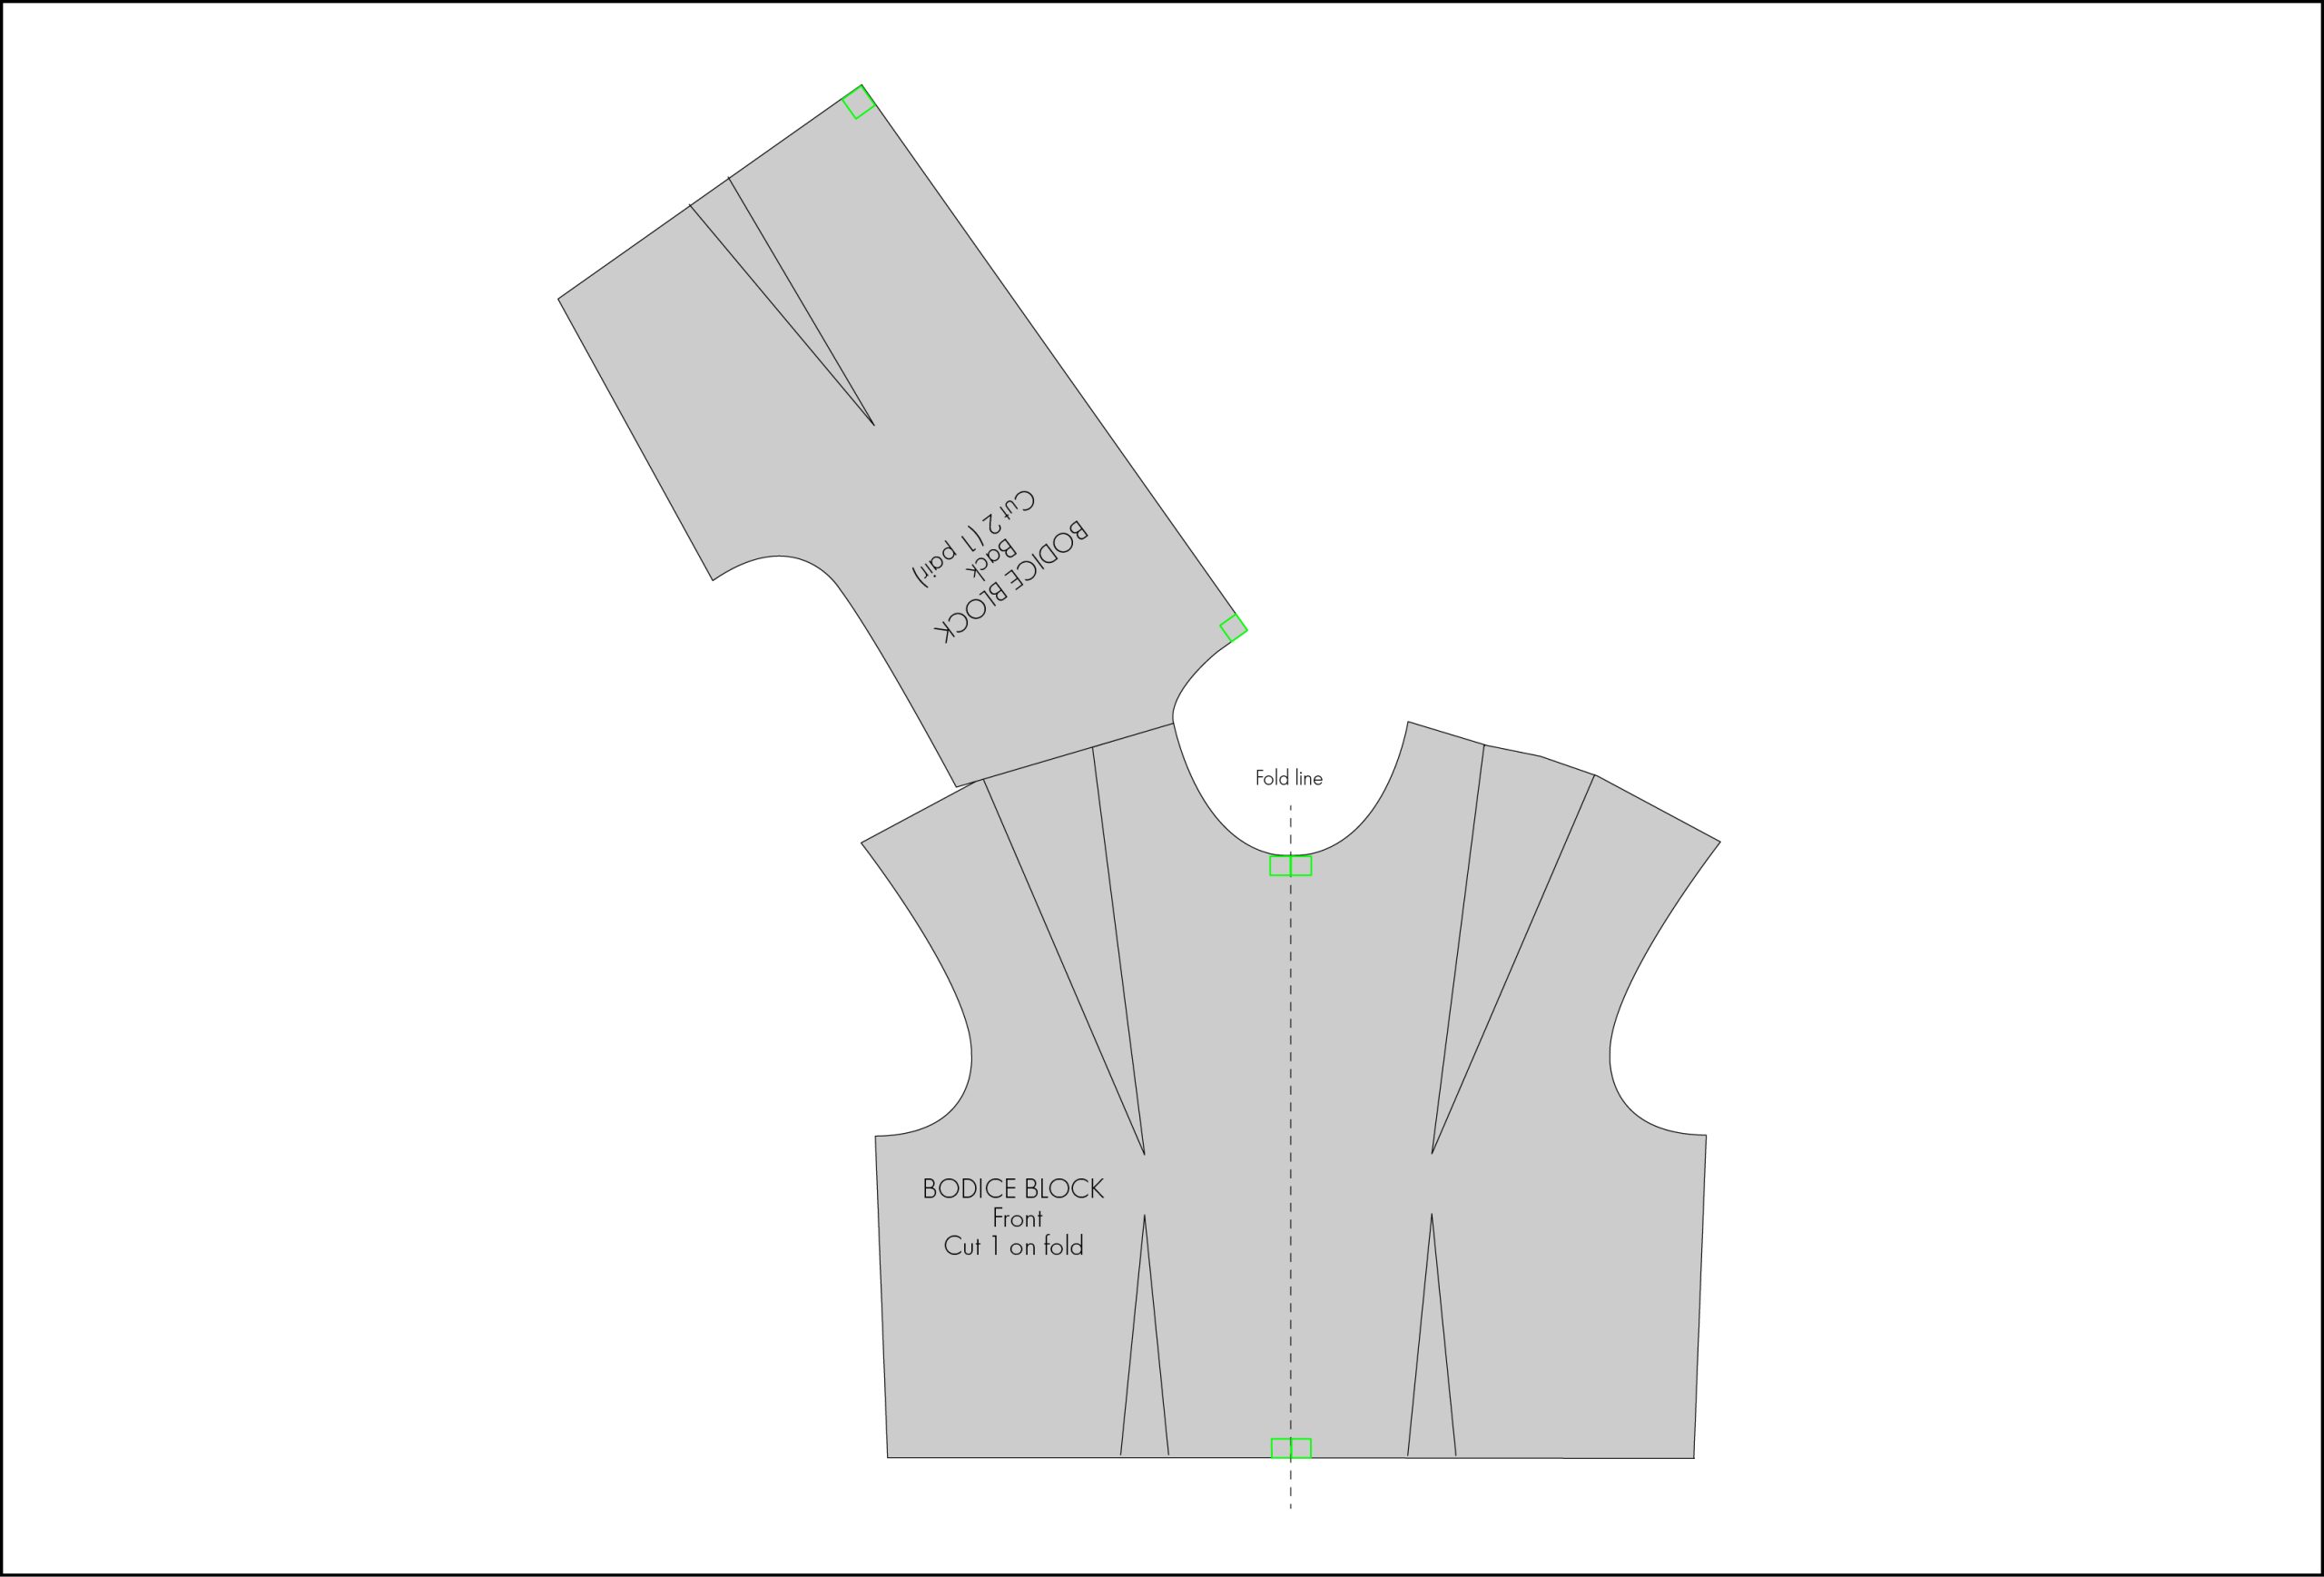
In Diagram 6 below, I demonstrate how to smooth the transition from the back to front neckline, armhole and crotch. Note that again for clarity, I have removed the seam allowances from the pattern pieces.
Squaring seams
There are instances where certain pattern pieces should meet at a 90-degree angle for the first 0.5–1cm to prevent irregular angles, or “V” shapes.
In Diagram 7 below, I’ve highlighted the areas on a basic bodice block where maintaining this 90-degree right angle is important. A good rule of thumb is that a right angle is needed at the centre front and back, and for pattern pieces cut on the fold. This will ensure that the pattern piece is smooth and symmetrical.
Truing sewing patterns becomes second nature with practice. By taking the time to refine your pattern pieces, you can avoid common issues like misaligned seams, uneven transitions, and poor fit.
Stay tuned for Part 2, where I’ll dive into some more advanced techniques.












2 Comments
Mary Chapitis
Is this a method to be used on purchased patterns? If so, does this indicate that purchased patterns are often “off” in the areas shown?
Emma Cartmel
Hi Mary,
Great question!
These suggestions are intended primarily for self-drafted patterns or when you have made adjustments to an existing pattern. You hopefully won’t encounter these sorts of inconsistencies with purchased patterns.
But if these concepts are new to you, it could be interesting to examine purchased patterns and see how they’re blended and trued.