Sewing Glossary: Full Bust Adjustment Tutorial
As many of you have been asking for advice on how to adjust our patterns for bustier ladies, we thought we’d kick off this new year with a tutorial on how to do a Full Bust Adjustment (FBA) and add a bust fitting dart to dartless patterns. If you’ve been following our blog, you might have noticed that most of our designs are oversized or loosely fitted and don’t necessarily need bust adjustments for up to B size cup. However, if you have a larger cup size, then you’ll most certainly need to make a simple bust alteration to create extra width and length to accommodate your curves and obtain a more figure-flattering fit.
Even though it sounds a bit complicated at first, the good news is that it’s actually pretty easy to do an FBA and add a dart to your favorite patterns. Obviously, it changes the original design to a more fitted look, but for fuller figures this is the best way to get a garment that fits properly without drag lines and bulk around the bust. It is amazing what a small pinched rectangle of fabric (commonly known as dart) can do to transform a flat piece of cloth into a perfectly sculpted form that goes around all the curves of your body.
With this technique you will be able to adapt virtually every top or dress patterns for large cup sizes.
Materials & Tools
Pattern paper or tracing paper, measuring tape, pen (for the purpose of this tutorial we are using contrasting markers), straight ruler, tracing wheel, scissors, tape
Measurements
Before you begin any alterations, you need to take a few measurements that will help you determine your size cup, amount for the alteration and the placement of the dart.
Here is what and how to measure:
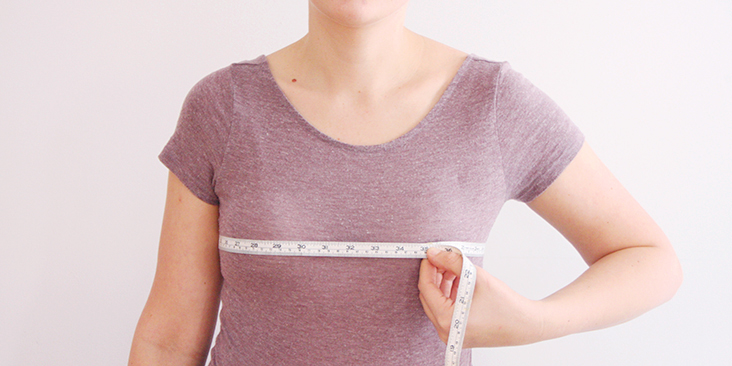
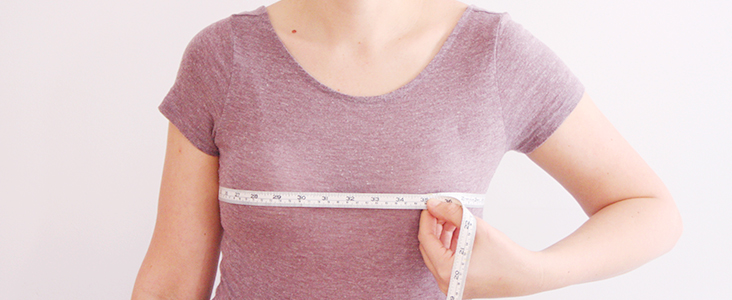
- Full bust: In a well-fitting bra, measure yourself around the fullest part of your bust, keeping the measuring tape straight across and around the back.
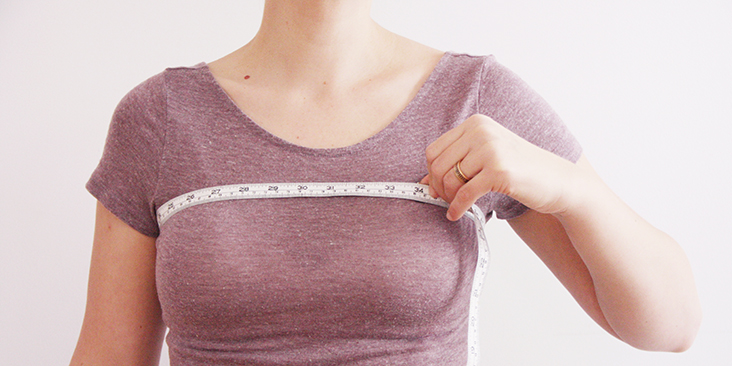
- High Bust: Measure around your upper chest just under your armpits, keeping the measuring tape straight across and around the back.
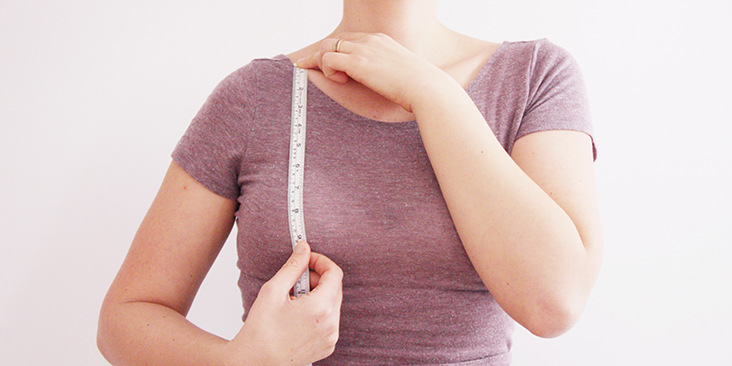
- Shoulder to Apex: Measure straight down from the shoulder seam to the apex (latin for “nipple”). Please note that the end of the measuring tape in this picture should be slightly higher, right at the shoulder seam.
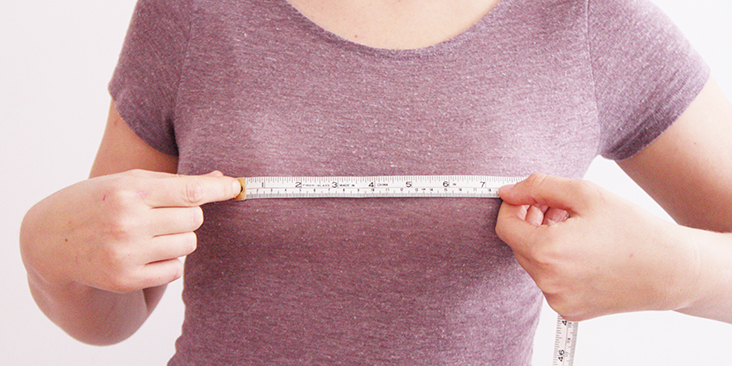
- Apex to Apex: Measure across the bust from apex to apex and divide this measurement in half to determine the location of your apex point from the center front of your pattern.
Now that you have all your measurements, compare your High Bust measurement to your Full Bust measurement. The difference between the two will give you your size cup.
If the difference is :
1″ (2.5 cm) or less = A cup
1 ¼” to 2″ (3 cm to 5 cm) = B cup
2 ¼” to 3″ (5.5 cm to 7.5 cm) = C cup
3 ¼” to 4″ (8.3 cm to 10 cm) = D cup
4 ¼” to 5″ (10.8 cm to 12.7 cm) = DD cup
And so on.
Choose your cup size and divide it by 2 since the front bodice pattern represents one half of the front and the fabric is cut on the fold. This is the width that needs to be added to your pattern. For example, your difference between High Bust measurement and your Full Bust measurement is 2.5″, meaning that you have a C cup size bust. Divided by two, you get 1.25″ – this is the amount that you need to add for the FBA.
Pattern
For the best fit, choose a pattern from our TUTORIALS section that is graded to your size (if you need help grading the pattern, please follow our tutorial HERE) and using your High Bust as a reference. If you would grade your pattern using your Full Bust measurement, you would end up with a pattern that fits in the bust but is too large in the shoulders, sleeves and neck. So by going with the High Bust measurement, you’ll get a better fit in the shoulders and the neckline and then you’ll just adjust it on the bust area.
If you are working with a commercial pattern, we recommend tracing off a copy of your front bodice piece so that you can keep the original one intact in case you need to use it again.
Steps
Begin by marking your personal apex point on your pattern. To do that you’ll need your Shoulder to Apex and Apex to Apex measurements.
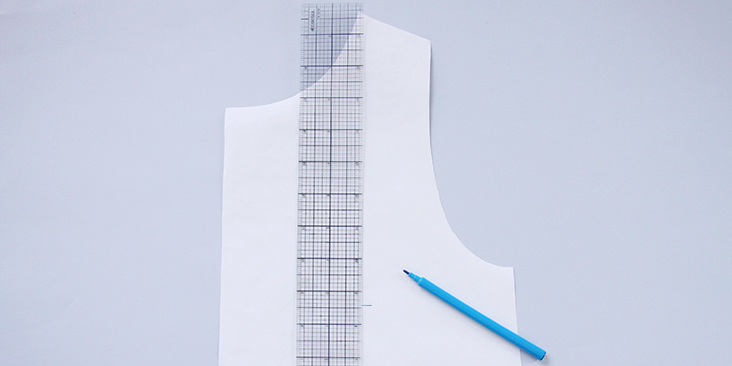
1. First mark your Shoulder to Apex measurement on the pattern with a short horizontal line for the level.
2. Use the half width of your Apex to Apex measurement (since you are working on half a pattern) and mark it at the level of your Shoulder to Apex mark with a vertical line. The cross mark you got is your apex (or bust point) that we’ll call “A”.
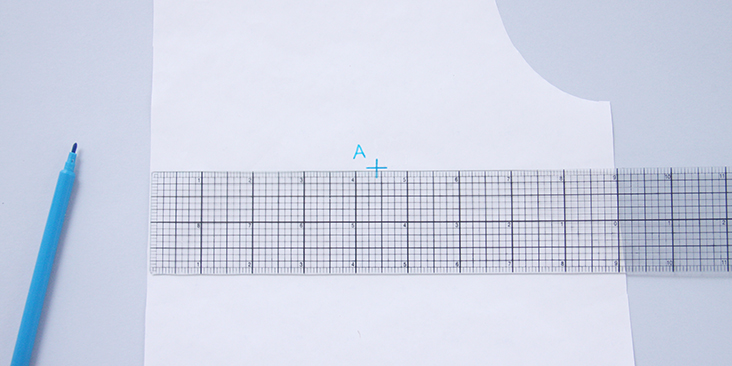
To make sure that the apex is placed correctly, we recommend placing your paper pattern against your body, with shoulders and side seams at the right place, and check if your cross mark location corresponds to your nipple location. Adjust the position if necessary.
3. Mark three more lines coming out of the apex.
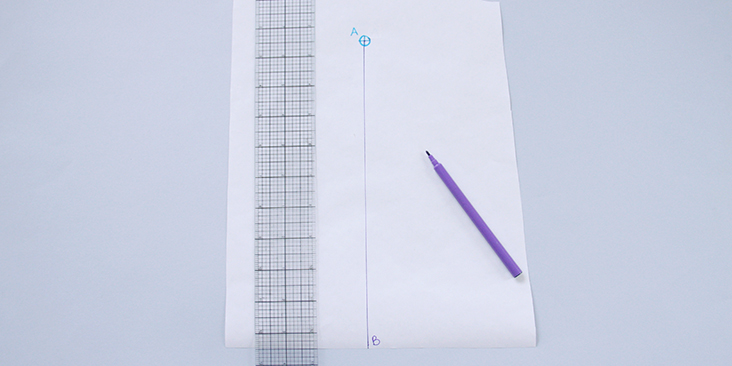
The first one should go from the apex straight down to the hemline that is parallel to your center front edge and the grainline. We’ll call it “A – B”.
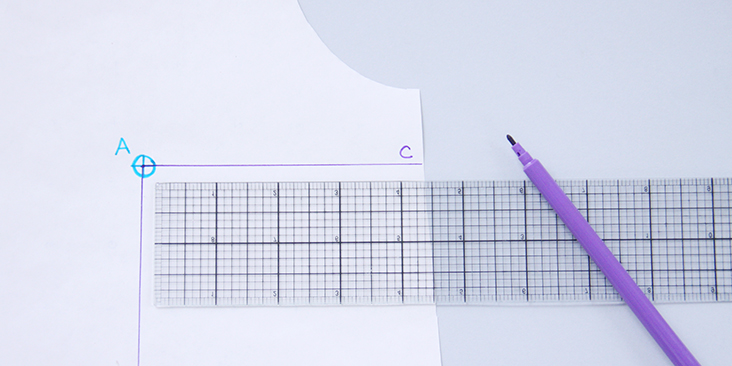
The second line will go from A out to the side seam at a 90 degree angle (so perpendicular to your center front edge and the grainline). We’ll call this line “A – C”.
And lastly, the third line (“A – D”) will go to the lower third of your armhole.
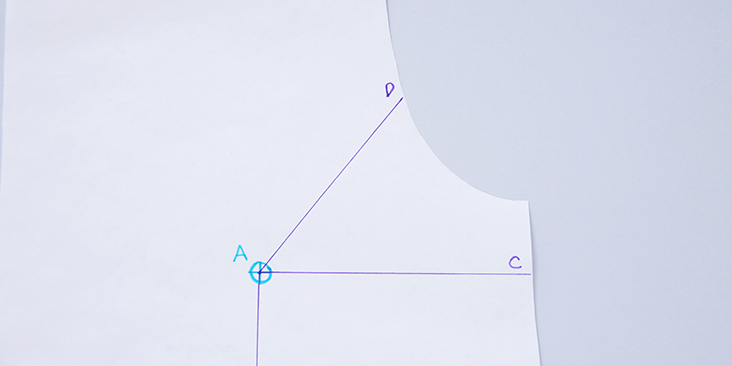
4. The A and D points are going to become your pivot points when you’ll start spreading the bodice. So we highly recommend stabilizing these pivot points with small pieces of clear tape. This way they will not break when you start spreading the bodice.
5. Now it’s time to cut your pattern. Start cutting from B at the hemline up to A at the apex, and up towards the armhole stopping a few millimeters before D. Do not cut through at the armhole; keep about 1/8″ intact to pivot your pieces. Lastly, cut along the horizontal line starting from C at the side seam towards A and stopping a few millimeters away from the A.
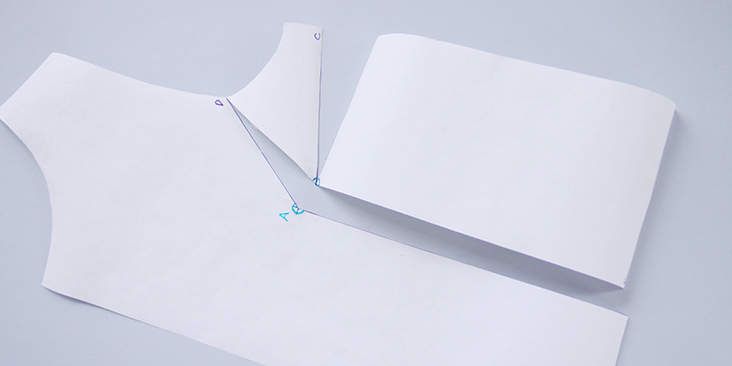
Ok, now our pattern is slashed and ready to be opened up the desired width (bust differential divided by 2). Let’s start the spreading!
6. On a spare piece of pattern paper draw two parallel lines that are separated by the calculated amount. In our case these lines will be 1.25″ apart for a size C cup (as calculated earlier in the “Pattern” section).
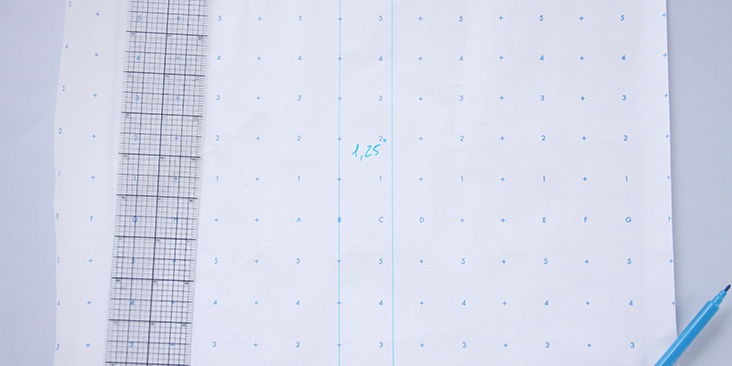
Slide this piece of paper underneath your slashed pattern and spread the “A – B” cut to your desired width lining up the edges parallel and right on the lines that you’ve drawn. As you spread this open, you’ll see that a dart is magically forming at the side seam. The bigger your bustline is, the wider the dart is going to be.
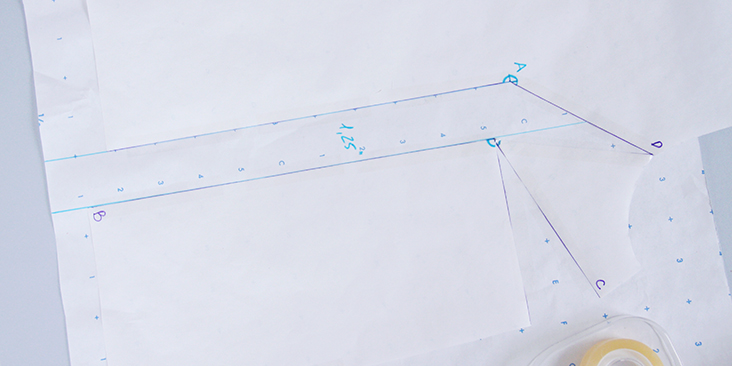
Stabilize your pattern with a few pieces of clear tape.
This does not affect the size of the armhole, so don’t worry about the sleeves. However, you’ll notice that the pattern is no longer lined up at the bottom. The wider your spread is, the longer one side of your hemline becomes. And this is because women with full bust lines need some extra length to go across and down their curves. So the next step is to adjust the hemline.
7. Use the lower hemline as your guide and extend it to the center front to lengthen your pattern.
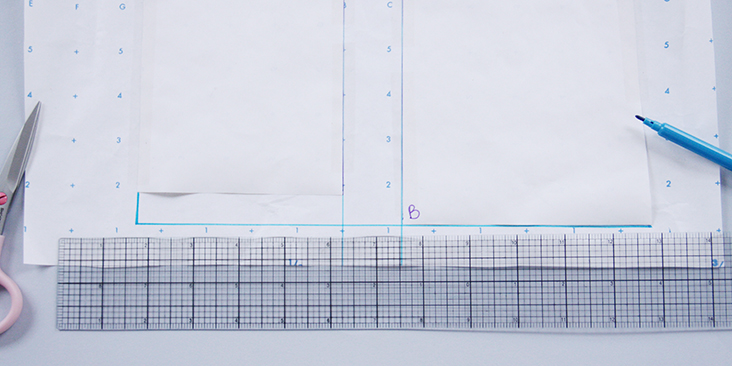
Ok, so now you have successfully added the 1.25″ FBA amount to your bodice pattern and it’s time to go back to your newly created dart structure and adjust it a little.To make this new dart sit well on your body, you need to redraw the dart legs a little.
8. Measure the space in between the two dart legs to see how wide it’s become. In our case the dart is 1.75″ wide.
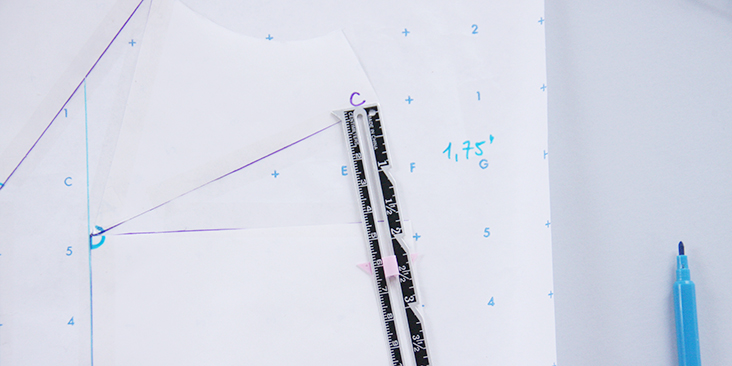
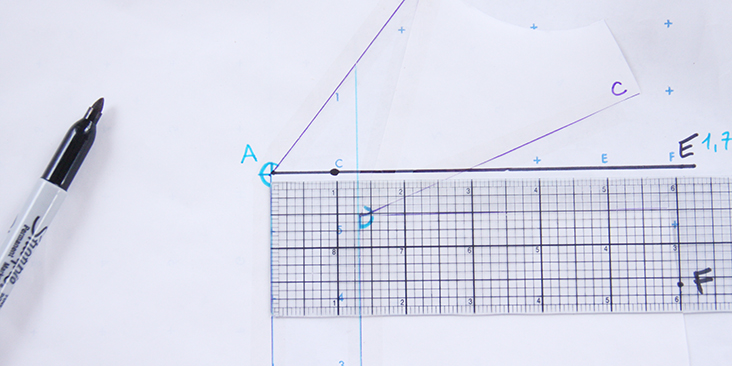
9. Then draw another line coming out of your apex (A) right to the side seam that is perpendicular to the grainline and you center front. This line (that we’ll call “A – E”) will become your upper dart leg.
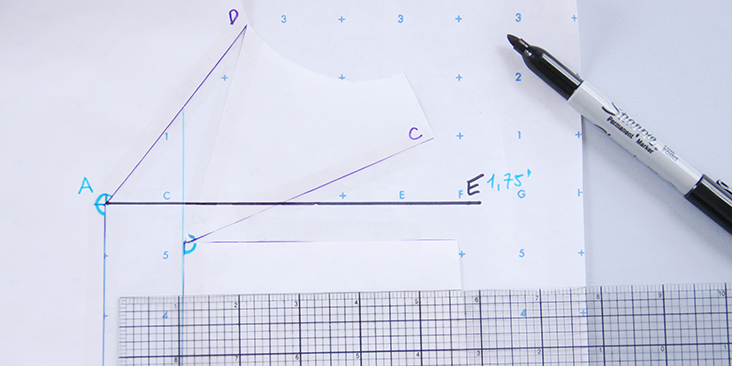
10. Measure from E down 1.75″, the width of your dart, and mark it on the side seam. This is going to be your bottom leg of the dart that we’ll call “F”.
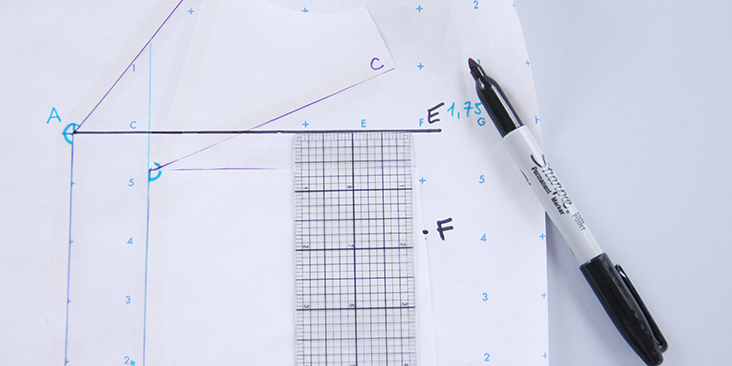
To avoid any pointy-boob situations, you never want your dart point to be right at the apex point (“A”). So you’ll need to relocate it a bit. The fuller the bust, the farther back the dart tip sits from the apex. As a general rule, for an A or B cup, end the dart ½” (13 mm) from your apex point. For a C cup, end the dart 1″ (2.5 cm) from the apex point. For a D cup – 1 ¼” (3 cm) and so on.
11. On your upper dart leg (“A – E”), measure the needed amount (1″ (2.5 cm) in our case for a C cup) and mark it away from the apex point towards the side seam to create a new dart point.
12. Connect this new dart point with “F”, your bottom dart leg.
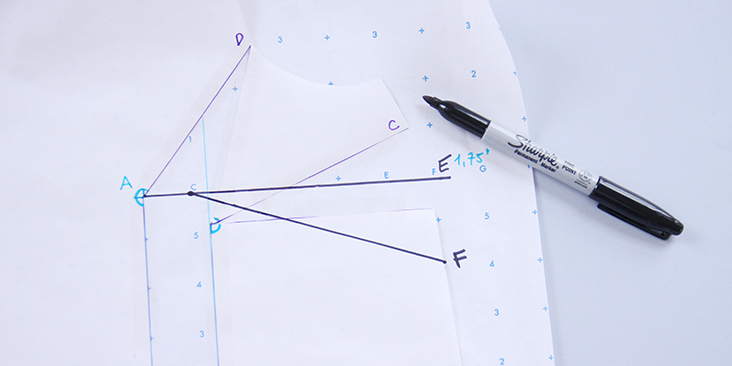
Et voila! Your dart is now formed! The very last thing to do here is to even out the side seam and perfect the dart.
13. Fold the new dart lines towards each other (the bottom dart leg (F) up to the top leg (E)). The paper will bulk a little but do not worry about this, just make sure that your lines are touching.
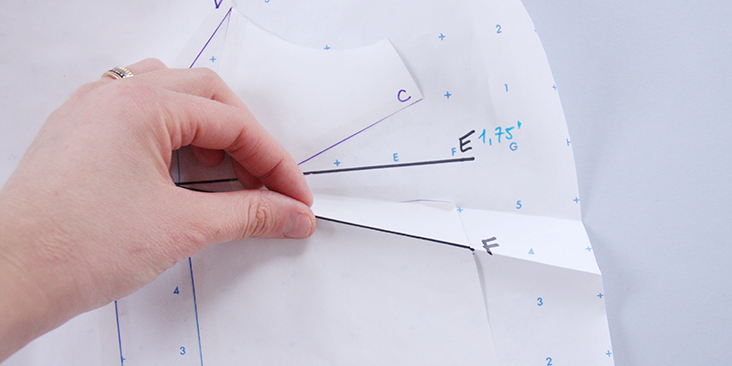
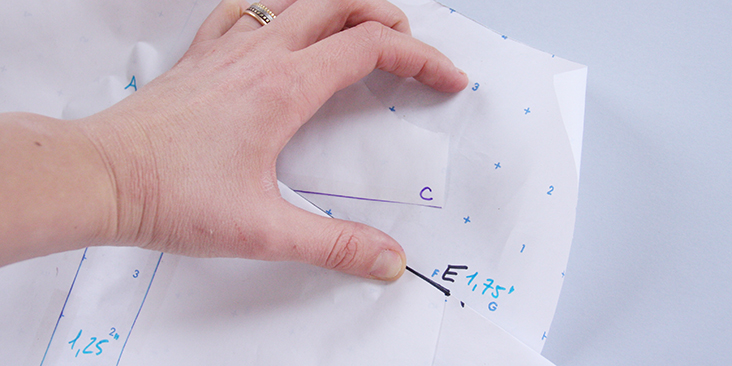
While holding the dart in place, connect your underarm point to the hemline to adjust the side seam.
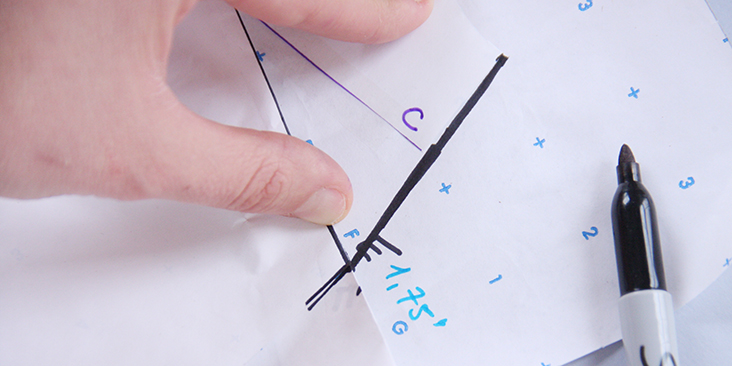
14. Finally, mark the dart jog with a tracing wheel by pressing firmly. This way when you open up your dart, you’ll see the marked triangle at the dart opening that is called the dart jog. Trace the jog to finalize your new side seam cutting line.
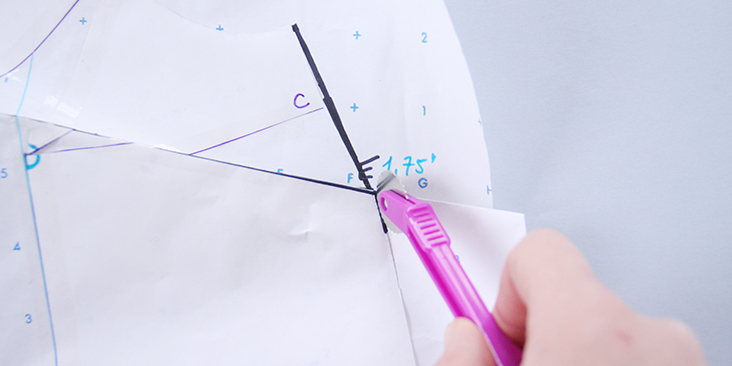
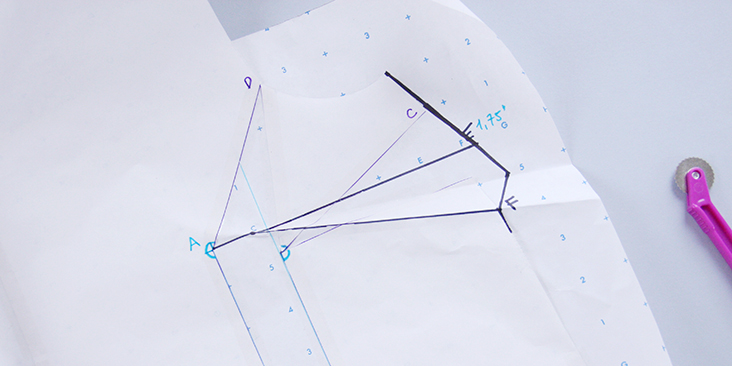
15. Trace off your newly adjusted pattern, transfer the dart and add seam allowances and you are all done with the FBA and ready to sew!
Tip: Before cutting your beautiful fabric, we strongly recommend to check the fit by sewing the bodice in muslin first. You still may need a few more minor alterations to fit the bodice.











27 Comments
Constance Tangonan
Question: I tried to do an FBA on the Agustina top and am not sure where to put the “D” line. Is it even possible to do an FBA on this pattern? Thank you for your help. Connie
Erin Logan
That is a wonderfully clear and concise tutorial. Could we please have the same or similar for the Nico dress which has CURVED darts? Plus the way to reduce/ remove (rotate out) sweep fullness without adding extra darts or giving the garment princess seams? I’ve seen an example or two, but it is not explained quite this clearly.
Mariel Lanas
Hi there! I’m trying this on the Chelsea top (raglan sleeves) and finding that when I adjust for the bust differential, my AC dart overlaps rather than spreading apart. Can this method work for raglan sleeve designs, or is there another recommendation? Thank you!
Mariel Lanas
Oops – this was a me problem! I made the cuts wrong. Turns out all you have to do is post a comment and the answer will immediately reveal itself ‘:)
Lauren Linen
Glad you got it figured out Mariel 🙂
Vanessa Cato
Thank you for such a clear tutorial. My question concerns the width of the garment below the bust after adding the dart. Having added an inch or more, will the garment now become too loose around the hips?
Charlotte Hague
Hello, Thank you for this tutorial.
I am wanting to try this FBA on the phoebe tank for myself. Do I still need to add in the seam allowance at the end as the phoebe tank pattern has a 1cm already included?
Many thanks
Lauren Linen
Hello, Our Phoebe tank already has seam and hem allowances included.
Virginia Atmopawiro
Dear Rima, thanks a million for this tutorial. It is only now that I come across it while looking at the Jade relaxed pattern. I made the Phoebe tank for myself, but it was too tight for my boobs 🙁
I’ve seen a shared picture of the Phoebe with the bust dart!, and I was sold… but I did not know how to do that myself. BUT now… I can make another Phoebe tank with a better fit. SEW Happy me :)))
Merike Saarniit
Because of my bust (GG-H), I had to add 4″ in the A-B width. Since the pattern will be on the fold, that means 8″ overall added. That will make the tank top way too big below my bust. Also, due to extreme pivoting, the arm scye is very distorted. Should I consider darts coming up from hem of the tank?
Judi David
YES! Turn the bust dart and “hem dart” into a princess seam.
Wendy Cookson
Do you use the same adjustments if there is a dart on the pattern already?
Elaine Rutledge
I want this question answered as well. I have been researching FBA from different sources and yours makes the most sense. For instance, I don’t want to increase the size of my upper chest. But the question remains…what if the pattern already has a dart. Do I just ignore it?
Elaine Rutledge
I’ve been researching, and trying different methods. I’ve concluded that I need to add to the existing dart. The Nico pattern with the diagonal dart required a little more attention. Cardinal rule with bias: to avoid puckers, join edges cut at the same angle. First I swing the dart to my high bust line, centering it on the horizontal line for balance. My high bust line is determined by measuring from the shoulder (along the bra strap) down to the bust apex – the highest point. Then I make the necessary adjustments. Note that the bust apex is an inch or so away from the end of the dart when sewn even though I use the apex for adjustments. I can then swing the dart back to the diagonal if I wish, but I prefer a balanced dart: i.e. the center of the dart is along the Horizontal Balance Line – which is the same as my high bust line – and the sewing lines of the dart are on either side of that line.
Mary J
When measuring my daughter, a collegiate rower who wears a 32D-DD bra and has a broad muscled upper back and shoulders, her high bust measurement is very similar to her full bust measurement ~ 35.5″ but she is very curvy. (Her under bust measures 30.5.) My sense is that it’s her upper back that’s making the measurements so similar – as she’s definitely not an A or B cup. Would it make sense to only measure her from the front, in essence, only measuring her from center of under arm to center of under arm across bust and high bust to determine cup size? I appreciate your advice!
Patricia M Rivard
Yes, you can measure front and back separately. Just make sure they add up to her total circumference.
I developed as a swimmer, and on my slopers, I have back shoulder, as well as side center darts. Just like my front sloper. These darts can be added to these less constructed patterns.
I find that the fit is more comfortable and flattering, and well worth the effort.
Carolyn M
Hi! I am also doing a FBA on the button down pleated dress pattern. I was wondering where do I place my hinge point D along the sleeve? Do I hinge the whole sleeve as well, or do I stop somewhere in the middle where the underarm would be? Since this pattern is a fully dropped shoulder, it is more difficult to discern where this rotation point should happen. Thanks!
Rima Khusainova
Dear Carolyn, sorry for the delay in getting back at you! What you need to do is to trace and cut out the bodice pattern piece, place it against your body and mark the curve of the underarm. This is where you should place your point D and then follow the FBA instructions for the rest. I’d even recommend cutting off the rest of the sleeve and then glue it back and adjust the curve.
Jessica
Hello I want to do a FBA adjustment on your free printable pattern “button down pleated dress.” Where along the long shoulder length do I place the ruler to measure down to apex? Do I do it along side the very top and edge of v neck, or do I move further over to the right? I have no idea where to place the ruler to measure down to apex.
Thanks kindly.
Jessica
Rima Khusainova
Hello Jessica! For the shoulder to bust measurement, hold the tape measure in the middle of your shoulder (approximately where your bra strap sits) and measure down to bust point (your nipple). I’d also recommend that you cut out the paper pattern first and then place it against your body to check where your bust point is and which spot on the shoulder line corresponds to the middle of your shoulder. Hope this helps and let me know if you need any further assistance!
Jessica
You are incredible!
Susan Isherwood
I have a question about the side seam. From the underarm down, it should NOT be straight, correct? That was always the bit about putting in darts I found very confusing. Also, the front bottom width is now about as much wider as is the bust front width?
Thanks!
Rima Khusainova
Dear Susan. This is a great question but the answer really depends on the design of your front bodice (whether the side seam is straight initially, how much FBA you add etc). Once you start spreading your bodice, you’ll see that the bust dart and the side seam will fall naturally into place. You’ll just have to make some minor adjustments (like perfect the dart jog and the side seam) and trace you new pattern. But yes, normally the underarm is not straight (due to the dart jog – the little dart triangle – that you’ll create as explained in the last steps of the tutorial) and the bust width is slightly wider than the hem width (again, due to the dart jog). I really invite you to take one of your bodice patterns and try – you’ll see that it’s very easy and logic 🙂 Hope this helps!
Martha Penate
I would Like have more samples as this
Rima Khusainova
We have more coming!
Denise C
I have a question on the measurement from the shoulder to the apex. It looks like the model is measuring from the collar bone to the apex. Is this the correct way or should it be the center of the shoulder. When the pattern is being drafted, they are using the top where the shoulder seam is and that seam would rest on the center of the shoulder, not on the collar bone.
Thanks
Rima Khusainova
Dear Denise, yes, you should measure from shoulder seam at the center of the shoulder down to the apex point.