


How to Thread a Sewing Machine: A Beginners Guide – Part 1
Threading a sewing machine can feel a bit daunting at first, but it quickly becomes second nature after you’ve done it a couple of times. These days, I don’t even think about it—muscle memory just takes over.
That said, writing this tutorial made me slow down and walk through each step more deliberately. It reminded me just how intuitive the process becomes with a little practice.
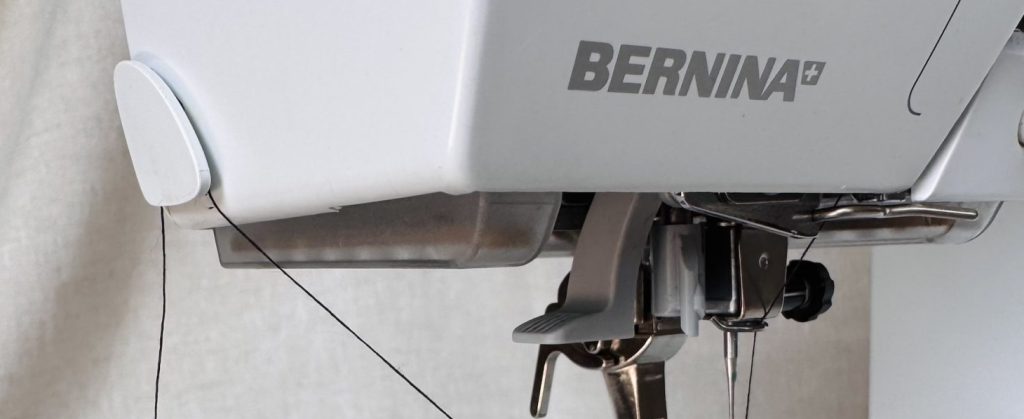
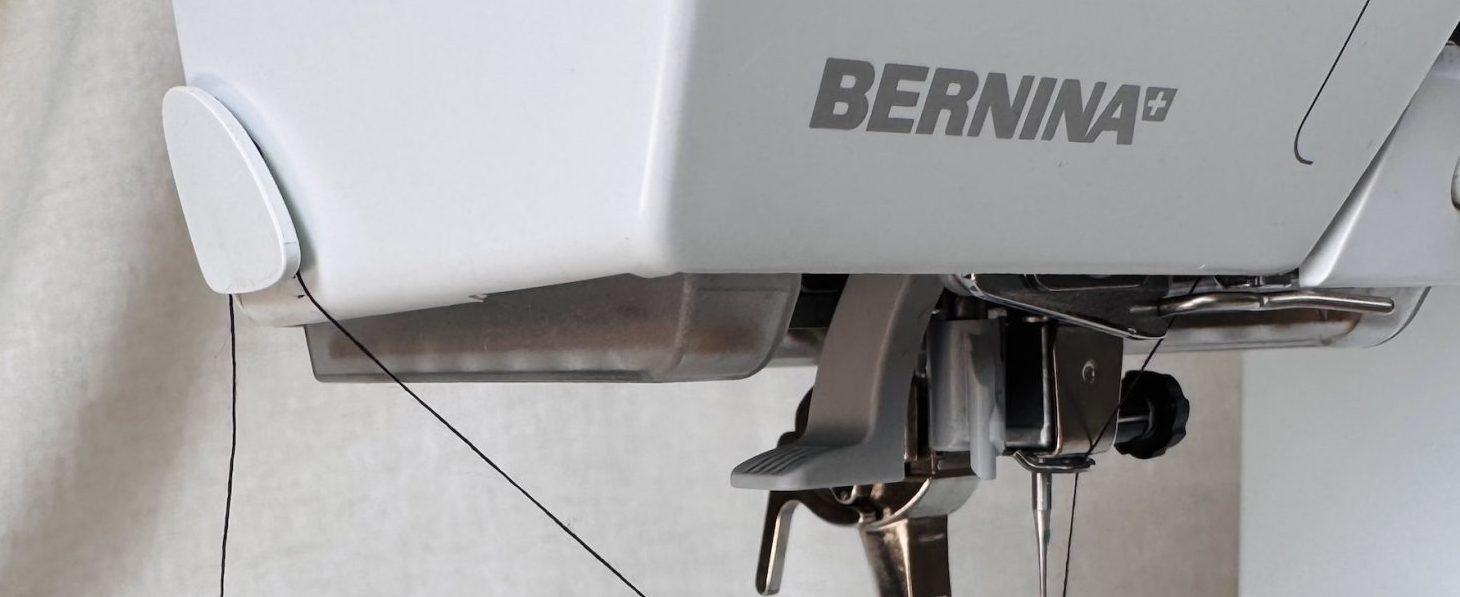
To demonstrate how to thread a sewing machine, I’ll be using my Bernina B530. Even if your machine looks different—say, if your bobbin loads from the top instead of the front—the basic process is usually quite similar. You may just need to adjust one or two steps depending on the model.
This tutorial turned out to be a bit more involved than I initially expected, and I wanted to include plenty of photos to help along the way. So, I’ve broken it into two parts:
- Part 1 covers the basics: tools and equipment, the anatomy of a sewing machine (as it relates to threading), how to wind and insert a bobbin, and how to thread the upper thread of your machine.
- Part 2 will dive into some more specific processes: changing the needle and presser foot, using specialty needles (such as twin needles), and troubleshooting common thread tension issues.
What You’ll Need
First things first. Let’s gather some tools and equipment.
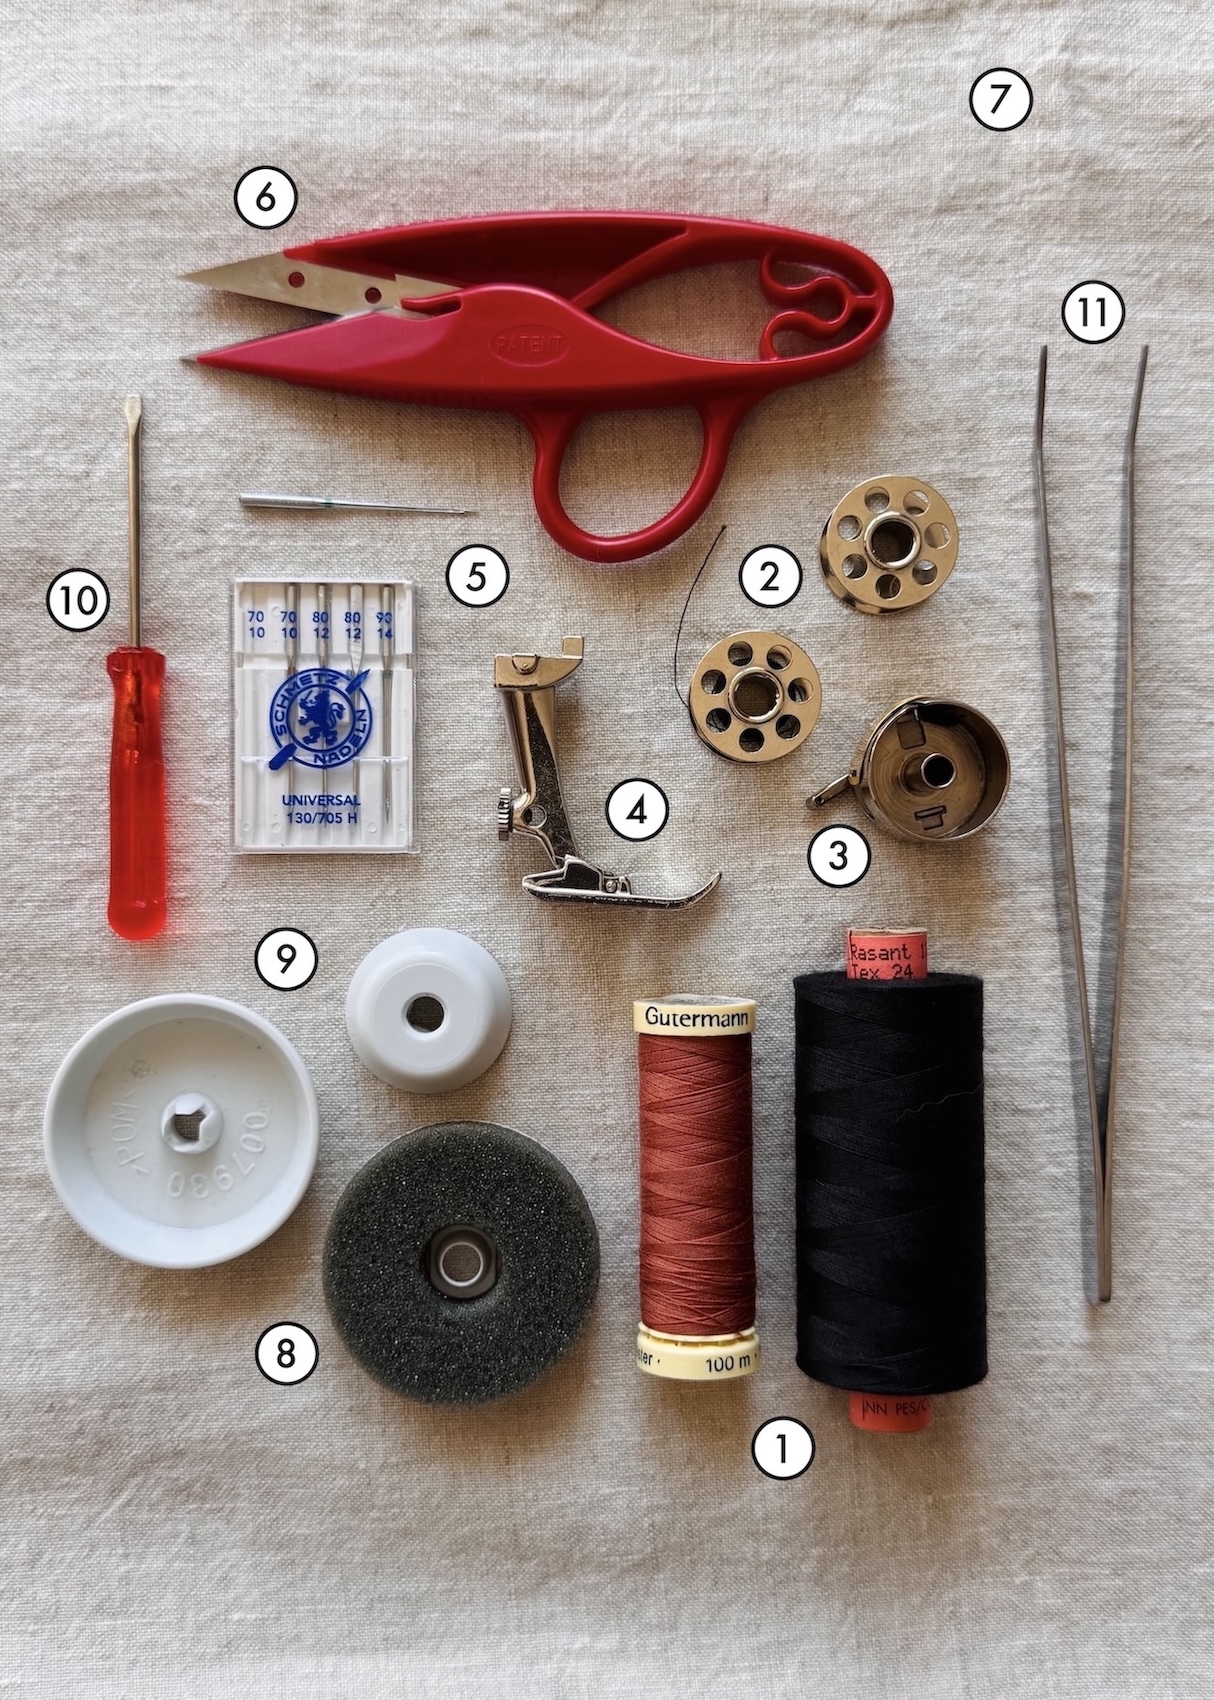
1. Good quality thread. I recommend brands like Gutermann, Mettler, or Amann Rasant. It really does make a difference to the stitch quality and they are better for the machine.
2. Bobbin(s)
3. Bobbin case
4. Presser foot
5. Needles. These will depend on your fabric and the needs of your project. If you need some help deciding, check out the article ‘Understanding Sewing Machine Needles’.
6. Scissors or thread snips
7. Scrap fabric. Preferably the same fabric you’ll be using for your project.
Optional extras:
8. Foam pad(s)
9. Spool disc(s)
10. Screwdriver
11. Tweezers
12. Sewing machine manual. It’s always useful to keep this nearby. Even if you think you know your machine well, reviewing the manual can reveal some helpful features or tips you may have missed. I recently revisited mine and discovered functions I didn’t know existed even after 12+ years of having my machine!
If you don’t have a physical copy, check the manufacturer’s website as many offer free PDF versions.

Tip: Before starting any new project, I like to take a few minutes to give my machine a quick clean and oil—especially around the bobbin area. A small brush and a lint-free cloth work well for removing dust and fluff. While you’re at it, pop in a fresh needle. These small habits don’t take long, but they make a big difference to both your sewing machine’s performance and the quality of your projects.
Understanding the Different Parts of a Sewing Machine
Sewing machines will differ slightly from model to model, but this guide will hopefully offer a solid starting point. I’ve focused on the key components involved in threading and features you’ll find on most, if not all, sewing machines.
Front view:
13. Bobbin cover
14. Stitch plate
15. Reverse button
16. Thread take-up cover
17. Thread take-up lever
18. Stitch width
19. Needle position
20. Stitch length
Close up front:
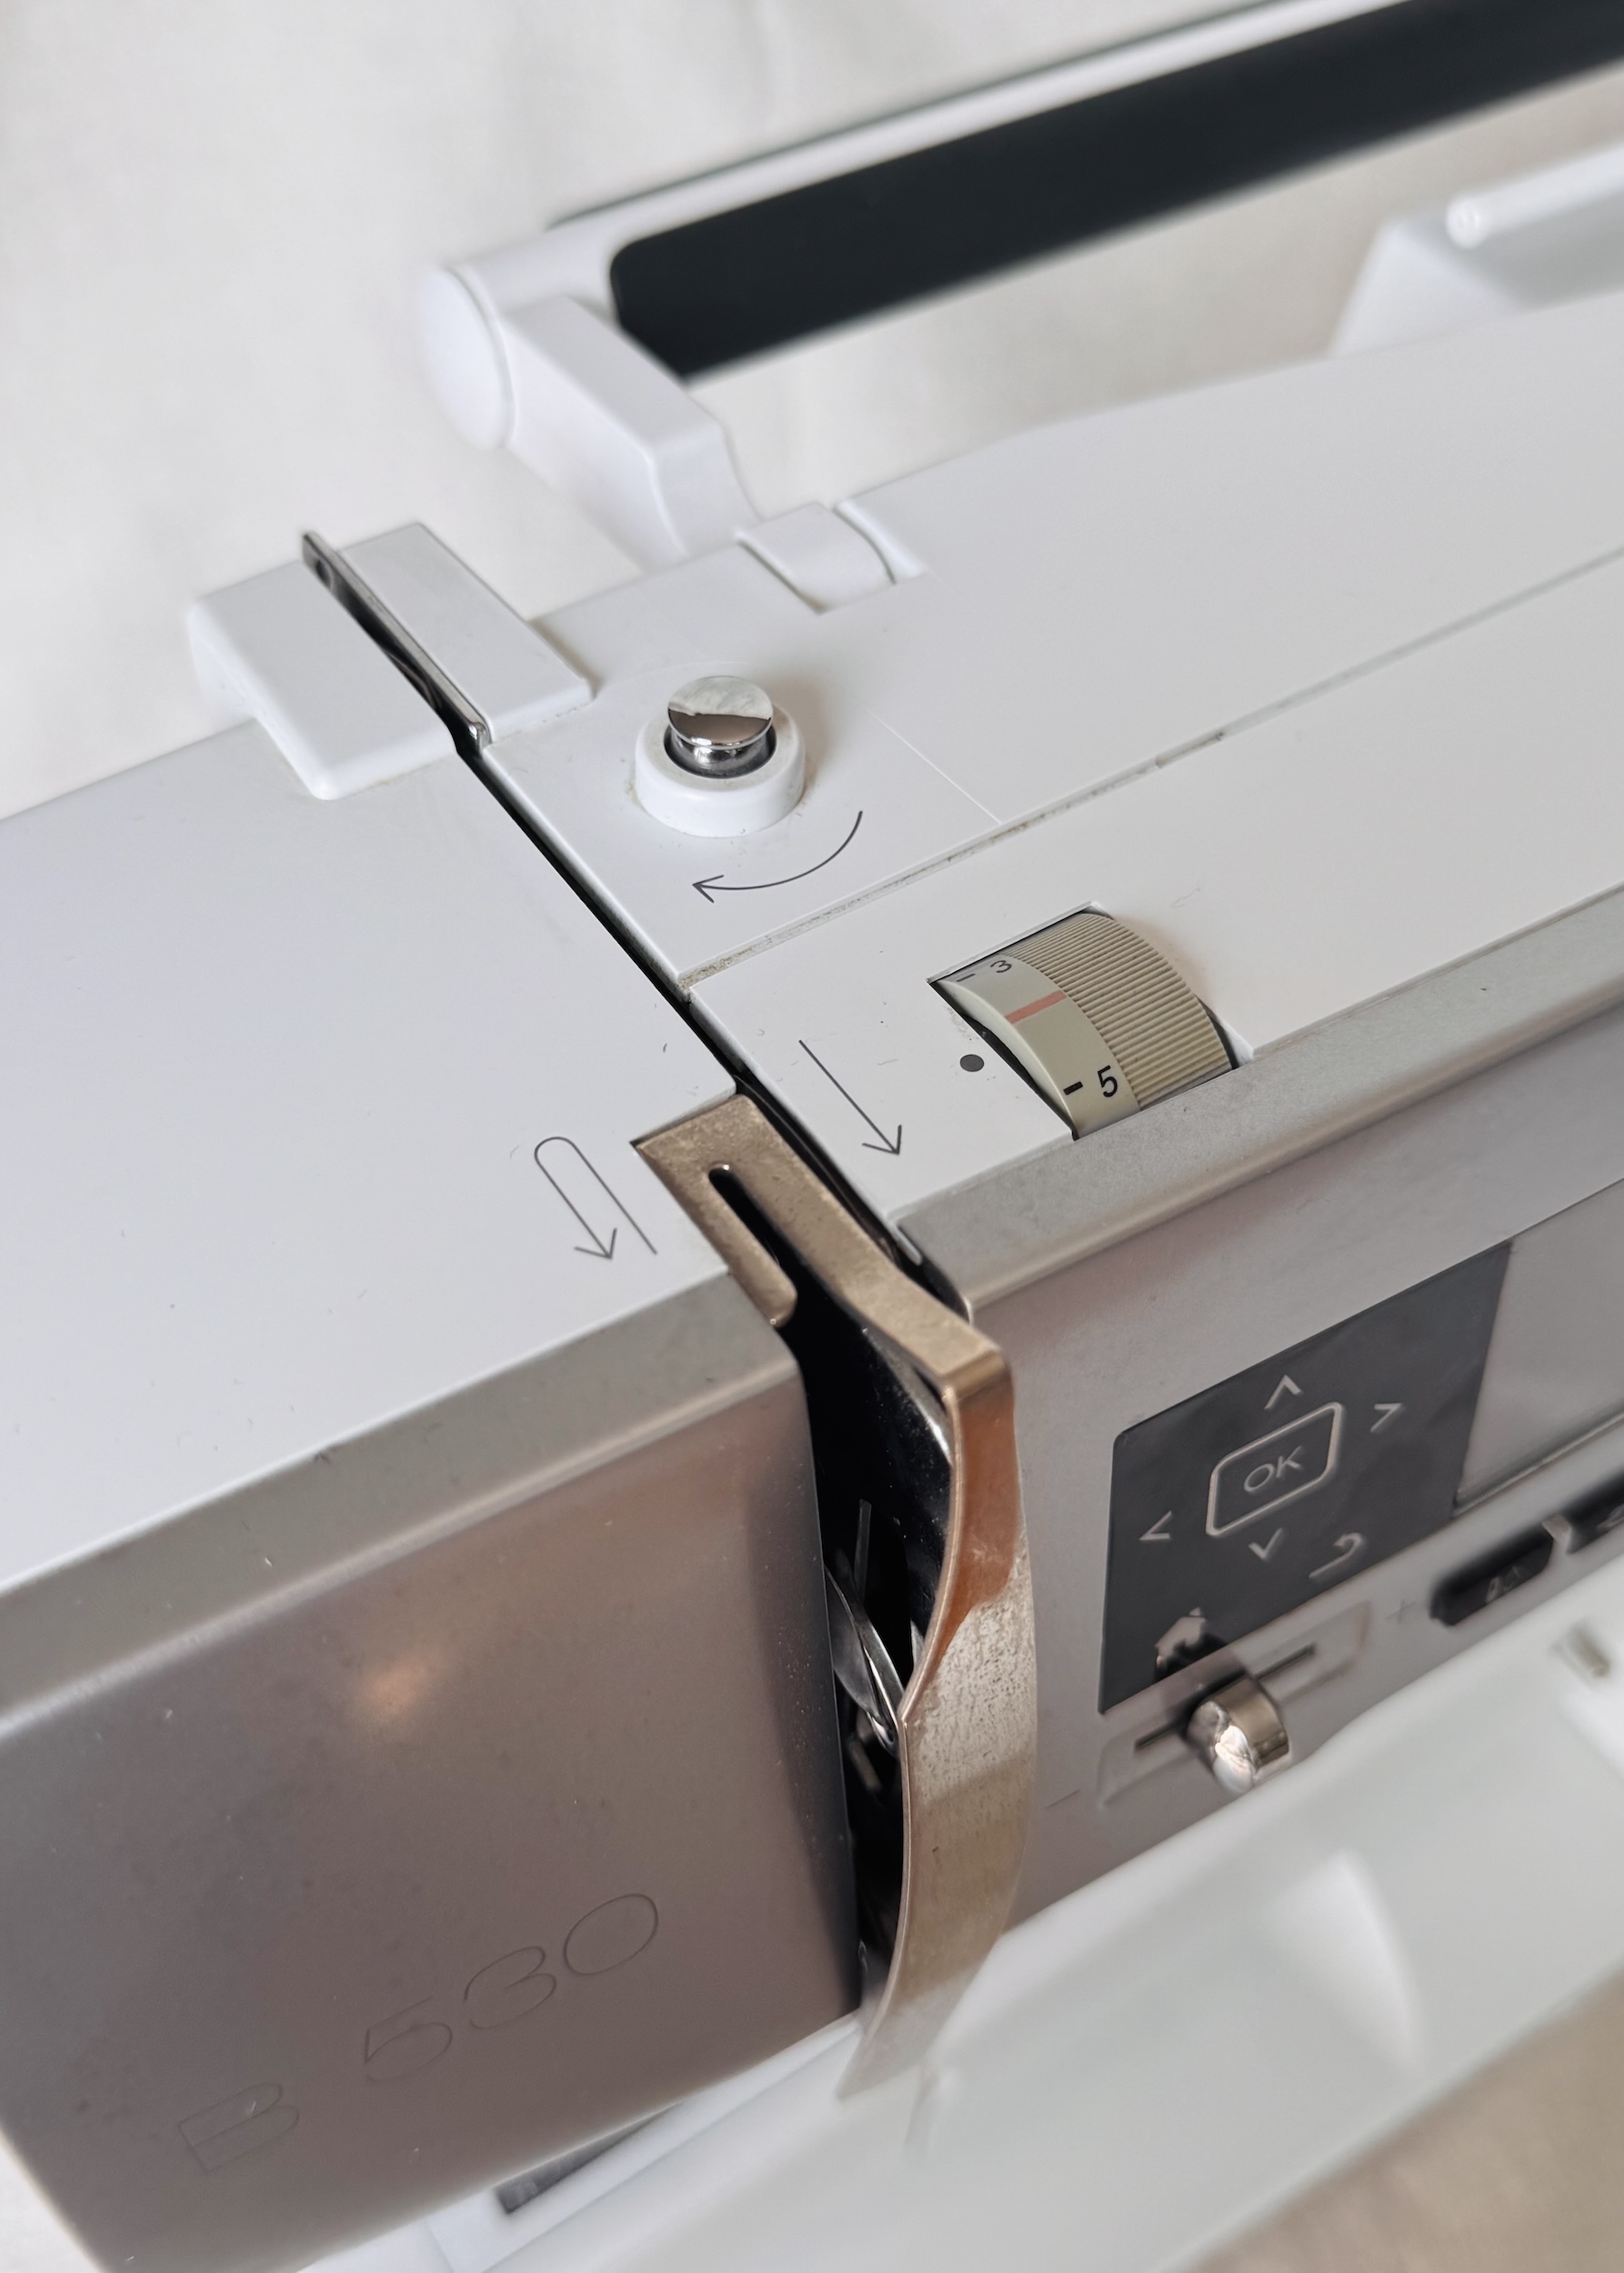
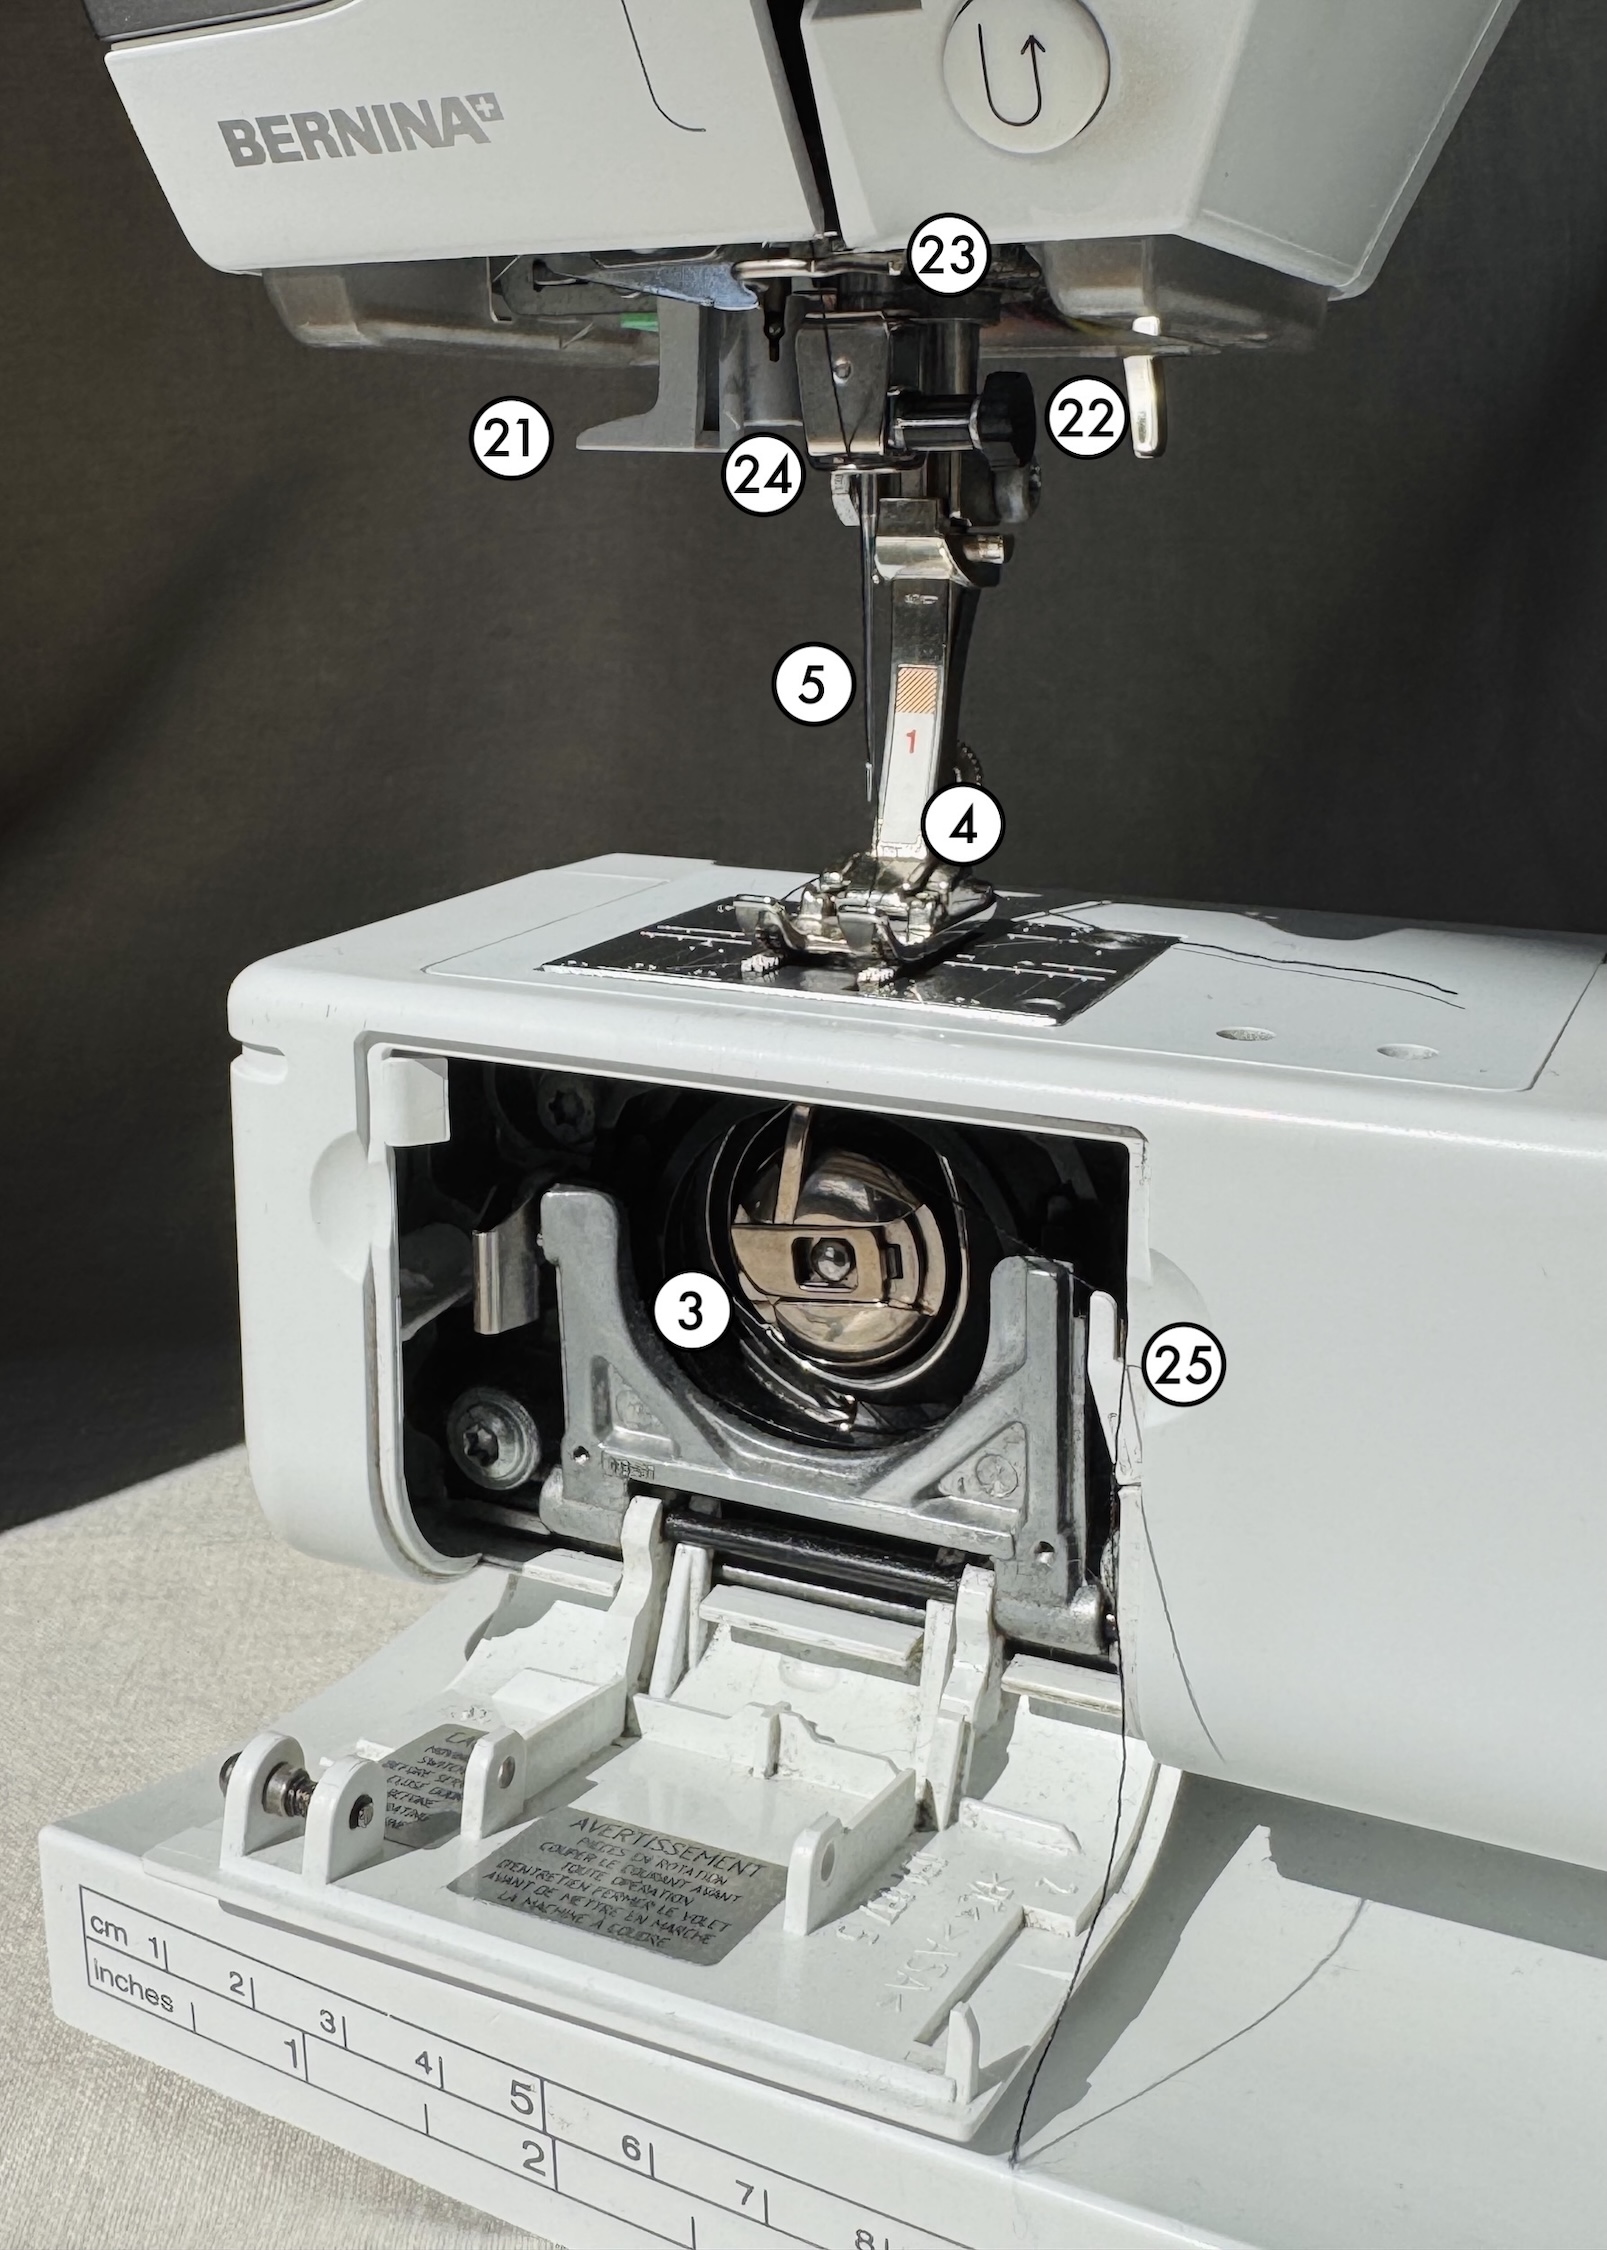
21. Automatic needle threader
22. Needle clamp
23. Upper thread guide
24. Lower thread guide
25. Thread cutter (bobbin cover)
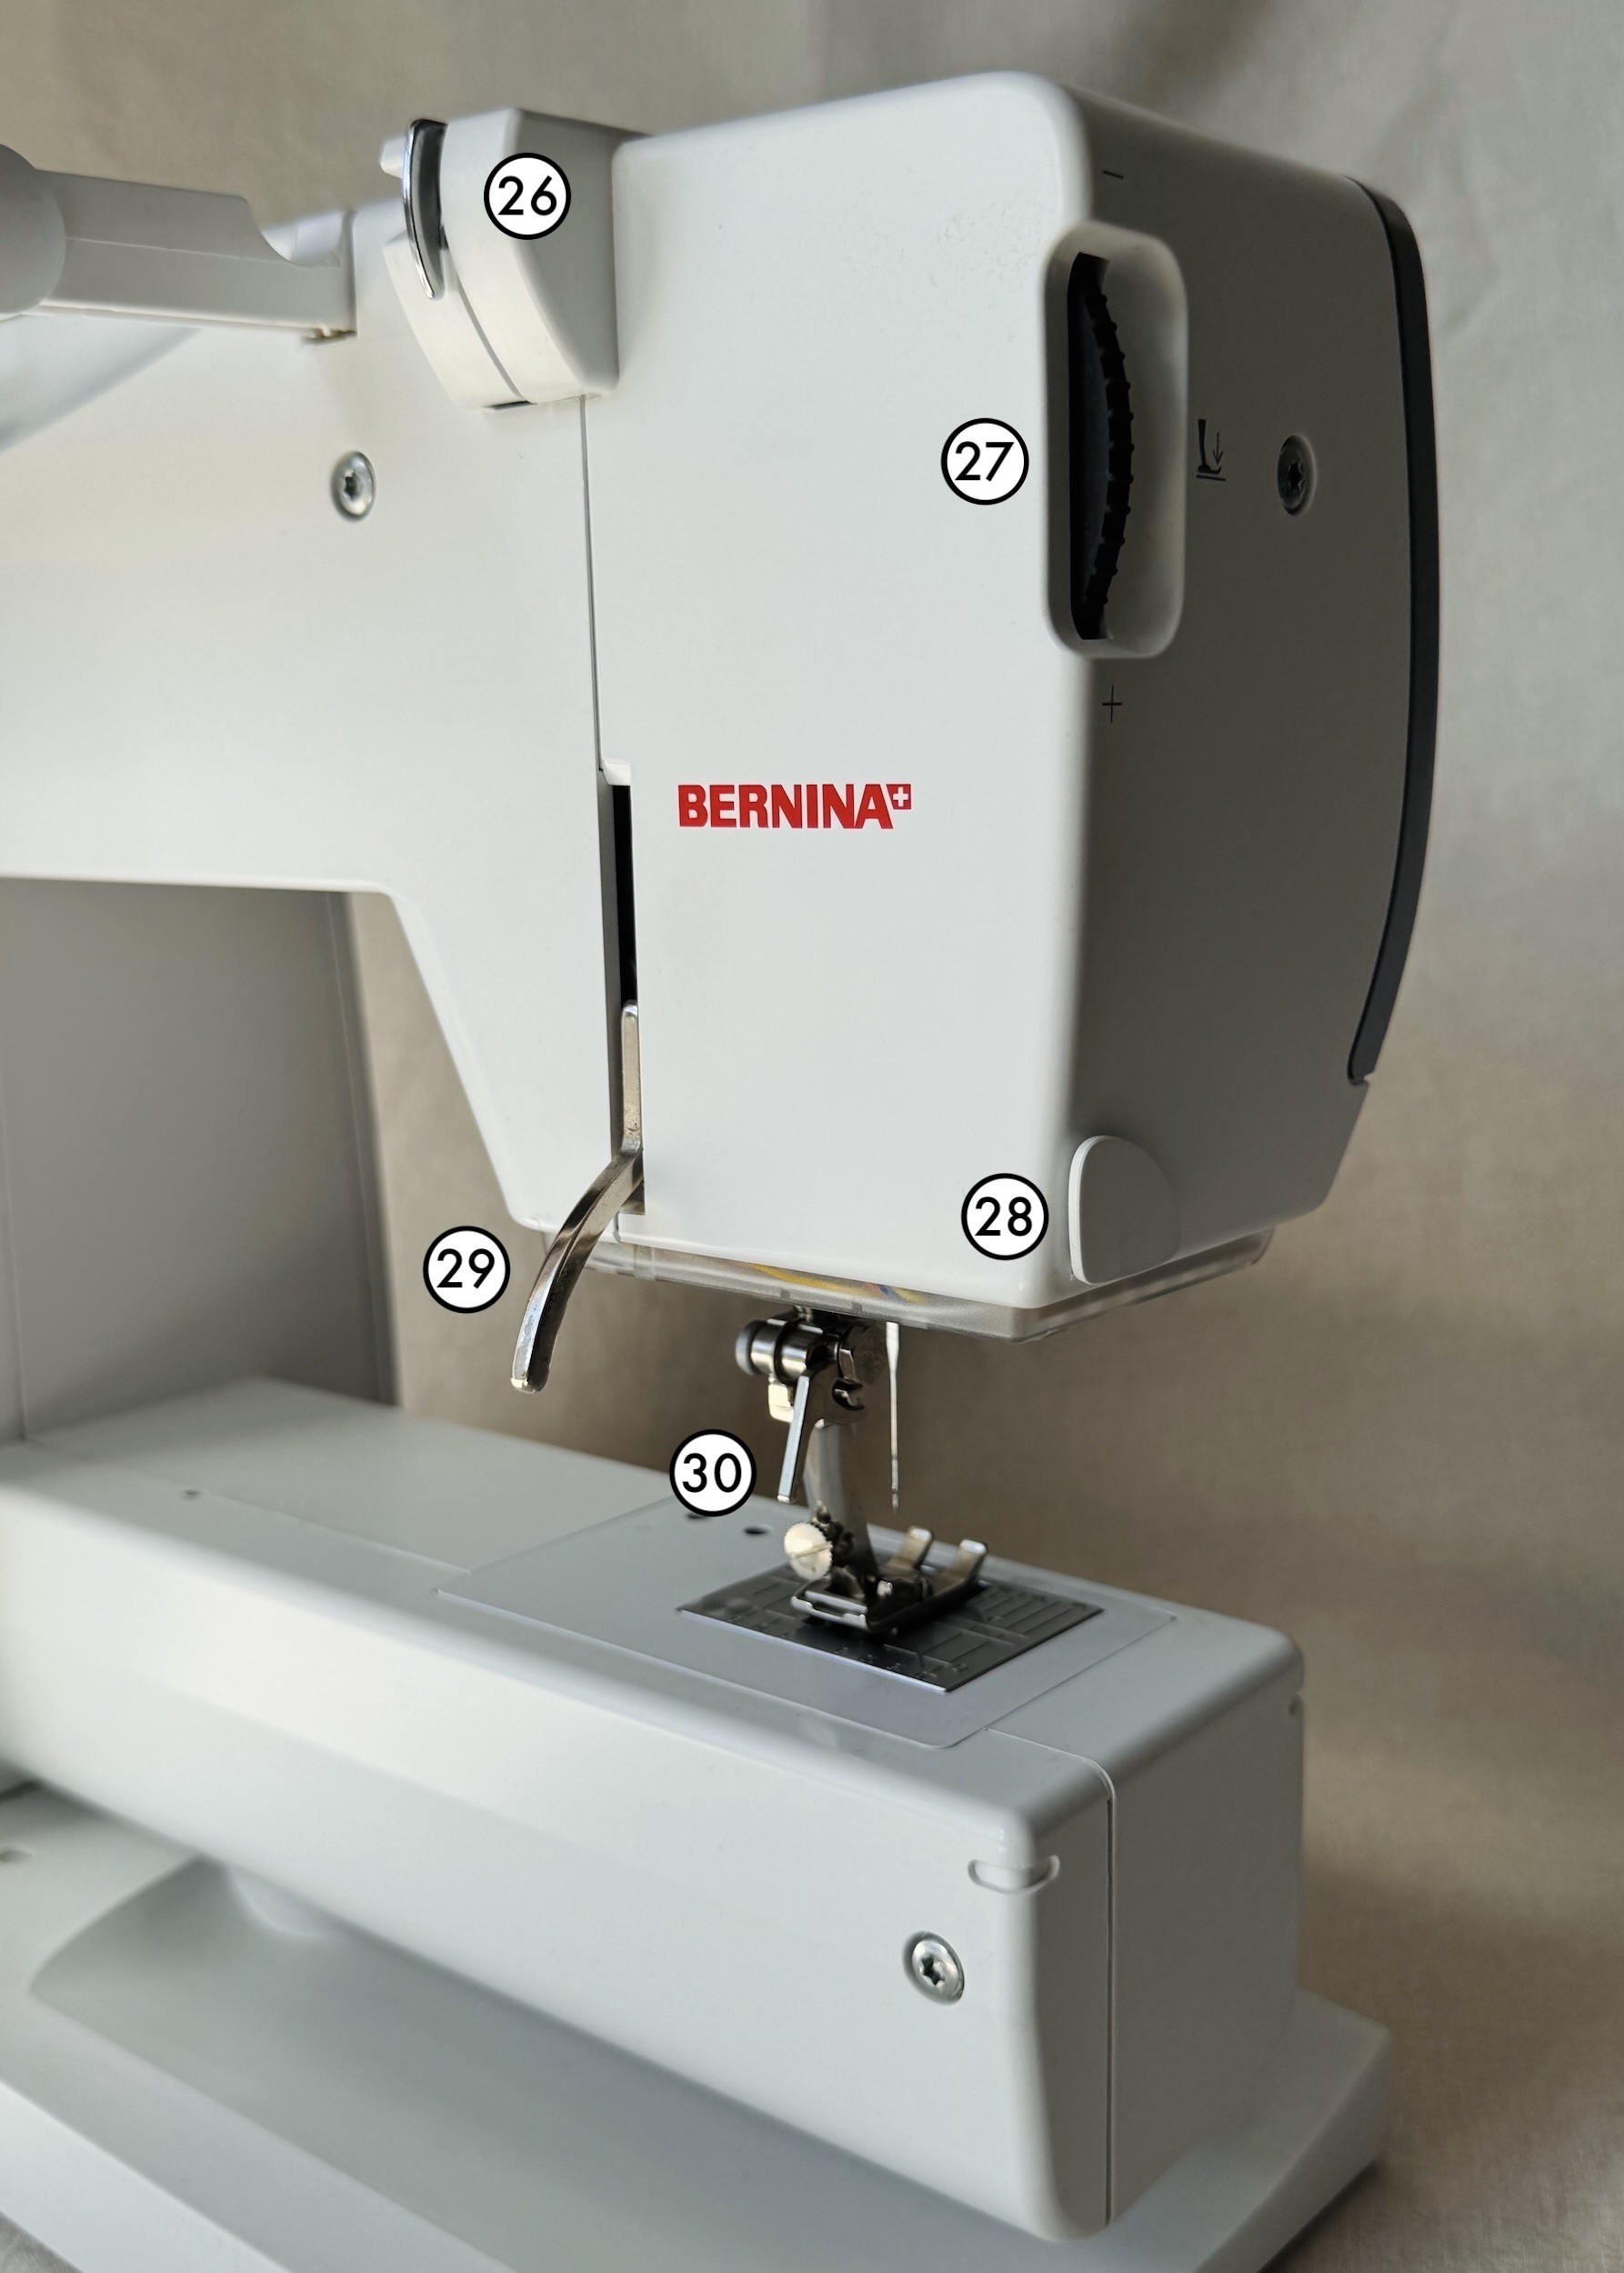
Left side:
26. Rear thread guide
27. Presser foot pressure adjustment wheel
28. Thread cutter (rear)
29. Presser foot lifter
30. Presser foot clamping lever
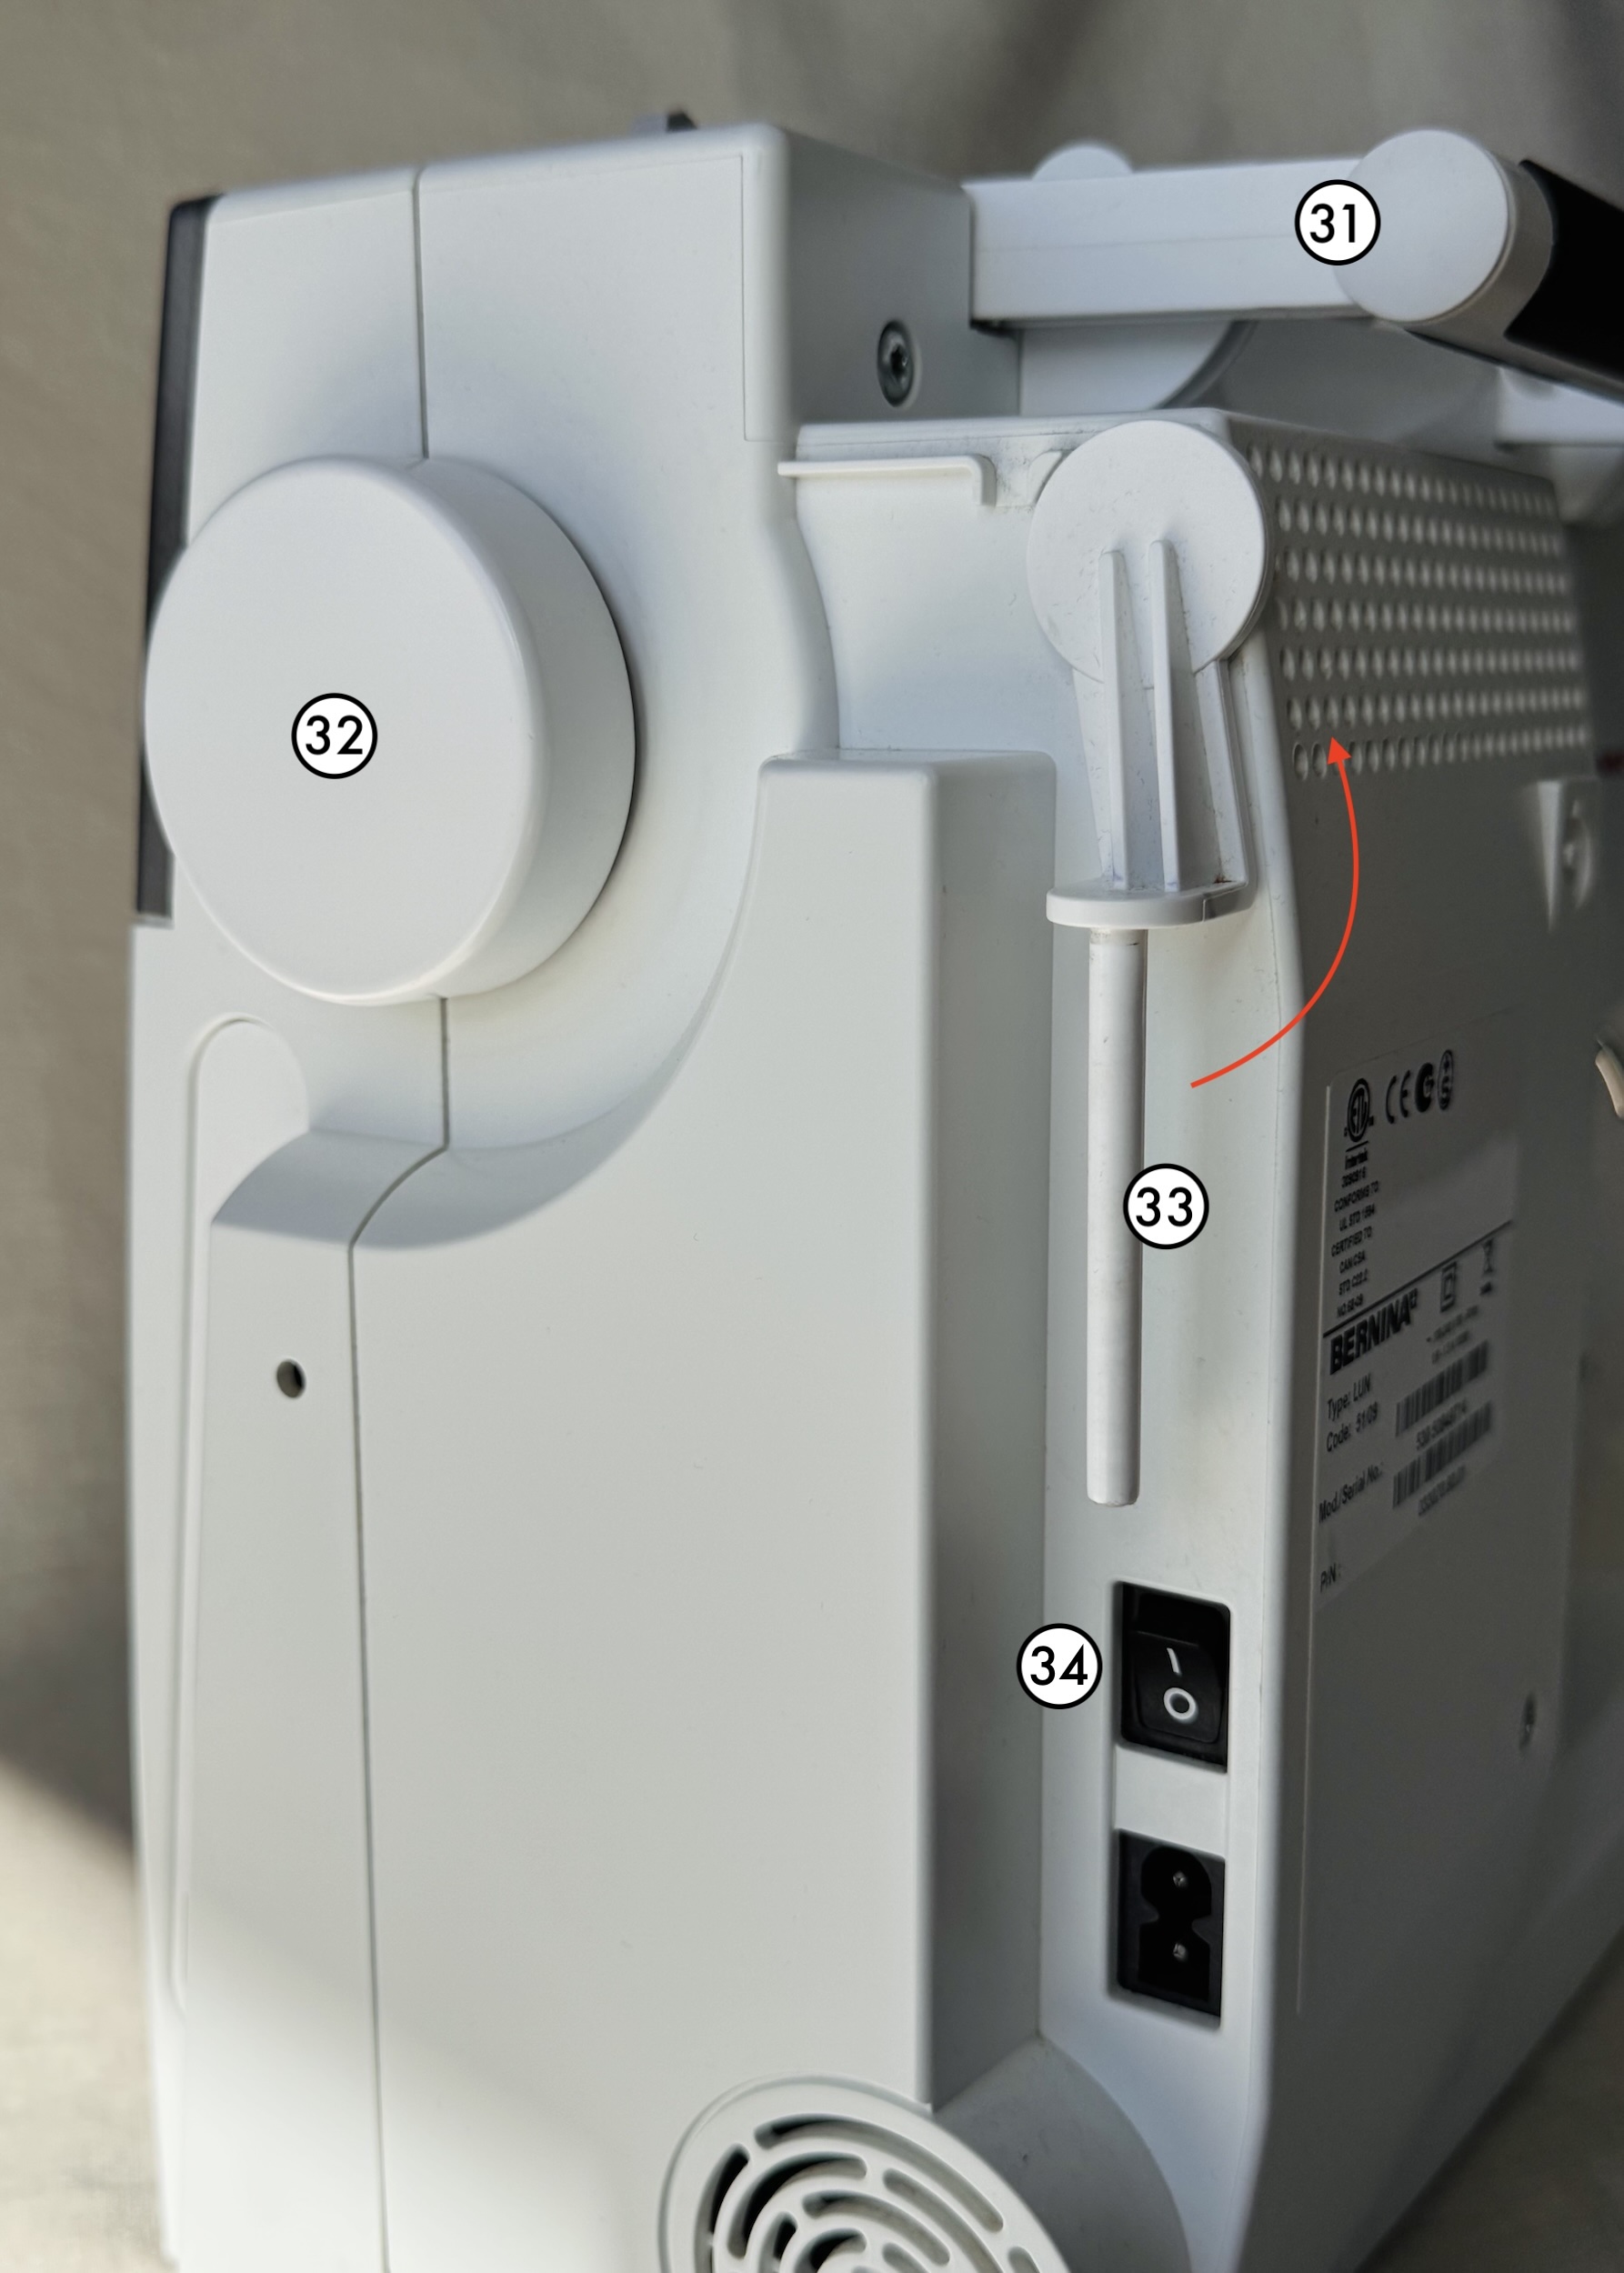
Right side:
31. Carrying handle
32. Hand wheel
33. Vertical spool pin
34. Power button
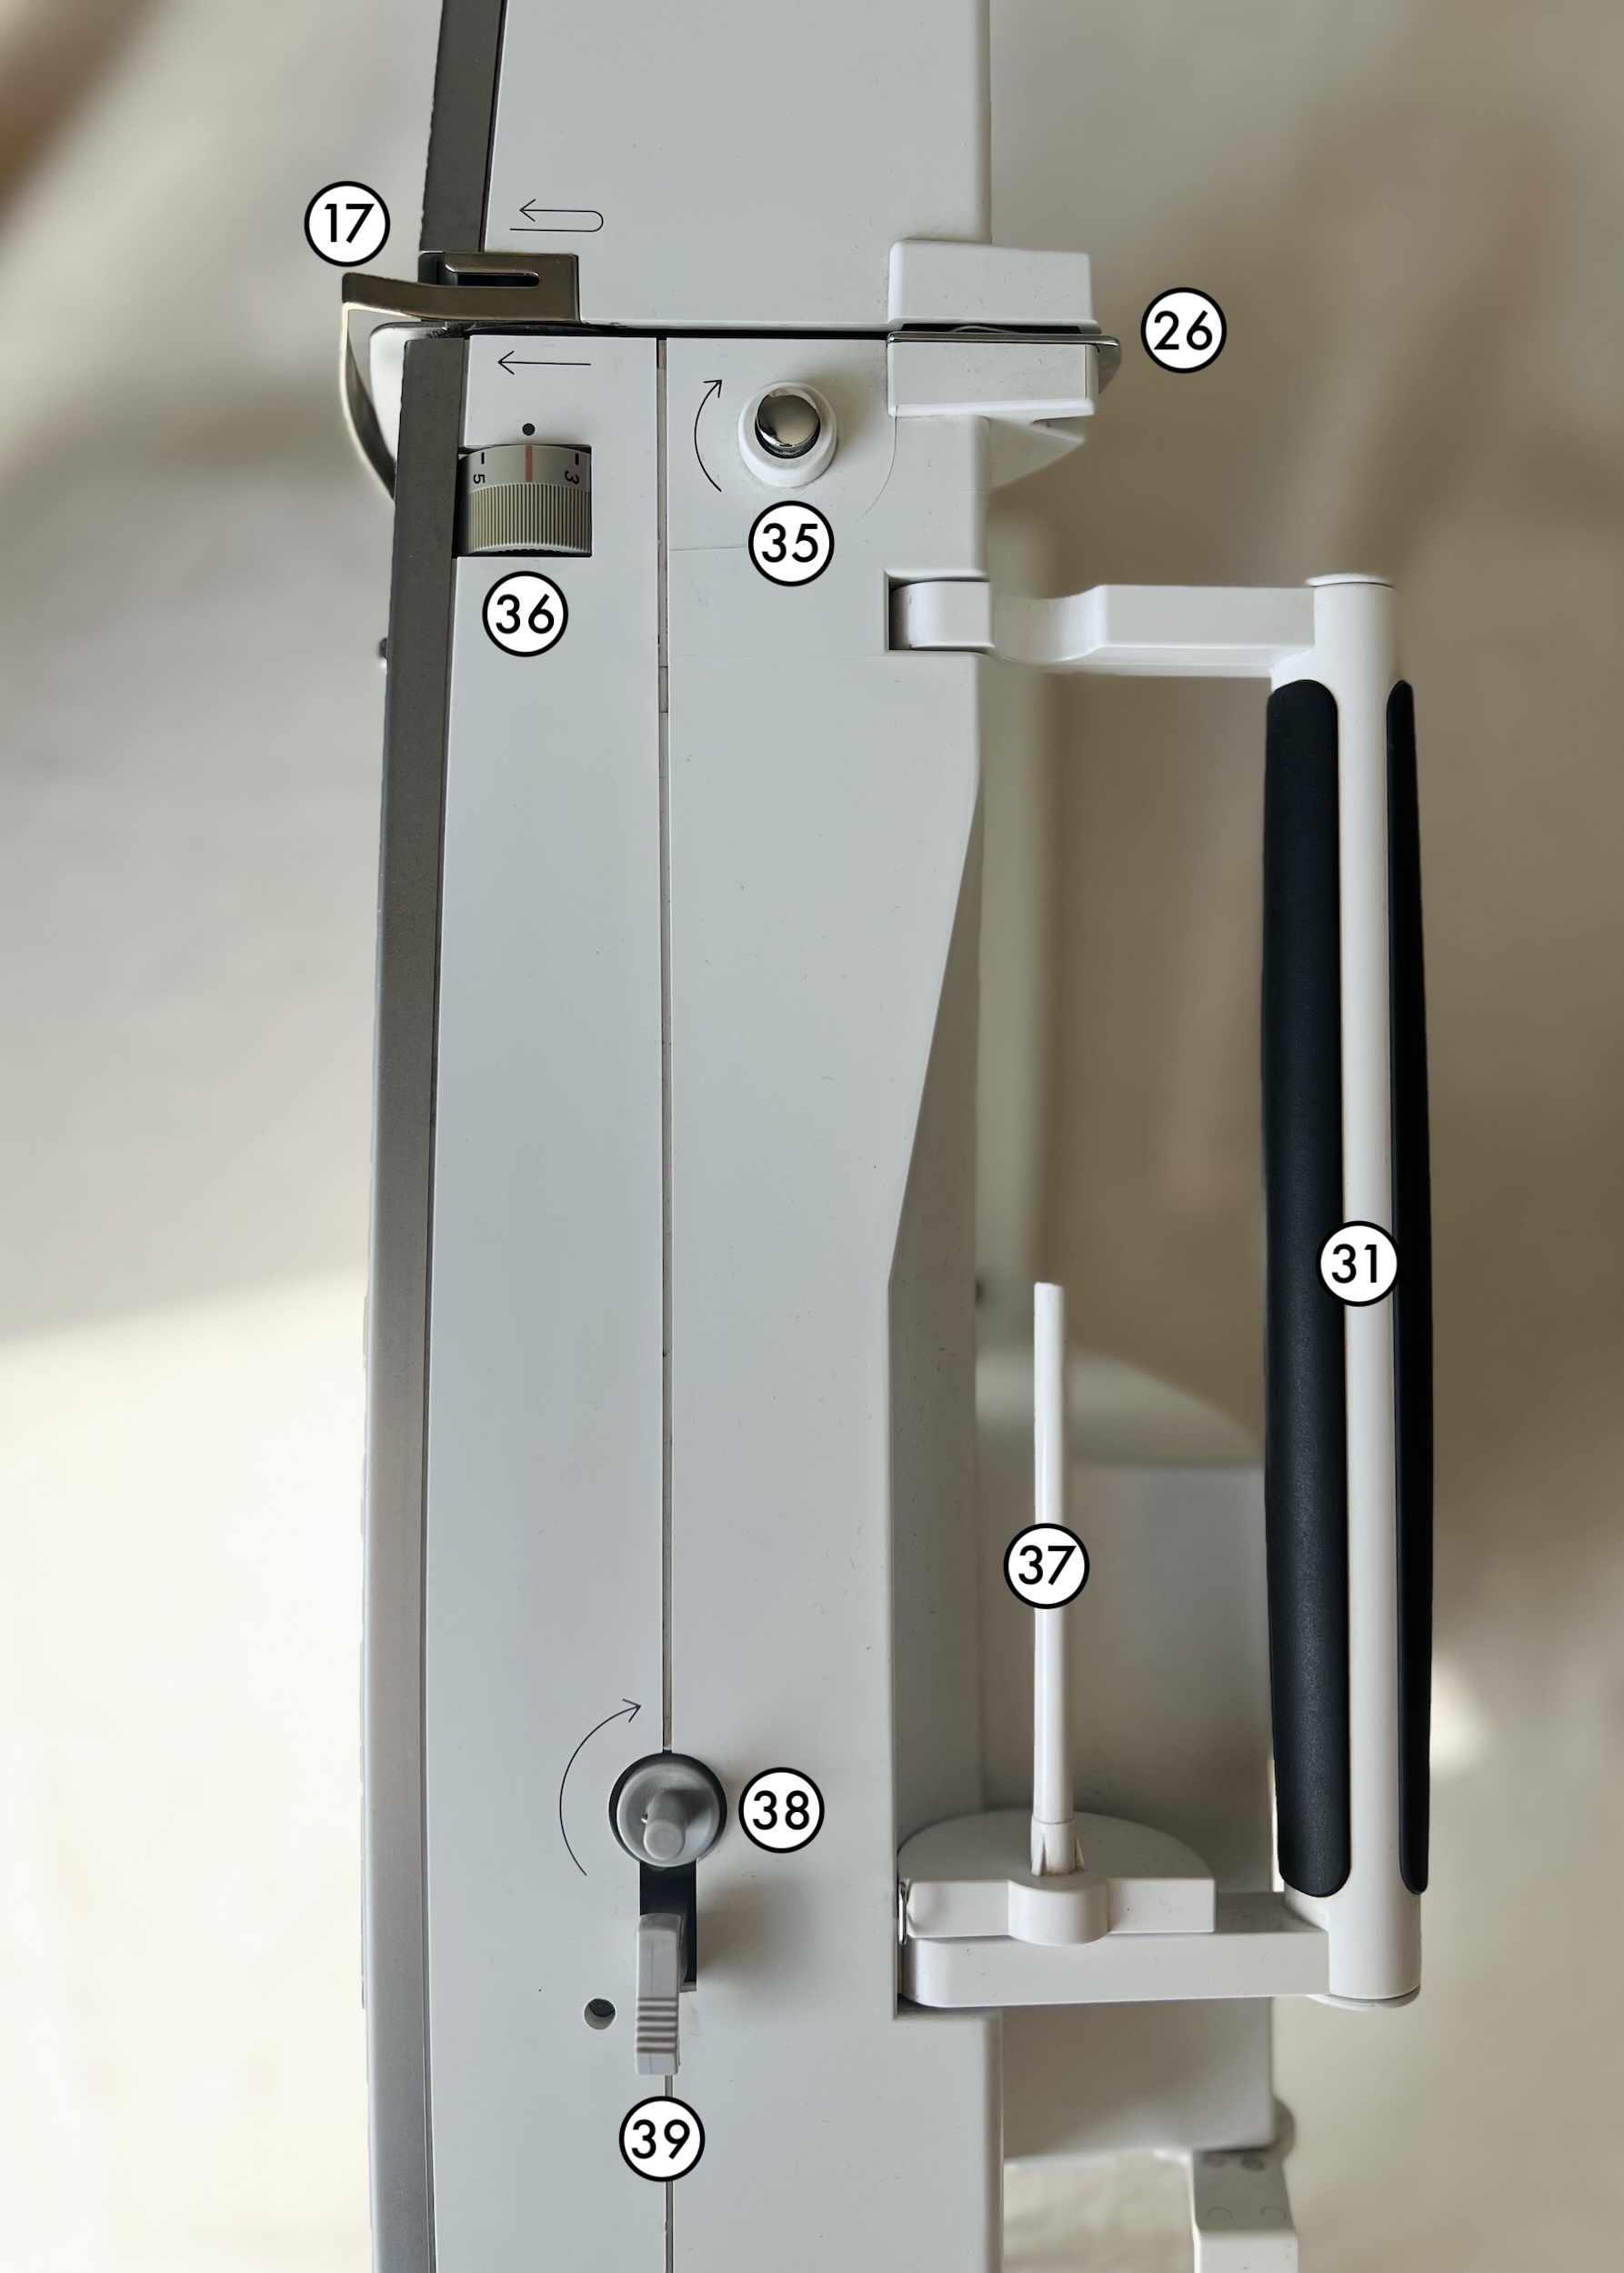
Top view:
35. Bobbin winder pre-tension
36. Thread tension adjustment wheel
37. Horizontal spool pin
38. Bobbin winder device
39. Engaging lever and thread cutter (bobbin)
Extra bits and bobs:
40. Latch
41. Tension screw
42. Slot
43. Tension spring
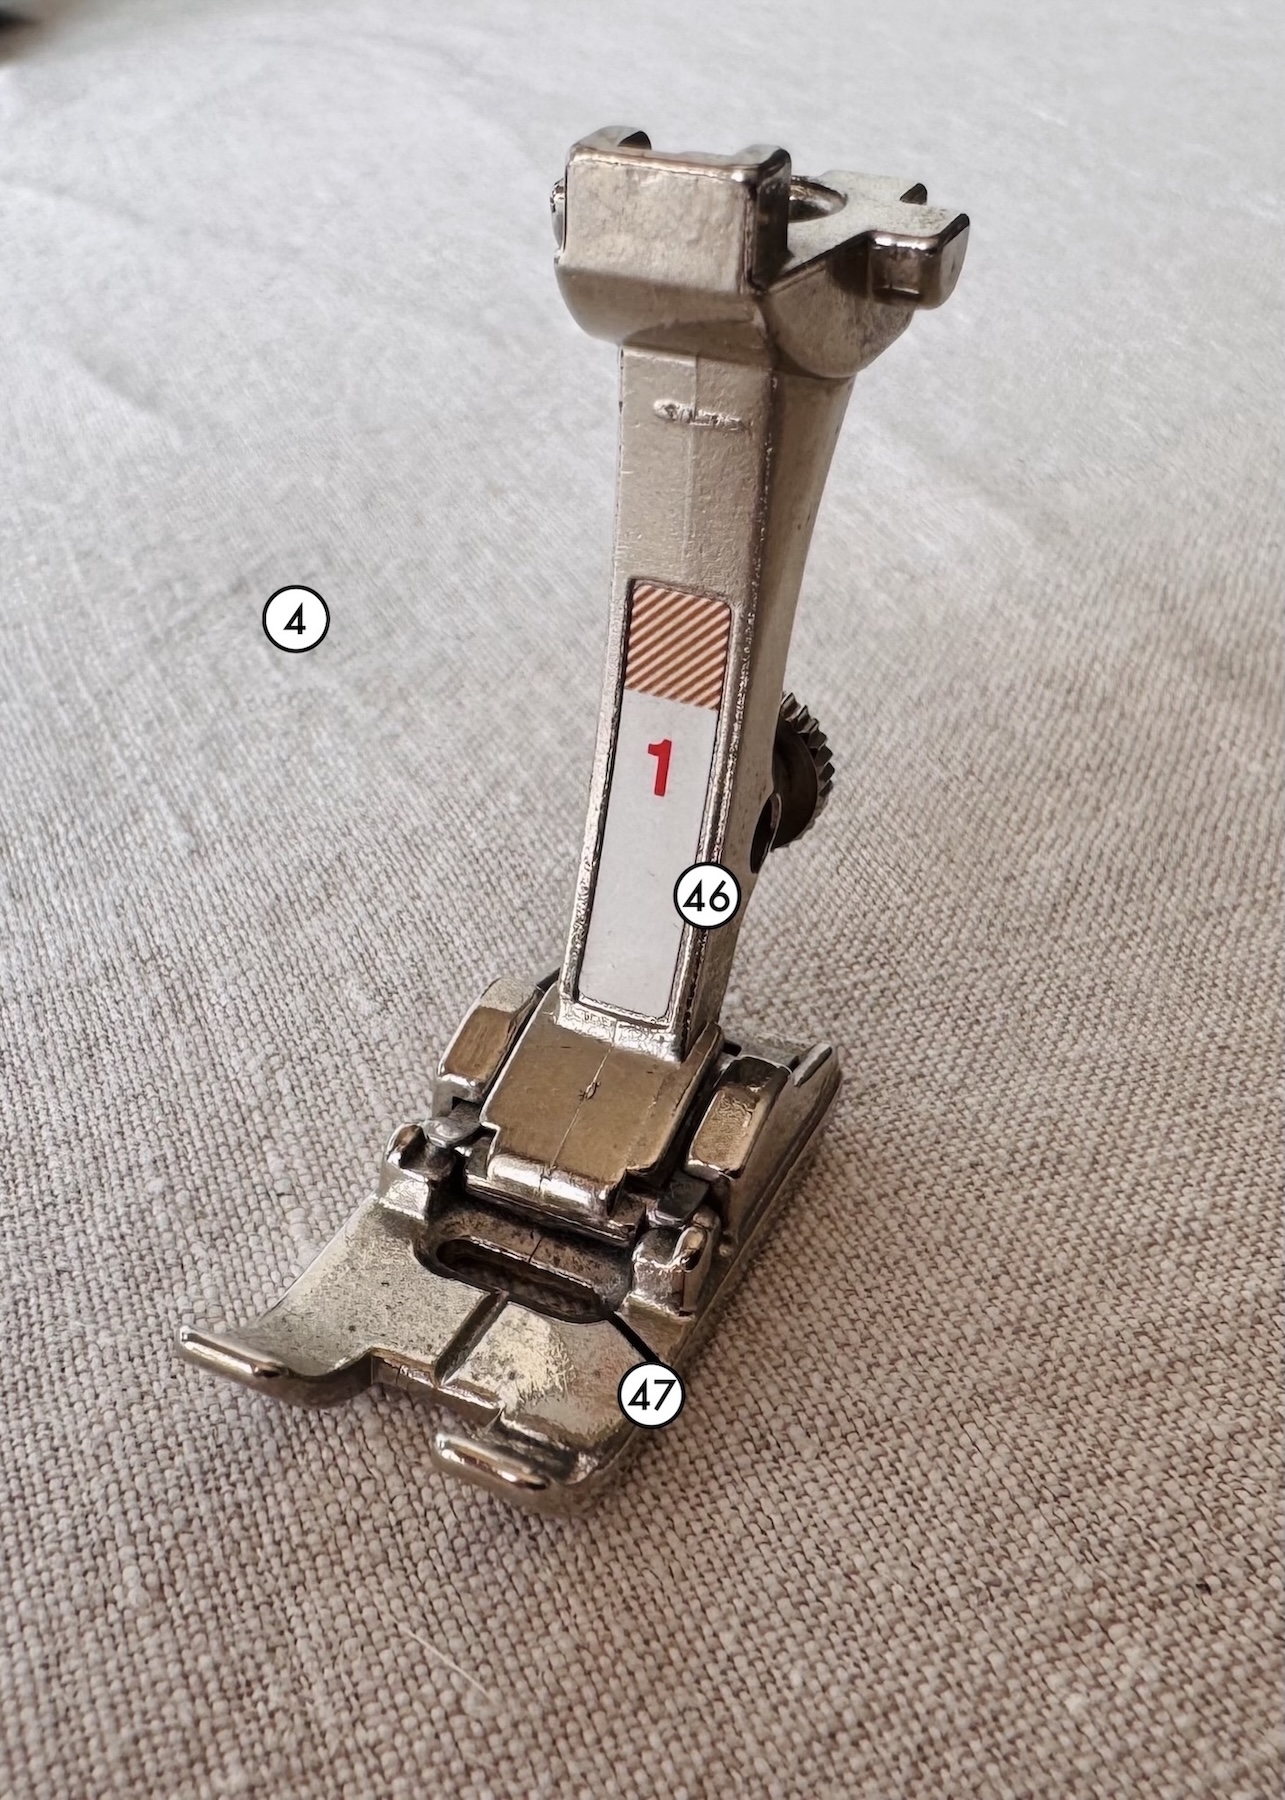
44. T-shape slit
45. Finger
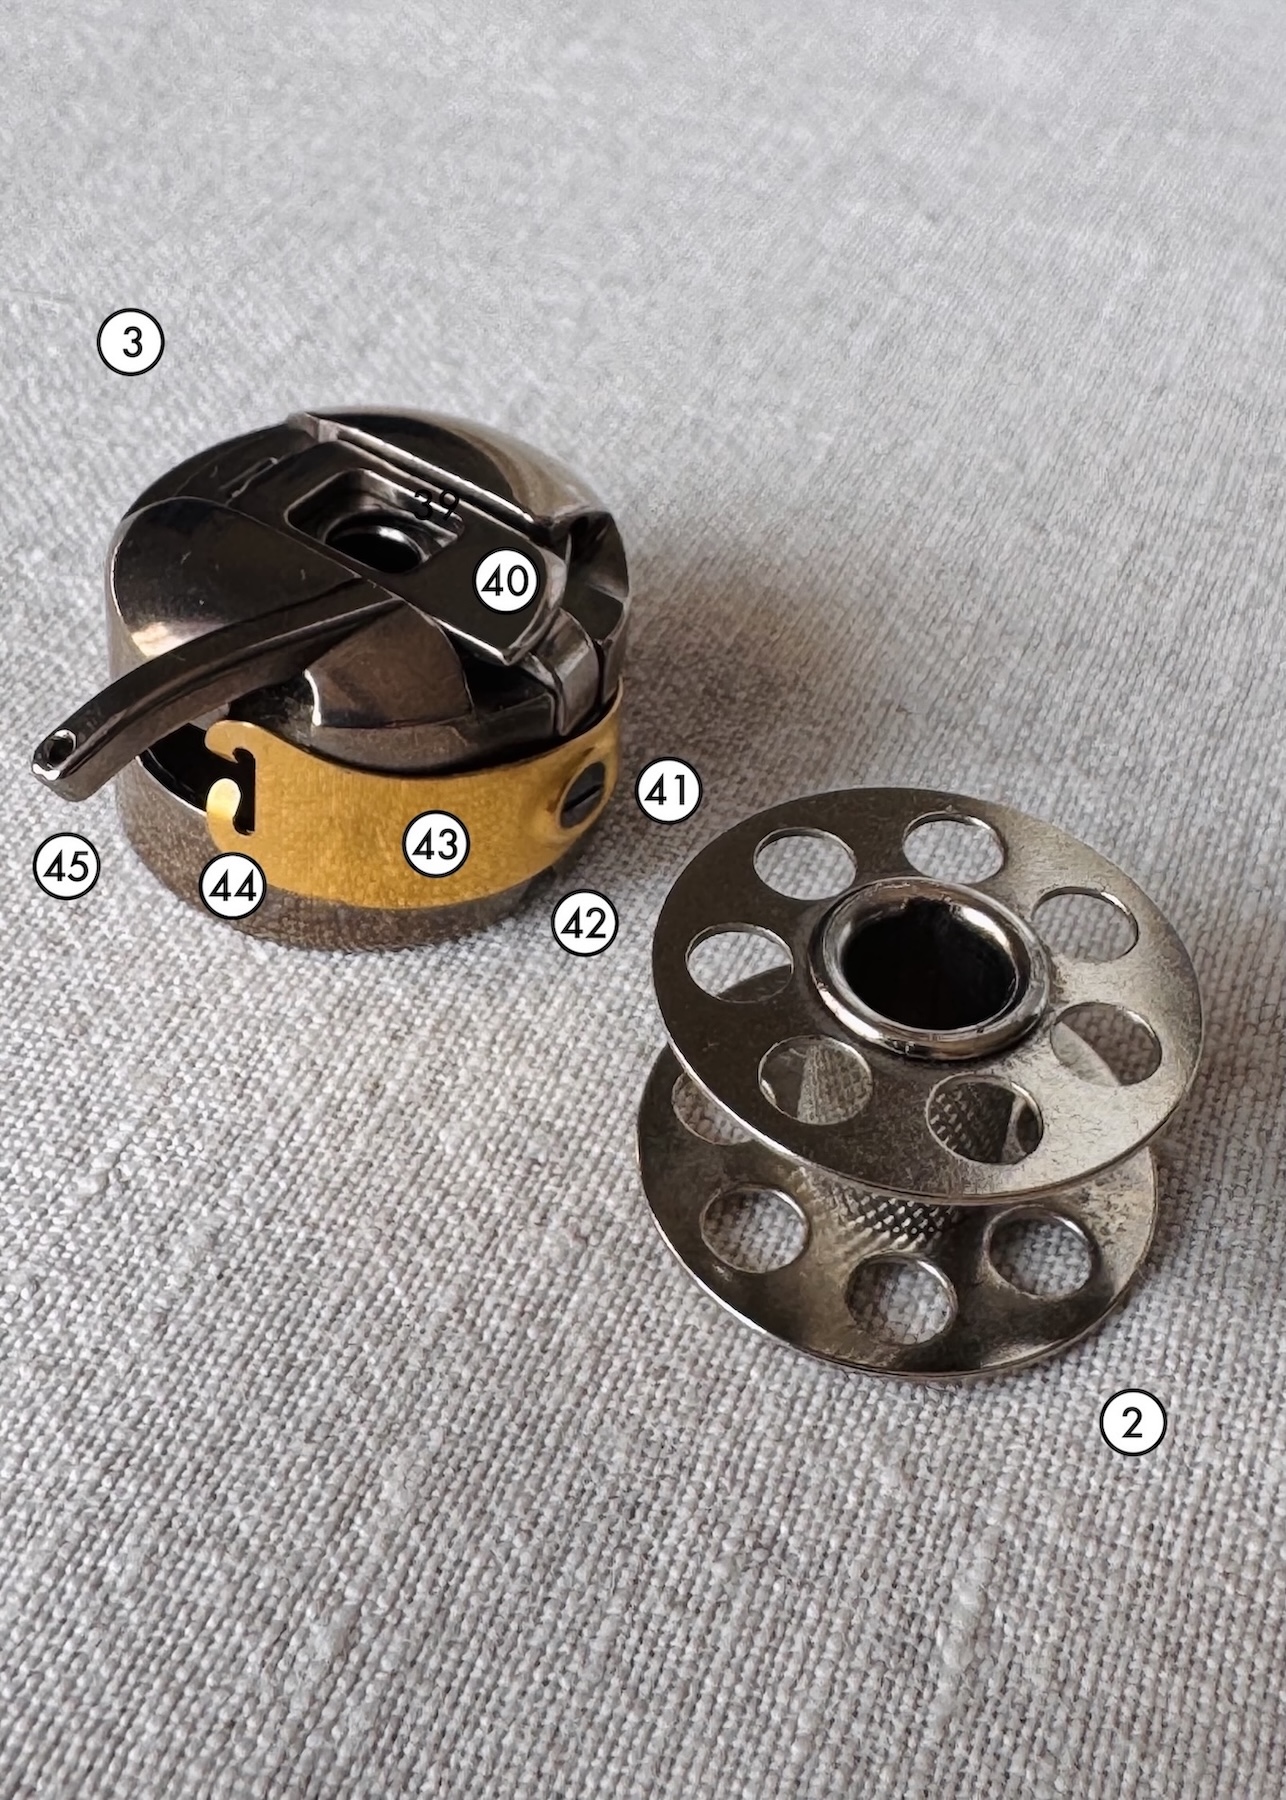
46. Peg
47. Sole
How to Thread a Sewing Machine
For safety, I highly recommend keeping the sewing machine turned off during most of the threading process. The only exception is when winding the bobbin, which requires the machine to be on. Trust me, I’ve lost count of how many times I’ve accidentally pressed down on the foot pedal while threading. Keep those fingers safe!
Winding the bobbin
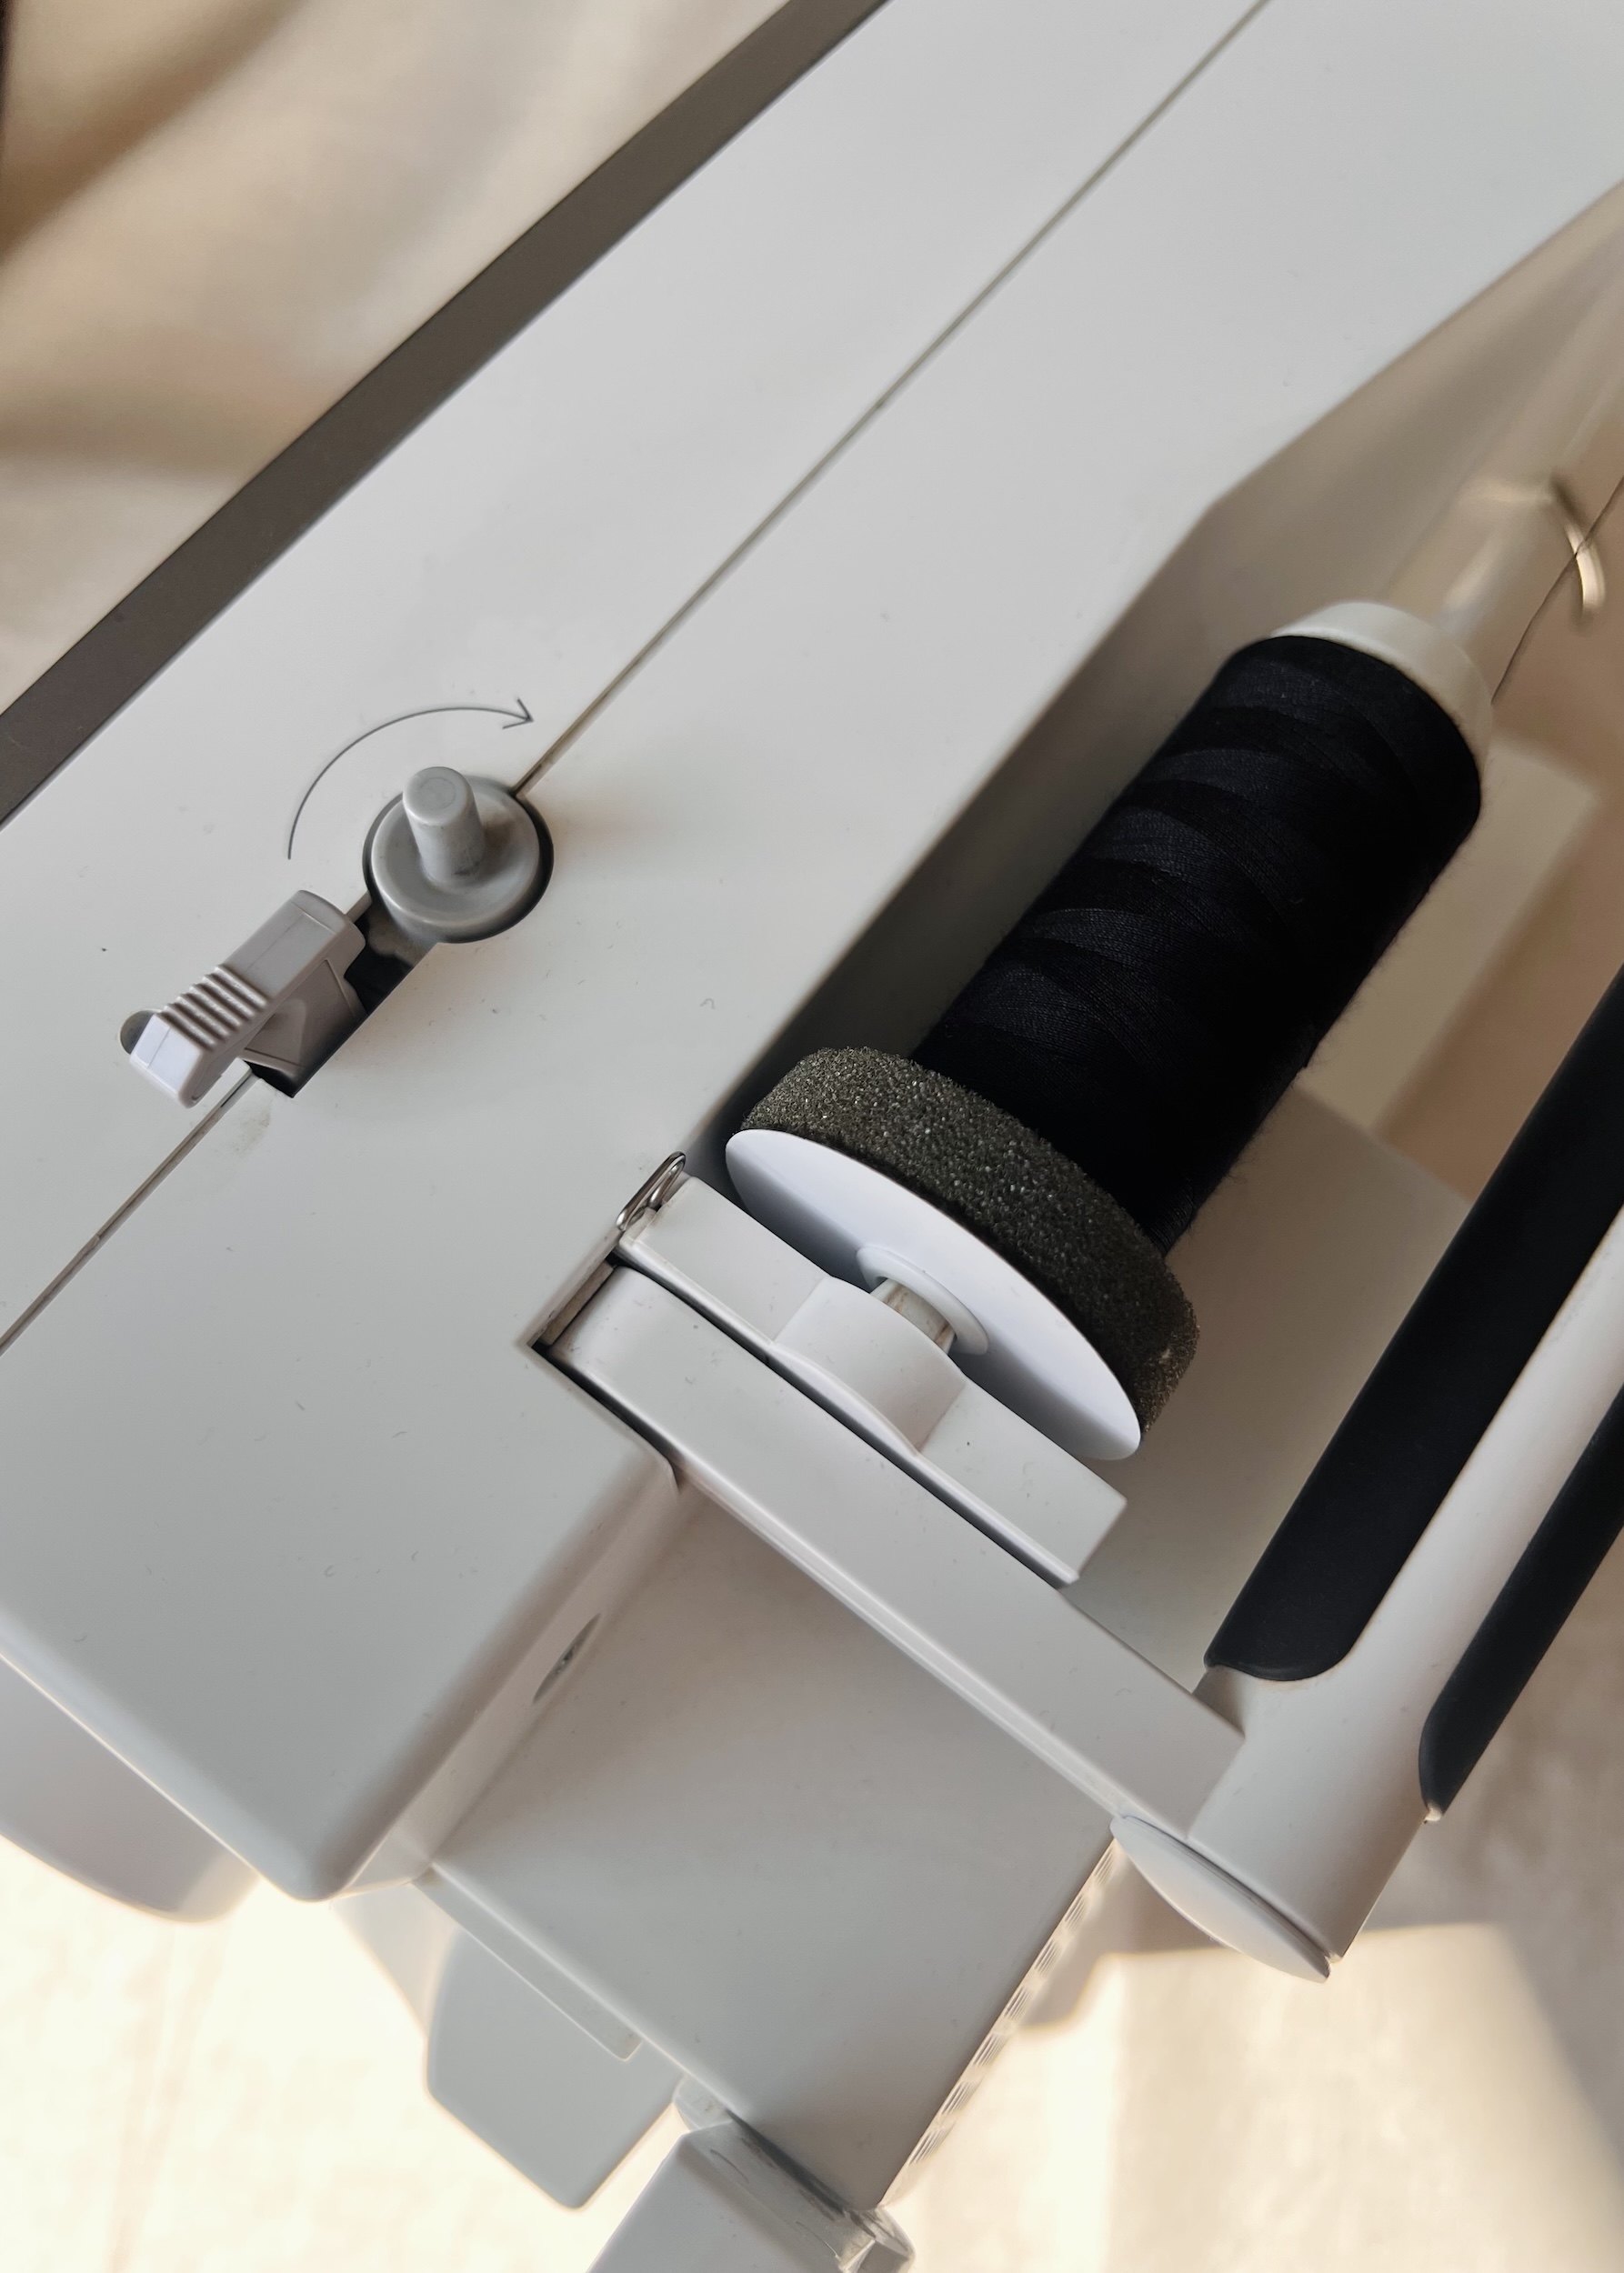
1. Place a foam pad onto the horizontal spool pin, followed by the spool of thread. Attach a spool disc on the end to prevent the thread from sliding off. Ensure that the thread unwinds in a clockwise direction.
Note: You can also use the vertical spool pin in the same way. This is sometimes simply a matter of personal preference.
 2. Place an empty bobbin onto the bobbin winder device.
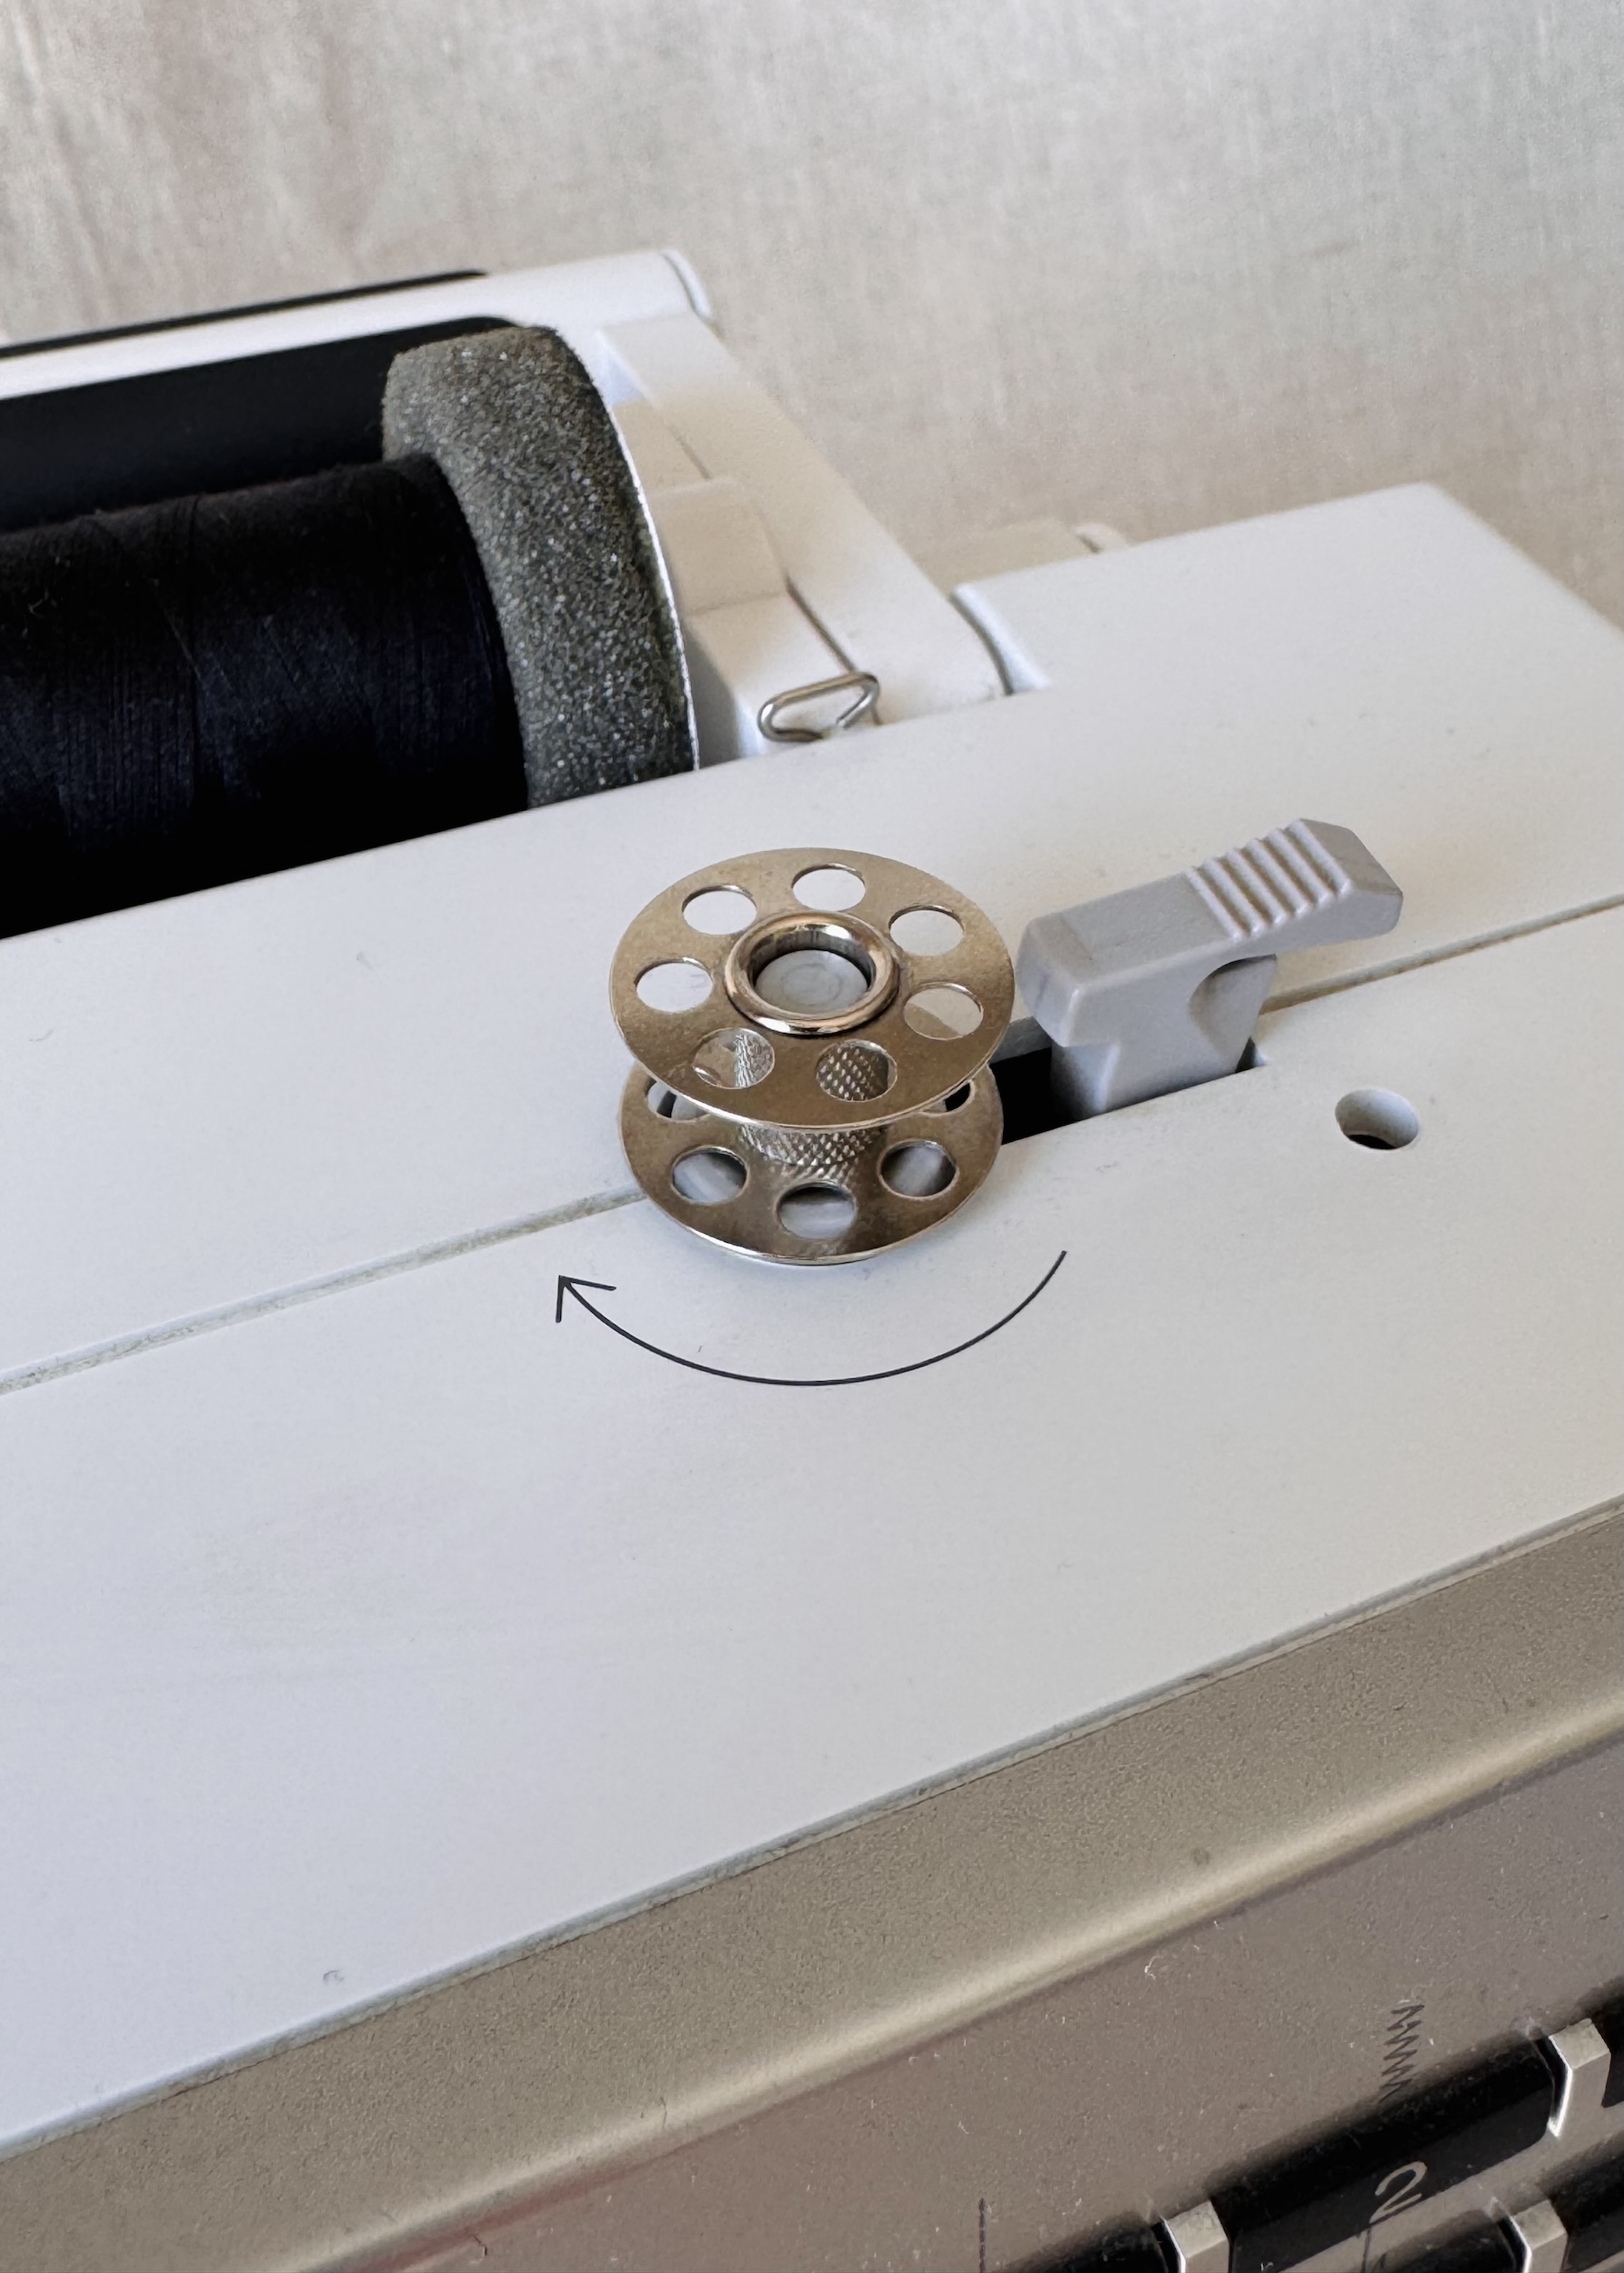
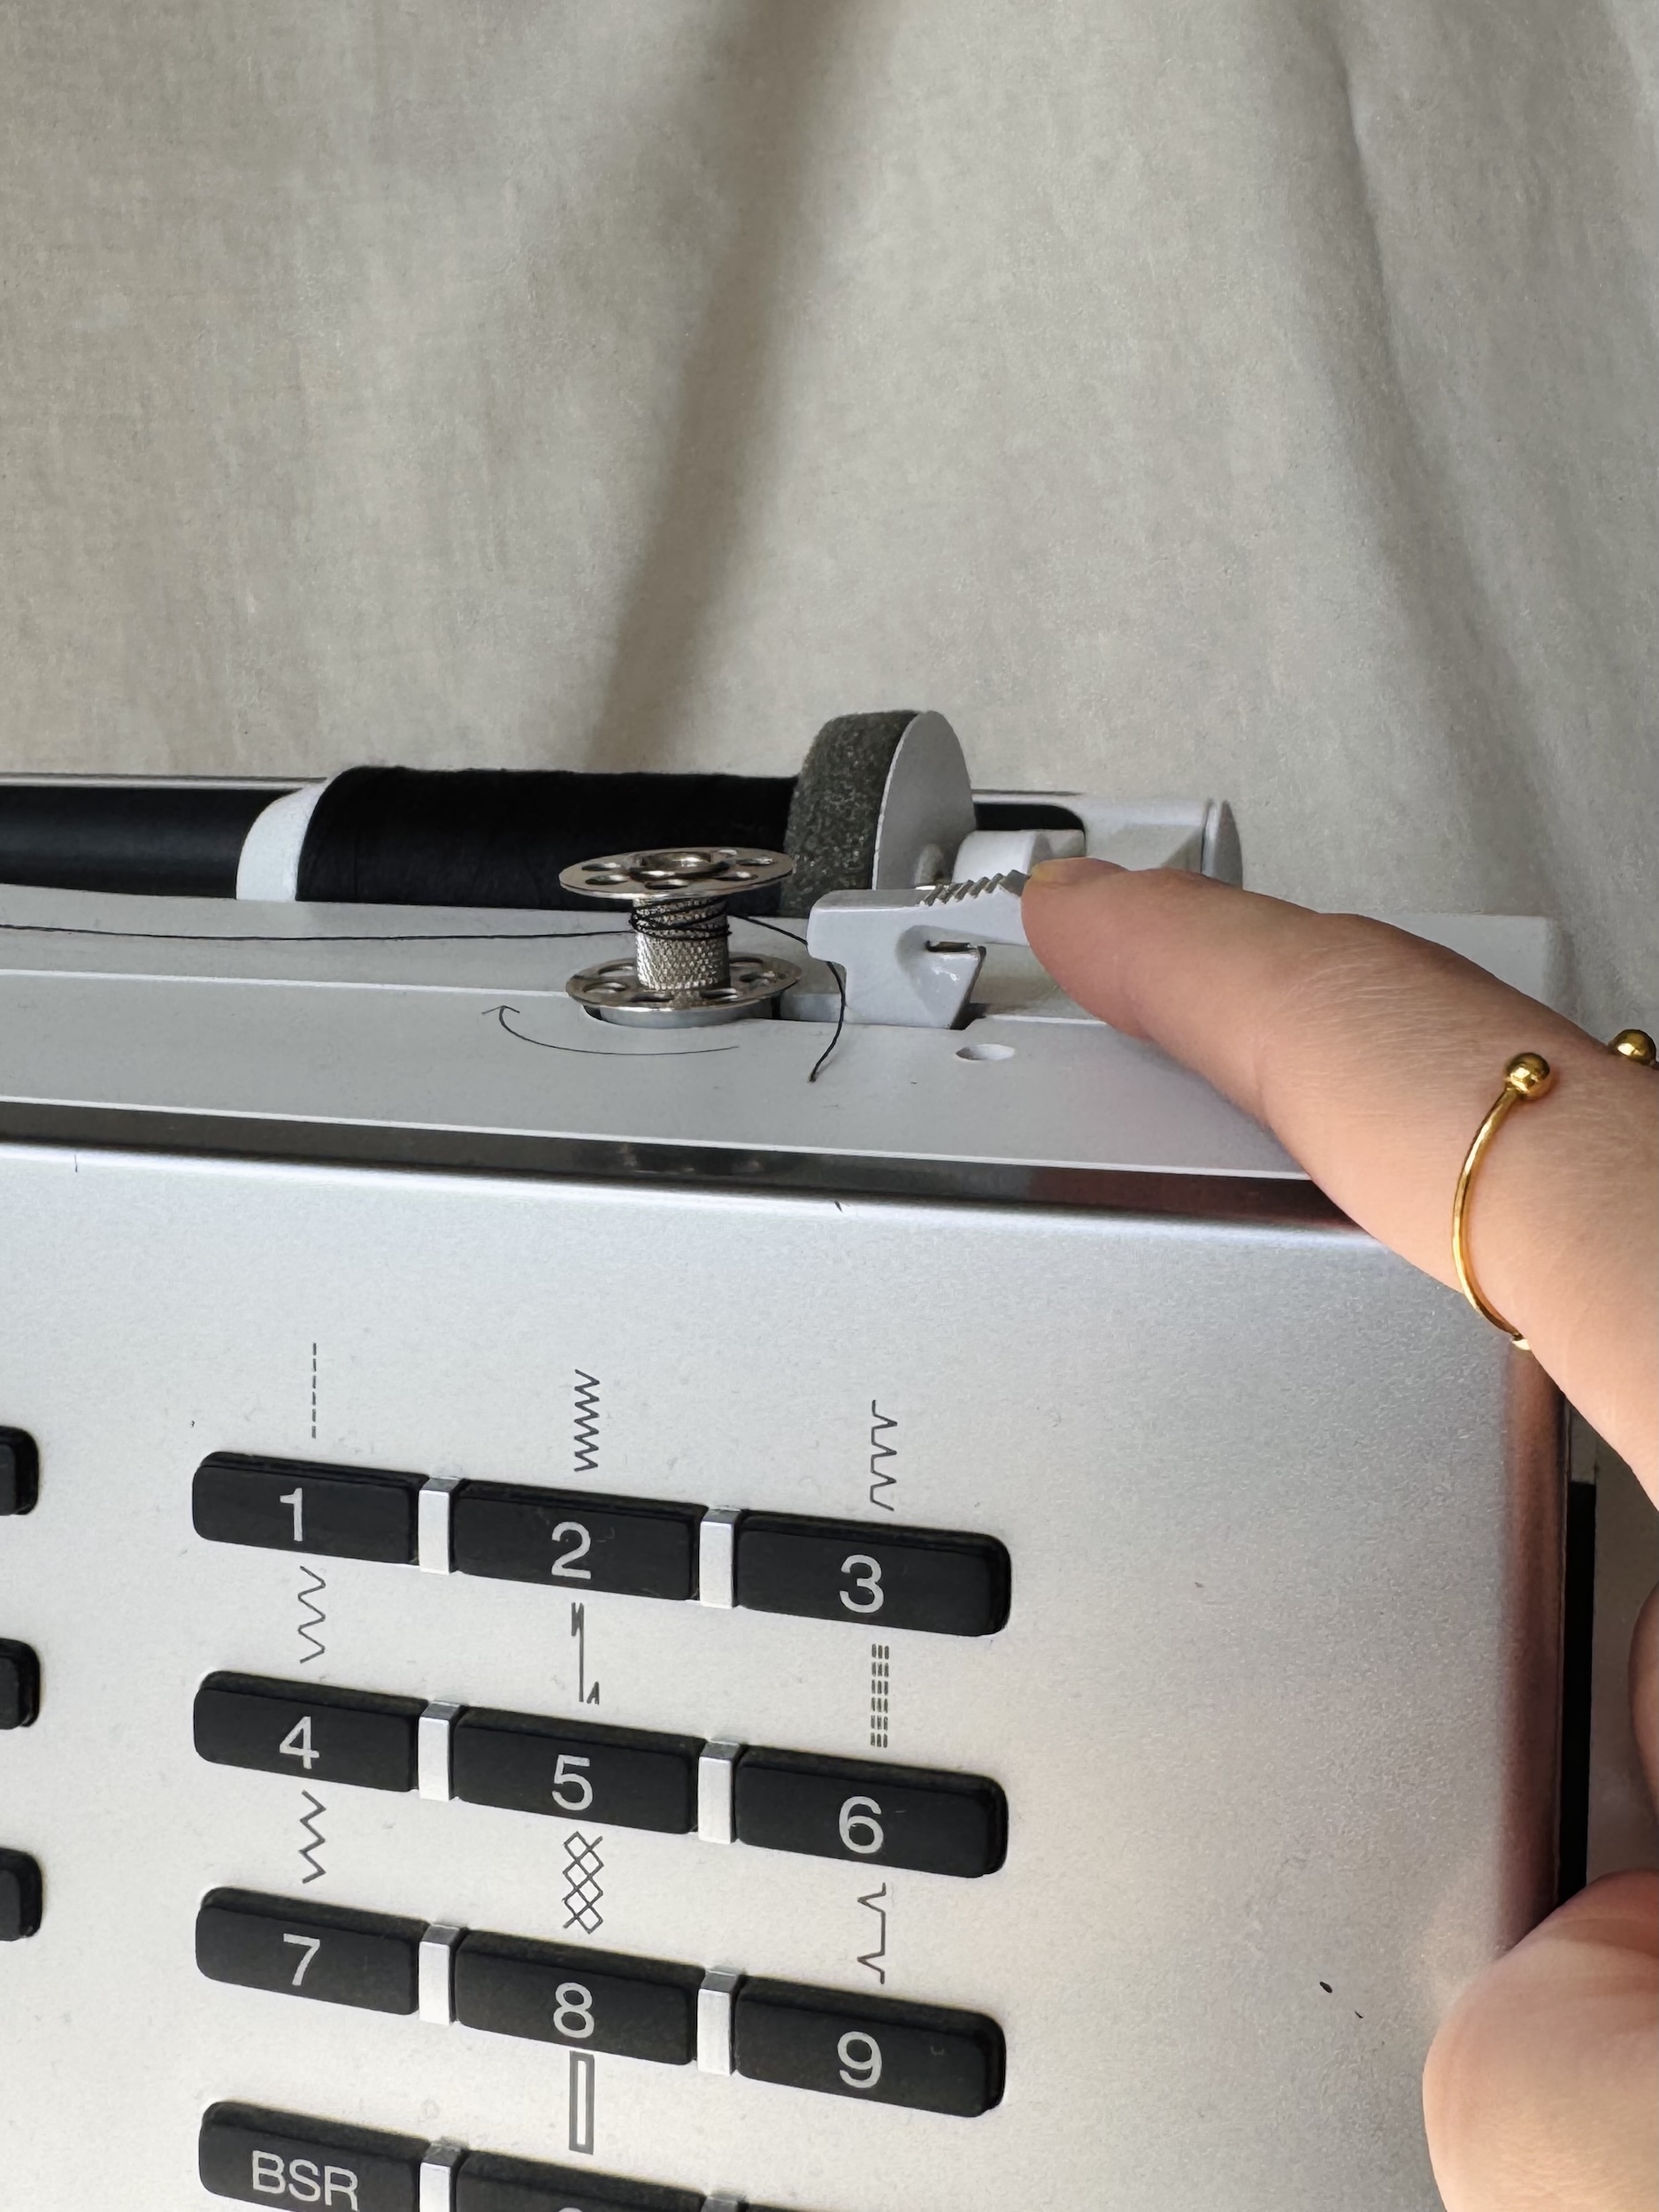
3. Feed the thread through the rear thread guide, and around the bobbin winder pre-tension.
4. Wind the thread around the bobbin 2–3 times in a clockwise direction.
5. Push the bobbin engaging lever towards the bobbin. The bobbin should start to wind automatically, stopping when the bobbin is full.
6. Remove the bobbin and cut the thread using the bobbin thread cutter.
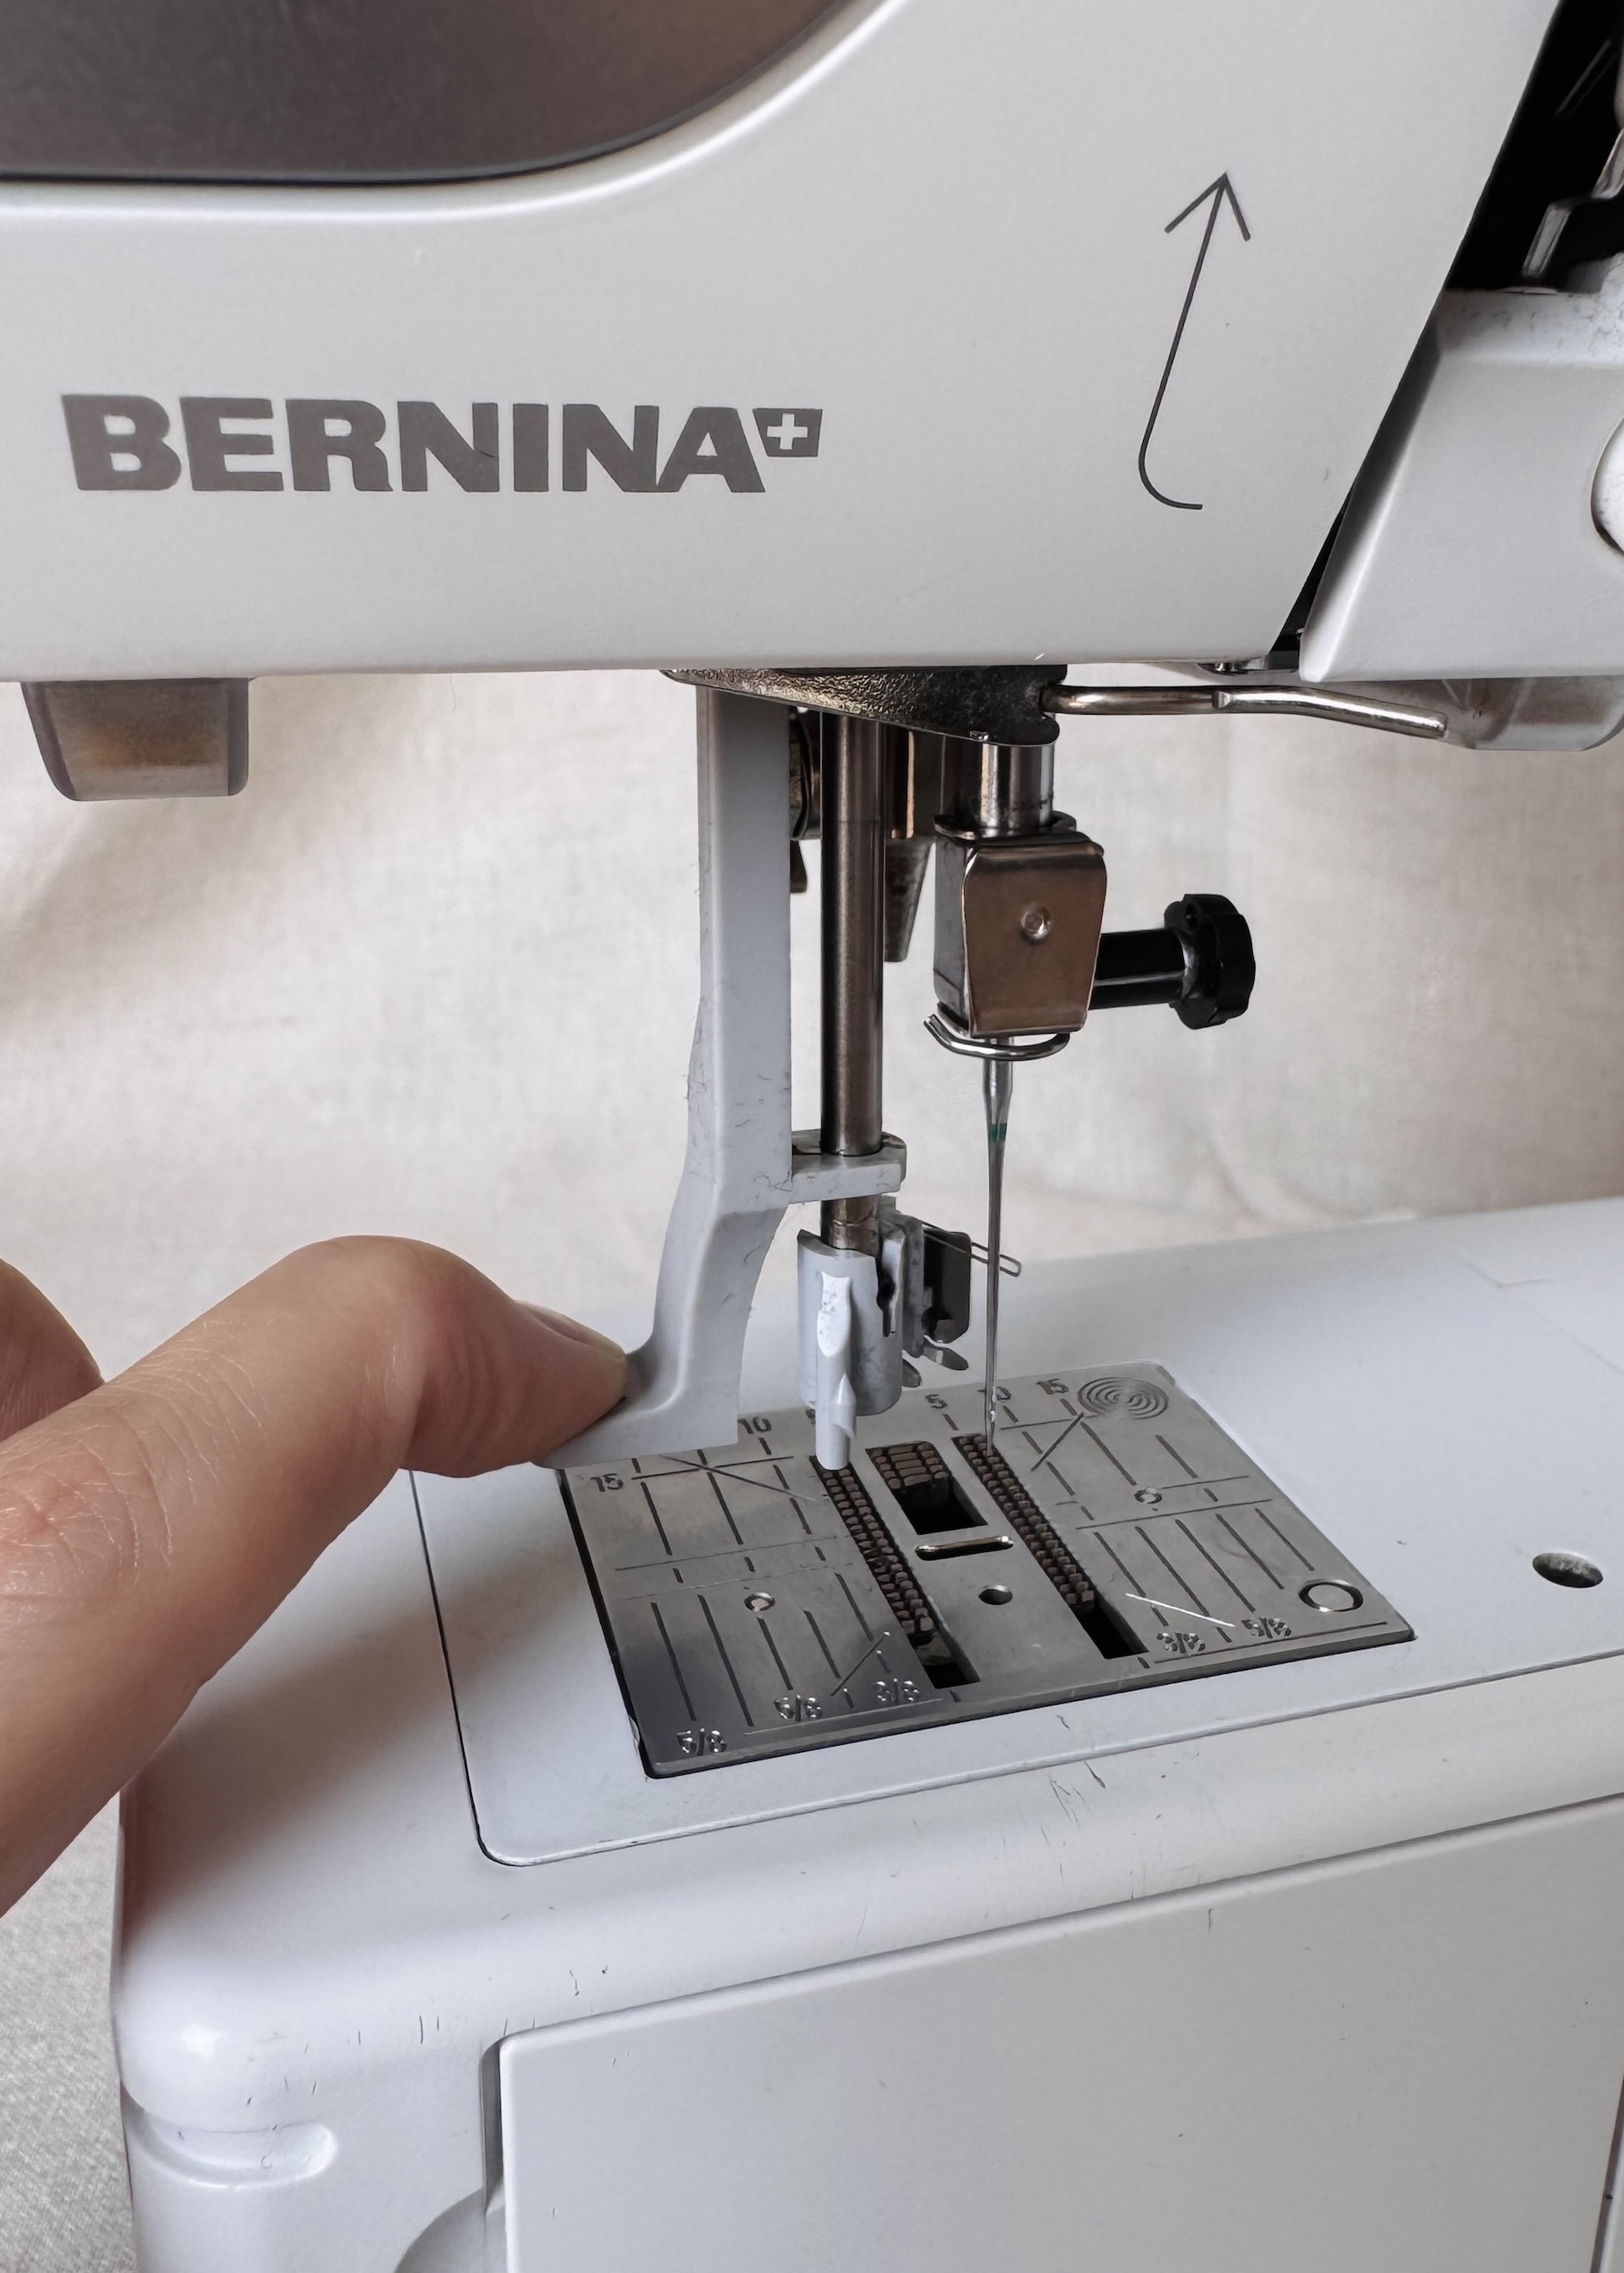
Threading the upper thread
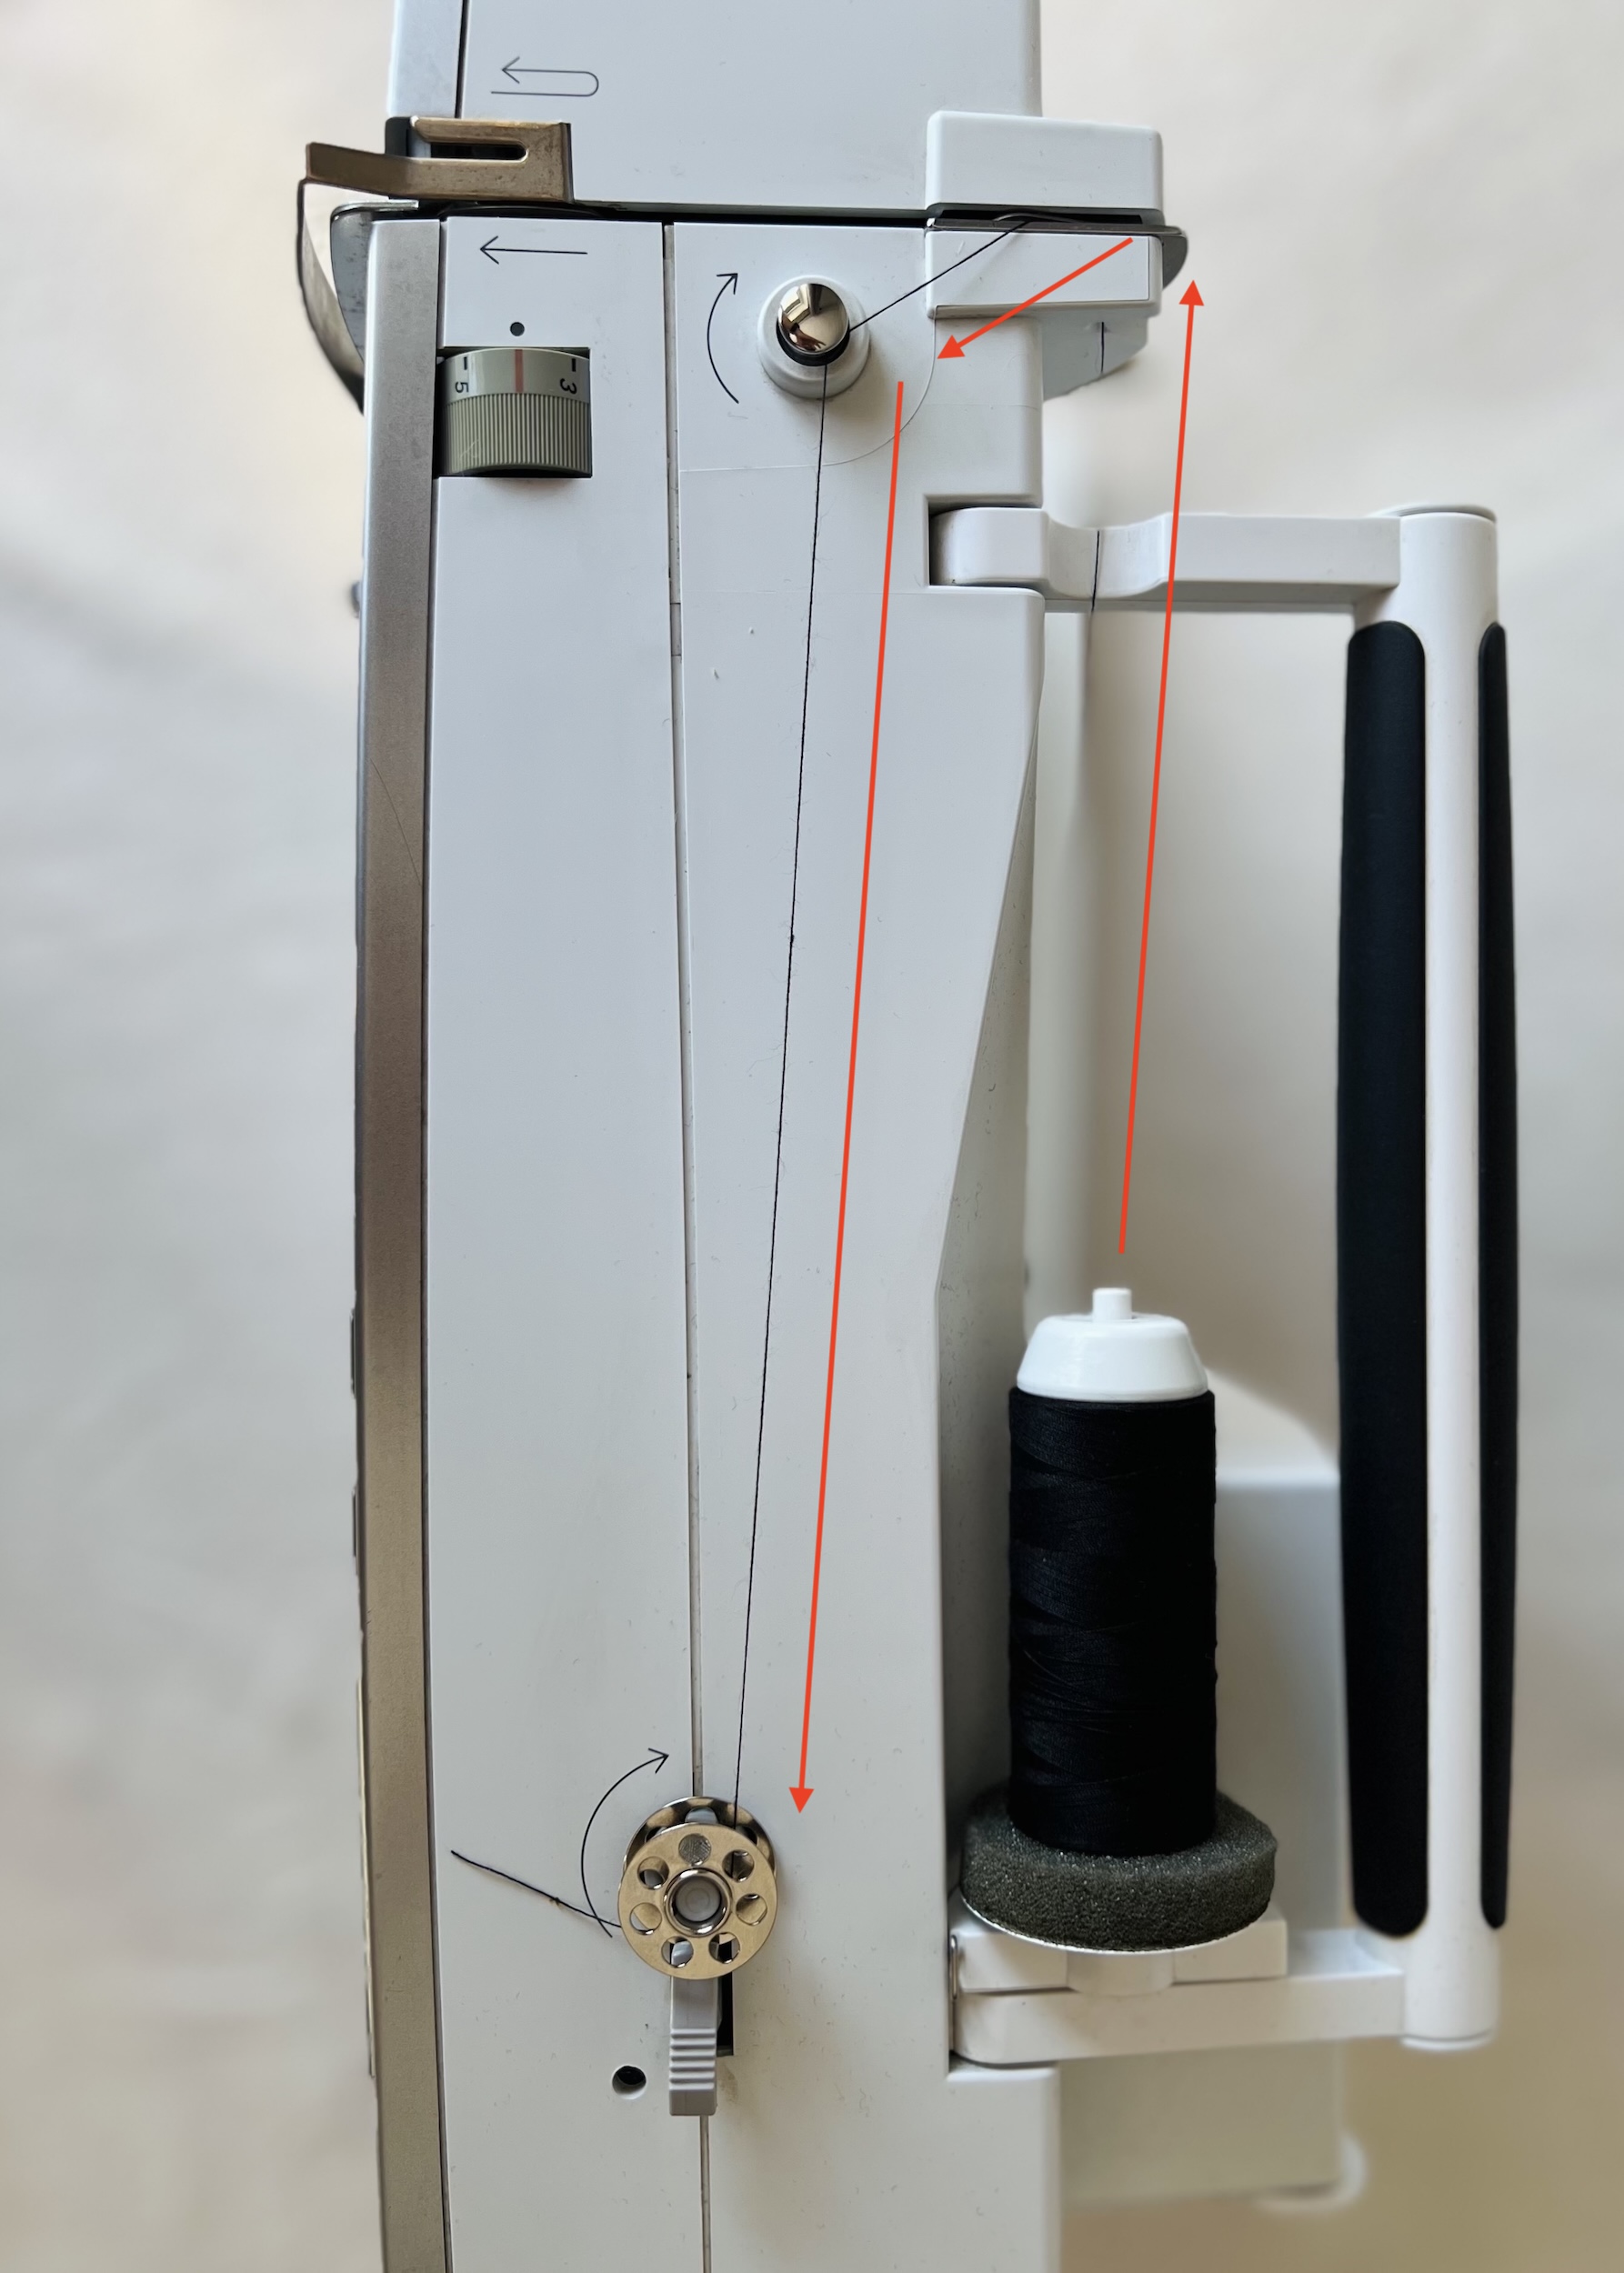
1. Raise the needle by turning the hand wheel.
2. Raise the presser foot by lifting the presser foot lifter at the back of the machine.
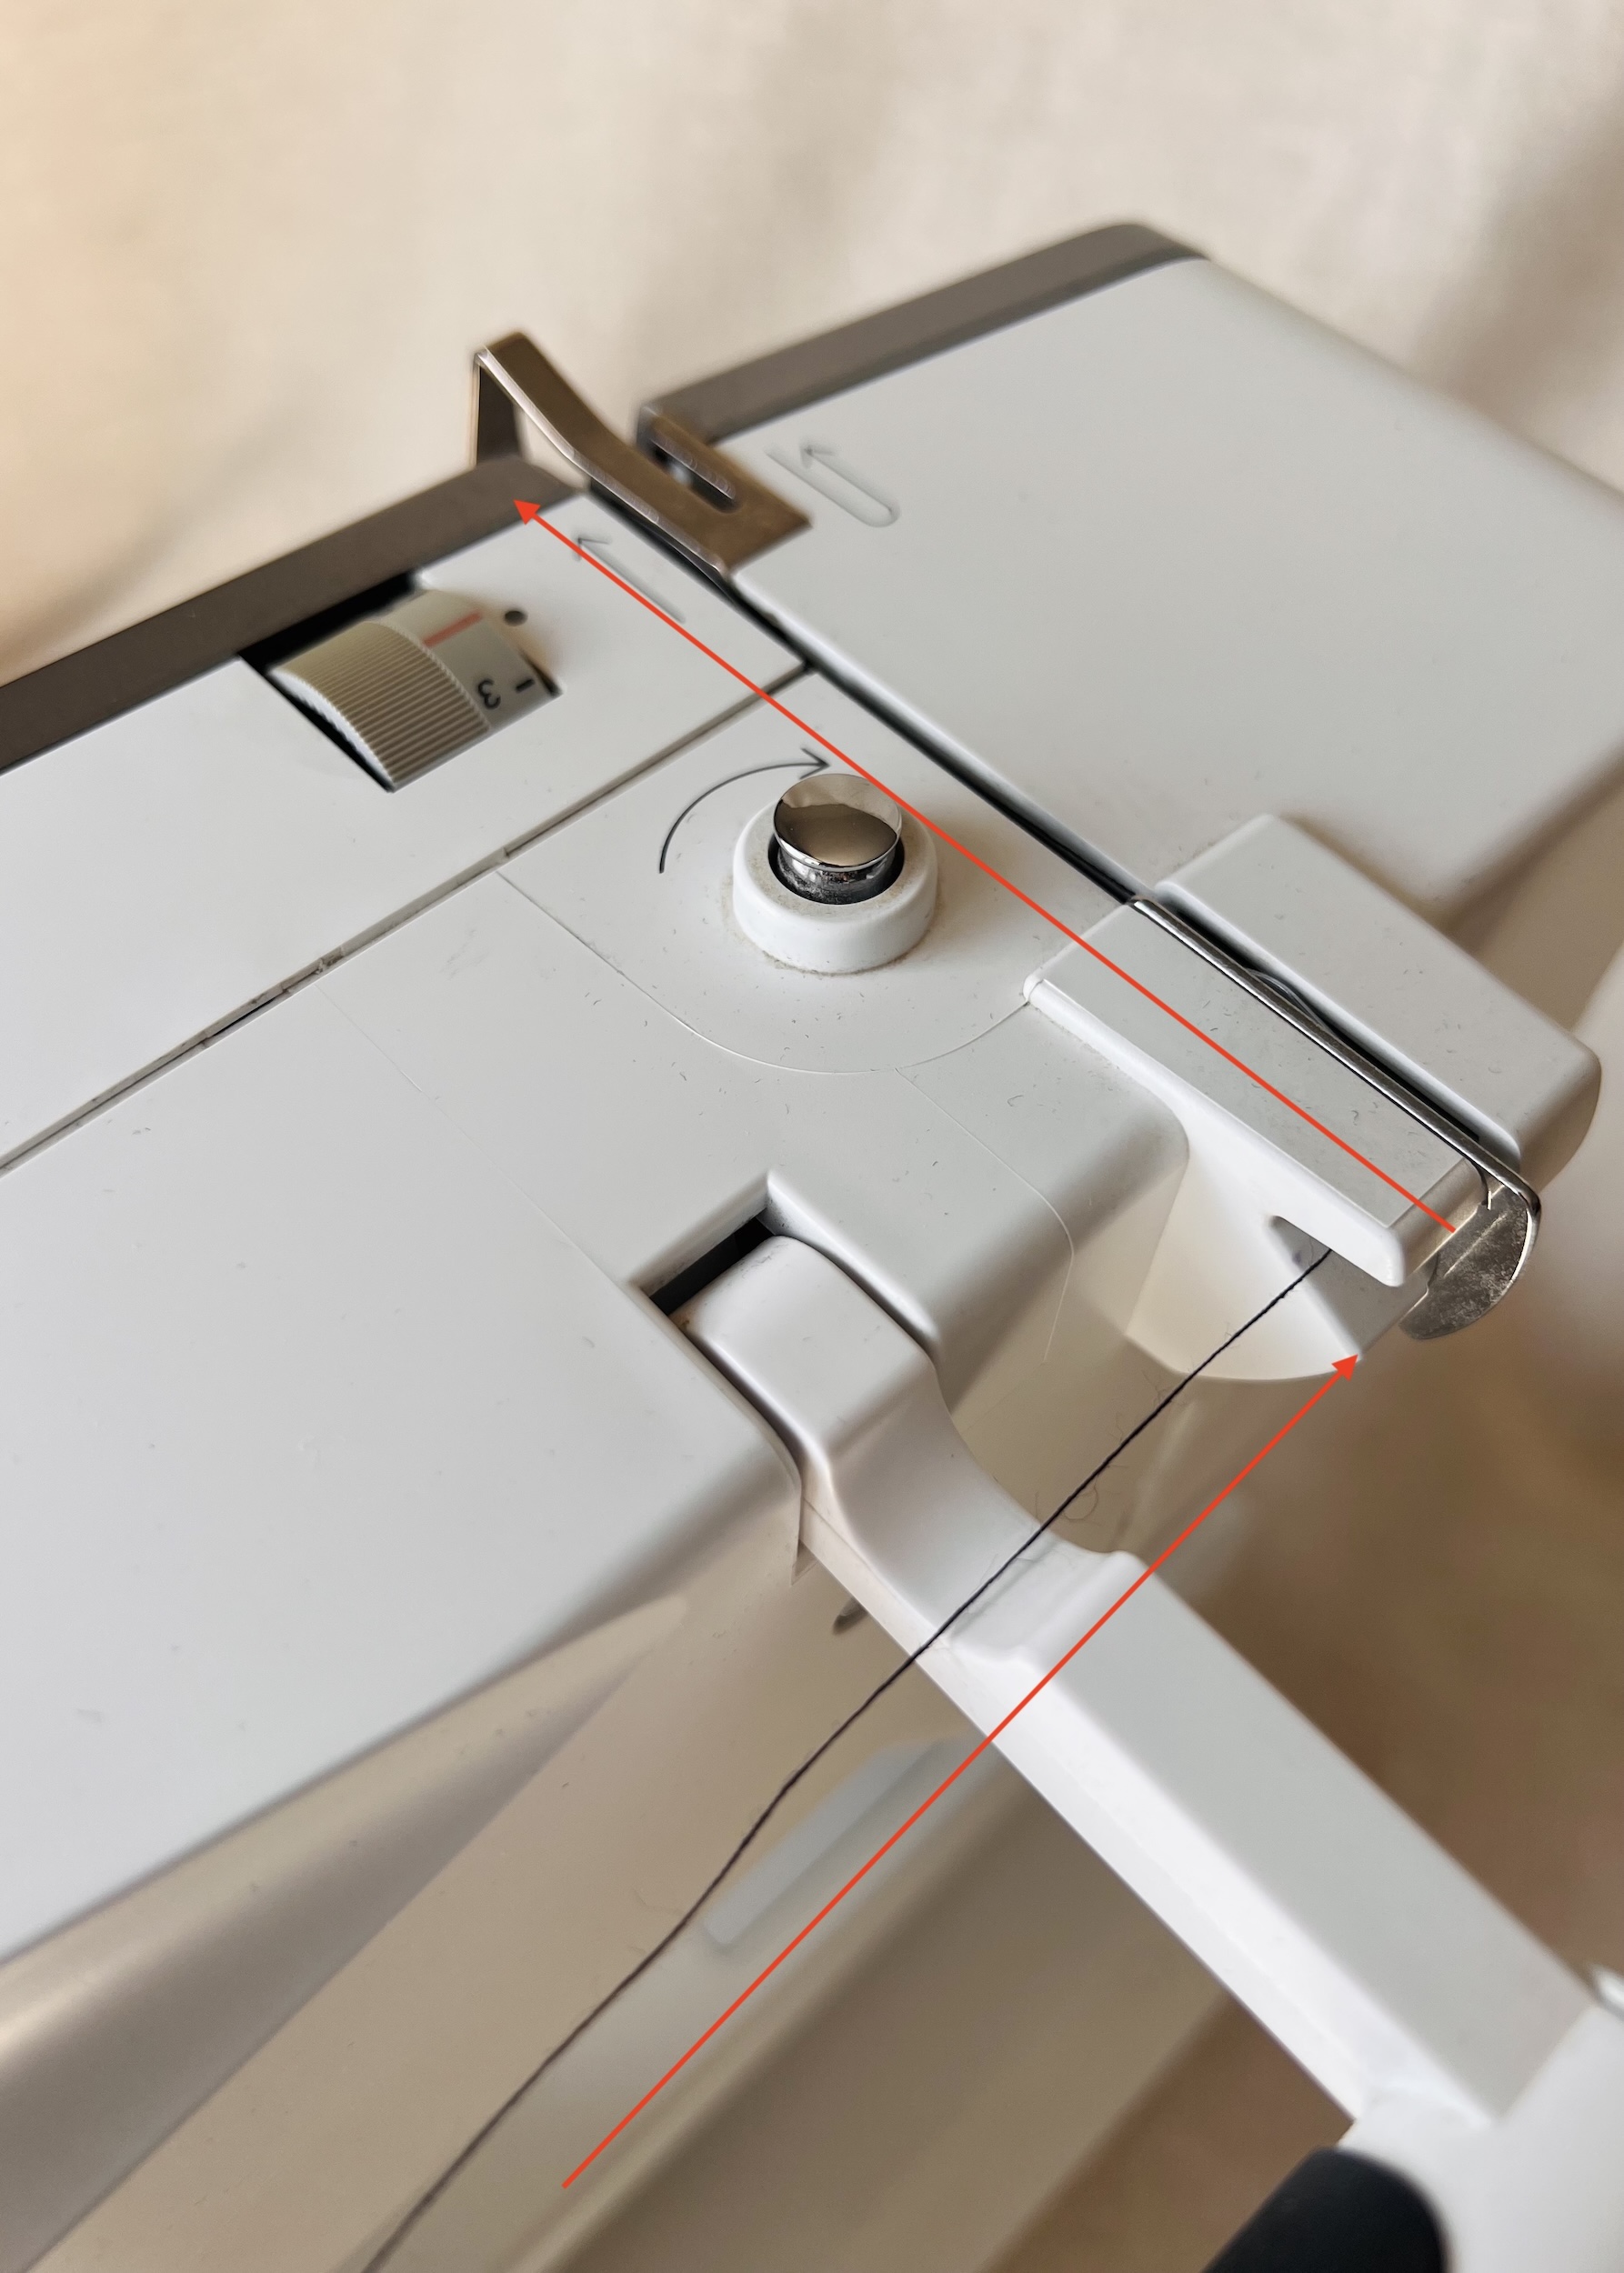
3. Position the spool of thread either on the horizontal or vertical spool pin (as per Step 1 of winding the bobbin).
4. Feed the thread through the rear thread guide, and toward the front right of the machine.
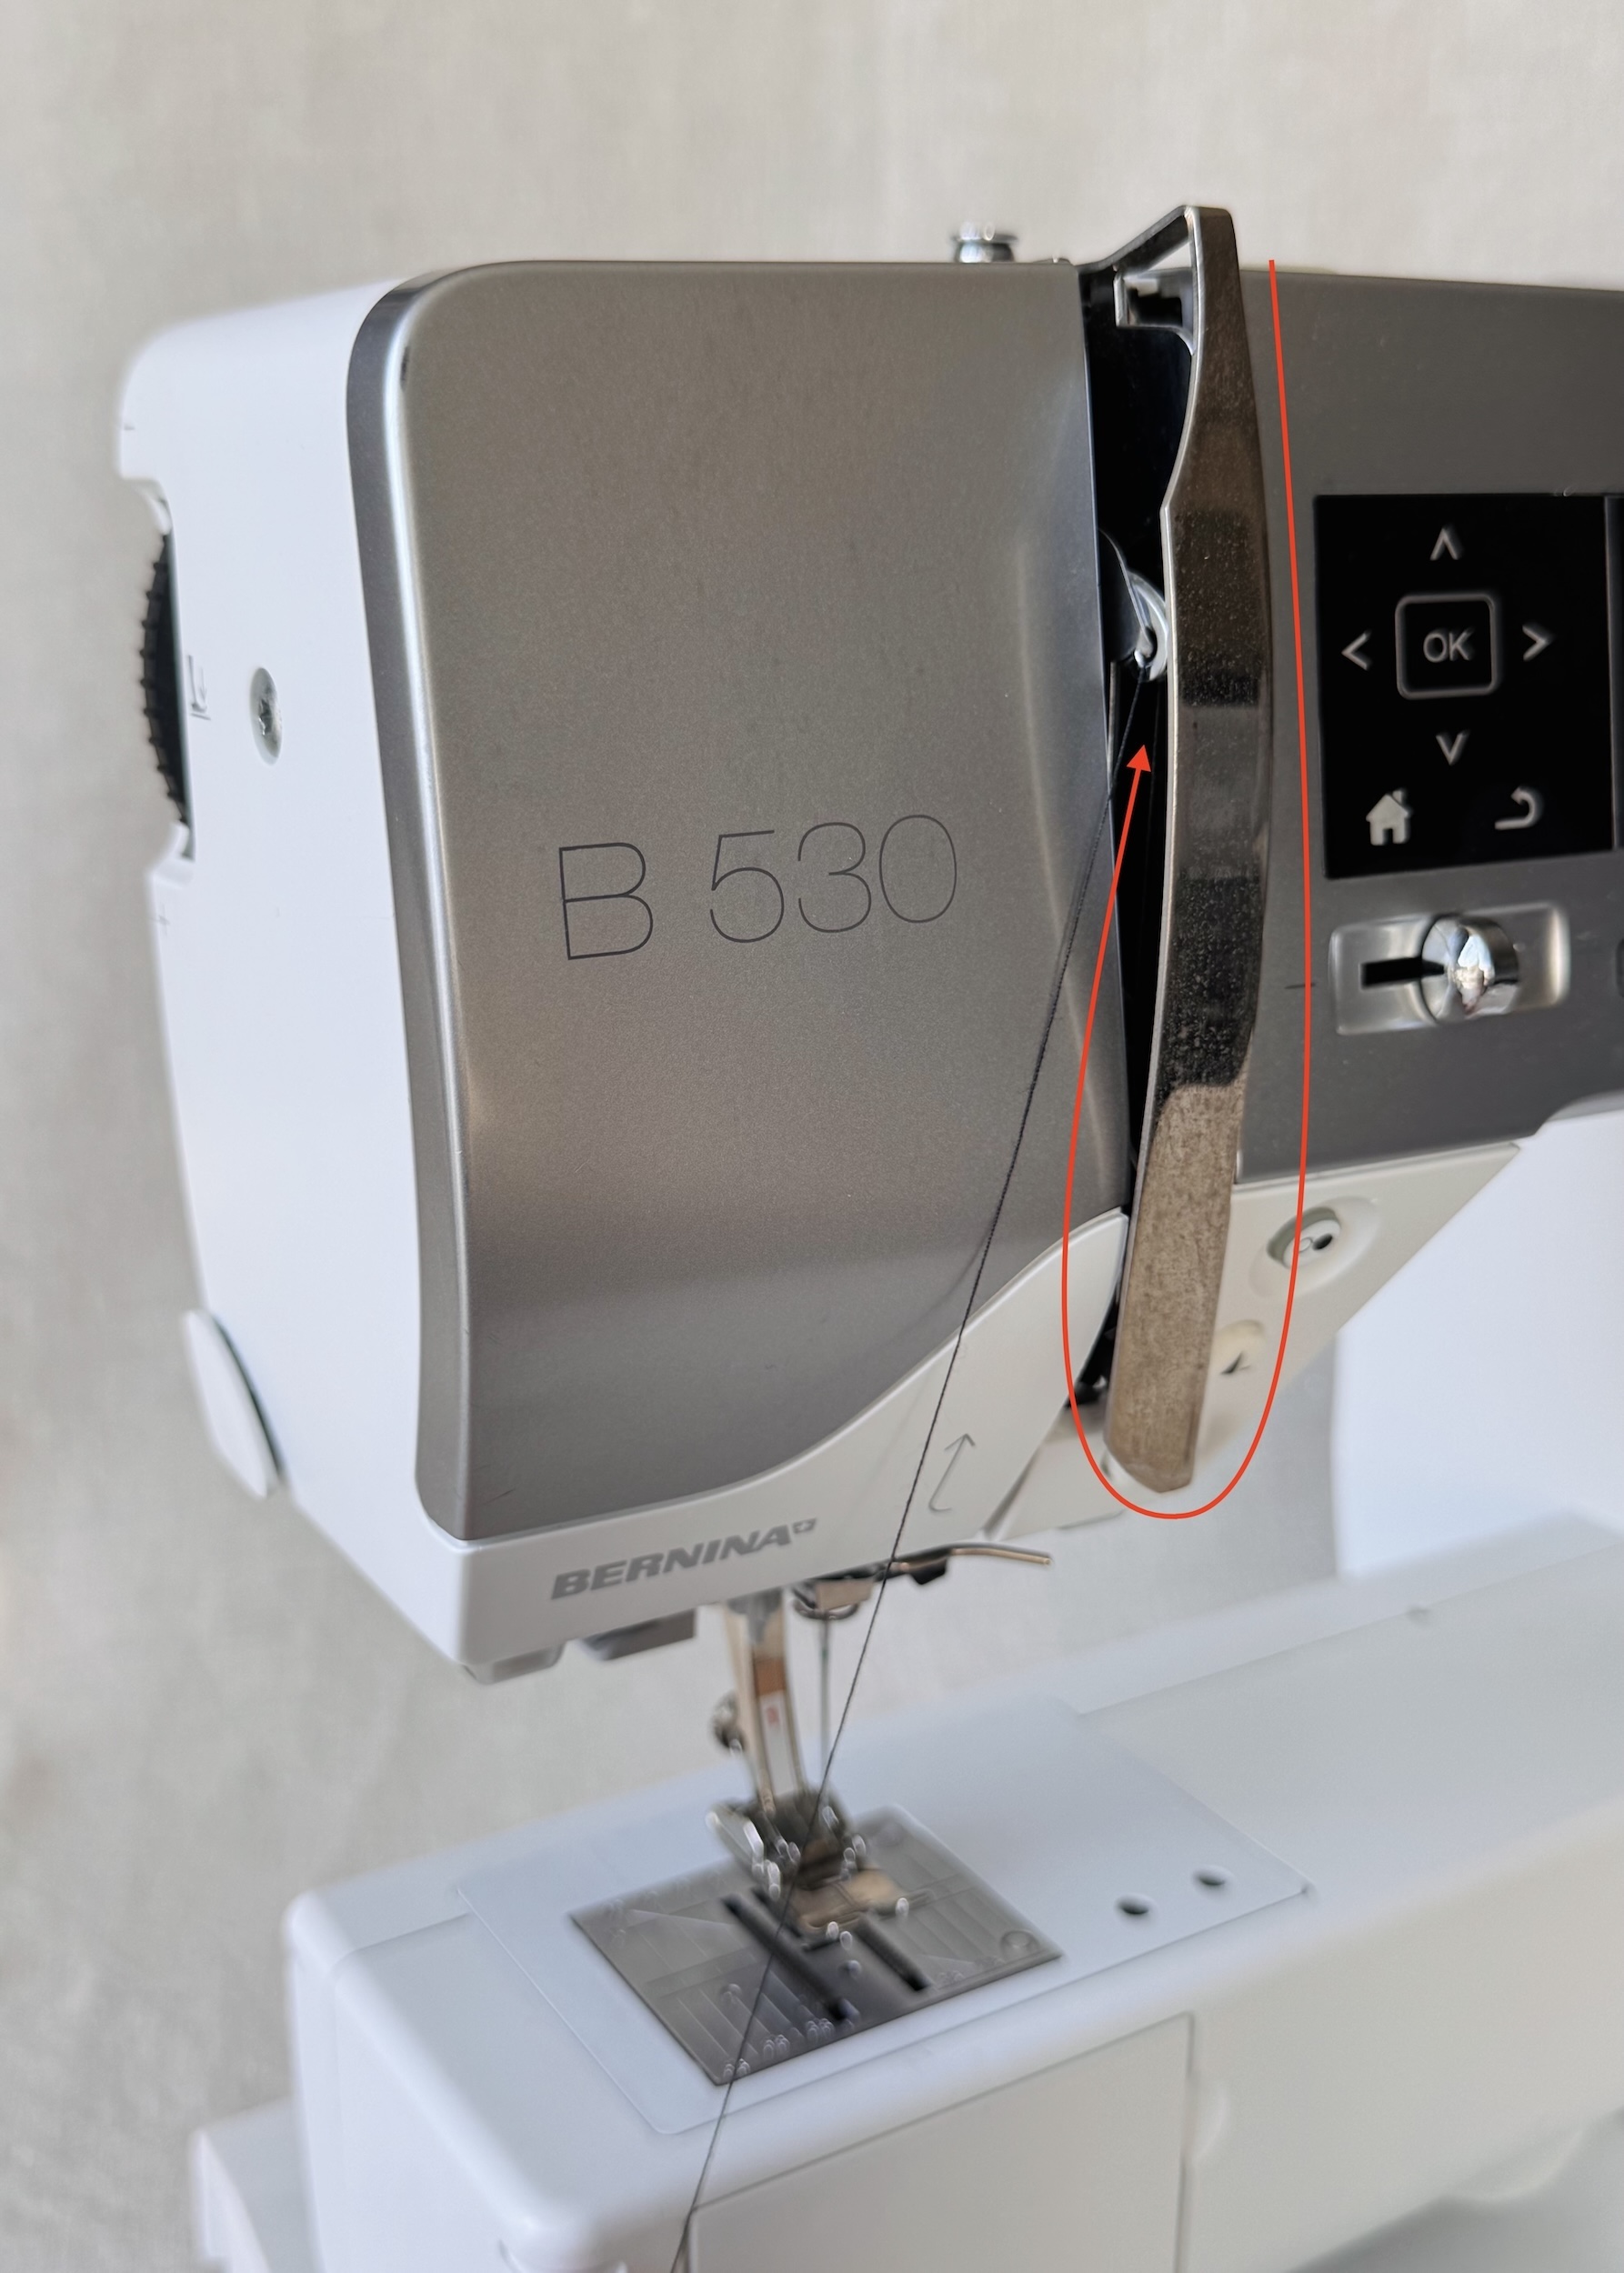
5. Feed the thread downward through the right of the thread take-up cover and around, before going back up through the left of the thread take-up cover.
6. Feed the thread through the thread take up lever.
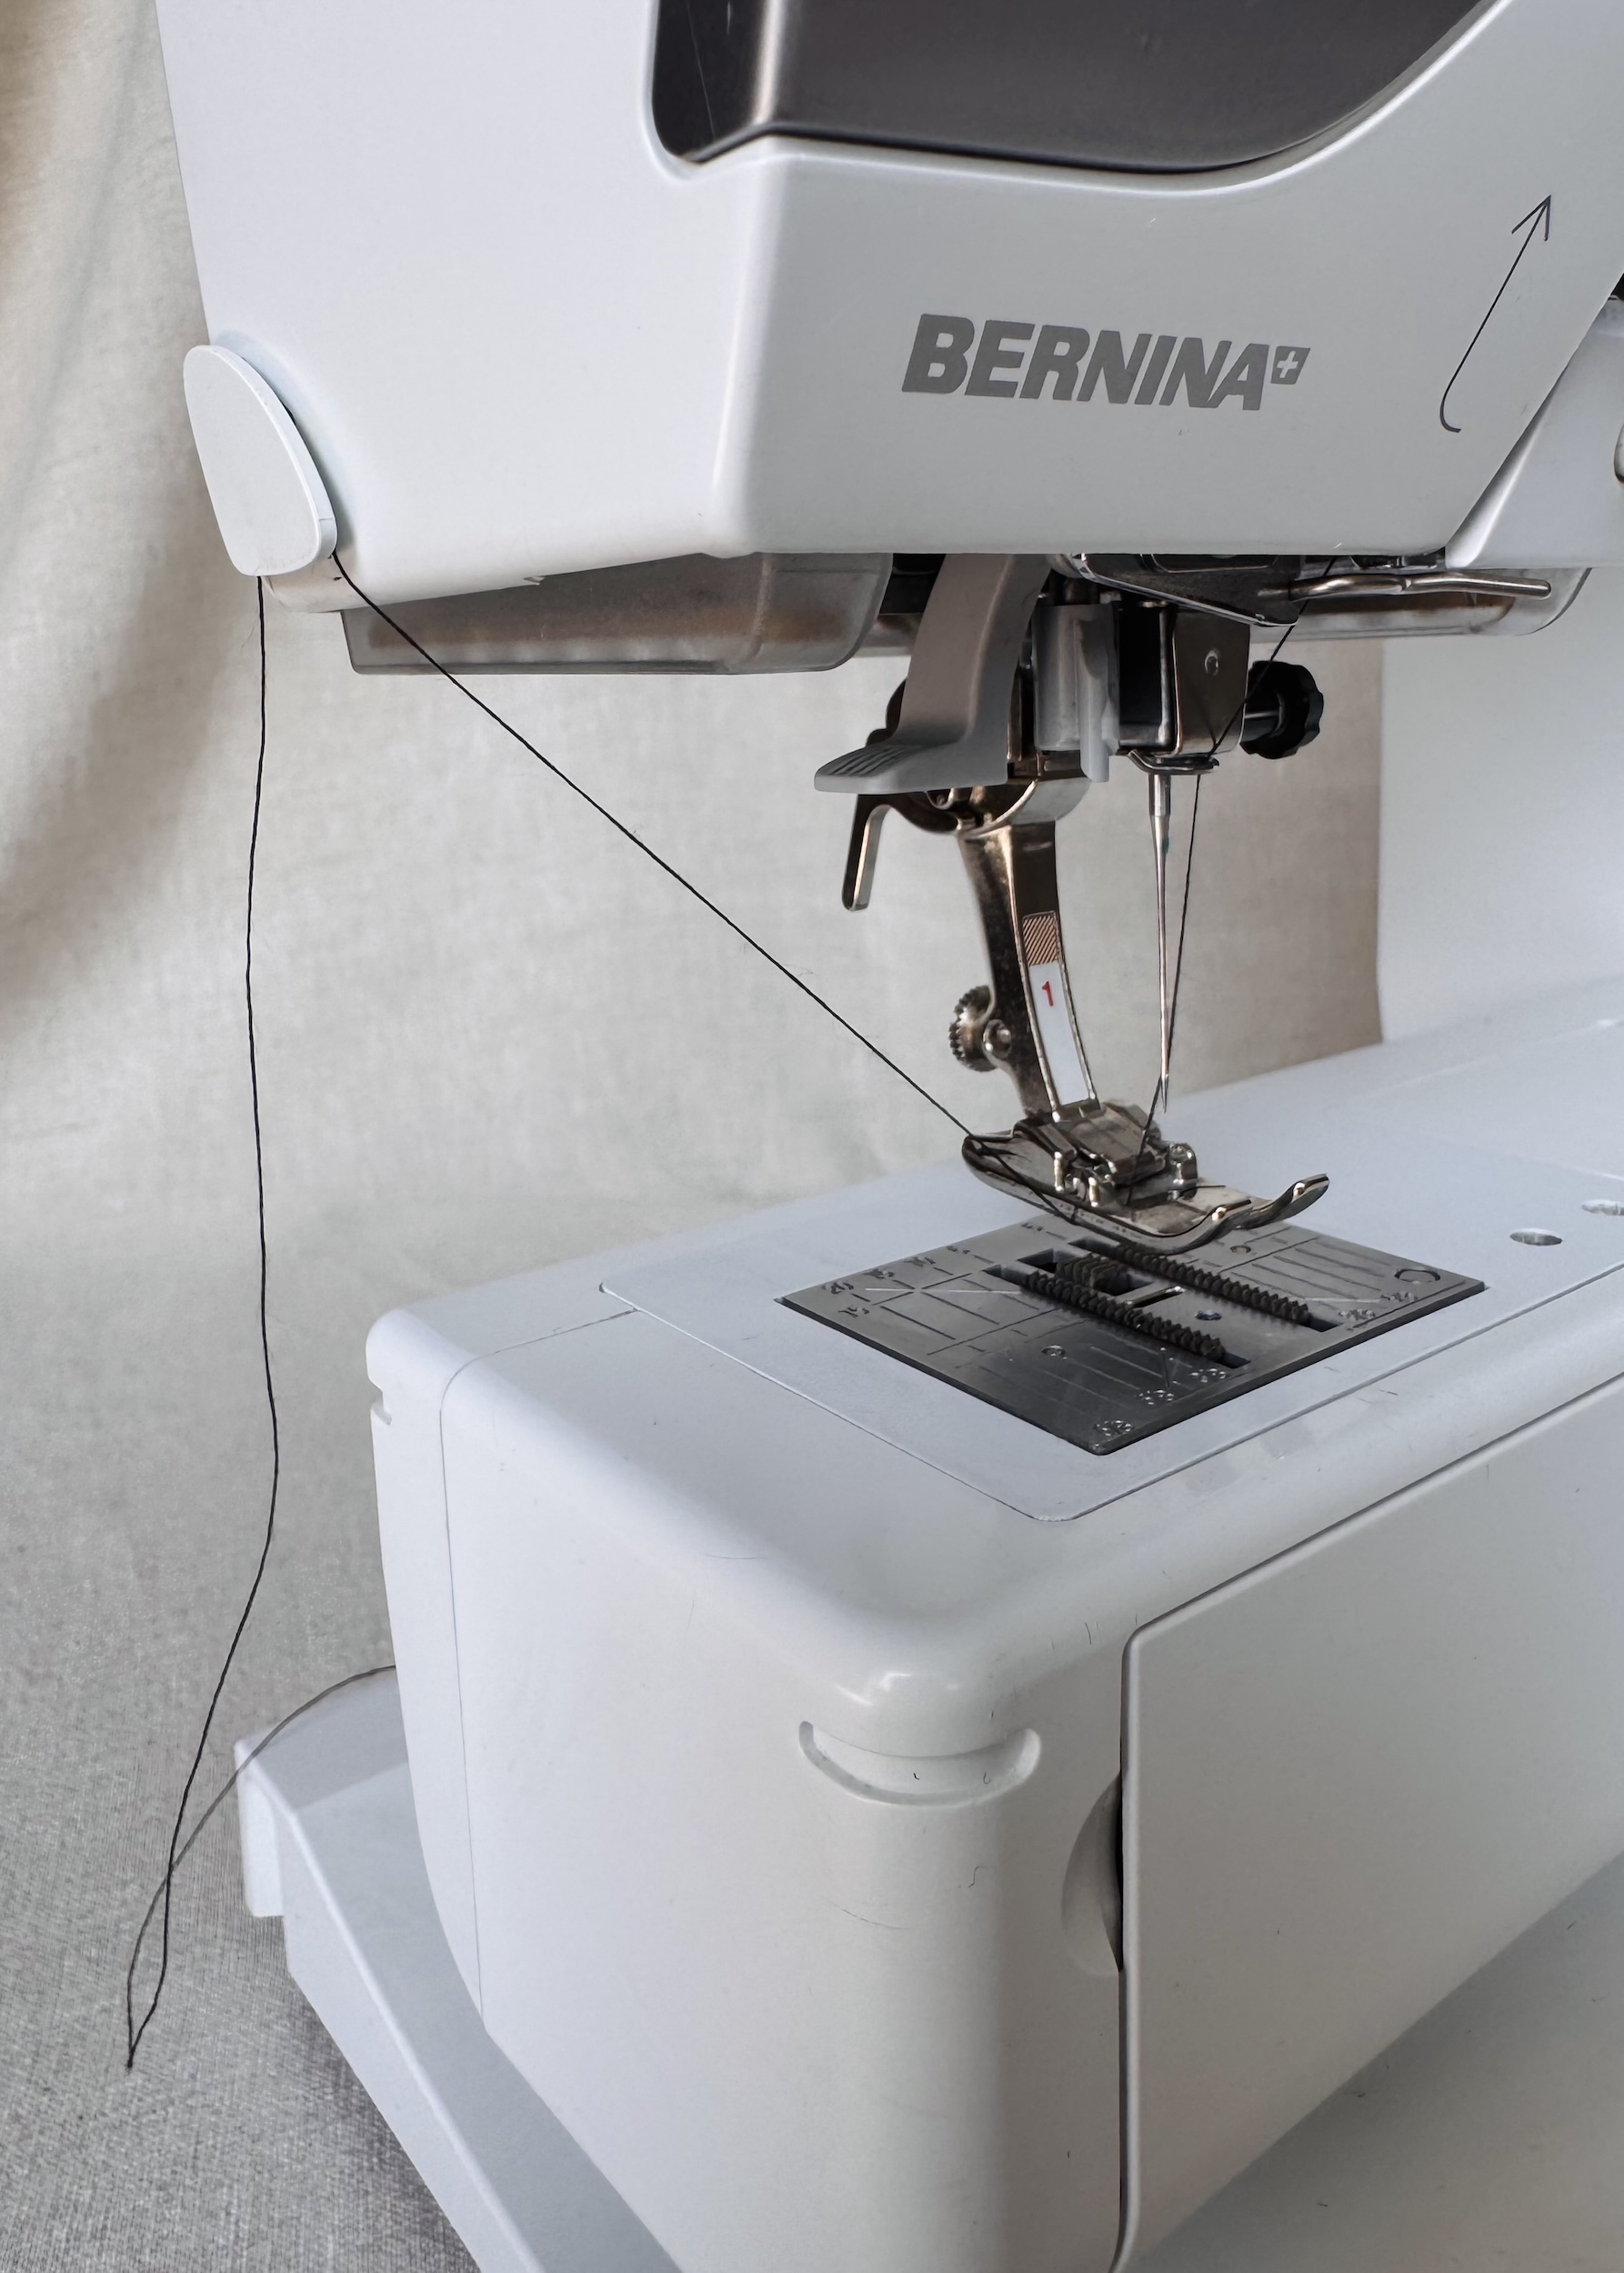
7. Feed the thread down through the thread guides.
8. Thread the needle and pull the thread through the slit of the presser foot and towards the back of the machine.
9. Cut off any excess thread length using the rear thread cutter.
Note: Check whether your machine has an automatic needle threader. On my machine, there is a pull down lever positioned to the left of the needle.
Tip: If you want to change the thread but don’t want to unthread the machine completely simply cut the end of the existing thread at the thread spool. Replace the thread spool with the new thread and tie the ends together. Trim the thread tail. Gently pull the old thread through the machine, pulling the new thread along with it. Cut the thread near the eye of the needle and pull through the old thread. Rethread needle with new thread. This method also works well on an overlocker too (check out the article ‘How To Re-thread an Overlocker (The Easy Way)’ for more on this.
Inserting bobbin into bobbin case
1. Insert the bobbin into the bobbin case ensuring the thread spins in a clockwise direction.
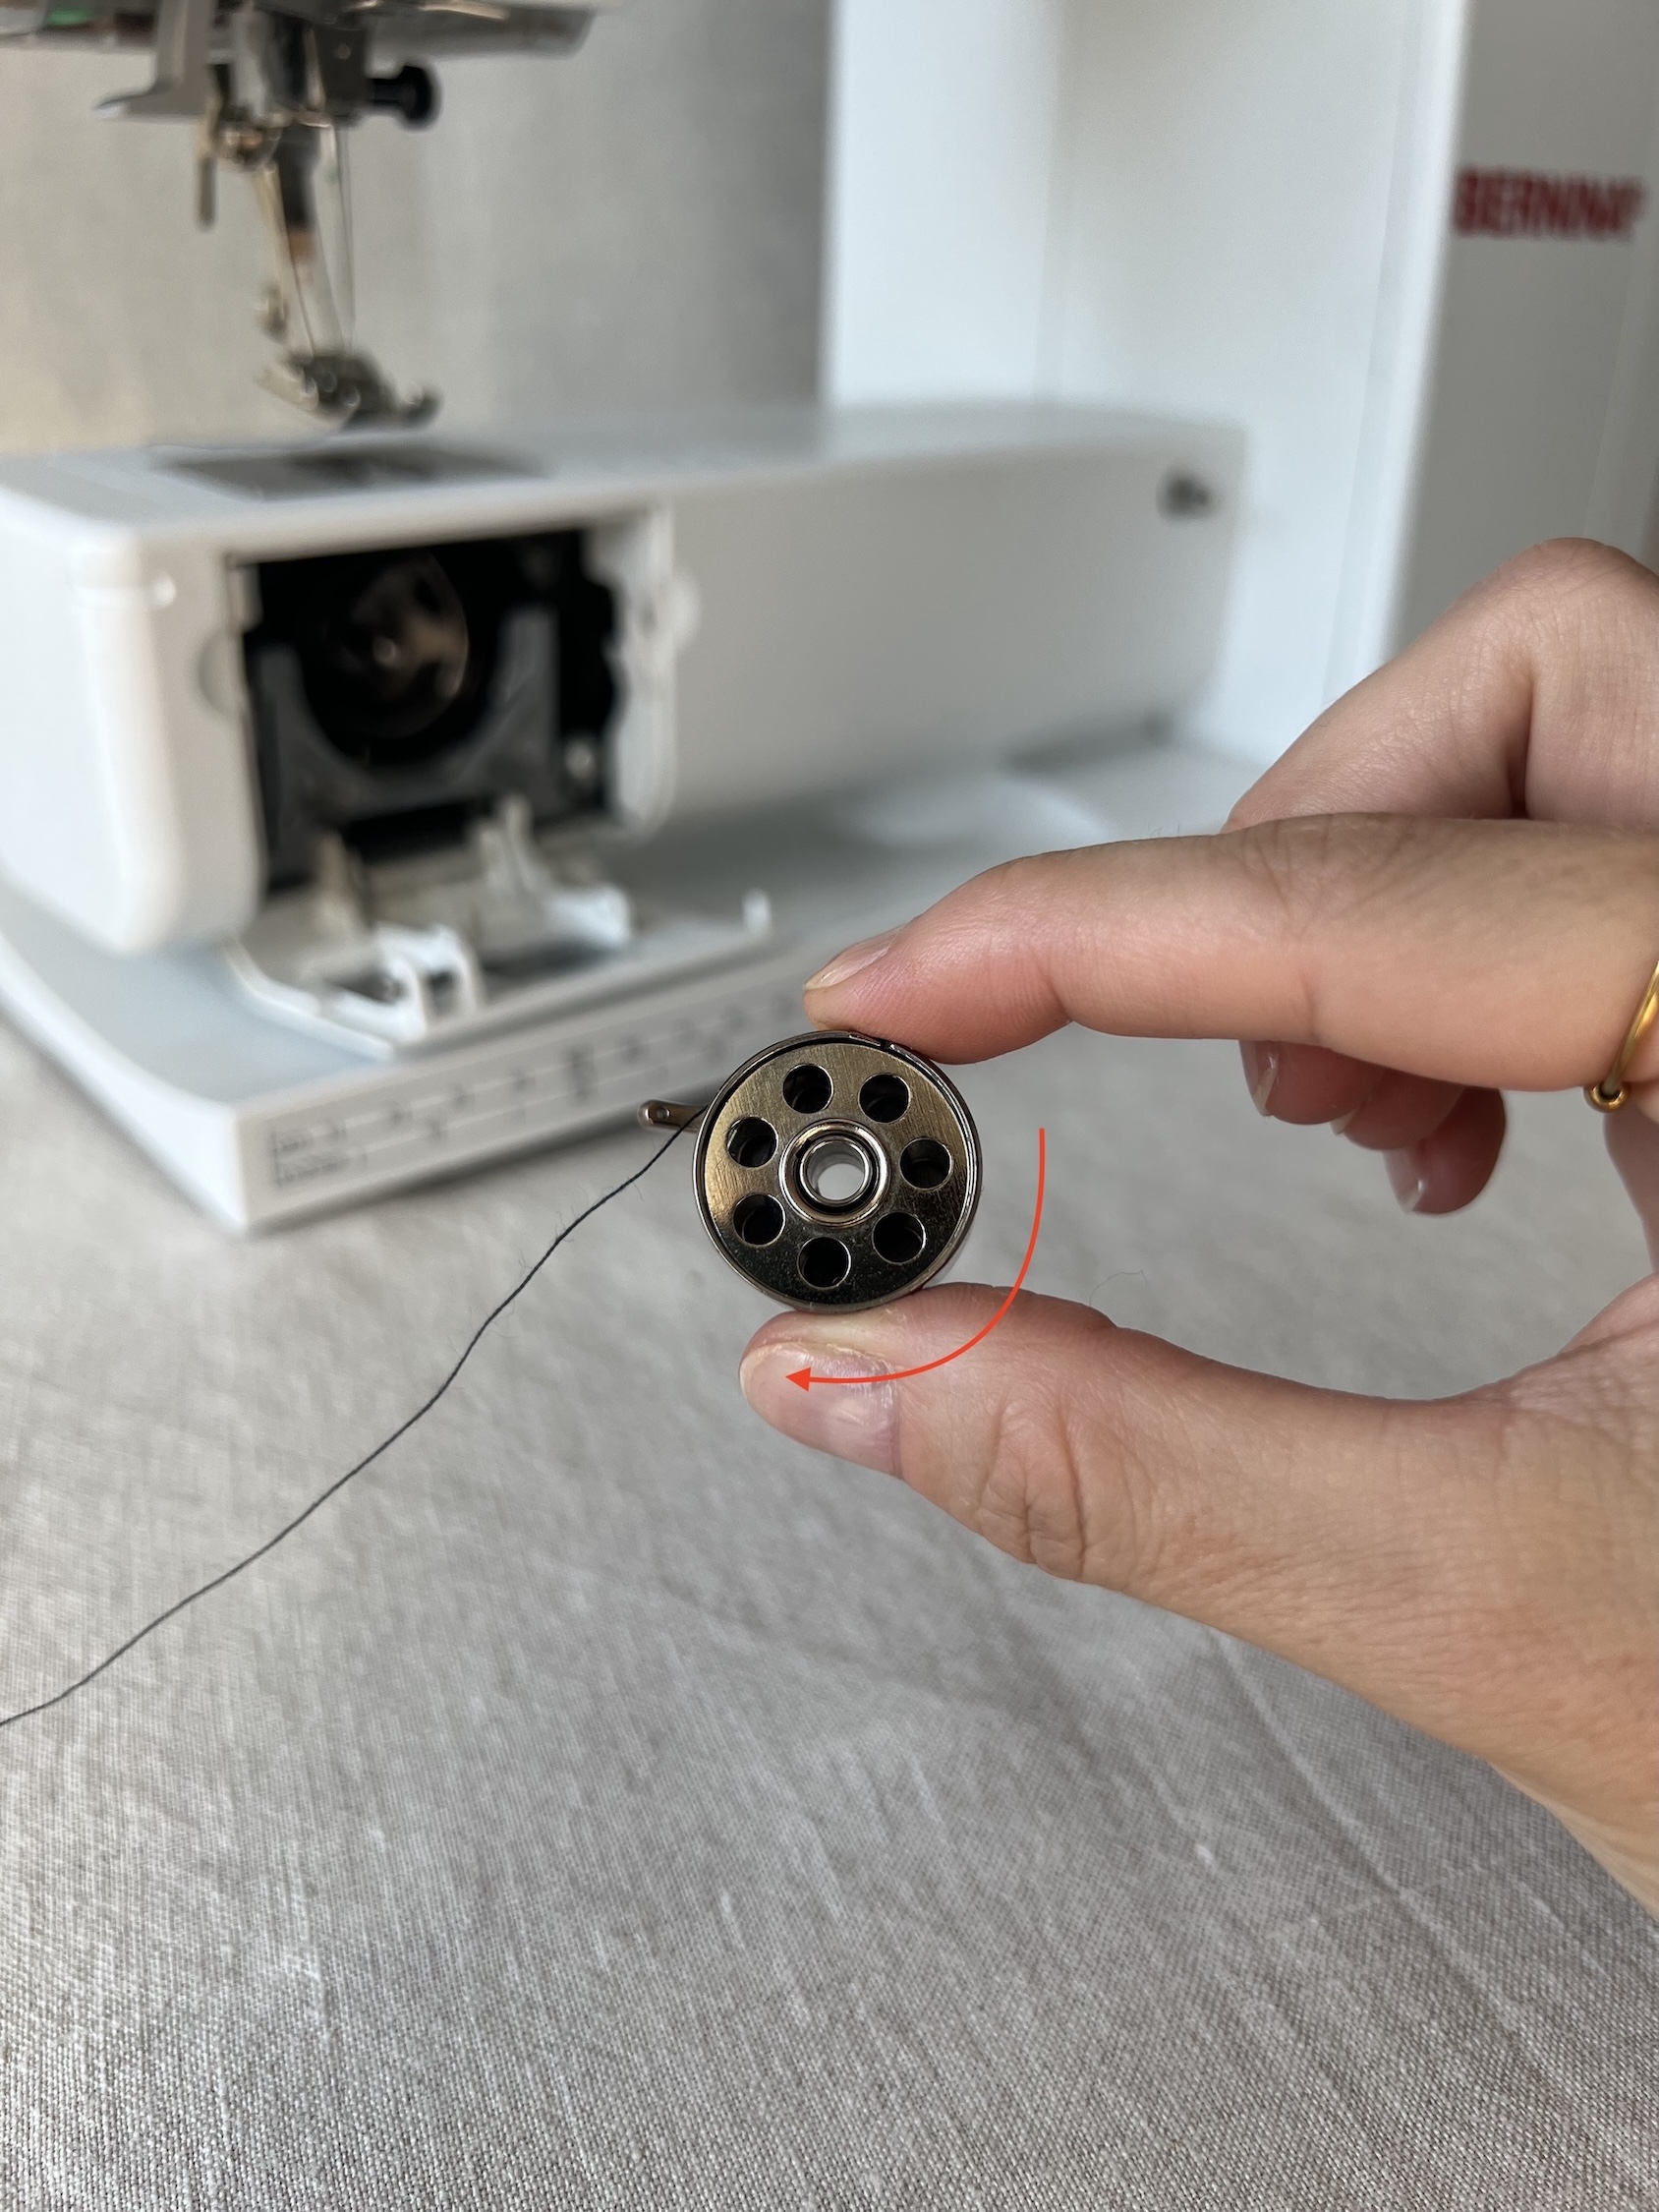
2. Hold the bobbin and bobbin case and ease the thread into the slot, under the tension spring, and into the t-shape slit.
3. Pull the thread a little to double check that the thread is spinning in a clockwise direction.
Tip: If sewing buttonholes, try threading the bobbin thread through the finger of the bobbin case. This will make the tension a little tighter and hopefully create a neater button hole.
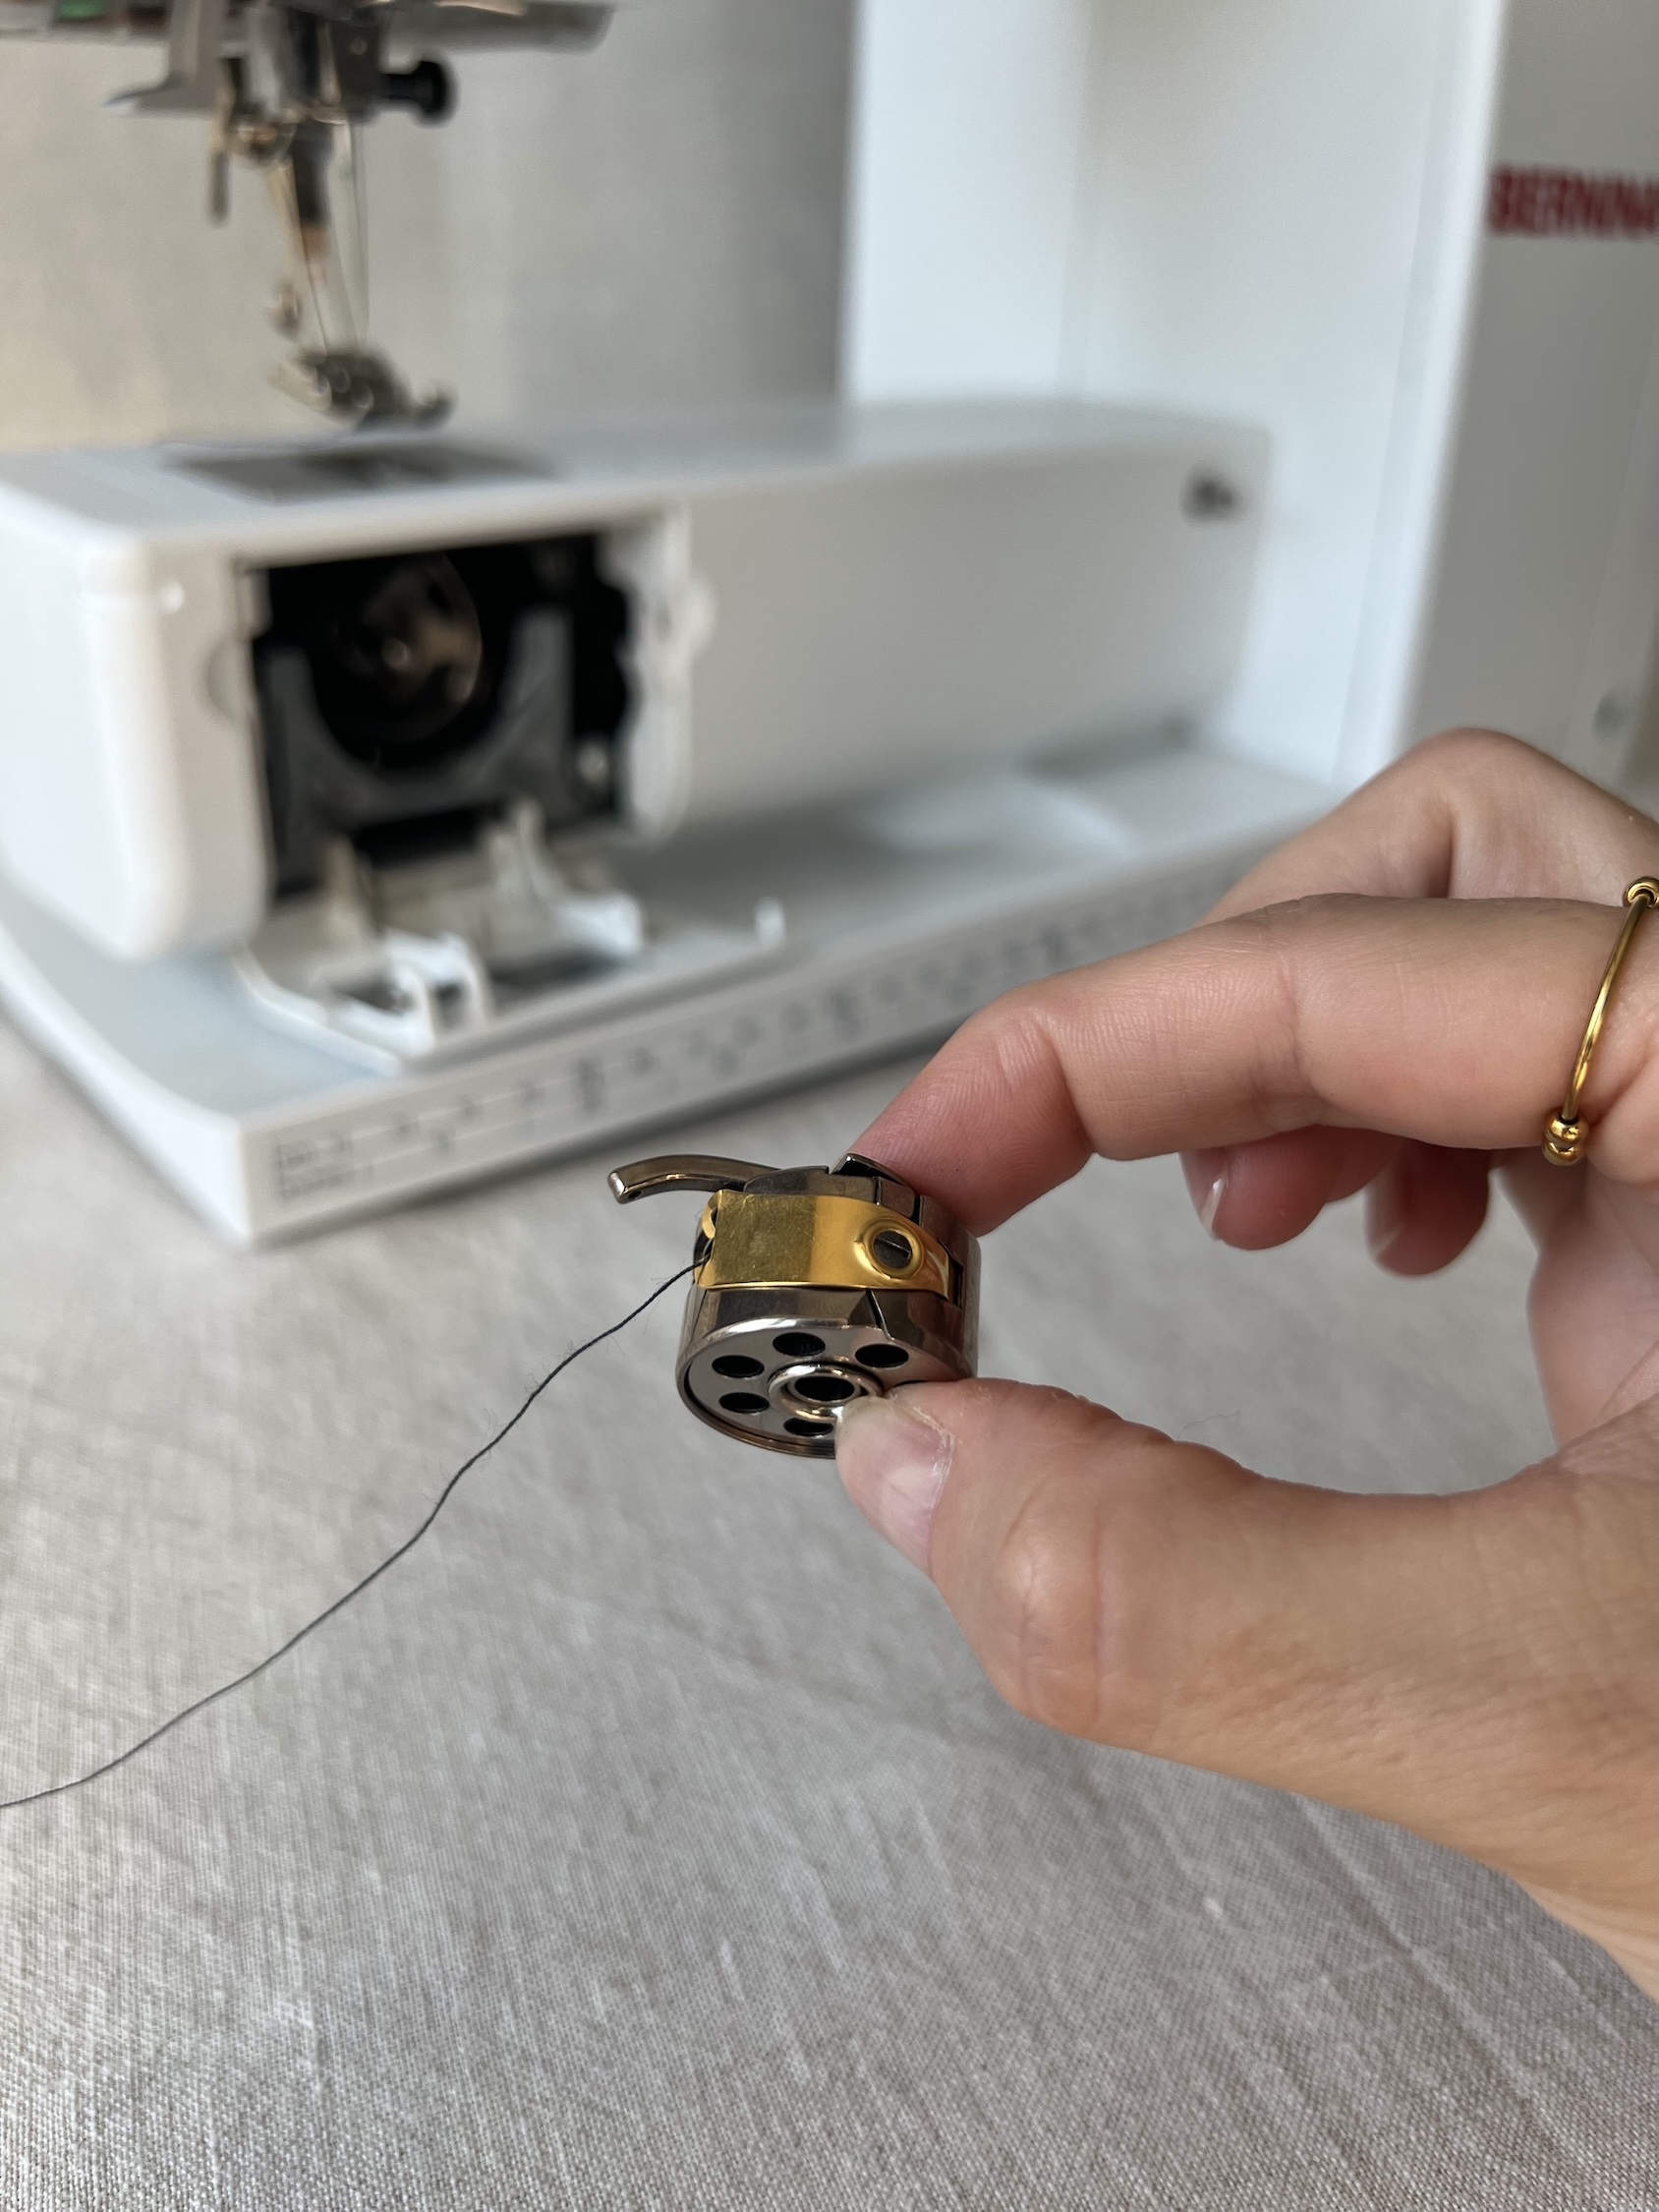
Inserting the bobbin and bobbin case into the machine
1. Raise the needle by turning the hand wheel.
2. Raise the presser foot by lifting the presser foot lifter at the back of the machine.
3. Open the bobbin cover.
4. Lift the bobbin case latch, and insert the bobbin case into the machine. Ensure the finger of the bobbin case points in an upwards direction.
5. Gently push the bobbin case into the machine until you hear a click.
6. Cut off any excess thread using the bobbin cover thread cutter.
7. Check that the bobbin case has been inserted correctly by winding the hand wheel a couple of times. The bobbin case should rotate as you do this. You will know if it has not been inserted correctly as it will simply fall out. If this is the case, just try again. If everything is okay, simply close the bobbin cover.
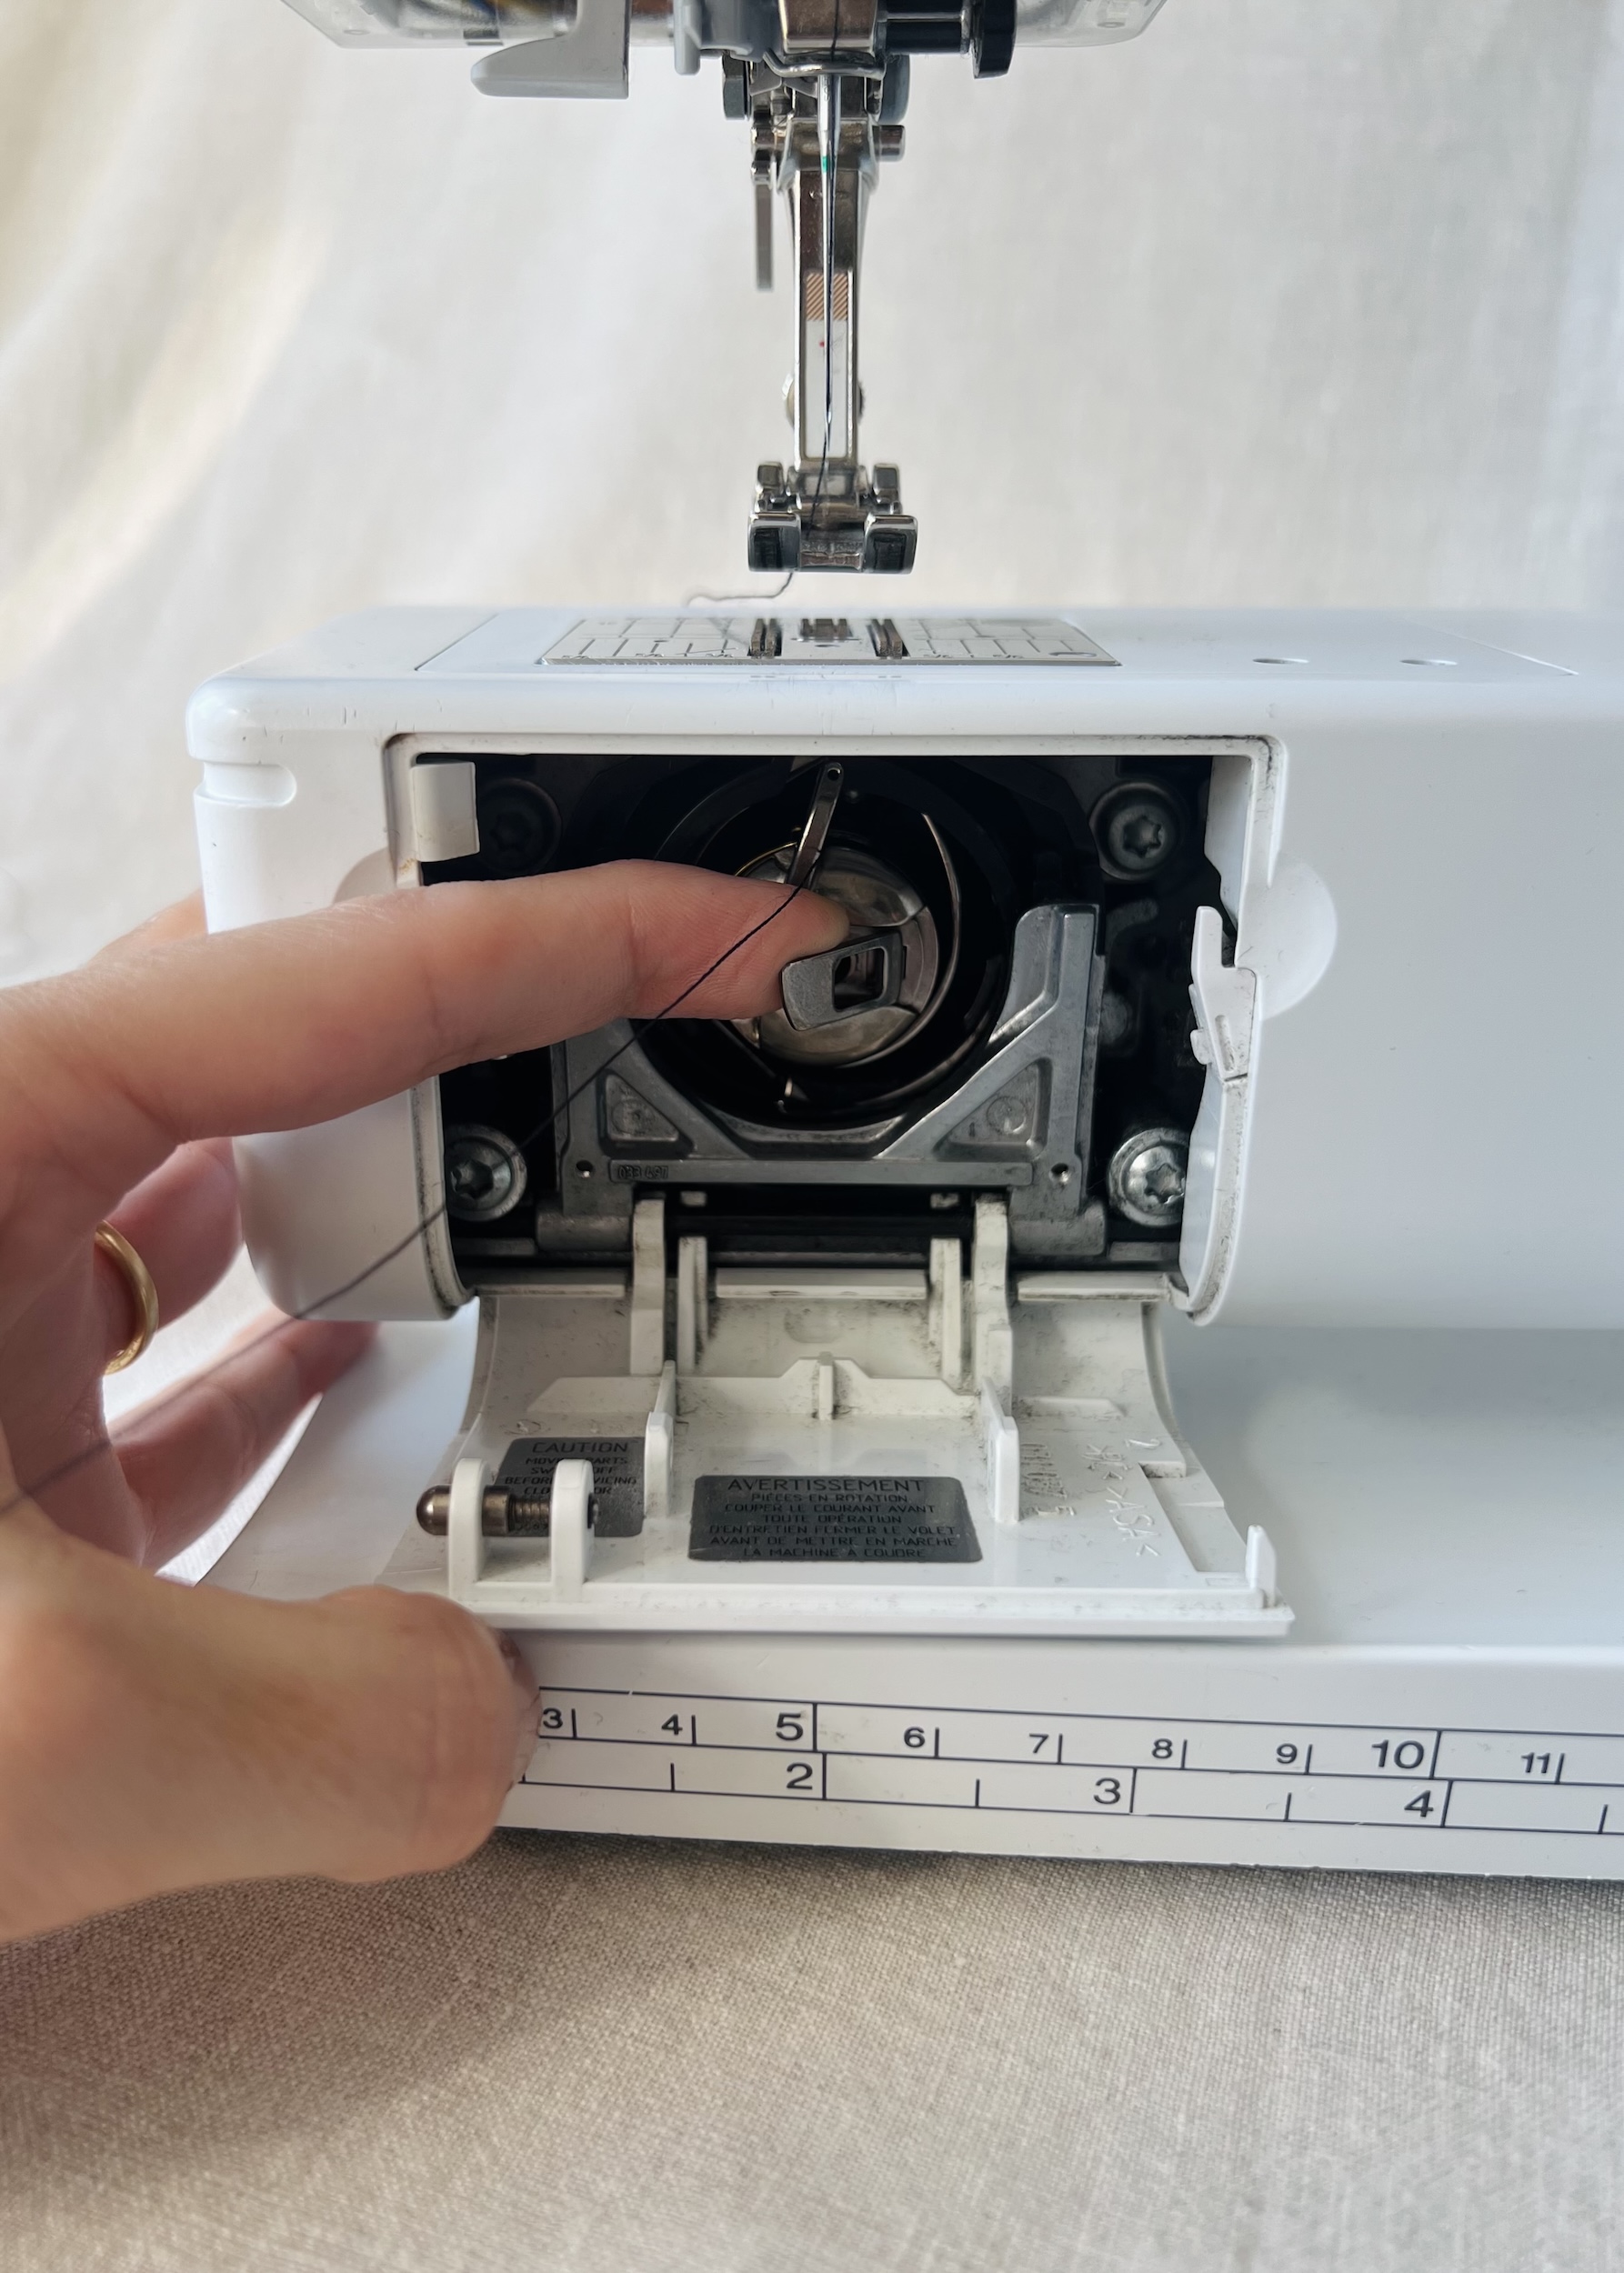
Bringing up the bobbin thread
1. Turn the hand wheel a couple of times to lower and raise the needle. This motion should catch the bobbin thread from below. If the bobbin thread doesn’t come up on the first try, simply turn the hand wheel a couple more times.
2. Use your fingers or a pair of tweezers to gently pull the bobbin thread up through the stitch plate.
3. Pull both the top and bobbin threads toward the back of the machine.
4. Cut off any excess thread using the rear thread cutter.
Take your time when threading your sewing machine—there’s no rush. A little patience and practice really do go a long way, and before you know it, threading will become second nature. Once you’ve threaded one machine, you’ll find it much easier to thread others too, even if the layout is a little different.
Most machines include helpful guides right on the body—like numbered paths or arrows—so be sure to use them. And finally, don’t forget your manual. It might not be the most exciting read, but it’s one of the best resources you have.
Stay tuned for Part 2, where I’ll cover some more specific processes.
You May Also Like
About Author
Emma Cartmel
Heya! I’m Emma, and I'm an Aussie living in beautiful Munich with my husband Ben, and our pug Harley. I am a designer, pattern maker, and sewist, and I share my expertise and experience through my ‘cartem.sewing’ page. You can follow me on Instagram @cartem.sewingRelated posts

Sewing Essentials: Stitch Width, Stitch Length & Needle Position
Thinking back to my high school textiles days, I remember having to test stitch settings on every fabric we planned to use for our projects. We would cut out little squares of fabric and experiment with different stitch lengths and widths, and edge-finishing techniques. At the time, it felt unnecessary, not to mention tedious….

Sewing Essentials: A Simple Guide to Notches
I love a notch, so much so that I’ve decided to dedicate this article to these small but important markings. Here, I’ll explain why they’re so helpful, when to use them, and how to add them to your own patterns or adapt them for existing ones. What exactly are notches? Notches are small markings found…

How to Select and Use Interfacing: A Simple Guide
Iron-on or sew-in, woven or non-woven, lightweight or heavyweight. With so many different types, weaves, and weights to choose from, how do you know which interfacing is best for your project? In this article, I will explain the two main types of interfacing before diving into the differences in weave and weight. Hopefully by the…

Sewing Essentials: A Simple Method for Reversible Seams
There are so many ways to finish a seam, from good old overlocking to French seams and binding. I recently stumbled across another method that’s pretty nifty, and honestly, I kind of wish I had known about it sooner. It is a bit like binding, but topstitched in place so it doesn’t move or flap…

Sewing Essentials: Understanding Different Types of Sewing Elastic
Elastic is a really common notion used in sewing. You’ll find it on everything from waistbands to cuffs and necklines. It plays a crucial role in giving garments both support and shape. Have you ever had the waistband of your pants twist and never sit quite right? Or maybe you’ve noticed the leg opening of…


SEW THIS LOOK


Latest Posts


Leave a comment