Tutorial: How to Make Quilted Christmas Star Stockings
Are you ready to make some beautiful linen stockings? They are a great use of your scraps.
I decided to use some leftover Silver linen to make some new Christmas stockings for my family. We have quite the miss-matched collection of stockings from past years, and my youngest son didn’t even have his own yet.
Finally, we have a matched set for the whole family!
I’m still new to sewing linen, but one thing about it that is different than sewing knits is that EVERY SCRAP IS PRECIOUS. I’ve tucked away those beautiful little pieces after each garment I’ve made this year, eagerly looking forward to the day when I can turn them into quilts.
Stockings are a perfect starting point if you’re like me and haven’t quilted in years, or if you are brand new to quilting. Don’t be nervous! Grab your leftover linen and get ready to dive in.
These stockings feature a simple Sawtooth Star quilt square and showcase the gorgeous textures of the linen. I’ve used all IL019 5.3 oz for mine, but almost any weight should work.
Let’s get started!
Materials
½ yard Main Fabric, I used FS Silver FS Signature Finish Midweight linen
½ yard Lining Fabric of choice
Small scraps of Contrast Fabric for Star, used here are
FS EMERALD FS Signature Finish Midweight Linen
FS GINGER FS Signature Finish Midweight Linen
FS KENYA FS Signature Finish Midweight Linen
FS CERAMIC FS Signature Finish Midweight Linen
Optional Batting
A small piece of twill tape, ribbon, or leather for the hanging loop
Tools
Sewing Machine
Rotary Cutter with ruler and mat
Pins
Iron
Matching Thread
Scissors
Pattern
Download and print the stocking template HERE
Method
I used all pre-washed fabrics. Some quilters do not pre-wash, and that makes for a crinklier finished product. I haven’t personally tested that method with linen, so I’ll leave that up to your discretion if you would like to try it.
PLEASE NOTE THAT ALL SEAMS ARE ¼ INCH UNLESS STATED OTHERWISE.
My Pfaff machine has a bright red line for 1/4“, which I LOVE. It makes it even easier to keep those seams exact. I wish I had that when I was young and working on my first quilts. You can use a piece of washi tape on your machine if you want a bolder line to follow. Keeping your seams carefully at ¼” will help everything line up so your quilt squares will come together easily.
We will begin by cutting out all the necessary pieces. You will want to use a rotary cutter for the quilt pieces. Keeping them perfectly accurate will help your quilt block sew up easily. You can use scissors OR a rotary cutter for the curved pieces.
Steps
Cut out the Sawtooth Star Pieces
From the fabric chosen for your STAR
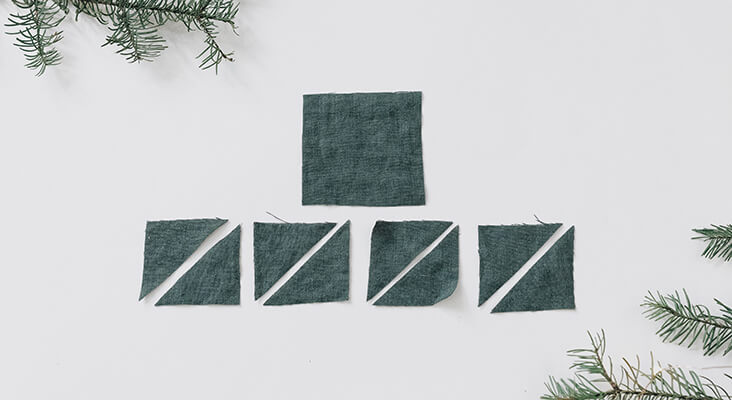
Cut one center square 3 ½ inches
Cut 4 squares 2 3/8” and bisect on one diagonal
From the fabric chosen for your MAIN FABRIC
Cut 4 squares each 2”
Cut 1 square 4 ¼” and bisect on both diagonals to get 4 triangles
You now have all the pieces for your sawtooth star quilt block
For the rest of your stocking pieces
Cut 2 strips of the main fabric 1 3/8” by 6.5”
Cut one strip of the main fabric 2” by 8.5”
These pieces will frame the quilt block at the top of the stocking.
For the bottom of the stocking front, fold down the pattern along the dotted line and use the section below the dotted line down for the lower part of your stocking.
With the stocking template:
Cut one stocking back:
Cut 2 lining pieces and (optional) 2 batting pieces
(NOTE: I recommend trimming ½” off the top of 2 lining pieces, making them a little shorter than the outer pieces, so that when you tuck the lining into the stocking it does not stick out at the top at all.)
Piecing the Sawtooth Patch:
Begin by sewing the smaller star point triangles to the larger background triangles, make 4
Press the seams open with an iron on a steam setting. They should look as shown:
Sew the other half of the star points to the background triangles.
Press the seams open again. The linen can shift a bit, but try to hold it straight and steam it well with a hot iron.
Sew 2 of these to the center square on opposite sides.
Sew the small squares to the other two on either side.
It should now look like this:
Finish your sawtooth star by carefully lining up the seams with pins and sewing them to opposite sides of the star. If your corners don’t quite match up the first time, you can carefully seam rip it and try again.
You’ve made a sawtooth quilt patch! Beautiful work!
Next, you will sew the two 1 3/8” wide strips to either side of the quilt patch.
It should look like this:
Press the seams open. Here is what the back should look like. Pressing between each step helps ensure that all the corners match well.
Finally, sew the 2” strip above the quilt block, and the curved bottom piece below the quilt block:
You have finished the top of your stocking!
Now you have a few options. You can simply line it and keep it a thinner stocking. Or you can add batting and make it a thick stocking. You could hand quilt or machine quilt it, or not quilt it at all. Any of those options will work with a project this small.
I really wanted to hand quilt these because I adore the look of hand quilting, but I had to be honest with myself about how much time I have as a mother of small children.
So, for the sake of time and keeping this tutorial simple, from here the instructions will be for simply lining the stockings.
You can do that with or without batting. I like the puffier look with the batting, but if you don’t want that look then simply ignore the step of basting the batting.
Construct the stocking
Lay the stocking front right side up on a batting layer, pin in place, and with a long basting stitch and slightly under ¼” seam allowance, baste the batting to the front.
Repeat for the back of the stocking.
At the same time, baste your hanging loop in place as shown. For mine I used a strip of leather ½” by 6”, but you can use whatever you like.
Next, take your lining pieces and pin them right sides together along the top edge of your stocking.
Right sides together, sew the lining pieces to the front and back pieces along the top edge, using ¼” seam allowance.
Flip them open and iron the seam allowance away from the lining. They should now look as shown:
(NOTE: Remember if you would like your lining to not peek out at the top, the lining pieces should be ½” shorter than the outer pieces)
Now, lay the front and back pieces right sides together, with linings still flipped open. Pin all the way around to get a long tube, like this:
You are now going to sew around the entire perimeter.
Starting near the toe of the lining end, sew all the way along the edges of the lining and outer pieces, leaving a 2-3″ opening in the toe of the lining so that you can turn it.
You can clip the curves if you like. You can also finish the seams with a serger or a zigzag stitch. I chose to serge all the way around.
Then, reaching through the opening that you left, pull the stocking through itself, as shown:
Tuck the lining into the outer body of the stocking:
Give it a good finger press to smooth all the curves, or lightly steam them with your iron.
You have just about finished!
The only thing left is to hand stitch the opening in the lining closed with a needle and thread.
Yay! Sit back and admire your work. You did it! You made a beautiful heirloom stocking. Let me know if you try this tutorial, I’d love to see what you make!














5 Comments
Karen Thomas
I love these linen Christmas stockings. I’ve made 5 so far. I had to order more linen to make 4 more. I’m making stockings for my 8 grandkids and one great. Karen T.
Amee Villarreal
Hi, I’m curious if on your stocking pattern the triangles met up perfectly as well as the lines? mine is a bit wonky, but the 1 inch box is correct????
Sarah Harney-Hirsch
I love this Christmas Star pattern – I was looking for a simple Christmas stocking pattern, and this one fit the bill because I happen to have the linen fabric in my stash, white and red. I altered it a bit to add an embroidered name at the top, so I lowered the star placement. It is a real easy and quick sew.
Sarah H
Amee Villarreal
How did you alter it to allow for embroidered names? I would like to do that as well. do you have a photo of yours by chance :)?
LAURA OVERTURF
Sara!
Just what I needed this morning 🙂
Holiday blessings evermore for you and everyone you touch in this manner!
Laura O.