Linen Tote/Reuseable Shopping Bag
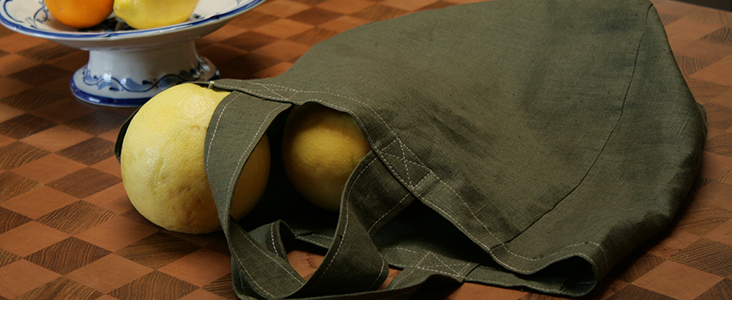
Here in Los Angeles, plastic bags are being phased out in favor of reusable cloth shopping bags. In most counties, you can’t even get plastic bags in stores and they charge 10 cents per paper bag. Why do that when you can make your own awesome tote bags (that double as reuseable shopping bags!).
Materials:
1 yard of IL019 Olive Green (or 4C22 or IL090)
Contrasting earth-toned thread
Measuring tape
Cutting board
Rotary or scissors
Tailor’s chalk
Pins
Sewing machine
Iron
Difficulty: Beginner to Advanced
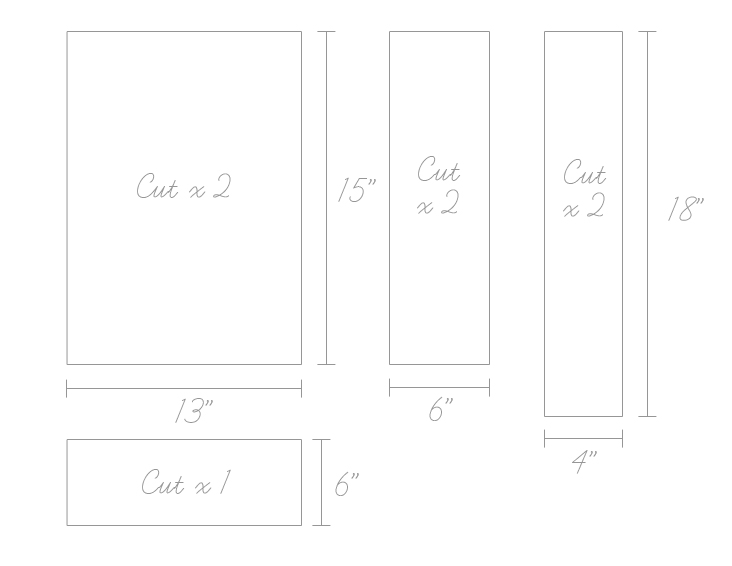
Here’s a guide showing the pieces and measurements needed to make this exact bag:
Once you have your fabric cut out, match up and pin the long edges of the sides of the bag, with WRONG sides together (this is important, as we’re going to be making french seams).
Sew these edges using a 1/4″ seam allowance, creating a box with no top or bottom!
Trim these edges a little bit (or you can skip this step, and use a slightly wider seam allowance in the next step).
Turn the box wrong-side out and iron the seams so that they can easily be sewn on, with the seam in the fold. Then sew this using a 1/4″ seam allowance (or 1/2″ seam allowance if you didn’t trim in the last step). What you are doing is trapping the raw edges in this seam, with the new hidden seams on the inside of the bag.
Iron all the french seams toward the larger pieces of the bag. Now pin the bottom piece in place, with wrong sides together (we’re going to be doing another french seam). Sew with a 1/4″ seam allowance, trim the seam, turn wrong-side out, iron the seam and sew with another 1/4″ seam allowance.
See? French seams are easy.
When going around the bottom corners of your bag, just keep and eye on where the corner edge of the bag is. You can shift it around as you’re sewing to make a better corner.
Turn your bag right-side out. We’re going to hem the top of the bag and make the straps!
To make the straps, take the strap pieces that you cut out and fold them in half. Iron the fold, and pin the long raw edges together. Sew this raw edge with a 1/4″ or 1/2″ seam allowance. Turn the strap inside out and iron. Now, on each side, sew a 1/4″ seam. This is mostly for decoration, but also keeps the strap nice and straight.
Repeat this process with the other strap.
Now onto the bag and sewing the straps in.
Fold the top raw edge of the bag over by 1/4″ and iron. Fold this edge in by 1″ and iron again. This is the hem for the bag.
Position the raw edges of the straps under this hem at 2 1/2″ in from the sides of the bag, and pin into place.
Repeat this for the other side, and pin the rest of the bag hem into place. Sew near the folded edge, securing the 1″ hem in place. Fold the straps up and pin in place.
Sew a seam across the top of the hem, approx. 1/4″ from the edge. This will secure the straps into place, but you’ll want to make them even stronger by sewing an X design over them.
This should ensure that the straps are super secure! From here, you can leave the fabric loose, or add some cardboard to the bottom or sides of the bag to help it stand up. It’s great for groceries, lunches, a shoulder bag, sleepovers, just about everything. Enjoy making your tote bags, and don’t forget to share your creations in the comments below.








7 Comments
LEIGH STANTON
I made this bag from some leftover “Autumn Gold middleweight” and it was easy to make and I learned so much about finishing the seams. It’s a sturdy bag for sure. I added a pocket on the front and followed the “Sashiko” embroidery tutorial for a little bit of extra design.
Joy Beeson
Instead of cutting four rectangles and sewing them together to make a long strip, I cut a long strip and join the ends with a flat-fell or mock-fell seam in the middle of one side.
Connie
Thanks for the pattern. I plan to make some of these for the ladies at church to carry their Bibles and ect. in to church.
Laurie Healy
I made 6 of these bags in the canvas weight linen, but for the bottoms I used art foam which is a little stronger than just cardboard. They hold up beautifully and I get lots of compliments on them. I did them in the cranberry red, I forget the actual color name, but I love my bags. And no more plastic bags to try and remember to recycle!
Lou Ann
I love the tutorial, however, I can’t see the pattern well at all. I have tried to darken my computer and it just washes out that direction also. Is there a way to see the pattern and the information on the pattern? I would love to make some of these.
Joanne
Here are the measurements in inches:
(2) 13×15 (bag front and back)
(2) 6×15 (bag sides)
(2) 4×18 (handles)
(1) 6×13 (bag bottom)
Maryann Purgason
Love this! The store bought bags have their limits–they tear up, they are too big, crinkly and won’t fold up for storage, plus they slide around in the car and make noise. This is a great idea. I could fold one of these into a pocket.