


How Much Fabric Do You Need? A Simple Estimation Guide

Starting a new sewing project is always exciting. But there is nothing more frustrating than running out of fabric halfway through… or ending up with scraps that aren’t quite big enough for anything useful (trust me, I’ve been there! I have a whole drawer full of pieces like this).
If you’re working with a commercial or indie sewing pattern, you are in luck! They usually include handy fabric requirement sections to guide your choices, and often even suggest different layouts depending on your fabric width.
But what if you’re drafting your own pattern? Or you have made alterations to an existing one? How can you figure out the right amount of fabric for your sewing project then?
This guide has got you covered, hopefully helping you estimate how much fabric you will need for your next make.
Note: The two methods I focus on in this guide can be carried out either manually or digitally. For the purposes of this article, I’ve demonstrated both methods digitally, but I’ve included all the necessary details to help you complete them manually as well.
While the examples centre on a basic pant pattern, the same principles can also be applied to other patterns.
Method 1: Create a mock layout
I love the almost jigsaw-like nature of laying out pattern pieces. There’s something really satisfying about the challenge of seeing how little fabric you can use by fitting the pieces together just right. It’s a fun and practical way to take a sustainable approach and make the most of what you’ve got.
Creating a mock layout lets you do just that, but without the fabric!
Step 1: Collate the pattern pieces
Gather all the pattern pieces that will be required and take note of the following:
- Are all the seam allowances included?
- How many of each pattern piece needs to be cut (e.g. cut 1, cut 2, cut on fold, etc.)?
- Are all the pattern pieces flat and smooth to ensure accuracy during layout?
Tip: Depending on what the pattern pieces are made from, I sometimes give them a light iron (up-and-down motion, not pressing) to smooth out any wrinkles or folds.
Step 2: Measure the fabric’s width
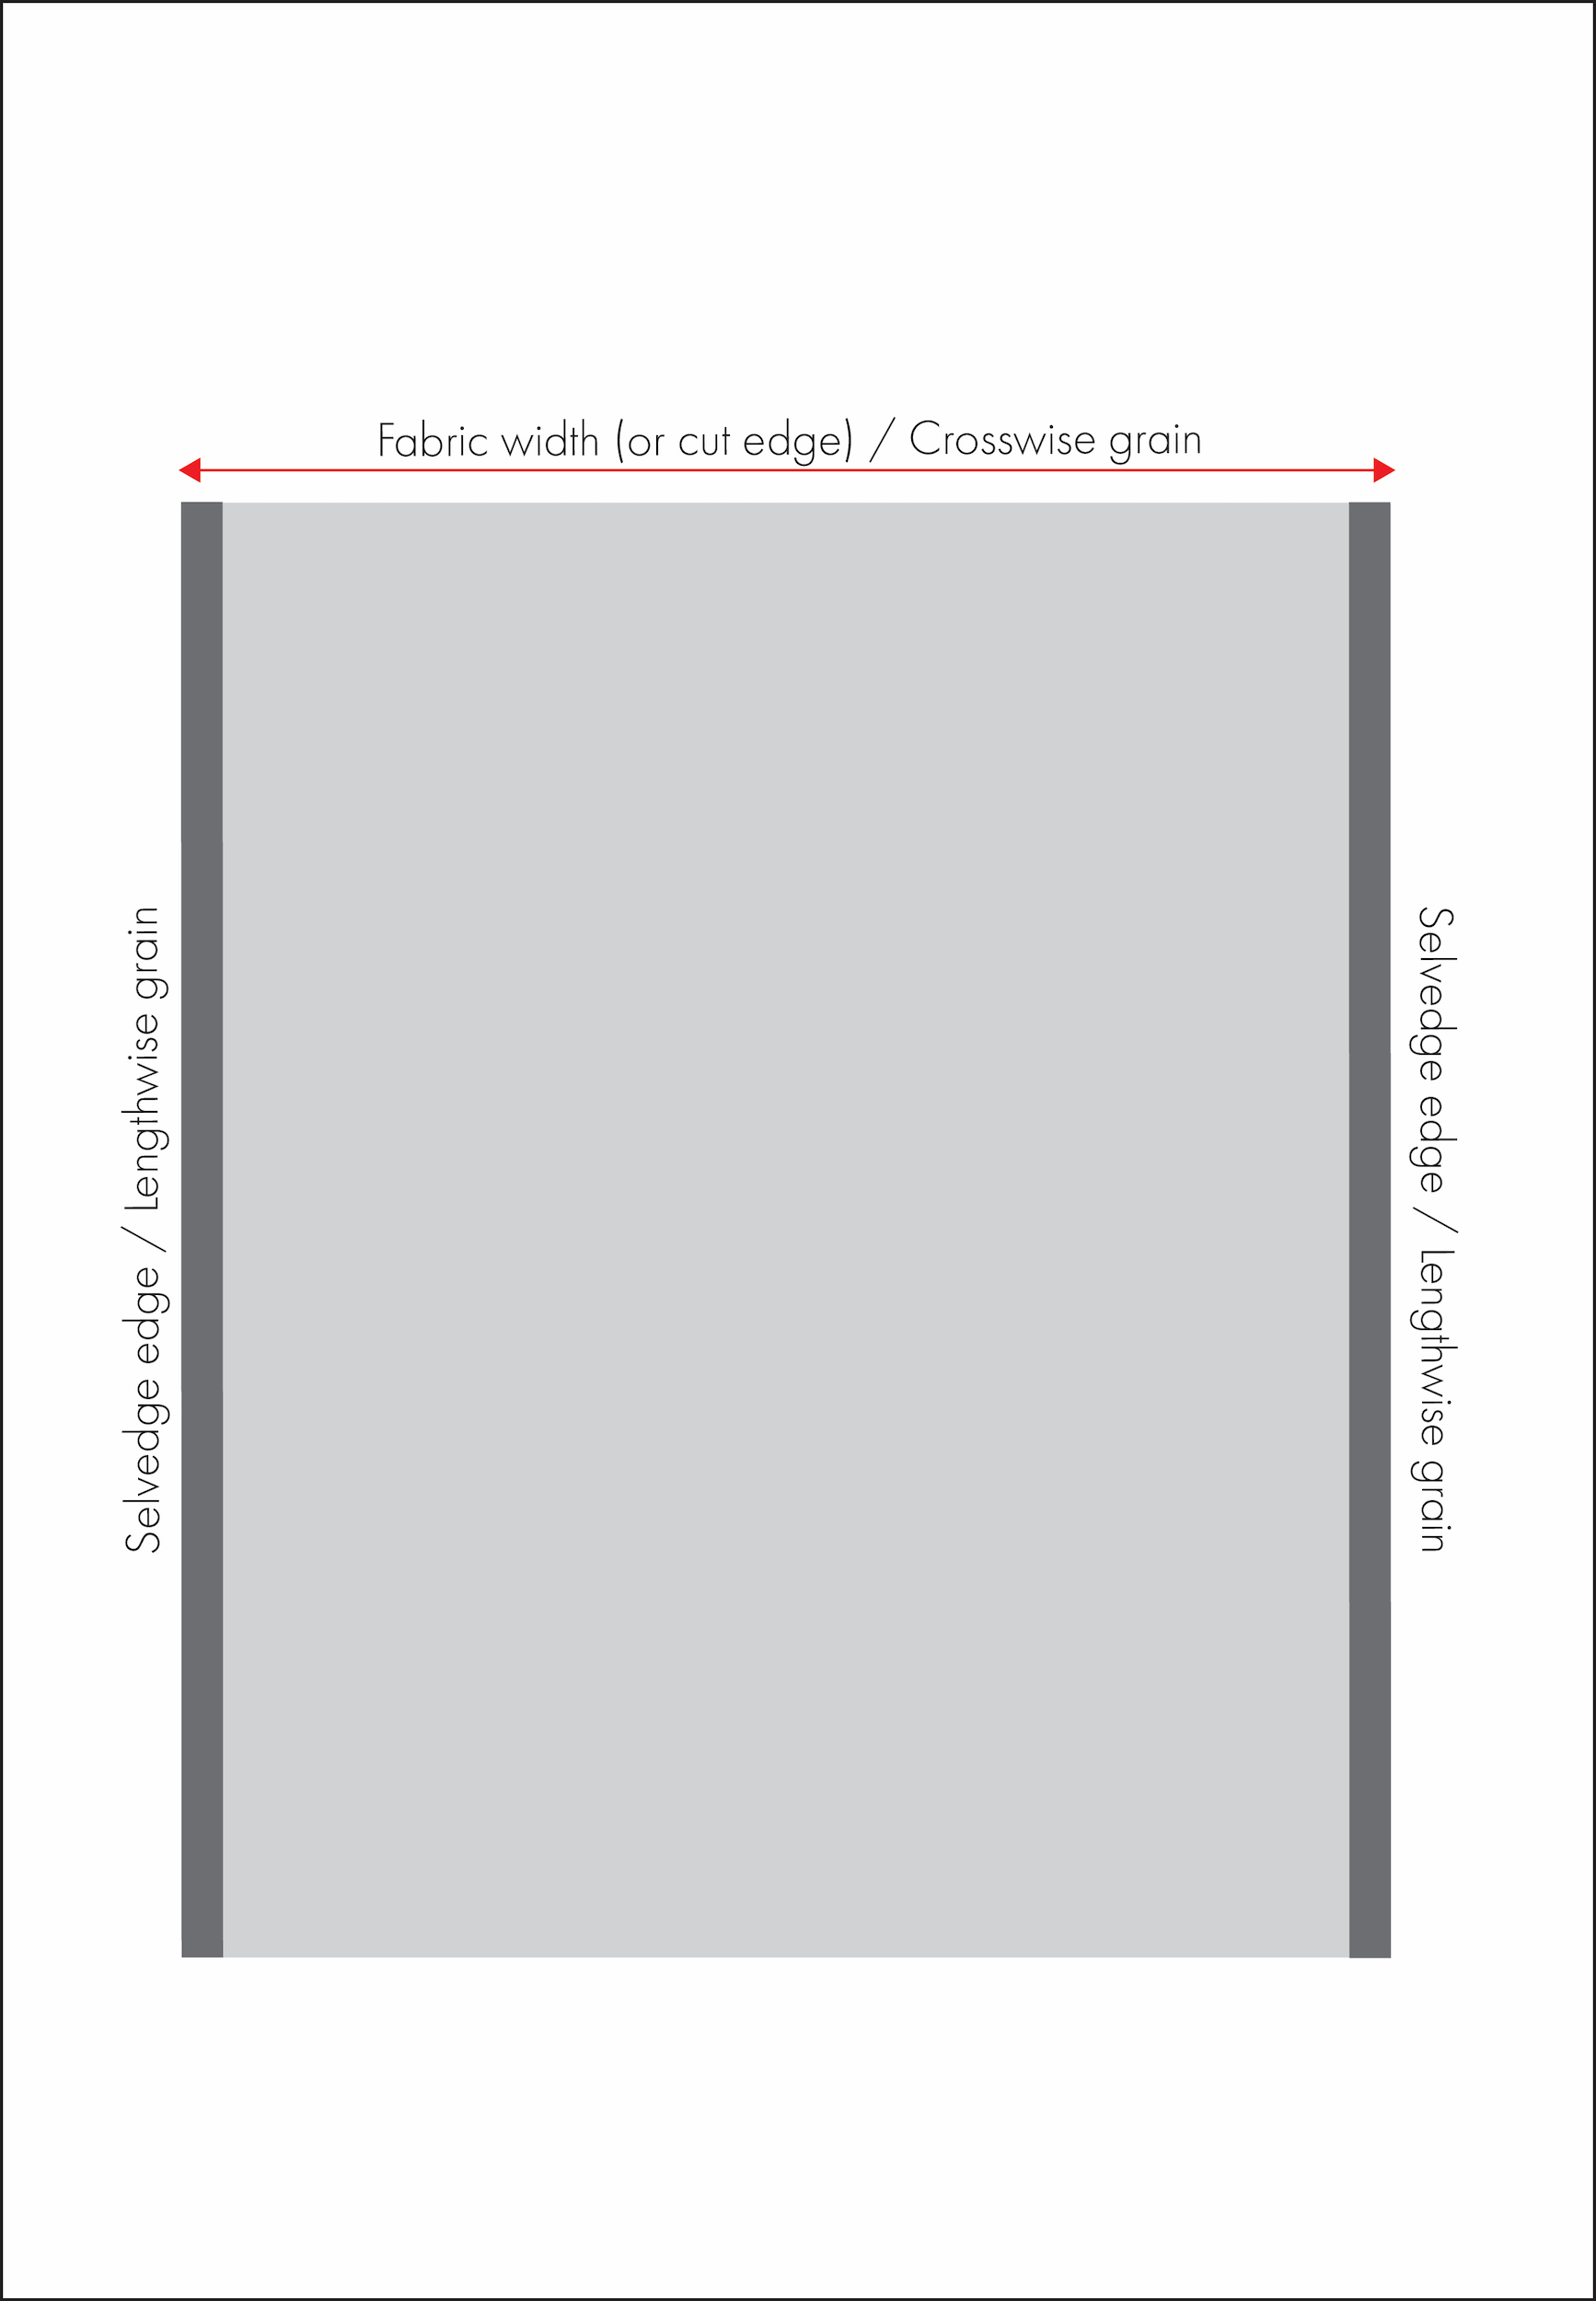
Check the width of the fabric—this usually ranges from 110 cm to 140–150 cm.
If you are unsure, simply measure from selvedge to selvedge—the tightly woven edge that runs along the lengthwise grain of the fabric (see Diagram 1 below).
Step 3: Decide whether to work flat or folded
Whether you decide to lay the fabric flat or on the fold can depend on a few things:
- The width of the fabric.
- The shape and size of the pattern pieces.
- Whether any pieces are meant to be cut on the fold.
For example:
- If you’re making trousers, you might fold the fabric lengthwise to better fit the longer, narrower pieces.
- For an asymmetrical garment, like a crossover top that involves large and irregular pattern pieces, you may want to keep the fabric flat. In this instance:
- Remember that pieces marked “cut 2” (or “cut 1 pair”) will need to cut once, then flipped for the second.
- If any pieces are cut on the fold, consider tracing or unfolding the pattern piece to create a complete one.
Step 4: Mark out the fabric area
Use masking tape, string, chalk, or any other objects to mark out the usable width of the fabric (folded or flat) on the floor, a table, or a surface that works for you.
Step 5: Lay out out the pattern pieces
Now for the fun part!
Start placing the pattern pieces within the marked area created above to see how they fit. This step often involves a bit of trial and error—so don’t be afraid to play around until it fits the way you want it to. You may even find that one way uses much less fabric.
Remember to:
- Keep pieces a couple of centimetres away from the selvedge edge (you don’t necessarily want to include this in the layout).
- Be sure to maintain grainline accuracy.
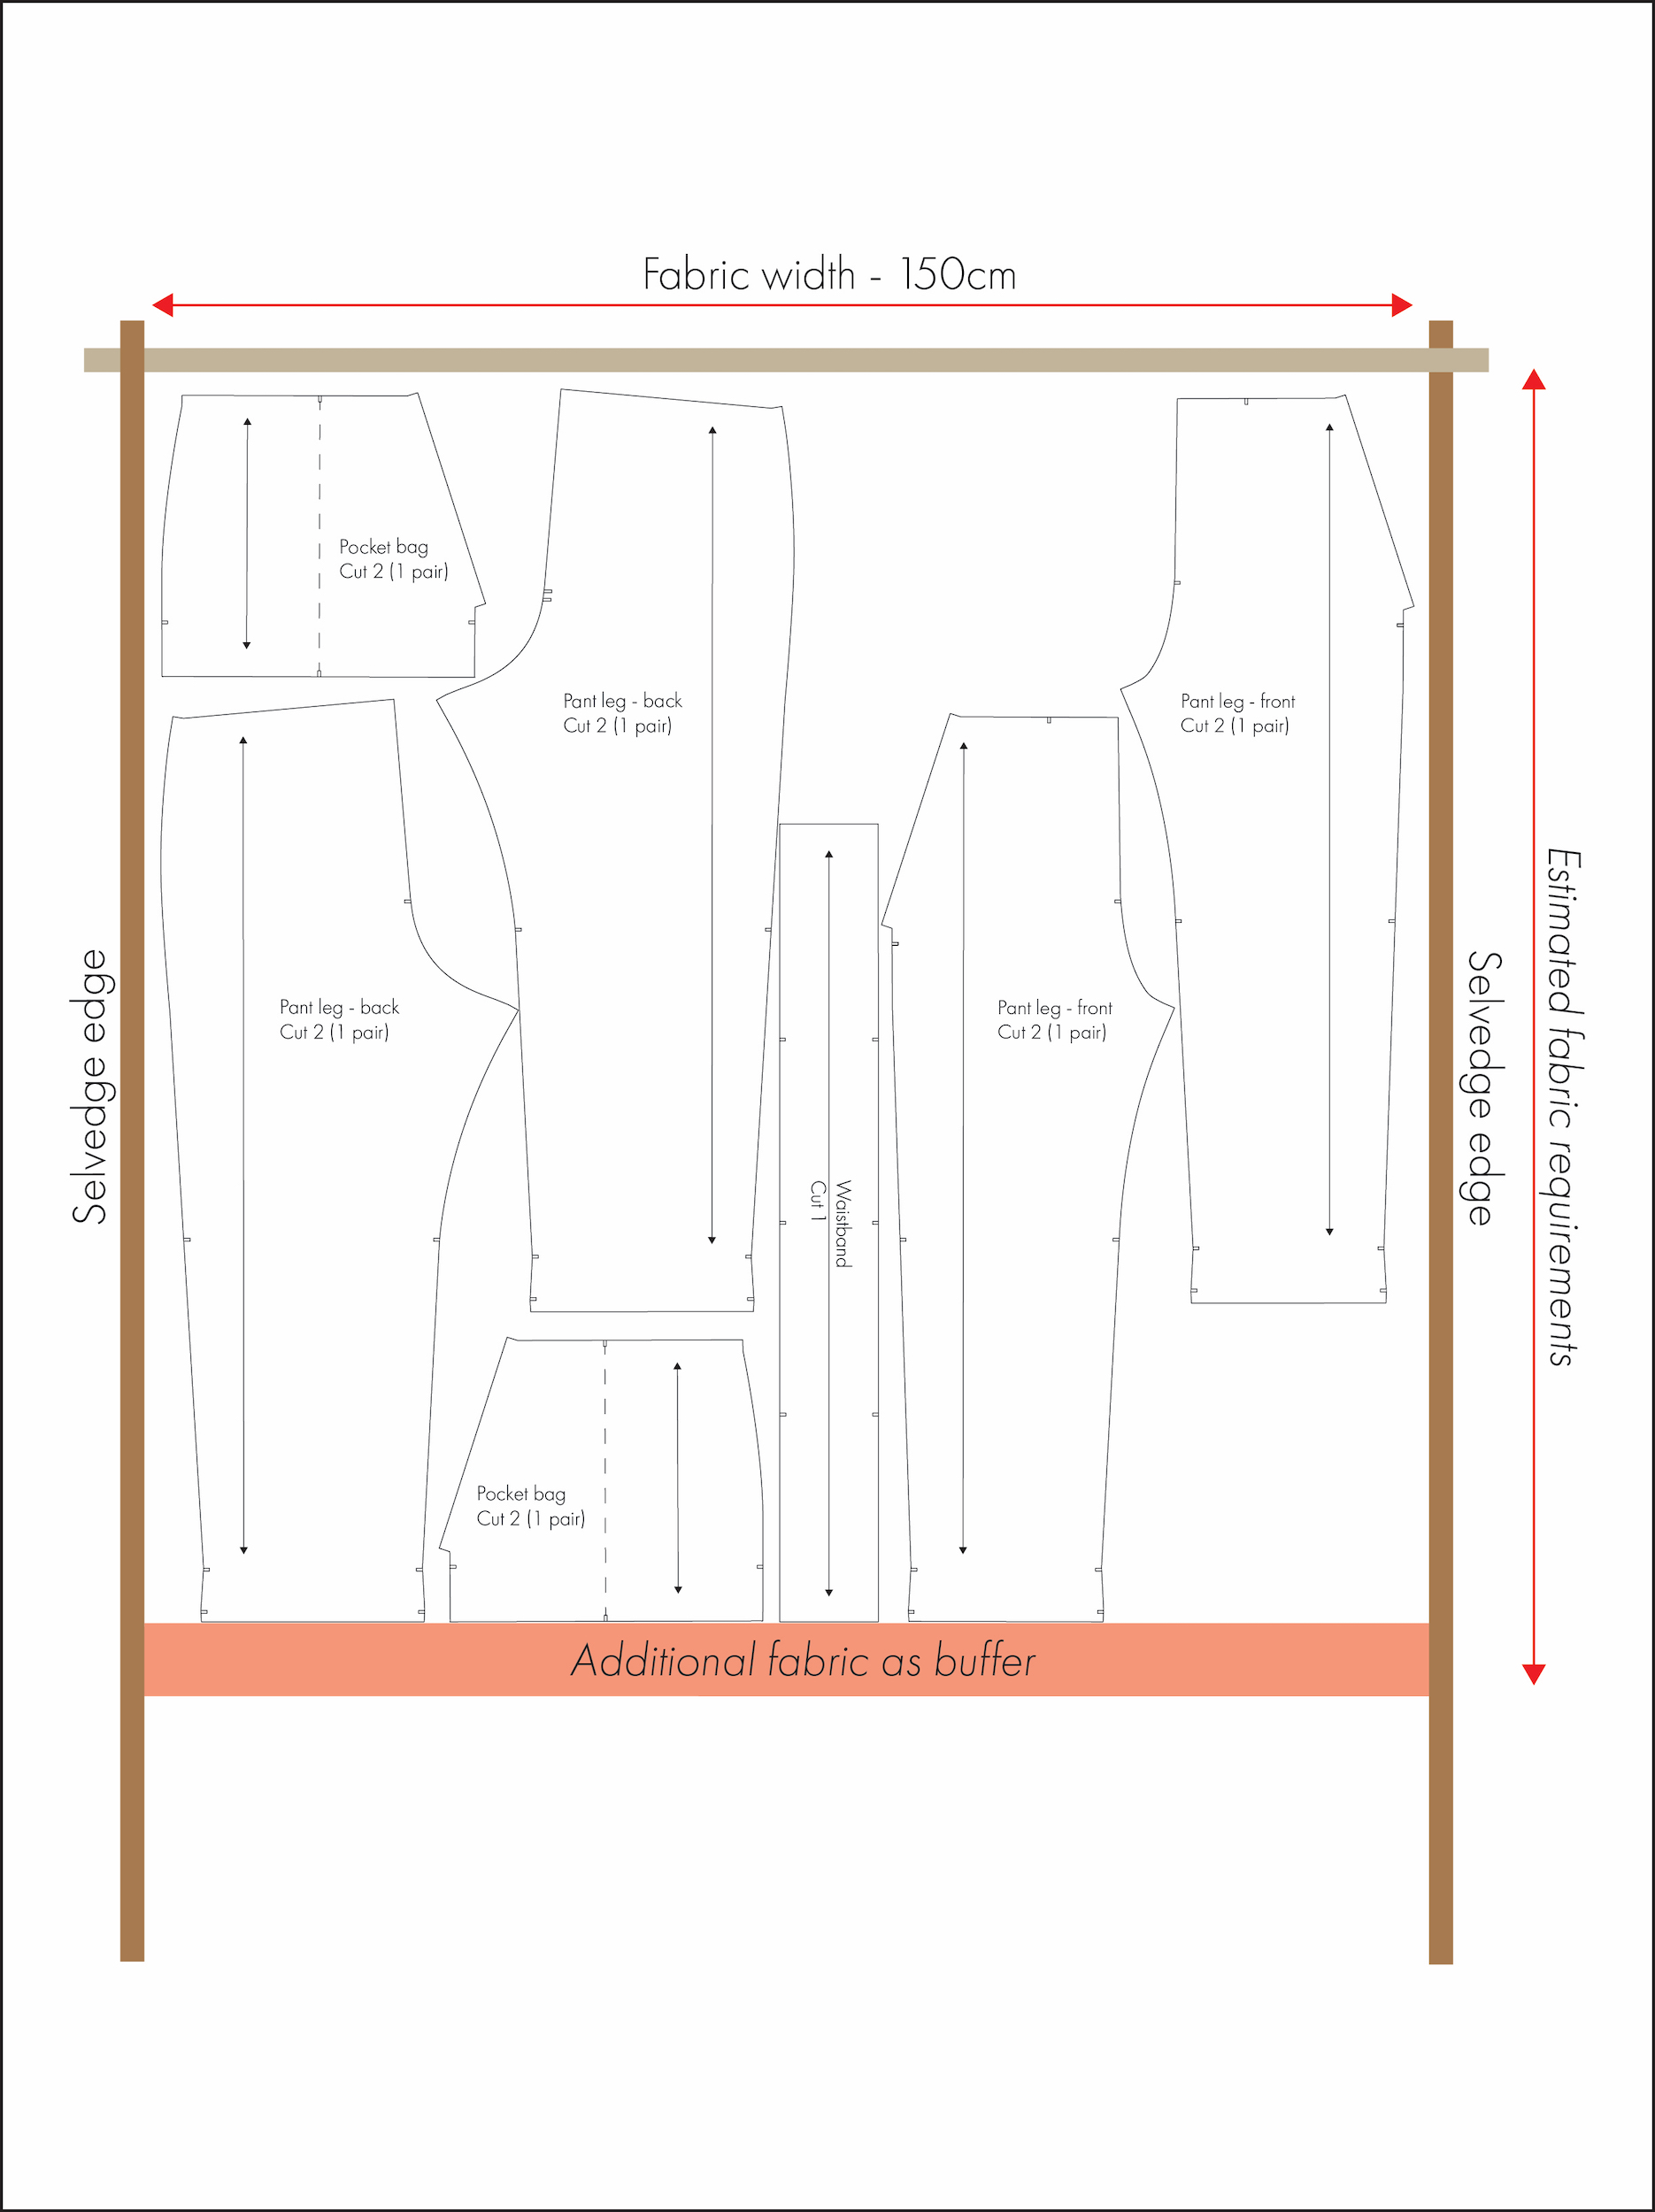
In Diagram 2 below, I’ve shown how you can tape out the dimensions of the fabric based on a 150cm wide fabric laid flat.
The downside of this option is that it takes up a lot of space (not ideal if you’re in a small space like me) and requires each pattern piece to be cut out individually.
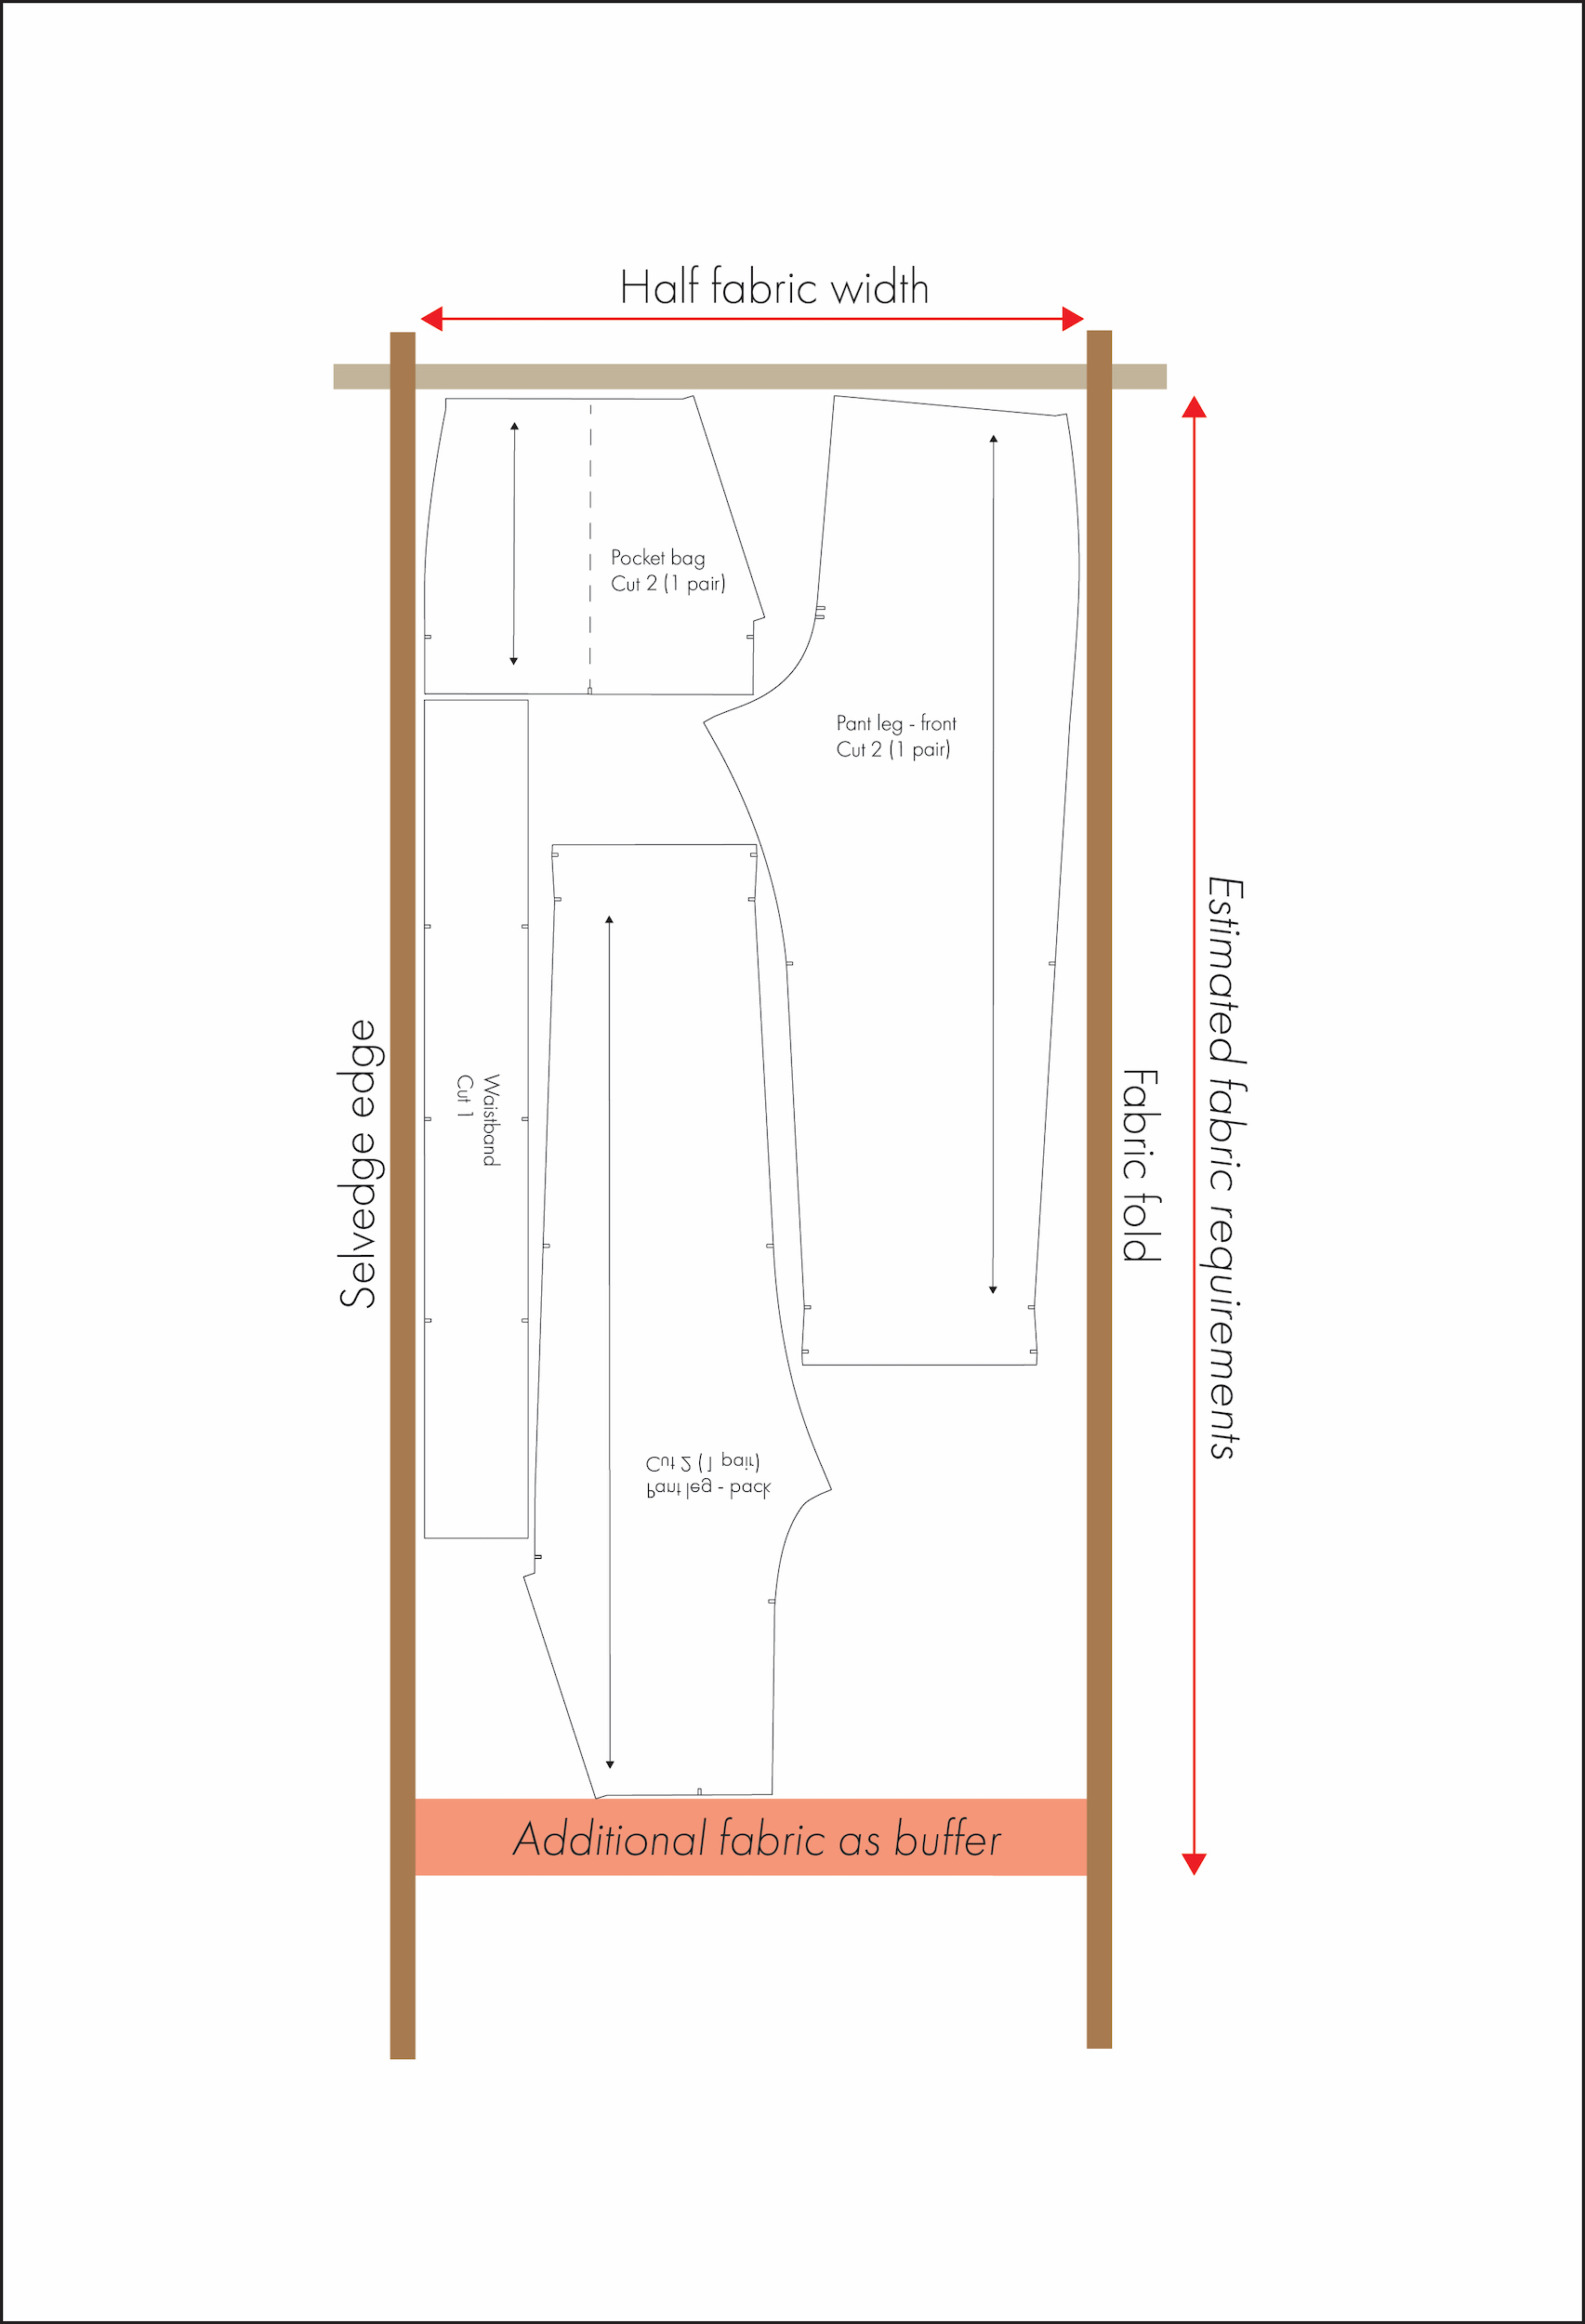
In Diagram 3 below, I have demonstrated how to tape out the dimensions based on a 150cm wide fabric that will be folded in half. In this case, you will be working with a width of 75cm wide.
The advantage of doing it this way is that it uses less space and allows you to cut 2 pieces at once—meaning less cutting overall.
Step 6: Measure the required fabric
Once you’re happy with the layout, simply measure the length of fabric used along the selvedge edge.
Step 7: Add a bit of wiggle room
I now recommend adding an extra 10–20 cm to this measurement to allow for things like pre-washing shrinkage, fabric shifting, or layout adjustments you may make later on.
When is the mock layout method useful?
- When you want a visual reference for how the pattern pieces will be arranged.
- When you need a more accurate estimation of how much fabric is required, helping to reduce fabric waste.
- When working with large or irregularly shaped pattern pieces.
- When using directional prints or fabrics with a nap (think corduroy or velvet), where the orientation of the pattern pieces matter.
Method 2: Turn the pattern pieces into rectangles
I like to call this the “guesstimate” method, because while it won’t be 100% precise, it’ll get you close enough to knowing how much fabric is required.
This method essentially involves turning the pattern pieces into rectangles to estimate the fabric use.
Step 1: Collate the pattern pieces
Gather all the pattern pieces needed and identify how many of each are required.
If any pieces are meant to be cut on the fold, consider tracing or unfolding them into full pieces for easier measuring.
Make sure all the pieces are flat and smooth to ensure accuracy.
Step 2: Measure the fabric width
Check the width of the fabric. Just like in the previous method, if you are unsure, simply measure from selvedge to selvedge.
Step 3: Turn each pattern piece into a rectangle
This is where the “guesstimating” happens!
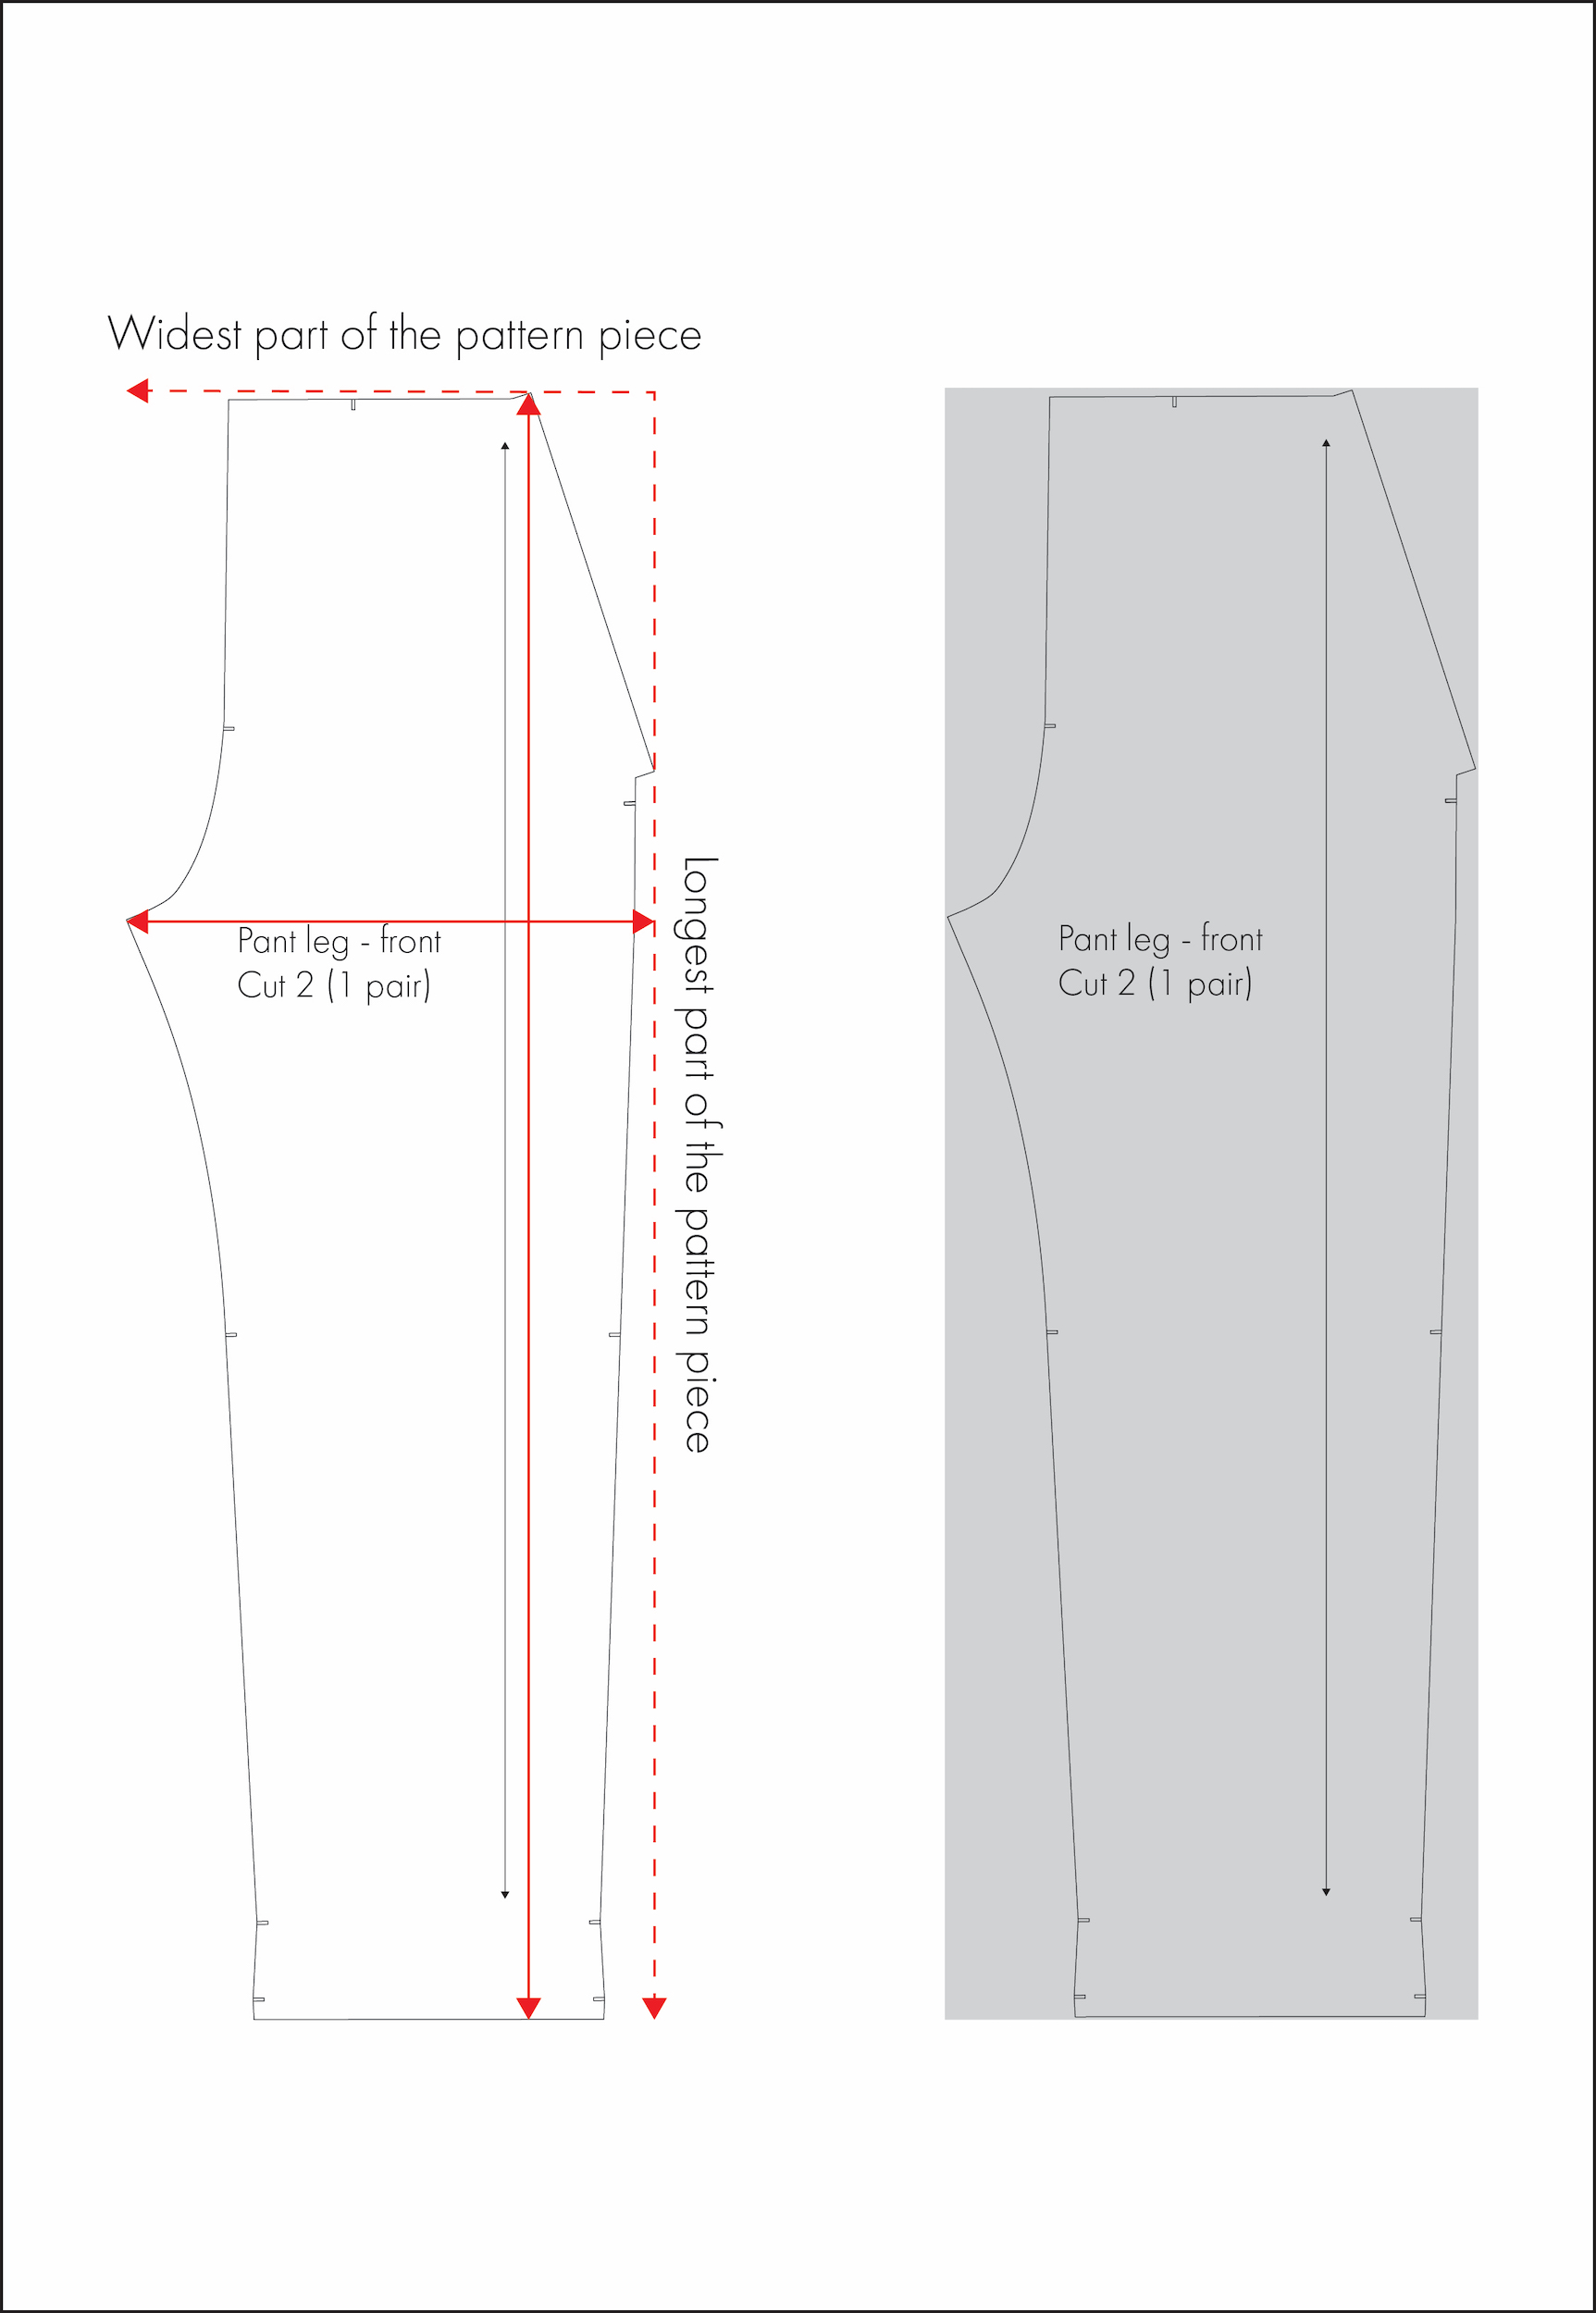
Begin by measuring the widest part of each pattern piece ? this becomes the rectangle’s width. Then measure the longest part ? this becomes the rectangle’s length. At this stage, ignore any curves or shaping—it’s all about creating a rough estimation.
In Diagram 4 below, I’ve identified the widest part of the pant leg front as being at the crotch, and the longest part as the distance from waist to hem. Using these points, I have created a rectangle to represent the overall space that the pattern piece will occupy.
Step 4: Stack the rectangles
Now, get into the mindset of actually laying out these pattern pieces onto fabric.
Use the width of the fabric as the starting point, and begin arranging the rectangles side-by-side or top-to-bottom, depending on their size and shape. It’s a bit like playing Tetris!
While this method won’t provide the most efficient layout like a proper mock-up might, it’s a quick and helpful way to get a rough estimate of how much fabric you’ll need.
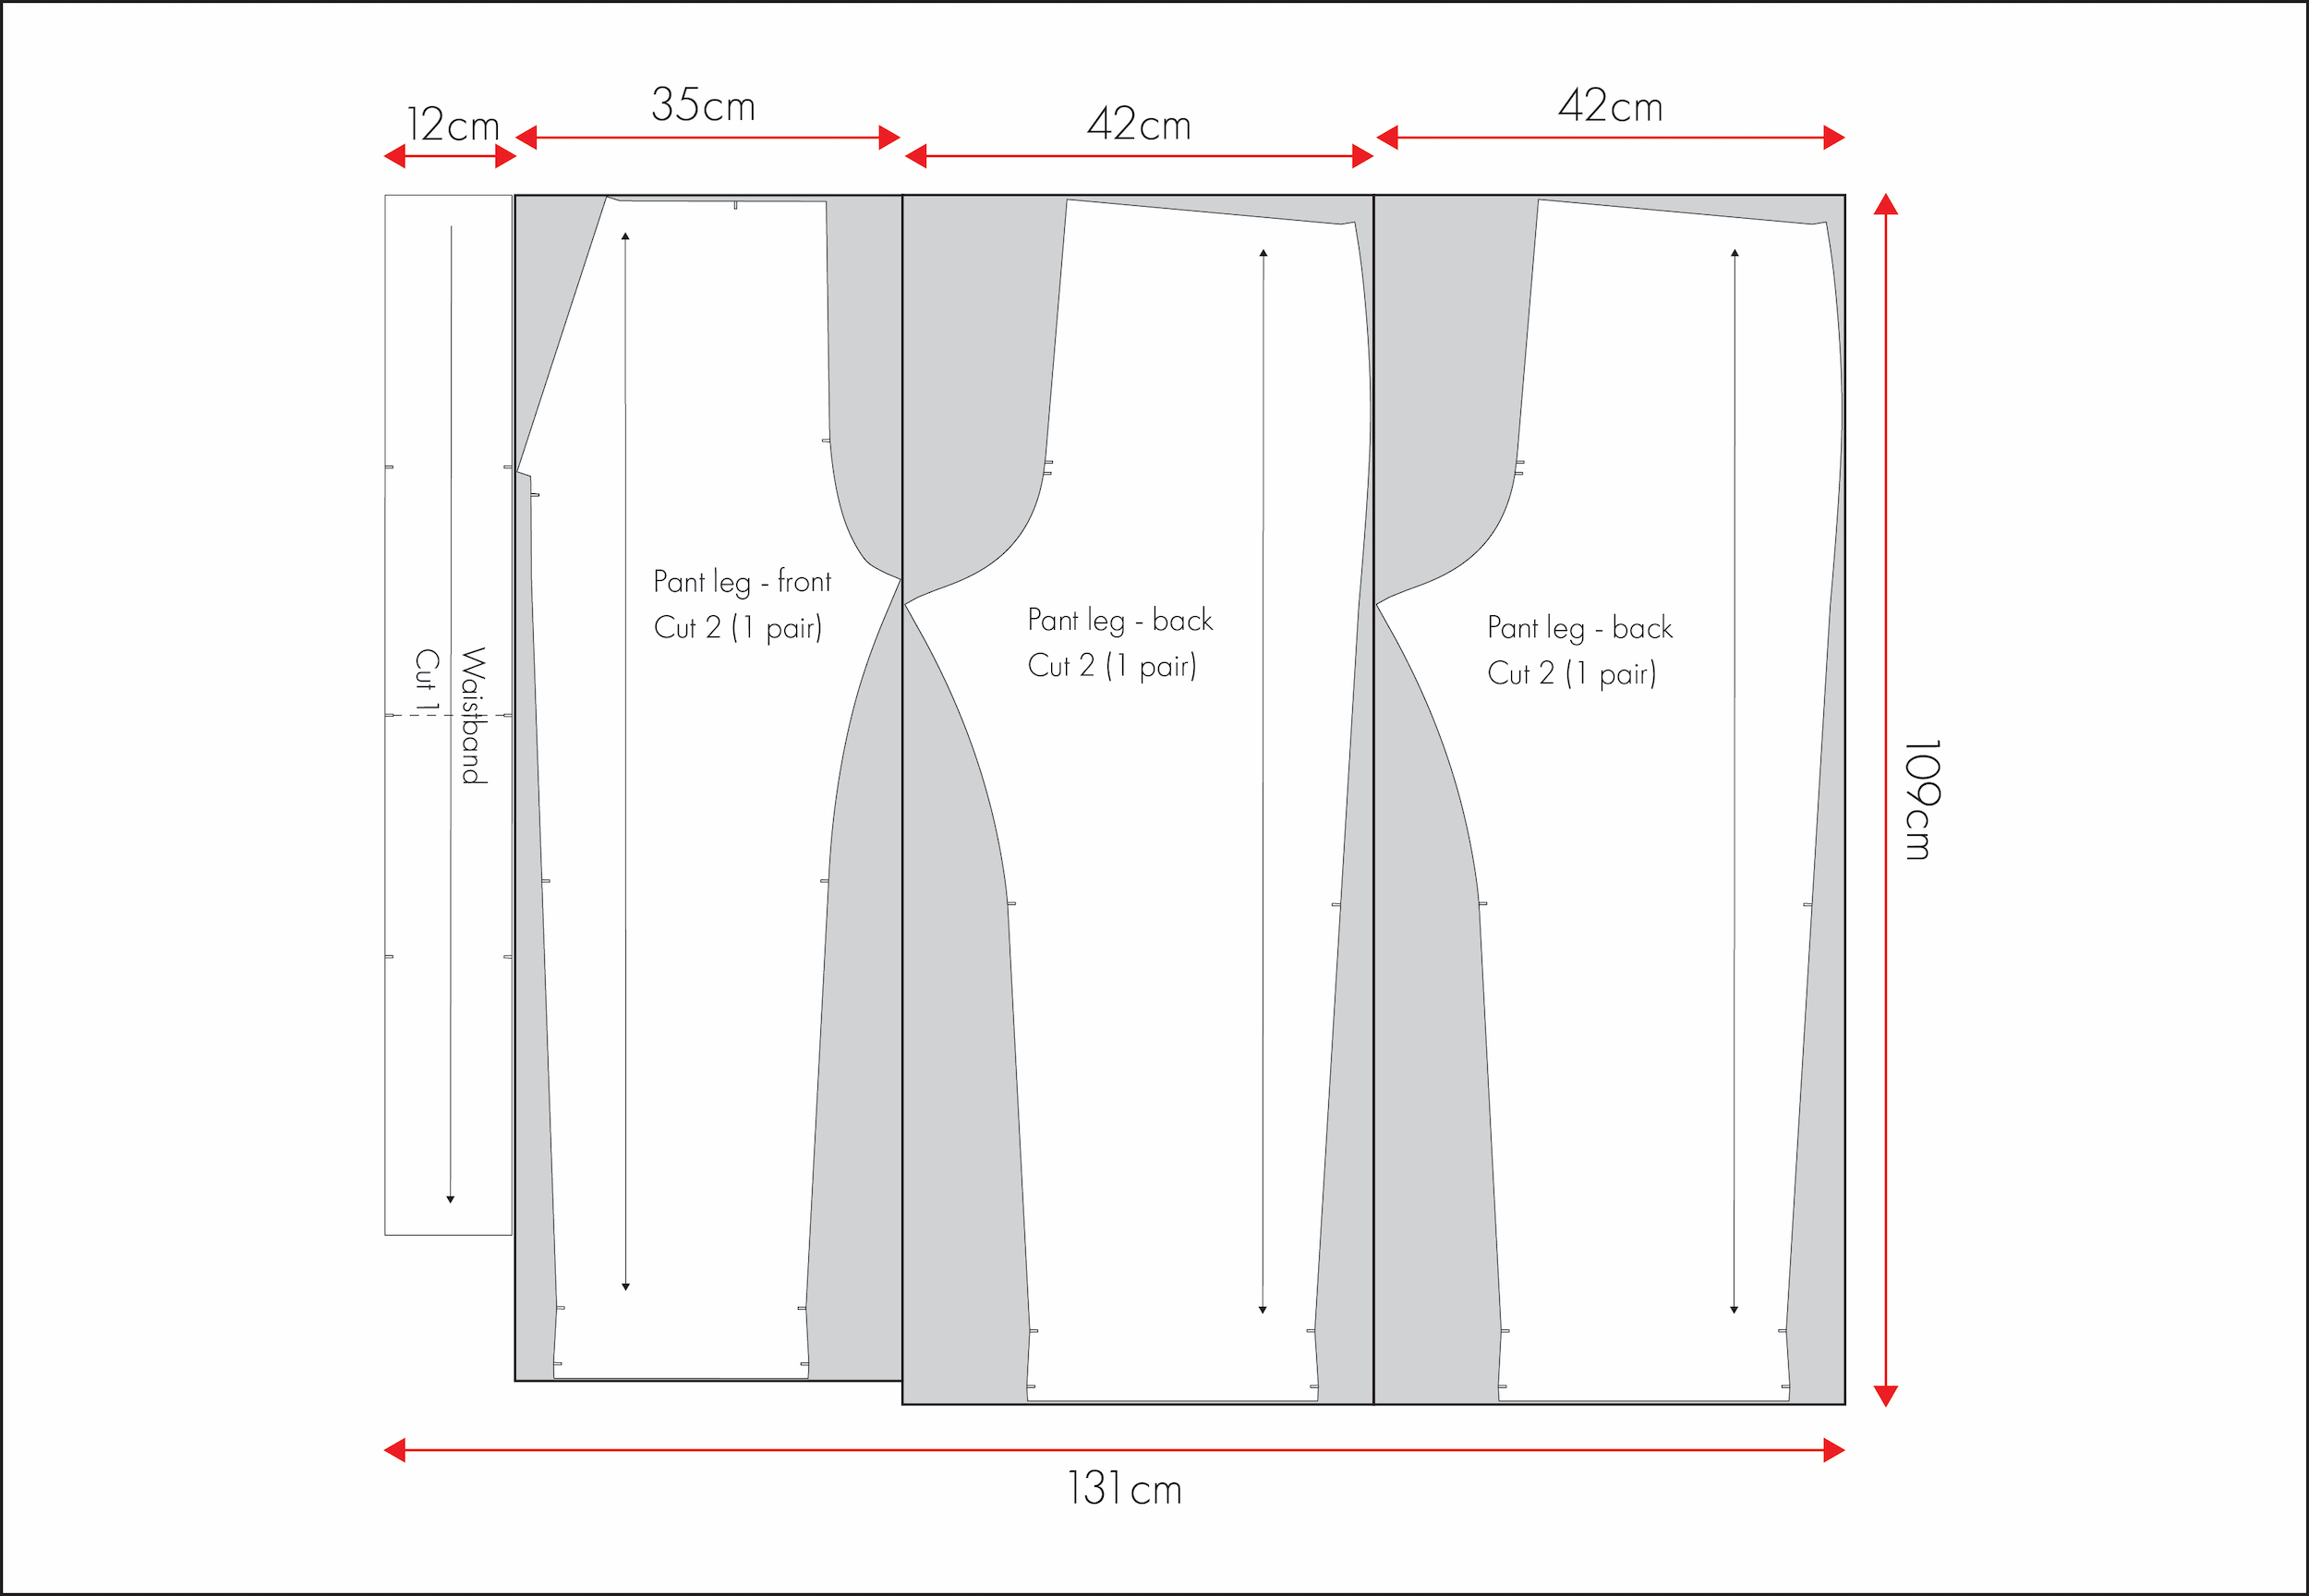
I will demonstrate how you might do this with the pant pattern I’ve been focusing on, and fabric that is 150cm wide.
The first step is to measure each of the rectangular pattern pieces.
- Waistband (W) = 12cm wide × 93cm long
- Front leg (F) = 35cm wide × 107cm long
- Back leg (B) = 42cm wide × 109cm long
- Pocket (P) = 34cm wide × 38cm long
Now it’s time for a bit of simple math.
If the fabric is 150cm wide, I can fit the following rectangular pattern pieces side-by-side (refer to Diagram 5):
(W) 12 + (F) 35 + (B1) 42 + (B2) 42 = 131cm
This fits within the 150cm fabric width with a nice buffer to spare.
Next, identify the longest of these pieces—the back leg at 109cm. This gives us our first layout section: 109cm in length.
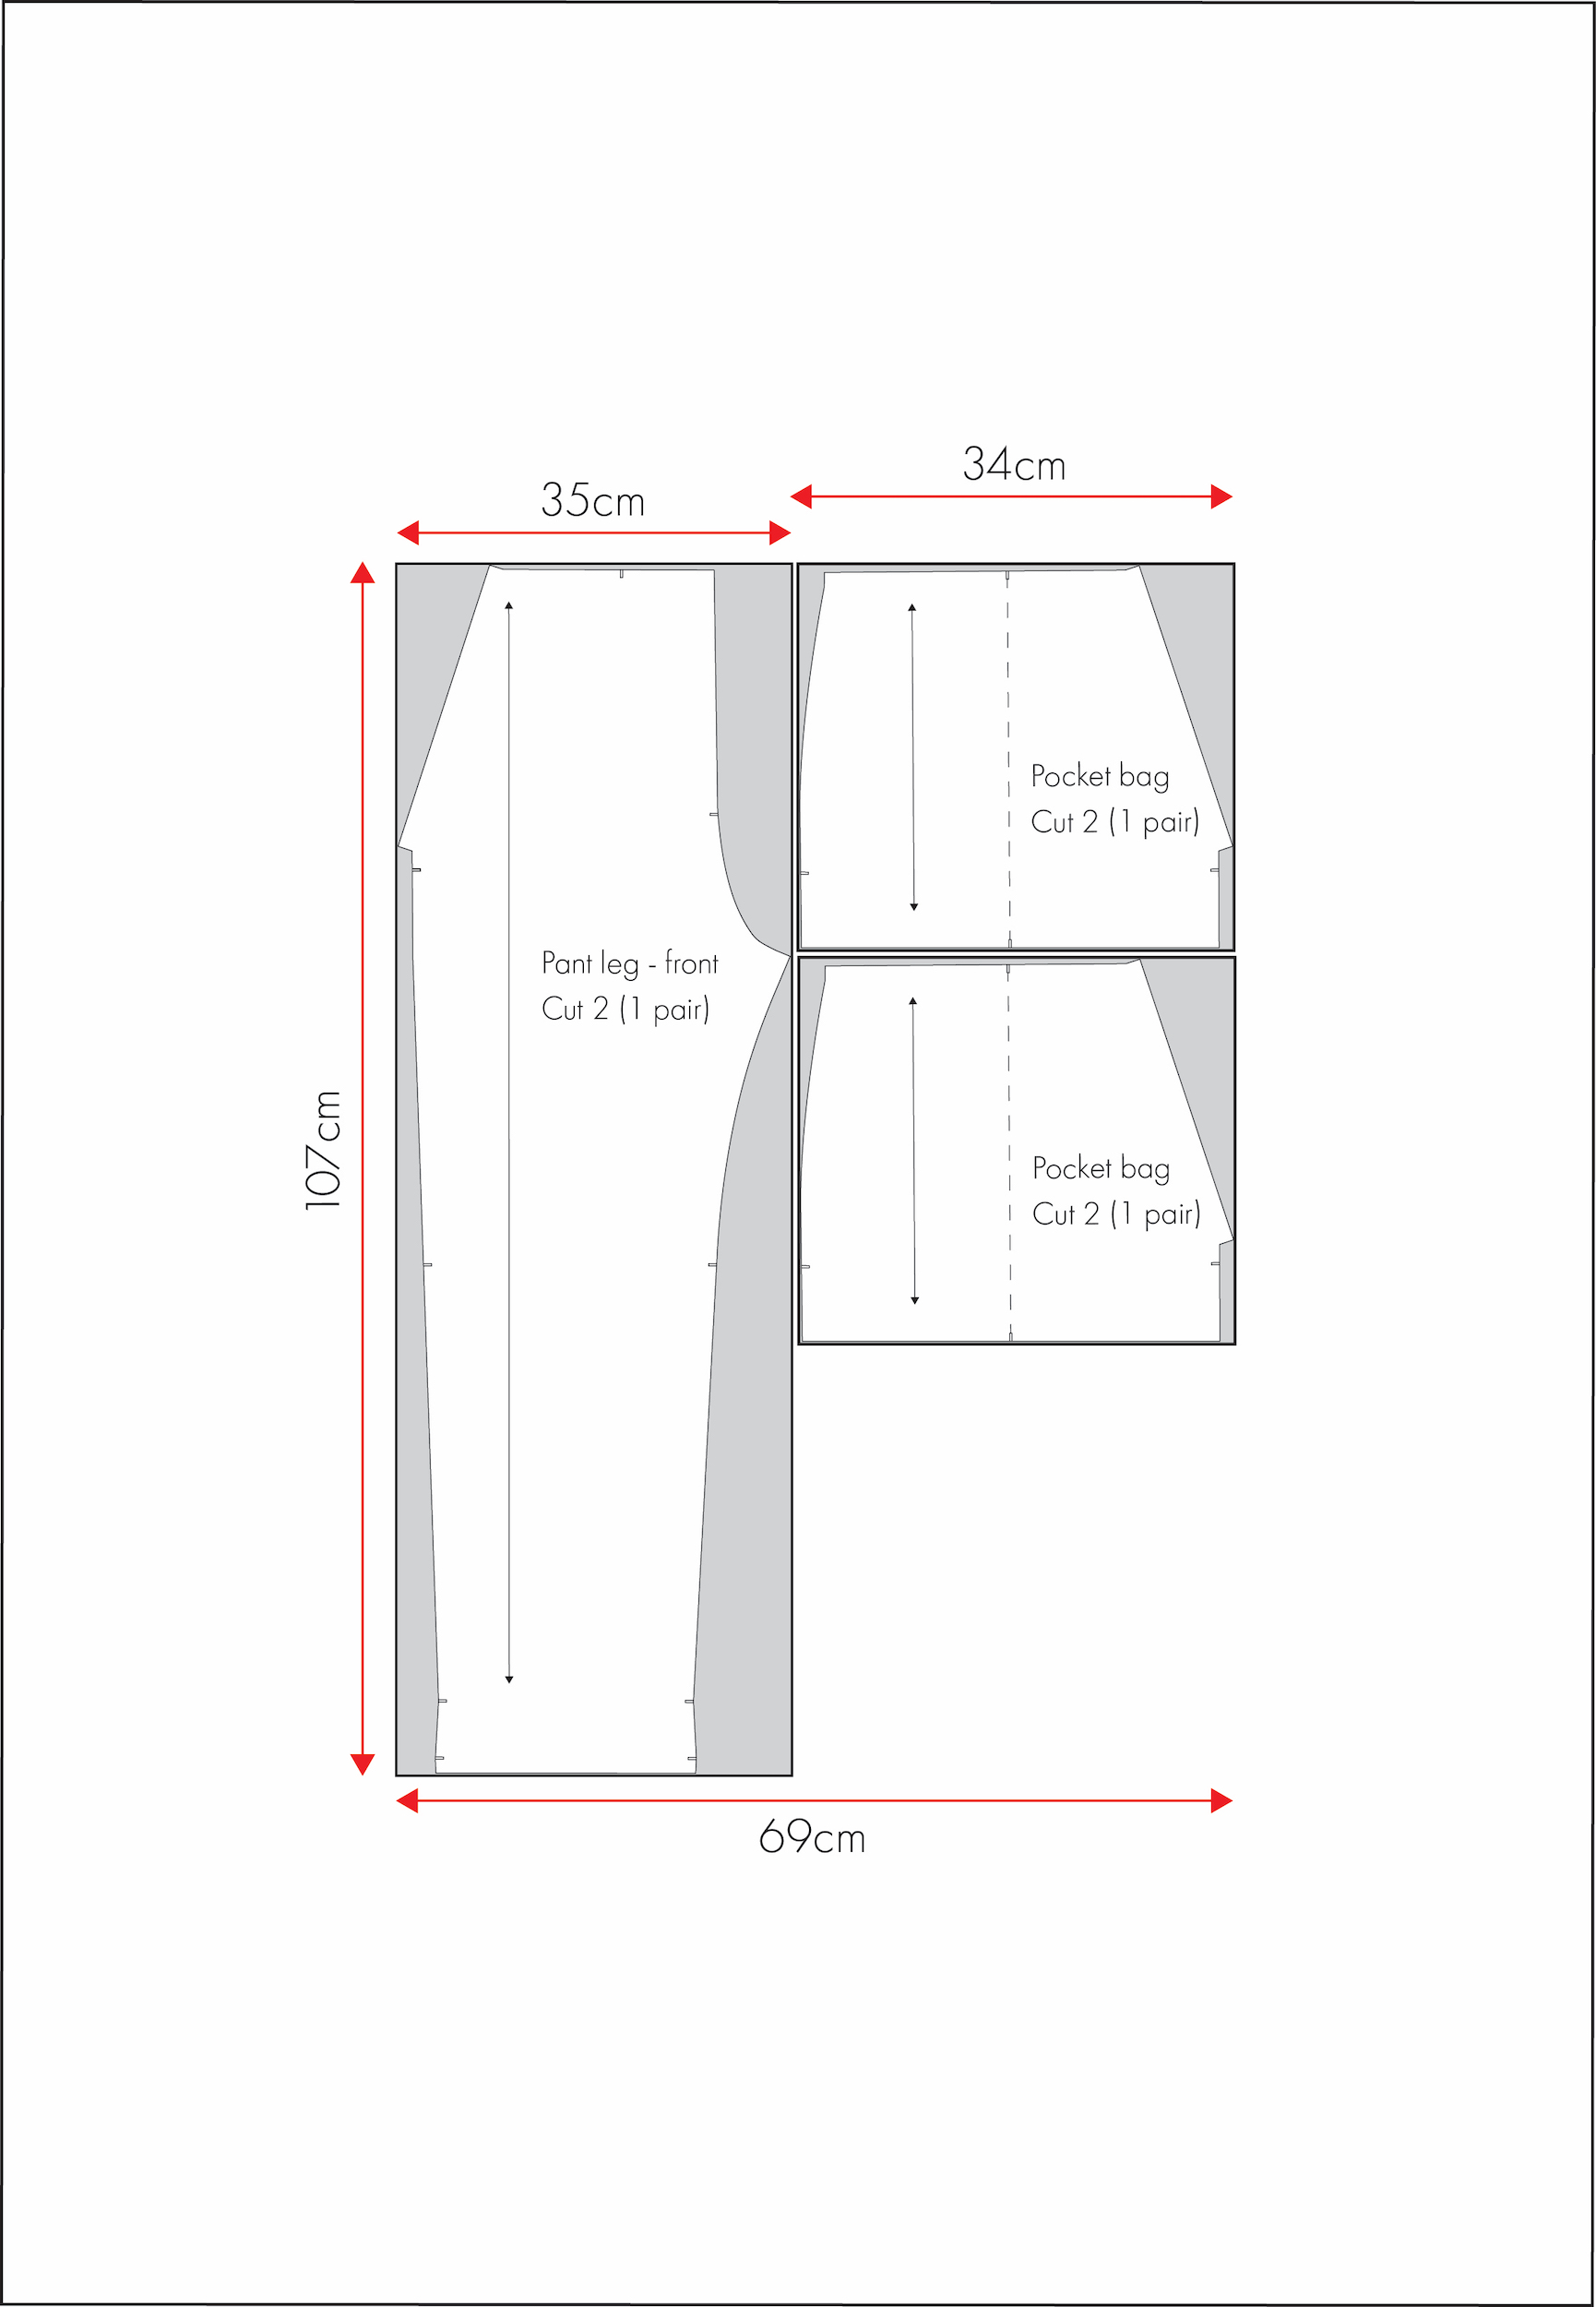
Now I’m left with the front leg and 2 pockets to lay out.
Let’s arrange them:
(F) 35 + (P) 34 = 69cm wide
These also fit nicely across the fabric width. The pockets are small enough to easily slot in on top of each other.
Again, identify the longest of these pieces—the Front leg at 107cm. This gives us our second layout section: 107cm in length.
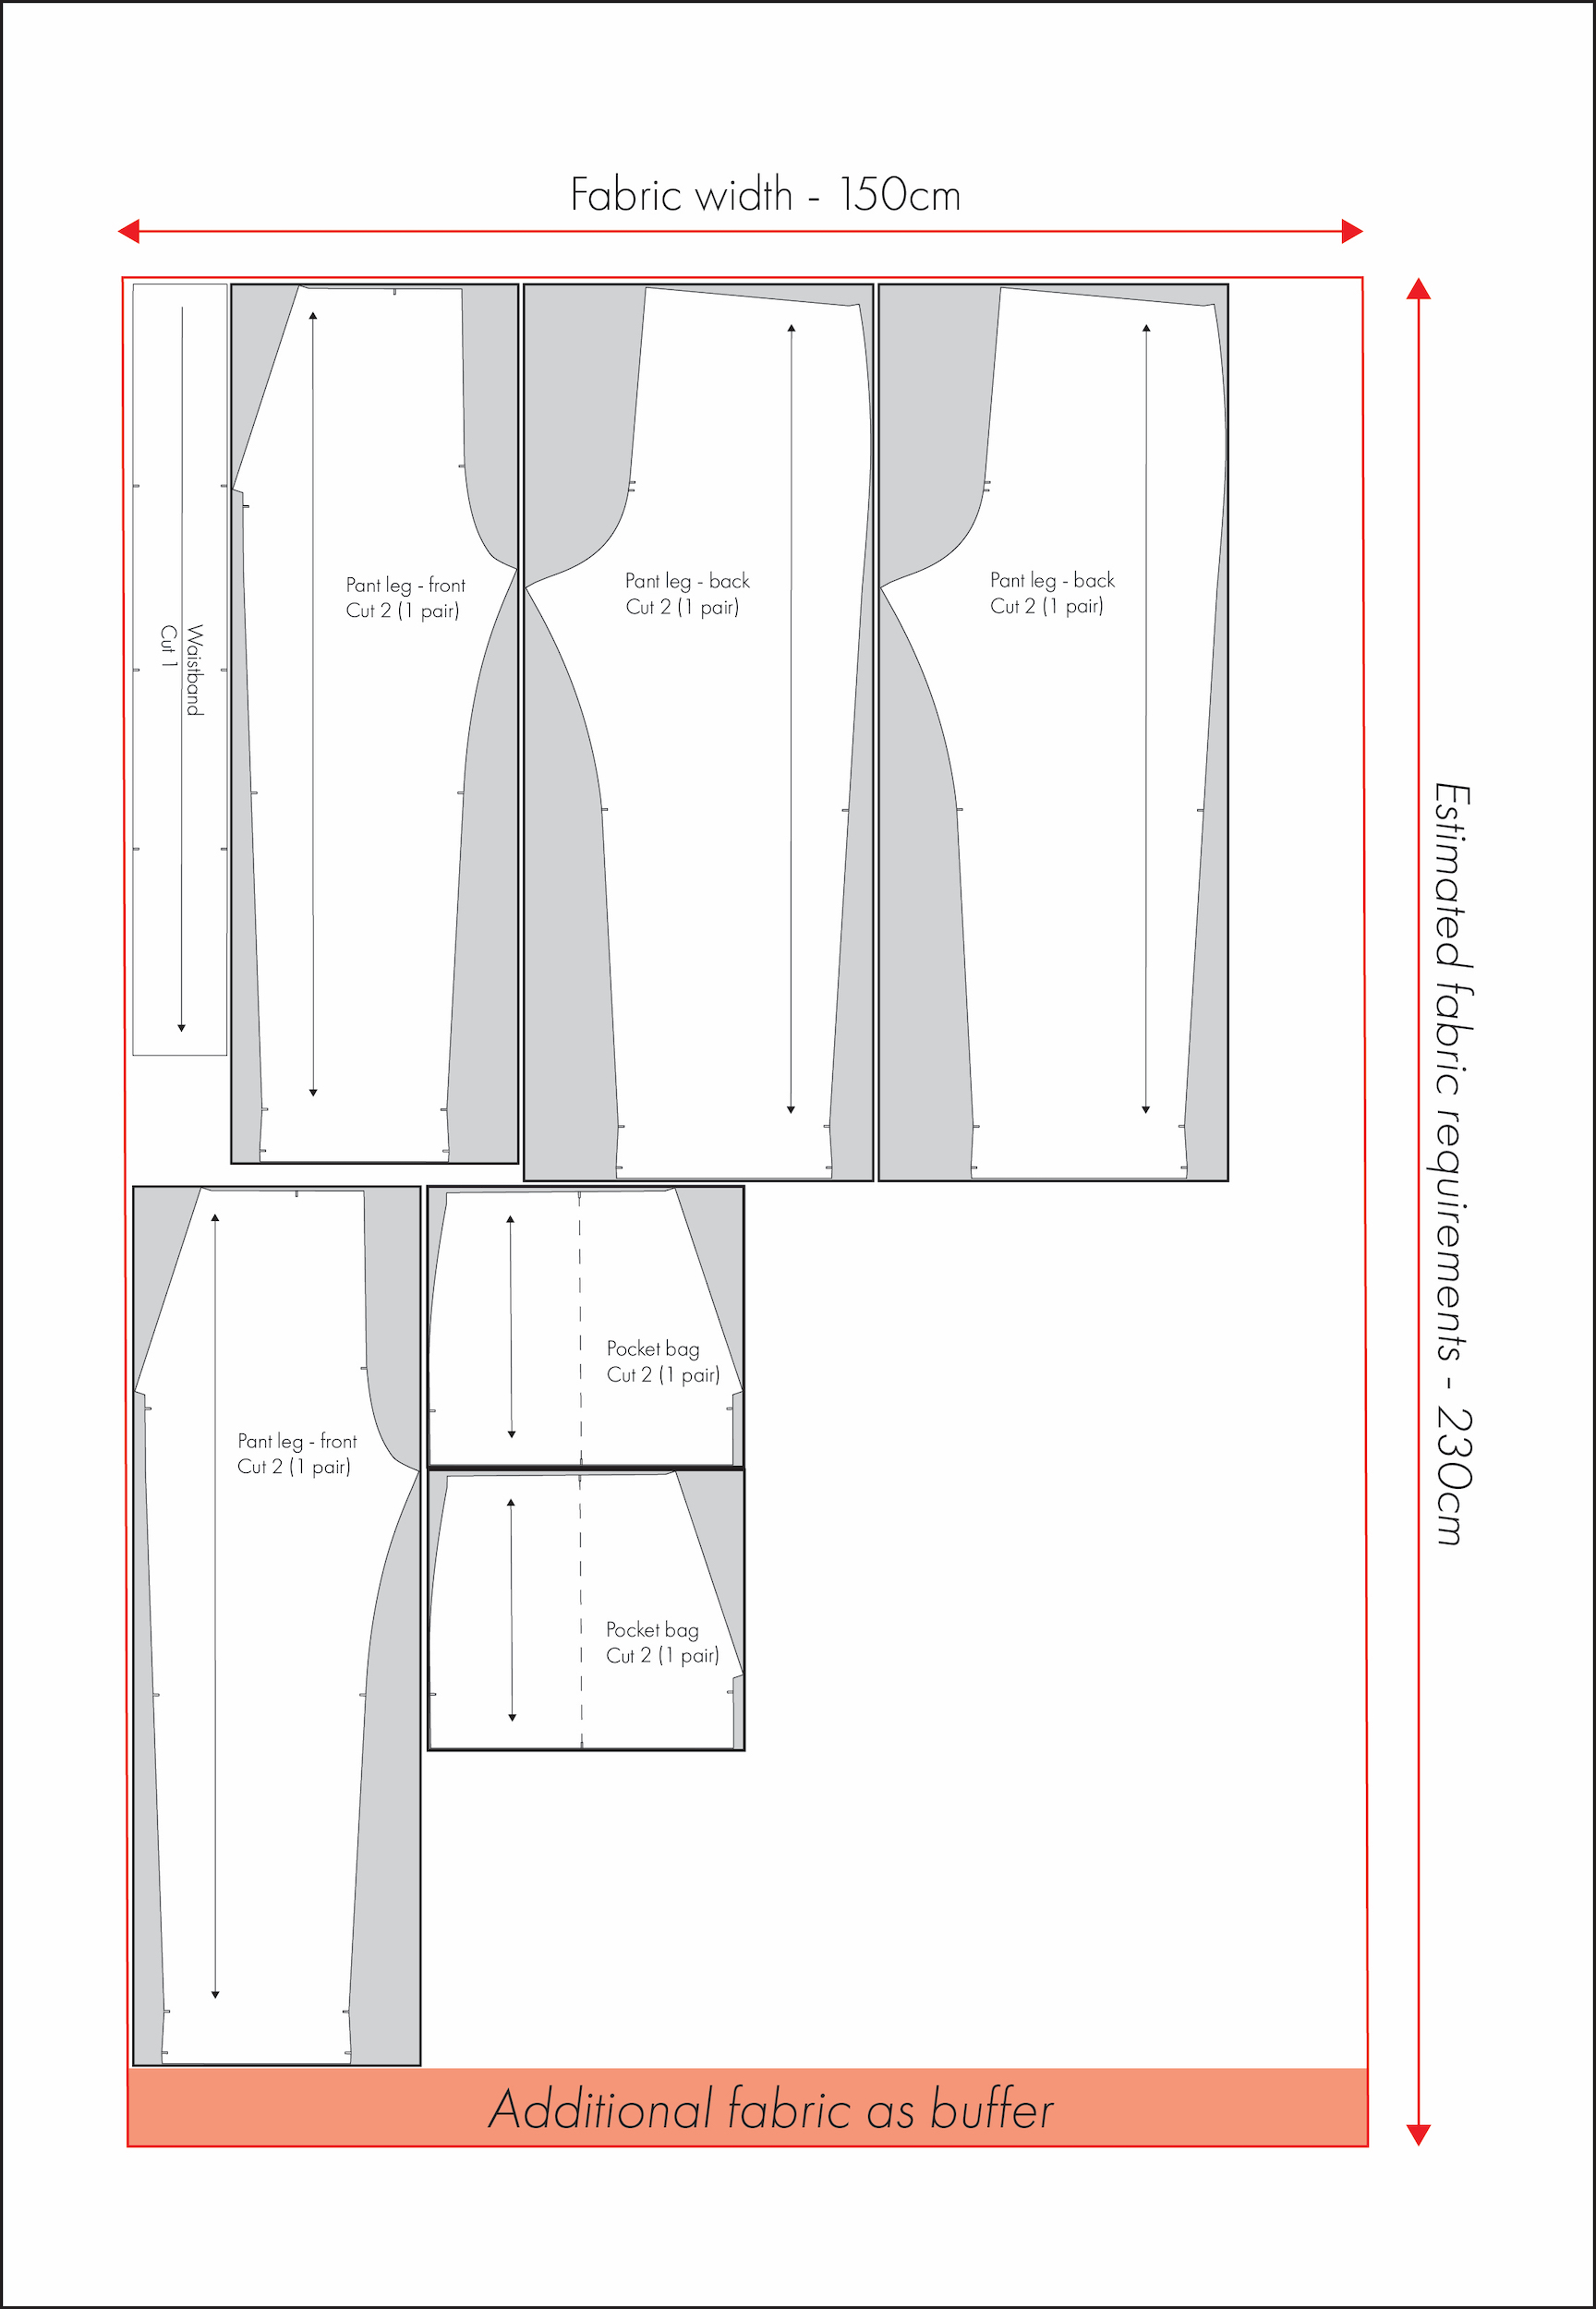
Therefore, a good estimate for the fabric length needed would start at:
Length 1 (109cm) + Length 2 (107cm) = 216cm
Step 5: Add a Bit of Wiggle Room
Once you’ve got a rough layout and total fabric length, add 10–20 cm just in case. This extra wiggle room allows for pre-washing shrinkage, fabric shifting, or layout adjustments later on.
Therefore, as demonstrated in Diagram 7 below, a good estimate of the fabric required for these particular pants would be around 230cm.
When is the mock layout method useful?
- When you are planning a project and don’t have the time or space to do a full mock layout.
- When you just want a rough estimate—particularly if you’re still drafting your own pattern and expect to make further changes.
- When working with simpler and more regular shaped pattern pieces.
Things to keep in mind
- Additional materials: It’s easy to focus only on the main fabric, but don’t forget to factor in linings, facings, interfacing, bindings, or any other additional materials. You can use the same estimation methods for these as well.
- Follow the grainline: Always ensure the pattern pieces are aligned correctly with the grainline.
- Allow for shrinkage: Pre-wash the fabric before cutting. For a how to and additional tips on pre-washing, take a look at my article ‘How to pre-wash fabric: A simple guide’.
- Watch for print direction and pattern repeats: Directional prints, stripes, plaids, and large-scale motifs may require extra fabric for proper placement and matching. Take time to plan how prints will sit on the body to ensure accurate alignment and avoid awkward placements—especially at seams and centre fronts or backs.
- Mind the nap: Some fabrics, like velvet or corduroy, have a directional nap that affects how they reflect light or feel to touch. All pattern pieces should be cut in the same direction for a consistent look, which may require more fabric.
Ensuring you have the right amount of fabric for your sewing project involves a little bit of planning and consideration. By understanding your pattern requirements, measuring accurately, accounting for shrinkage, and double-checking your calculations, you will hopefully be able to estimate how much fabric you need—reducing the risk of running short or ending up with those excess scraps.
About Author
Emma Cartmel
Heya! I’m Emma, and I'm an Aussie living in beautiful Munich with my husband Ben, and our pug Harley. I am a designer, pattern maker, and sewist, and I share my expertise and experience through my ‘cartem.sewing’ page. You can follow me on Instagram @cartem.sewingLeave a Reply to Masha Karpushina Cancel reply
Related posts
Sewing Essentials: A Guide to Sewing Threads
You might be thinking “Thread is thread… right?” Well, not always. Sewing thread is a key part of any sewing project. But just like fabric, the thread you choose matters, affecting things like the strength, appearance, and durability of your stitching. But if you have ever shopped for sewing thread, you probably know that it…

Sewing Essentials: Stitch Width, Stitch Length & Needle Position
Thinking back to my high school textiles days, I remember having to test stitch settings on every fabric we planned to use for our projects. We would cut out little squares of fabric and experiment with different stitch lengths and widths, and edge-finishing techniques. At the time, it felt unnecessary, not to mention tedious….

Sewing Essentials: A Simple Guide to Notches
I love a notch, so much so that I’ve decided to dedicate this article to these small but important markings. Here, I’ll explain why they’re so helpful, when to use them, and how to add them to your own patterns or adapt them for existing ones. What exactly are notches? Notches are small markings found…

How to Select and Use Interfacing: A Simple Guide
Iron-on or sew-in, woven or non-woven, lightweight or heavyweight. With so many different types, weaves, and weights to choose from, how do you know which interfacing is best for your project? In this article, I will explain the two main types of interfacing before diving into the differences in weave and weight. Hopefully by the…

Sewing Essentials: A Simple Method for Reversible Seams
There are so many ways to finish a seam, from good old overlocking to French seams and binding. I recently stumbled across another method that’s pretty nifty, and honestly, I kind of wish I had known about it sooner. It is a bit like binding, but topstitched in place so it doesn’t move or flap…


SEW THIS LOOK


Latest Posts


3 Comments
Lisa Miller
Those are all great tips, especially if you draft your own patterns. My method is a bit different. If I’m making my own pattern, then I mentally count lengths for sleeves, torsos, lower bodies, anything particularly large or bulky (e.g. a capelet or ruffle), add a bit (about 1/2 yard) for all the other smaller bits like pockets, facings, making bias tape, cuffs and so on. Then…I double it! 🙂 I can always find a use for more fabric, if not on the garment in question, then to make something else with the remainder. I mostly do Medieval and Renaissance costuming these days, so calculating yardage needed is often simply a matter of how full I want a garment to be.
Granted, for any fabric costing more than $200 a meter or yard, I’d draft each piece, make a muslin toile, further refine the pattern, then lay the pieces out on my handy-dandy grid lined cutting board (cardboard) and keep pencil and paper handy for notes as I went along. But mostly I just buy more, a lot more (does “buy the bolt” sound familiar?) and find a use for everything that is left over.
Masha Karpushina
Lisa hello! My name is Masha and I am the editor of the thread. I am looking for writers who specialise in Renaissance costuming. Is this something you might be interested in?
Emma Cartmel
Hi Lisa.
Thanks so much for sharing your method! It’s always interesting to hear how everyone approaches pattern drafting and fabric estimating in their own way.
Medieval and Renaissance costuming sounds amazing. I’d also love to hear more about your process.