


Understanding Seam Allowance: A Simple Guide
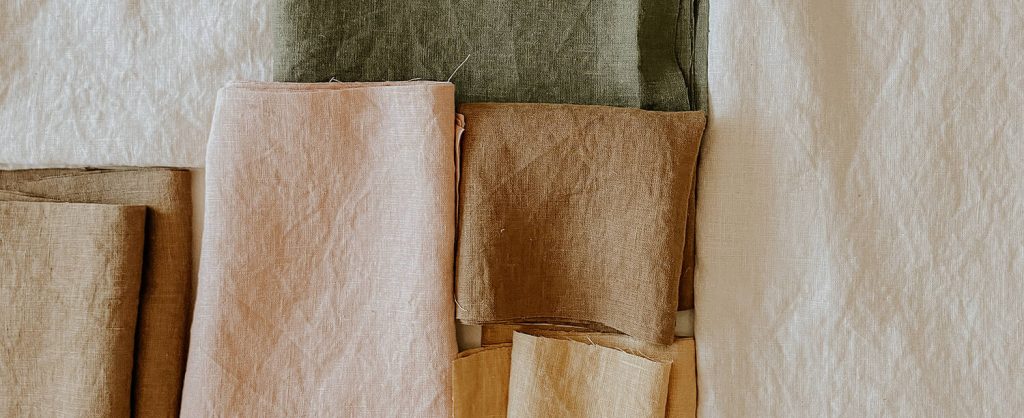
Photo by Alisha Cooke
Every garment needs seam allowance—it’s a crucial part of garment construction. Sometimes it’s already included in the pattern; other times, it may need to be added, especially when working with a self-drafted pattern or after making adjustments.
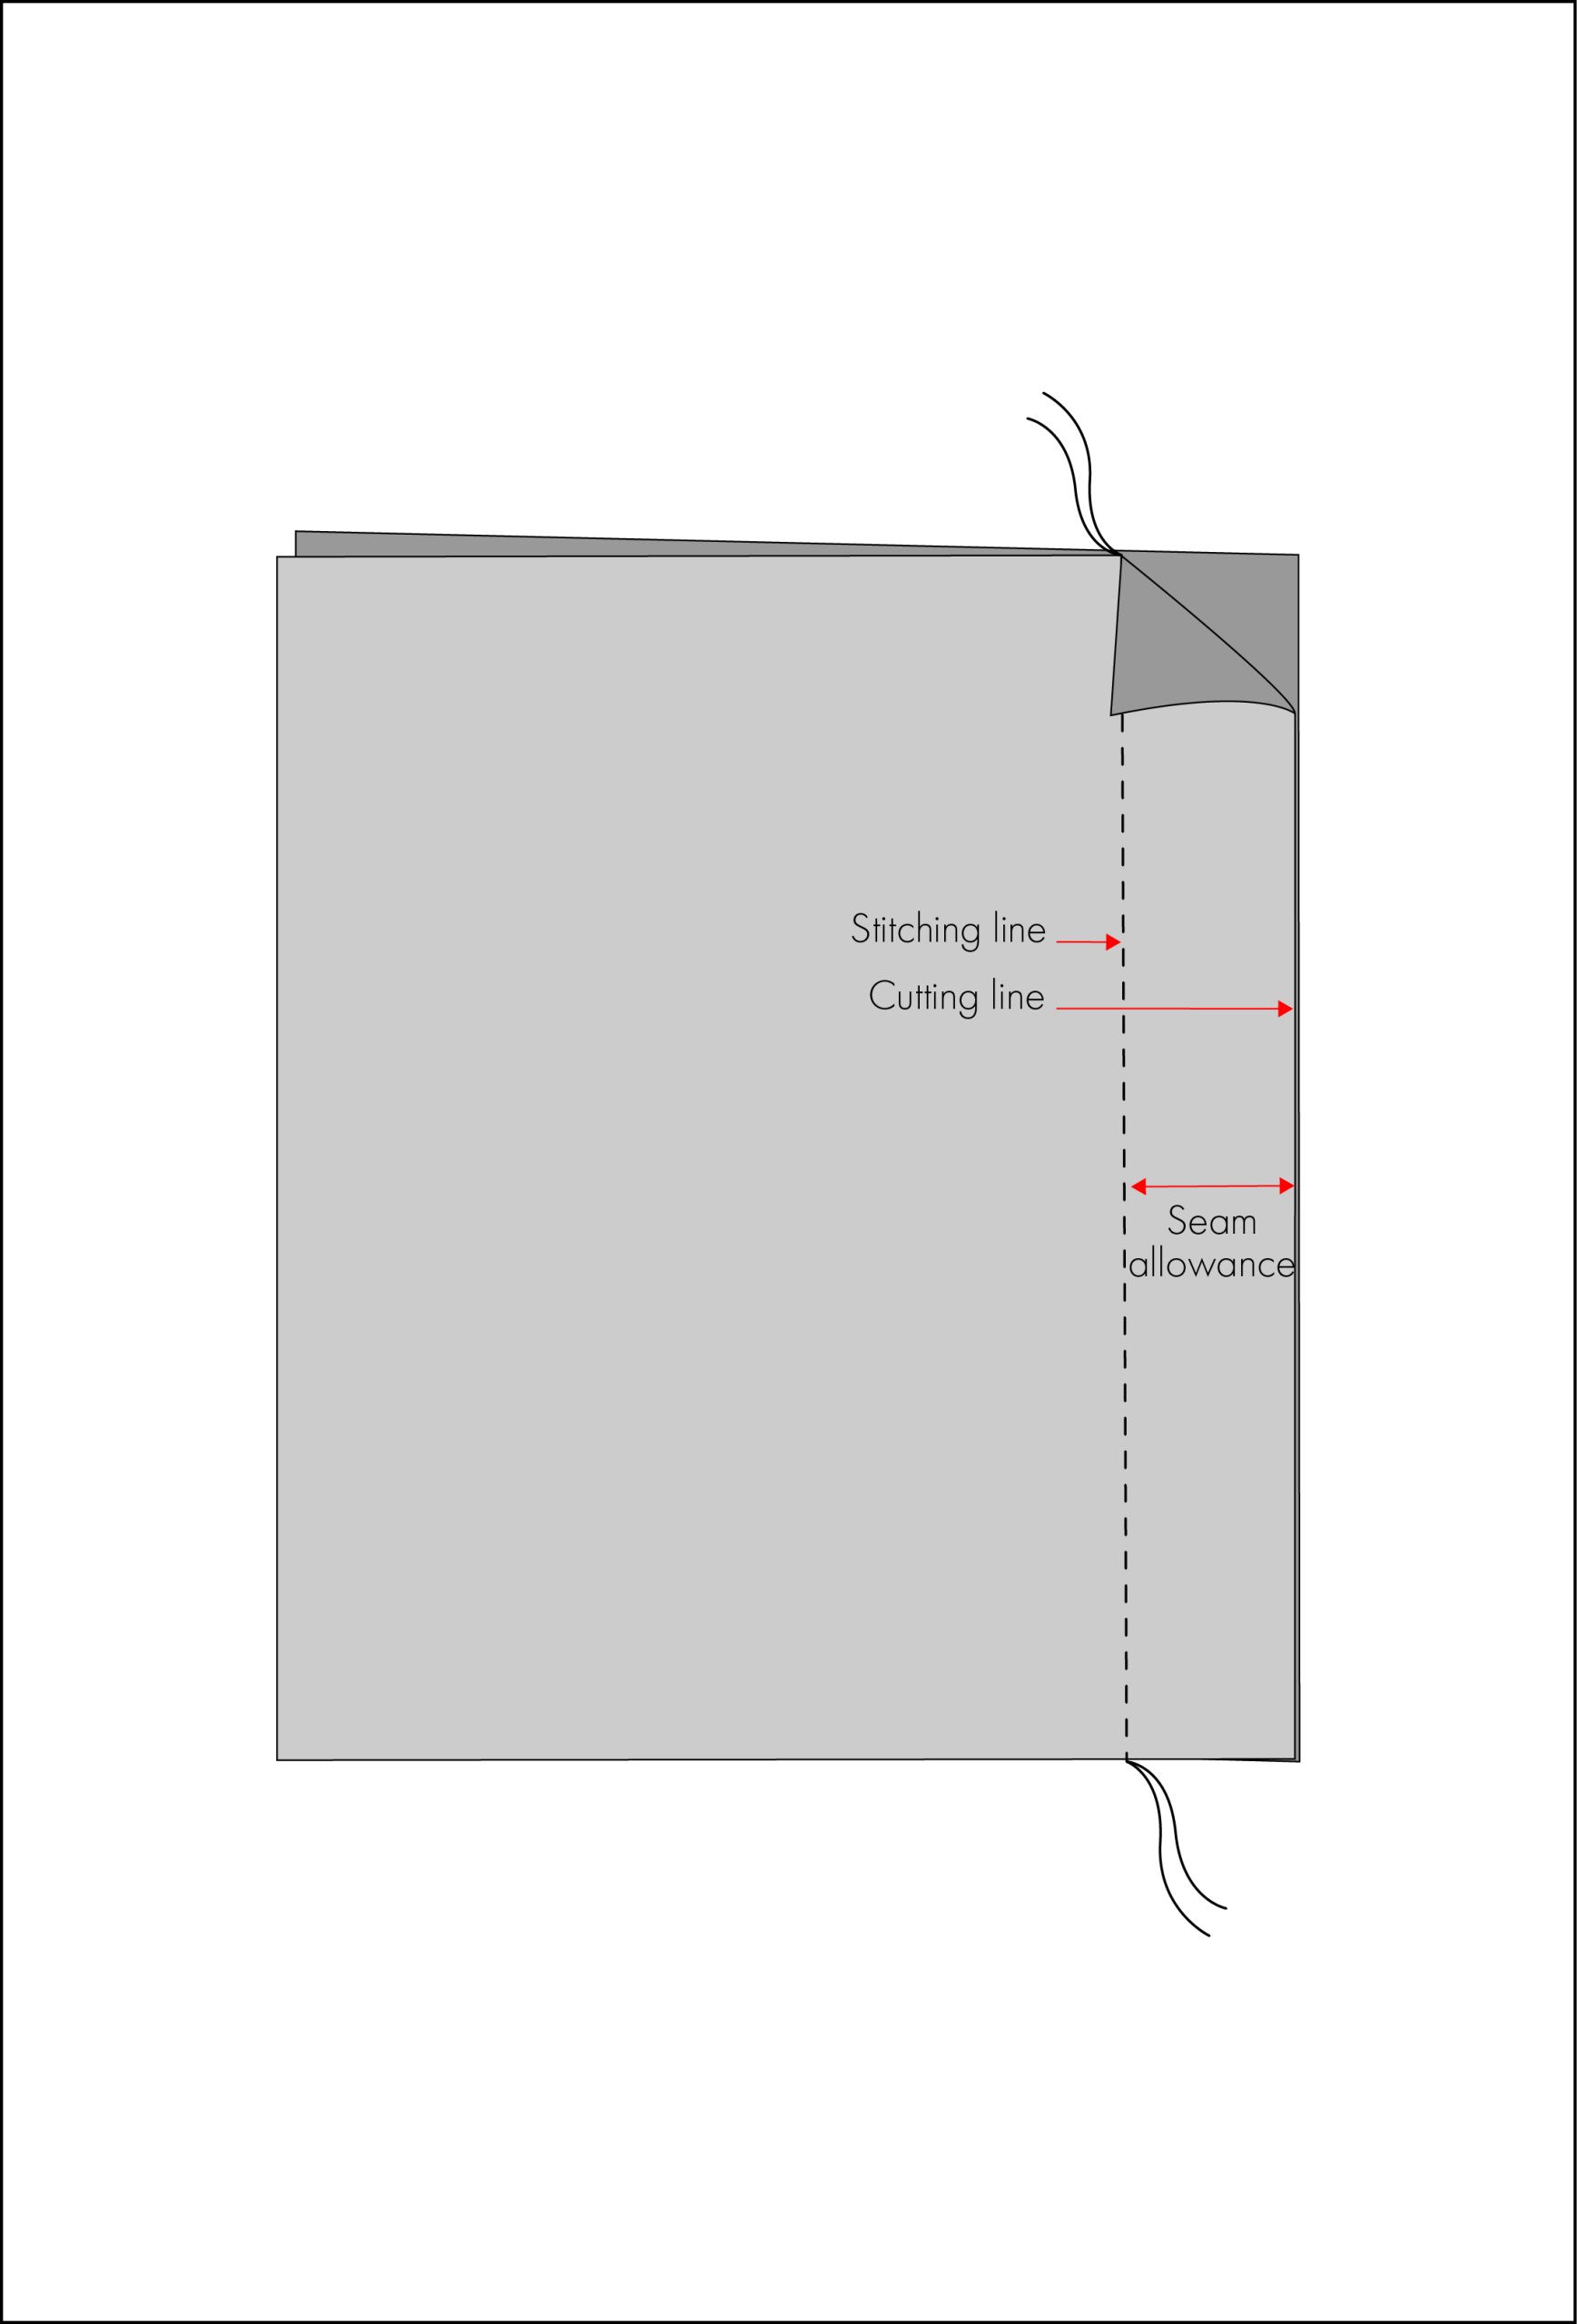
Seam allowance is the extra fabric added around the edges of a pattern piece. It creates space between the stitching line and the cutting line (or the edge of the fabric).
However, seam allowance isn’t just there to join pieces of fabric together—it plays a big role in how a pattern fits, functions, and holds up over time. Having enough seam allowance strengthens seams, helping prevent them from unraveling or weakening with frequent wear and washing. It can also make the sewing process easier by providing space for handling during stitching and for applying finishing techniques. Plus, it allows for adjustments—especially in areas like waistbands and side seams—offering flexibility to refine the garment for a better fit.
So, how do you know how much seam allowance to add around a pattern piece? Hopefully, this simple guide will help!
Common seam allowances
The width of the seam allowance can vary depending on several factors, including the fabric type, seam finish, positioning, the strength needed for the seam, as well as the construction method. While standard seam allowances typically range from 1cm (3/8″) to 1.5cm (5/8″), they can be as narrow as 0.6cm (1/4″) or extend several centimetres, especially for hems.
There’s no hard-and-fast rule or one-size-fits-all approach to seam allowance. It can really be a bit of a mixed bag—some of it comes down to the designer, where they’re based, or even what they were taught. A lot of it also comes down to personal preference.
Below, I’ll walk you through some of the most common seam allowances and when each is likely to be appropriate.
Factors to consider when selecting seam allowance
Before deciding how much seam allowance to use, I recommend considering the following:
- Fabric type: Are you working with a particularly heavy, lightweight, or delicate fabric? Is the fabric prone to fraying?
- Type of seam: Are you sewing a standard straight seam or something with a curve?
- Sewing method: Is the seam open, closed, or bagged out? Will you be overlocking the edges, or using a more specialised edge finish like a French seam? Are you inserting a zipper?
- Location: Is the seam in a high-stress area—such as the crotch—where movement and friction could put extra strain on the fabric?
- Fit adjustments: Is the seam is in an area where you might want to make future alterations, like a waistband or hem?
- Bulk management: Is the seam at a bulky junction, such as the crotch or underarm?
Tip: For extra guidance, head to your wardrobe and pull out a few garments. Turn them inside out to see what seam allowances were used and what edge finishes they allowed for.
0.6cm (1/4″) seam allowance
Let’s start with the narrowest! While it may seem small, a seam allowance of 0.6cm (1/4″) is ideal for certain situations:
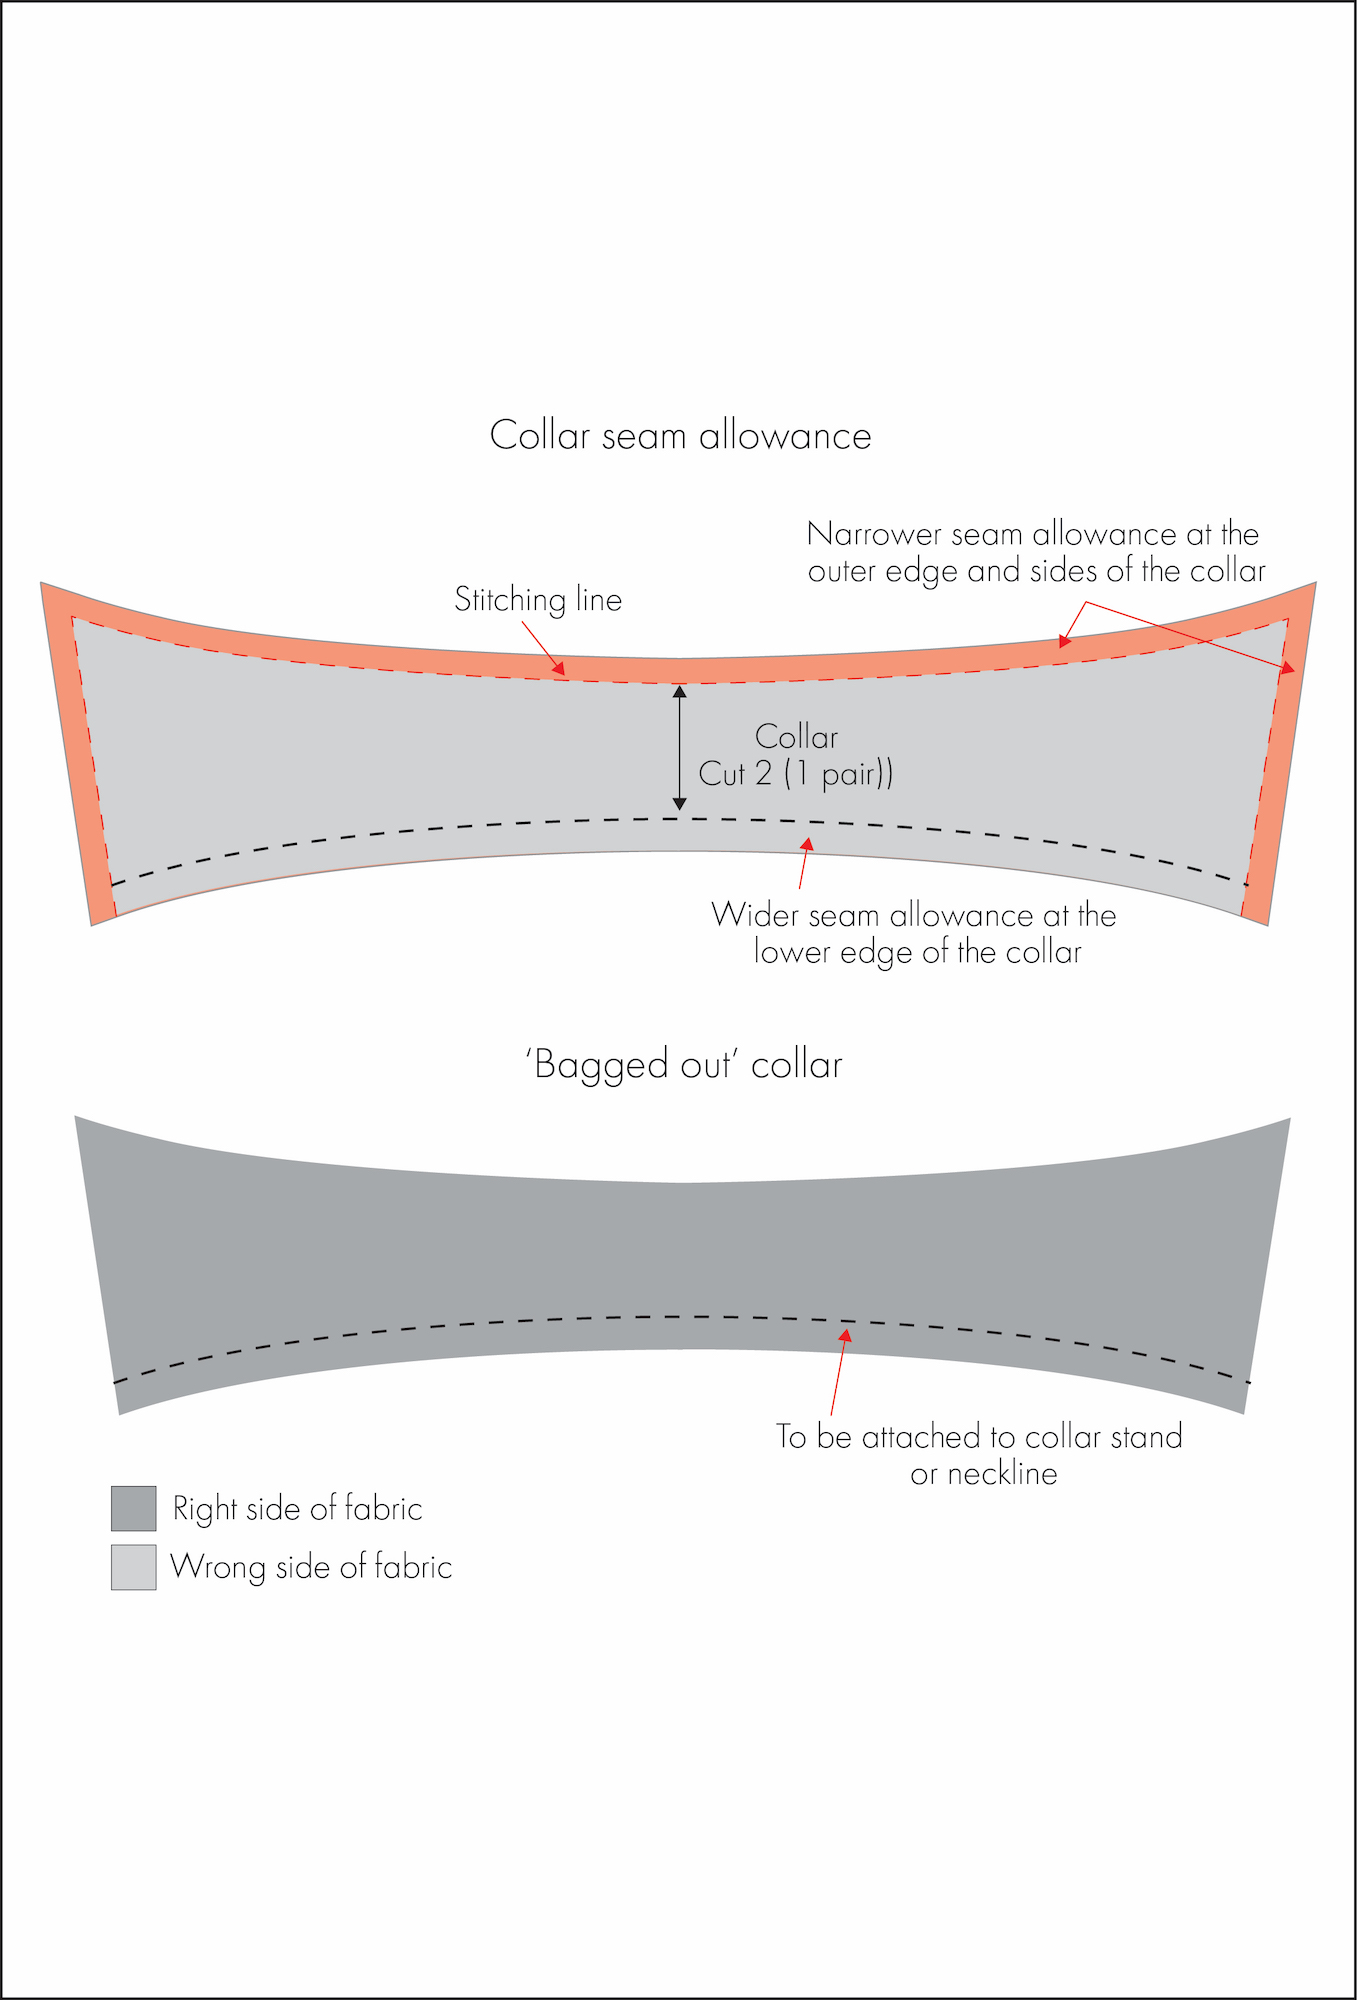
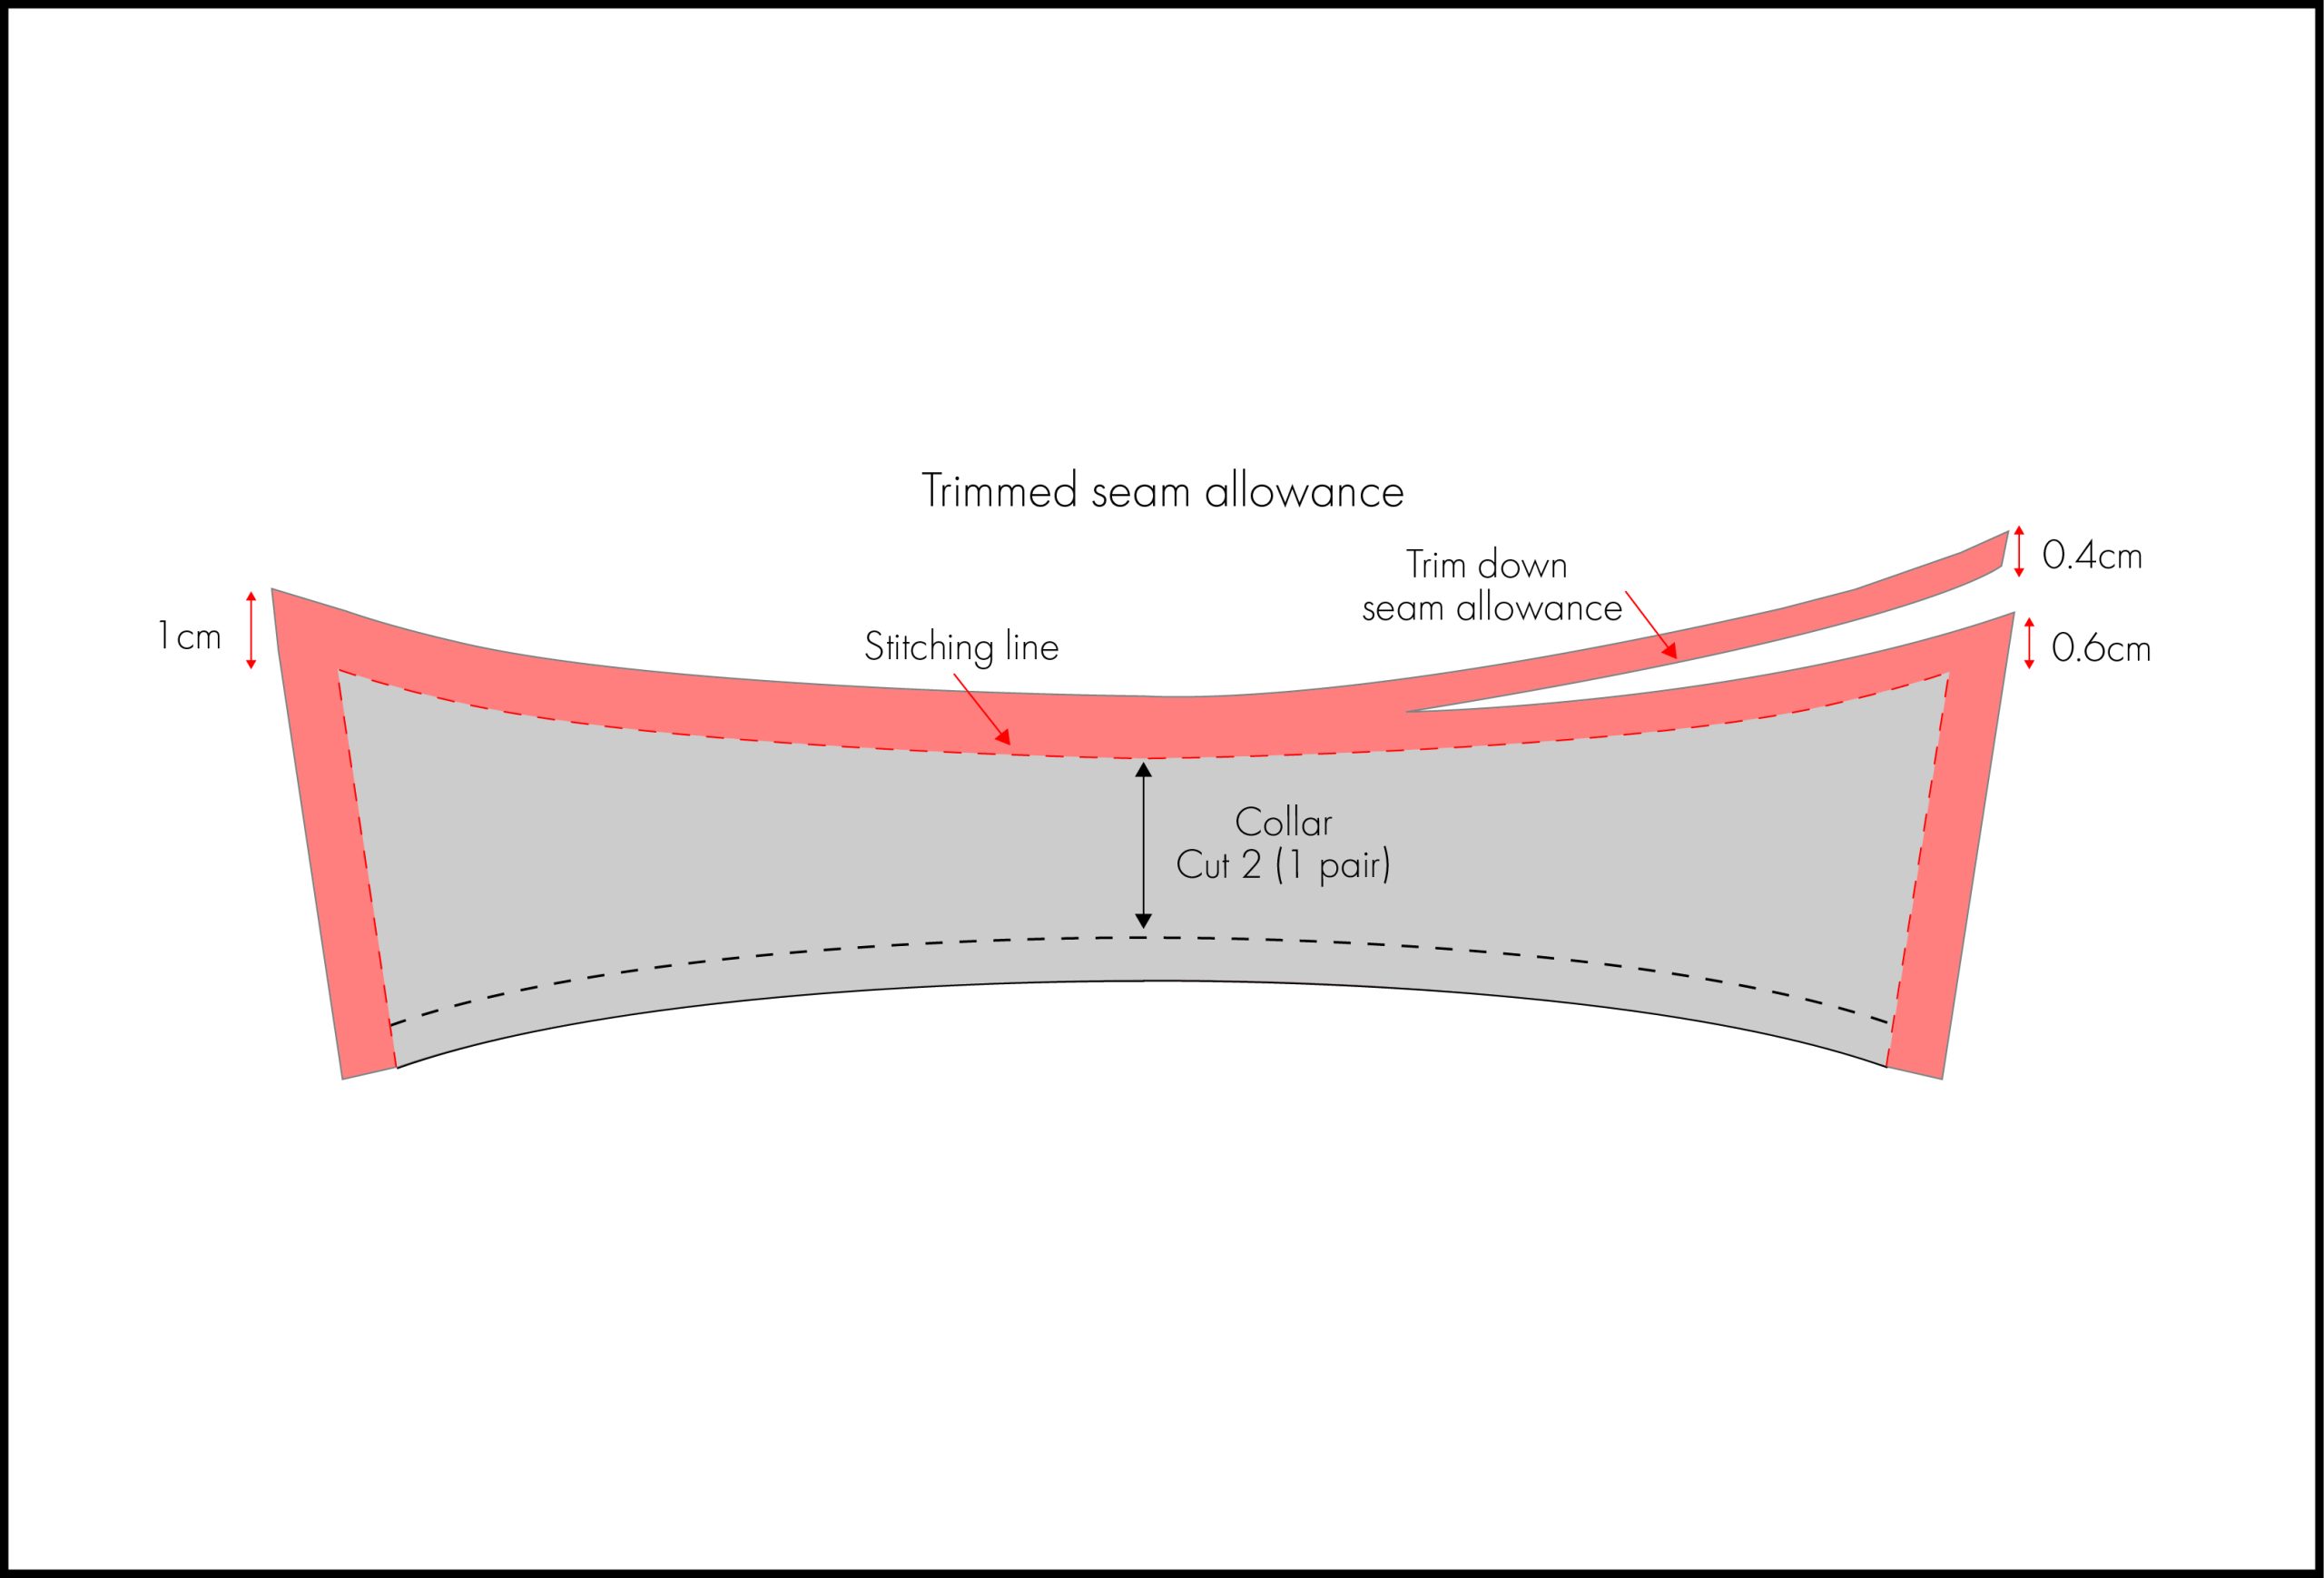
- Bagged-out areas: In bagged-out areas—such as collars and collar stands—a smaller seam allowance helps reduce bulk and creates a cleaner finish. Since these seams are fully enclosed, there’s also less risk of fraying. As shown in the example below, the sides and outer edge of the collar can use a smaller seam allowance (top diagram), as they’ll be turned to the inside or ‘bagged out’ (bottom diagram). The lower edge, however, features a larger seam allowance, as it will be attached to the collar stand or neckline.
- Curved seams: Curved seams—such as necklines—are often easier to sew and manipulate with a smaller seam allowance, reducing the need for excessive clipping.
- Fine or delicate fabrics: Lightweight and sheer fabrics can benefit from a smaller allowance that keeps the garment neat, lightweight and smooth, while helping to maintain its drape.
1cm (3/8″) seam allowance
A 1cm (3/8″) seam allowance is a common and versatile choice, suitable for various seams. It works well for:
- Standard seams: Think side seams, shoulder seams, panel lines, crotch seams, or waistbands. This allowances provides enough room for a clean, secure finish without adding unnecessary bulk.
- Curved seams: For curved seams, such as armholes or princess seams, a 1cm (3/8″) seam helps create smoother curves and reduce bulk when clipped and notched.
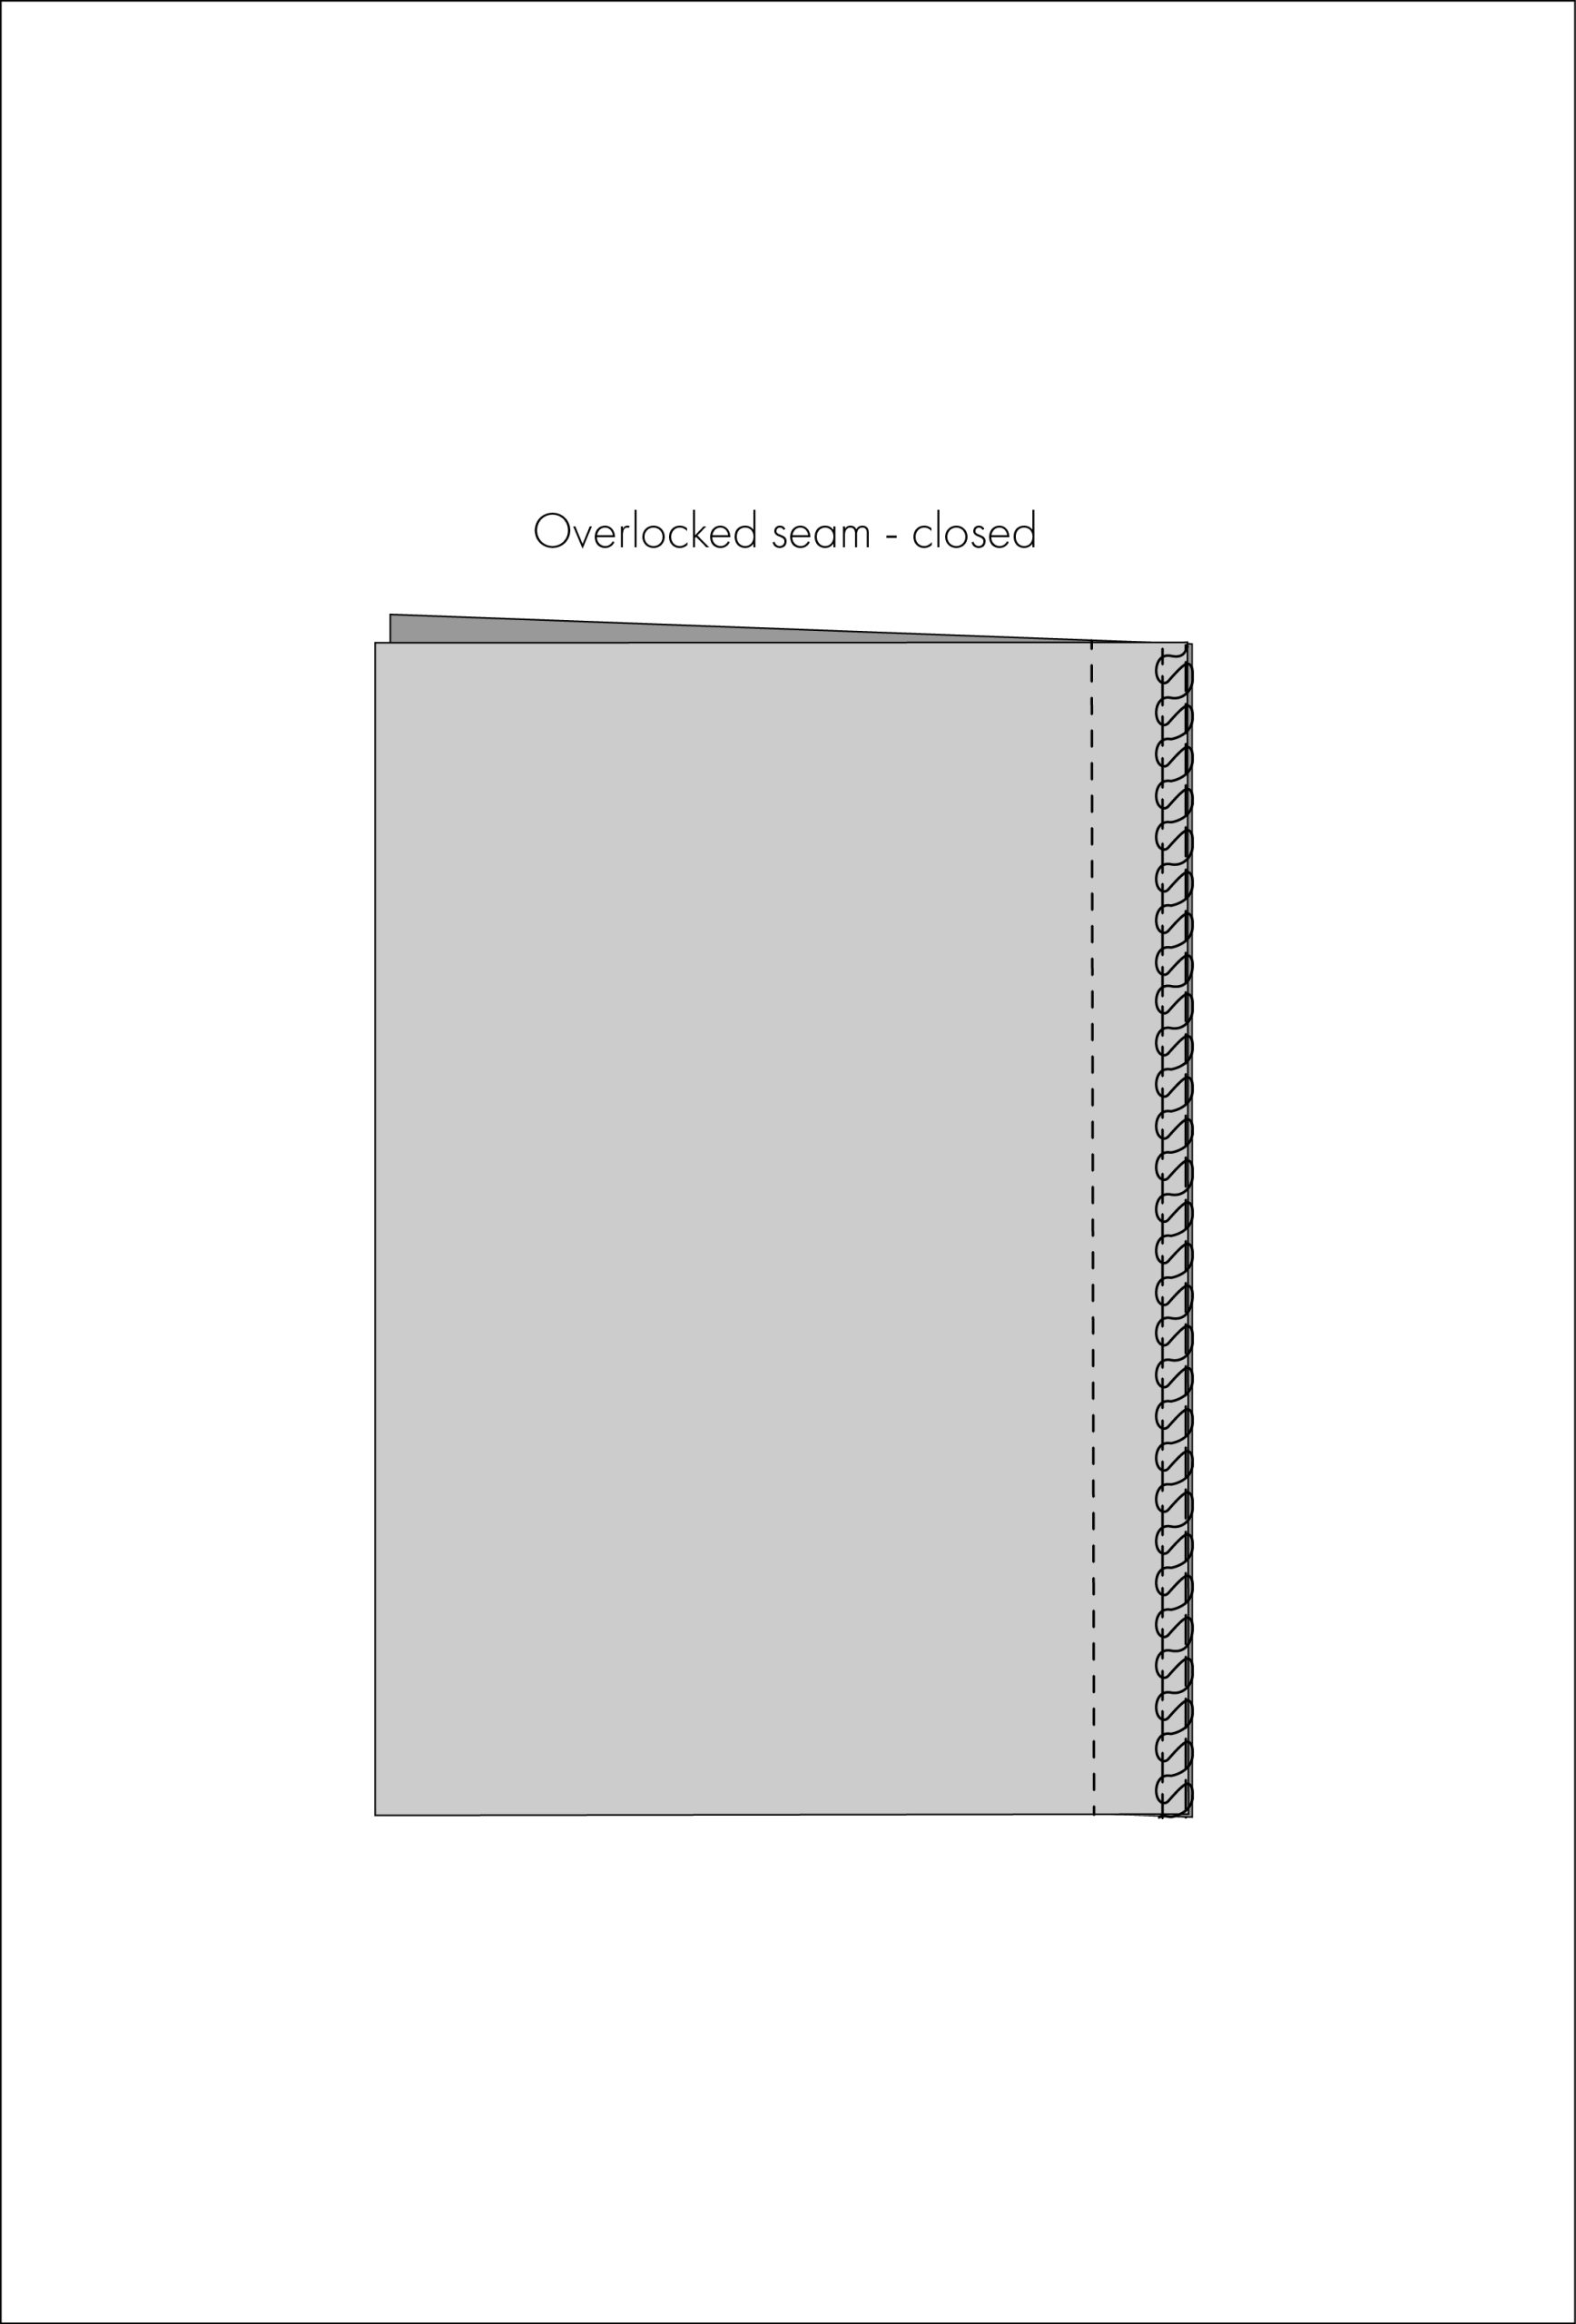
- Overlocked/serged seams: A good choice when seams are overlocked closed.
- Bagged out areas: A 1cm (3/8″) seam allowance is also suitable for enclosed seams, such as collars or facings. As shown in the diagram below, it’s sometimes easier to start with a wider seam allowance and then trim it down. The fabric choice and personal preference can help guide which approach works best.
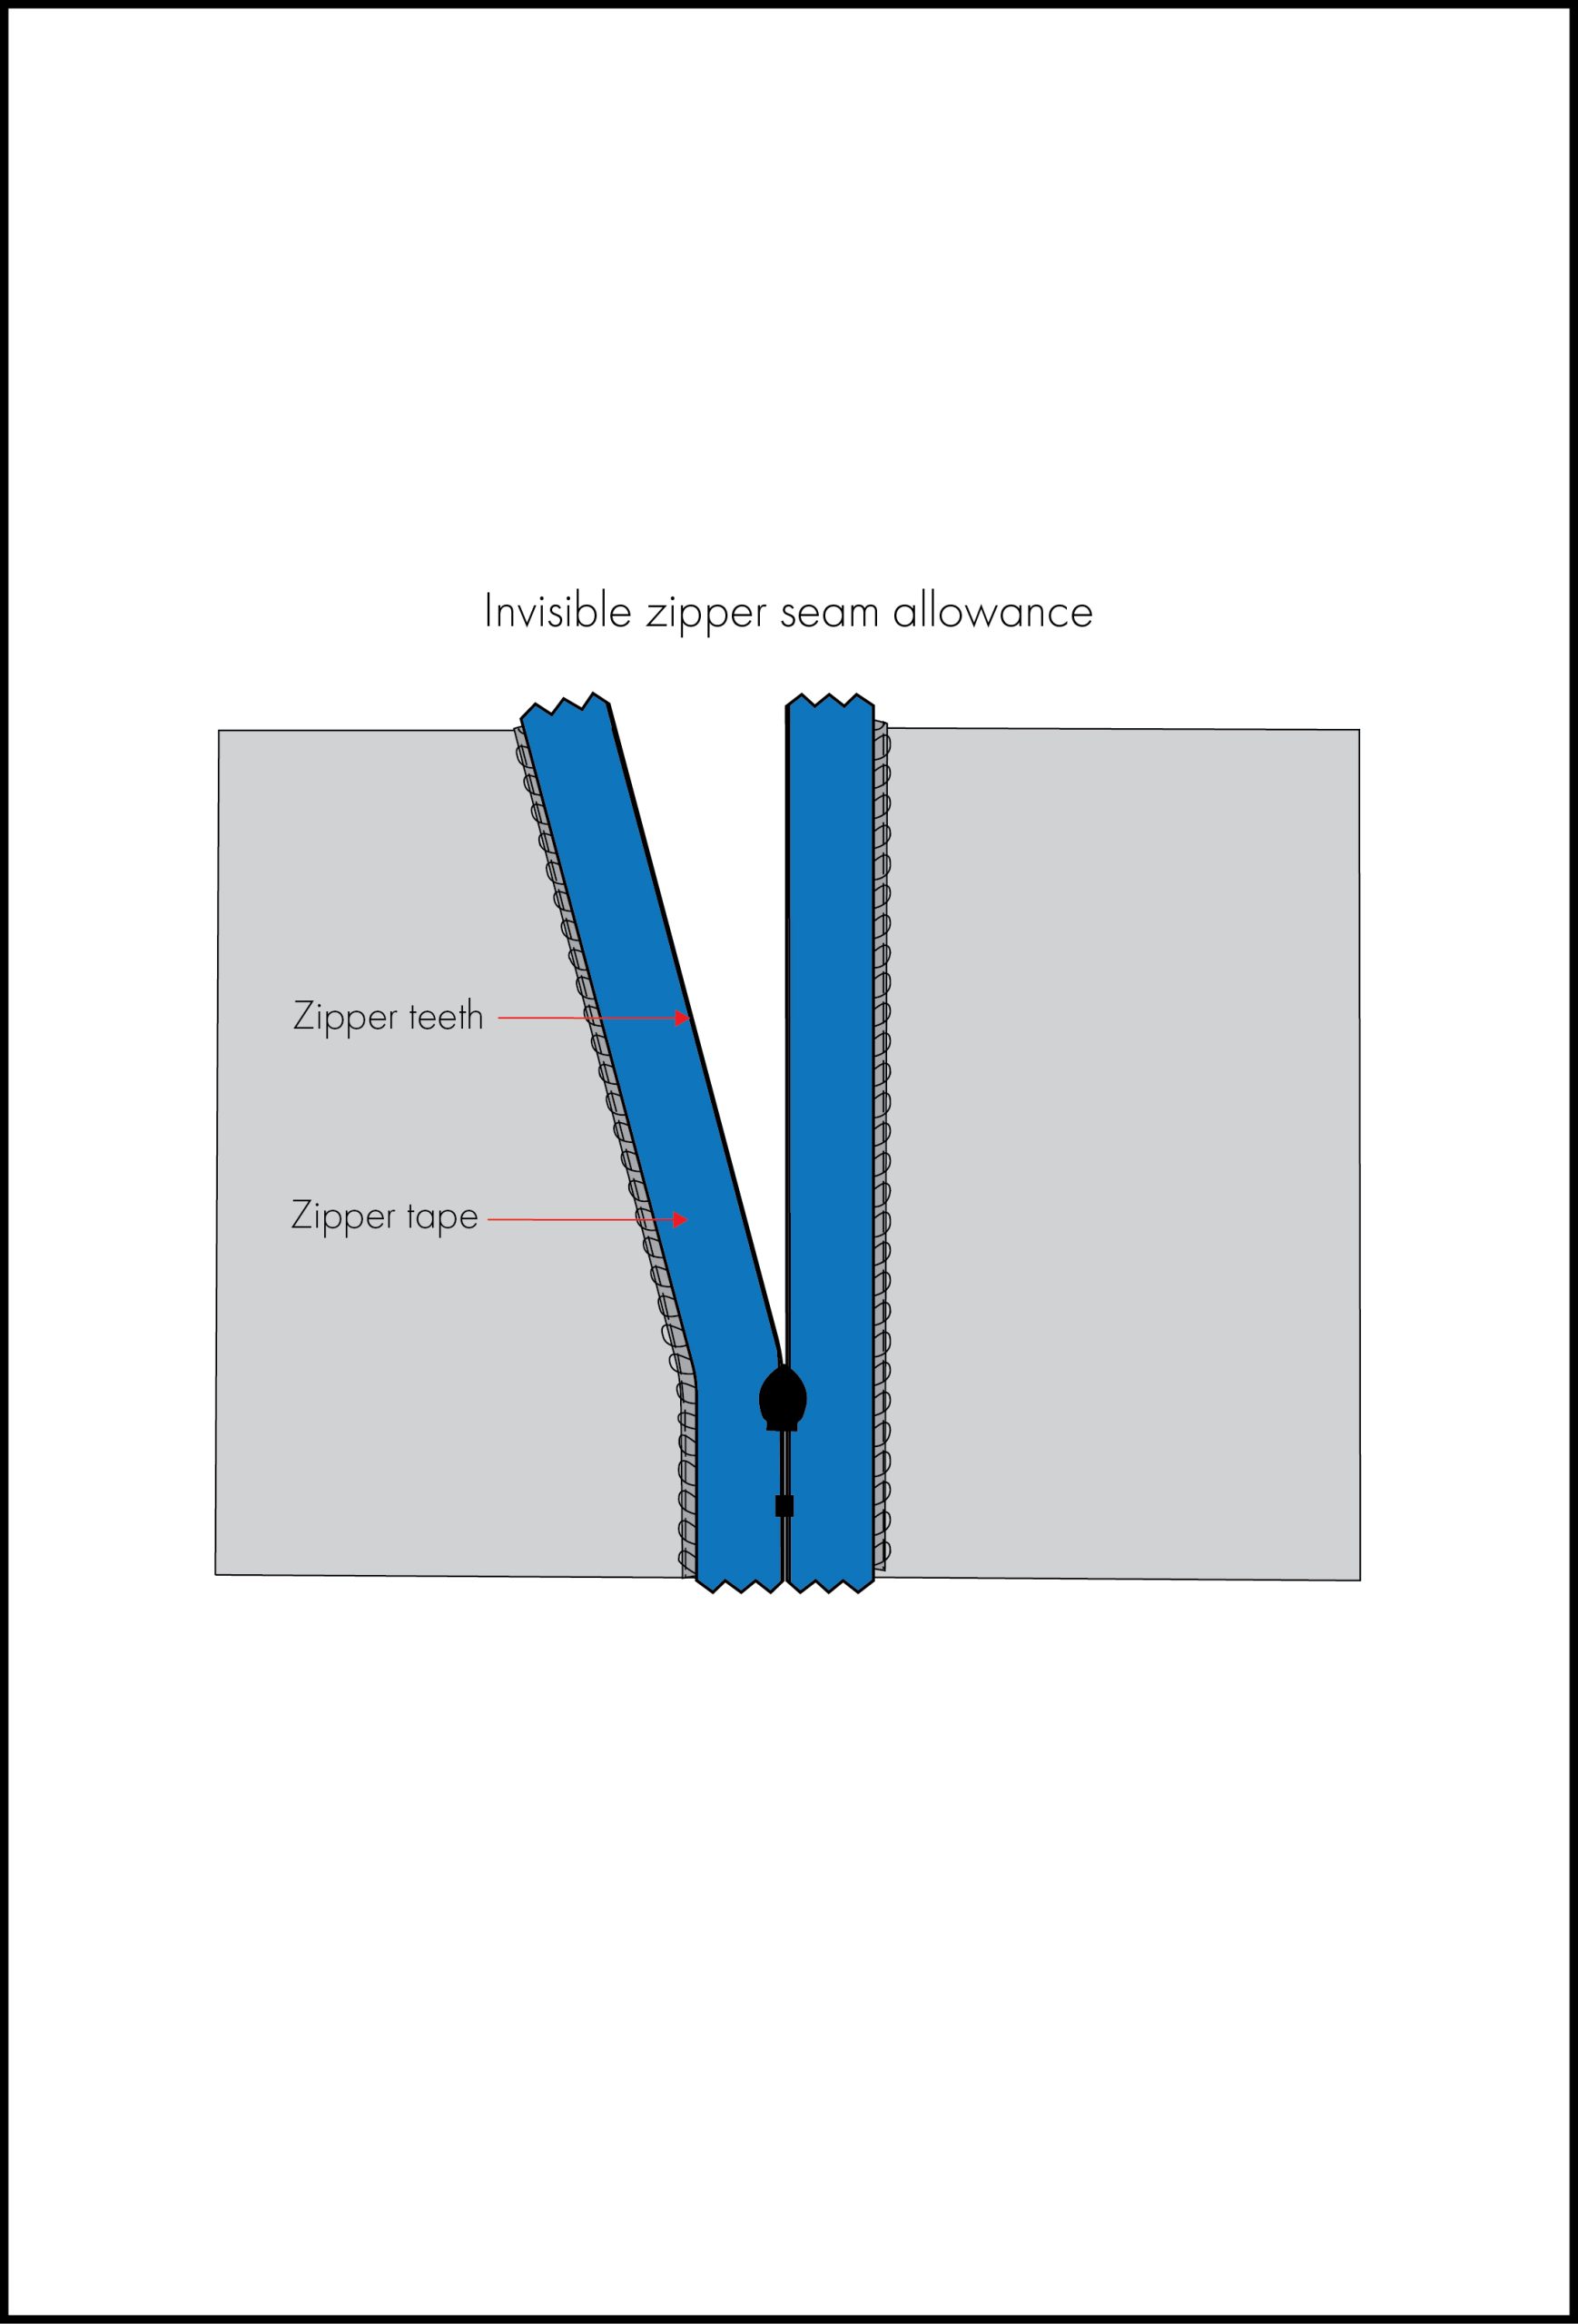
- Invisible zippers: Since invisible zippers are sewn close to the zipper teeth—often using a special invisible zipper foot—a 1cm (3/8″) seam allowance works well. It can be helpful to align the zipper tape with the cutting line (or fabric edge) for accurate placement.
1.2 to 1.3cm (1/2”) seam allowance
I’ve sewn a variety of indie patterns over the years and have come across both 1.2cm and 1.3cm (1/2”) seam allowances, so I’ve grouped them together here.
1.2cm was the standard seam allowance I was taught when I studied fashion design in Australia. However, these days, I often use 1.3cm as it gives just a little bit more room and works well with my machine.
Sure, we are only talking about a millimetre difference, but both options serve a similar purpose: they strike a nice balance between strength, ease of sewing, and minimal bulk. I tend to treat them as fairly interchangeable.
The applications for a 1.2–1.3cm (1/2”) allowance are similar to those for 1cm (3/8”):
- Standard seams: Both 1.2cm and 1.3cm (1/2”) work well for side seams, shoulder seams, panel lines, crotch seams, or waistbands, providing a clean, secure finish without extra bulk.
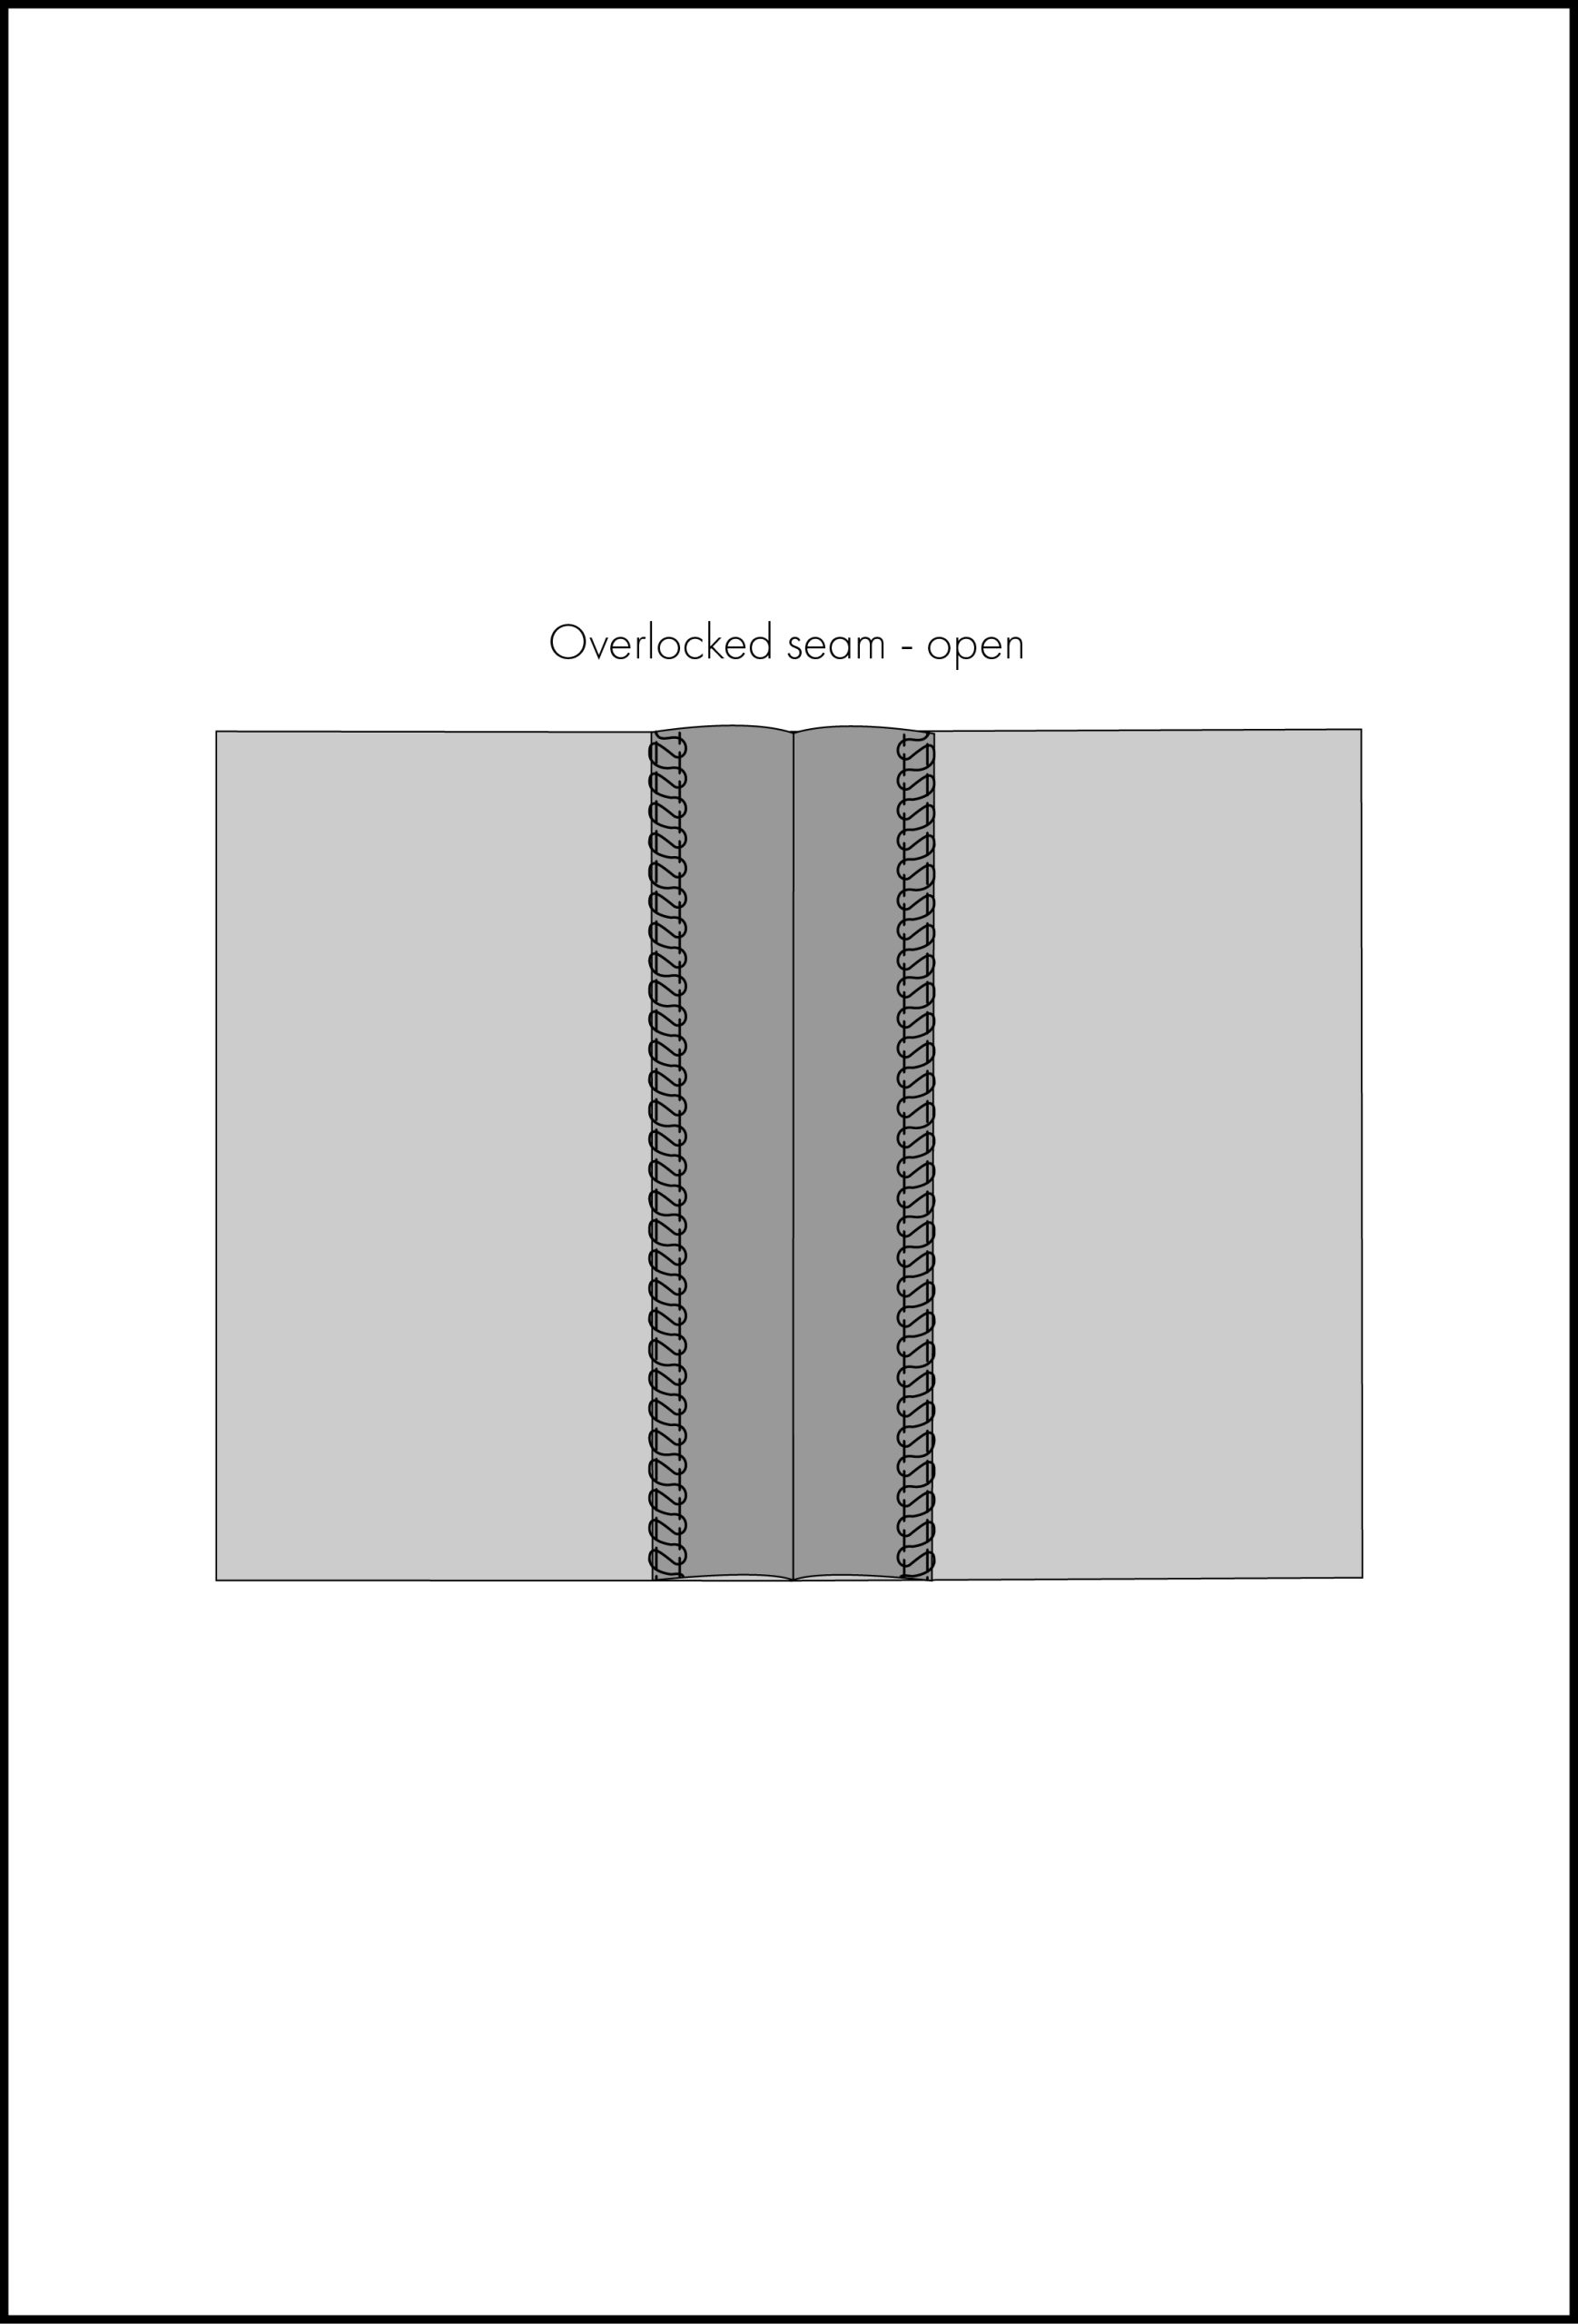
- Overlocked/serged seams: Works well for overlocked seams (closed or open).
- Bagged out areas: Like collars, necklines, facings, or lined garments—where it might be easier to start with this allowance before trimming it down.
- Invisible zippers: The extra millimetres give you a bit more room, which can be helpful when you prefer additional fabric beyond the zipper tape or if your pattern requires it.
1.5cm (5/8″) seam allowance
A 1.5cm (5/8″) seam allowance is another common and standard option. I come across this allowance more often when working with commercial sewing patterns (e.g., McCall’s, Simplicity, Vogue).
Here are some of the key uses for this allowance:Standard seams:
- Standard seams: This allowance works well for standard seams that involve straight stitching, like side seams and shoulder seams. It also provides a bit of extra space for minor fitting adjustments later on.
- Overlocked/serged seams: A good choice when seams are overlocked open.
- Standard zippers: Unlike invisible zippers, it’s helpful to have a little more space when inserting standard zippers. A 1.5cm (5/8″) seam allowance provides extra room to fold the fabric back and topstitch neatly, if needed.
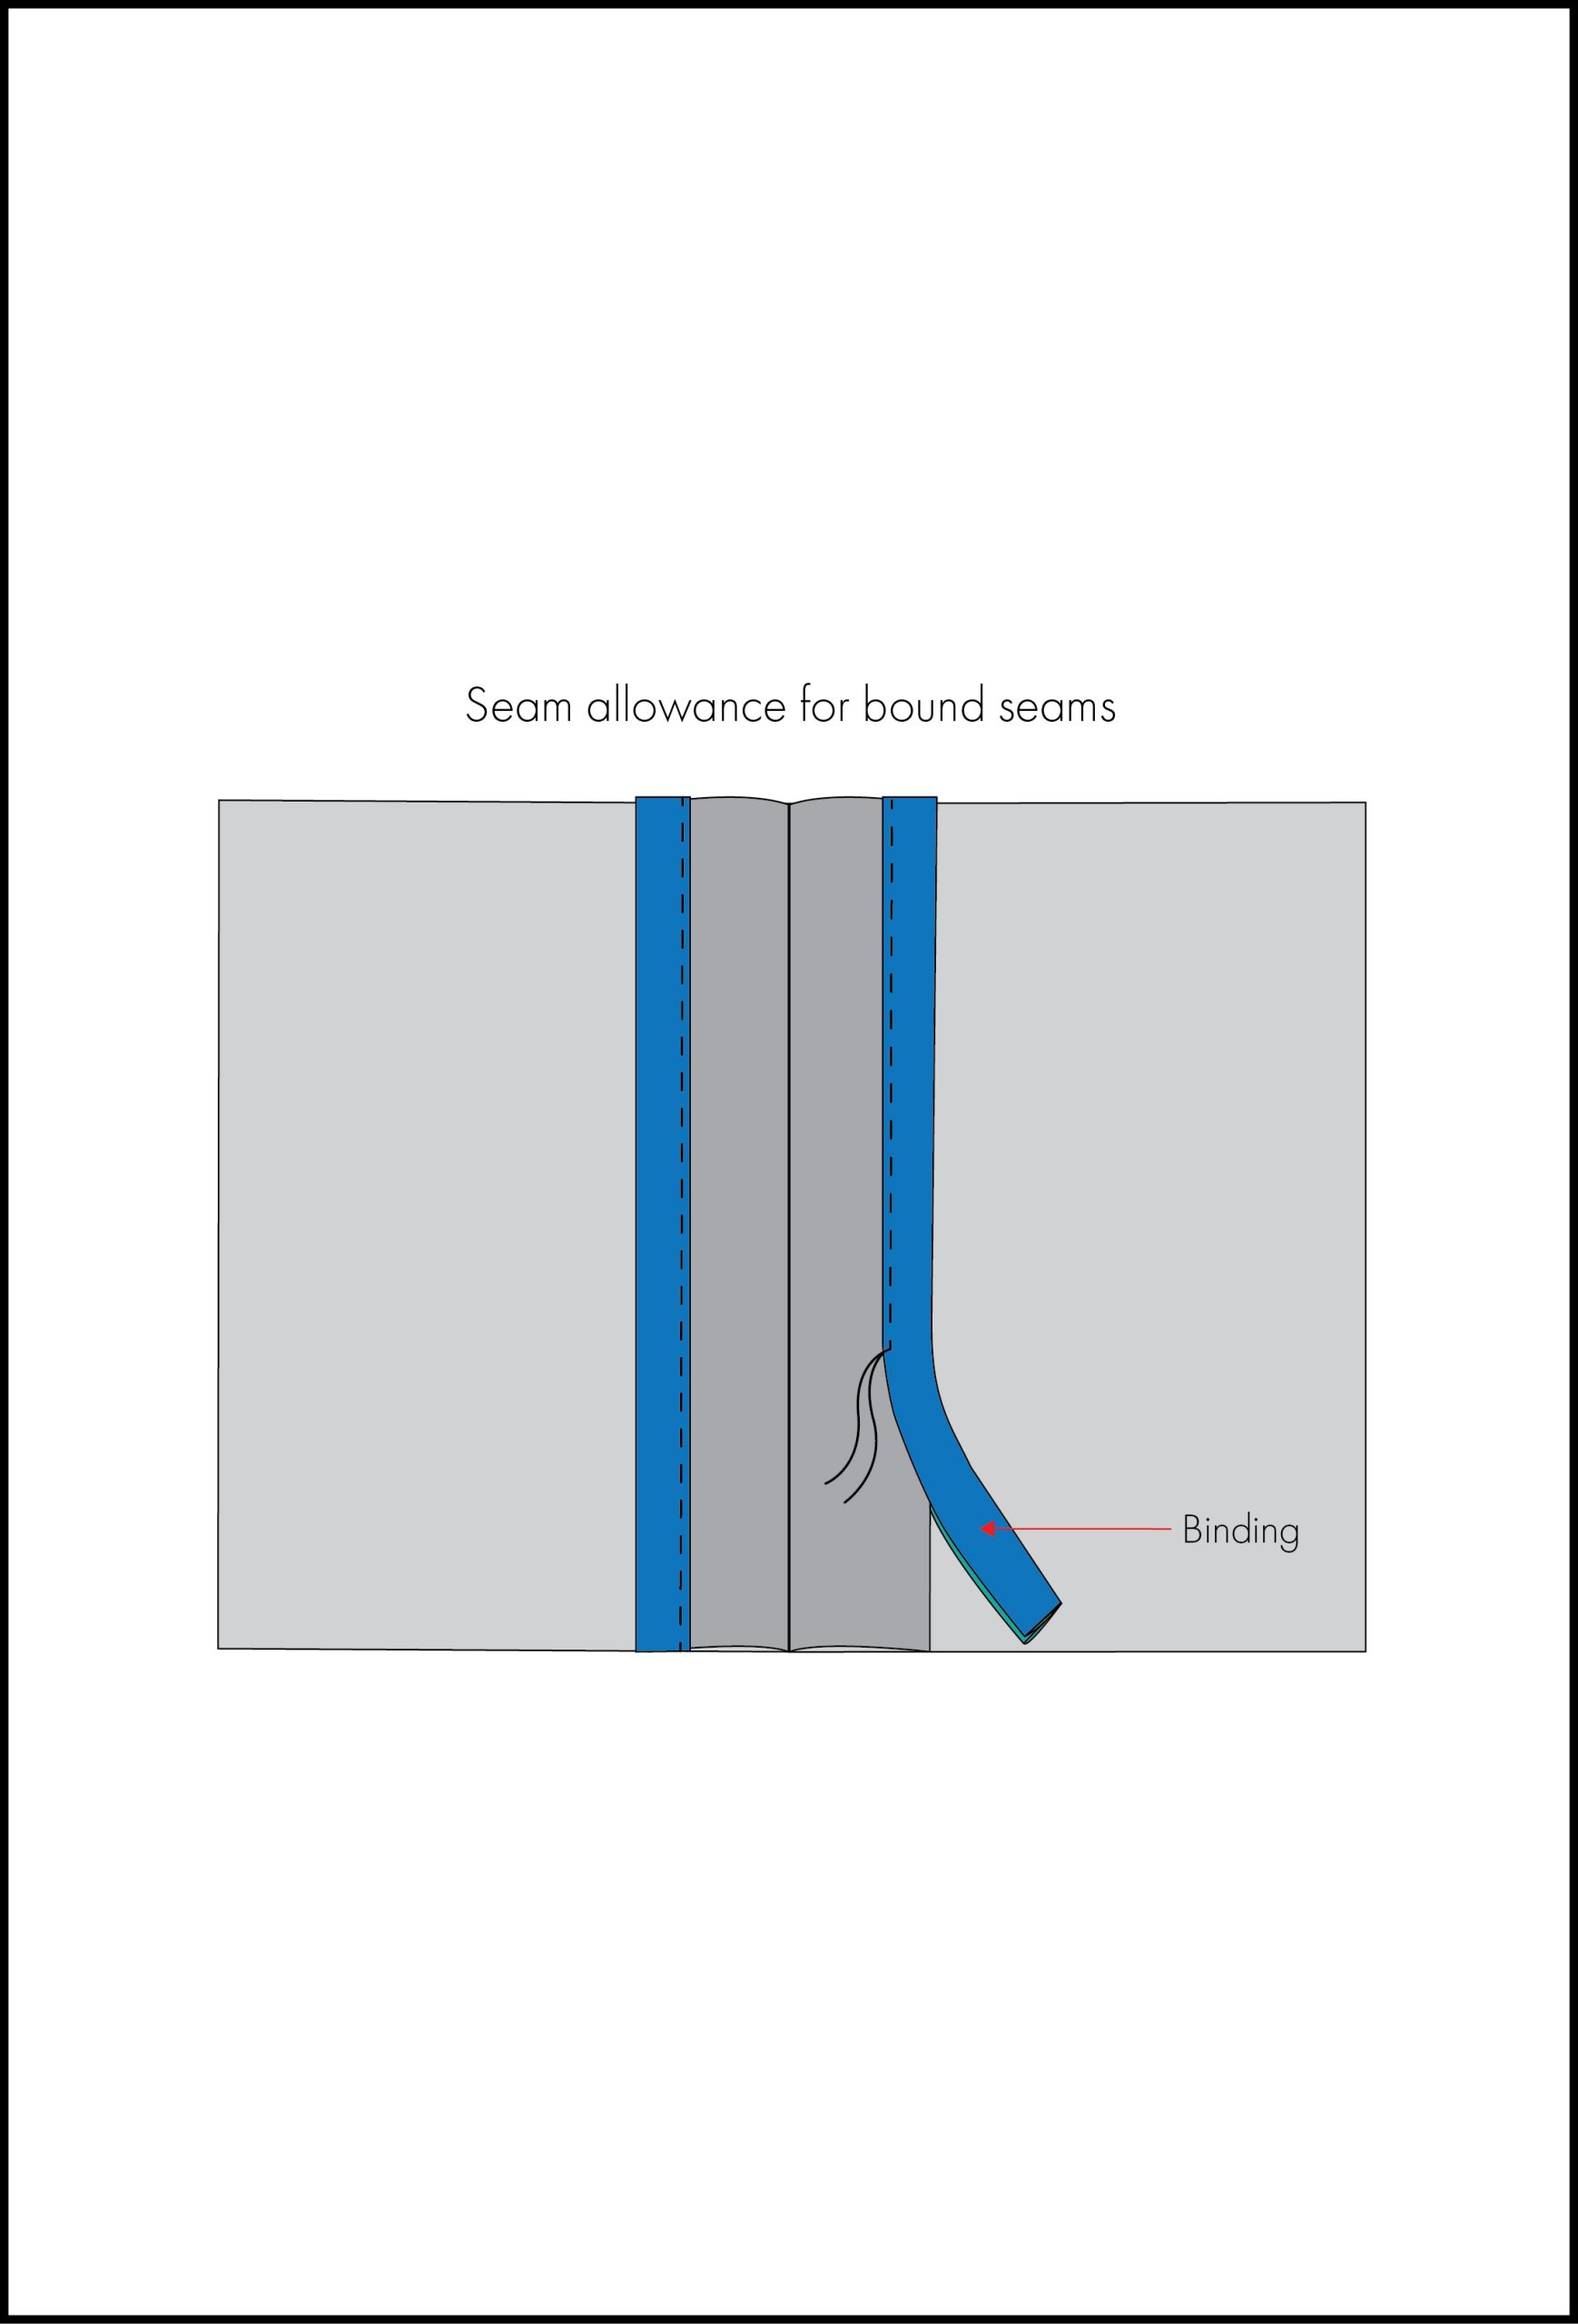
- Bound seams: This finish involves encasing raw edges with bias binding. The added seam allowance makes it easier to handle while sewing and ensures the raw edges are fully enclosed while stitching accurately.
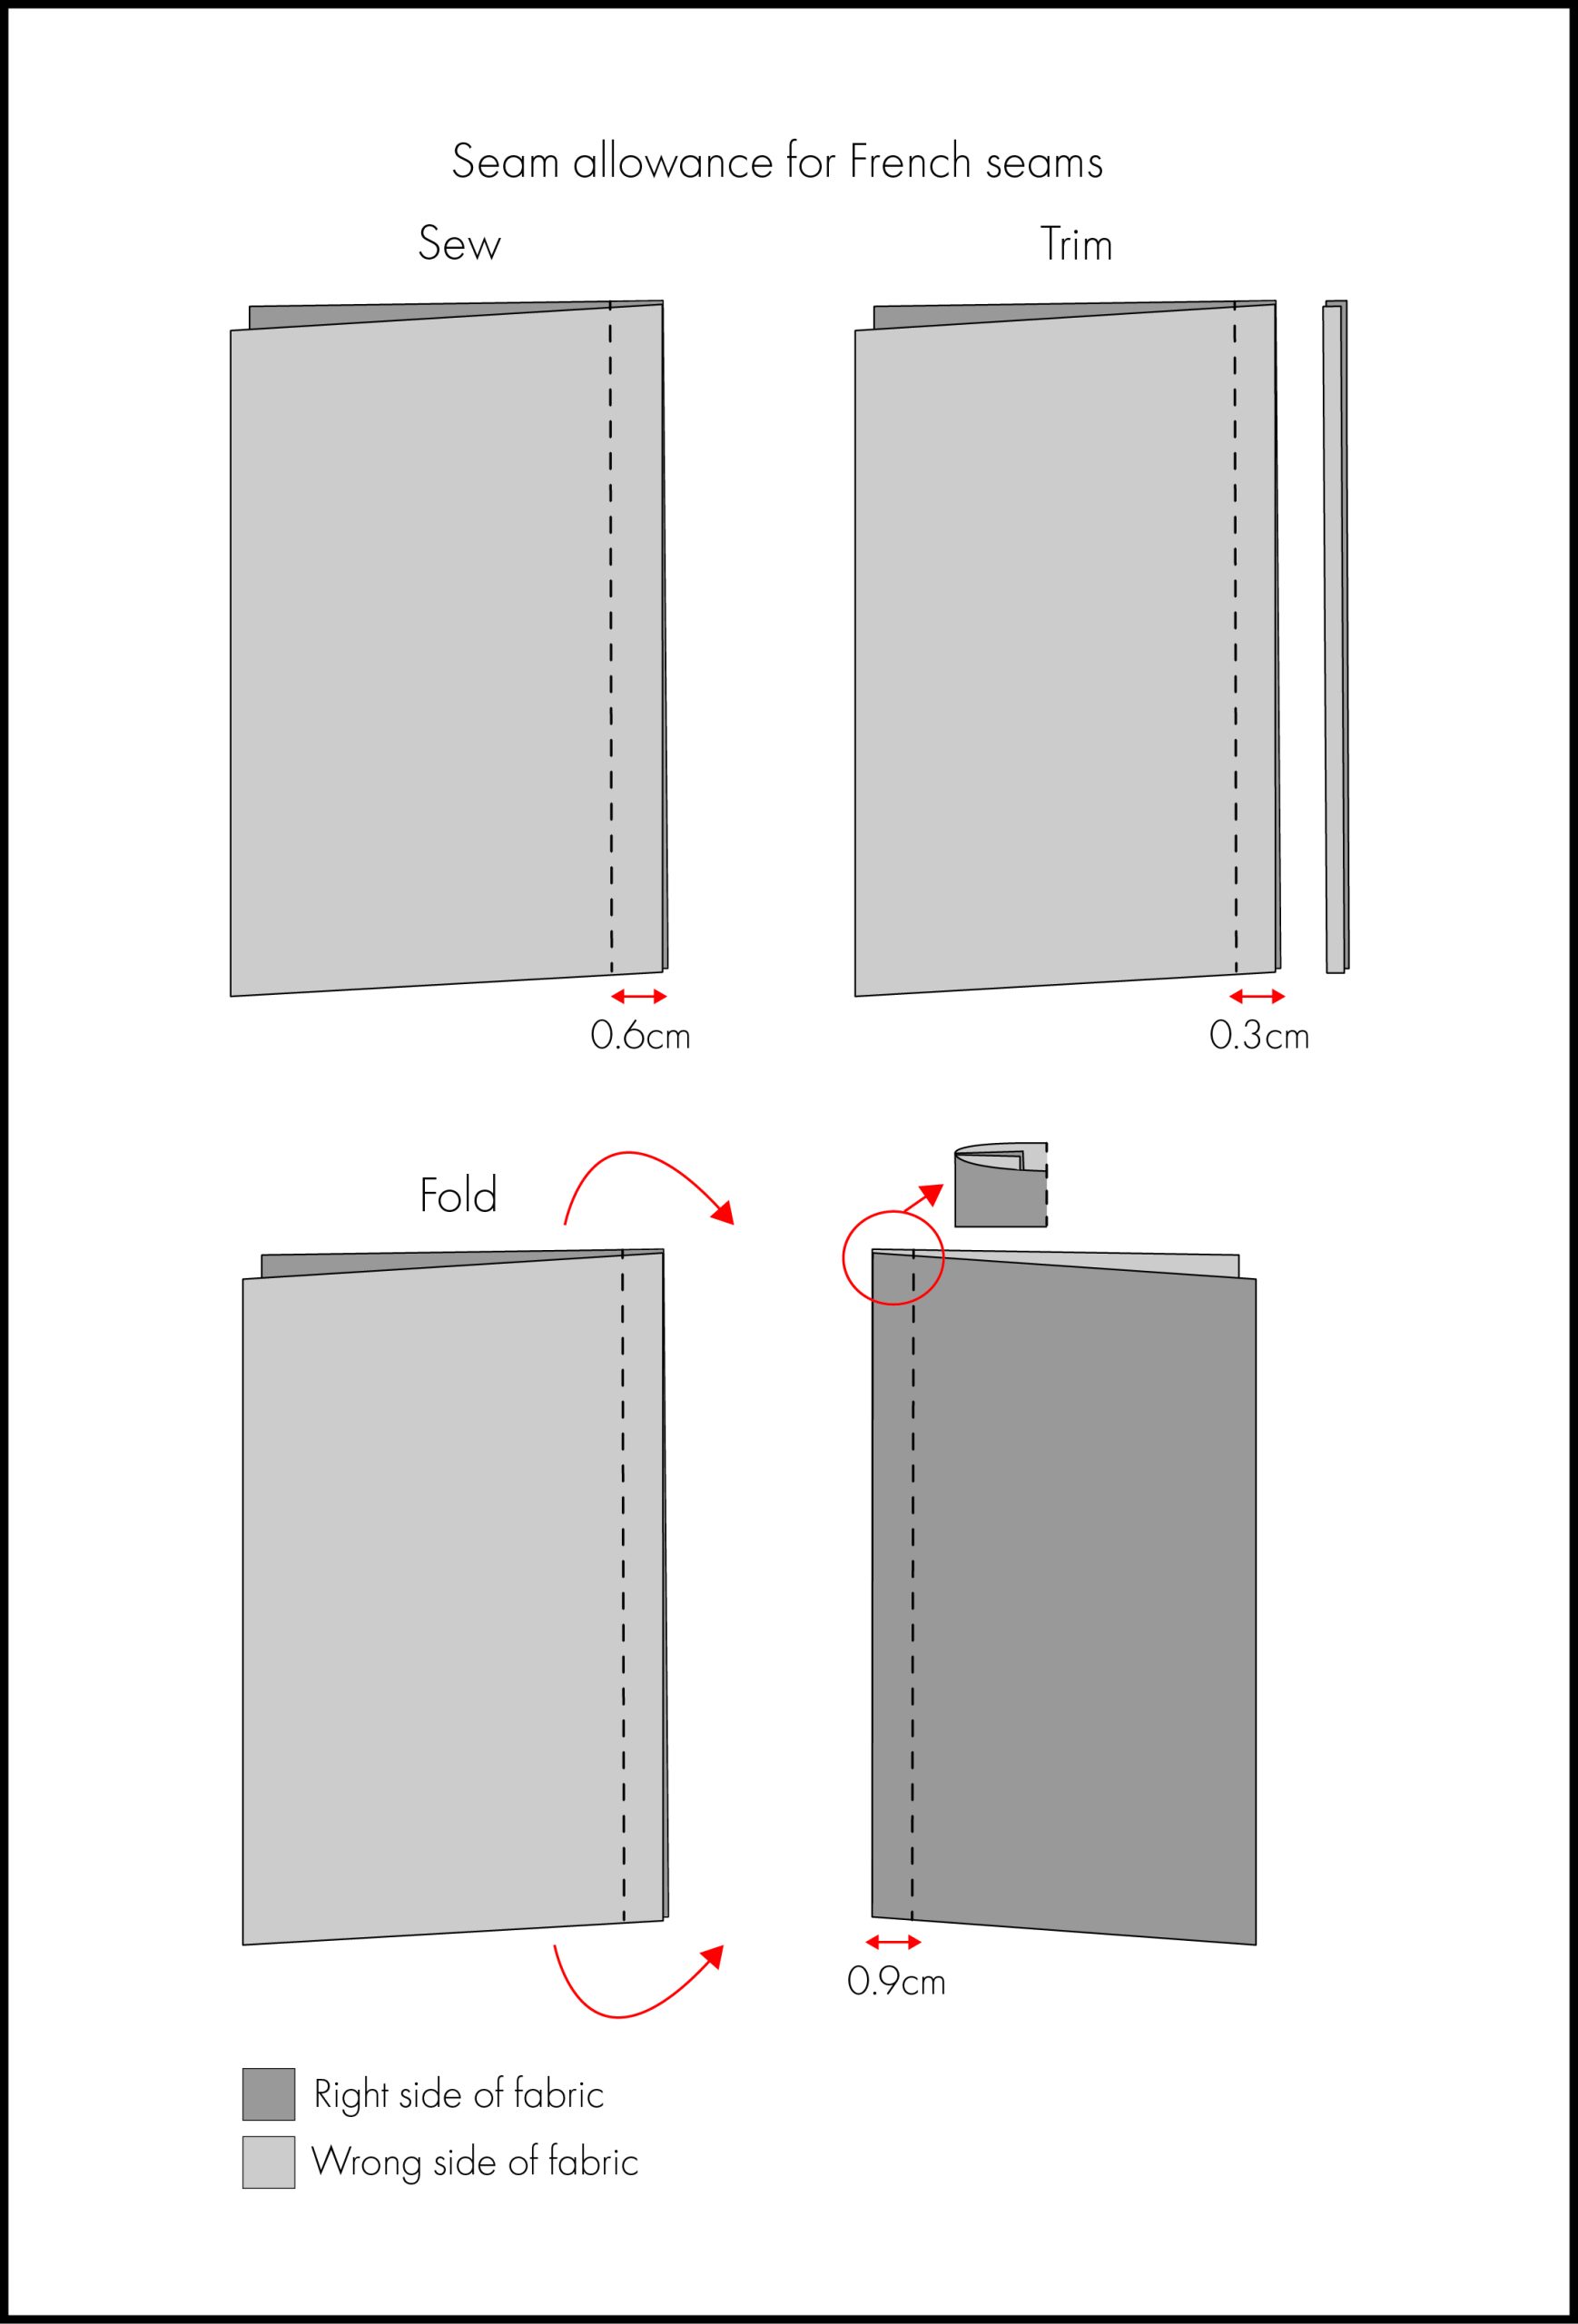
- French seams: French seams enclose the raw edges within the seam itself, creating a clean finish. They are sewn in two steps: first with the wrong sides together, then with the right sides together. In the diagram below, a 1.5cm (5/8″) seam allowance provides enough room to firstly sew a seam at 0.6cm (1/4”), before trimming back to 0.3cm (1/8″), folding the fabric back, and stitching the second seam at 0.9cm (3/8″), fully enclosing the raw edges.
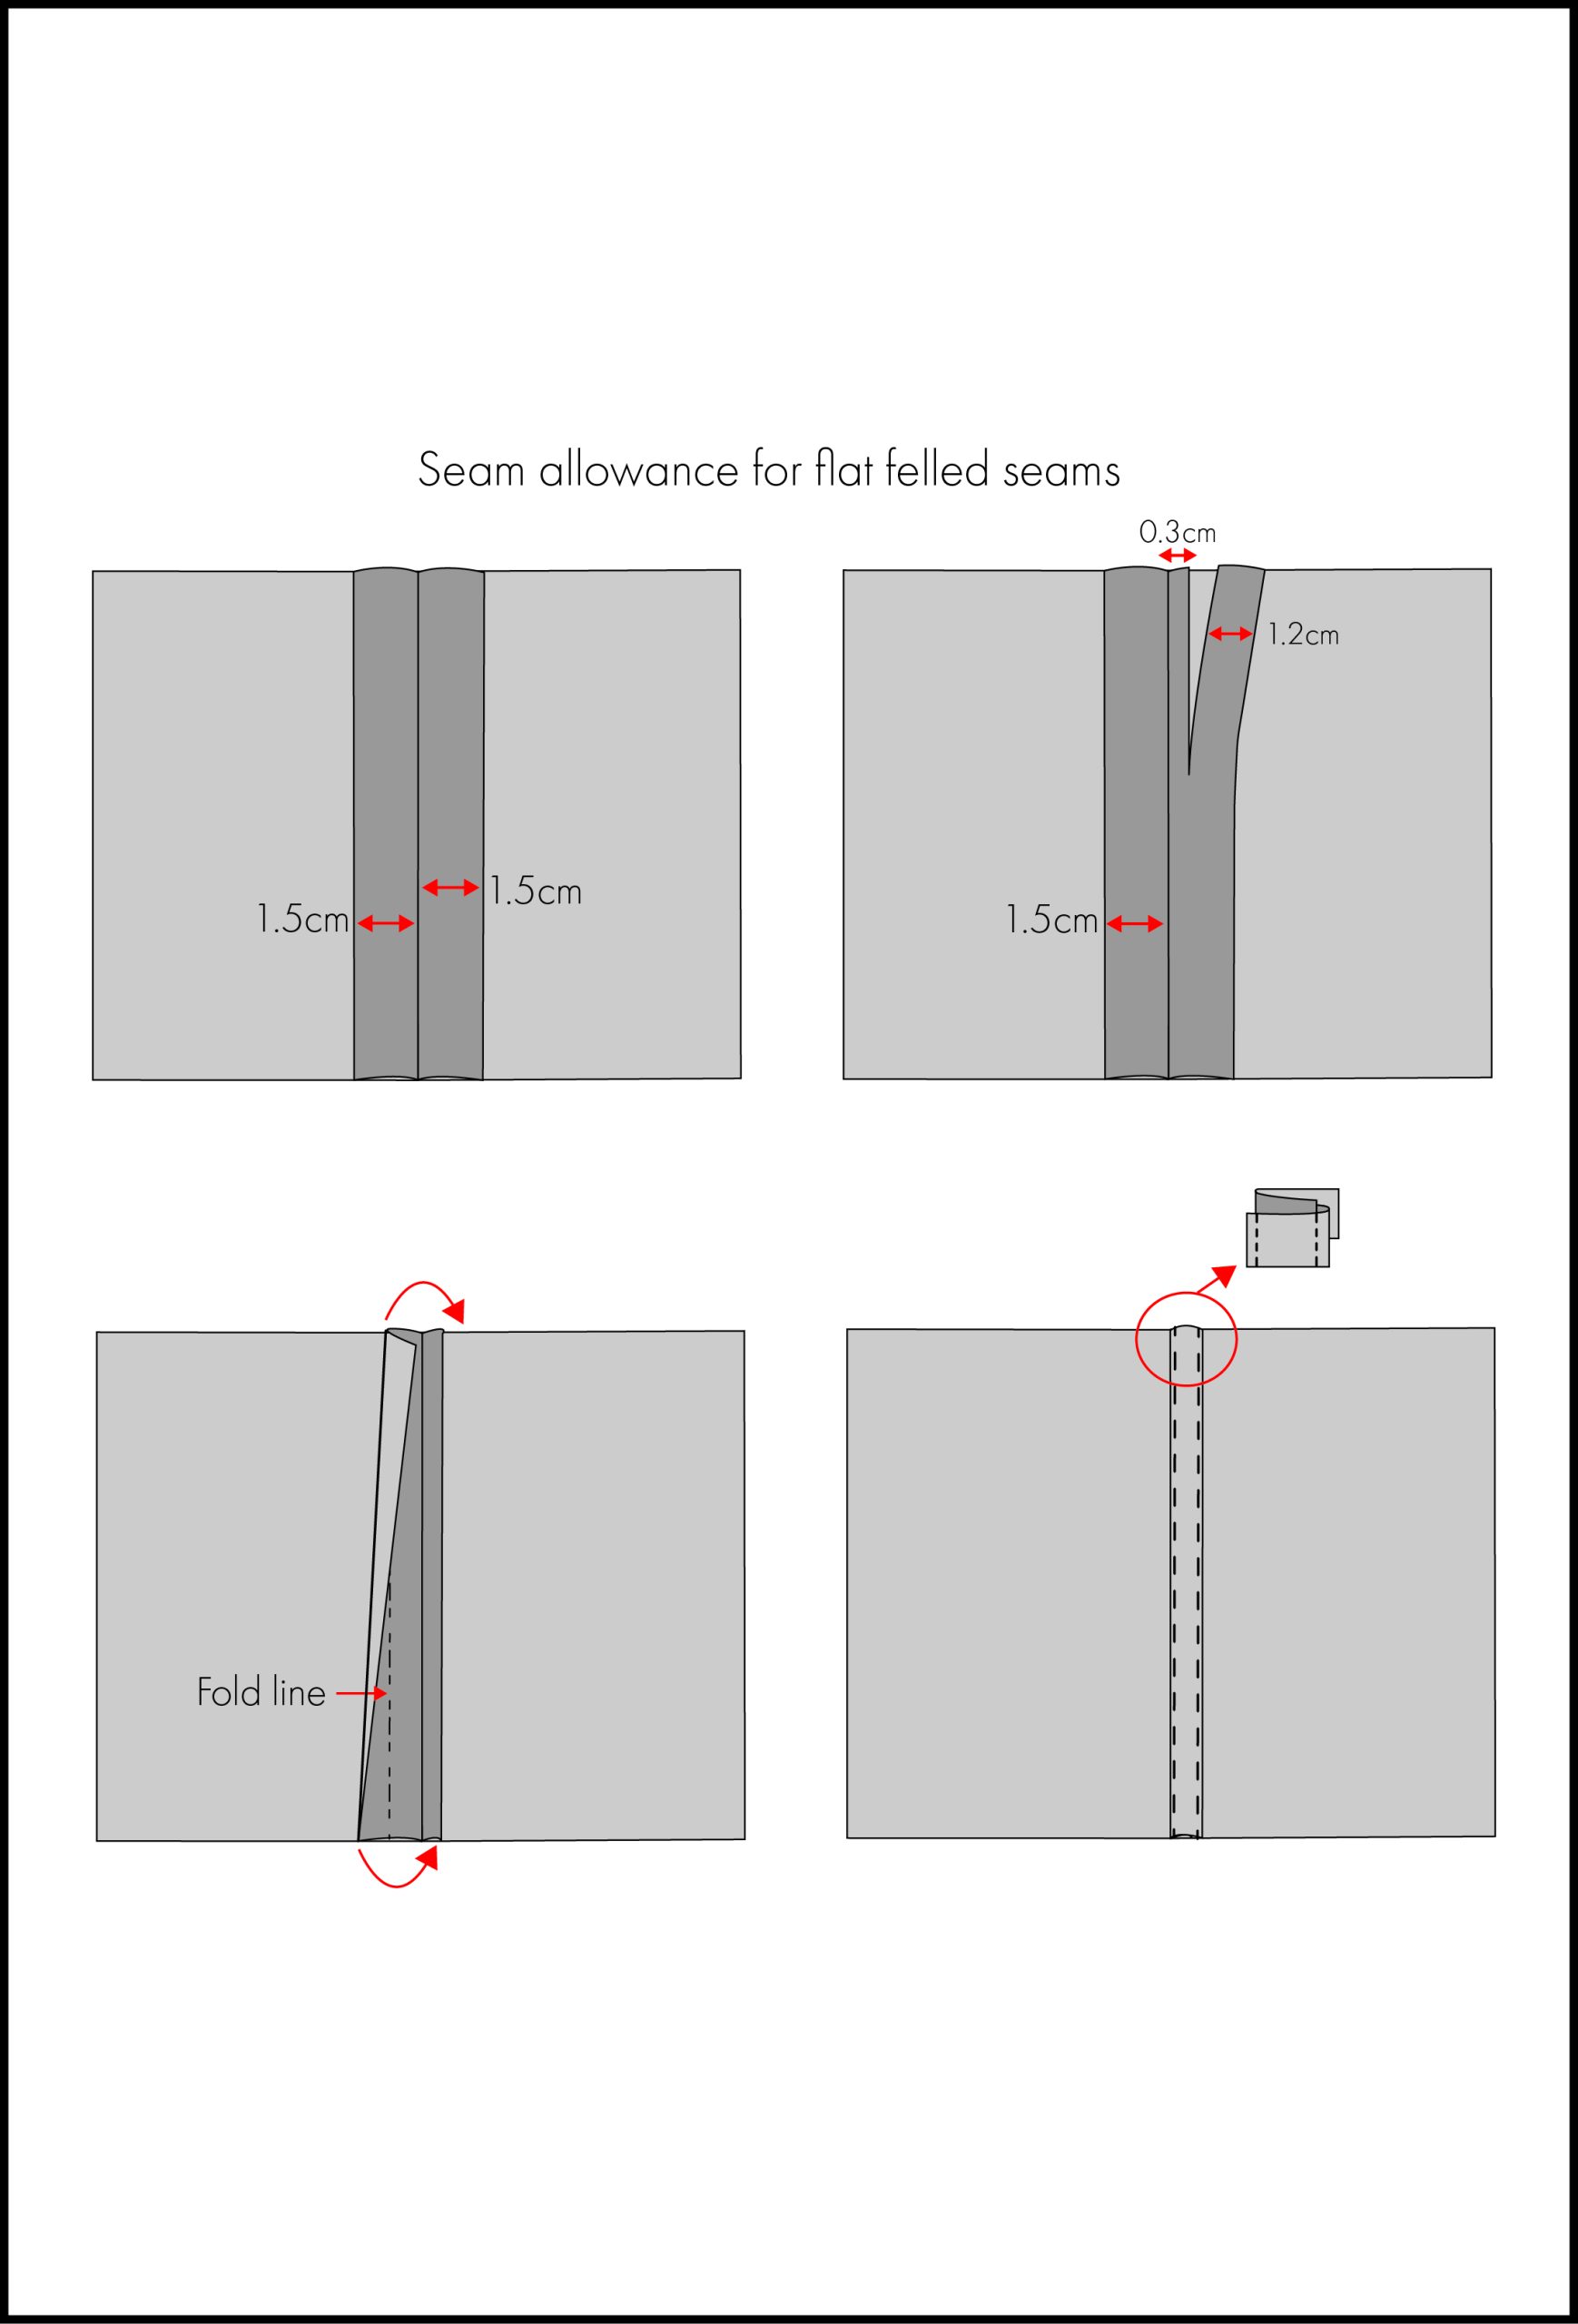
- Flat-felled seams: This finish tucks raw edges inside the seam, commonly used in jeans and shirts. The diagram below illustrates how a wider seam allowance provides enough room to sew at 1.5cm (5/8″), trim one side down to 0.6cm (1/4”), and then fold the larger seam allowance in half to fully enclose the smaller one.
2cm (3/4”) seam allowance
While not as common, a 2cm (3/4”) seam allowance can be useful in specific situations or when working with certain fabrics. For example:
- Exposed zippers: These zippers, placed on the outside of the garment, benefit from extra seam allowance. It makes insertion easier, helps with topstitching neatly, and ensures a clean finish.
- Heavy/thick fabrics: For fabrics like denim, canvas, or other heavyweight materials, a larger seam allowance adds strength and stability. It also makes handling easier, reduces bulk when pressing seams open, and ensures durable construction.
- Fit adjustments: If adjustments may be needed in the future, a wider seam allowance provides extra flexibility—especially at the waist, hips, or bust. This is often used in tailored or custom-made garments, like jackets or pants, where precise fitting is crucial.
- French seams: While 1.5cm (5/8”) is usually sufficient, a 2cm (3/4”) seam allowance can be helpful, particularly with lightweight or delicate fabrics. The extra room makes handling that little bit easier, and the seam allowance can always be trimmed down.
Seam allowance for hems
Let’s not forget hems—they require extra allowance to turn the fabric up neatly. How much to add depends on the desired look and how the edge will be finished. Here are a few common approaches:
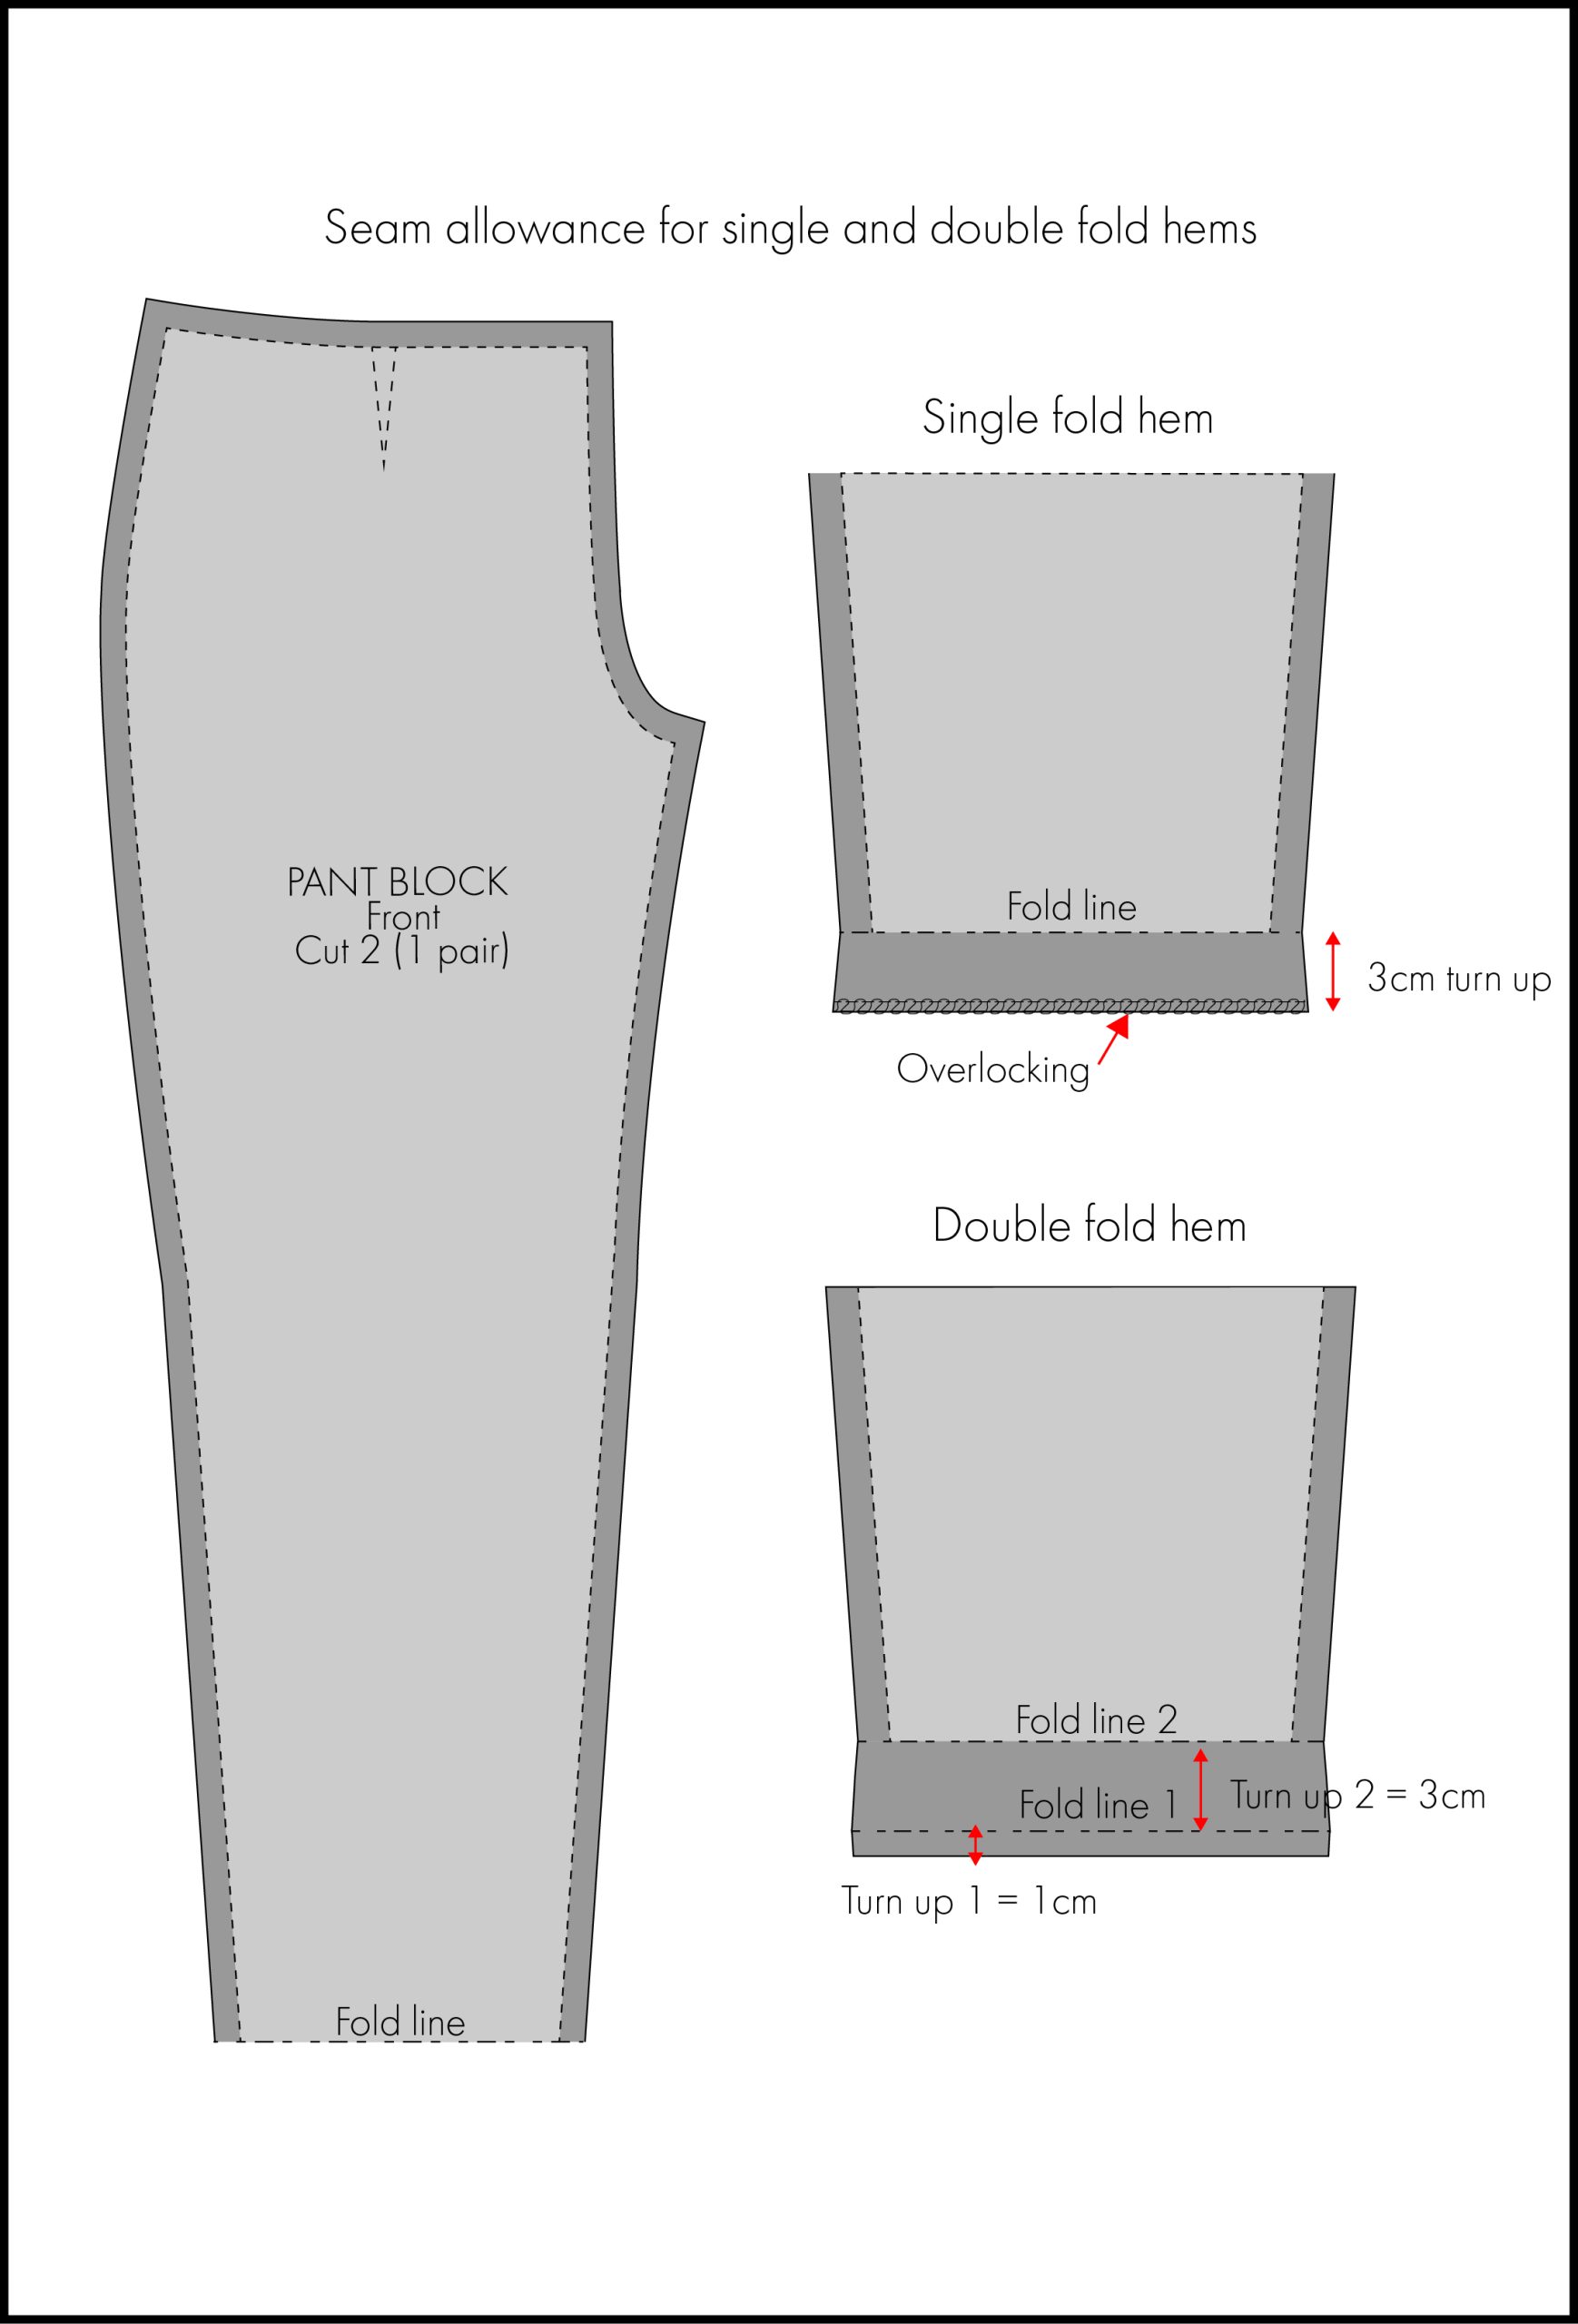
- Single fold hem: For a basic finish (like overlocking the edge and folding it up once), simply add the amount needed for the turn up. For example, if you want a 3cm (1 1/4”) hem, that’s the amount to be added.
- Double rolled hem: These involve two folds, so both need to included in the hem allowance. For example:
- A small rolled hem might turn up by 0.6cm (1/4”), then again by 1cm (3/8”) = total hem allowance 1.6cm (5/8”)
- A deeper hem could turn up 1cm (3/8”), then another 3cm (1 1/4”) = total hem allowance 4cm (1 1/2”).
Tip: Don’t forget to true your seam lines including hems after adding allowances. If you need help, check out my two-part tutorial ‘Checking, Blending, and Truing Your Sewing Patterns’ for step-by-step guidance.
Seam allowance plays a big part in how your garment comes together—it affects the fit, strength, and how easy it is to sew. There is no one-size-fits-all rule, but once you get a feel for it, you’ll figure out what works best for you depending on the fabric, the finish, and your own sewing style. Over time, you’ll likely settle into your own go-to seam allowances for different projects.
About Author
Emma Cartmel
Heya! I’m Emma, and I'm an Aussie living in beautiful Munich with my husband Ben, and our pug Harley. I am a designer, pattern maker, and sewist, and I share my expertise and experience through my ‘cartem.sewing’ page. You can follow me on Instagram @cartem.sewingLeave a Reply to Sheila Ramsey Cancel reply
Related posts

Sewing Essentials: Stitch Width, Stitch Length & Needle Position
Thinking back to my high school textiles days, I remember having to test stitch settings on every fabric we planned to use for our projects. We would cut out little squares of fabric and experiment with different stitch lengths and widths, and edge-finishing techniques. At the time, it felt unnecessary, not to mention tedious….

Sewing Essentials: A Simple Guide to Notches
I love a notch, so much so that I’ve decided to dedicate this article to these small but important markings. Here, I’ll explain why they’re so helpful, when to use them, and how to add them to your own patterns or adapt them for existing ones. What exactly are notches? Notches are small markings found…

How to Select and Use Interfacing: A Simple Guide
Iron-on or sew-in, woven or non-woven, lightweight or heavyweight. With so many different types, weaves, and weights to choose from, how do you know which interfacing is best for your project? In this article, I will explain the two main types of interfacing before diving into the differences in weave and weight. Hopefully by the…

Sewing Essentials: A Simple Method for Reversible Seams
There are so many ways to finish a seam, from good old overlocking to French seams and binding. I recently stumbled across another method that’s pretty nifty, and honestly, I kind of wish I had known about it sooner. It is a bit like binding, but topstitched in place so it doesn’t move or flap…

Sewing Essentials: Understanding Different Types of Sewing Elastic
Elastic is a really common notion used in sewing. You’ll find it on everything from waistbands to cuffs and necklines. It plays a crucial role in giving garments both support and shape. Have you ever had the waistband of your pants twist and never sit quite right? Or maybe you’ve noticed the leg opening of…


SEW THIS LOOK


Latest Posts


4 Comments
Pingback:
How to Design a Sleeve Pattern | Fit-First MethodSheila Ramsey
What is a “bagged out area”? I tried to find the definition online and can’t. My sewing books are all packed for a move. I’ve been sewing for more than 50 years and never heard this term. Help!!
Sheila Ramsey
I’m sorry, please ignore the question – I found the answer online: “Bag Out refers to sewing your fabric pieces inside out, and then turning everything right side out so all of your seams, seam allowance and stitching is on the inside of your garment piece.” I’ve done it so many times and never know the name of it!
Sheila Ramsey
Knew, not know!