


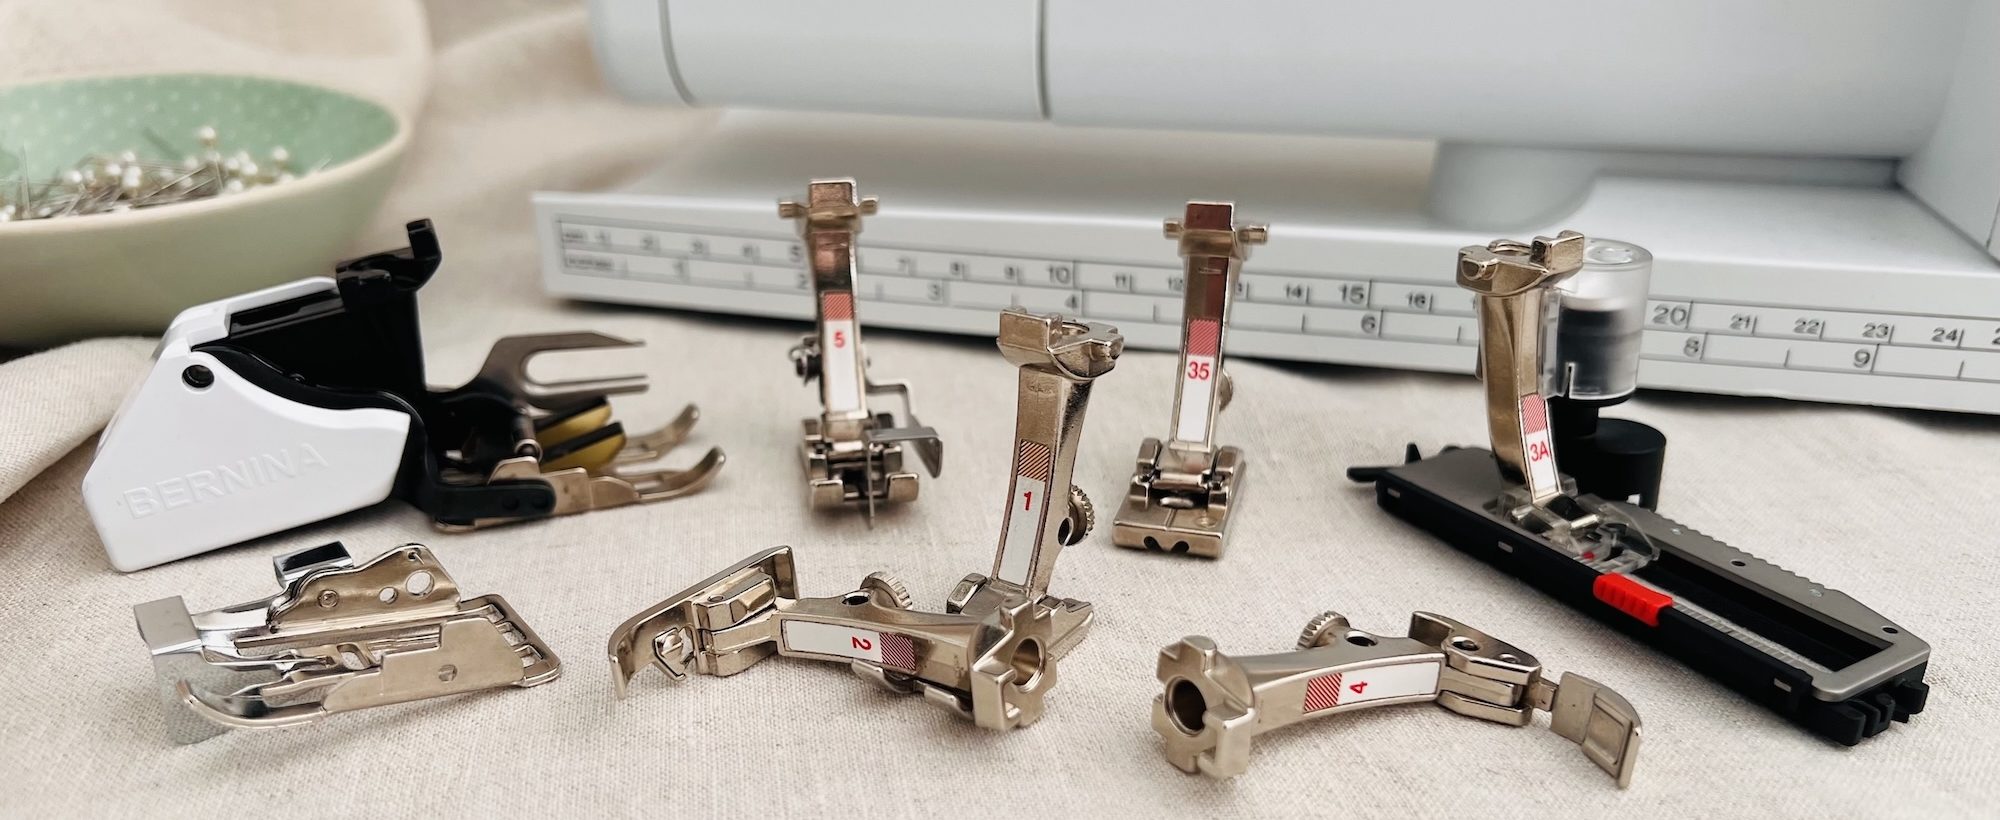
Sewing Essentials: A Simple Guide to Common Presser Feet
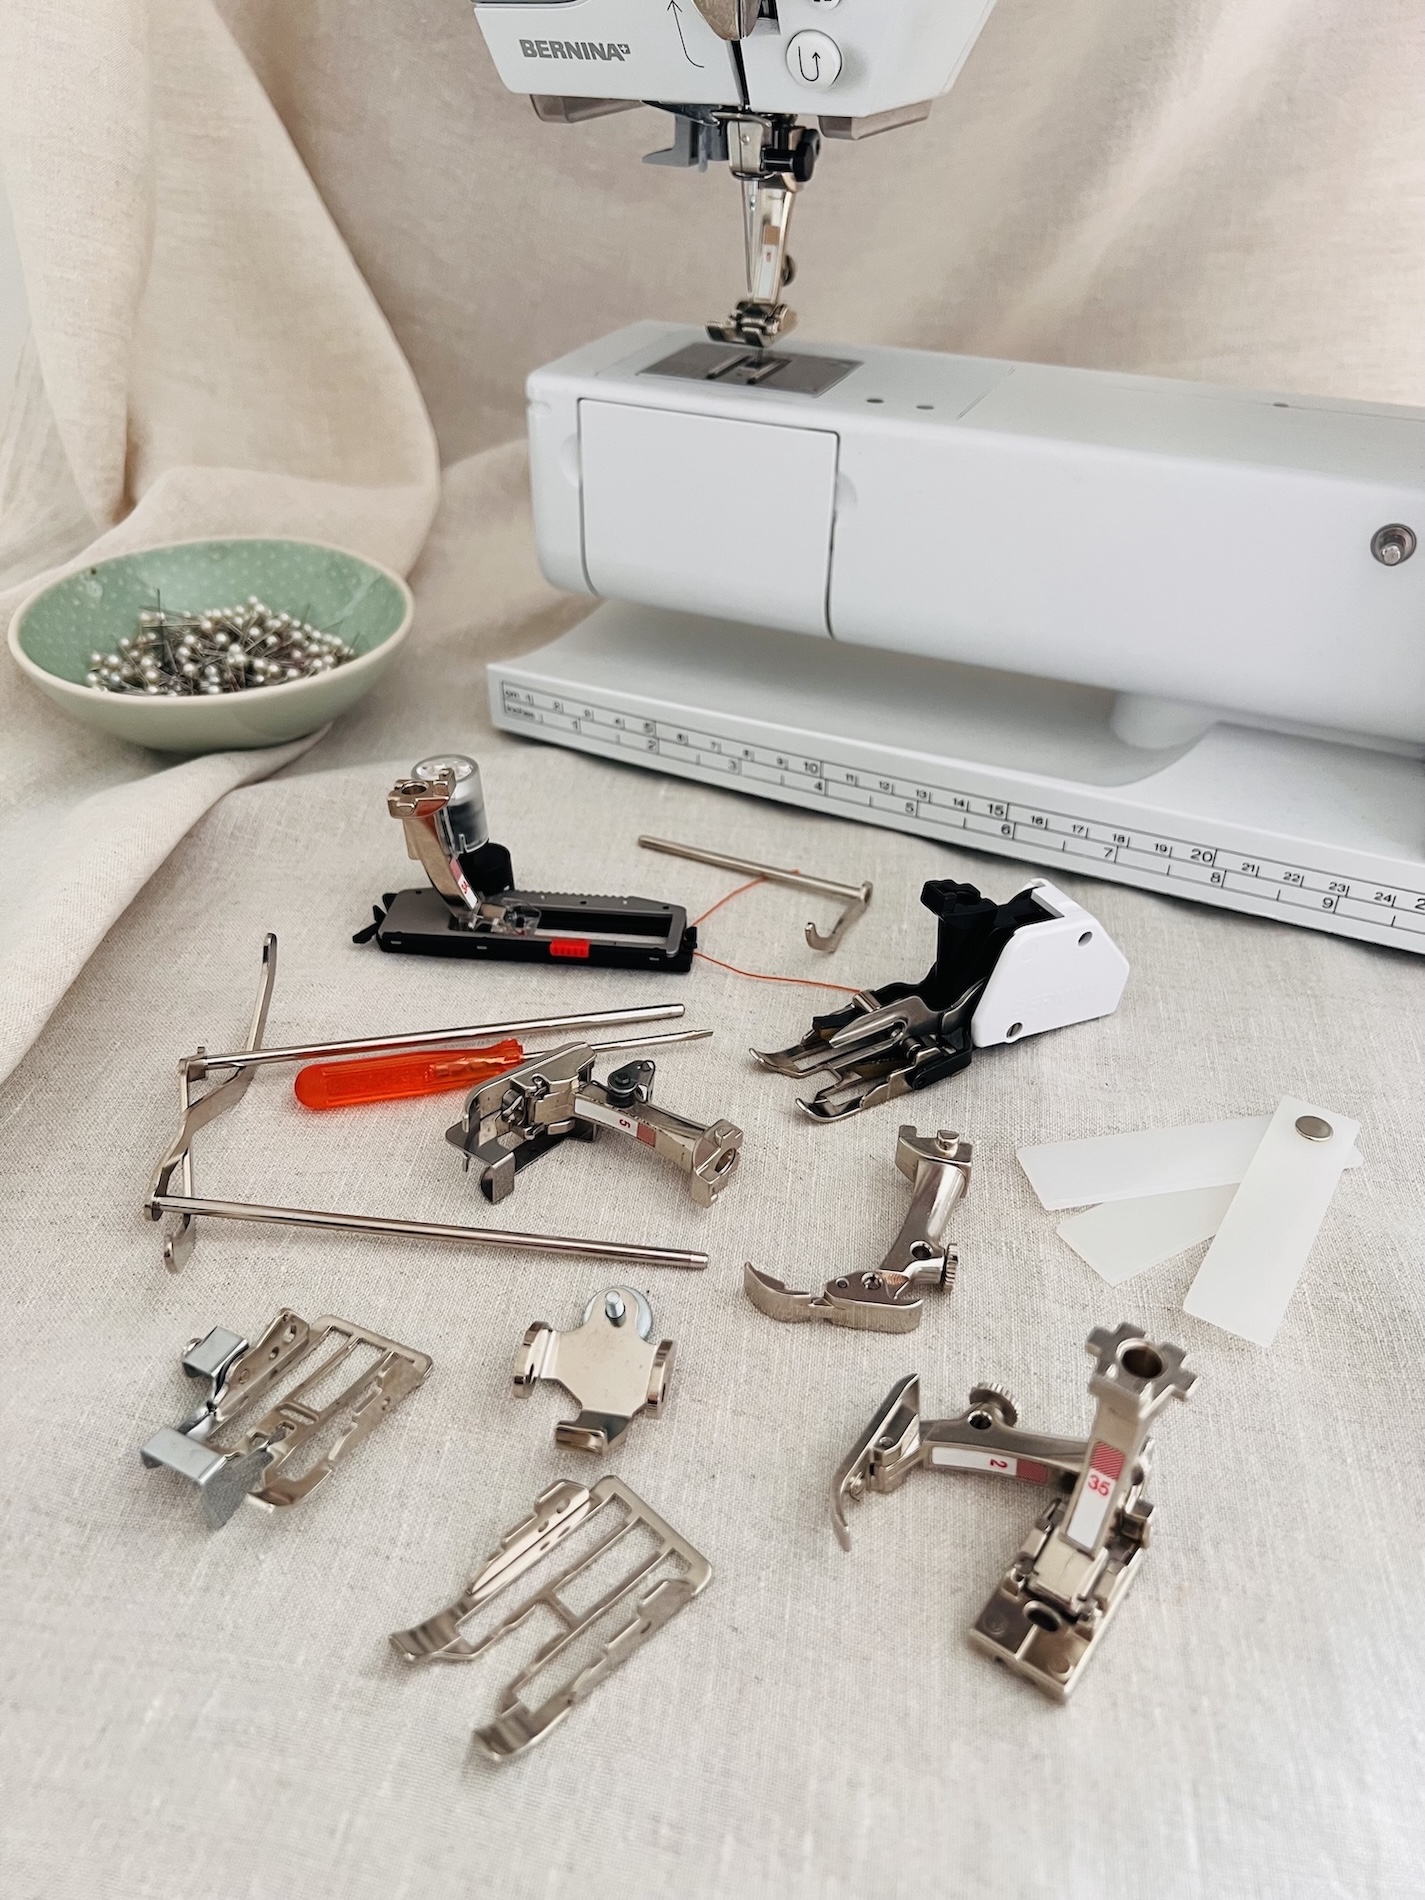
There are so many different presser feet available for sewing machines, each designed with a specific purpose, whether that be creating particular stitches or working with certain fabrics. Even after almost 20 years of sewing, I still haven’t used them all.
In this article, my goal is to give you a helpful introduction to what different presser feet can do and when to use them. I’ll be focusing on the most common types that I reach for again and again in my everyday sewing.
I’ll be using my Bernina B530, which has a 5mm stitch length and 5.5mm stitch width allowance for its presser feet. Some sewing machines support a larger stitch width of 9mm, therefore, check-in with your machine. Many presser feet are also brand or model specific so be sure to check before using or buying one.
What are Presser Feet?
Presser feet are a sewing machine attachment that play a key role in stitching. They help to:
- Hold the fabric flat and steady under the needle.
- Work with the feed dogs to move the fabric forward or backward.
- Ensure consistent and even stitches.
- Perform specialised tasks like inserting zippers, sewing buttonholes, quilting, and more.
A typical presser foot consists of two main components:
- Shank (also called the peg or leg): This is the part which is attached or inserted into the machine.
- Sole (also called the foot): This is the part that comes into contact with the fabric.
Furthermore, presser feet generally come in two main types depending on the sewing machine:
- One-piece presser foot: This is the type my machine works with. The shank and sole are combined into a single unit, requiring you to remove the entire foot in order to change it.
- Two-piece presser foot: For this type the sole snaps or slides on and off the shank.
7 Common Presser Feet
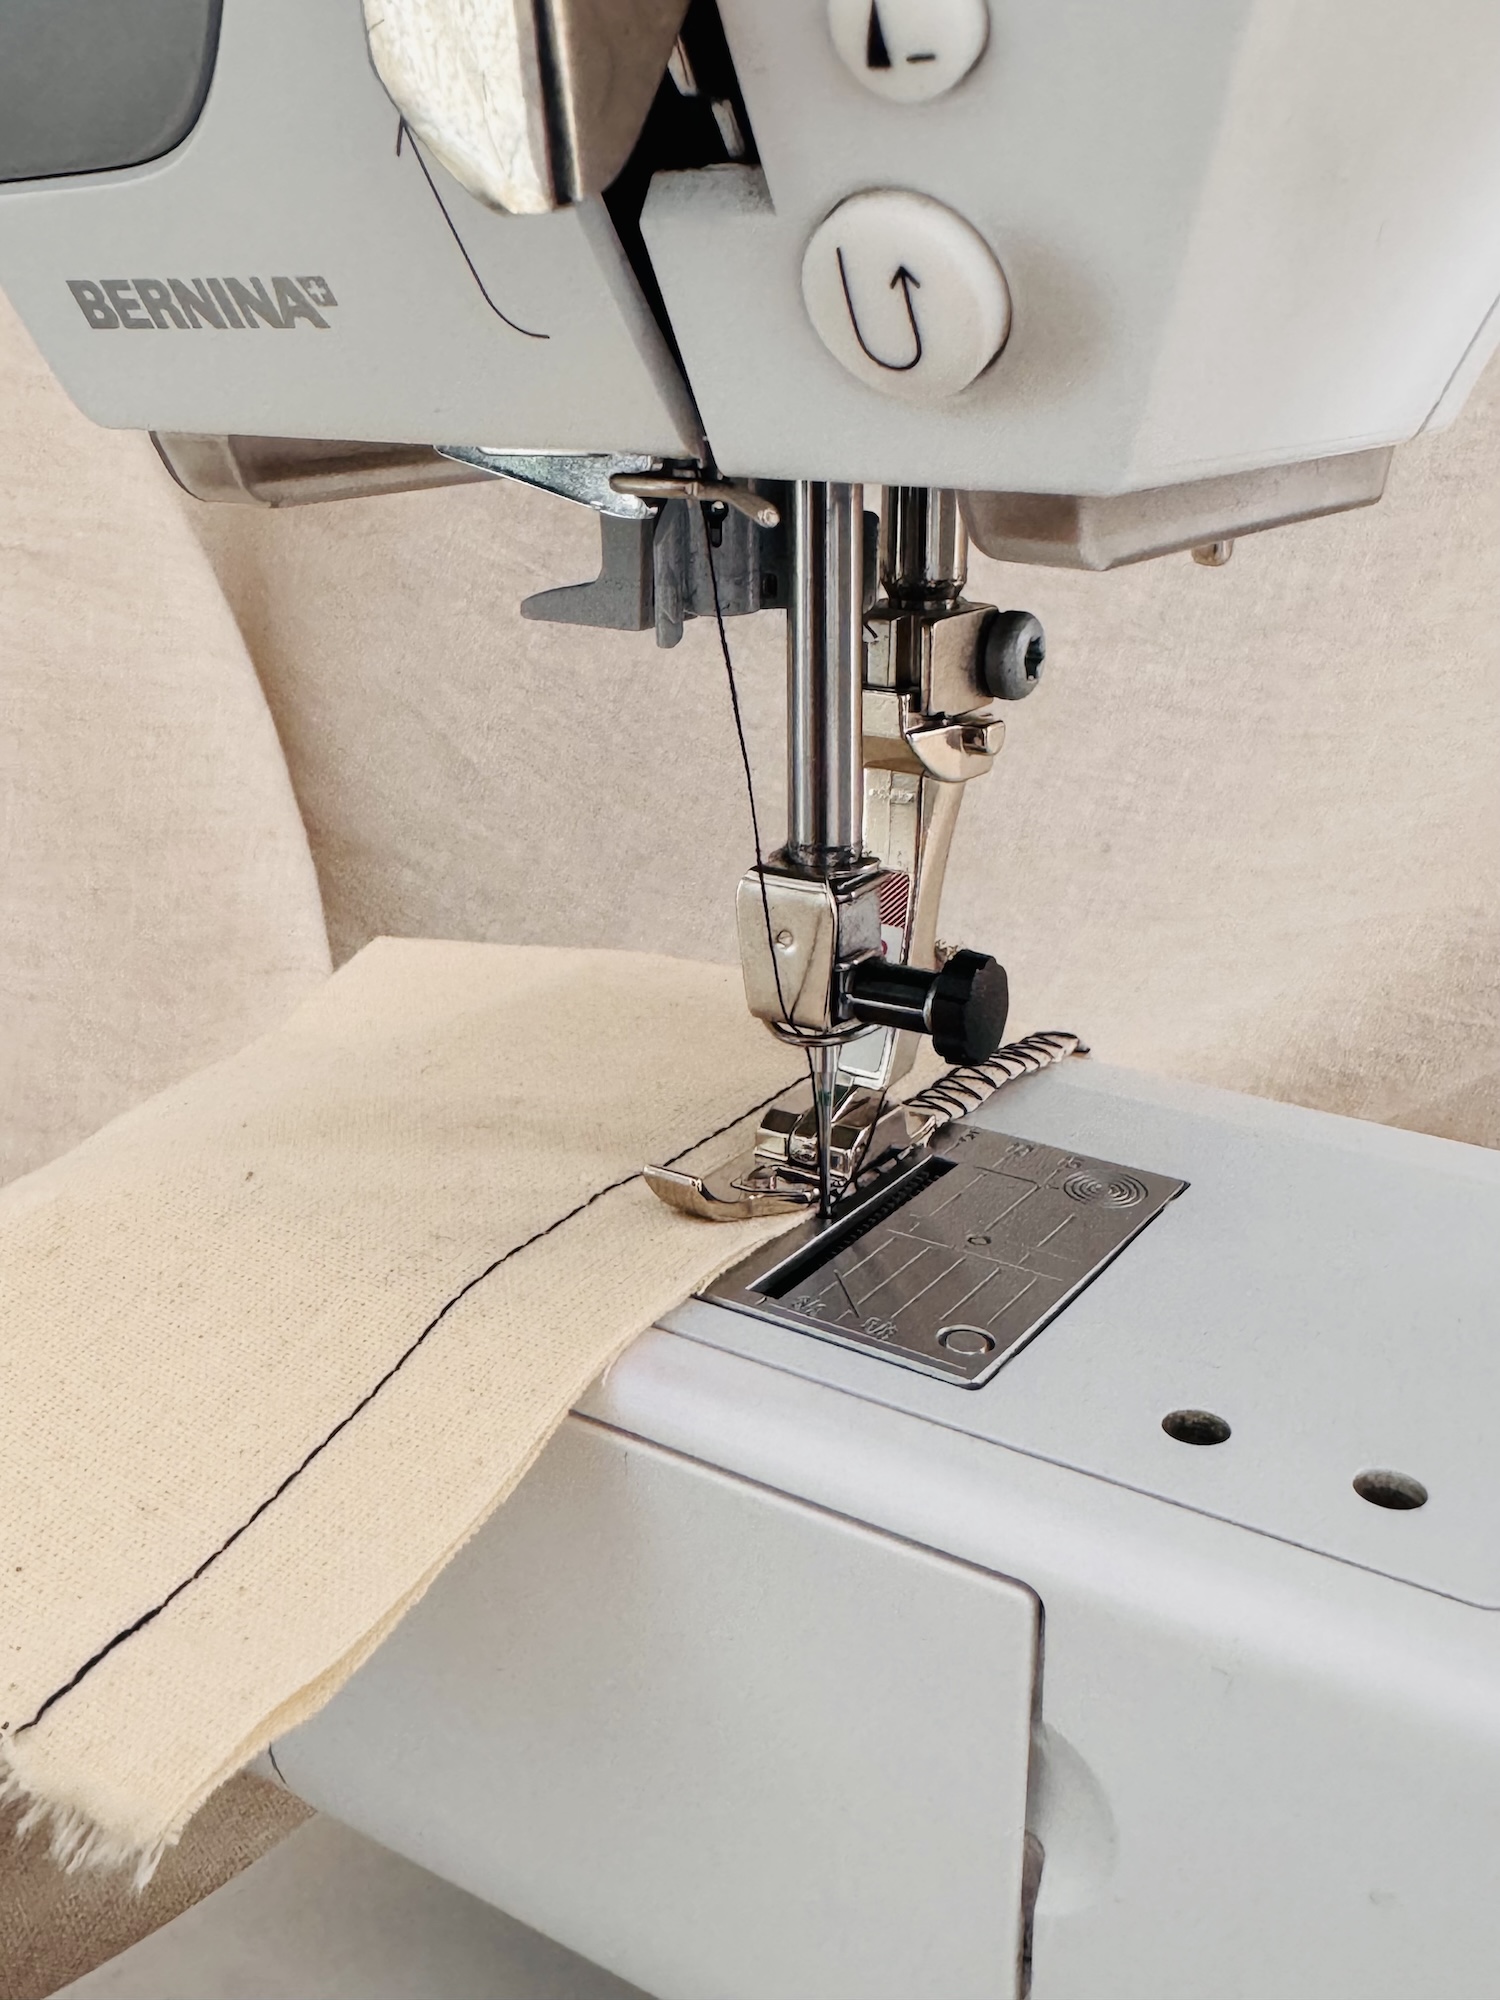
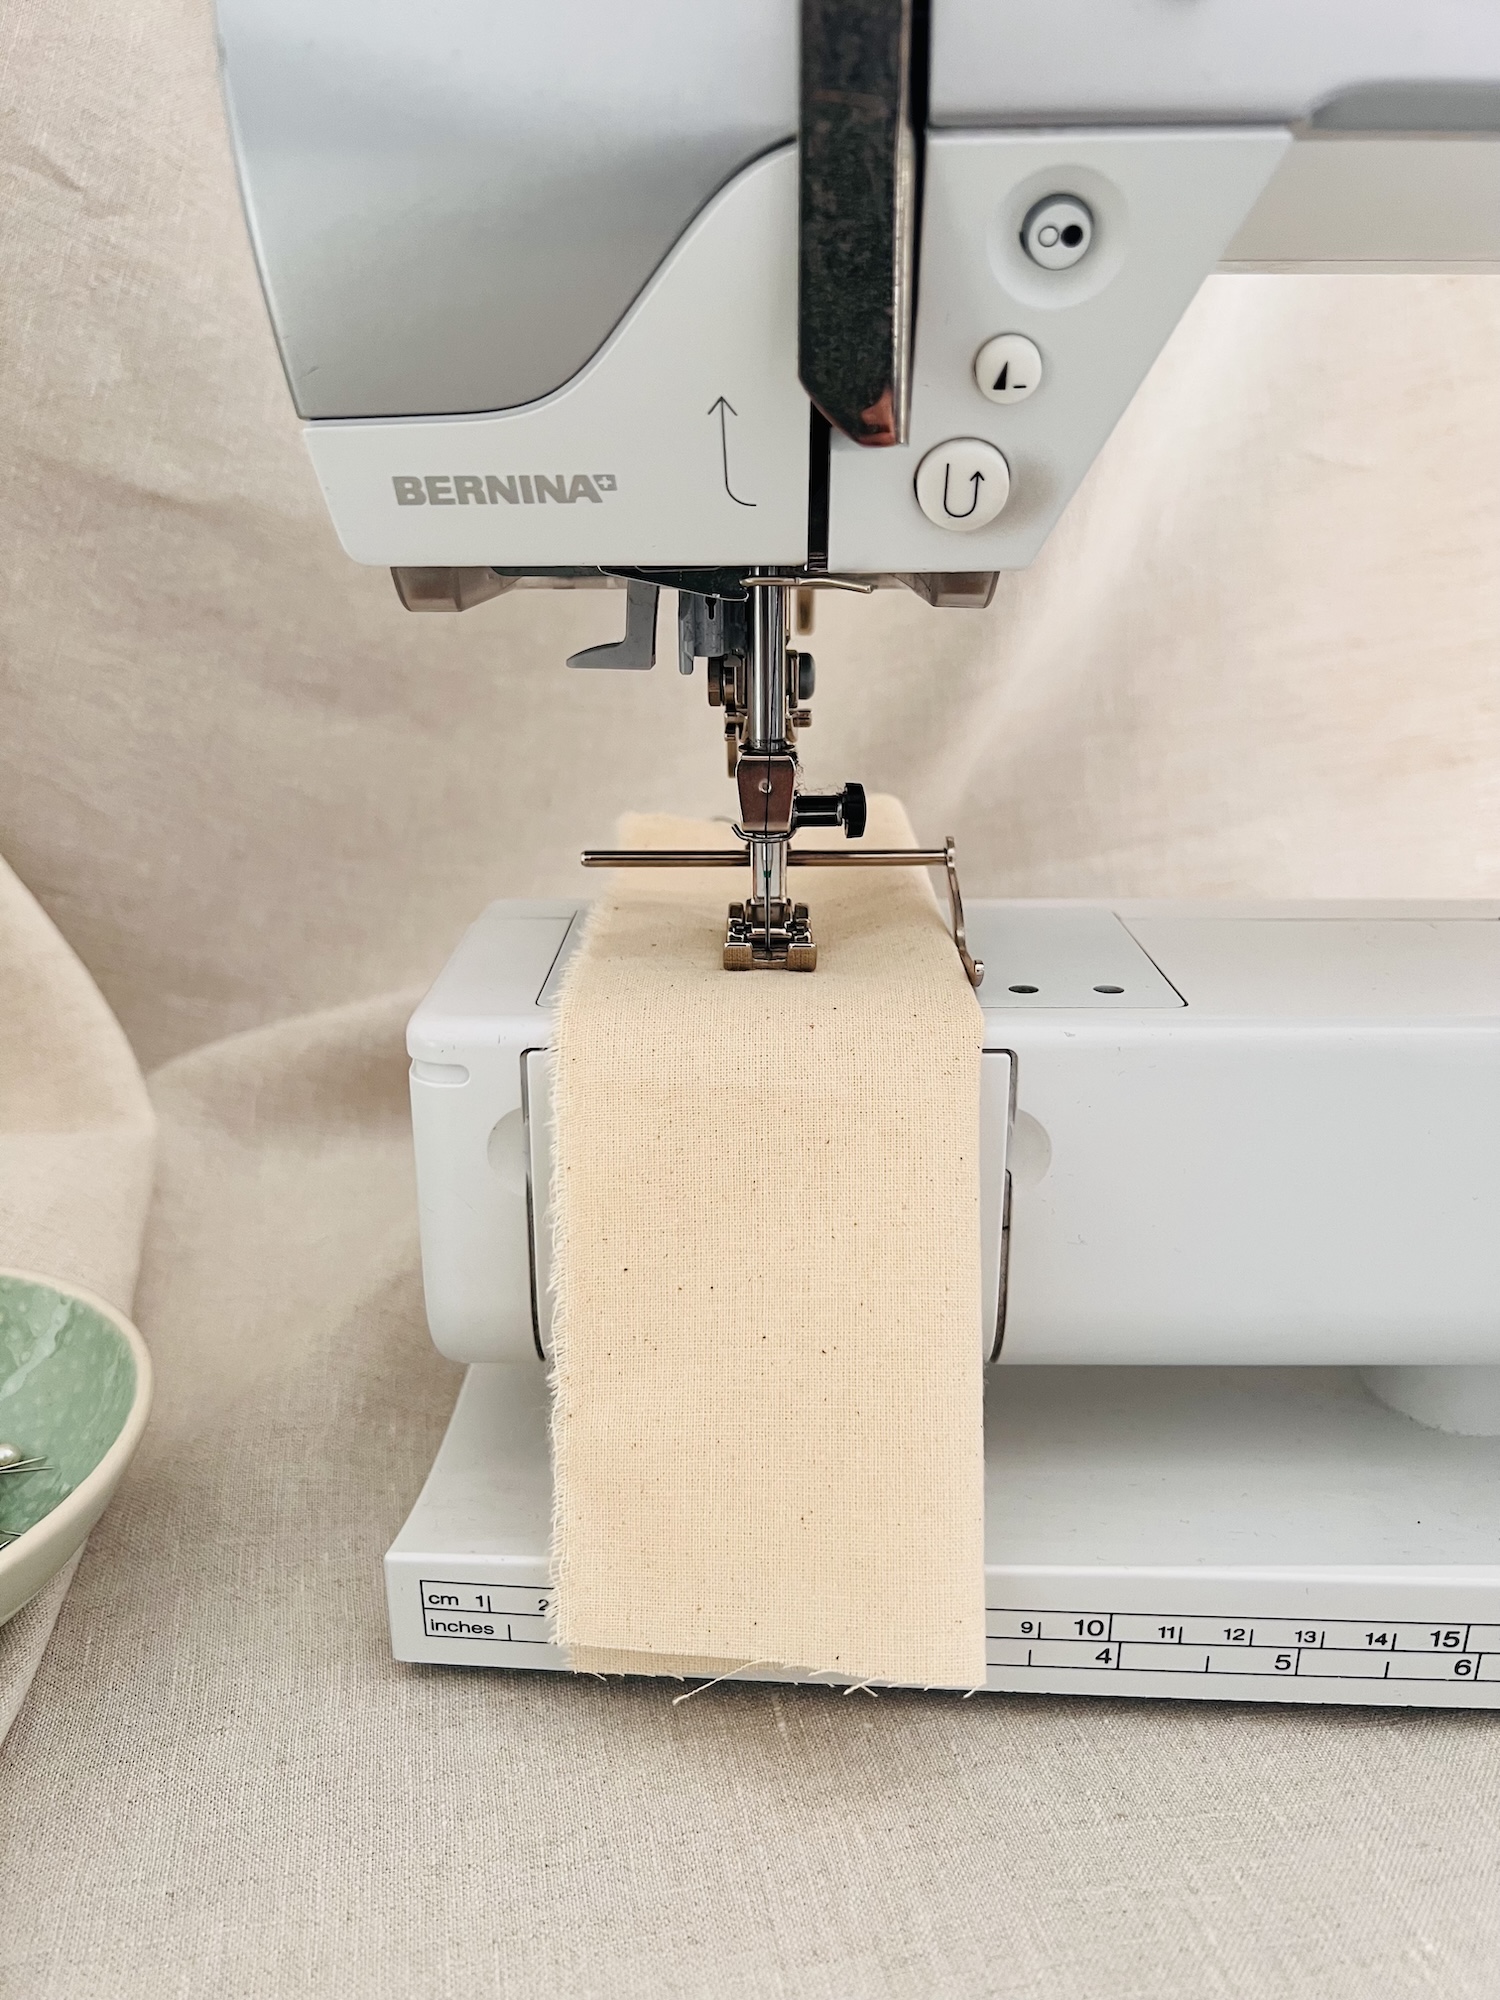
1. Reverse Pattern Foot – (Bernina Foot #1)
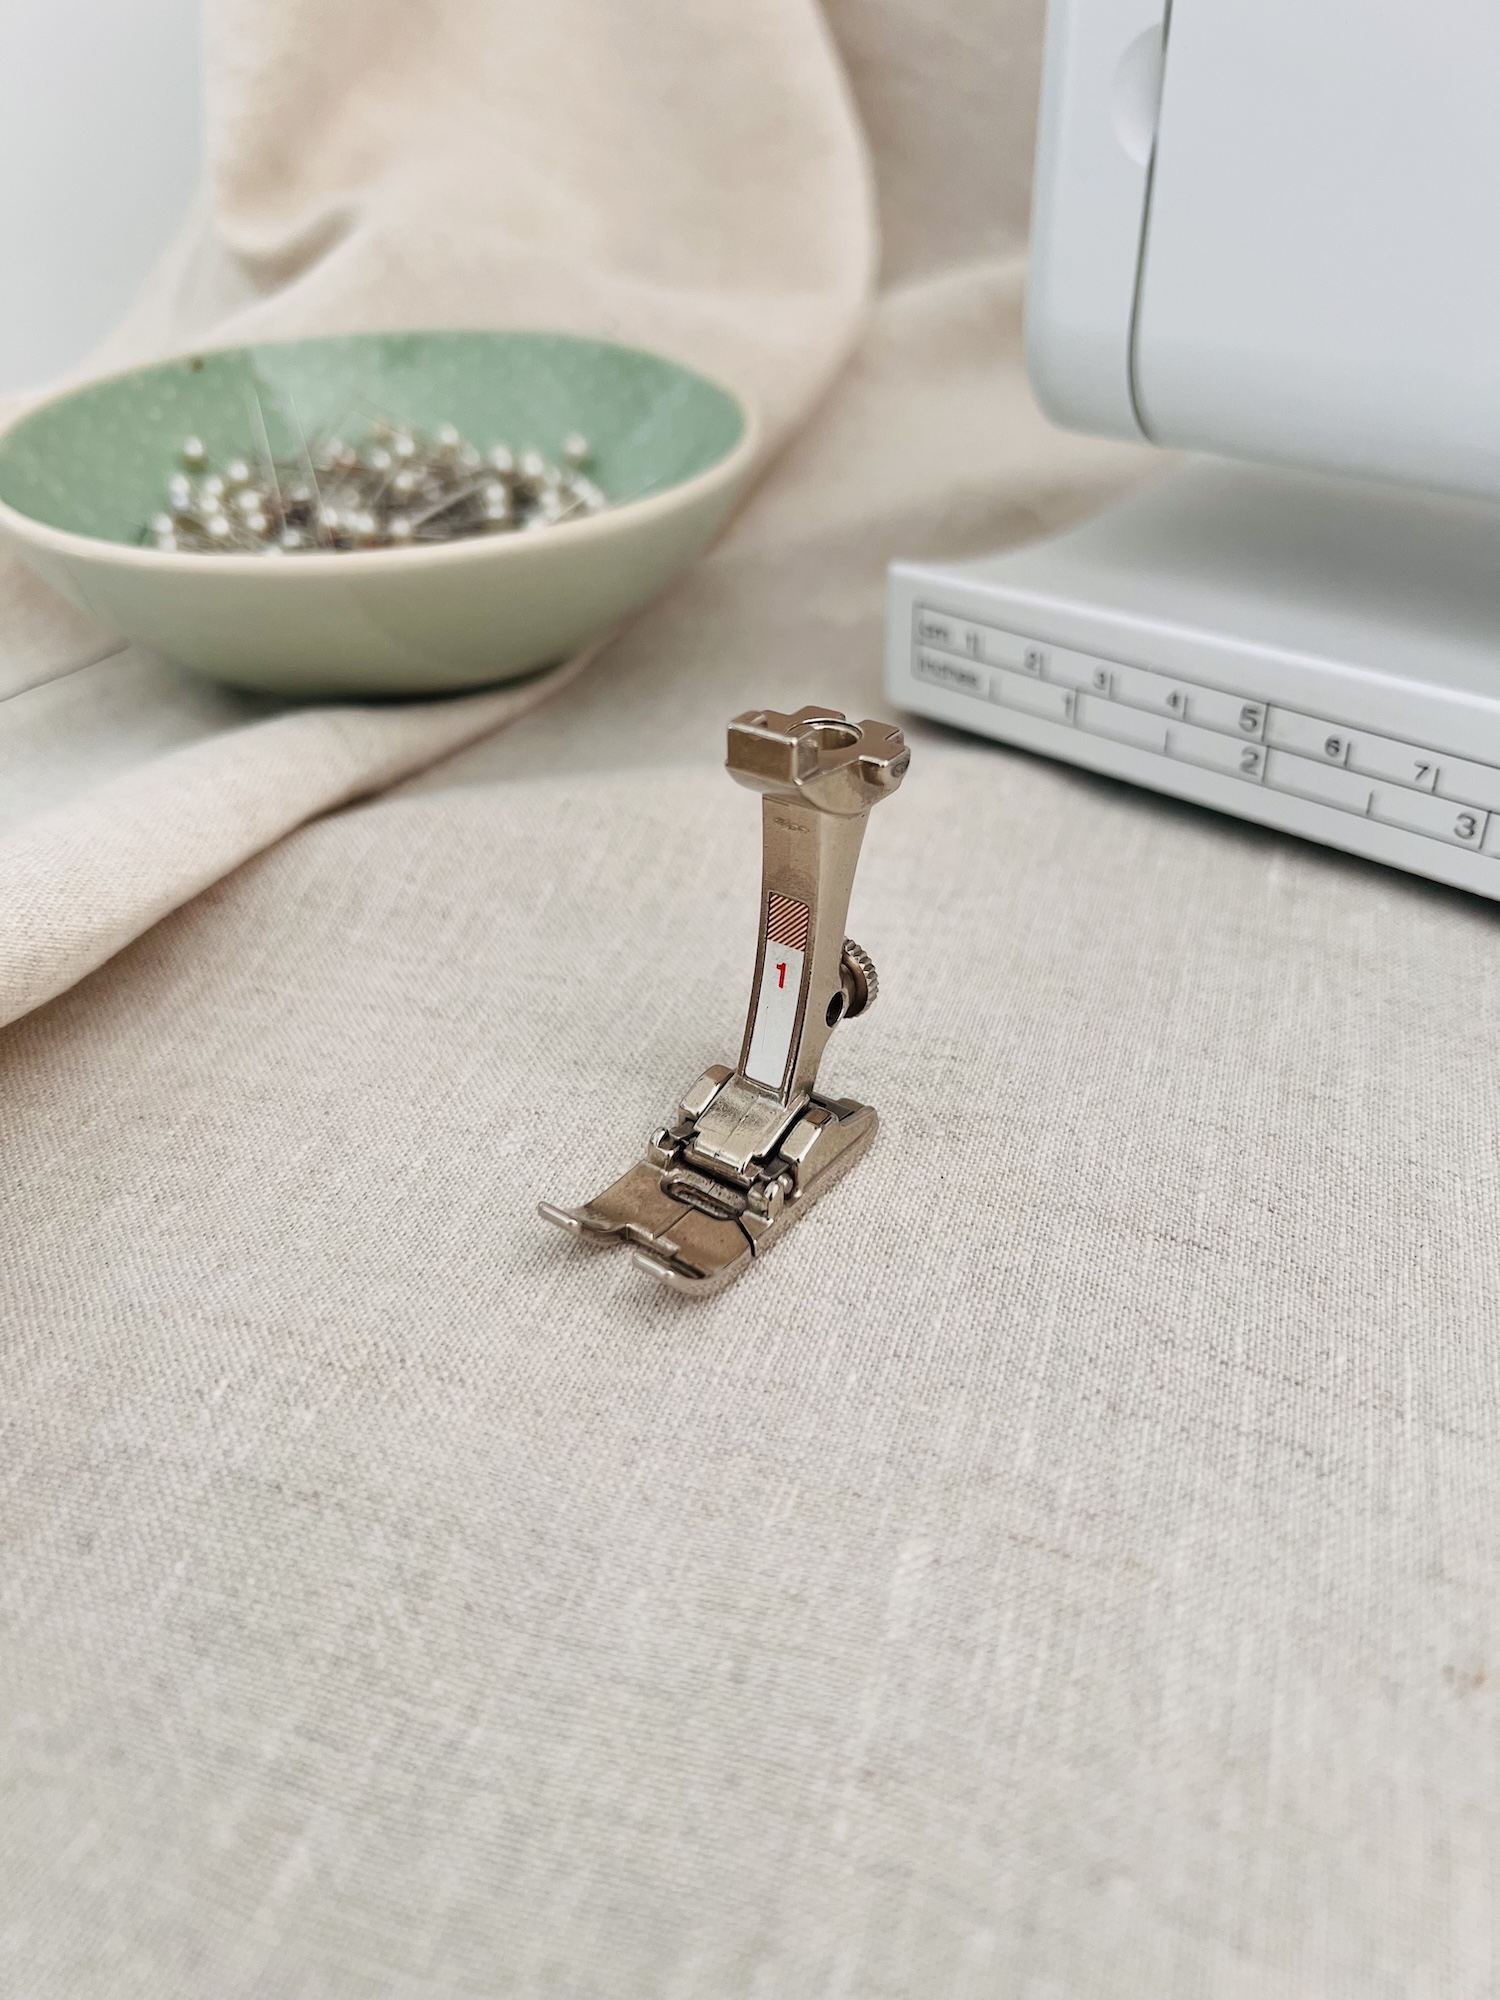
The Reverse Pattern Foot, specifically the Bernina Foot #1, is the one I reach for most often. Honestly, it stays on my machine most of the time.
The name “reverse pattern” comes from its ability to handle not only straight stitching, but also forward and reverse stitch patterns.
This foot is incredibly versatile and functions as your standard, all-purpose foot that will suffice for most of your general sewing tasks.
If you take a closer look at the Reverse Pattern Foot, you’ll notice a few design elements:
- A symmetrical and balanced design with a wide, flat sole.
- Equal-length “toes” on either side of the needle opening.
- A wide needle opening to accommodate side-to-side needle movement that is required for different stitch types, such as zigzag.
- A vertical indentation running through the centre, in front of the needle opening, that helps with visual alignment while sewing.
- A threading slot to the right of the needle opening, which allows the thread to be pulled under the foot and to the back of the machine.
- Underside indentations in front of and behind the needle slot. These allow space for any stitch build-up, particularly when zigzagging or reversing.
When should you use the Reverse Pattern Foot?
This foot is a great all-rounder and can be used for a variety of tasks, including:
- Straight stitching on various fabrics, being ideal for general sewing of seams and hems.
- Zig zag stitching, with the stitch width dependent on your machine’s capabilities.
- Stay-stitching curves or bias-cut areas in order to prevent stretching.
- Basic gathering that is created by rows of stitching using a longer stitch length.
- Twin needle sewing with the foot’s wide needle opening being able to accommodate the width of a twin needle. Be sure to always double-check the foot’s width capacity before sewing with these needles. You want to ensure that the needle does not hit the foot.
- Decorative stitches that require reverse-feed capability.
- Topstitching: While not as precise as a dedicated topstitching foot, you can use the edge of the foot as a guide and simply adjust the needle position for wider or narrower results.
- Stitch-in-the-ditch (with care): Again, although not specifically designed for this purpose, you can use the central, vertical indentation as a guide. By positioning this guide within the seam line and keeping the needle in the central position you can sew within the ditch. This can be a good cheat when a specialised foot maybe isn’t available.
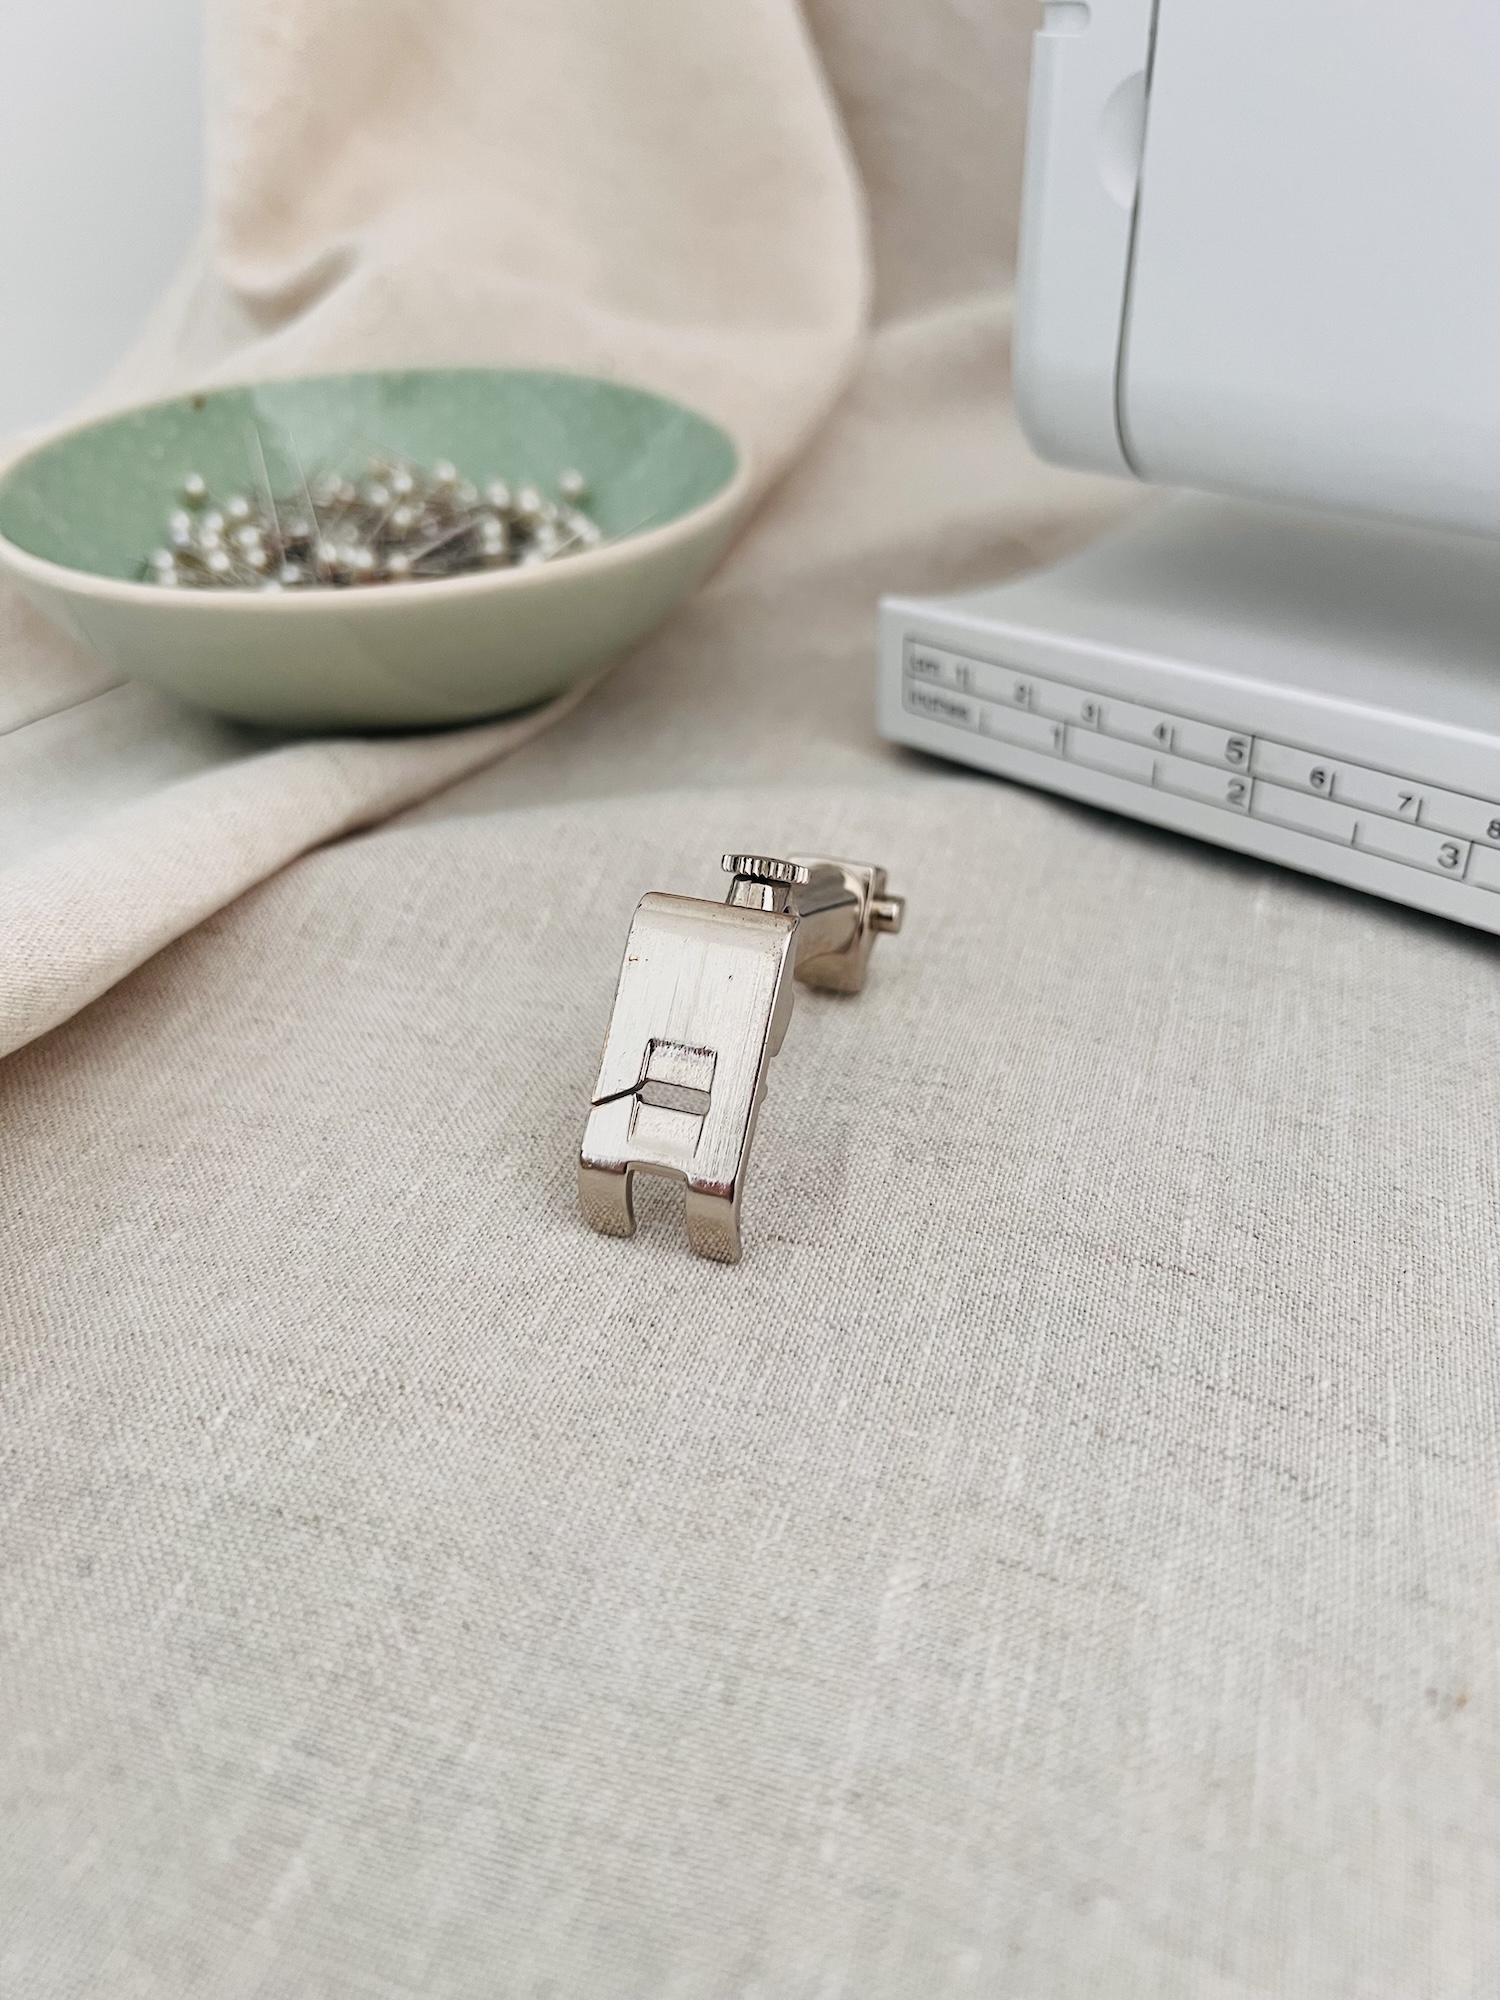
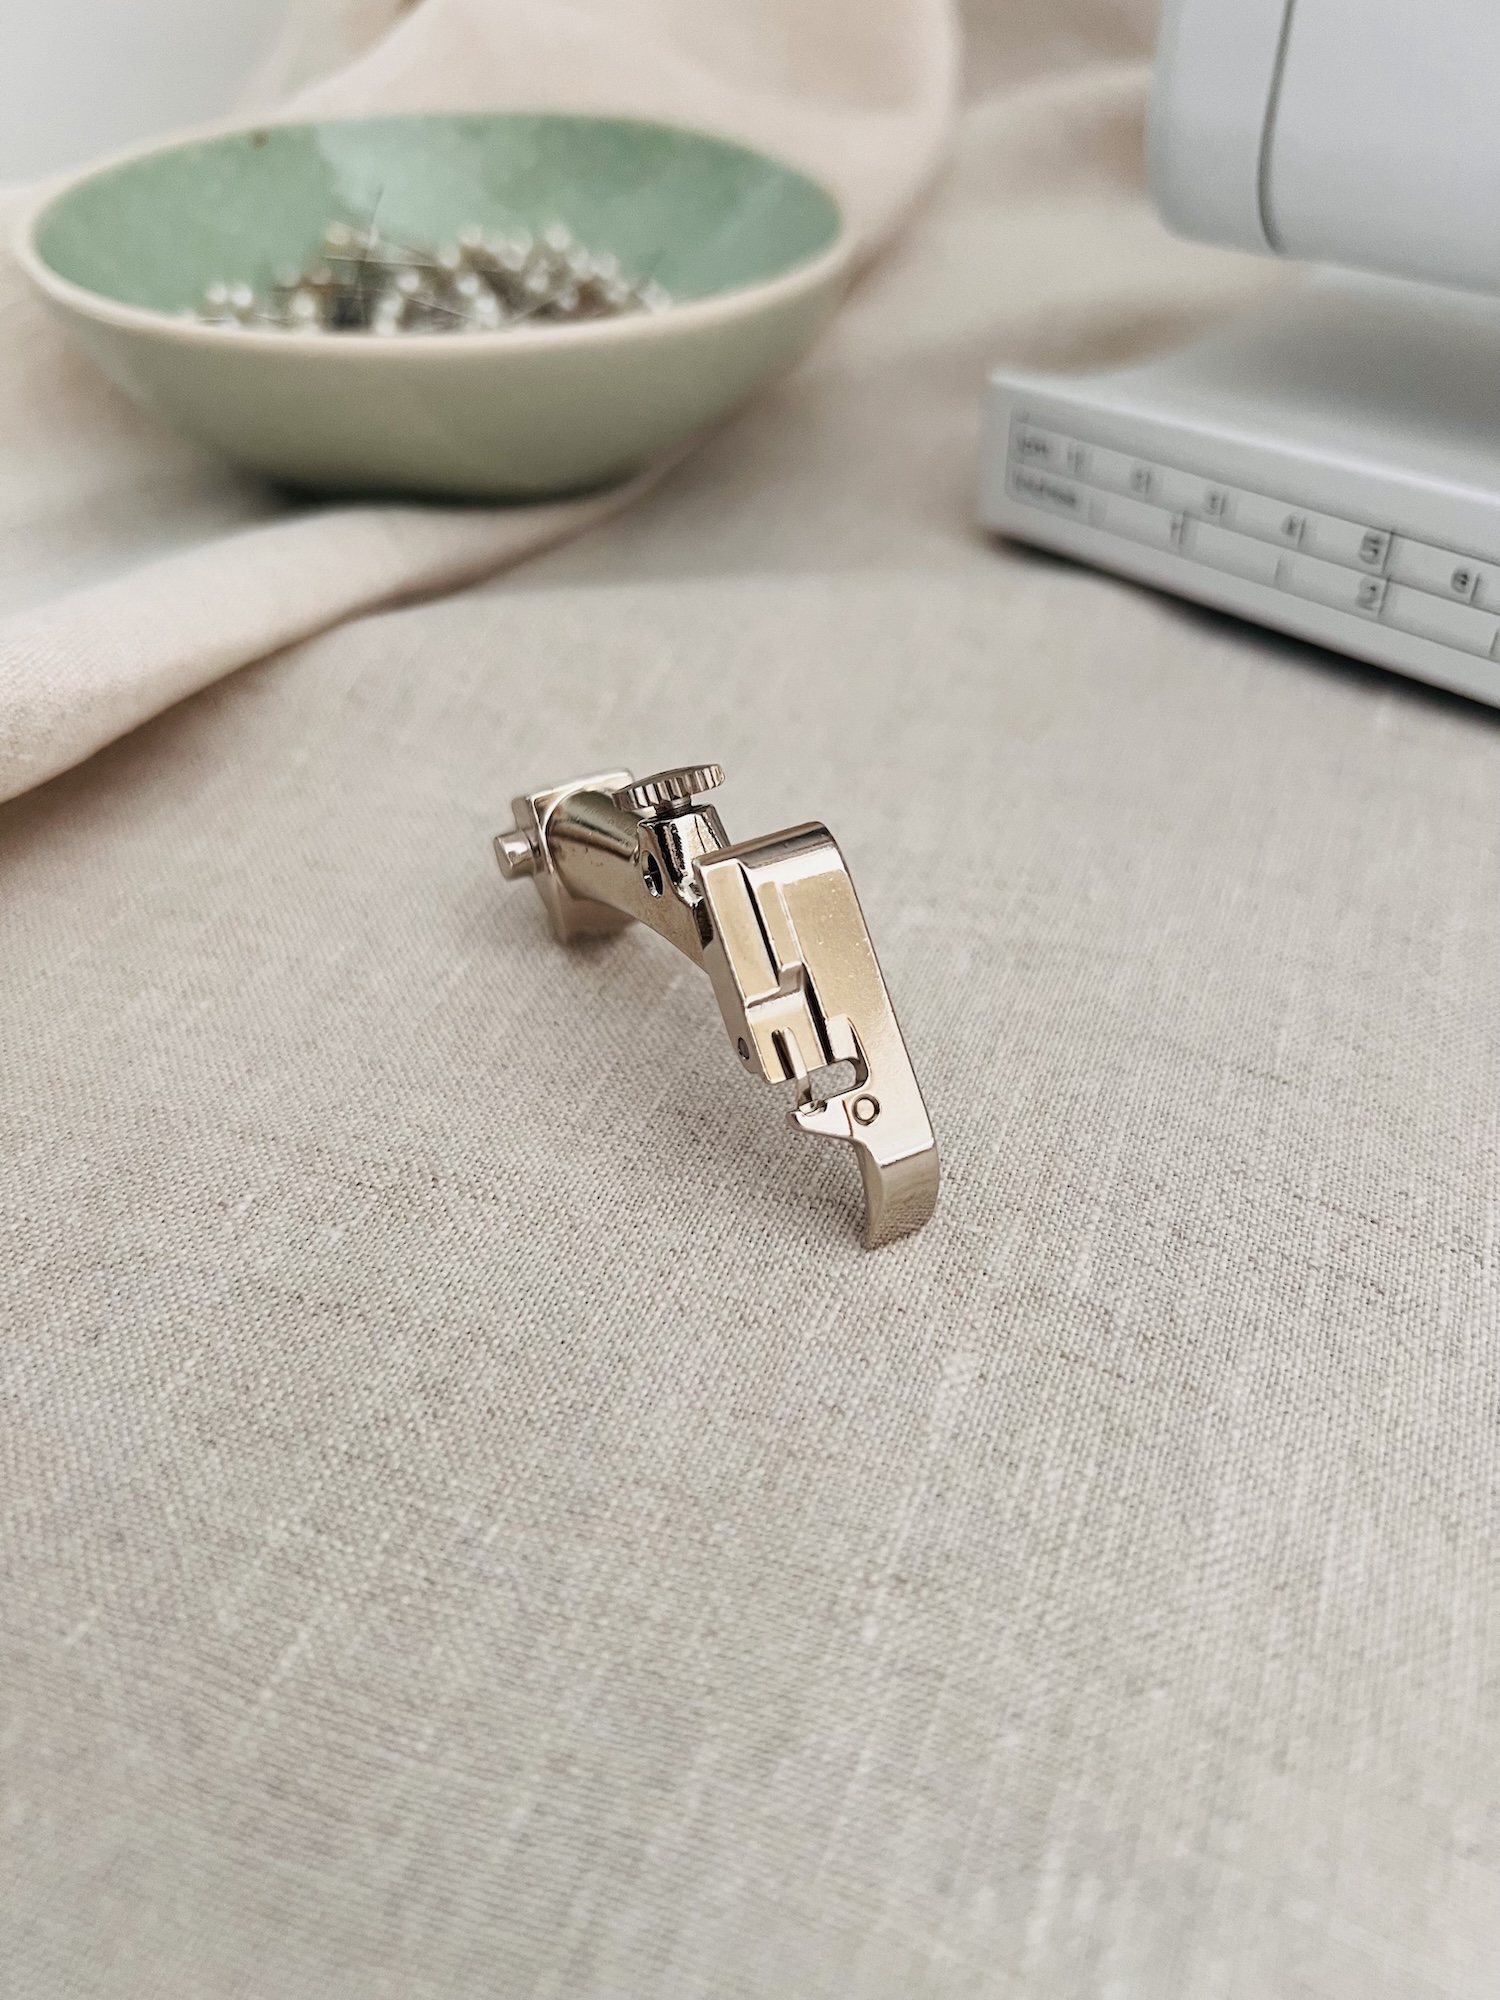
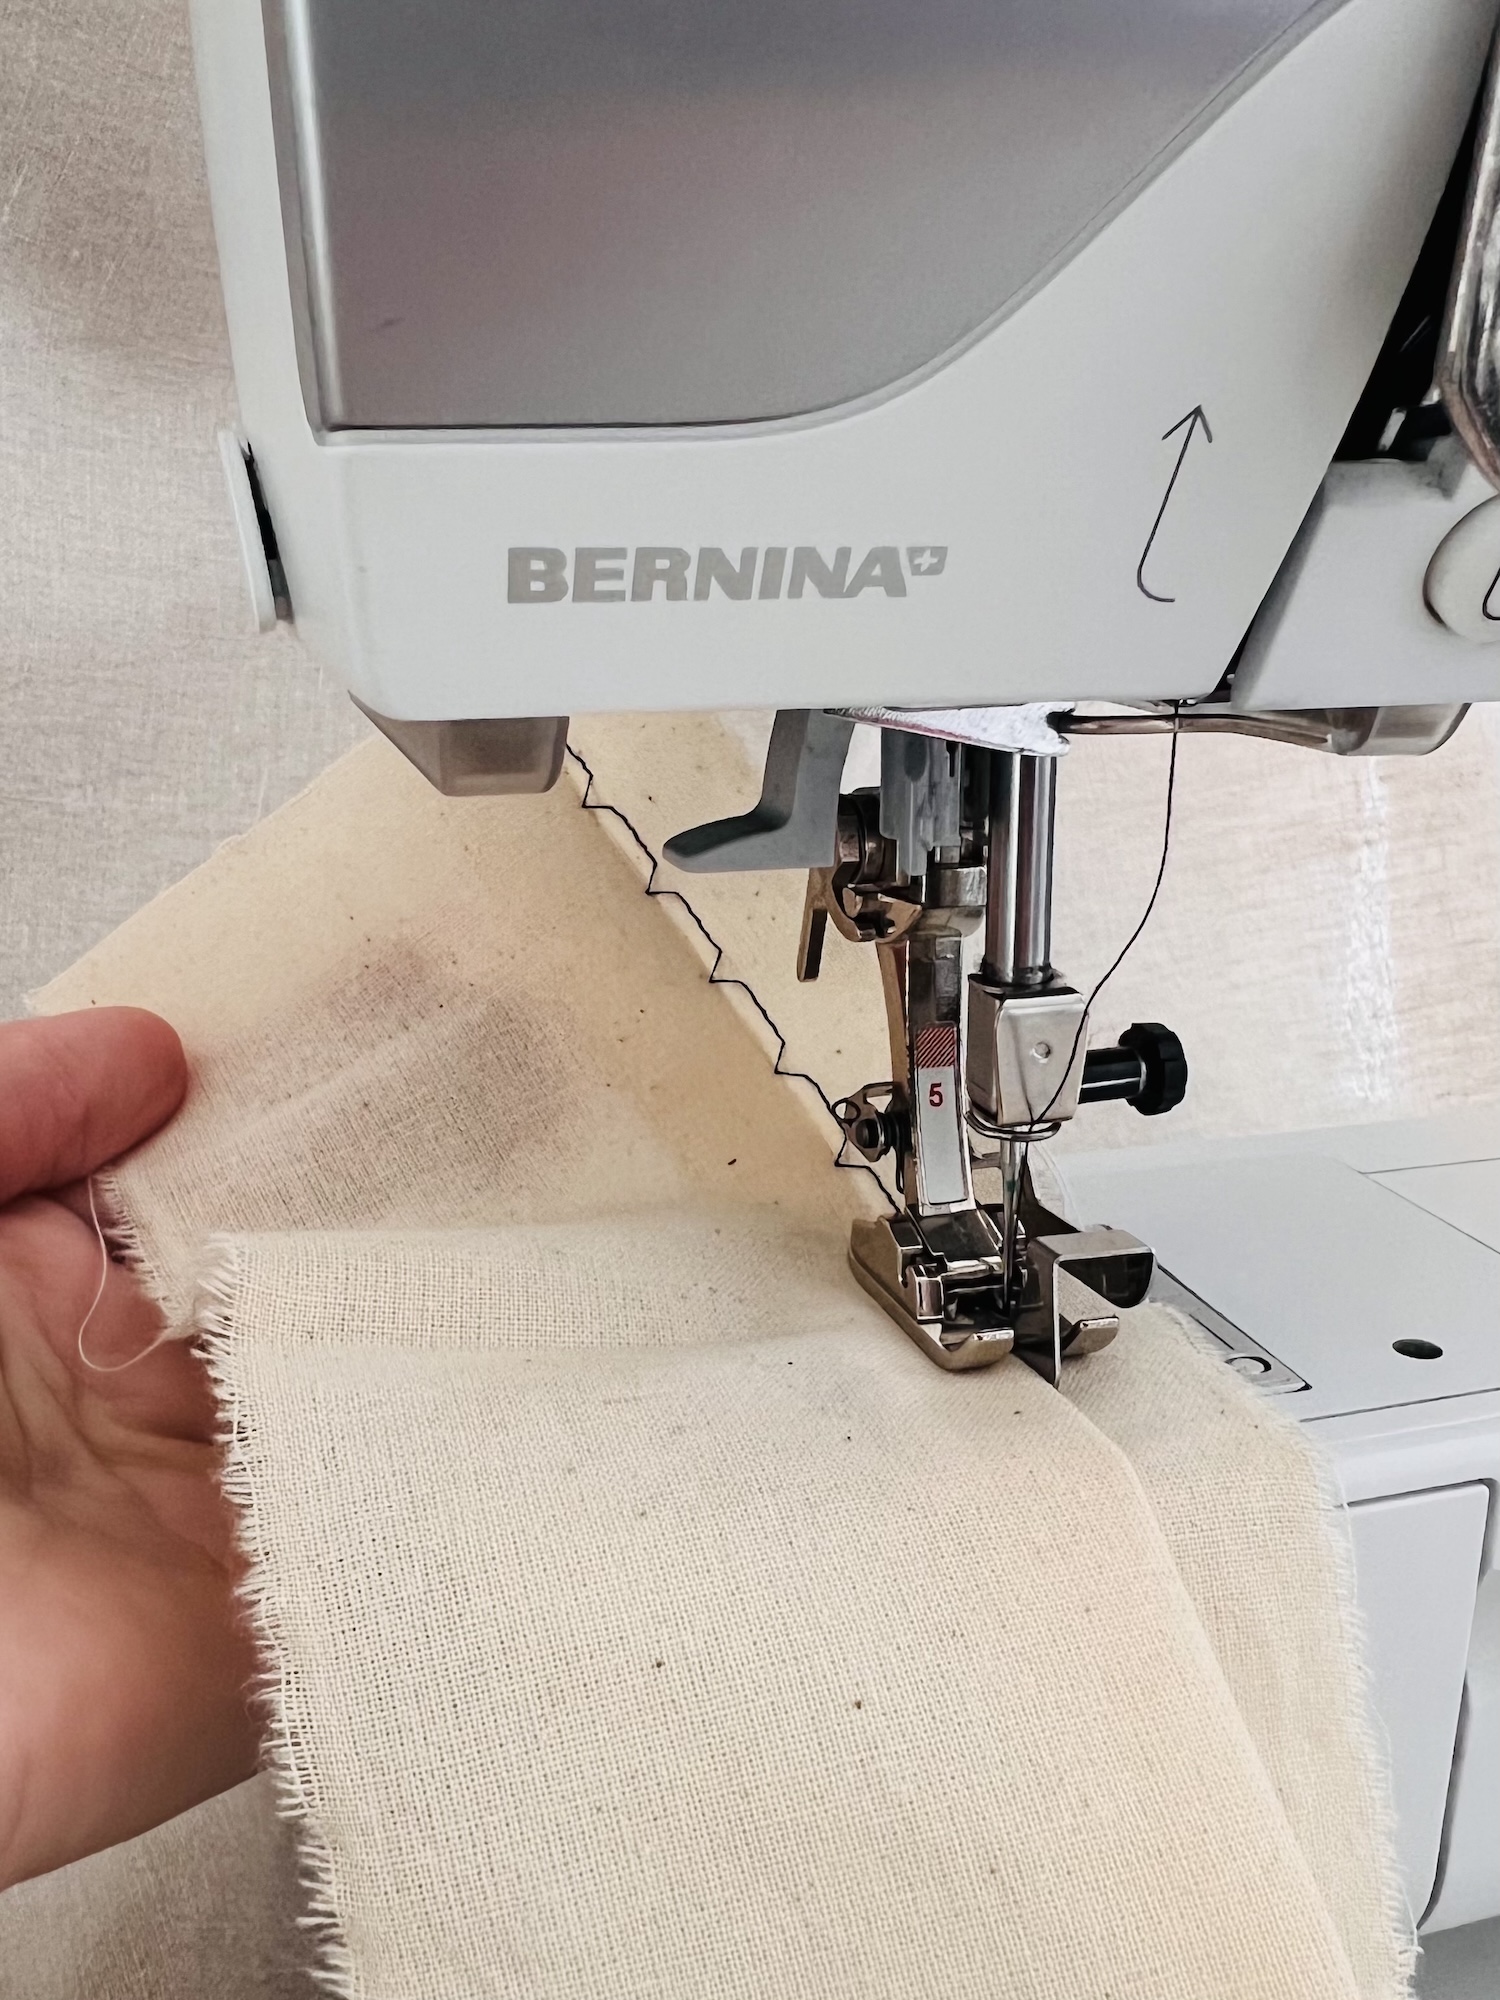
2. Overlock Foot – (Bernina Foot #2)
To be honest, I don’t use the Overlock Foot very often, as I prefer my actual overlocker for finishing fabric edges. However, the Bernina Foot #2 is specifically designed for overcasting stitches, providing a neat, overlocker-style finish when a dedicated overlocker maybe isn’t available.
While this foot helps neaten and secure raw fabric edges, unlike an overlocker, it doesn’t trim the fabric edge automatically, so you’ll need to trim manually as required. Still, it’s a great alternative for those without access to an overlocker.
When you look at the Overlock Foot, you’ll notice a few distinctive features:
- A wider single toe on the left side.
- A thin vertical metal bar (or pin) next to the needle opening. This pin acts almost like a tiny finger that the stitch can wrap around. It helps the thread to form neatly around the fabric edge, without pulling it too tightly and puckering or curling the fabric.
- Indentations or grooves on the underside, especially behind the needle opening and the metal pin. These channels allow the bulkier overcasting stitches to pass freely underneath, helping prevent the fabric from dragging or bunching as you sew.
When should you use the Overlock Foot?
The Overlock Foot is a great alternative when you don’t have access to an overlocker. It finishes raw edges or seams neatly, helping to prevent fraying on both woven and knit fabrics.
How to use the Overlock Foot:
1. Select the overlock stitch setting on your machine.
Note: My machine automatically sets the stitch length, width, and needle position as per the type of stitch selected. These settings will vary from machine to machine. If these need to be set manually on your machine, check in with your manual.
2. Ensure the feed dogs are engaged (up).
3. Place the fabric under the presser foot, aligning the raw edge with the metal pin.
4. Sew. The needle will move from side to side, and back and forth. As it swings to the right, it should sew just off the fabric edge, allowing the thread to wrap around.
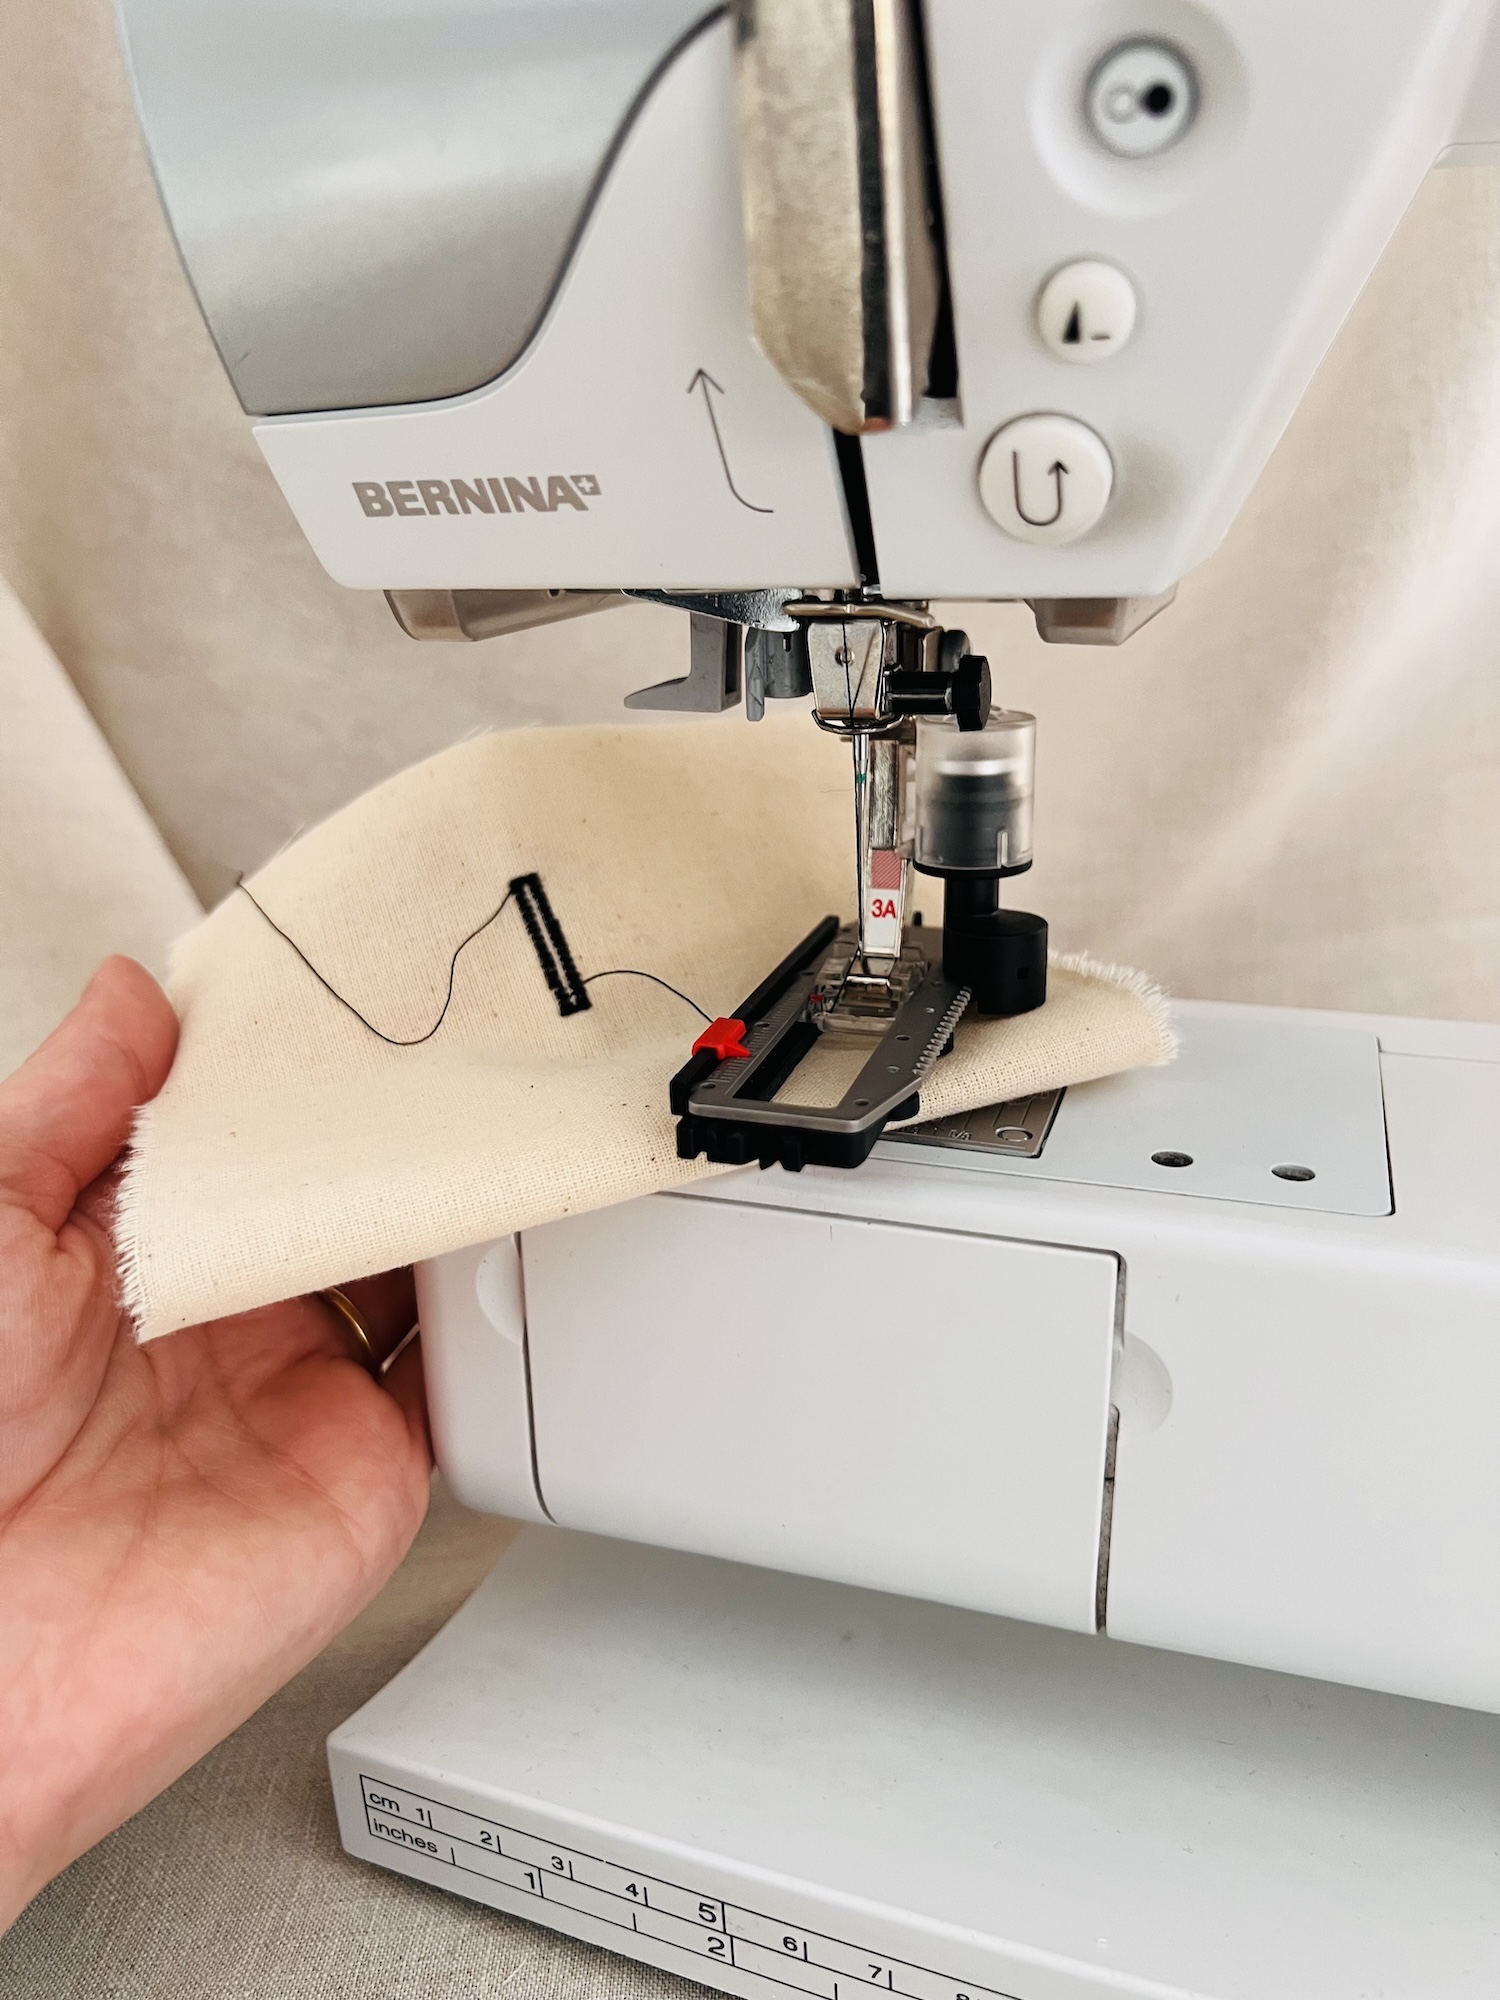
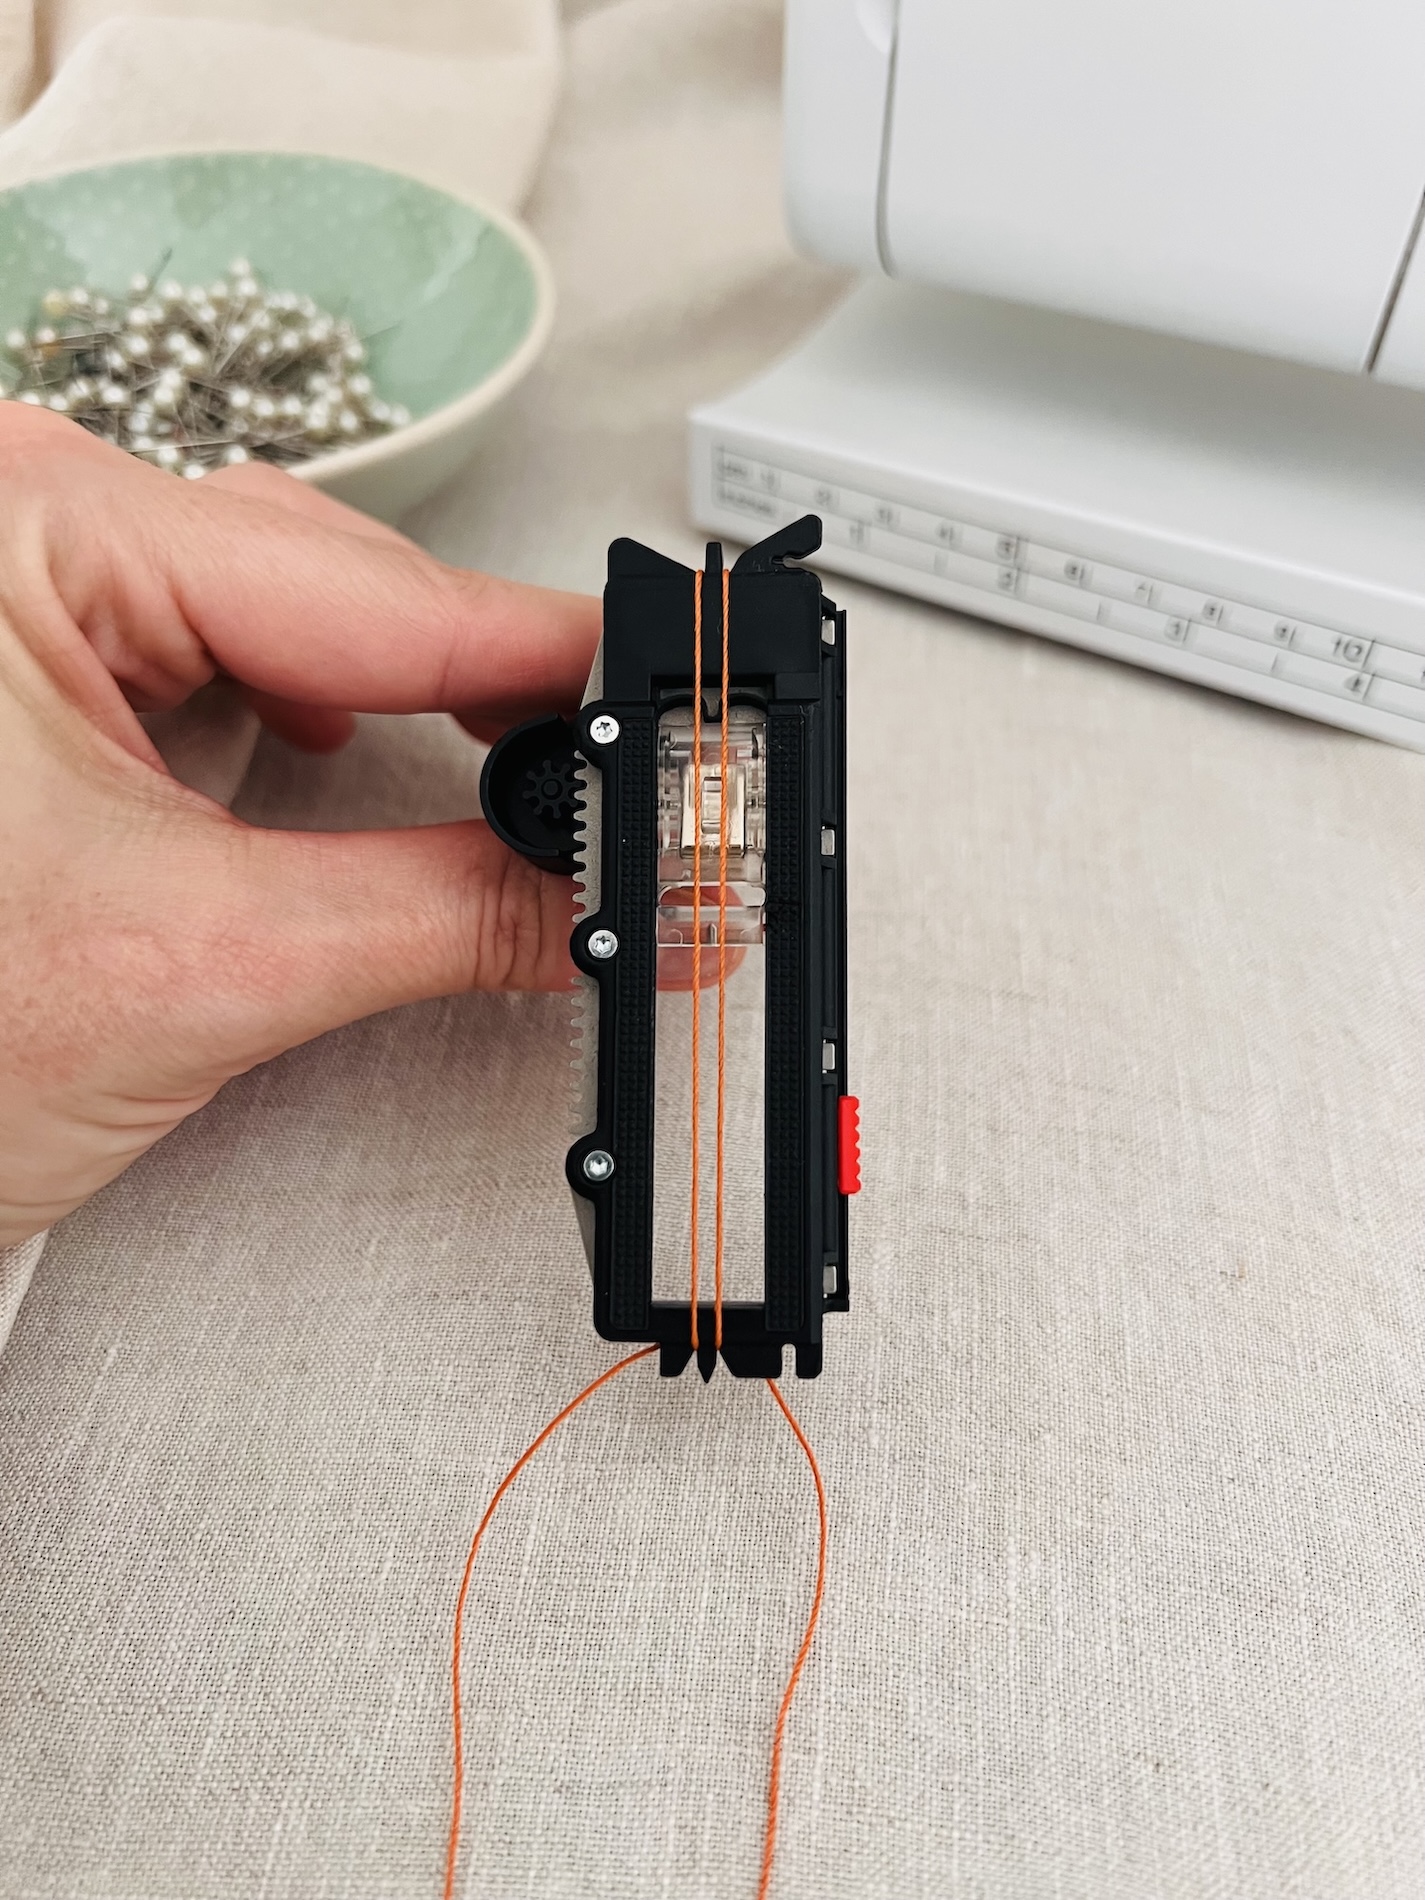
3. Automatic Buttonhole Foot – (Bernina Foot #3A)
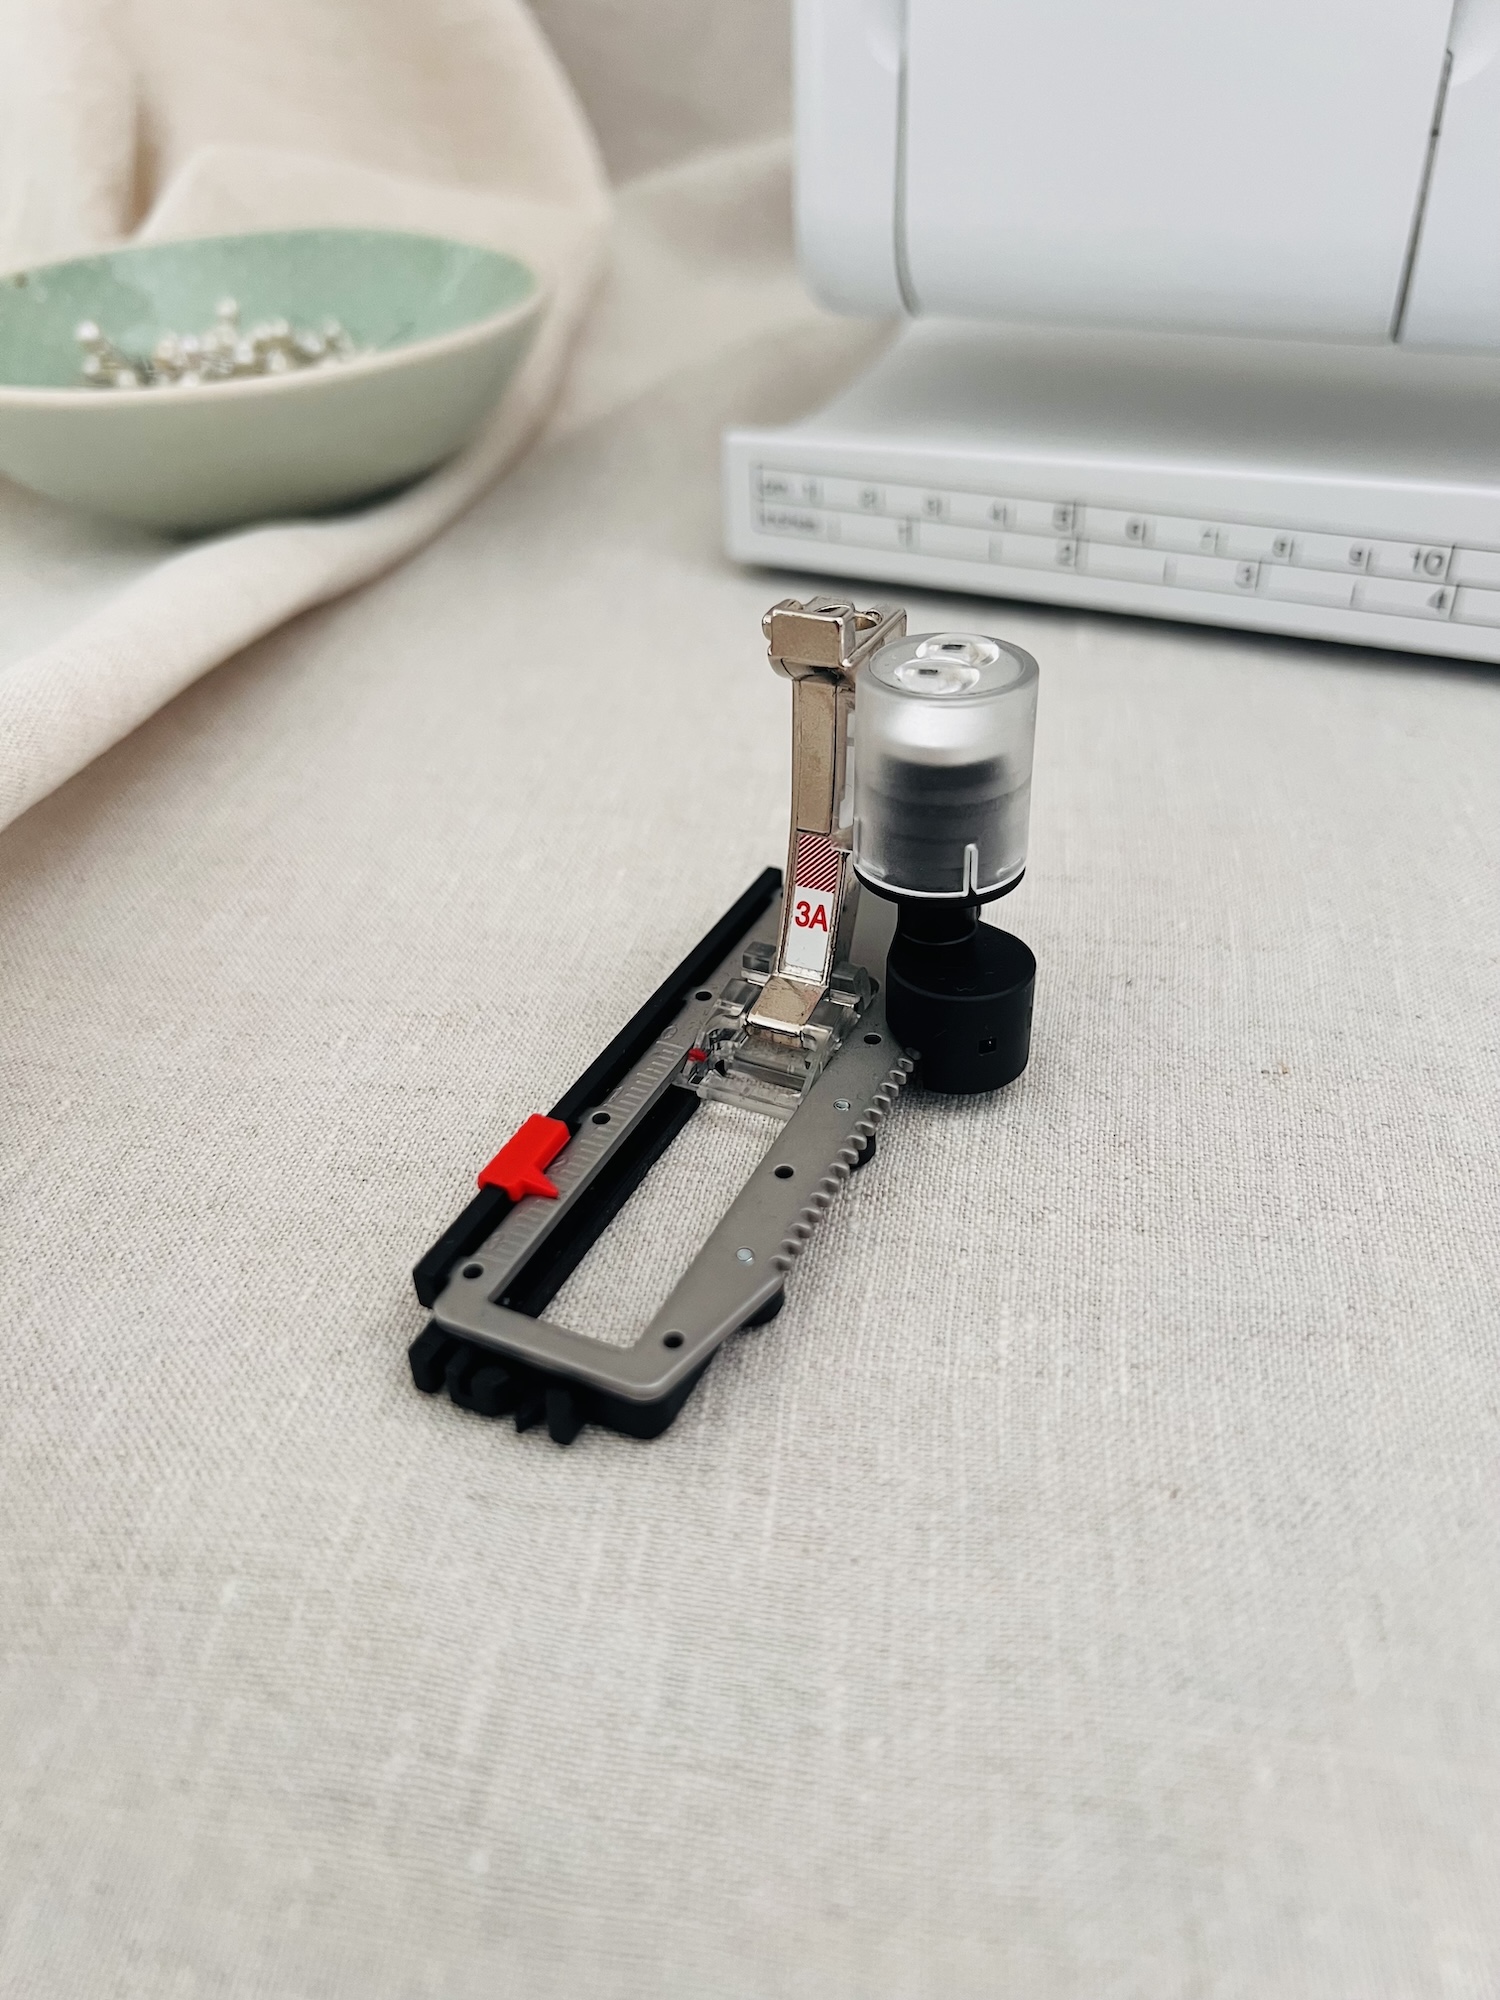
Gone are the days of avoiding buttonholes because it felt impossible to get them all the same length. The Automatic Buttonhole Foot, also known as Bernina Foot #3A (with the “A” standing for automatic), is one of my favourite feet. It’s a game changer!
This foot will produce any number of identical buttonholes (up to 30mm in length) without having to guess the length each time. It can be used on a variety of fabric weights, from light to medium-heavy.
So how does it do this? The foot has a built-in sensor on the side that measures the exact length of the first buttonhole and communicates this to your machine. As long as the settings remain unchanged, your machine should continue to sew perfectly matched buttonholes.
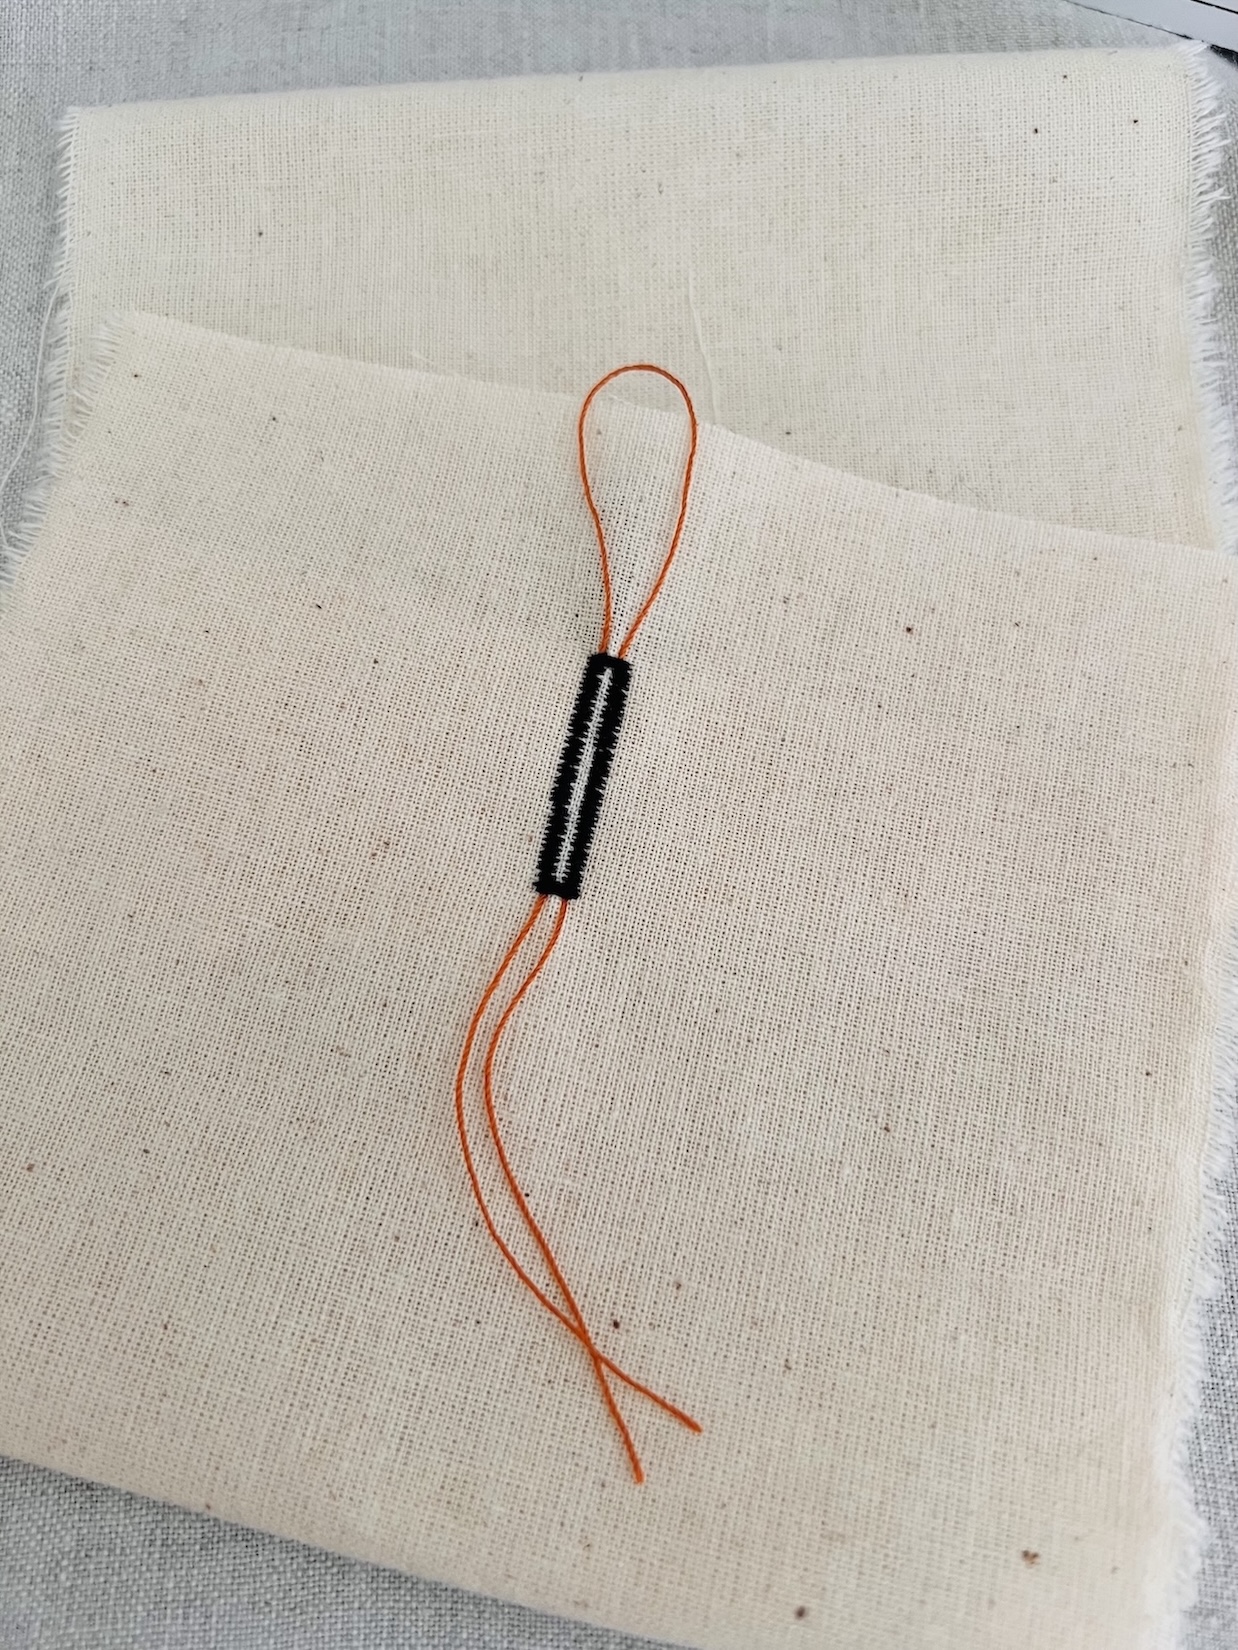
This foot can also be used to create corded buttonholes. Corded buttonholes are ideal for when a little extra reinforcement and strength is needed. They prevent stretching, especially when working with knit or loosely woven fabrics, helping the buttonhole to keep its shape over time. The type and thickness of cord used can vary depending on your fabric. Heavier fabrics may need a thicker cord, while lighter fabrics work better with something finer. Suitable cord options include:
- Perle yarn No. 8 (also known as Perle cotton or Pearl cotton No. 8): a high-sheen, tightly twisted, non-divisible cotton embroidery thread
- Thick hand sewing thread.
- Topstitching thread.
- Fine crochet cord or cotton.
The Automatic Buttonhole Foot 3A can look pretty intimidating, so lets break it down:
- A sensor (the round clear and black thing) is positioned at the back right corner that communicates with your machine, telling it the required buttonhole length.
- A large, rectangular frame that sits around the sole of the foot. This moves back and forth as you sew the sides of the buttonhole.
- A printed measuring guide and red slider on the left of the frame that is used to guide the buttonhole length.
- Small cord hooks located at the front and back that hold the cord or thread in place for corded buttonholes.
How to sew standard buttonholes using the Automatic Buttonhole Foot:
1. Mark the position and length of the buttonhole on your fabric using a washable fabric marker or chalk.
2. Attach the automatic buttonhole foot to your machine.
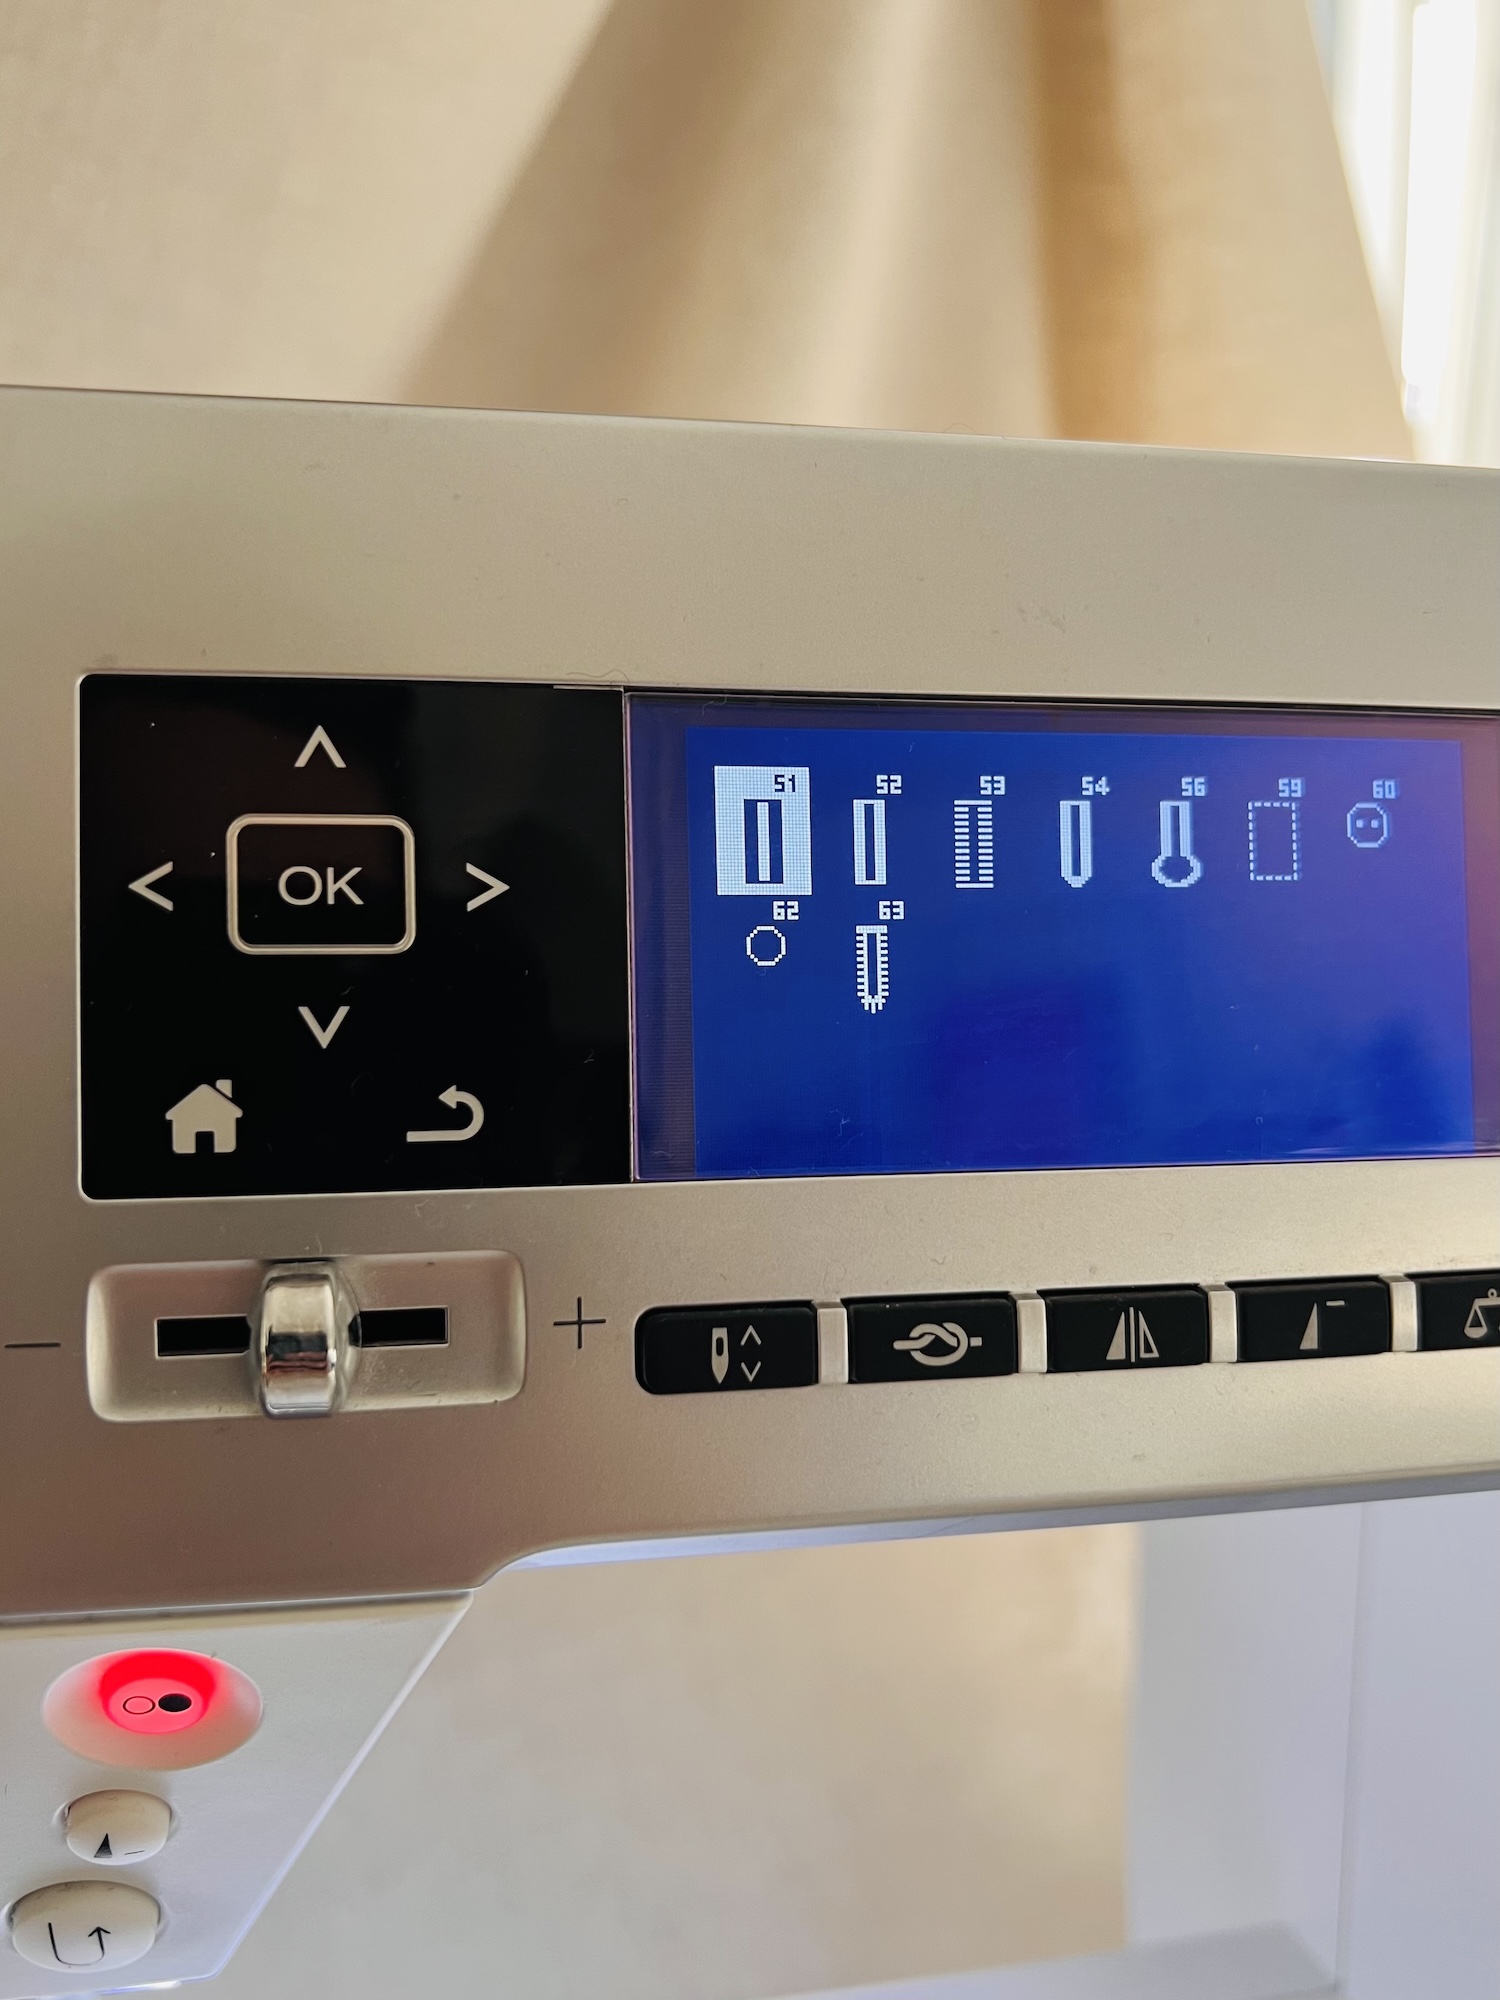
3. Select the buttonhole style on your machine. Options may include standard (rectangular), rounded end, keyhole or stretch. This should automatically set the stitch width, length and needle position.
4. Ensure the feed dogs are engaged (up).
5. Position the fabric under the foot, aligning the needle with the top centre of the buttonhole.
6. Lower the needle into this starting point using the hand wheel.
7. Lower the presser foot completely and set the red slider to the desired button length. For example, if you want a 2cm buttonhole, slide the red marker to the 2cm position.
8. Start sewing. The machine will sew the buttonhole in the following order:
- Left side with tight but narrow zig zag stitch.
- Right side with straight stitches in reverse.
- Top bar tack with a wide zig zag stitch.
- Right side again with tight but narrow zig zag stitch.
- Bottom bar tack with a wide zig zag stitch.
- Securing stitches.
The length of the left side stitch (step 1) sets the size of all subsequent buttonholes. When the stitch reaches the red slider, press the ‘Quick Reverse Button’. This tells the machine to stop sewing the left side and sets the buttonhole length for the rest.
Tip: If sewing buttonholes, try threading the bobbin thread through the finger of the bobbin case. This will make the tension a little tighter and hopefully create a neater button hole.
How to sew corded buttonholes using the Automatic Buttonhole Foot:
1. Guide the cord to the right side, bringing it under the foot and toward the back.
2. Hook the cord over the central pin at the back of the foot.
3. Bring the cord along the left side, under the foot and toward the front.
4. Insert the two cord ends into the small slits at the front of the foot to hold them in place.
5. Sew the buttonhole following the buttonhole steps above.
6. To finish, pull the cord ends to the wrong side of the fabric using a hand sewing needle, and knot to secure the cord ends.
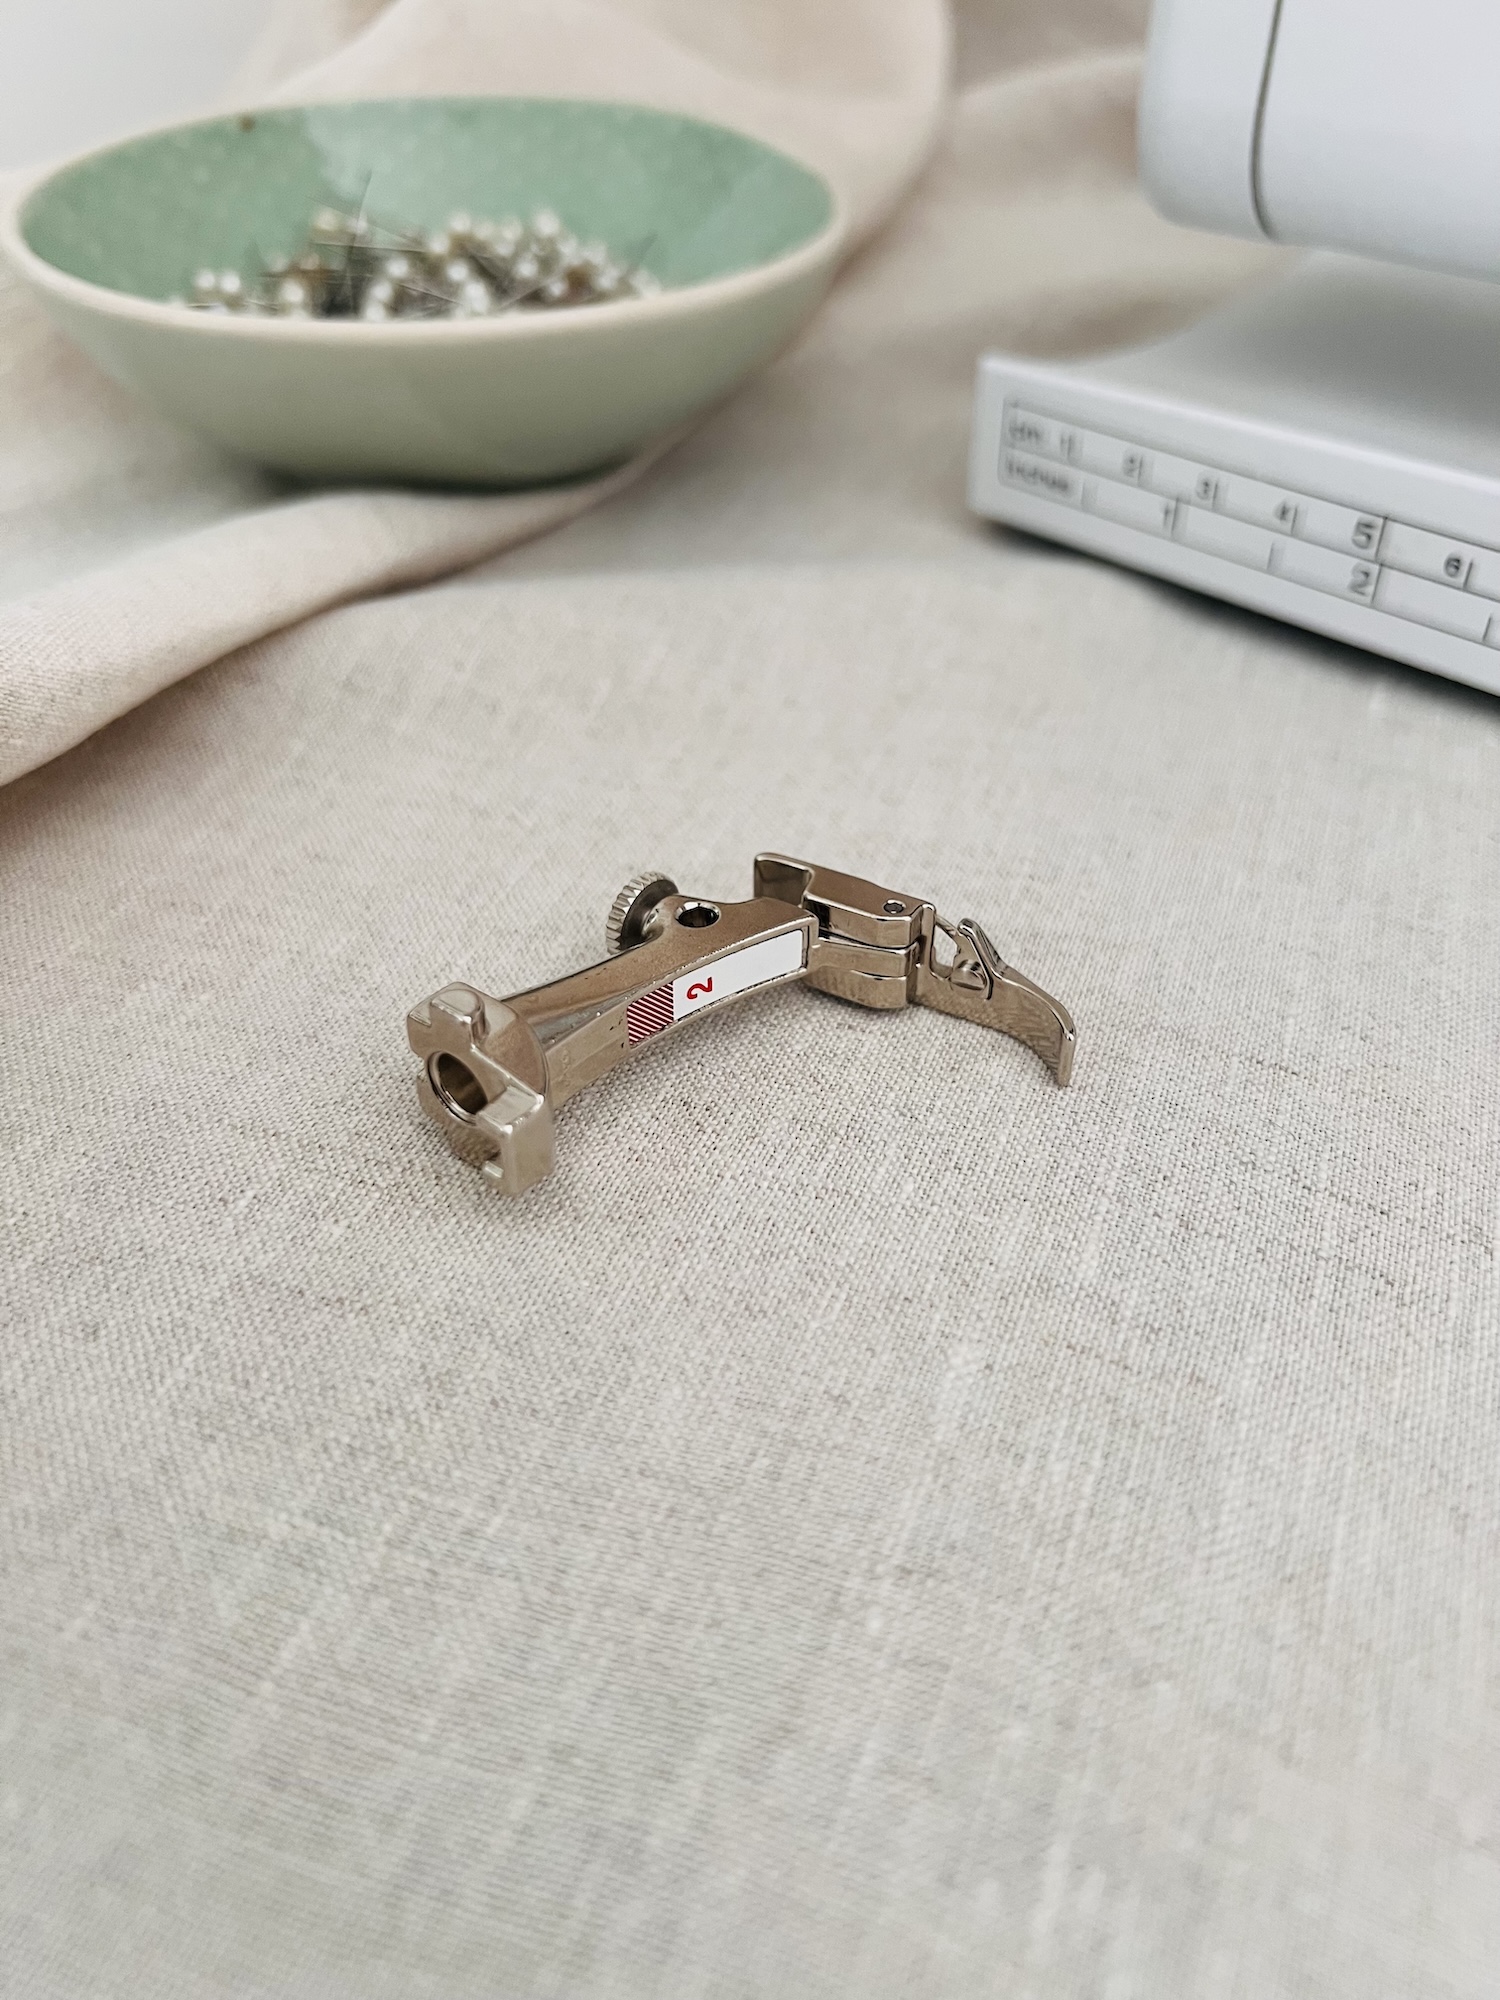
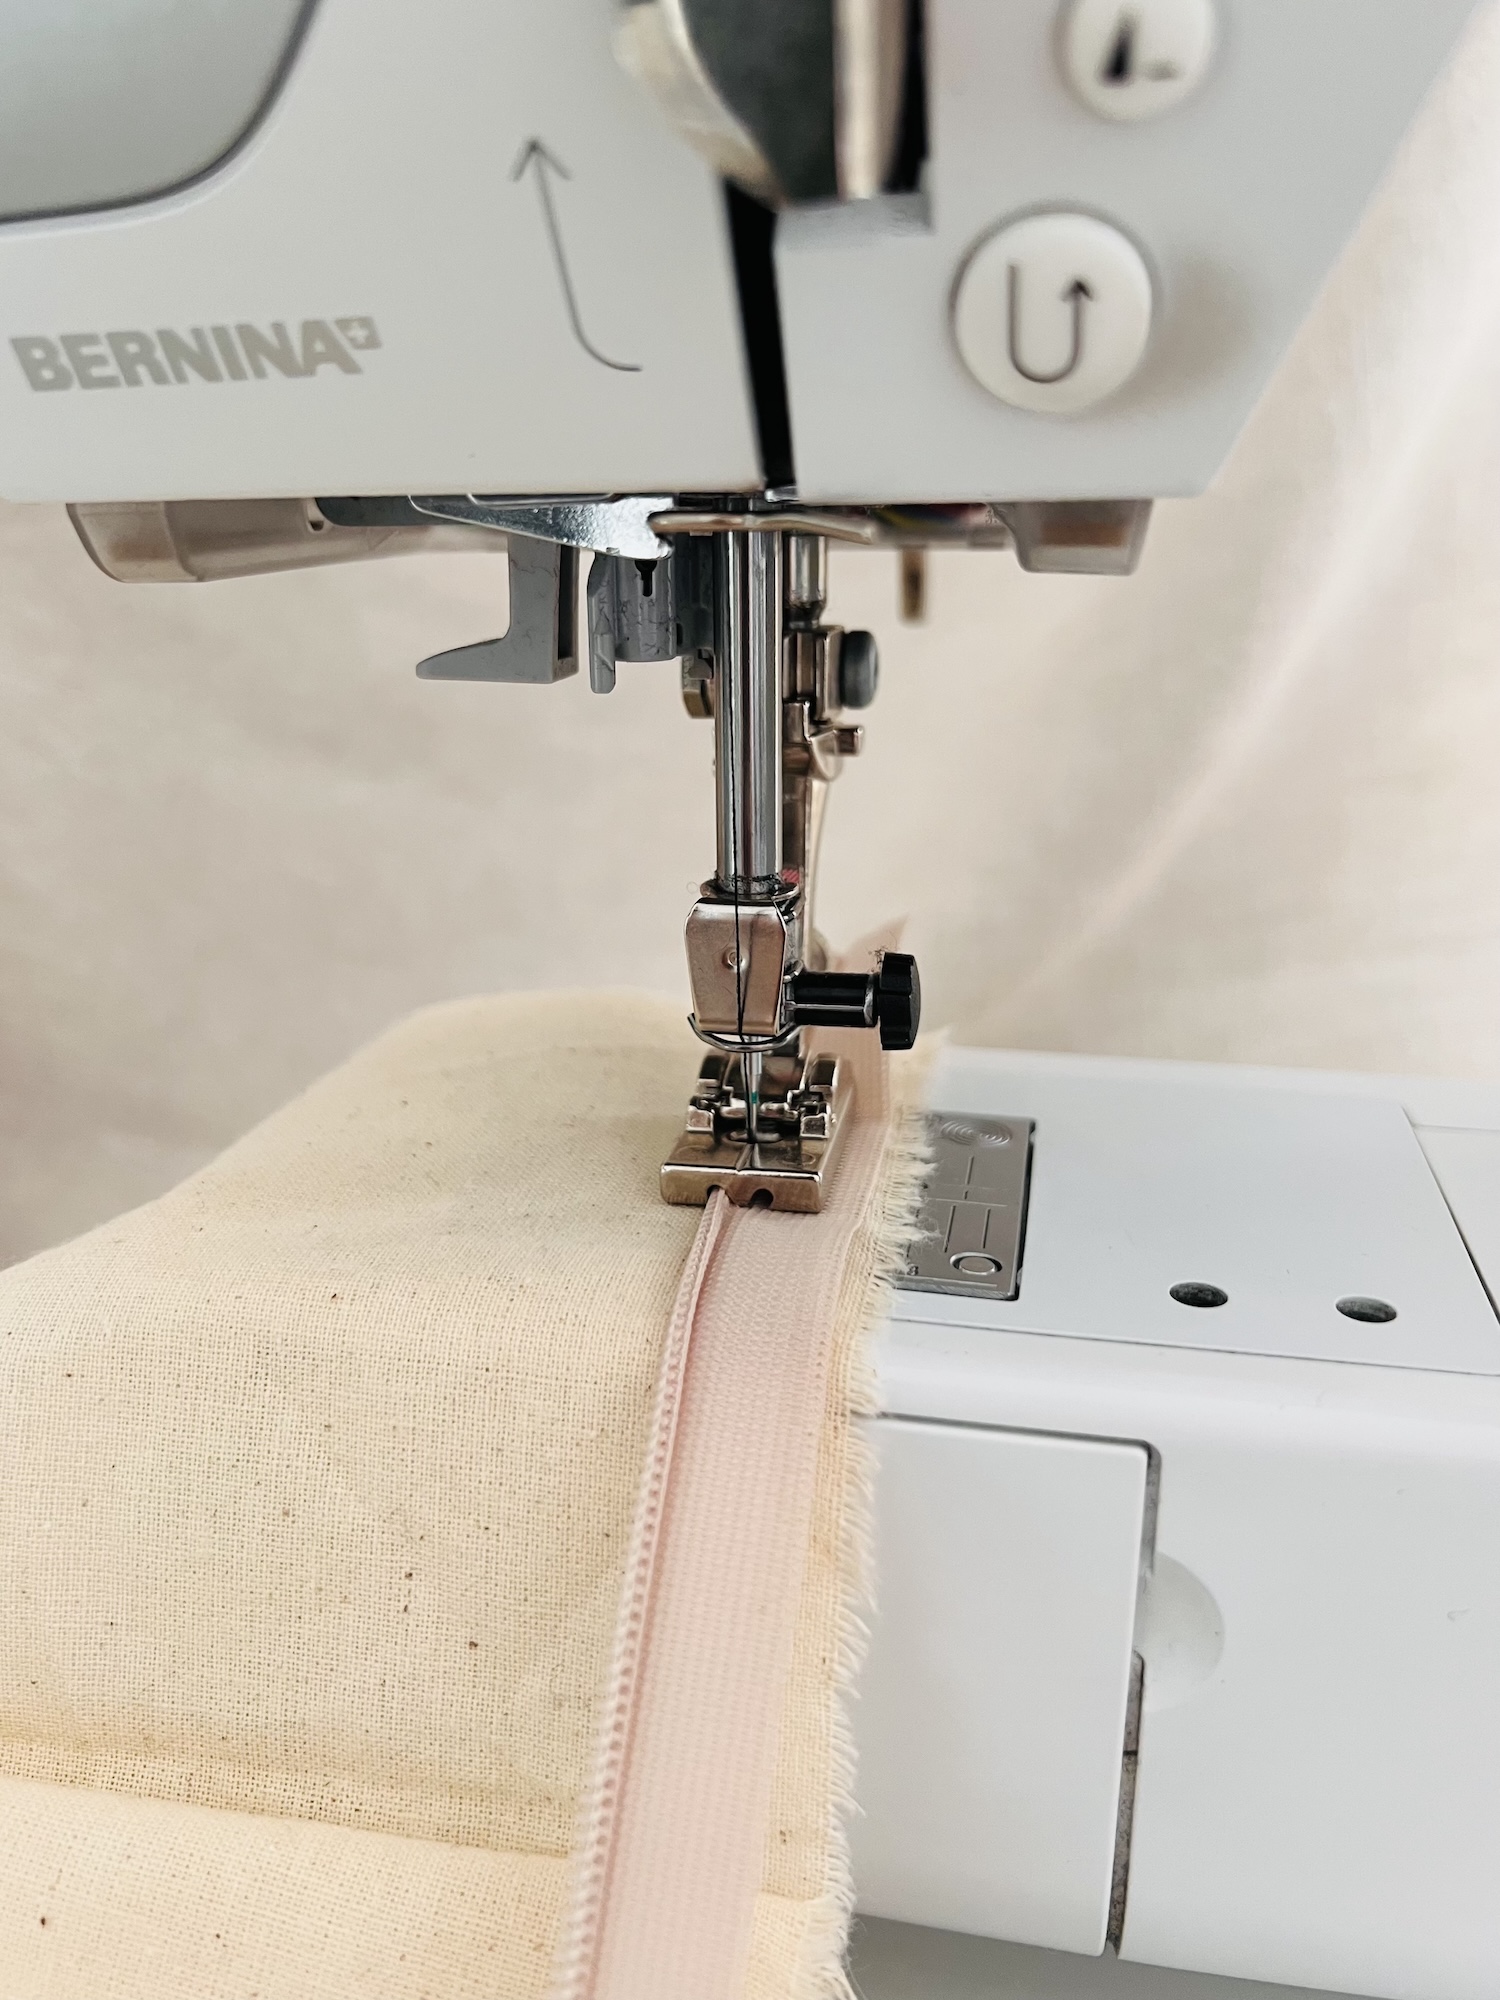
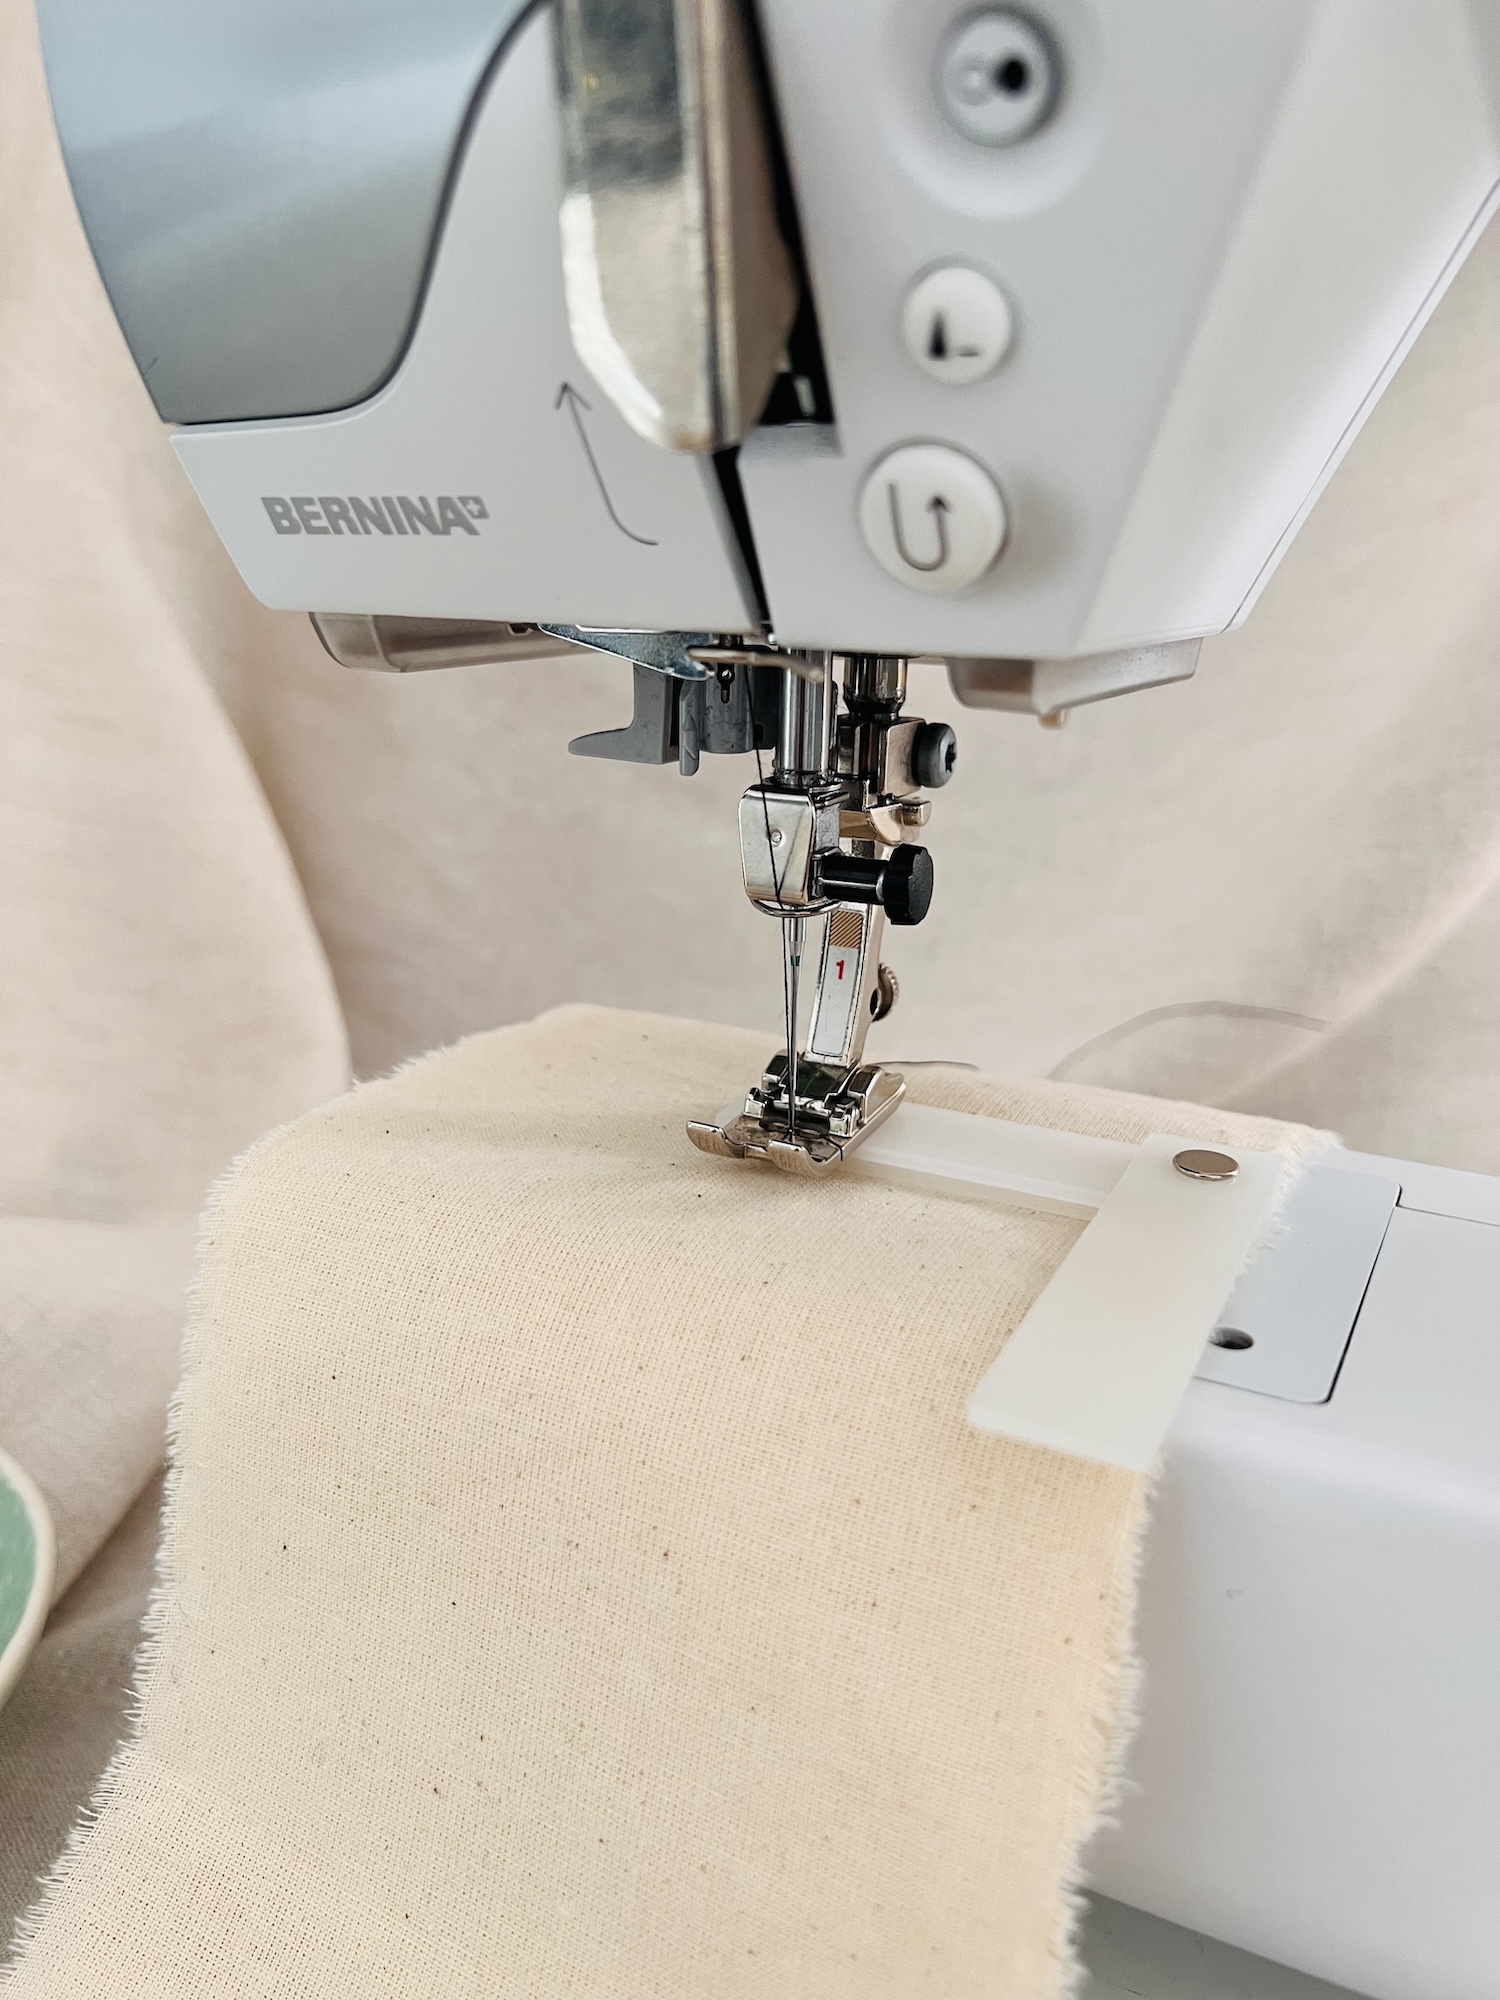
4. Zipper Foot – (Bernina Foot #4)
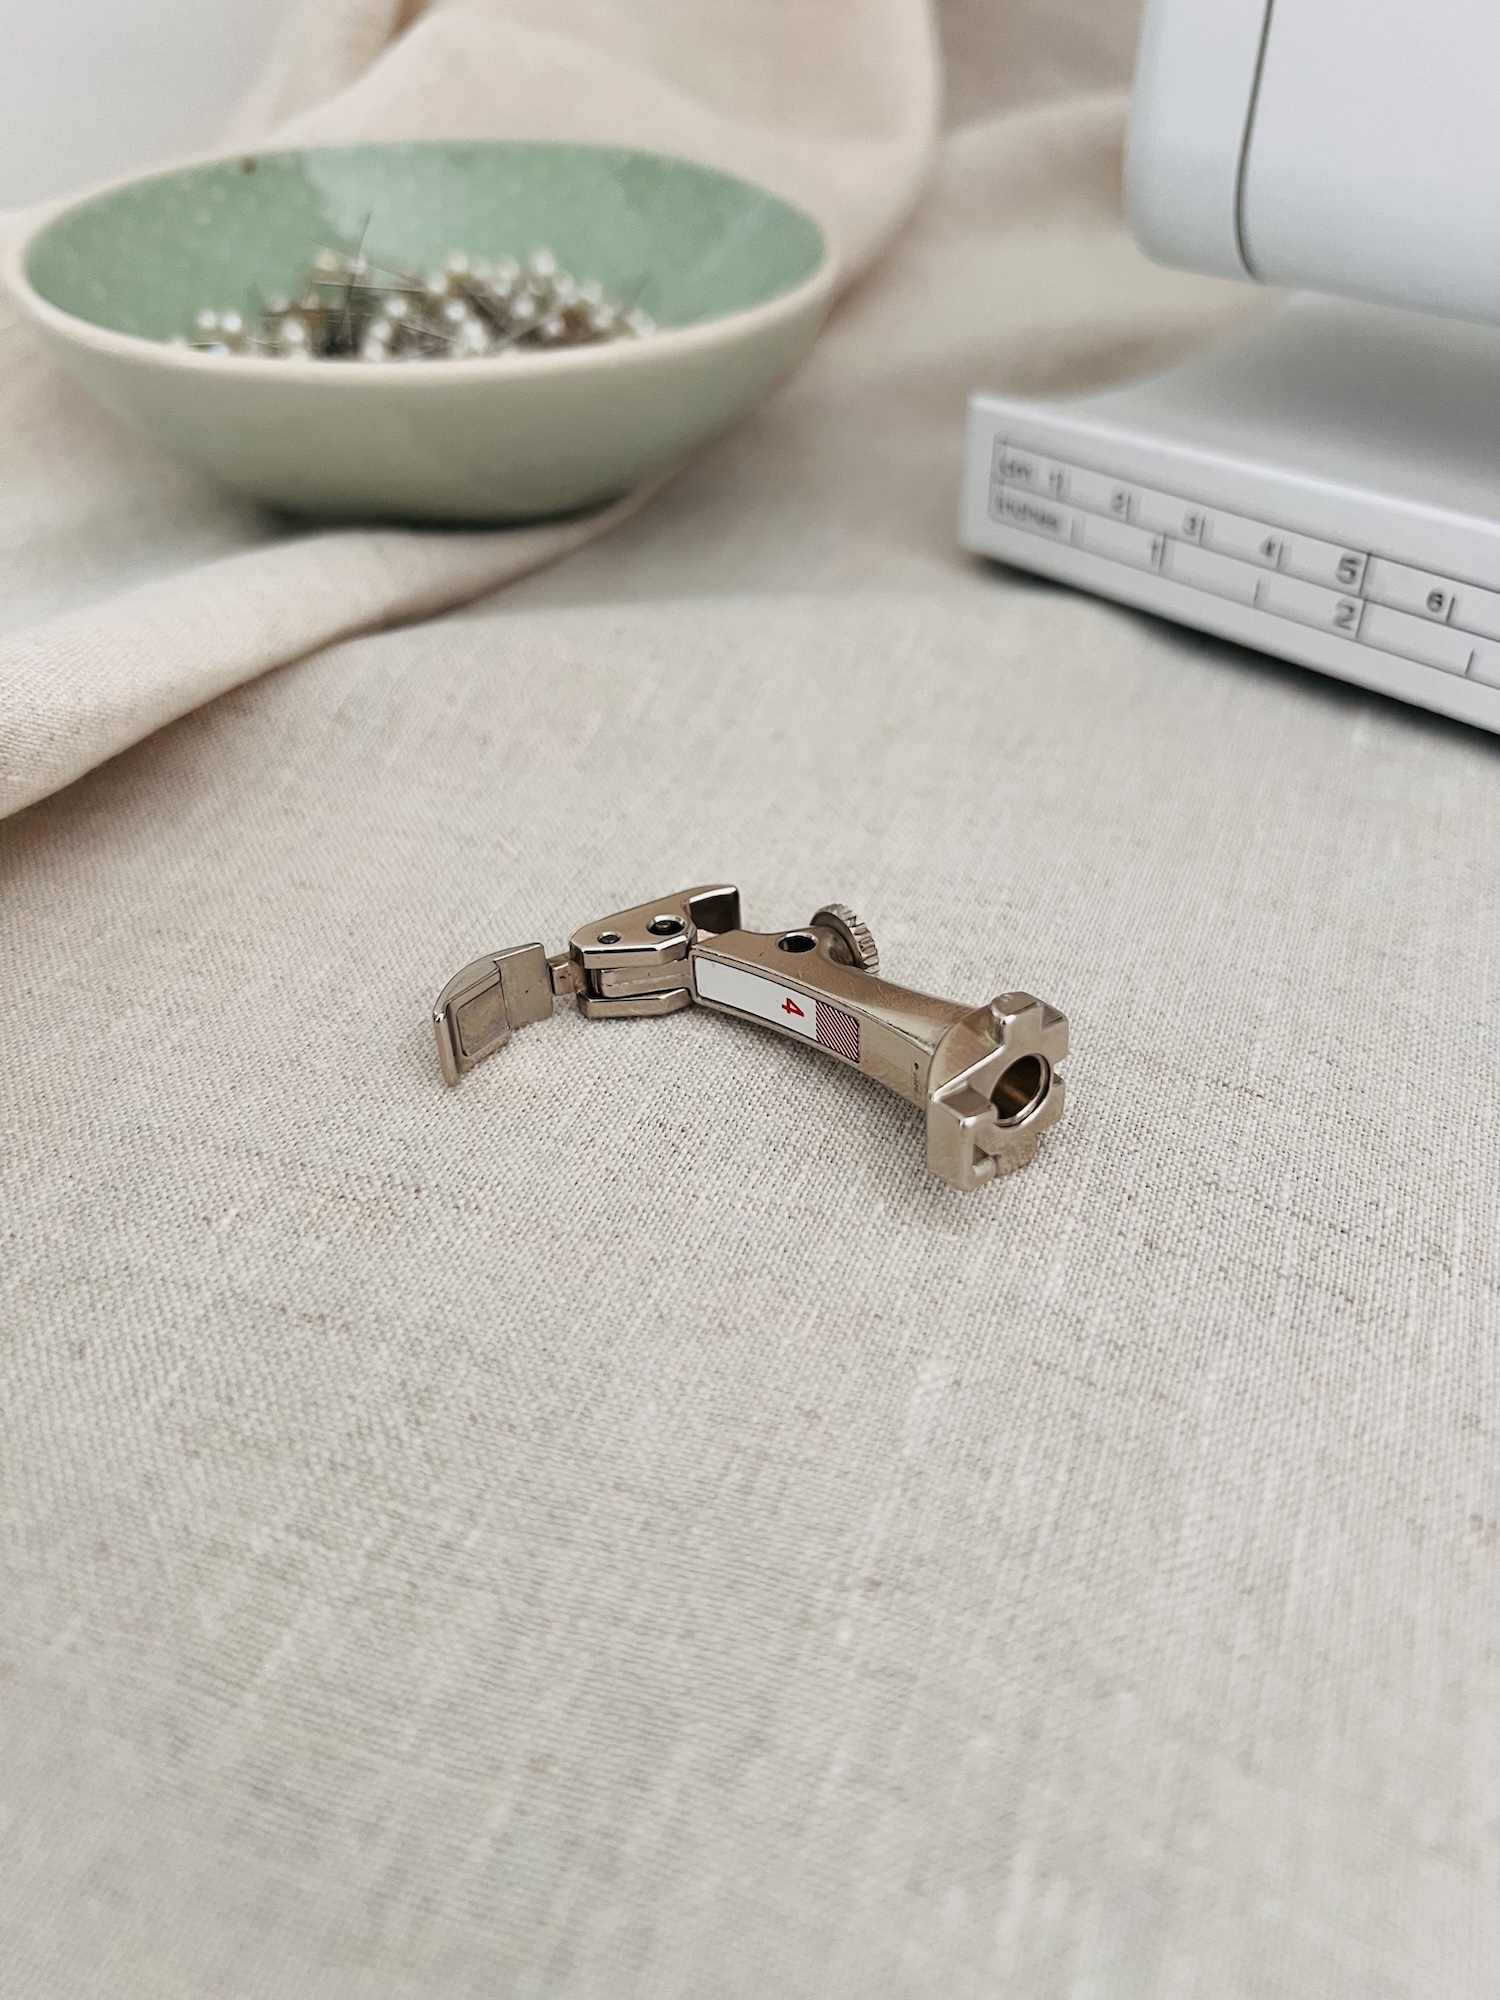
The Zipper Foot (Bernina Foot #4) is designed to help you insert regular plastic or metal-teethed zippers (like a fly zipper) neatly and easily. The foots narrow sole allows you to stitch really close to the zipper teeth.
This foot is also great for topstitching close to a seam or edge, just simply move the needle to the left or right as needed.
The Zipper Foot is pretty simple in its design. It features a narrow, centrally positioned toe with needle openings on the left and right. By moving the needle to the far left or right you will be able to sew close to the zipper teeth.
How to use the zipper foot:
1. Pin or baste the zipper into place. If pinning, make sure the pin heads face you and the points face toward the machine needle. This makes them easier to remove as you sew.
2. Set your machine to a straight stitch with a stitch width of 0 and stitch length of 2–3 depending on your fabric.
3. Adjust the needle position to the left or right, whichever brings the needle closest to the zipper teeth.
4. Sew the first side, starting at the bottom of the zipper. After stitching about 5 cm, leave the needle down in the fabric, raise the presser foot, and gently slide the zipper slider behind the presser foot. Lower the foot and continue sewing to the top.
5. Repeat for the second side, making sure to sew in the same direction as the first (i.e. bottom to top). This simply helps prevent the zipper tape from pulling unevenly.

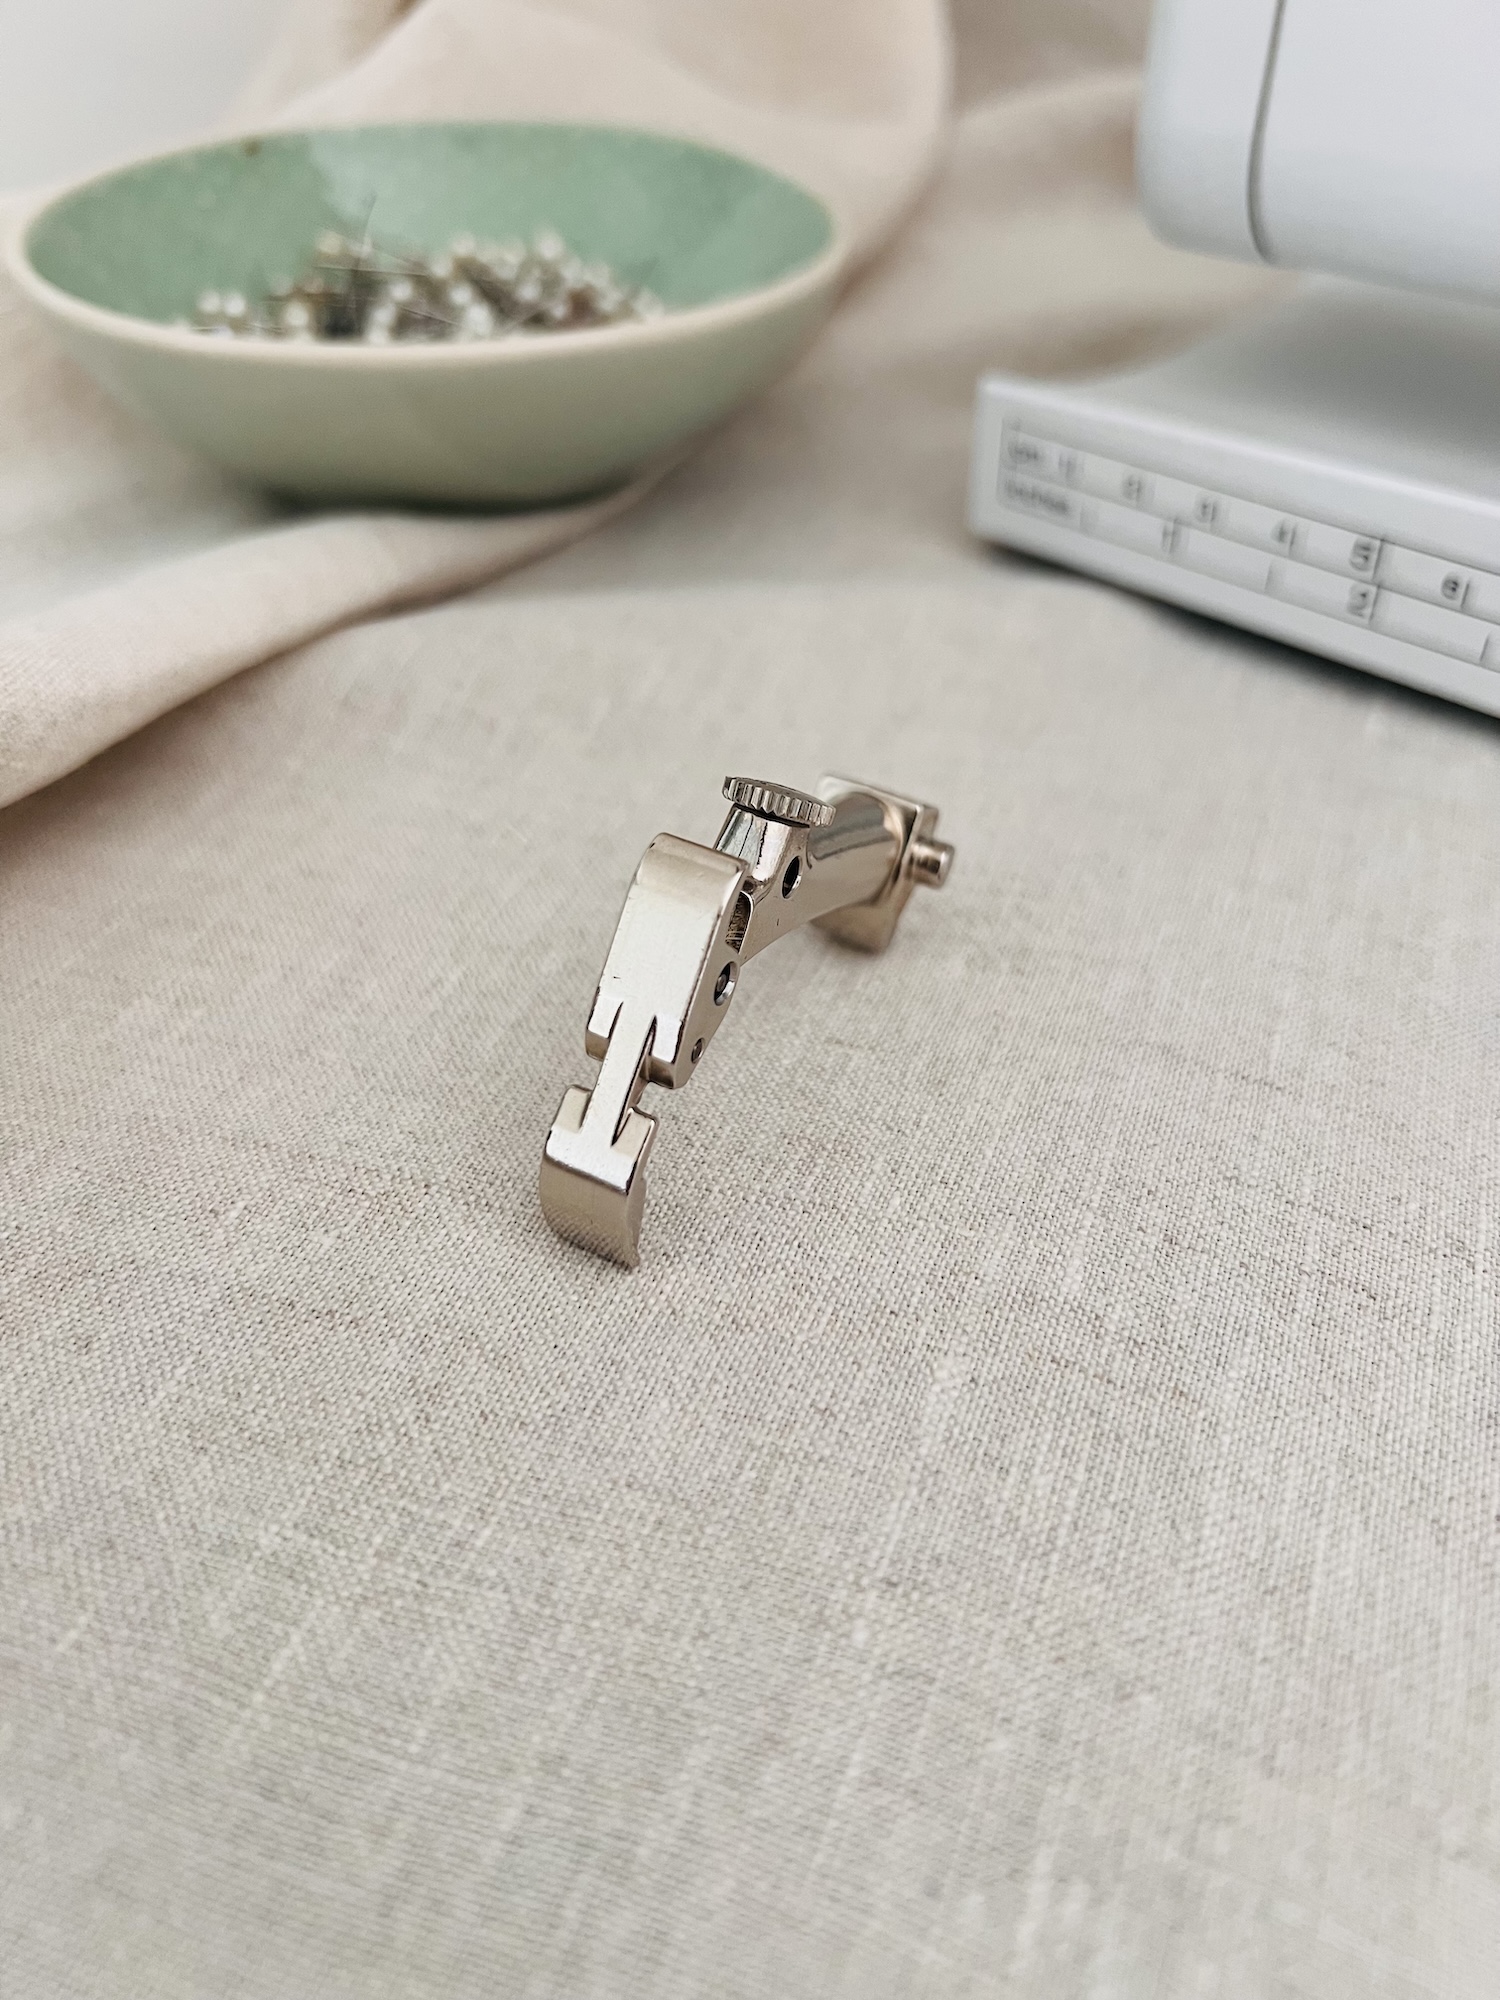
5. Blind-stitch Foot (Bernina Foot #5)
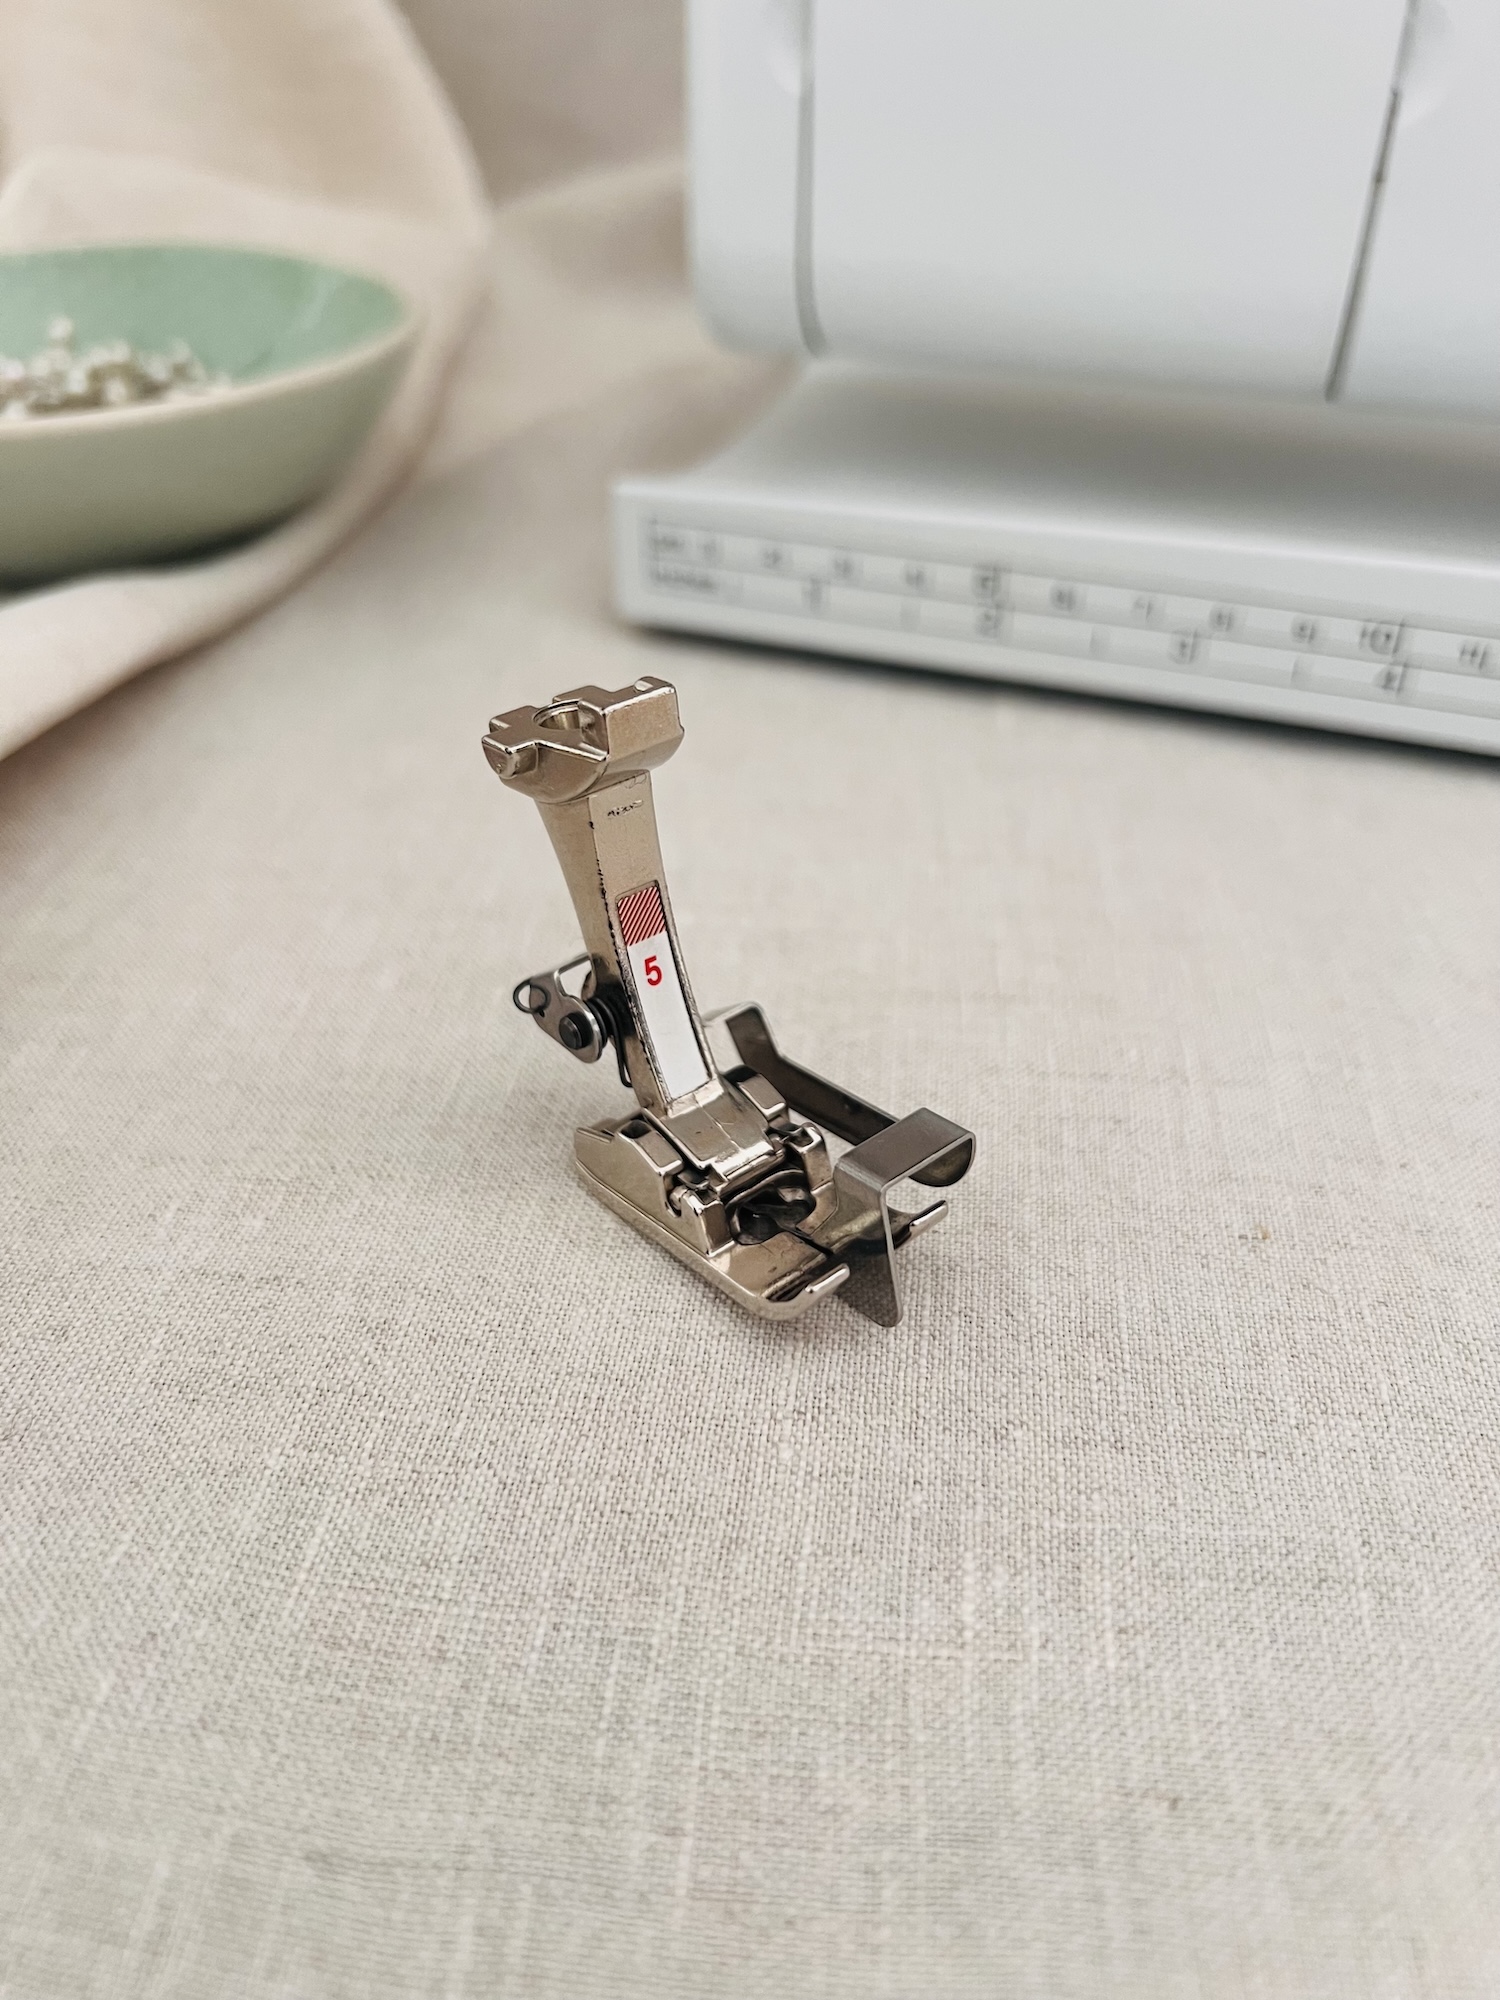
The Blind-stitch Foot, or Bernina Foot #5, is designed to create nearly invisible stitching. When sewing the needle catches just a tiny amount of the fabric, making the stitch barely visible from the right side. Therefore, this foot is perfect for hemming garments where you want a clean, more invisible finish.
In addition to blind hems, this foot is also works with topstitching and edgestitching. Simply align the central guide blade in the groove of a seam or along a fabric edge, and adjust the needle position accordingly to achieve an even row of stitching.
The Blind-Stitch Foot on closer inspection looks a bit like the Reverse Pattern Foot. What sets this foot apart is the distinctive central guide blade that extends from the back of the shank, along the right side, up and over the right toe, and through the centre of the foot. This guide blade serves a couple of functions:
- It helps the hem lie flat as the stitch forms over the blade, creating a slightly looser stitch.
- It maintains a consistent distance from the fabric edge, resulting in a neat, even hem.
How to sew a blind hem with the Blind-stitch Foot:
1. Finish the raw edge of your fabric with either an overlocker or a zig zag stitch.
2. Fold and press the hem in place as you normally would for a standard single fold hem.
3. Fold this hem allowance back on itself. This will create three layers of fabric, and the finished edge will stick out slightly to the side. Essentially, the wrong side of the fabric will be facing you, the folded hem allowance will be in the middle, and the finished edge will be to the side.
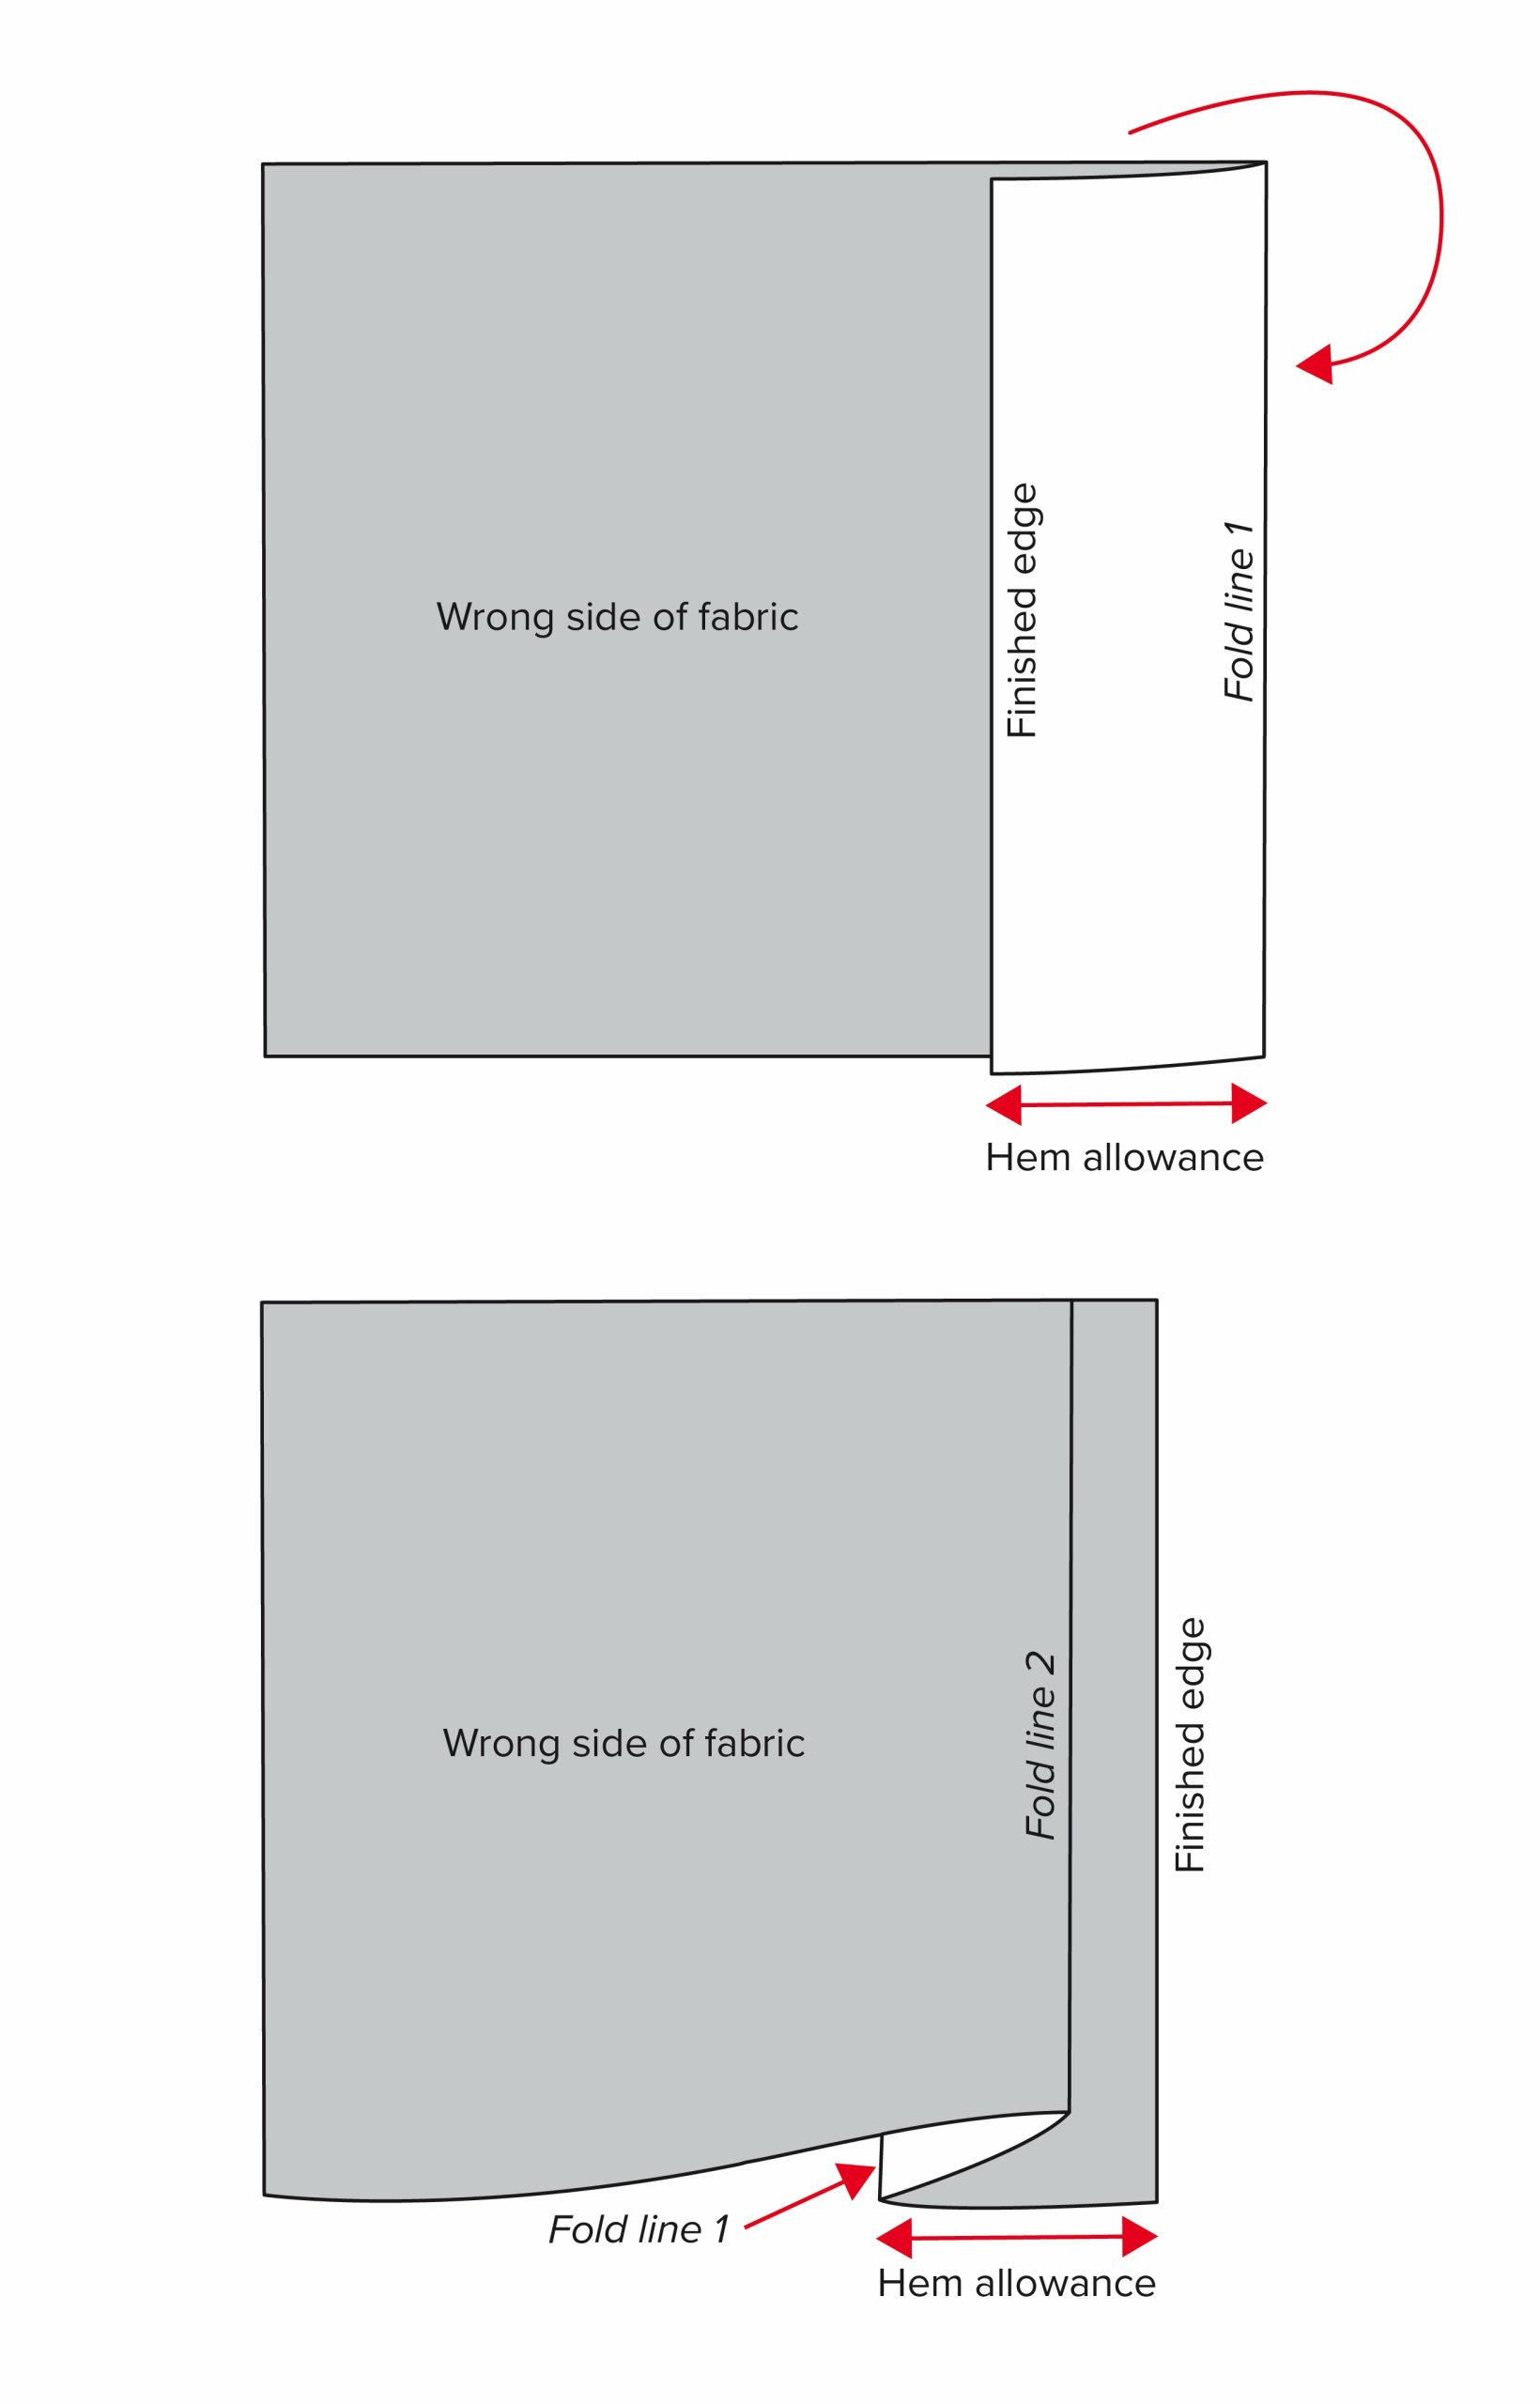 4. Select the blind-stitch setting on your machine. This should automatically set the stitch width, length and needle position.
4. Ensure the feed dogs are engaged (up).
5. Place the fabric under the presser foot, aligning the fold line 2 with the metal guide blade on the foot.
6. Sew slowly and guide the fabric evenly along the metal guide. The needle should just catch the edge of the fold with every few stitches.
7. After sewing 10 cm or so, take a minute to check your stitching to ensure it is invisible from the front.

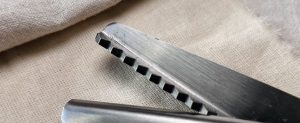
6. Invisible Zipper Foot (Bernina Foot #35)
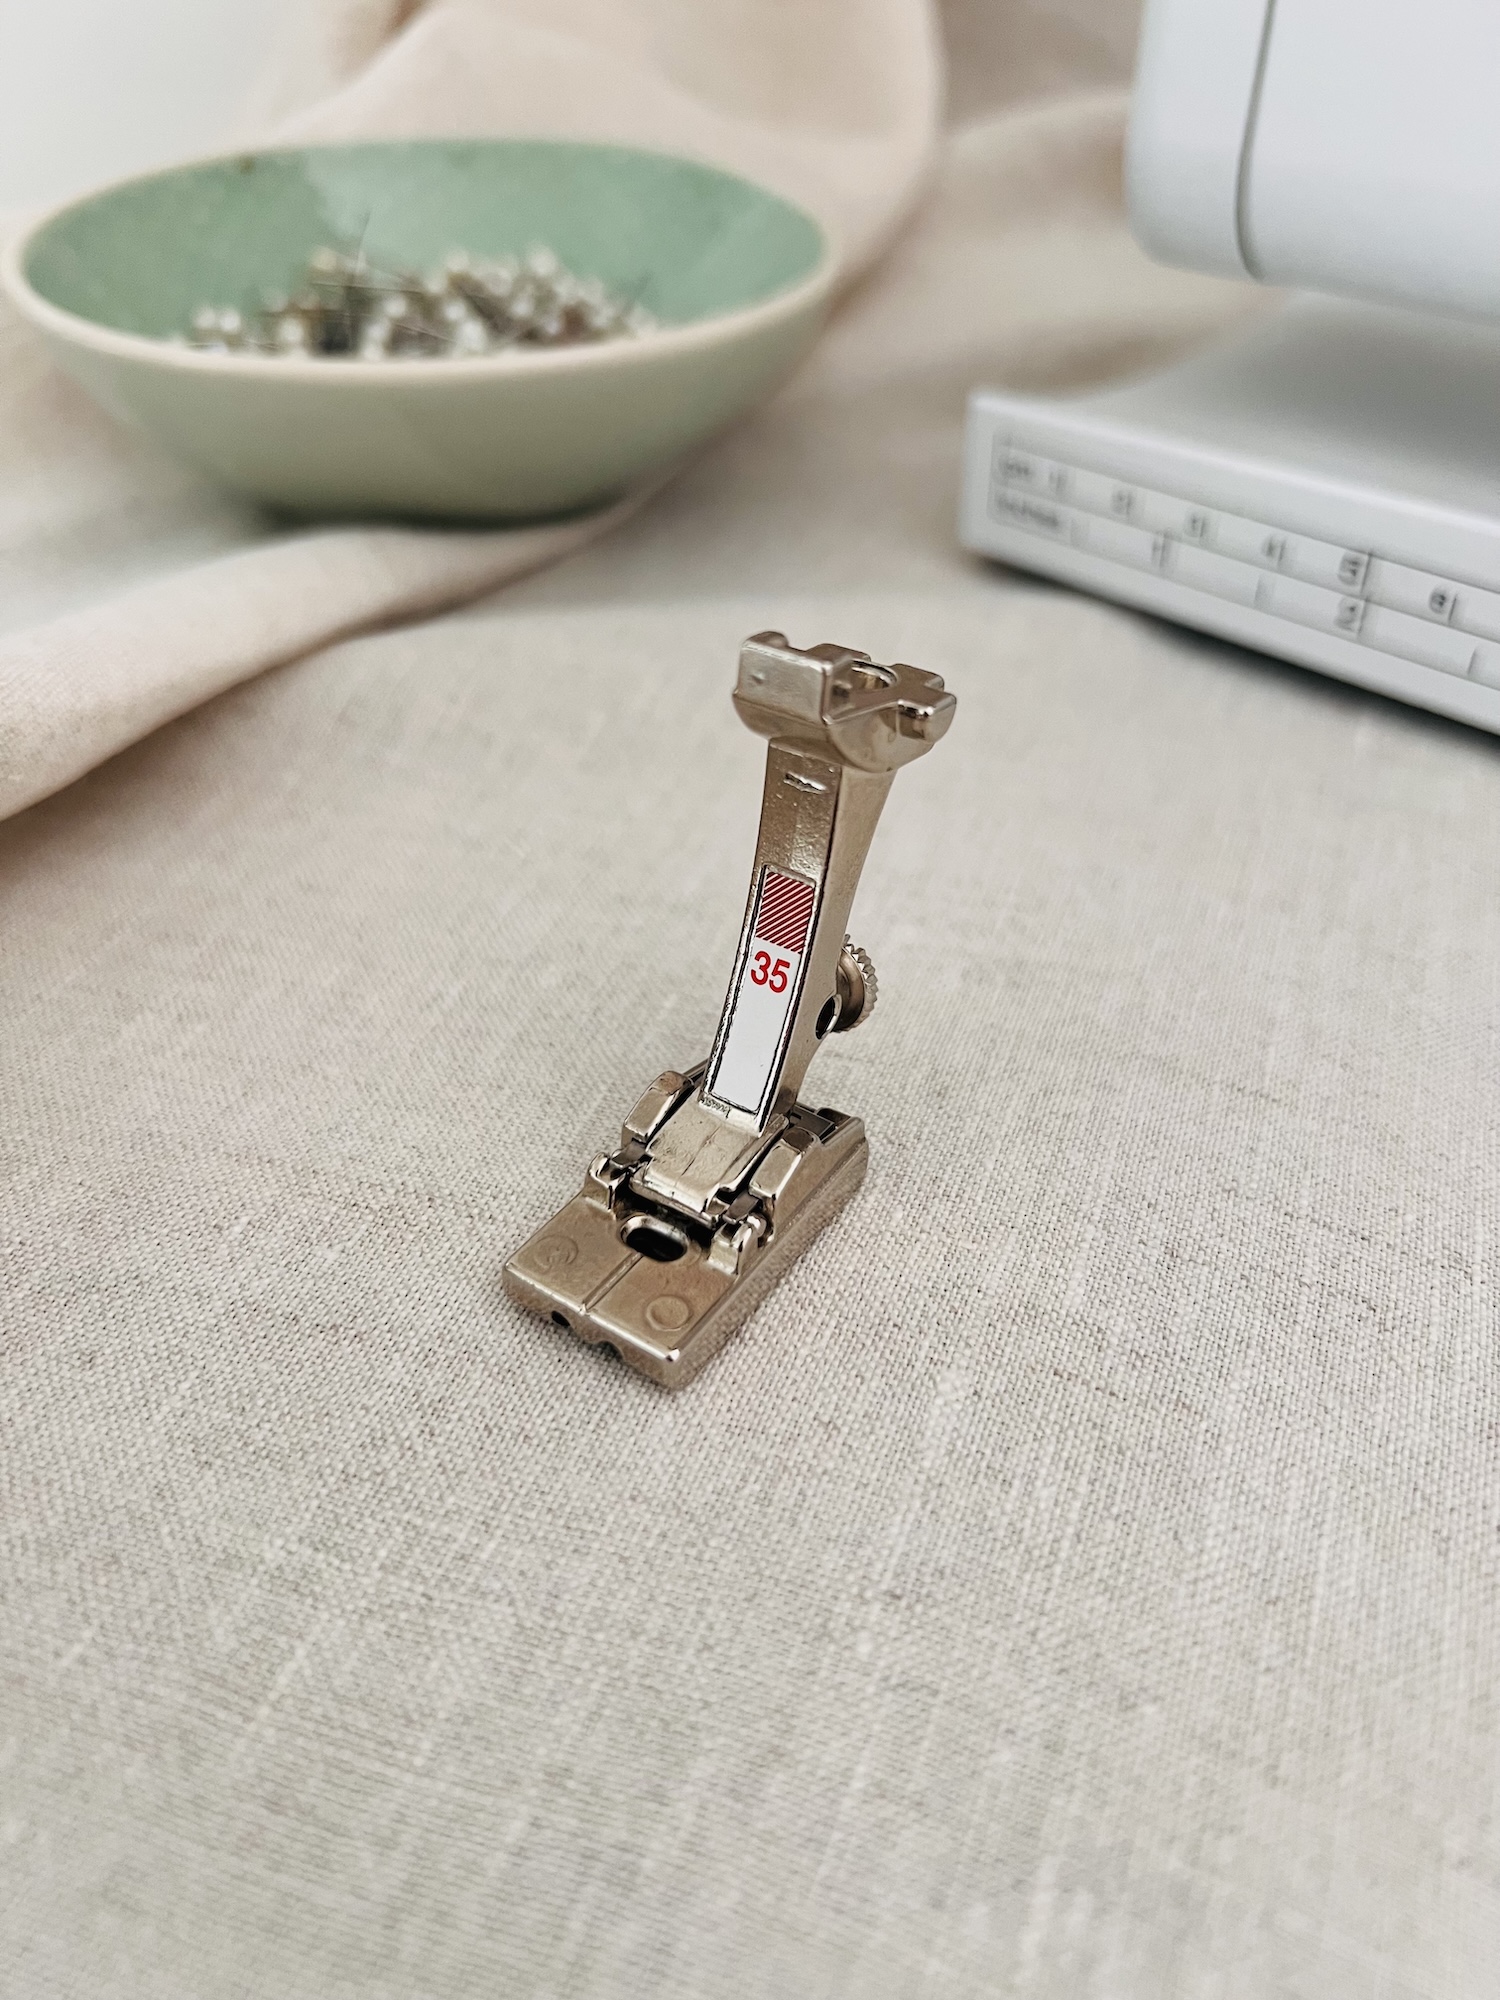
This was one type of closure I avoided when I first started sewing. But that all changed when I discovered the Invisible Zipper Foot, specifically Bernina Foot #35. Since then, invisible zippers no longer intimidate me.
Invisible (or concealed) zippers are perfect when you want a clean, uninterrupted finish, without any visible stitching or zipper tape. They’re sewn directly into the seam, so when inserted correctly, the zipper teeth are completely hidden, only the pull tab is visible. They are best suited to light- to medium-weight fabrics.
When you look at the Invisible Zipper Foot, you’ll notice the following features:
- A thick, wide sole and small needle opening.
- A central vertical indentation on the top, which helps with visual alignment as you sew.
- Two deep grooves underneath the sole, specifically designed to accommodate the raised zipper teeth. These grooves roll the teeth out of the way, allowing the needle to stitch very closely without making contact.

How to use the Invisible Zipper Foot:
For how to prepare and sew your invisible zipper refer to the article ‘Sewing Glossary: How To Install An Invisible Zipper Tutorial’. While this article uses a slightly different presser foot, the same principles apply.
7. Walking Foot (Bernina Foot #50)

Normally, when you sew the fabric is fed through the machine by the feed dogs underneath, while the presser foot holds it in place from above. But with tricky fabrics, the top and bottom layers can shift out of sync, leading to puckering, stretching, or uneven stitches.
The Walking Foot (Bernina Foot #50) solves this by using its own set of “feed dogs” on the underside of the foot. These work in unison with the machine’s feed dogs to grip and move all layers evenly, resulting in smoother, more consistent stitching.
Let’s break down the elements of this pretty intimidating looking foot:
- Main walking foot attachment (1), which is the primary component that attaches to your machine. It moves in time with the machine’s feed dogs to help feed the fabric evenly.
- Three interchangeable soles:
- Standard sole (2) for general sewing tasks
- Quilting sole (3) which as an open front for better visibility of the needle and stitching
- Edge-stitching or stitch-in-the-ditch sole (4) that features a guide bar in front of the needle, helping you sew straight along seam lines with precision.
- Right and left seam guides (5), which can be screwed into the foot. These help you sew parallel lines with a consistent seam allowance—perfect for quilting or decorative stitching.

I won’t go into detail about how to use the walking foot as this has been covered in the article ‘What Is a Walking Foot and How to Use It’.
Handy Tools to Accompany Your Presser Feet:
Seam Guide:
This L-shaped metal bar attaches to the back of a presser foot. It helps maintain consistent and even seam allowances that exceed the guides on the stitch plate.
To use it, simply unscrew the screw at the back of the presser foot and insert the bar into the holes. Slide the bar to the desired seam width (measured from the needle). For example, if you’re sewing a 3cm seam, you want 3cm of the bar to protrude from the right side of the foot. Once it’s in the correct position, tighten the screw to secure it in place.
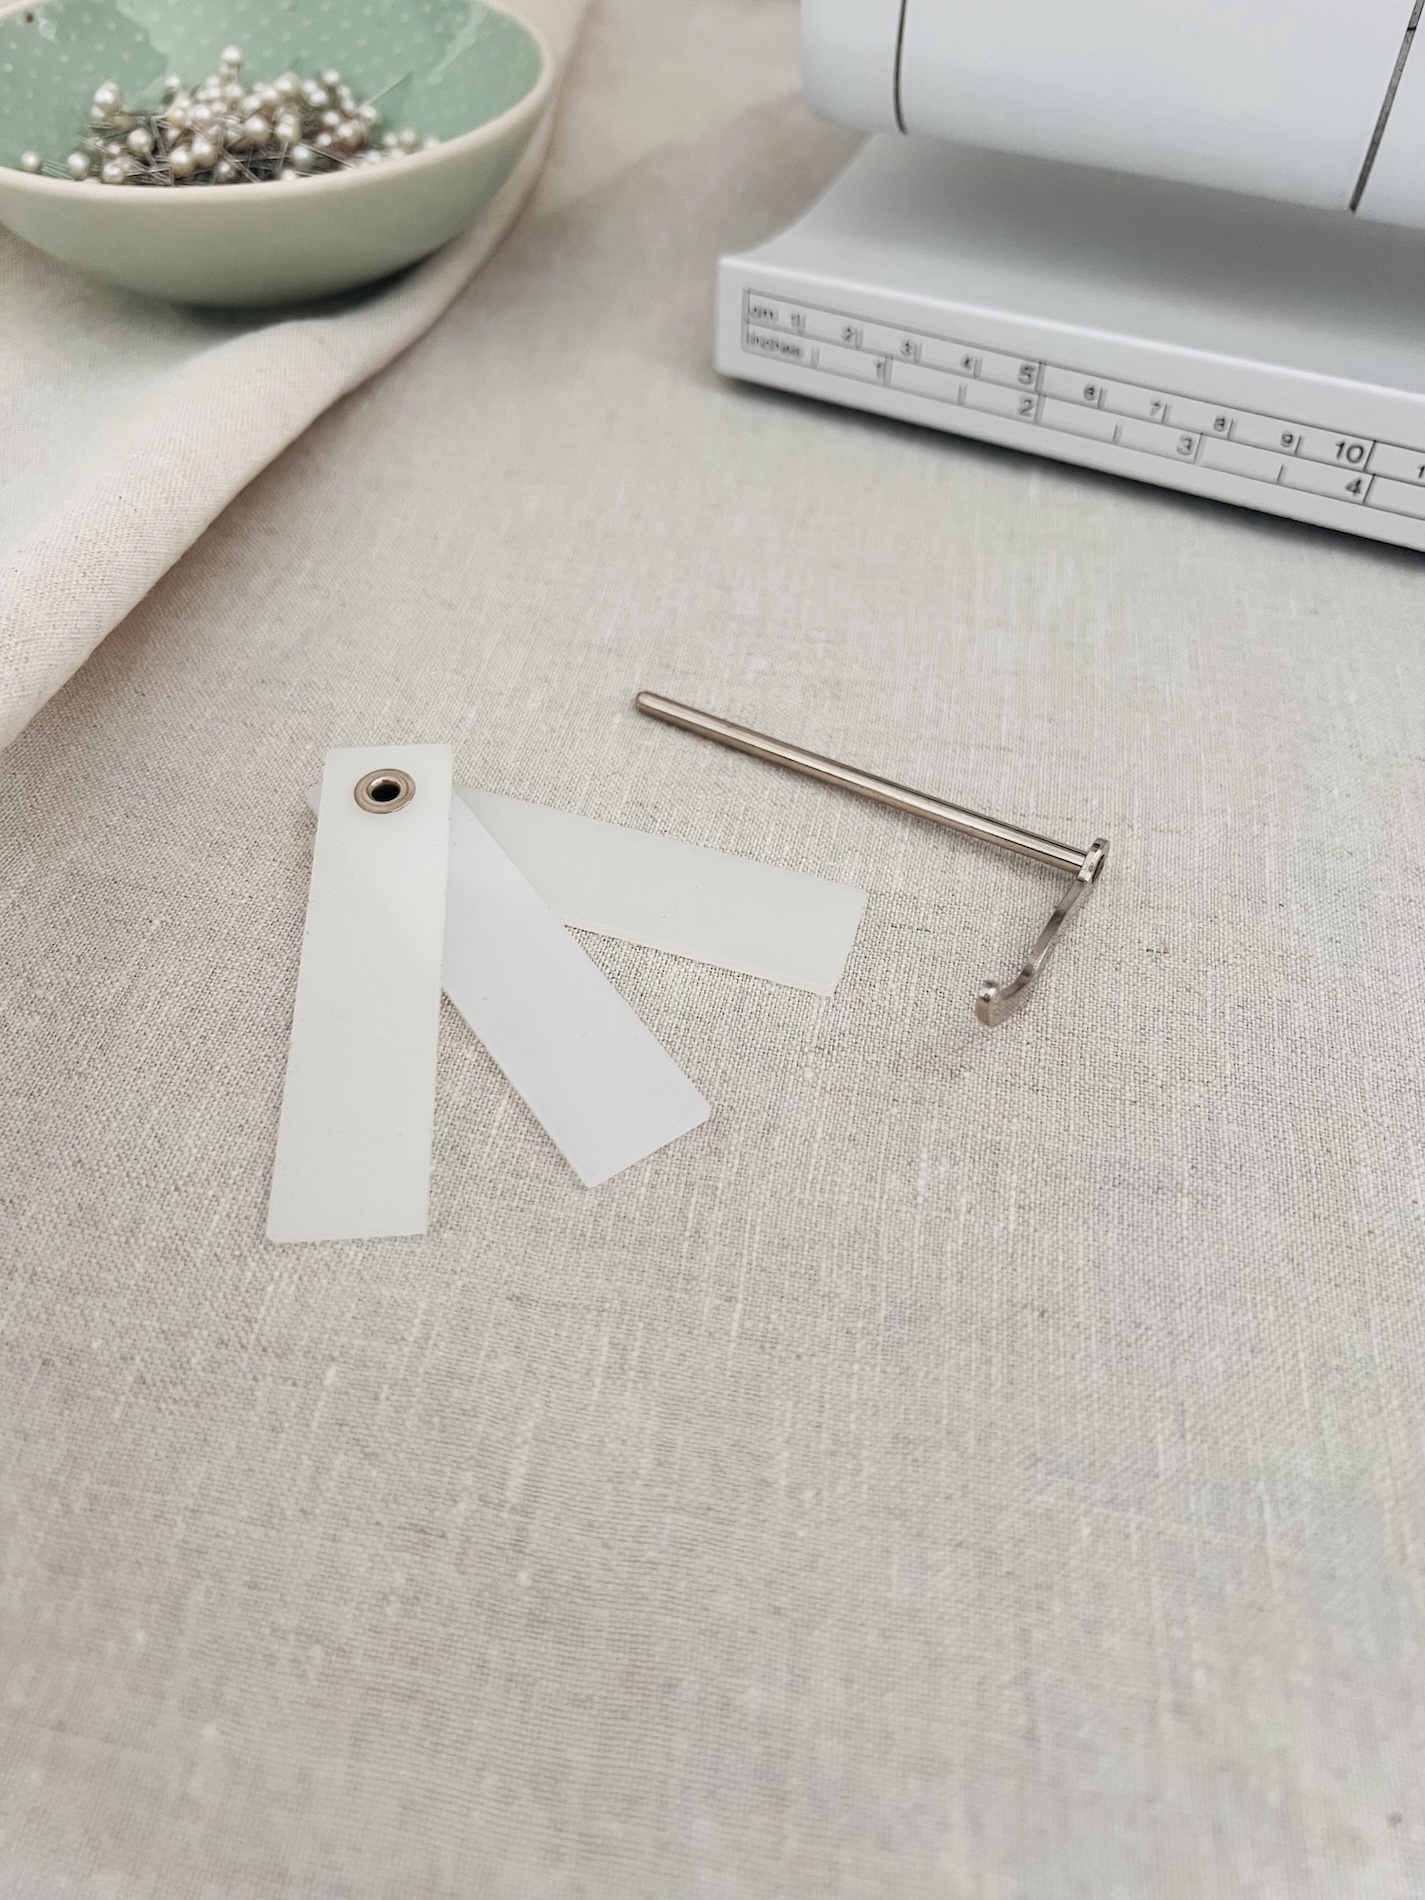
High compensation Tool:
The feed dogs can only work properly when the presser foot’s sole is level. When sewing between thick and thin layers (like at a crotch seam junction) the foot can sit at an angle, preventing the feed dogs from gripping and feeding the fabric smoothly.
There’s a simple fix. Simply insert 1, 2, or 3 compensation plates under the presser foot. Make sure the needle doesn’t hit the plates.
- To level the back of the foot place the plates behind the needle.
- To level the front or side of the foot place the plates under the side of the foot.
The goal is to lift the foot so it’s sitting flat and even, allowing the feed dogs to work properly. Once the foot is level and the stitching is past the uneven area, simply remove the plates and continue sewing.
As I mentioned at the start of this article, there are so many types of presser feet made for all kinds of sewing tasks. This guide has only skimmed the surface, but I hope it’s given you a solid foundation in the feet you’ll reach for most often in your everyday sewing. With these basics, you’ll hopefully be able to tackle the most common techniques.
About Author
Emma Cartmel
Heya! I’m Emma, and I'm an Aussie living in beautiful Munich with my husband Ben, and our pug Harley. I am a designer, pattern maker, and sewist, and I share my expertise and experience through my ‘cartem.sewing’ page. You can follow me on Instagram @cartem.sewingRelated posts

How to Select and Use Interfacing: A Simple Guide
Iron-on or sew-in, woven or non-woven, lightweight or heavyweight. With so many different types, weaves, and weights to choose from, how do you know which interfacing is best for your project? In this article, I will explain the two main types of interfacing before diving into the differences in weave and weight. Hopefully by the…

Sewing Essentials: A Simple Method for Reversible Seams
There are so many ways to finish a seam, from good old overlocking to French seams and binding. I recently stumbled across another method that’s pretty nifty, and honestly, I kind of wish I had known about it sooner. It is a bit like binding, but topstitched in place so it doesn’t move or flap…

Sewing Essentials: Understanding Different Types of Sewing Elastic
Elastic is a really common notion used in sewing. You’ll find it on everything from waistbands to cuffs and necklines. It plays a crucial role in giving garments both support and shape. Have you ever had the waistband of your pants twist and never sit quite right? Or maybe you’ve noticed the leg opening of…
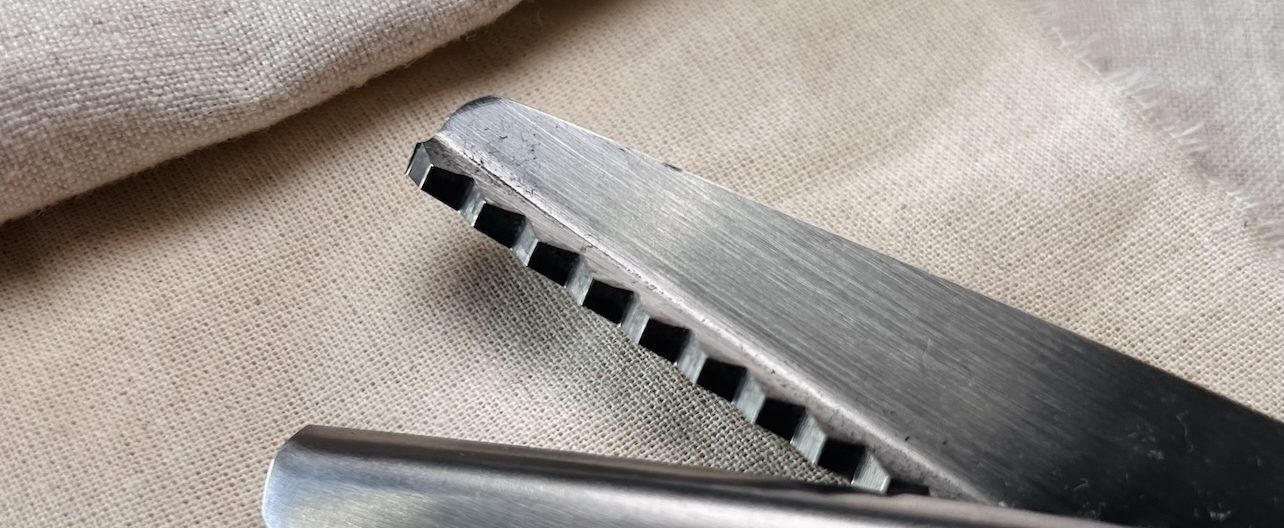
Sewing Essentials: A Guide to Sewing Scissors
Just like you’d use a bread knife for bread or a pizza cutter for pizza, sewing scissors are designed for different materials and tasks. From dressmaking shears and embroidery scissors to snips, pinking shears, and thread clippers, each one has its place in your sewing toolkit. There are plenty of brands to choose from too—Prym,…

An Introduction to Common Crotch Adjustments
Recently, I drafted a pattern and made a toile of a pair of drop-crotch pants. When I tried them on, I straight away noticed (and felt) they weren’t quite right. The most obvious issue was that the back crotch felt tight and pulled uncomfortably, especially when bending over. Walking also felt a little restricted, with…


SEW THIS LOOK


Latest Posts

Leave a comment