


Blending Between Sizes on a Sewing Pattern – Part 1: When to Blend
Let’s be honest—finding a sewing pattern that perfectly matches your measurements is pretty rare. And that makes sense! Every body is unique, fit preferences vary, and each pattern brand uses its own sizing system.
If you find yourself falling between sizes, you’re not alone. But the beauty of sewing is that in these situations, you can blend between sizes.
Blending between sizes is the process of combining parts of different sizes on a sewing pattern to better suit your body. This technique helps create a more customised and flattering fit, especially in key areas like the bust, waist, and hips.
As I was writing this tutorial, I realised there are really two parts to blending between sizes—the when and the how. Therefore, I have broken this tutorial into two parts. First, I will look at when blending between sizes might be a good approach. Then, in Part 2, I will walk you through how to do it with a few different examples.
Step 1: Take your body measurements
Start by taking your body measurements. These measurements are the foundation for choosing the right size. Even if you’ve measured yourself before, it’s always worth taking fresh measurements as our bodies change over time.
If you need some help taking your measurements, check out my earlier article How to Take Your Body Measurements: A Concise Guide.
Step 2: Understanding the pattern sizing and fit
Get to know the pattern, and take into account the following:
1. Body measurement chart: Each column in this chart corresponds to a pattern size, and the numbers listed are the actual body measurements that size is intended to fit. You may find that your body spans multiple sizes, for example, a size 8 bust and a size 12 hips. Deciding whether to blend in these instances depends not only on this measurement but also on the following factors.
2. Finished garment measurements: These are the actual dimensions of the sewn garment including any ease. Ease is the difference between the finished measurements and your body measurements. There are two different types:
- Wearing ease: The minimum amount of room added to be comfortable and allow for movement.
- Design ease: Additional room added to achieve a specific style or shape.
The amounts of ease can vary from:
- Positive (larger finished garment measurement than body measurement) = extra room for movement or style.
- Negative (smaller finished garment measurement than body measurement) = tight fit with the fabric stretching over the body.
- Zero (the finished garment measurement and body measurement are the same) = closely fitted
If there’s enough ease to accommodate your body comfortably, you may not need to blend—even if your body spans multiple sizes.
3. Garment style and intended fit: The garment’s overall style plays a key role—relaxed or oversized designs often allow more flexibility, while fitted or semi-fitted styles benefit from more precise shaping and blending. If the pattern includes enough built-in ease to comfortably accommodate your body, you may not need to blend sizes—even if your measurements span multiple sizes.
Step 3: Determine if you are between sizes
To blend or not to blend? To answer this, I will go through how to assess your measurements, interpret ease, and consider a garment’s style.
A great way to see if you fall between sizes, and whether blending is the right approach, is to look at a few real examples. I’ve chosen three different dress patterns from the Fabric Store to show how bust, waist, and hip measurements can affect sizing.
These aren’t the only areas on a pattern where blending might be needed, but focusing on them will hopefully provide a good starting point for making informed decisions. You’ll find additional tips for other fit areas at the end of this piece.
Note: The measurements for these patterns are all in inches (“).
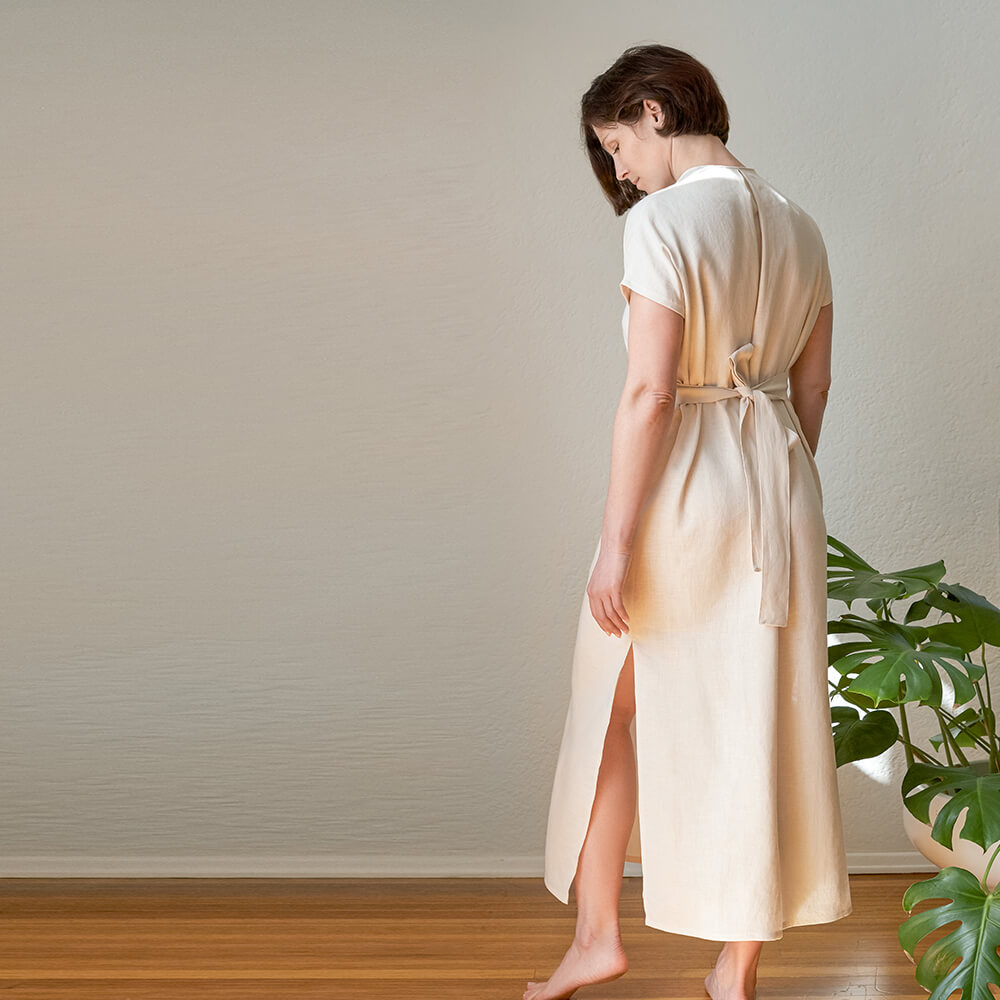
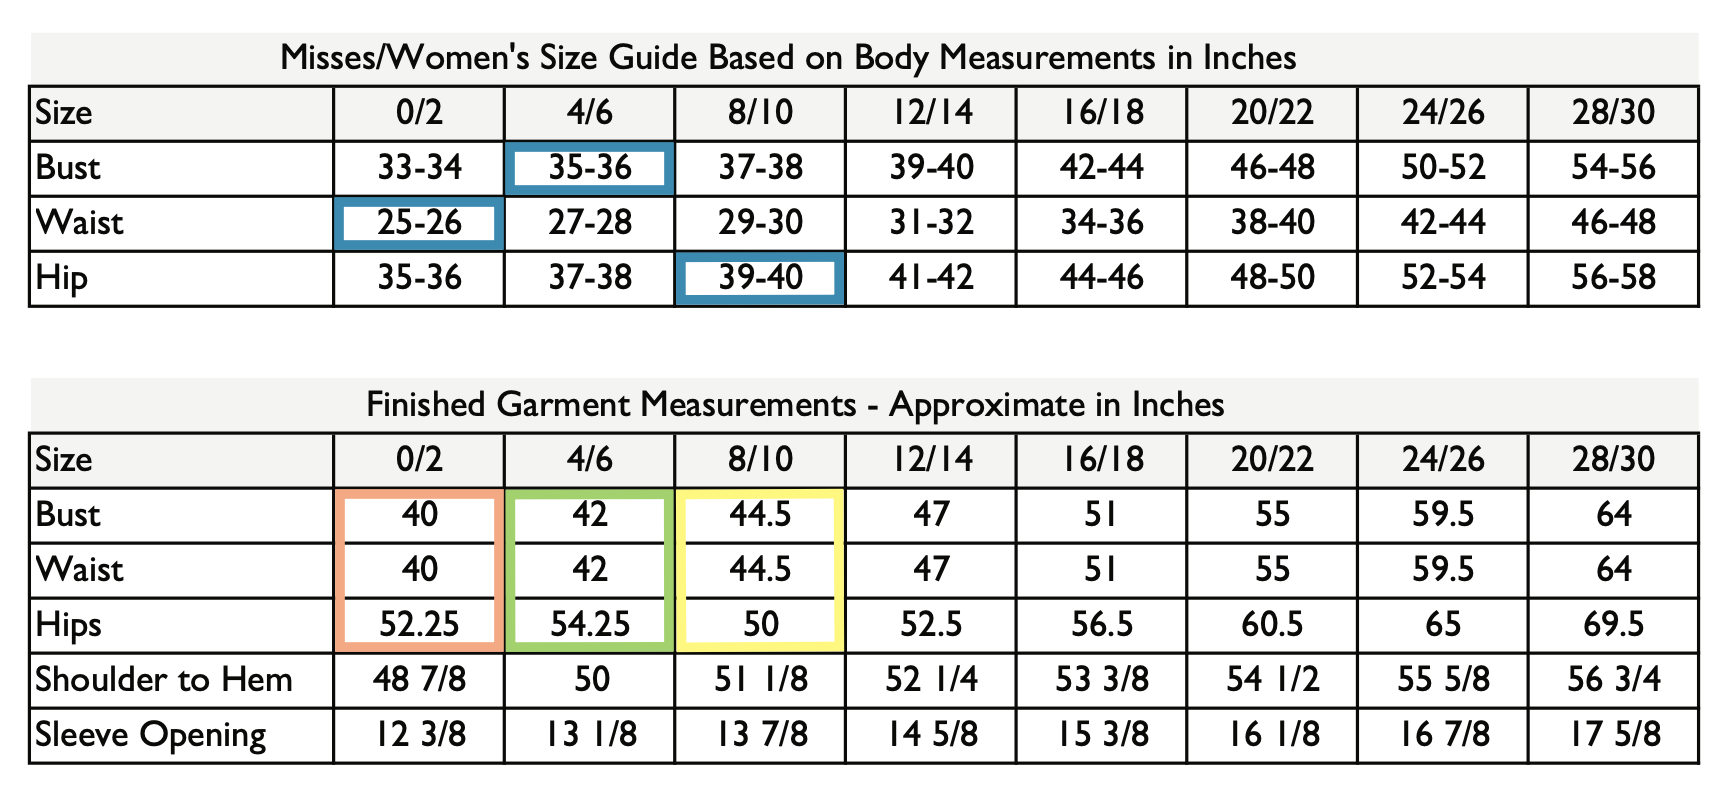
Example 1: The Aiko — Ombre Maxi Dress is a semi fitted, A-line maxi dress with moderate wearing and design ease.
Let’s pretend your measurements are:
- Bust: 40” (size 12/14)
- Waist: 31” (size 12/14)
- Hips: 46” (size 16/18)
You span two sizes (blue): 12/14 bust and waist, and 16/18 hips.
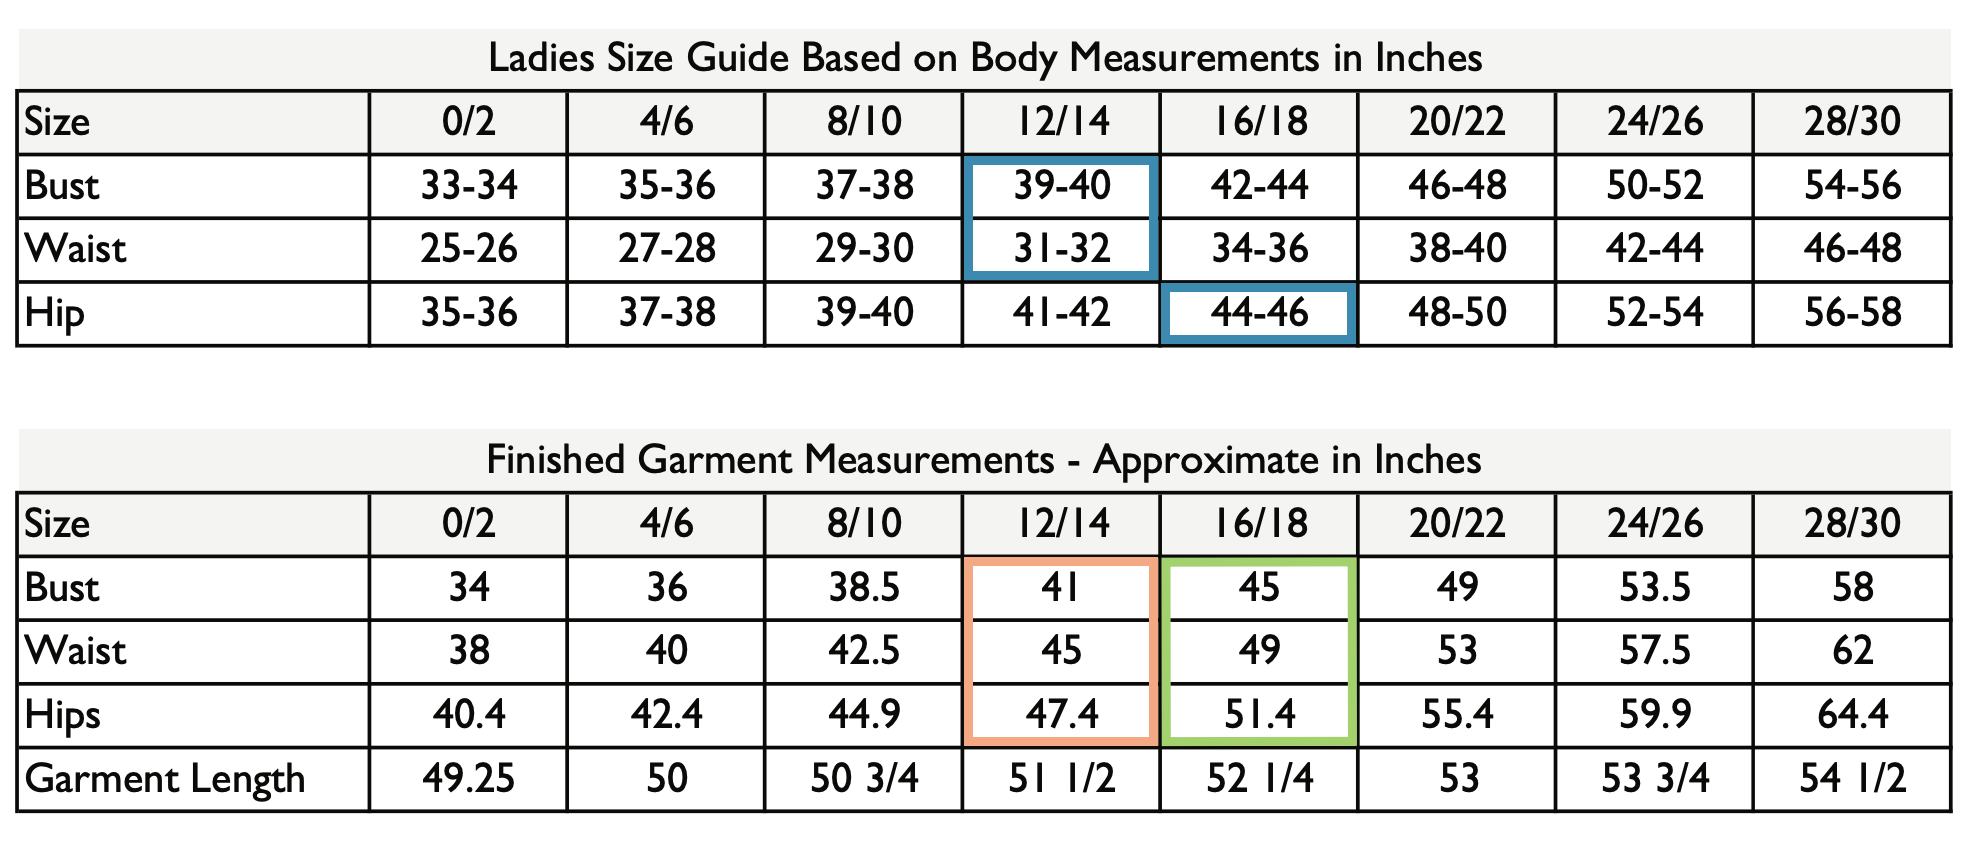
You typically have three options. To help decide which option is best, it’s useful to look at the ease (finished garment measurement minus your body measurement).
Option 1 (orange): Size 12/14 to fit the bust and waist.
- Bust: 41” – 40” = 1” ease
- Waist: 45” – 31” = 14” ease
- Hips: 47.4” – 46” = 1.4” ease
These amounts of ease work as intended at the bust and waist, but the fit will be quite snug at the hips. This could restrict your movement and alter the intended A-line shape (narrower at the top, widening toward the hem).
Option 2 (green): Size 16/18 to accommodate the hips.
- Bust: 45” – 40” = 5” ease
- Waist: 49” – 31” = 18” ease
- Hips: 51.4” – 46” = 5.4” ease
The fit will be looser than intended at the bust, which may affect the neckline and armholes. There will also be significant ease at the waist, potentially altering the silhouette, while the fit at the hips will remain as designed.
Option 3: Blend between the two sizes.
Since neither option 1 nor 2 quite nails the fit, in this instance I would recommend blending between sizes. That way, you can keep the intended fit through the bust and waist while maintaining extra room at the hips. This will preserve the overall A-line shape and ensure a comfortable fit.
Example 2: The Emma — Maxi Kaftan is a loose-fitting, pullover style with side slits. It’s designed with generous wearing and design ease for a relaxed, comfortable silhouette.
Let’s pretend you measure:
Bust: 36” (size 4/6)
Waist: 26” (size 0/2)
Hips: 39” (size 8/10)
You span three sizes (blue): 4/6 bust, 0/2 waist, and 8/10 hips.
You have four possible options. Let’s look at the ease for each one.
Option 1 (orange): Size 0/2 to fit the waist.
- Bust: 40” – 36” = 4” ease
- Waist: 40” – 26” = 14” ease
- Hips: 52.25” – 39” = 13.25” ease
Even though this size is chosen based on your smallest point (the waist), there is still possibly enough room at the bust and hips for a looser fitting design. This option would be a good one to toile first!
Option 2 (green): Size 4/6 to fit the bust.
- Bust: 42” – 36” = 6” ease
- Waist: 42” – 26″ = 16” ease
- Hips: 54.25” – 39” = 15.25” ease
This aligns with your bust measurement, and in loose-fitting garments like this, the bust fit tends to define the overall shape. You’ll still have a relaxed fit through the waist and plenty of room at the hips. This option should keep the intended shape and flow of the design without feeling oversized.
Option 3 (yellow): Larger size 8/10 to fit the hips.
- Bust: 44.5” – 36” = 8.5” ease
- Waist: 44.5” – 26” = 18.5” ease
- Hips: 50” – 39” = 11” ease
This accommodates the hips nicely, but it will feel quite oversized at the bust and waist. While that might be your preference for a super relaxed look, it could also result in the garment looking baggy, overwhelming the body.
Option 4: Blend between sizes
If you want to strike a balance—maintaining the intended shape without too much volume—blending is also a good option. For example, you might start with size 4/6 at the bust and waist, then blend to 8/10 at the hips. This approach keeps the kaftan flowing comfortably while preserving a balanced silhouette.
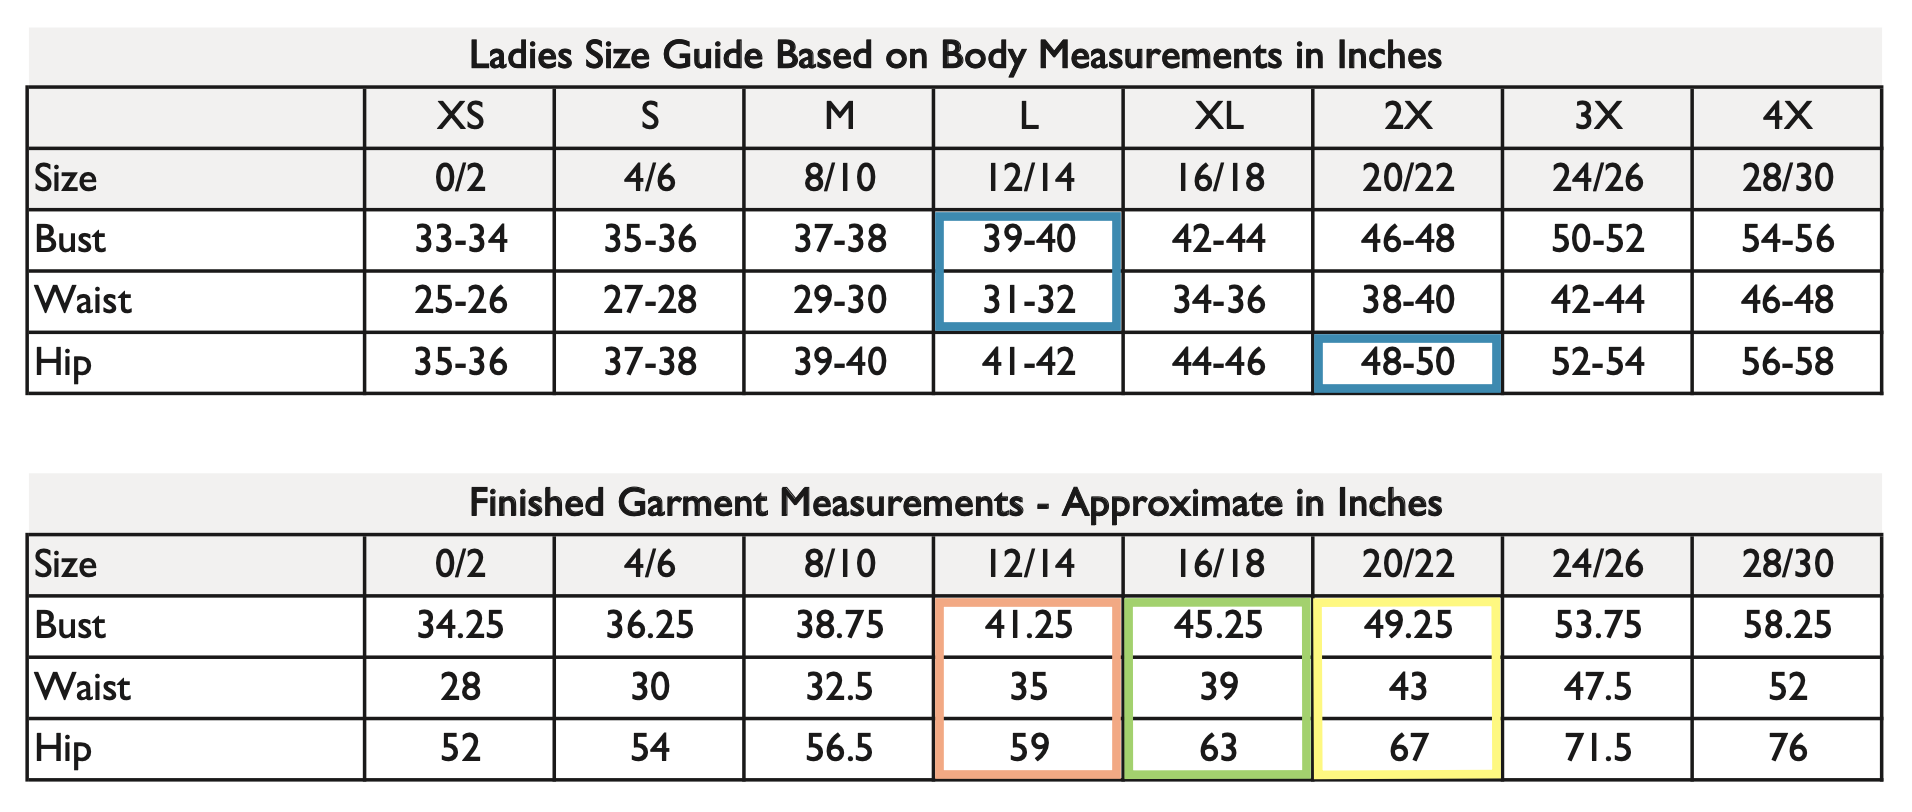
Example 3: The Luna — Camisole Sundress features a semi-fitted bodice and a gathered skirt.
Let’s pretend you measure:
Bust: 40” (size 12/14)
Waist: 32” (size 12/14)
Hips: 48” (size 20/22)
You span two sizes (blue):12/14 bust and waist, and 20/22 at the hips.
Let’s look at four possible options. Again, let’s identify the ease for each option.
Option 1 (orange): Size 12/14 to fit the bust and waist.
- Bust: 41.25” – 40″ = 1.25”of ease
- Waist: 35” – 32” = 3” of ease
- Hips: 59” – 48” = 11” of ease
This is a good option for a semi-fitted bodice, as it maintains the intended fit at the bust and waist. The gathered skirt, starting at the waist, naturally accommodates the hips and allows for a flowing, non-restrictive fit.
Option 2 (green): Size 16/18 which falls between the two.
- Bust: 45.25” – 40″ = 5.25”of ease
- Waist: 39” – 32” = 7” of ease
- Hips: 63” – 48” = 15” of ease
The bodice of this style is intended to be semi-fitted. In this instance, there is quite a bit of ease at the bust and waist. This could result in the bodice hanging from the body, being much looser than intended. However, since this style is more forgiving at the hips, it would still work there, the skirt will just appear a little fuller.
Option 3 (yellow): Size 20/22 to accommodate your hips.
- Bust: 49.25” – 40” = 9.25″ of ease
- Waist: 43” – 32” = 11” of ease
- Hips: 67” – 48” = 19” of ease
In this instance, the bodice will be far too oversized at the bust and waist—it will almost appear to hang off the torso. The fit at the hips will remain as designed.
Option 4: Blend Between Sizes
While Option 1 could work, blending could be a stronger alternative. By using size 12/14 for the bodice and blending to size 20/22 for the hips, you preserve the semi-fitted silhouette of the upper body and an adequately full skirt.
Notes:
- A full bust adjustment may be needed when the bust is particularly smaller or larger than what the pattern is drafted for. Simply choosing a smaller or larger size could cause poor fit elsewhere. Check out the helpful tutorial ‘Sewing Glossary: Full Bust Adjustment‘ for a simple guide.
- If you are unsure about how much ease you want, take a measuring tape and wrap it around your body to match the finished garment measurement—kind of like placing a hula hoop around your body. This can help you visualise how roomy or fitted the garment will be before you even start sewing.
What about those measurements that aren’t included?
As I mentioned previously, the bust, waist and hips aren’t the only parts of a garment where blending might be necessary. But not all patterns provide detailed measurements for areas such as shoulder width, thigh circumference, or crotch depth. So, how do you know if blending is needed in these areas?
Here are some simple approaches:
1. Measure the actual pattern pieces: If the pattern doesn’t include all the finished measurements you need, you can measure them yourself.
- Lay the pattern pieces flat (don’t forget to exclude seam allowances).
- Measure the part of the pattern you’re curious about—e.g., the width of a sleeve, crotch curve depth, or shoulder seam width.
- Multiply by 2 if you’re only measuring one half (e.g., a centre front cut on the fold).
- Compare that number to your body measurement.
2. Think about your fit history: Maybe you have you consistently found sleeves tight? Pants that ride up? Necklines that gape? Use your past sewing (or ready-to-wear) experiences to anticipate where you might need more or less room.
3. When in doubt, test!: Make a toile (a test version) of the garment, or simply the area you’re concerned about. The goal is simply to test the fit before committing to your final fabric.
I hope this guide has helped you feel confident in recognising when blending between sizes is a good approach for your sewing patterns. Stay tuned for Part 2, where I’ll walk you through the blending process step-by-step.
About Author
Emma Cartmel
Heya! I’m Emma, and I'm an Aussie living in beautiful Munich with my husband Ben, and our pug Harley. I am a designer, pattern maker, and sewist, and I share my expertise and experience through my ‘cartem.sewing’ page. You can follow me on Instagram @cartem.sewingRelated posts
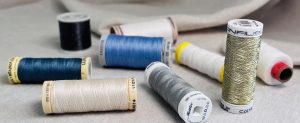
Sewing Essentials: A Guide to Sewing Threads
You might be thinking “Thread is thread… right?” Well, not always. Sewing thread is a key part of any sewing project. But just like fabric, the thread you choose matters, affecting things like the strength, appearance, and durability of your stitching. But if you have ever shopped for sewing thread, you probably know that it…

Sewing Essentials: Stitch Width, Stitch Length & Needle Position
Thinking back to my high school textiles days, I remember having to test stitch settings on every fabric we planned to use for our projects. We would cut out little squares of fabric and experiment with different stitch lengths and widths, and edge-finishing techniques. At the time, it felt unnecessary, not to mention tedious….

Sewing Essentials: A Simple Guide to Notches
I love a notch, so much so that I’ve decided to dedicate this article to these small but important markings. Here, I’ll explain why they’re so helpful, when to use them, and how to add them to your own patterns or adapt them for existing ones. What exactly are notches? Notches are small markings found…

How to Select and Use Interfacing: A Simple Guide
Iron-on or sew-in, woven or non-woven, lightweight or heavyweight. With so many different types, weaves, and weights to choose from, how do you know which interfacing is best for your project? In this article, I will explain the two main types of interfacing before diving into the differences in weave and weight. Hopefully by the…

Sewing Essentials: A Simple Method for Reversible Seams
There are so many ways to finish a seam, from good old overlocking to French seams and binding. I recently stumbled across another method that’s pretty nifty, and honestly, I kind of wish I had known about it sooner. It is a bit like binding, but topstitched in place so it doesn’t move or flap…


SEW THIS LOOK


Latest Posts


Leave a comment