


Sewing Essentials: Dart Manipulation

Photo by Roberta Sant Anna

Photo by Roberta Sant Anna
Dart manipulation is a pattern making technique used to reposition a dart on a garment without altering or adjusting its overall fit. Essentially, it’s a way to move the shaping in your pattern to a new location.
Dart manipulation lets you customise a sewing pattern to suit your design preferences. Whether you want to move a dart to a more flattering position, integrate it into a seam, or eliminate it entirely.
I first learnt about dart pivoting at university, around 17 years ago. At the time, being quite new to pattern making, I found this concept absolutely mind-blowing. It unlocked so many new design ideas and potential for altering that basic block into something truly unique. Plus, it’s kind of fun—there’s something satisfying about seeing a basic pattern transform with just a few strategic rotations and cuts.
For this guide, I’ll be demonstrating two methods of dart manipulation—the pivot method and the cut and spread method. I’ve tried to create diagrams that are easy to follow when working manually or digitally.
Anatomy of a dart
A dart has two main components:
- The apex is the point where the dart tapers and ends.
- The legs are the diagonal stitching lines that connect the widest part of the dart to the apex. They determine the width and length of the dart, and therefore its overall shape.

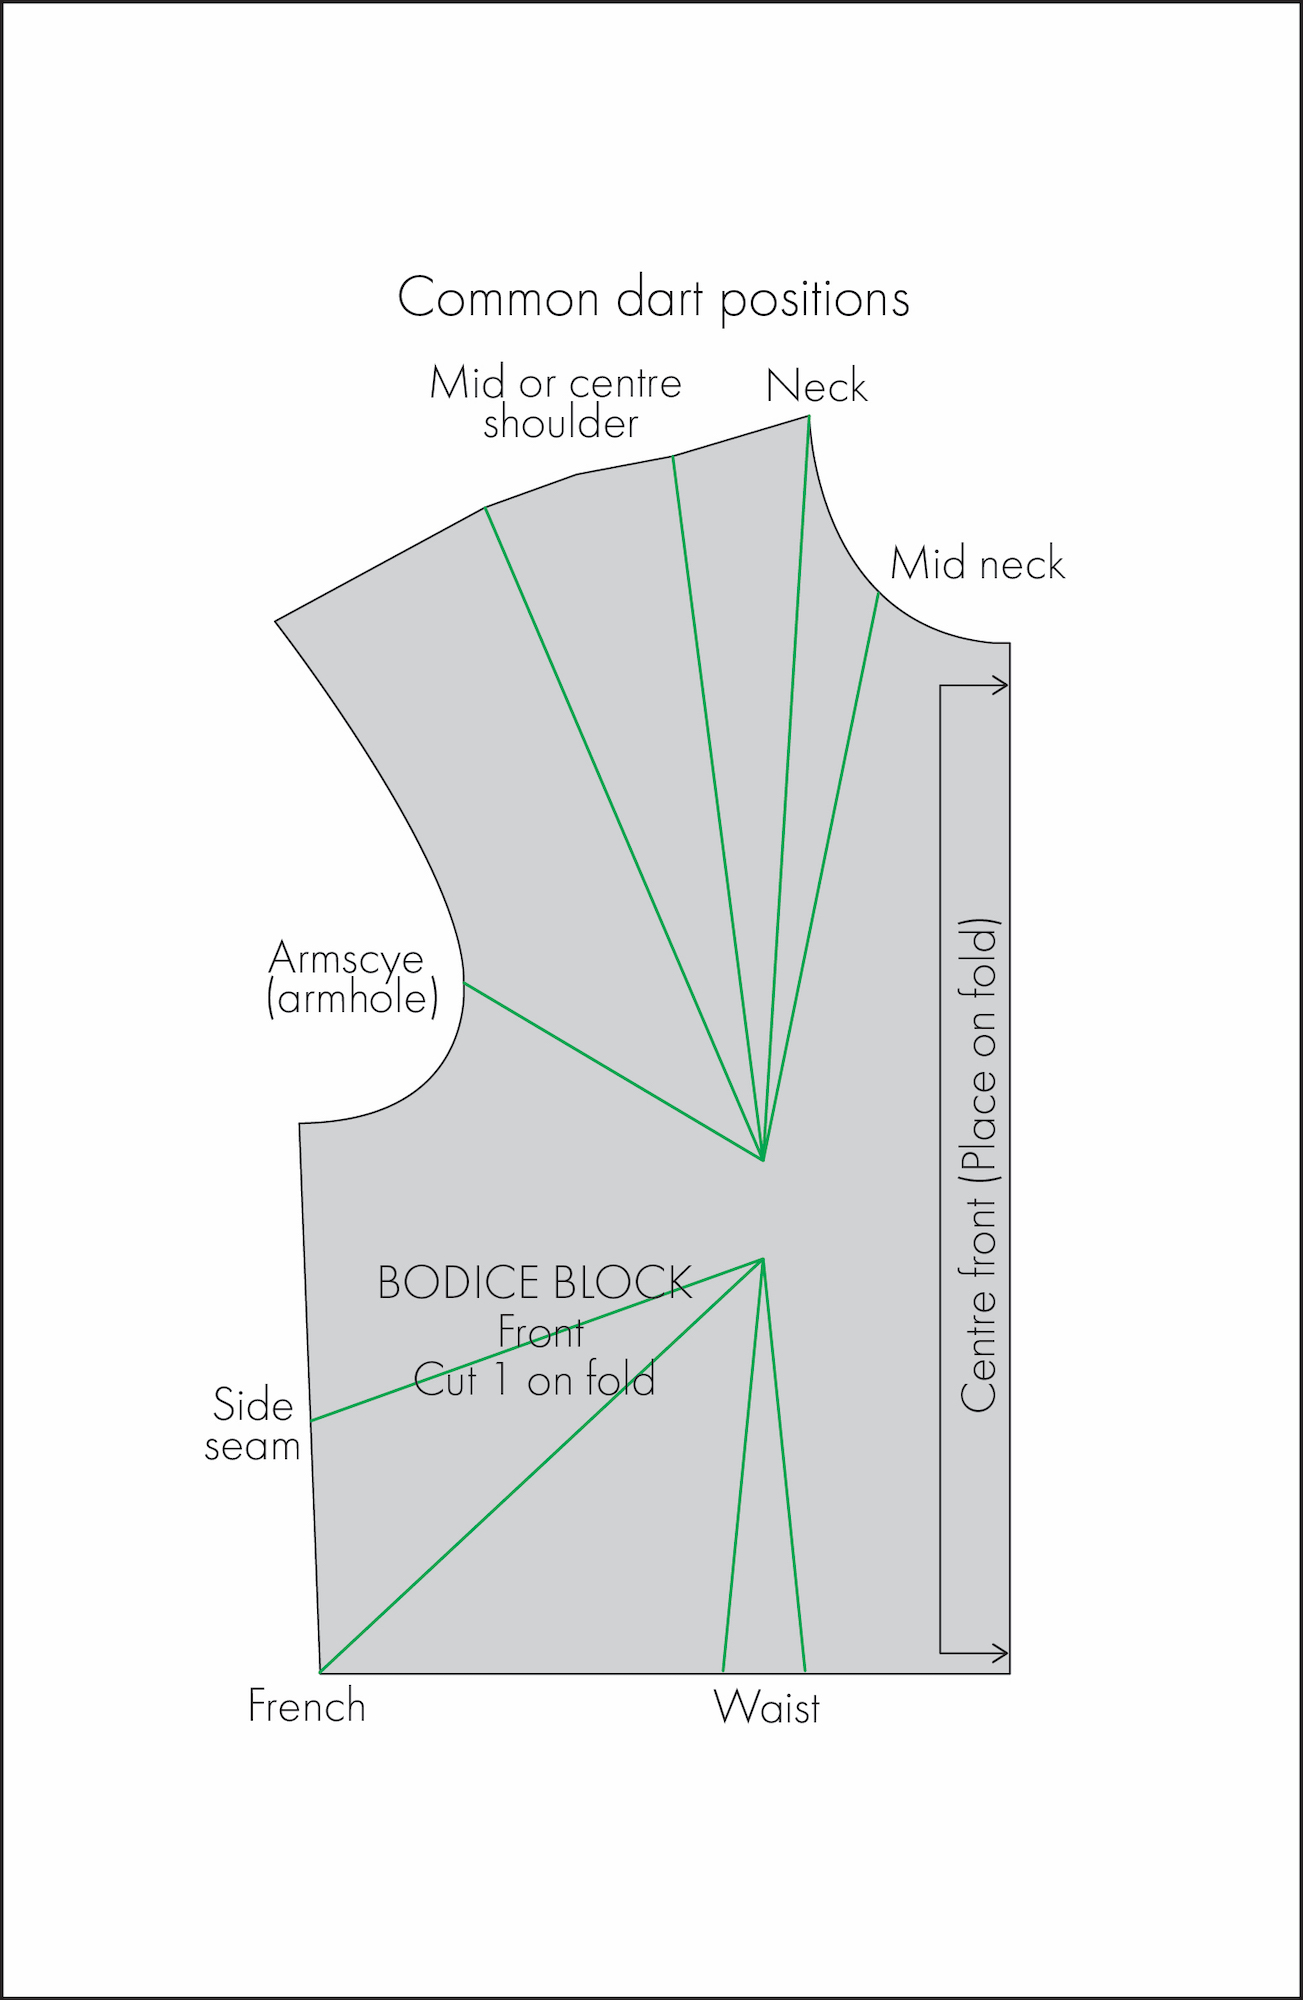
Common dart positions on a bodice
The diagram below highlights some of the most common dart positions on a bodice block, though it’s not an exhaustive list.
Darts can be repositioned to various locations on the front bodice, such as the side seam, waist, or shoulder. They can also be incorporated into a princess seam line to eliminate them entirely.
While I am focusing on the bodice block in this guide, the principles of dart manipulation can easily be transferred to other blocks with the steps remaining largely the same.
Tools and materials:
Before you begin, I recommend gathering the following tools and materials:
- Sewing pattern or block with an existing dart
- Ruler
- Tracing paper
- Pencil and rubber
- Scissors
- Tape
- Awl (optional)
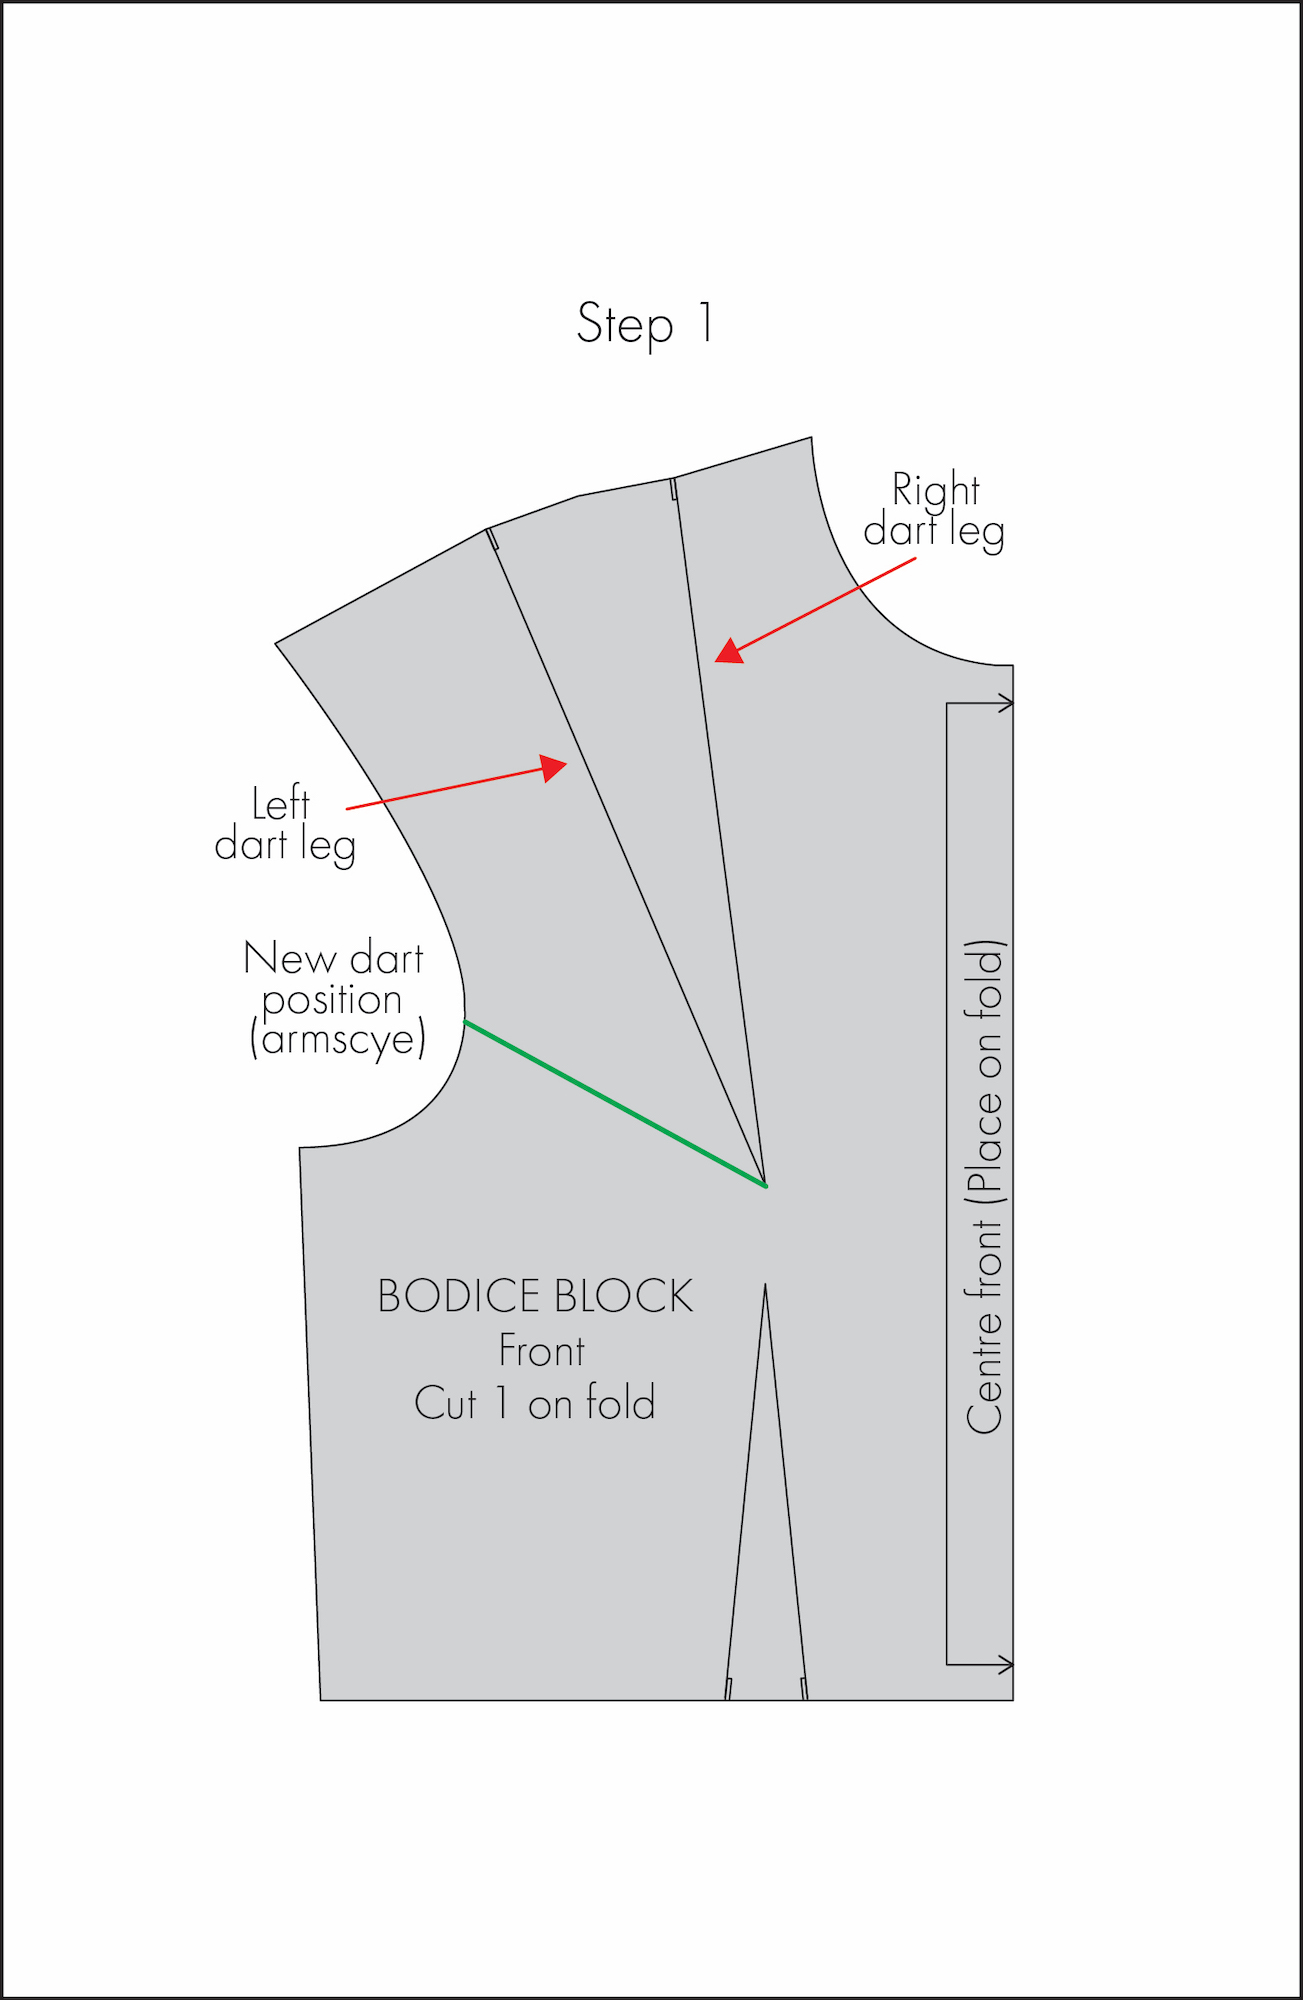
The pivot method
In this example, I’ll demonstrate how to shift the shoulder dart to the armscye (armhole) using a front basic bodice block.
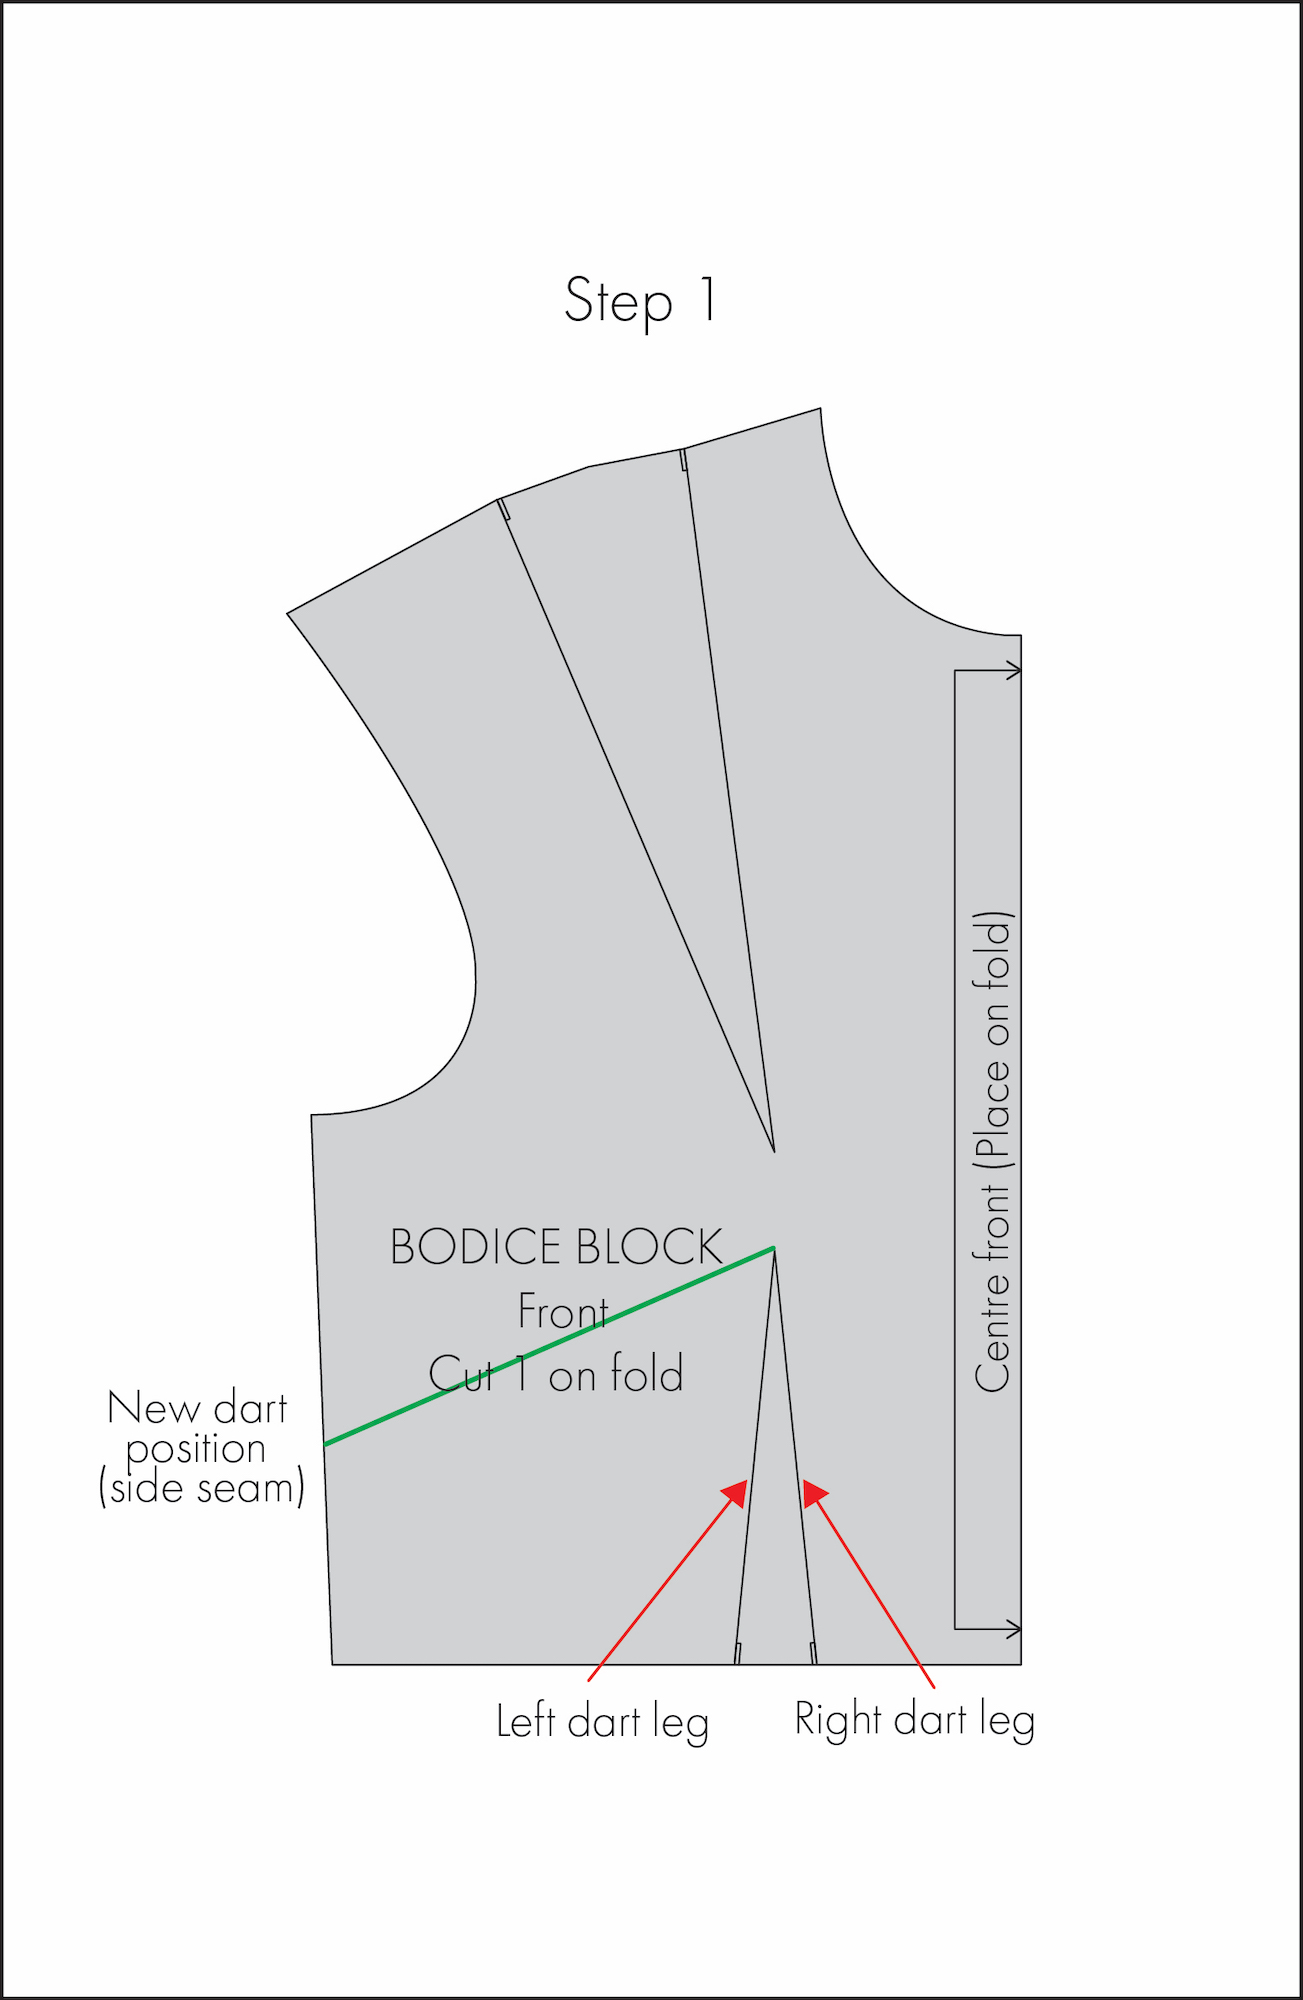
Step 1: Mark the new dart position
Note: For clarity, I have labeled the shoulder dart legs ‘left’ and ‘right’.
Start by drawing a line from the dart apex to the new dart position.
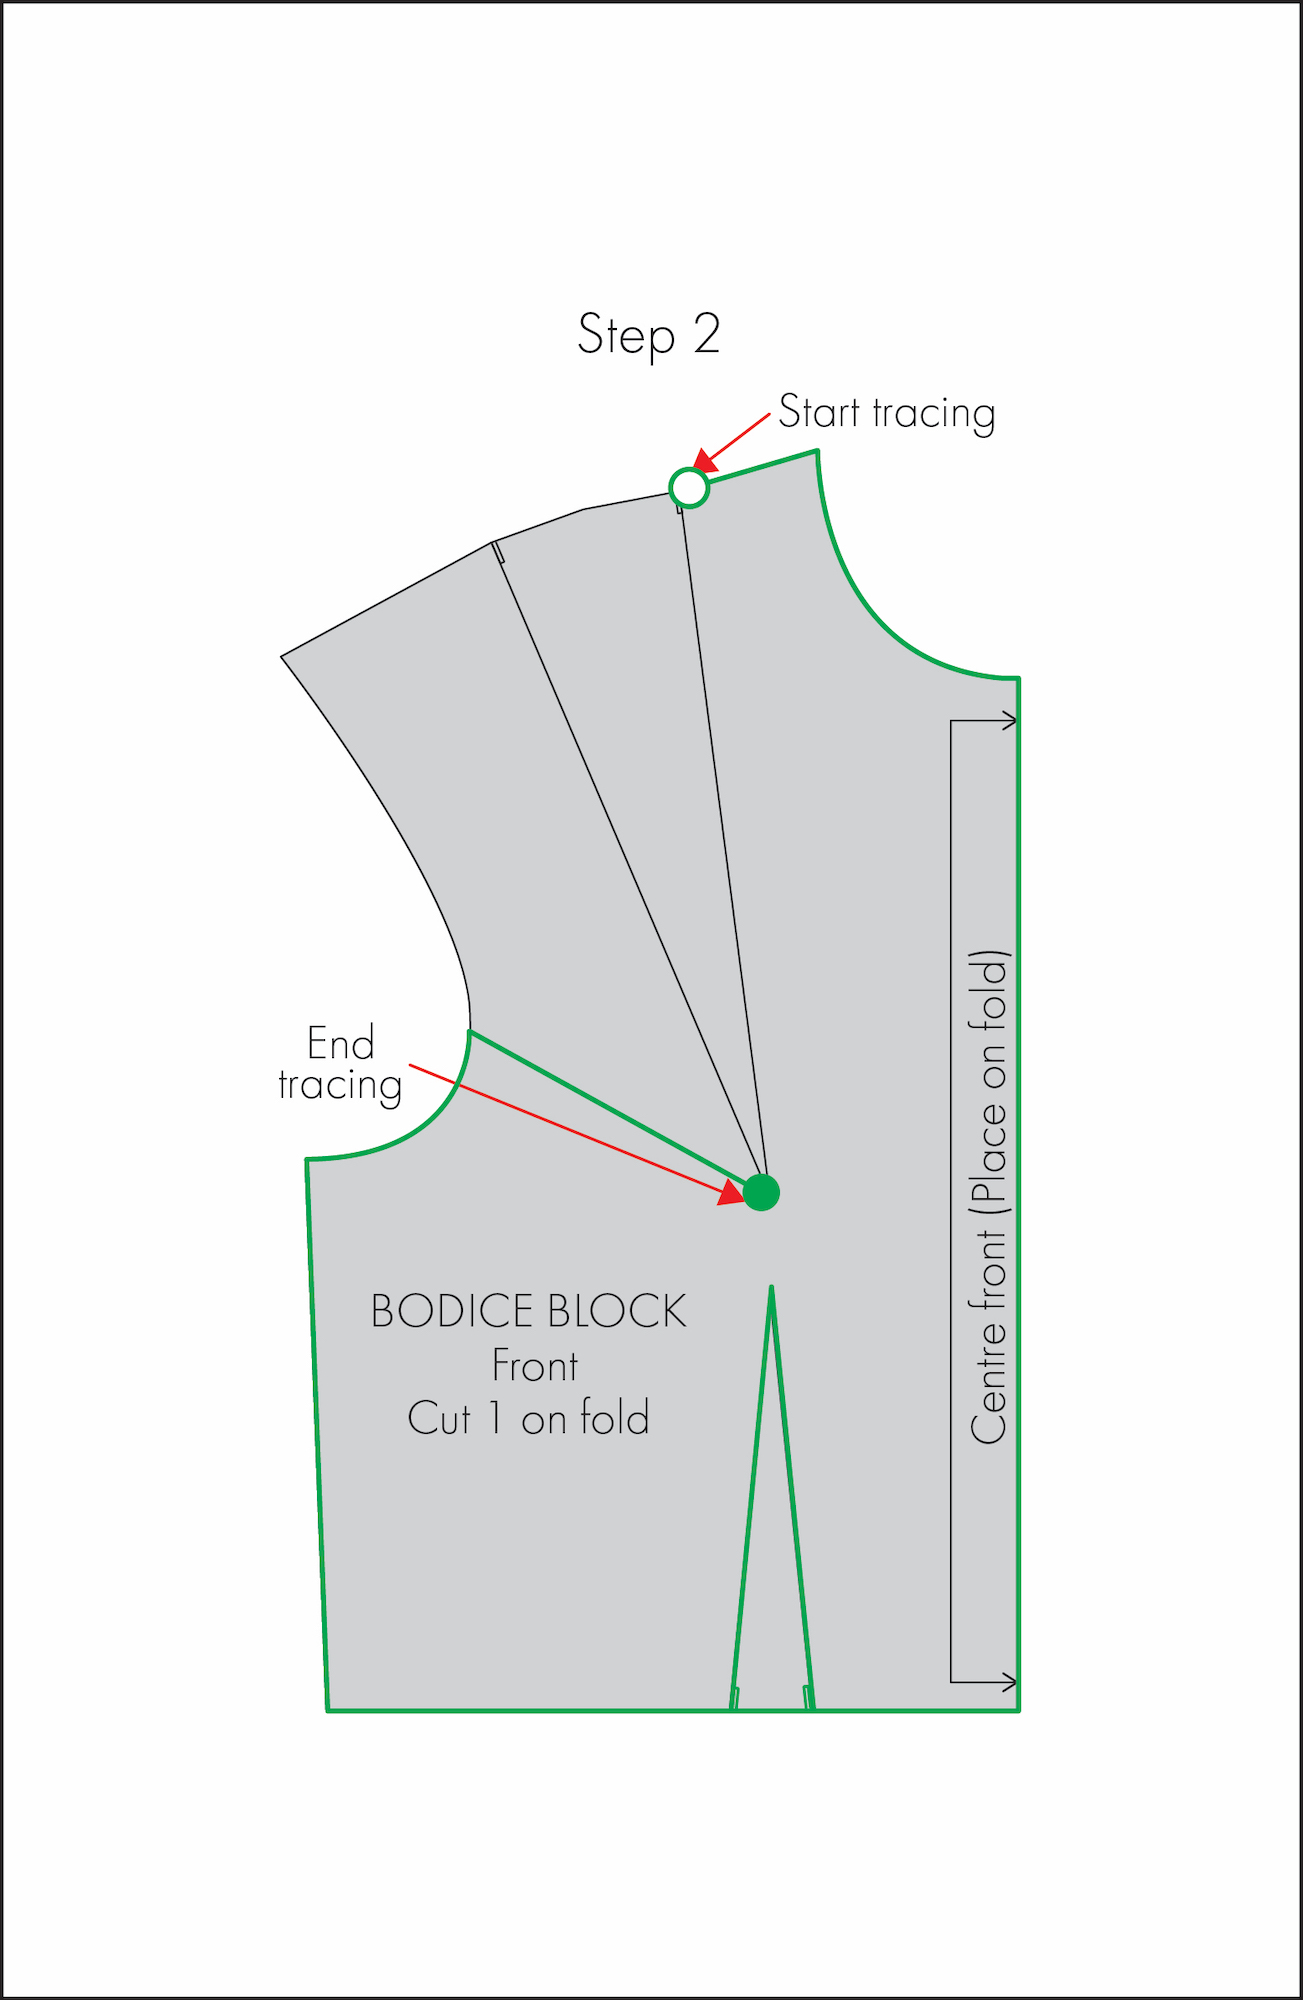
Step 2: Trace the pattern
- Begin tracing around the block or pattern piece, starting at the top of the right dart leg (the dart leg furthest from the new dart position).
- Continue tracing around the pattern piece until reaching the new dart position. Include the new dart leg in the tracing.
- Remember to include any markings, notches or darts in this tracing.
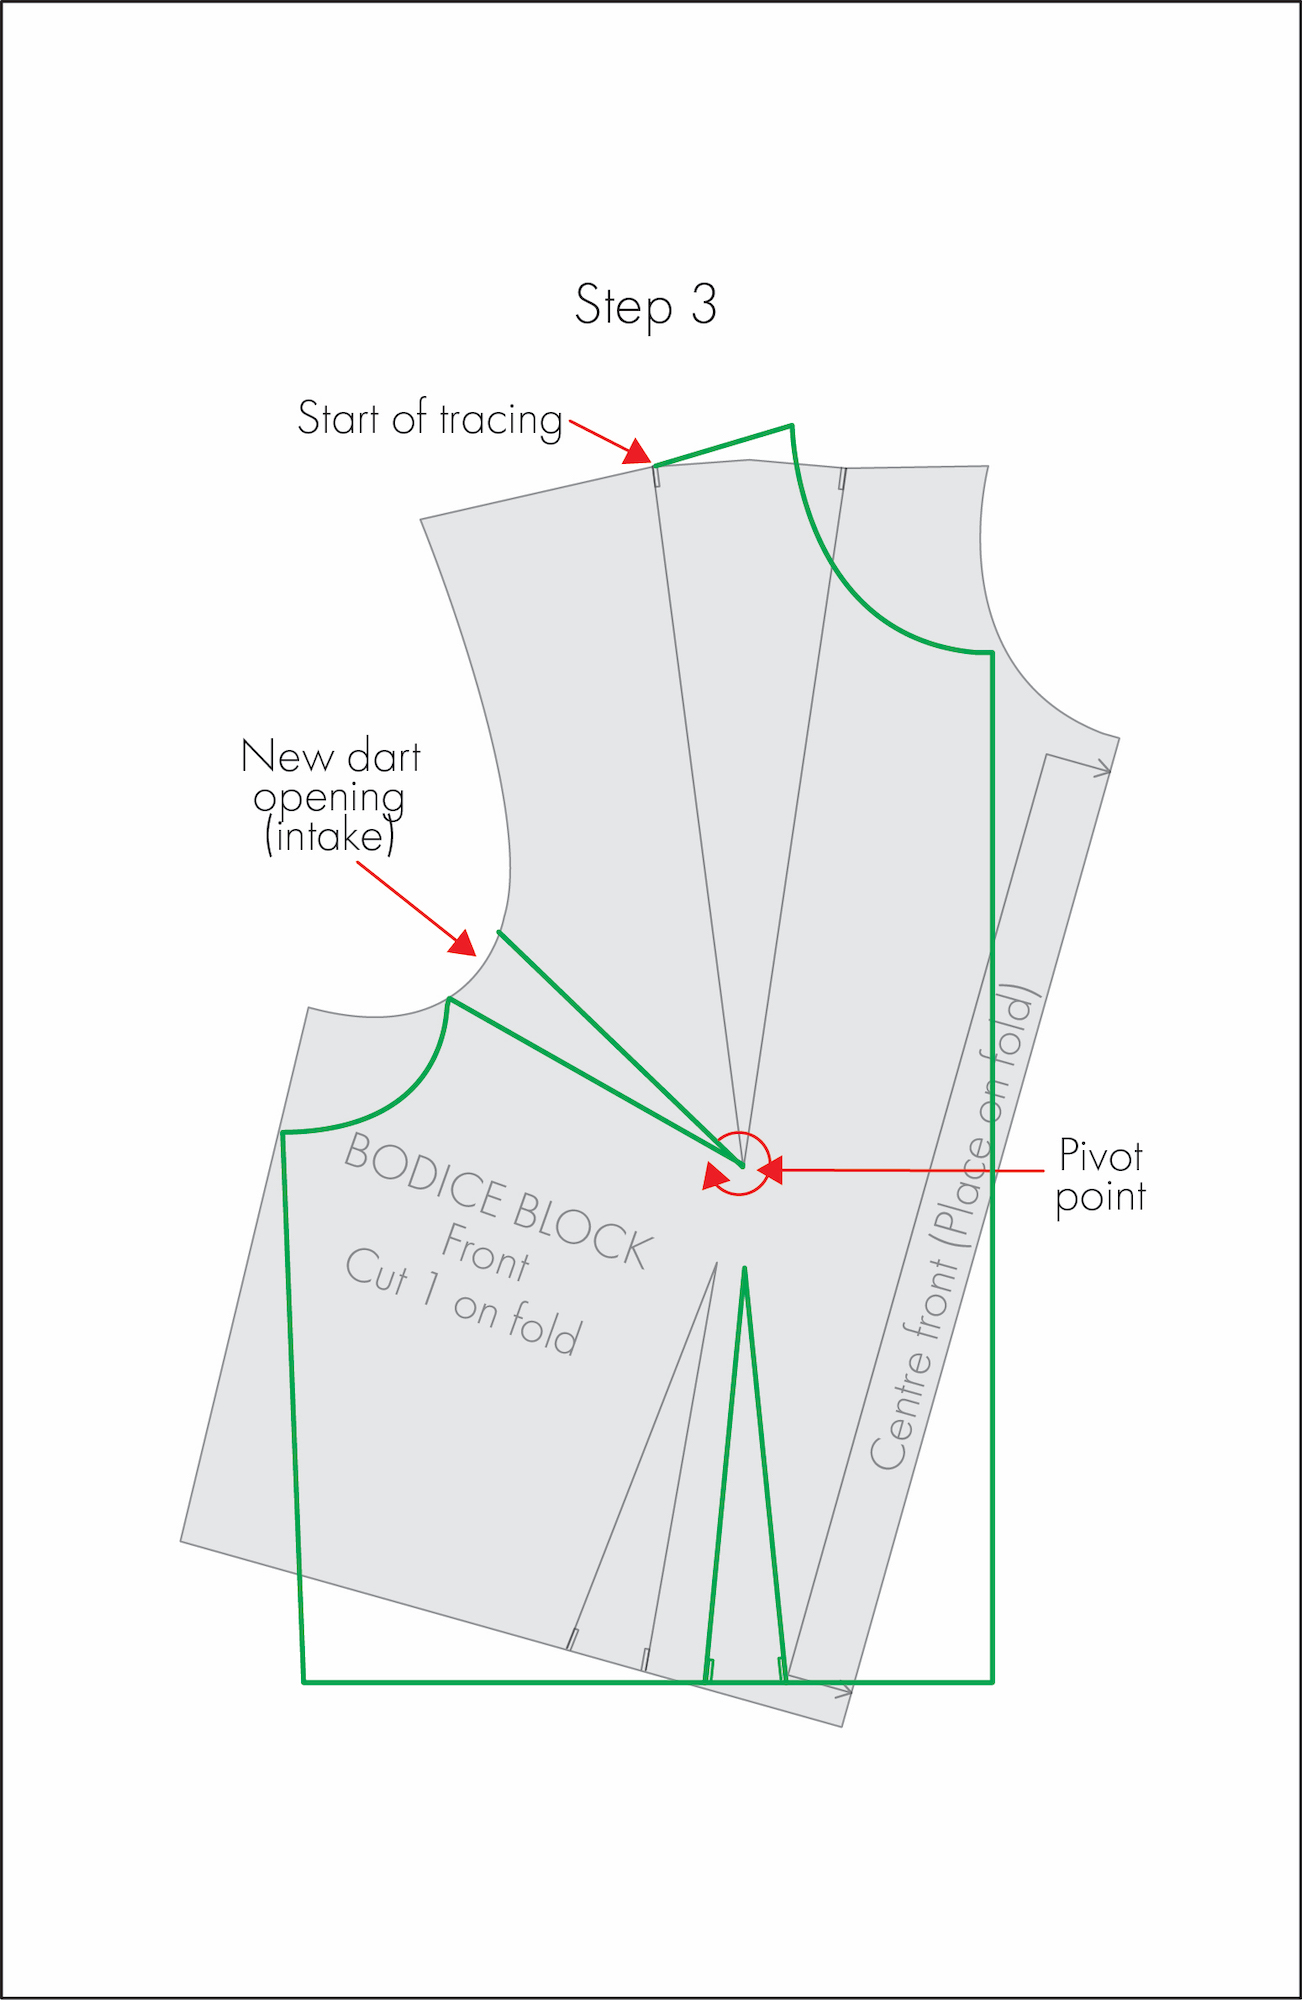
Step 3: Pivot the dart
- Place an awl or sharp pencil at the dart apex to anchor the block or pattern piece. This will be the pivot point.
- Rotate the block clockwise until the left dart leg aligns with the beginning of the tracing from Step 2. This will close out the shoulder dart.
- By doing this, the pattern will automatically open at the new dart location.
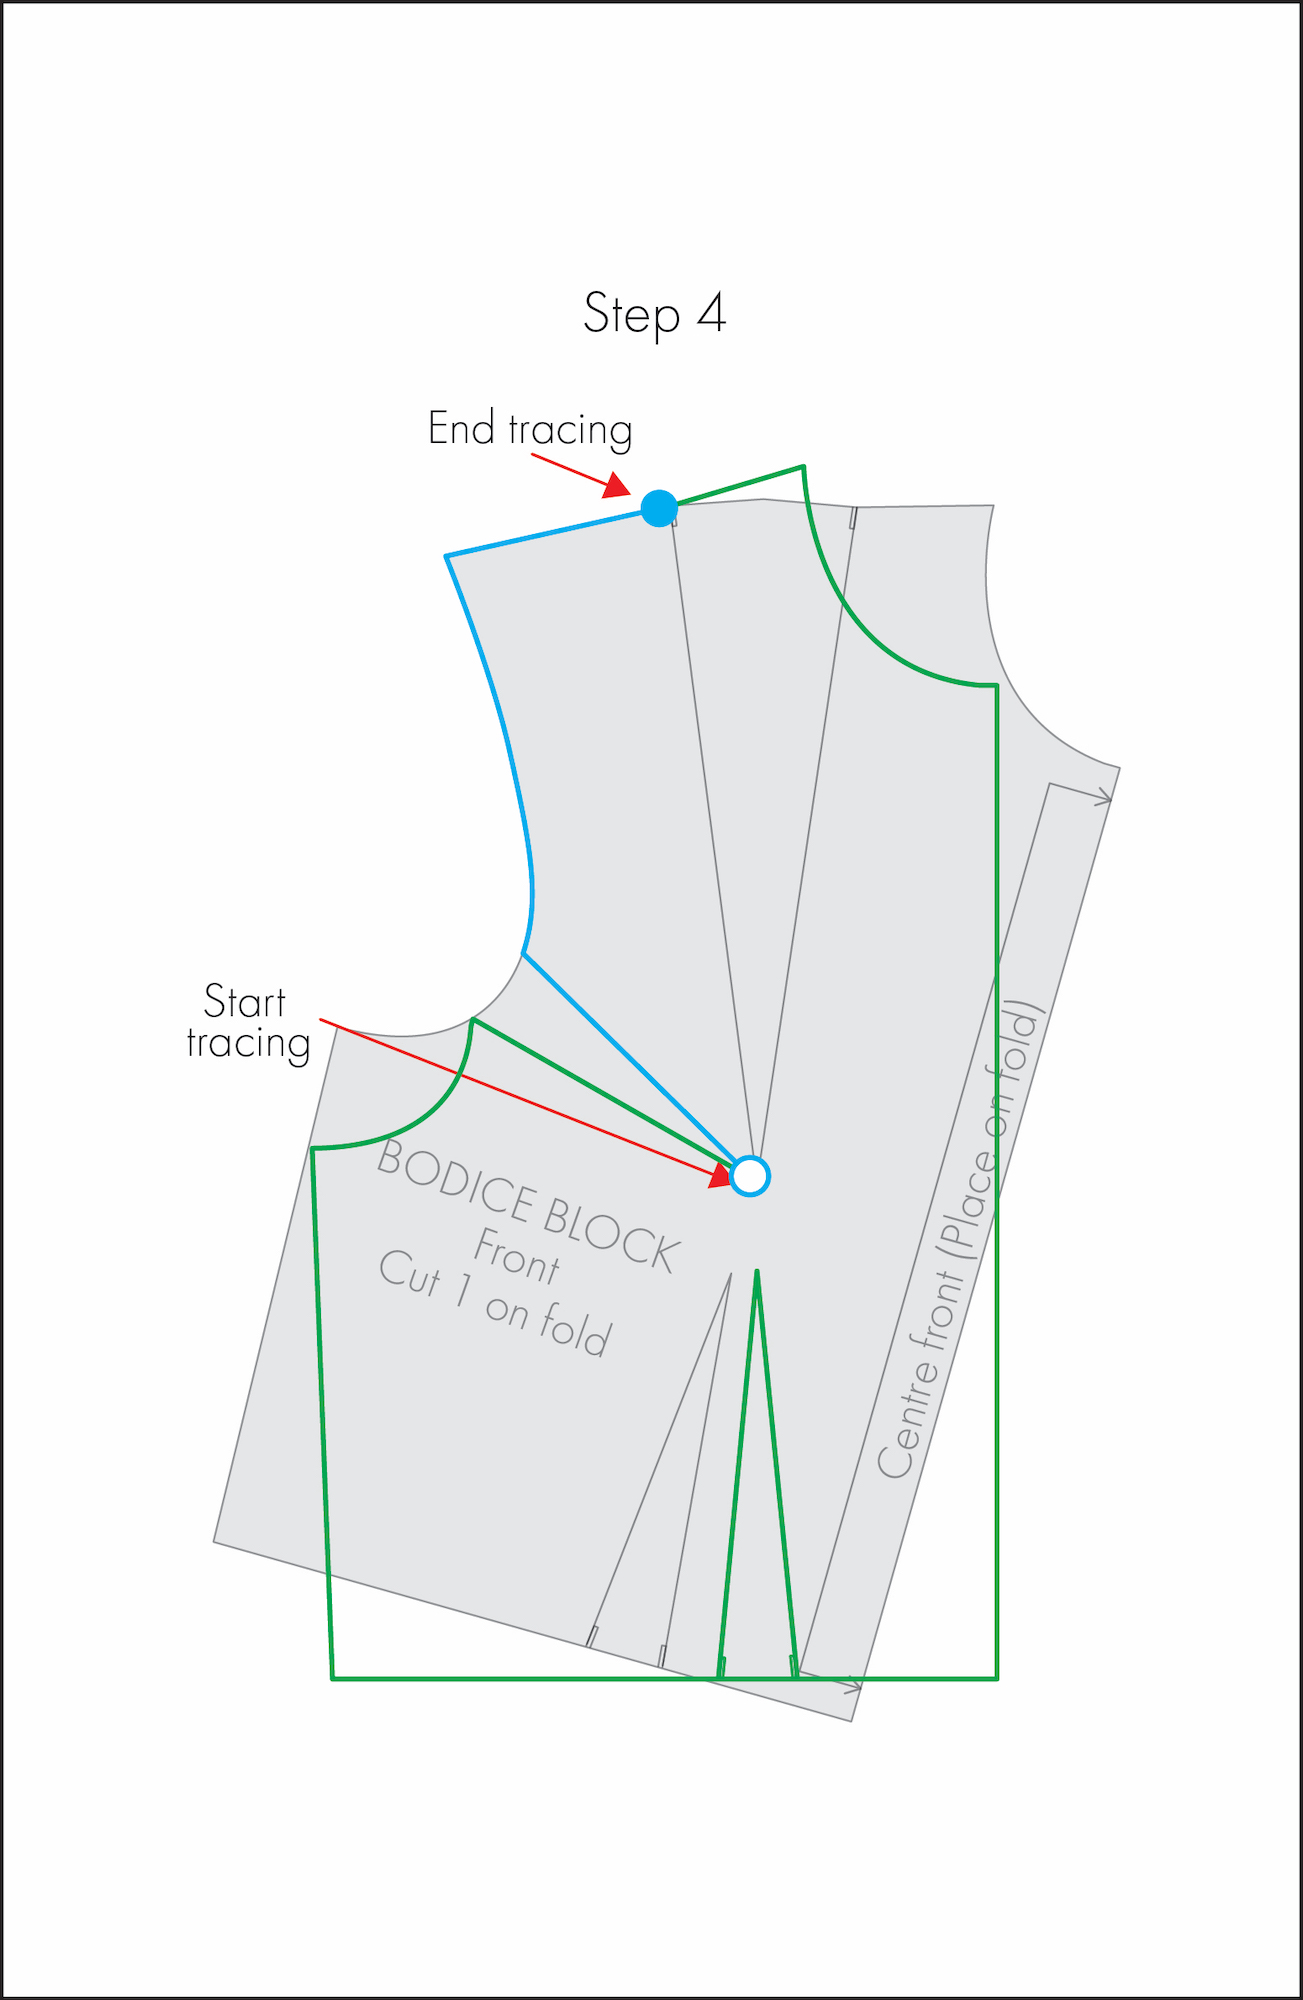
Step 4: Trace the updated pattern
Once the dart is closed, trace the updated pattern piece, starting at the new dart leg position and continuing to the top of the left dart leg.
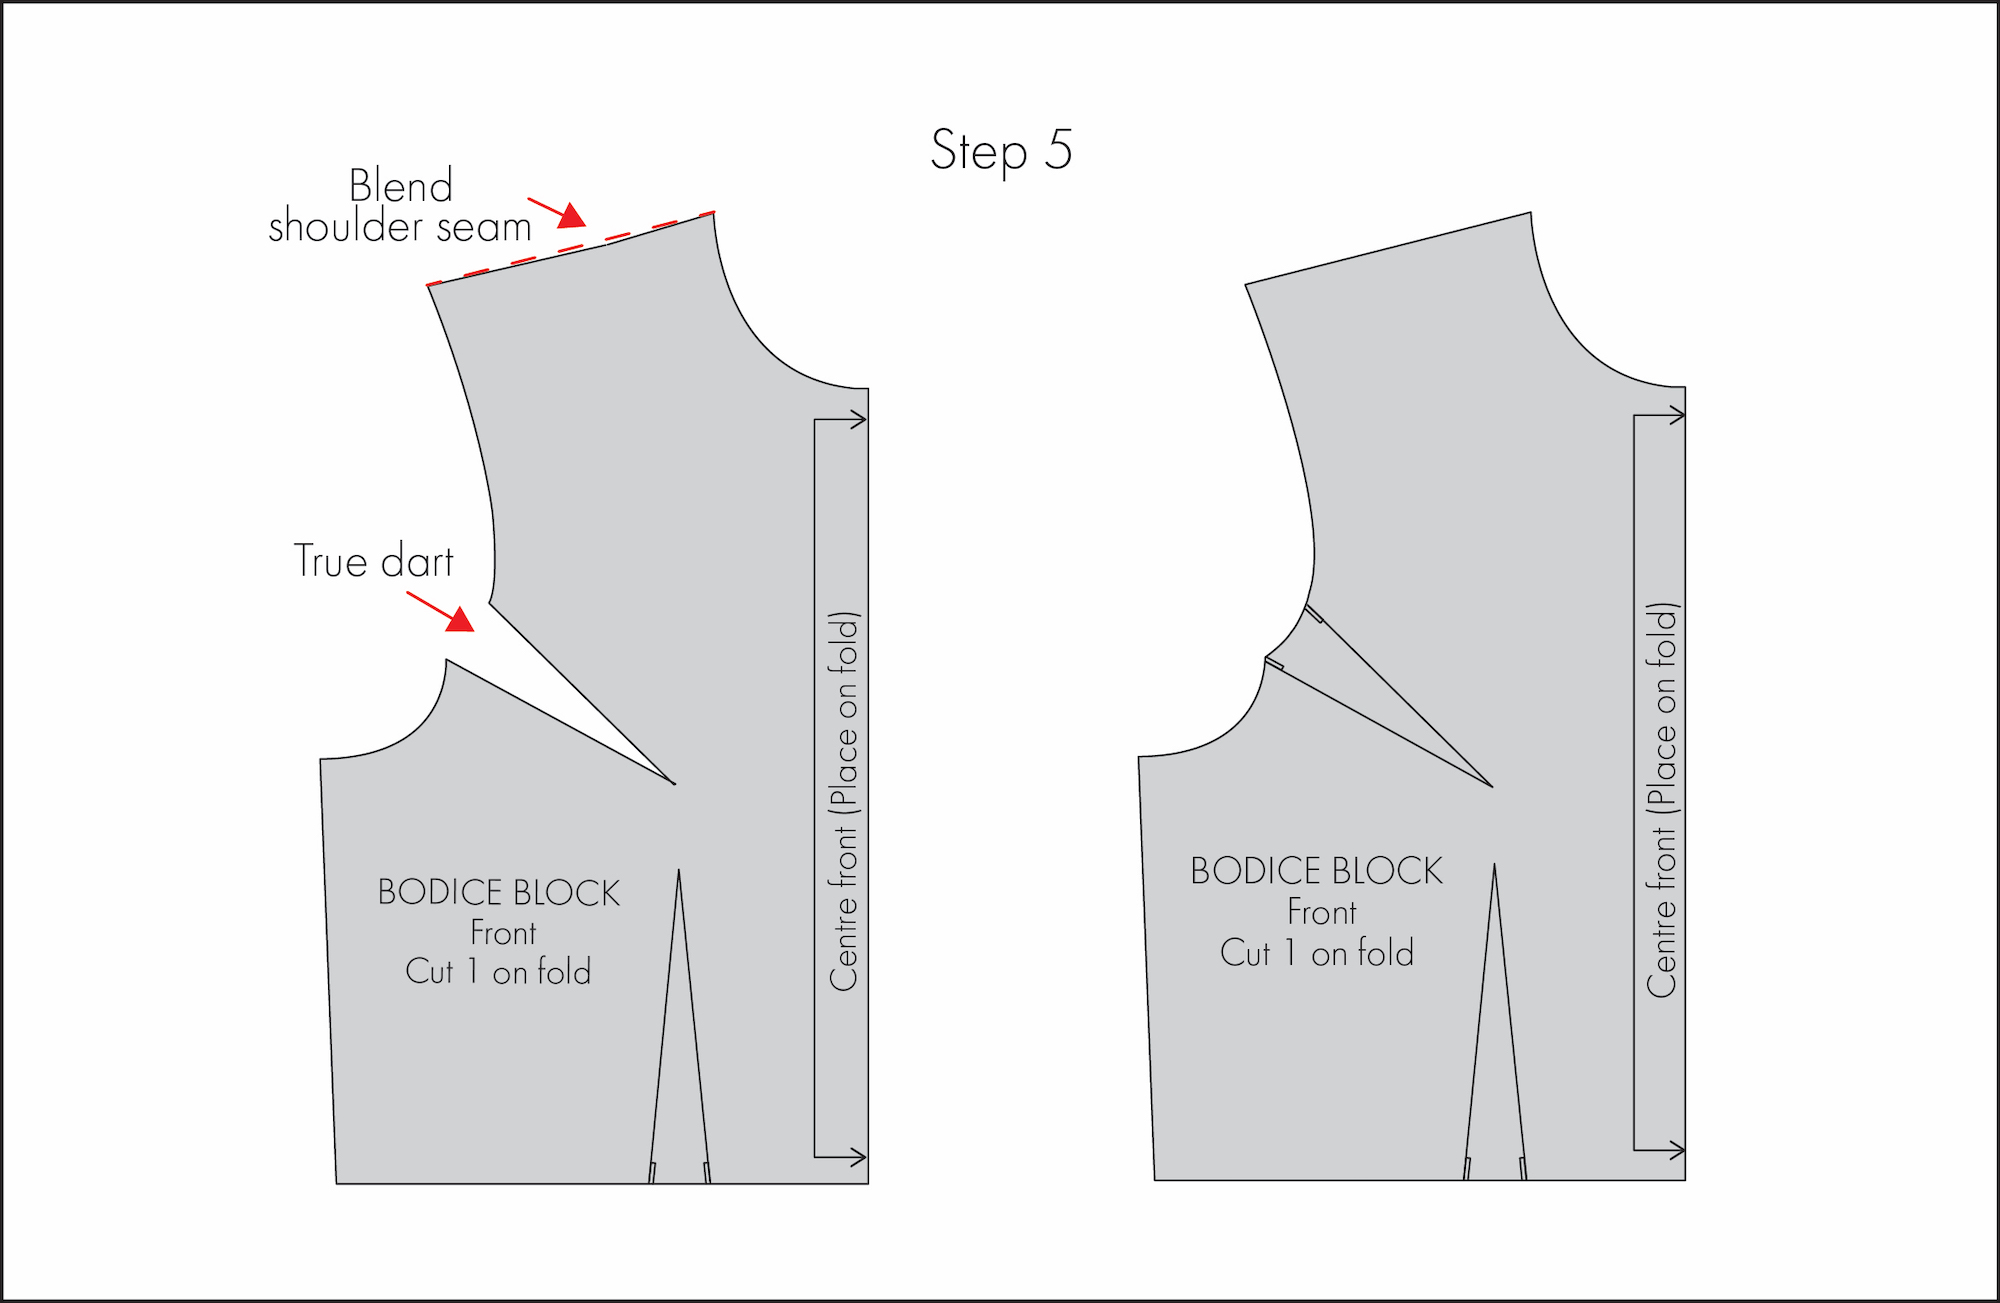
Step 5: Blend and true the pattern
- Add notches to the top of the new dart legs to ensure accurate alignment when sewing.
- Blend and smooth the shoulder seam for a clean transition.
- True the dart to refine its shape and ensure a precise fit. For guidance on truing darts, refer to my article “Checking, Blending, and Truing Your Sewing Patterns – Part 2.”
The cut and spread method
In this example, I’ll demonstrate how to shift the waist dart to the side seam using a front basic bodice block.
Step 1: Mark the new dart position
Note: Again, for clarity, I’ve labeled the waist dart legs ‘left’ and ‘right’.
Start by drawing a line from the dart apex to the new dart position.
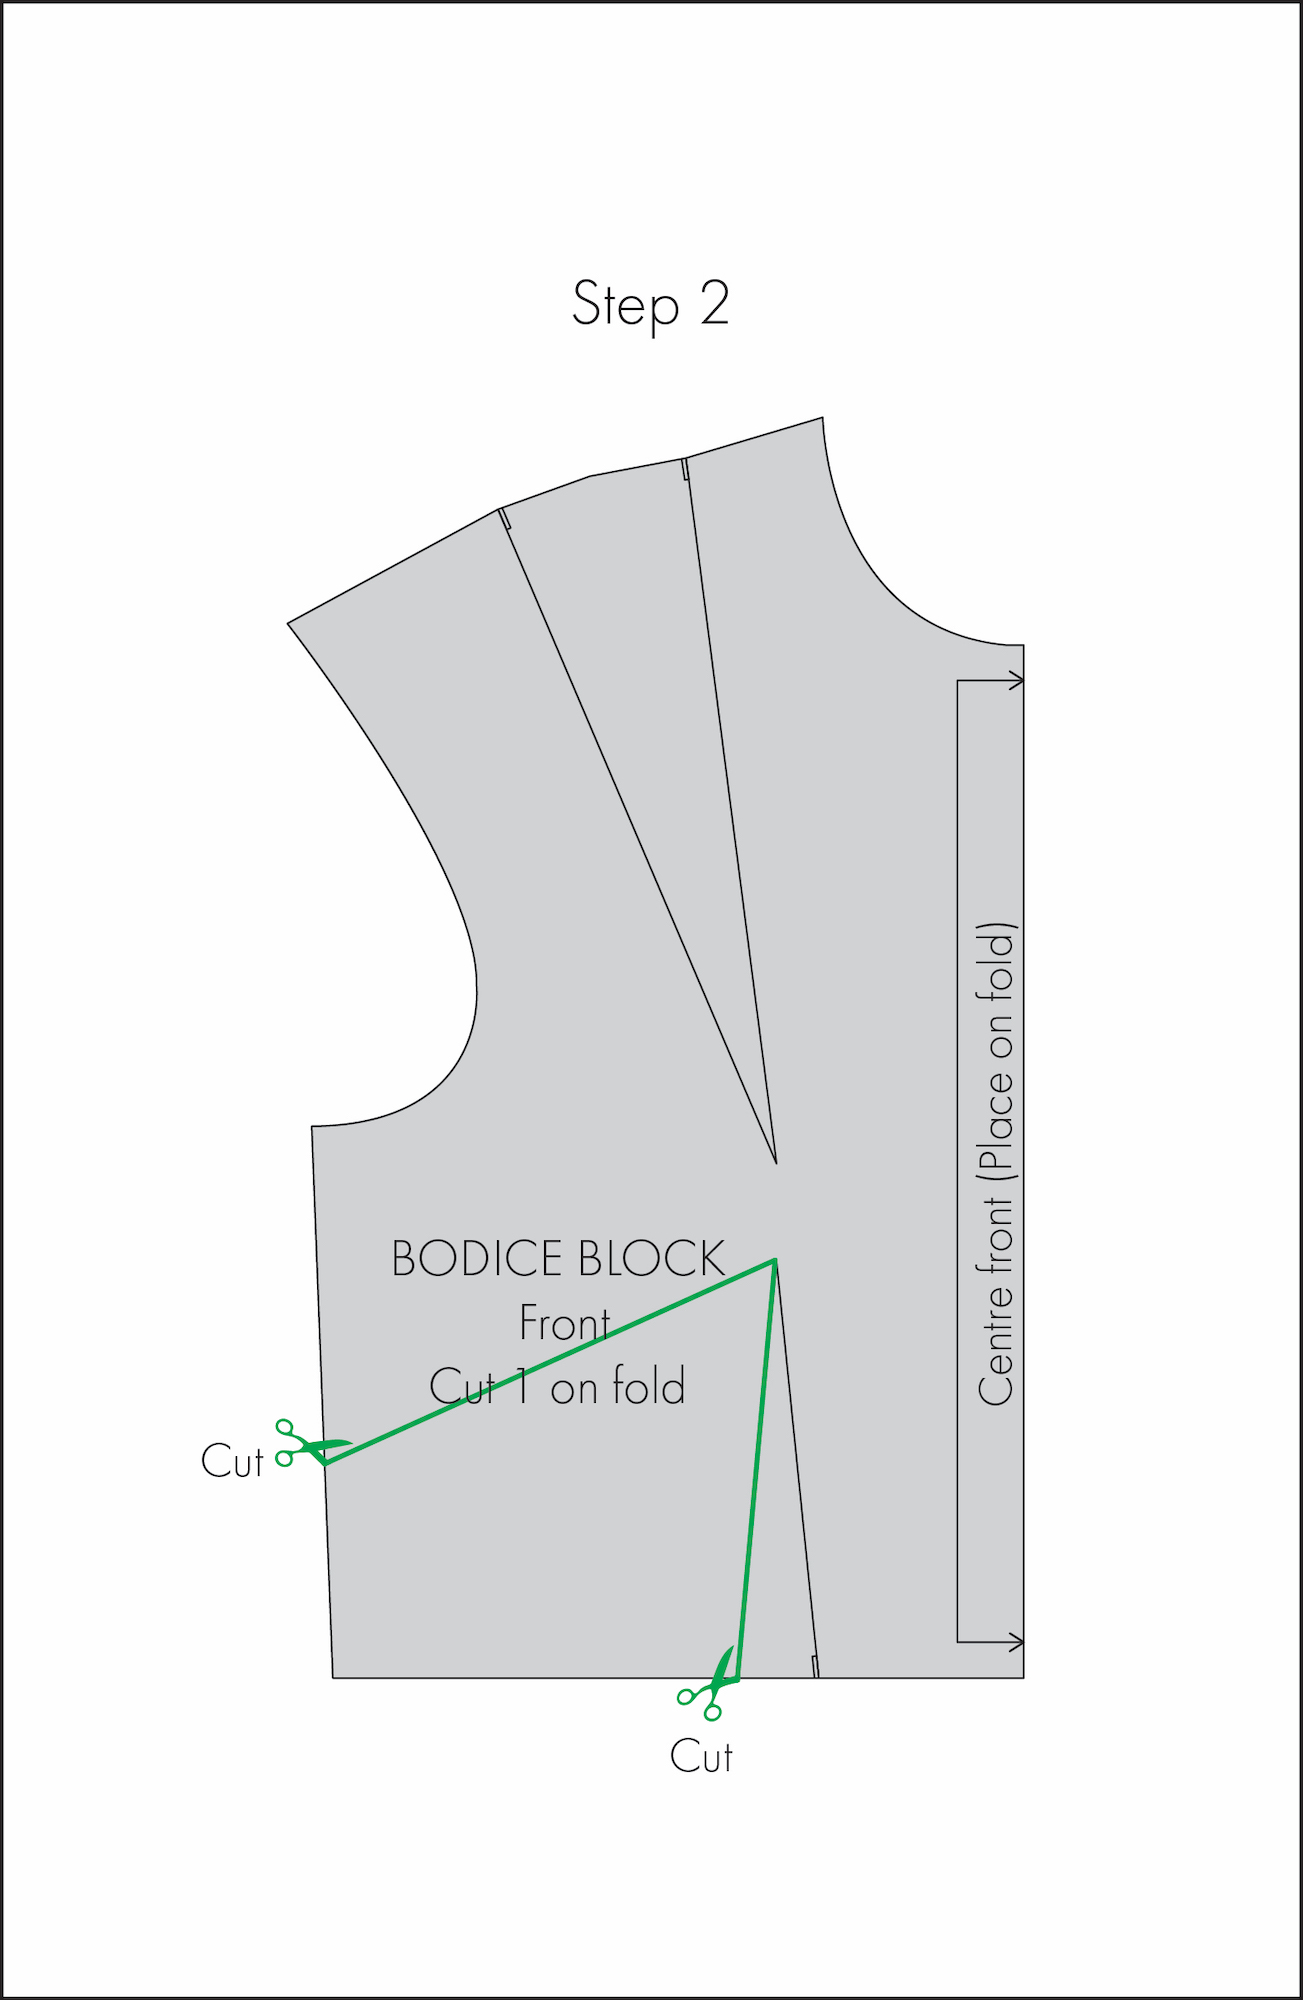
Step 2: Cut the dart
- Cut along the new dart position line, stopping 1–2 mm before the dart apex.
- Carefully cut along the left dart leg, again stopping just short of the apex.
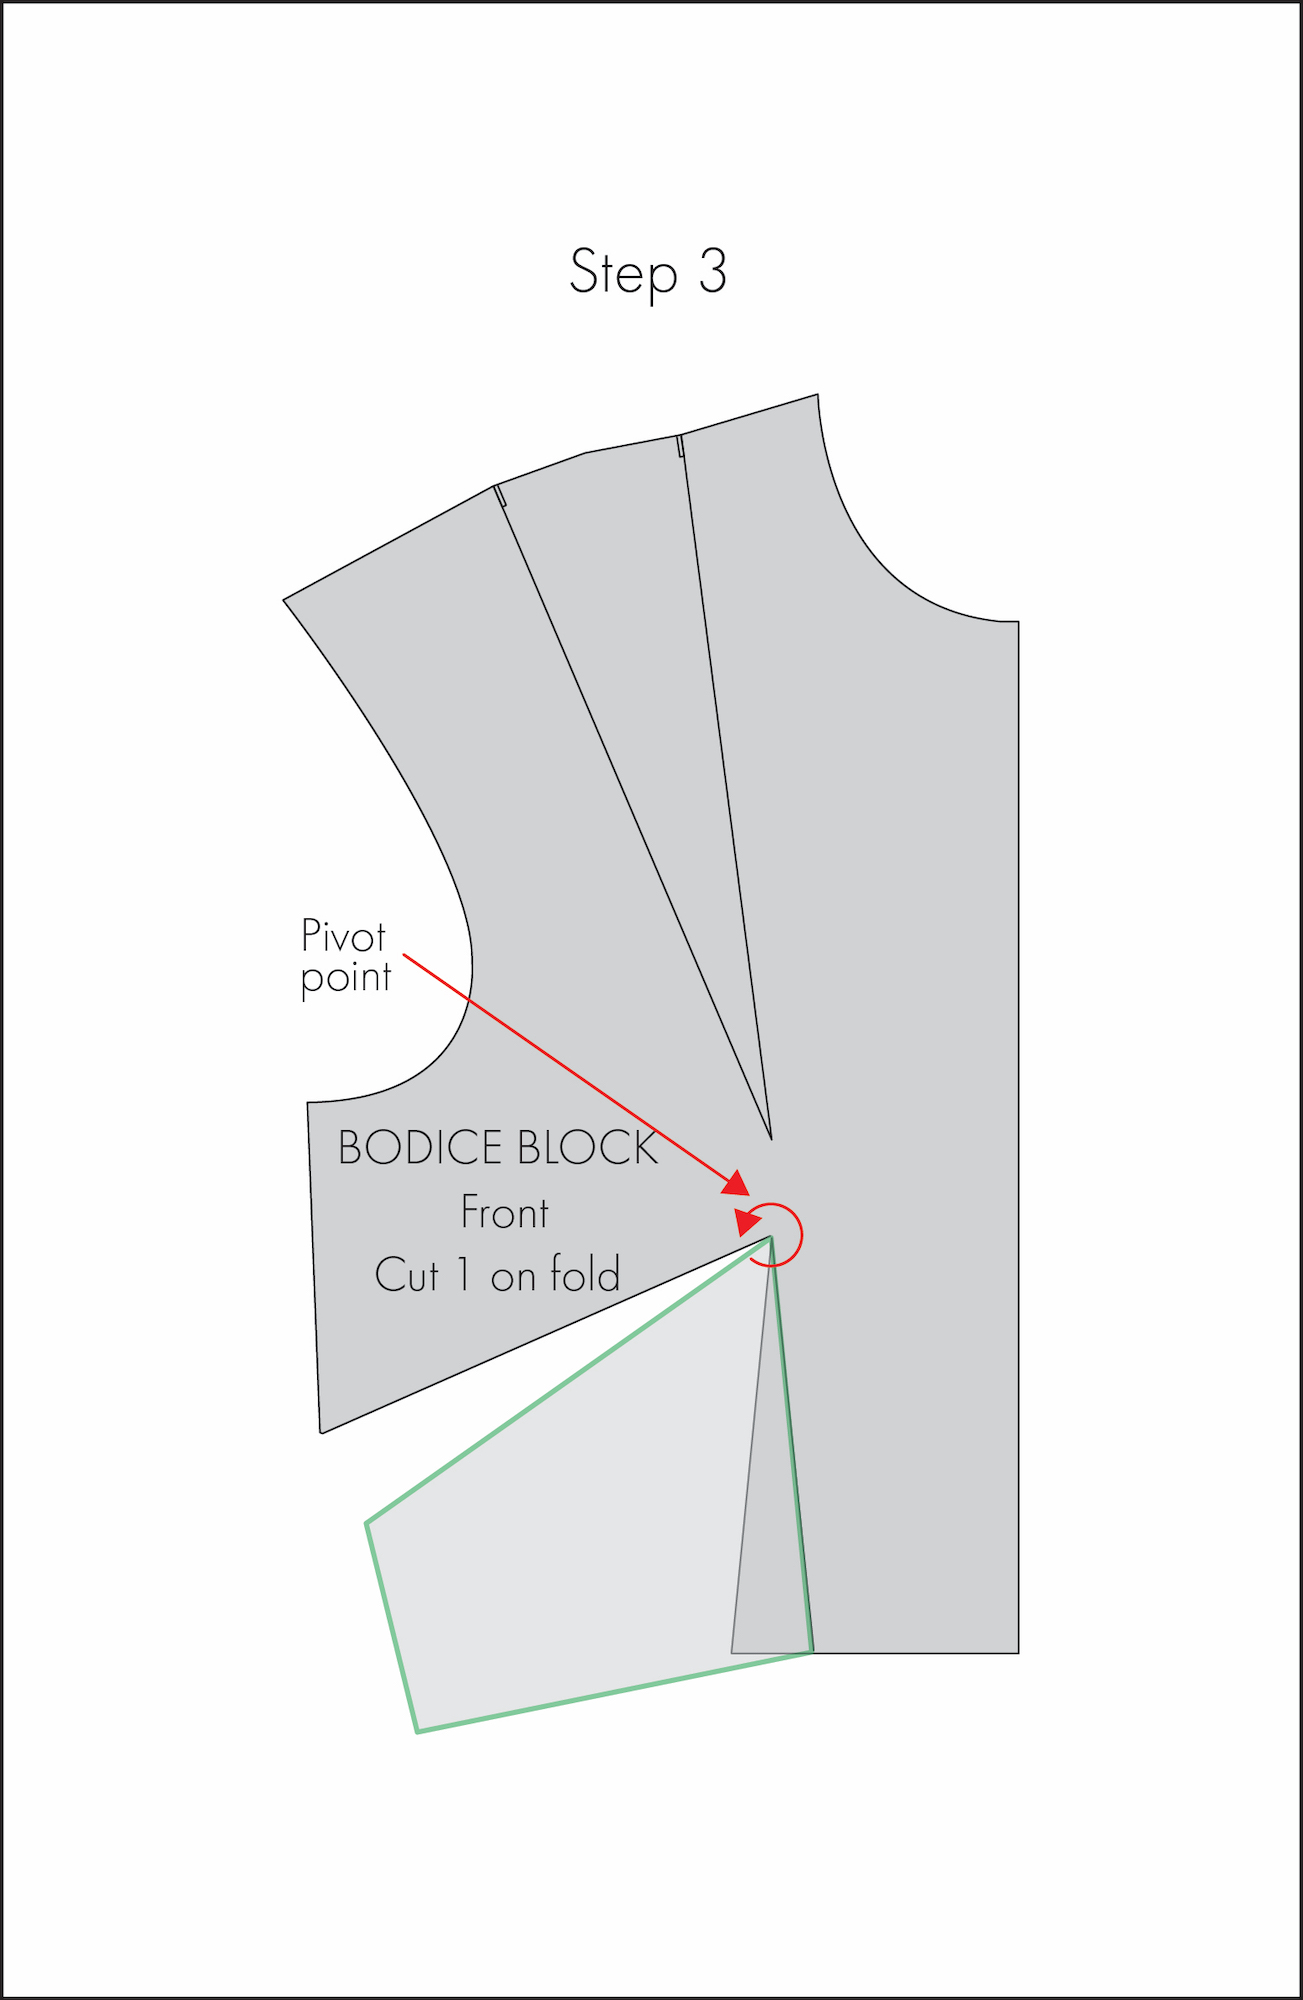
Step 3: Pivot and close the dart
- Gently rotate the cut section anti-clockwise towards the right dart leg, closing out the original dart.
- By doing this, the pattern will automatically open at the new dart location.
- Secure the new dart in place with tape, wights or glue.
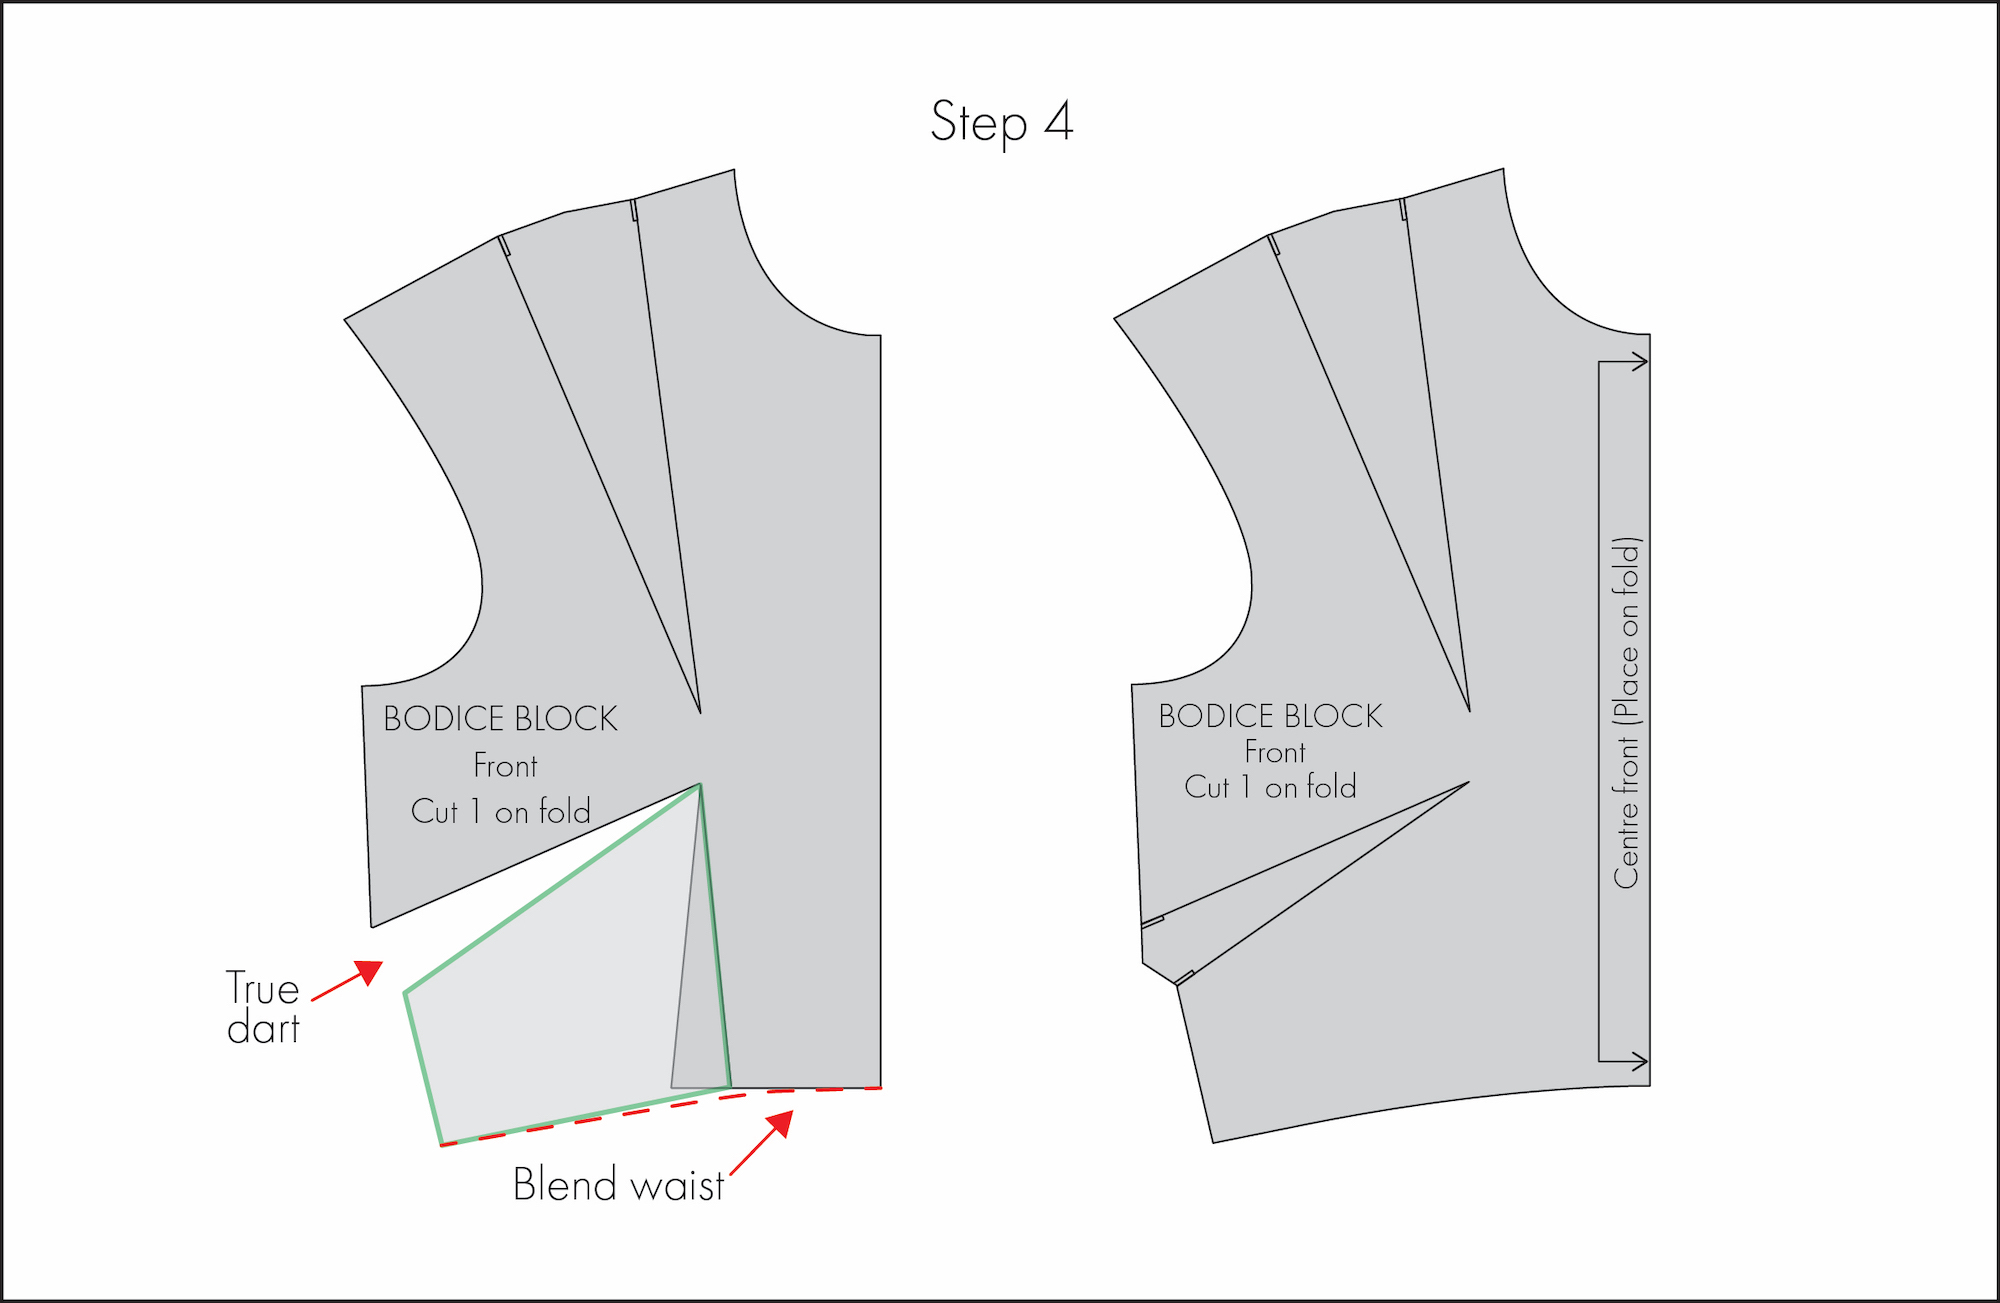
Step 4: Blend and true the pattern
- Add notches at the new dart legs to ensure accurate alignment when sewing.
- Smooth the waist line for a clean transition.
- True the dart to refine its shape and ensure a precise fit. For detailed guidance, refer to my article “Checking, Blending, and Truing Your Sewing Patterns – Part 2.”
Dart manipulation provides the flexibility to shape designs exactly how you want. Once you get the hang of it, it will open up so many possibilities. Hopefully, this article has inspired you to try it on one of your own patterns.
About Author
Emma Cartmel
Heya! I’m Emma, and I'm an Aussie living in beautiful Munich with my husband Ben, and our pug Harley. I am a designer, pattern maker, and sewist, and I share my expertise and experience through my ‘cartem.sewing’ page. You can follow me on Instagram @cartem.sewingLeave a comment
Related posts
Sewing Essentials: A Guide to Sewing Threads
You might be thinking “Thread is thread… right?” Well, not always. Sewing thread is a key part of any sewing project. But just like fabric, the thread you choose matters, affecting things like the strength, appearance, and durability of your stitching. But if you have ever shopped for sewing thread, you probably know that it…

Sewing Essentials: Stitch Width, Stitch Length & Needle Position
Thinking back to my high school textiles days, I remember having to test stitch settings on every fabric we planned to use for our projects. We would cut out little squares of fabric and experiment with different stitch lengths and widths, and edge-finishing techniques. At the time, it felt unnecessary, not to mention tedious….

Sewing Essentials: A Simple Guide to Notches
I love a notch, so much so that I’ve decided to dedicate this article to these small but important markings. Here, I’ll explain why they’re so helpful, when to use them, and how to add them to your own patterns or adapt them for existing ones. What exactly are notches? Notches are small markings found…

How to Select and Use Interfacing: A Simple Guide
Iron-on or sew-in, woven or non-woven, lightweight or heavyweight. With so many different types, weaves, and weights to choose from, how do you know which interfacing is best for your project? In this article, I will explain the two main types of interfacing before diving into the differences in weave and weight. Hopefully by the…

Sewing Essentials: A Simple Method for Reversible Seams
There are so many ways to finish a seam, from good old overlocking to French seams and binding. I recently stumbled across another method that’s pretty nifty, and honestly, I kind of wish I had known about it sooner. It is a bit like binding, but topstitched in place so it doesn’t move or flap…


SEW THIS LOOK


Latest Posts


13 Comments
Lisa Grabenbauer
I also learned about moving darts in my college class on pattern making, now 50 years ago. Truly mind-blowing for me! I bought some toile fabric recently, and hope to reacquaint myself with this creative effort! Thanks for your very complete instructions!
javeria nazir
This is such a great guide on dart manipulation! I love how you break down the steps, making it easy to understand and follow. It’s amazing how a little adjustment can completely change the look and fit of a garment.
I also think integrating clothes matching online could be a fun way to explore different dart placements across various designs. Imagine creating a collection where the darts are uniquely positioned on each piece to create a coordinated, flattering family set! Keep up the awesome work!
If you’re looking for stylish and coordinated family outfits, I highly recommend checking out Momyom’s Matching Outfits Collection. They offer a fantastic range of matching pieces that make it easy to create a cohesive and trendy look for the whole family. Whether you’re after something casual or a bit more formal, their collection has something for everyone. It’s a perfect way to make your outfits match effortlessly!
you can hit here to cheakout their latest update:
https://momyom.pk/collections/matching-outfits
Emma Cartmel
Thank you so much! I’m really glad you found the guide easy to follow. Dart manipulation can make such a huge difference in fit and design. Thanks for sharing your thoughts, and happy sewing!
Kathleen Smith
MOMYOM needs to be removed. It installs something the computer, plus it says it’s officially out of business. Please remove the link to momyom. Thank you.
Linda Sumner
Thank you for posting this! Knowing how to manipulate darts is so important as I soon found out when I made the Luna dress. It’s designed for a ballerina sized bust and didn’t work on my size C bust so I was forced to learn how to do this. After going down a size and then doing a full bust adjustment on the bodice it turned out great!
Emma Cartmel
You’re so welcome Linda! I completely agree—understanding dart manipulation makes such a difference in getting a great fit. I’m glad you were able to adjust the Luna dress to work for you. Happy sewing!
Lisa Grabenbauer
Linda, I will use your words to describe my shape – “ballerina-sized bust”!!!
Barbara Lindy
How would I take a jumpsuit pattern that is made for someone much taller and make proportioned for me. I’m 5’1”, size 6 in most clothing (sm); I’m proportioned to my height. My main concern is how much to take up from the neckline to the crotch.
Emma Cartmel
Great question Barbara! I can totally relate—I’m on the shorter side too, so adjusting pattern lengths is a regular part of my sewing.
Without knowing the exact jumpsuit design, it’s tricky to give a precise answer, but generally, the main adjustment will be in the torso length. Start by comparing your shoulder-to-crotch length to the pattern’s proportions. If the pattern doesn’t include this, you can measure the bodice and pants pieces yourself (subtracting seam allowances) to estimate the difference.
To shorten the jumpsuit proportionally, look for lengthen/shorten lines on the bodice and pants, or add your own:
For the bodice:
– Place the line below the bust but above the waist.
For the pants:
– Place the line above the crotch but below the waistline for crotch depth adjustments.
– If adding/removing more than 8cm due to height, adjust both above and below the knee.
– For smaller adjustments, you can simply shorten or lengthen at the lower hem.
Check out the article Tutorial: How to Lengthen or Shorten a Pattern for some great tips on lengthening and shortening.
Make sure to adjust evenly to maintain balance, and double-check that the waistline and crotch placement still align with your body. If shortening significantly, you might need to tweak the crotch curve slightly for comfort.
Since jumpsuits combine both a bodice and pants, making a toile (test version) will help you fine-tune the fit before cutting into your final fabric. It’s an extra step, but totally worth it!
Hope this helps! ?
Feel free to reach out to me directly (@cartem.sewing) if you need more specific guidance.
Kelly Singh
Amazing! I have never had dart positioning explained so well. Thank you
Emma Cartmel
Thank you Kelly! That makes me so happy to hear. I’m really glad my explanation made sense. Darts can be such a game-changer once you get the hang of them. Happy sewing!
Lisa Pratt
This is very clear and so fascinating. Thank you for taking the time to make the models and explain things so clearly. Wow!
Emma Cartmel
Thank you Lisa! That really means a lot. I’m so glad you found it clear and interesting. I loved putting this together. Happy sewing!