


Checking, Blending, and Truing Your Sewing Patterns – Part 2

Photo by Simona Sergi

Photo by Simona Sergi
In Part 1 of this tutorial, I covered the fundamentals of truing—aligning seam lines, smoothing curves, and refining edges—to create polished, professional patterns. Now, in Part 2, I will dive a bit deeper into more specialised examples of truing—hems, darts, and seam allowances. These details require a little more attention to ensure they blend smoothly into the overall design.
Note: While these methods apply broadly, this guide is specifically tailored for self-drafted patterns or those adjusted from existing designs.
How to true a hem
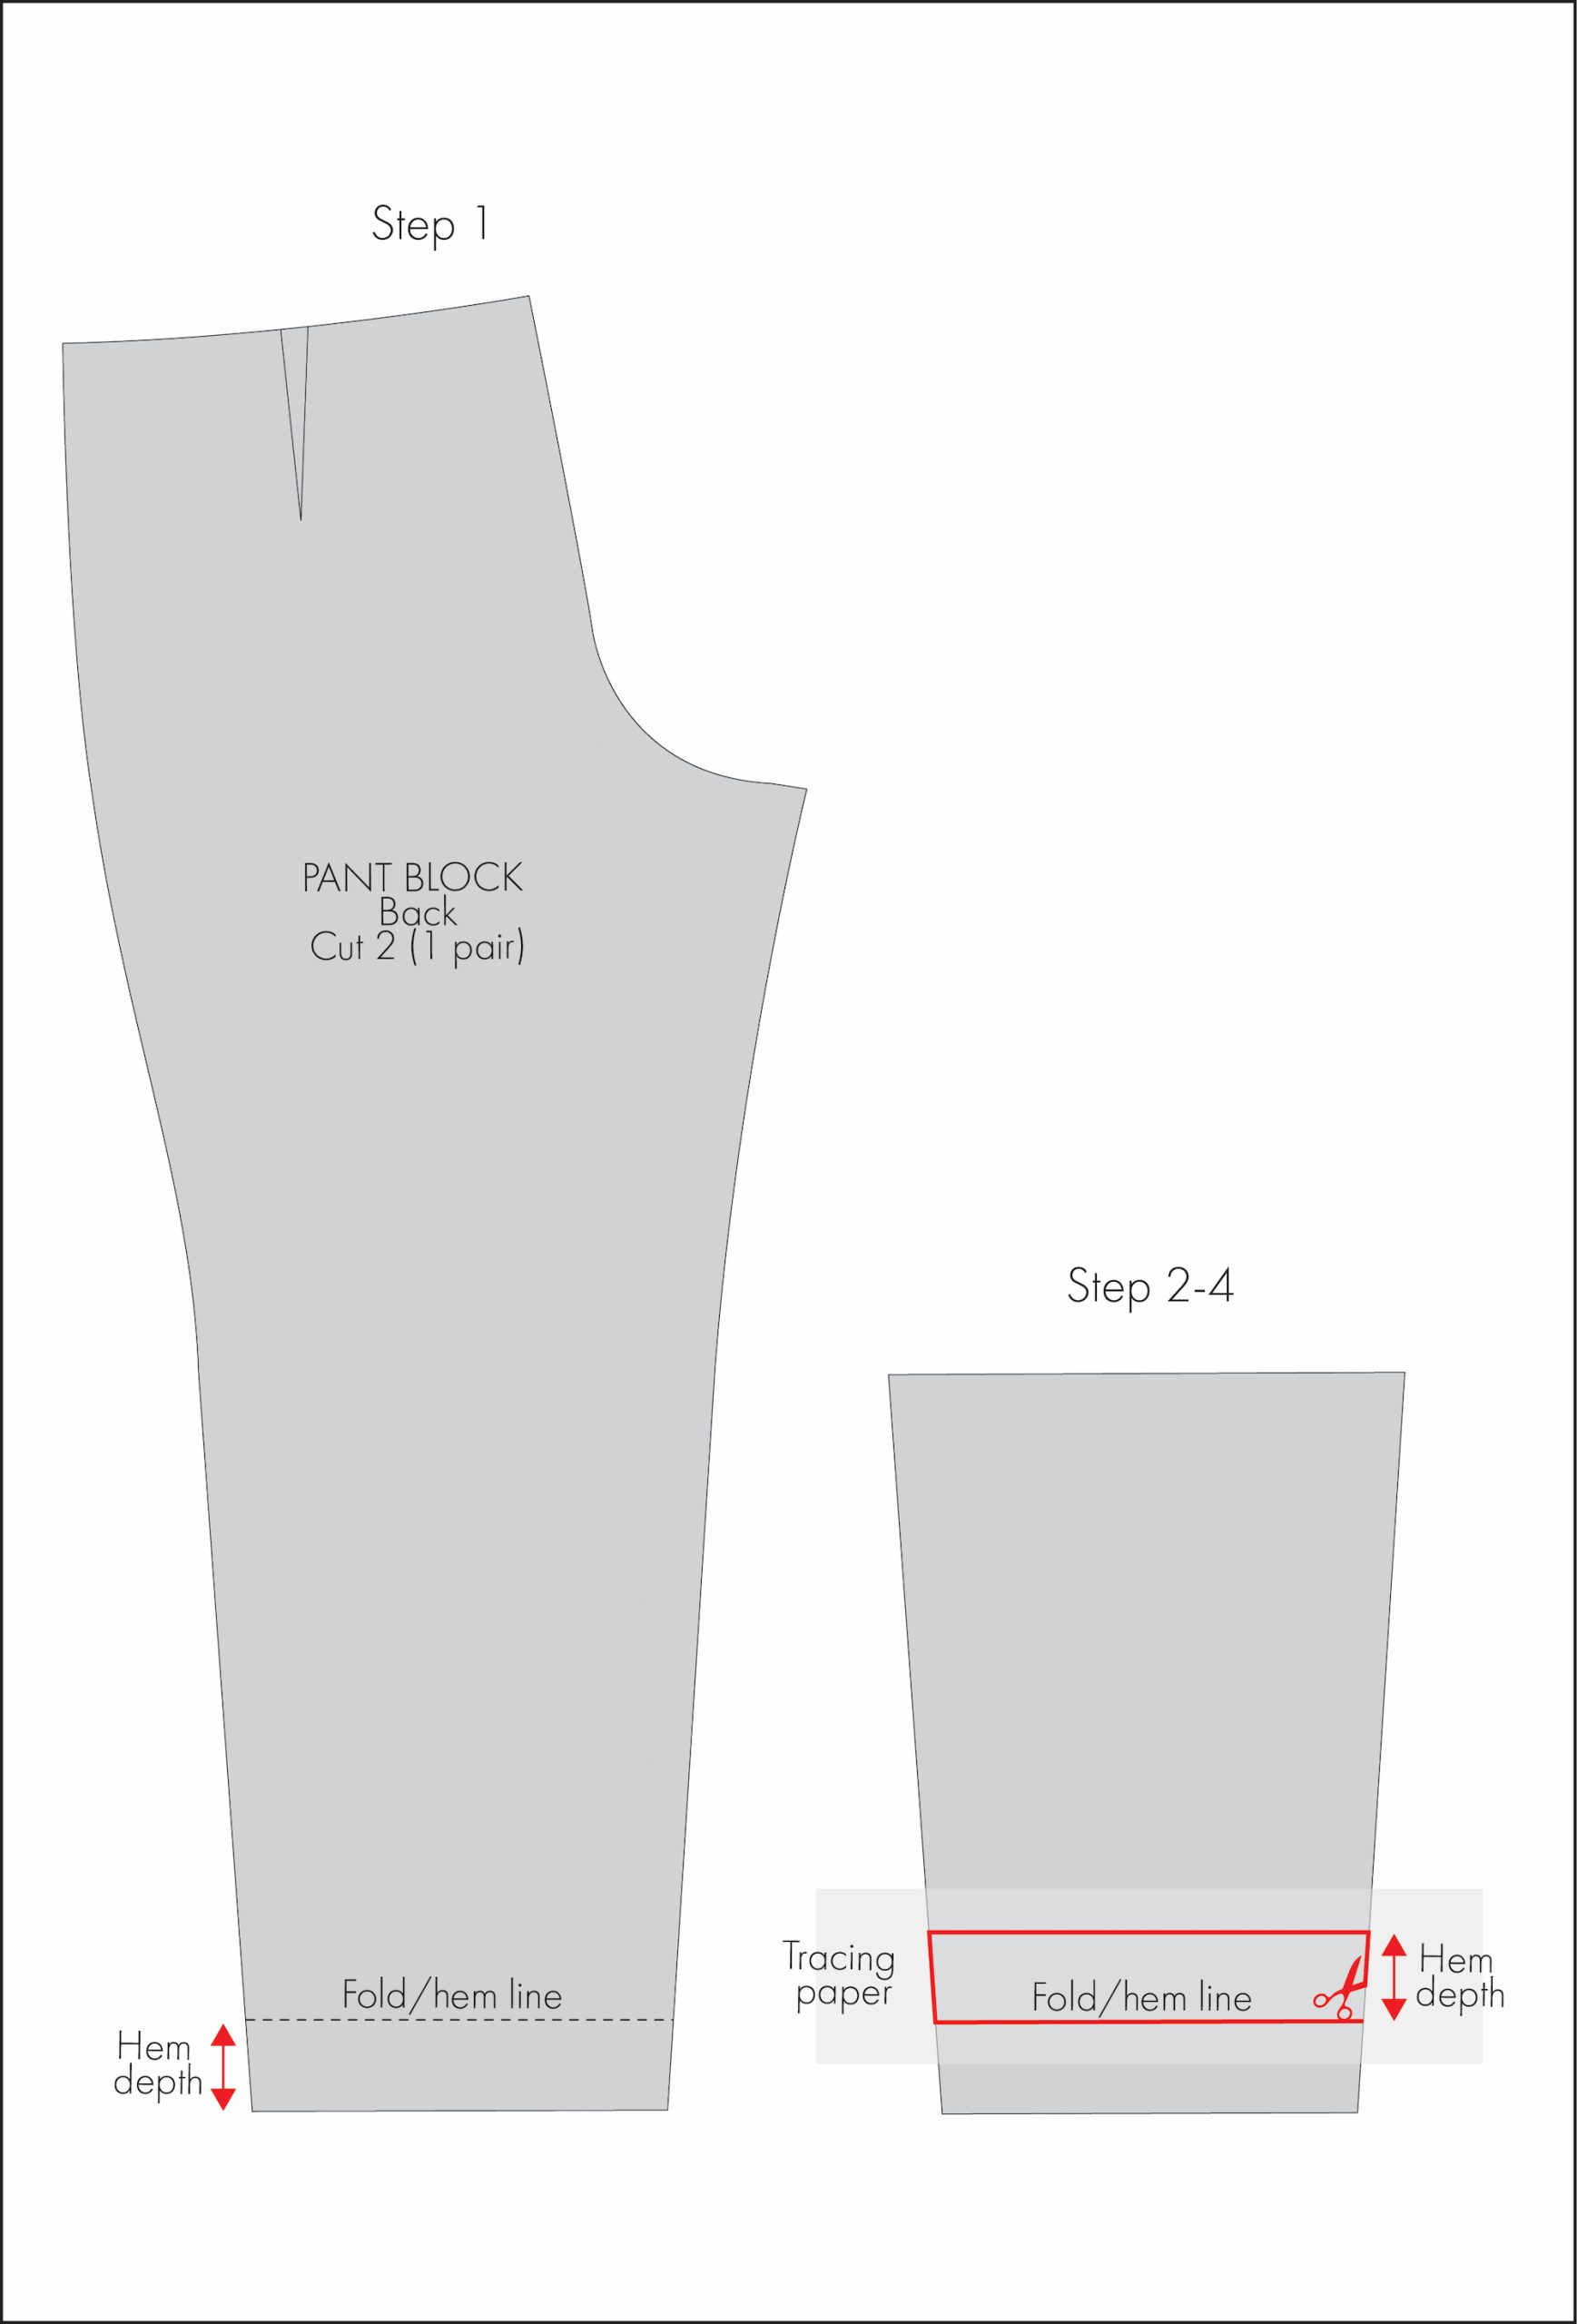
It’s important to ensure the hem is properly trued, especially in areas where the design tapers. For example, as shown in Diagram 1 below, if the hem of a tapered pant leg is folded up without adjustment, the cut line will be narrower than the pant leg itself. This mismatch can lead to distortion or an uneven finish.

To demonstrate how to true this area, I’ll use a basic back pant block with a tapered leg and a deep single-fold hem. I’ll walk you through two methods—one tailored for manual pattern making and another that works for both manual and digital techniques.
Note: For clarity, I’ve removed the stitching lines in some of the examples used in this guide, assuming they’ve already been checked and trued as covered in Part 1.
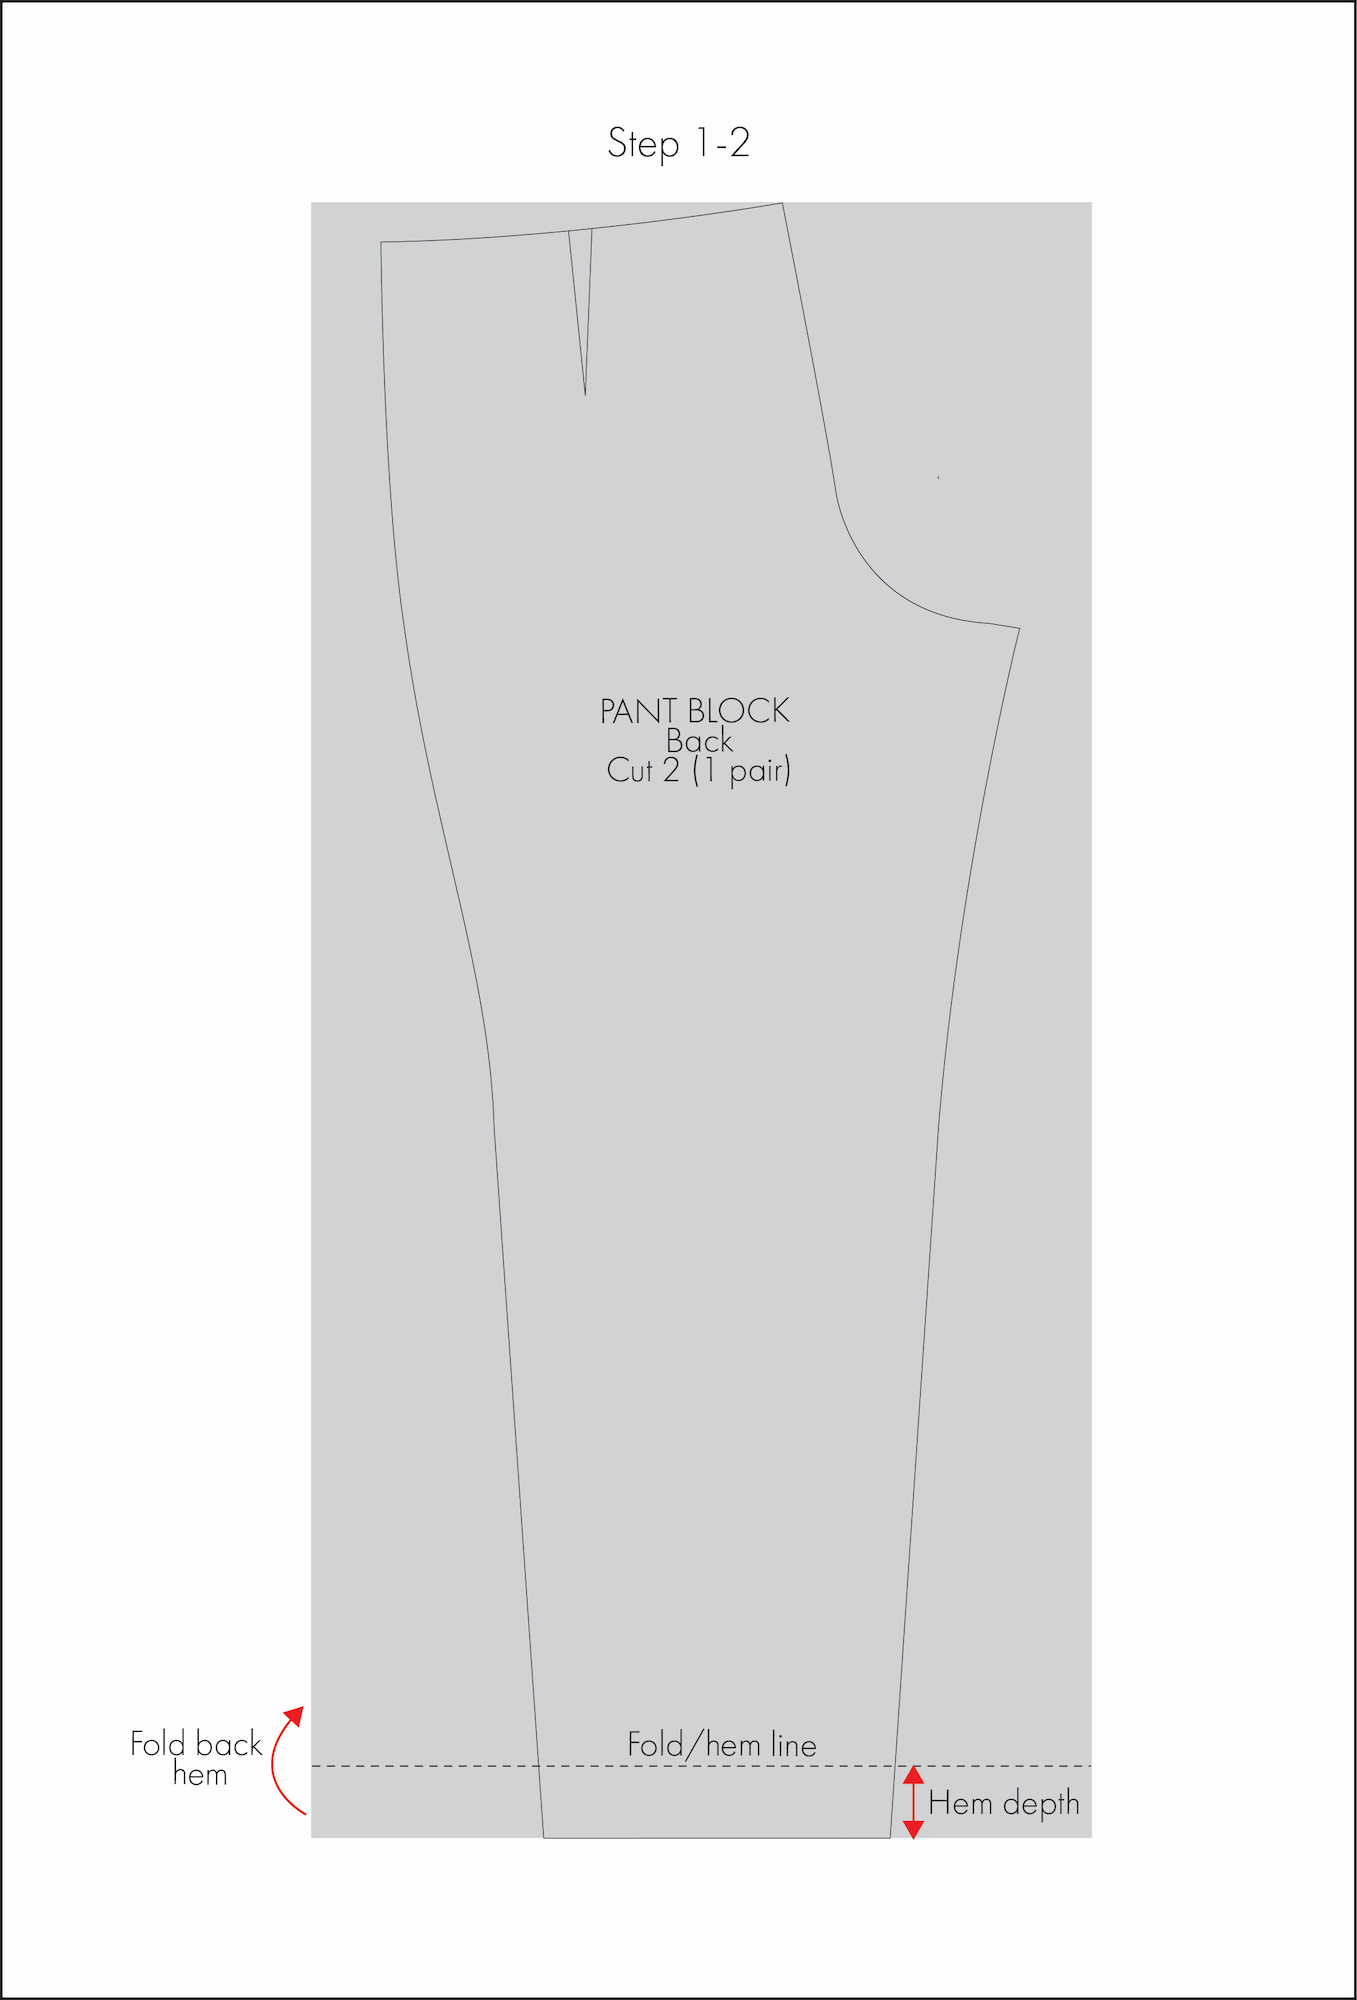
Method 1: The fold method (ideal for manual pattern making)
Truing before cutting out the pattern piece:
1. Determine the hem depth and mark the fold line.
2. Fold back the hem along the marked fold line.
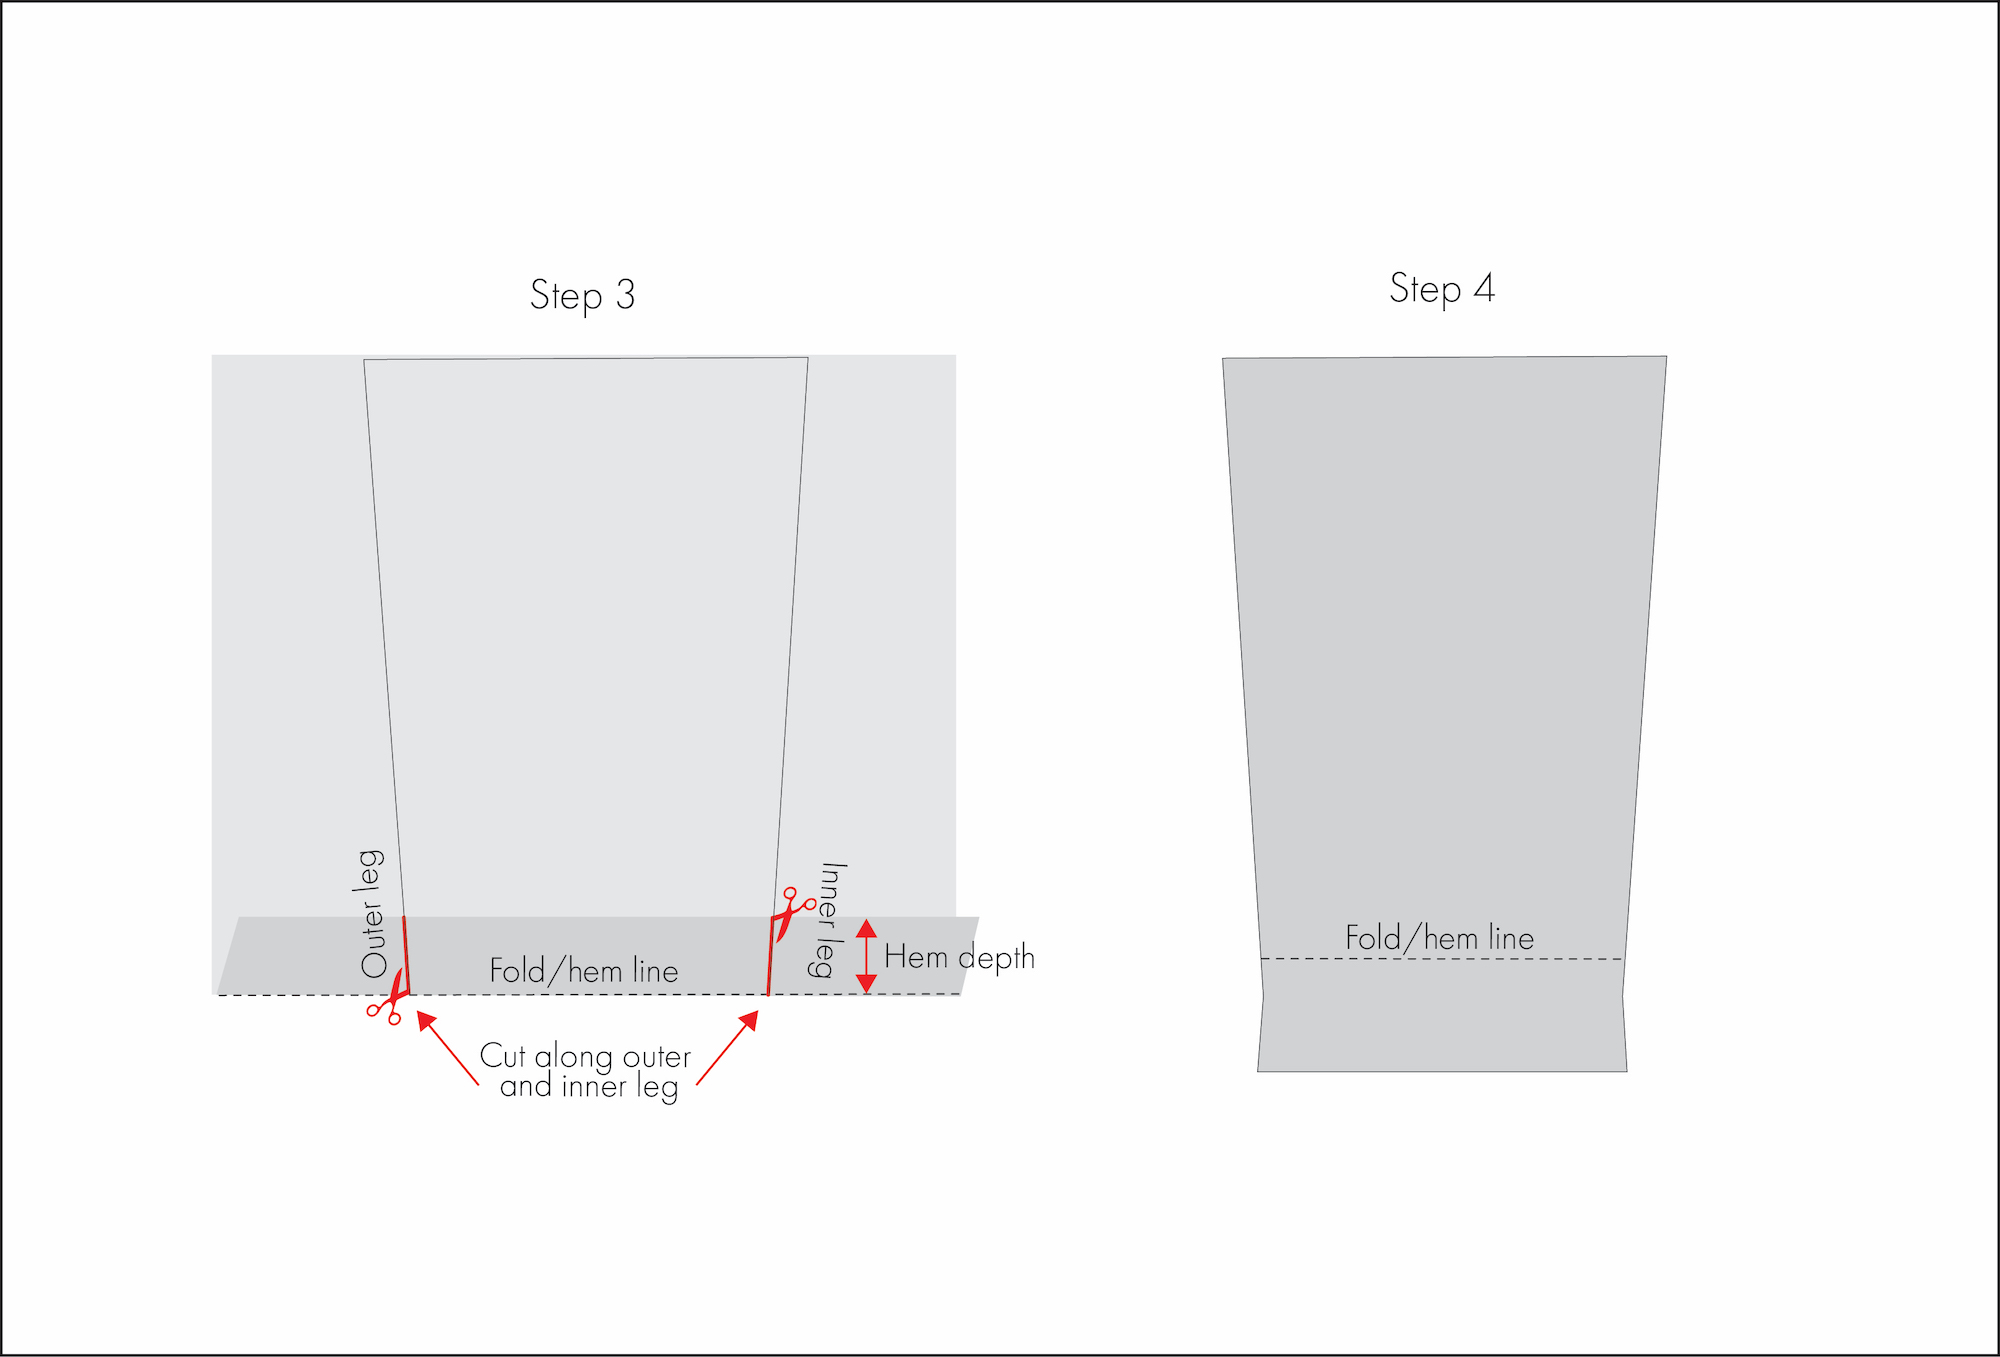
3. Cut along the outer and inner leg lines to the depth of the hem (refer to red cutting lines). Ensure both layers of the pattern paper are being cut.
4. Unfold the hem and cut out the remainder of the pattern piece as normal.
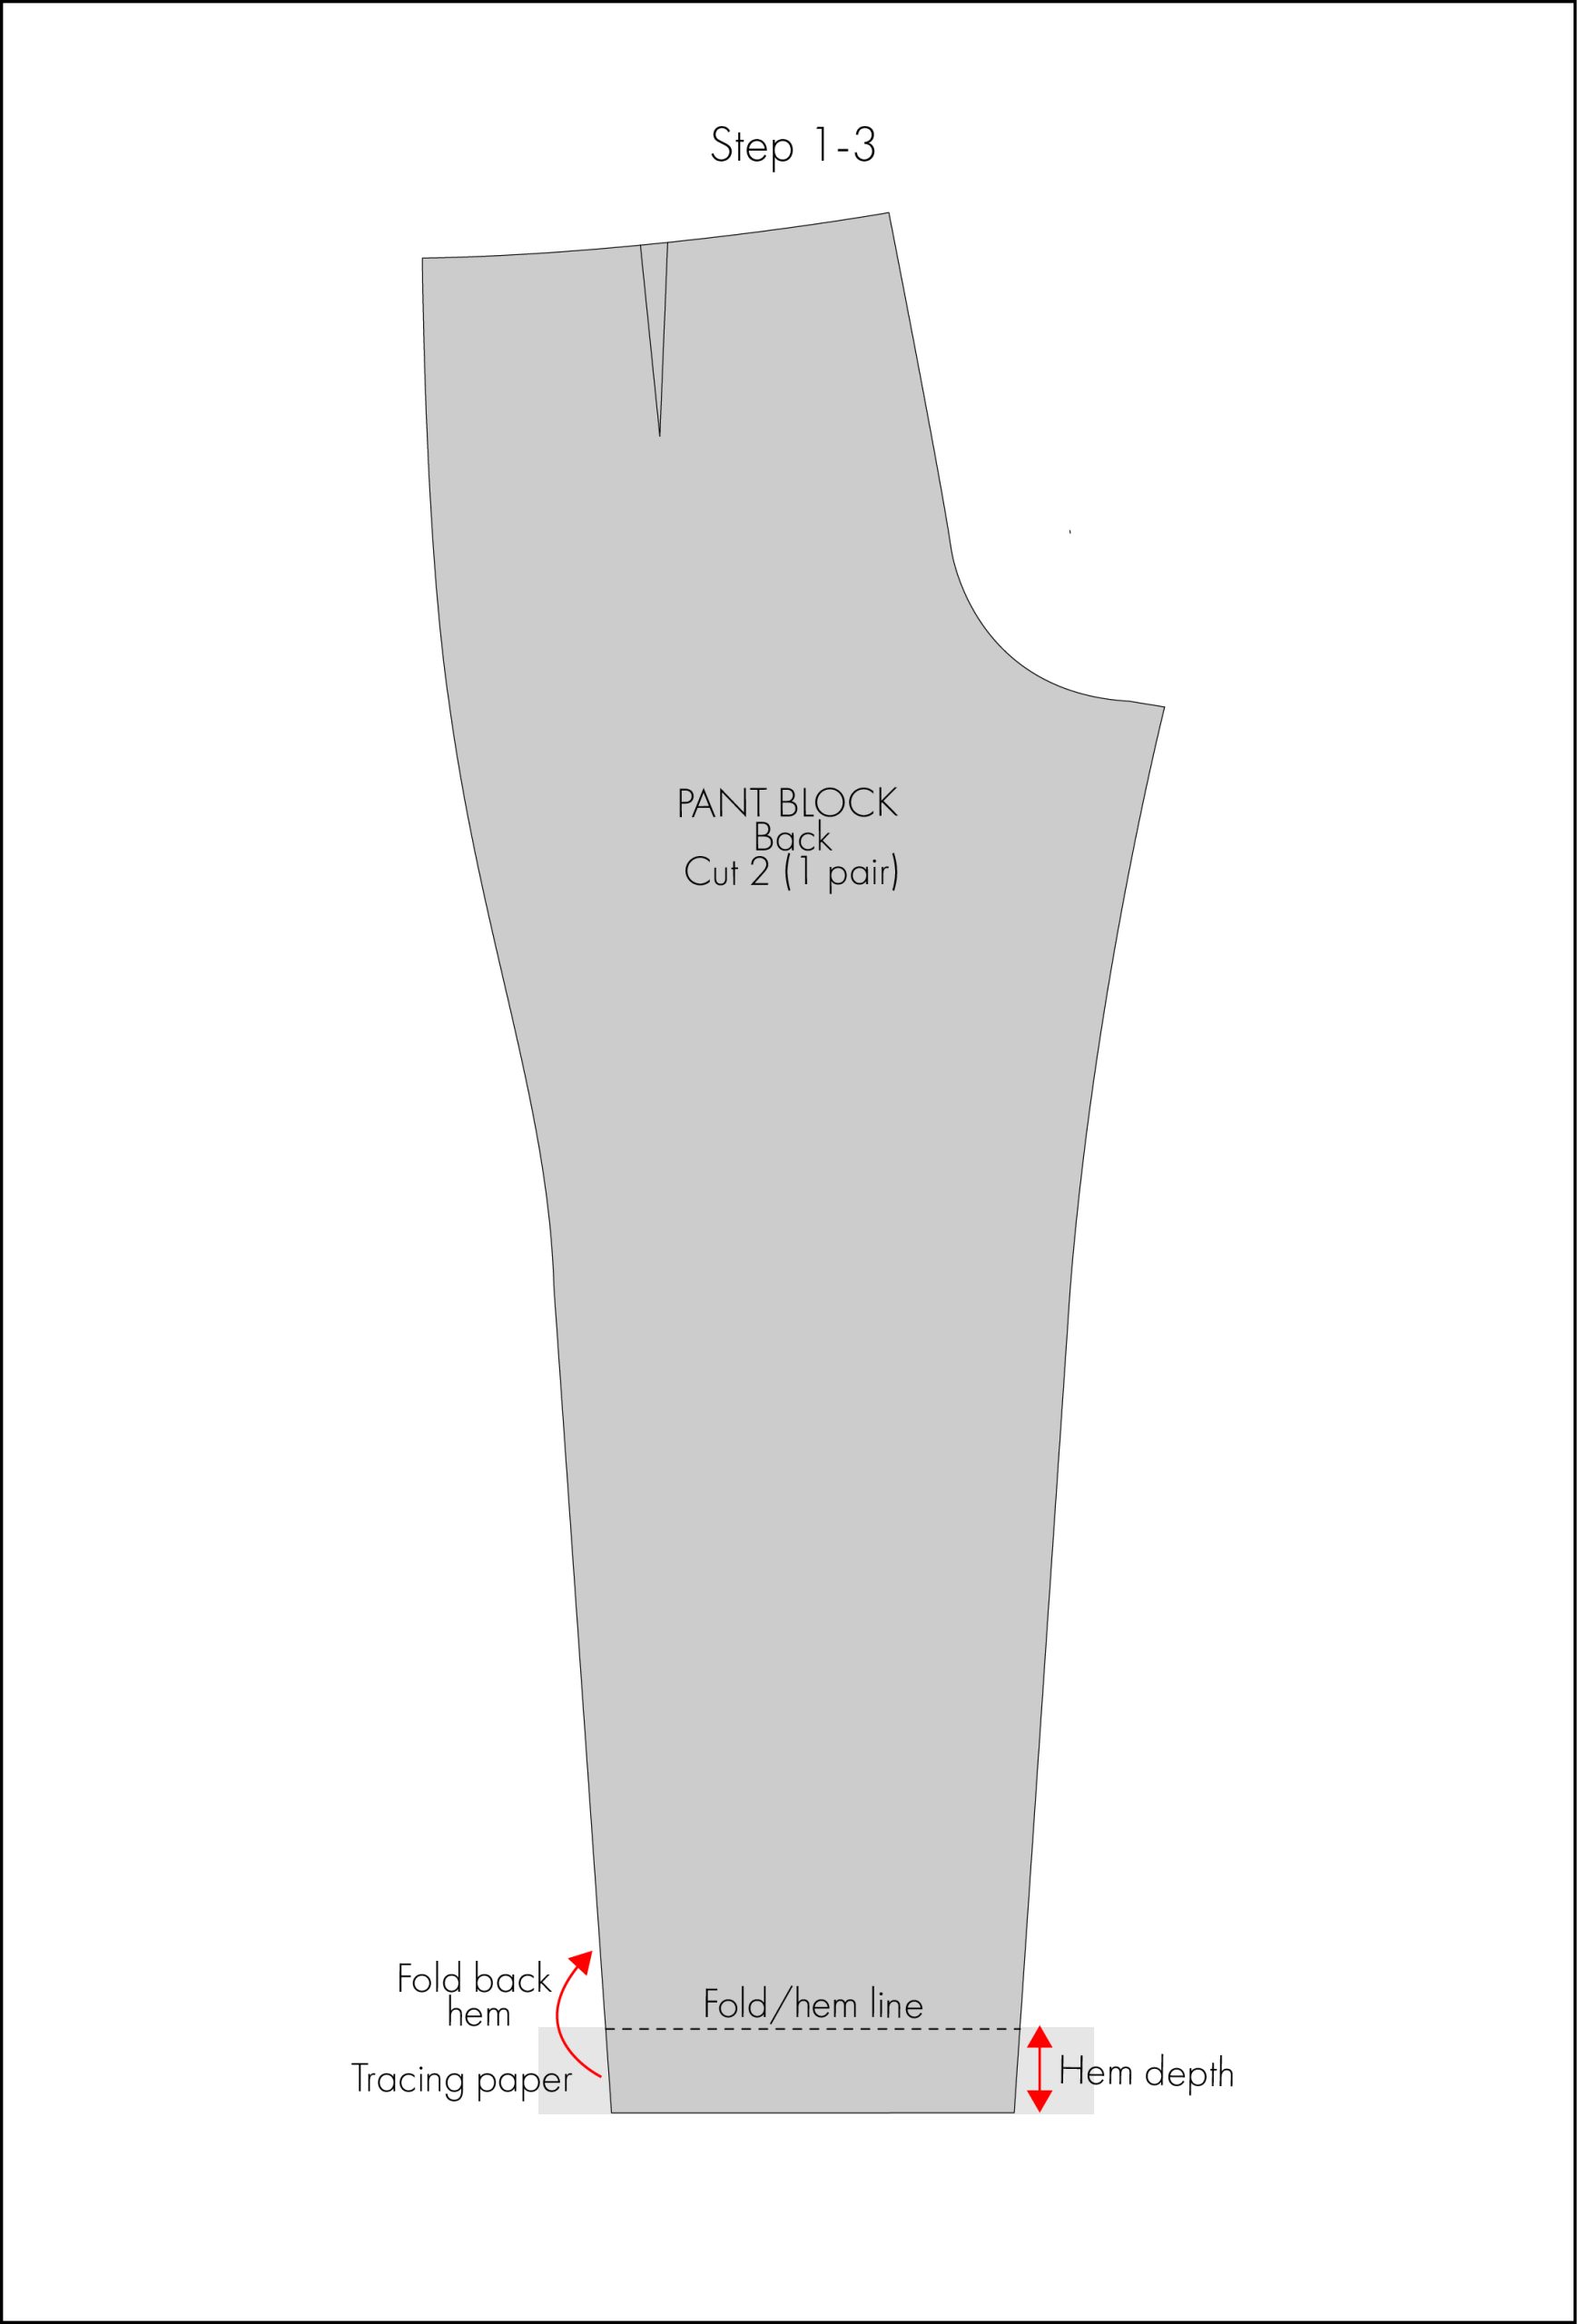
Truing after cutting out the pattern piece:
1. Determine the hem depth and mark the fold line.
2. Attach a piece of tracing paper that is equal to the depth of the hem, but wider than the pant leg.
3. Fold back the hem along the marked fold line.
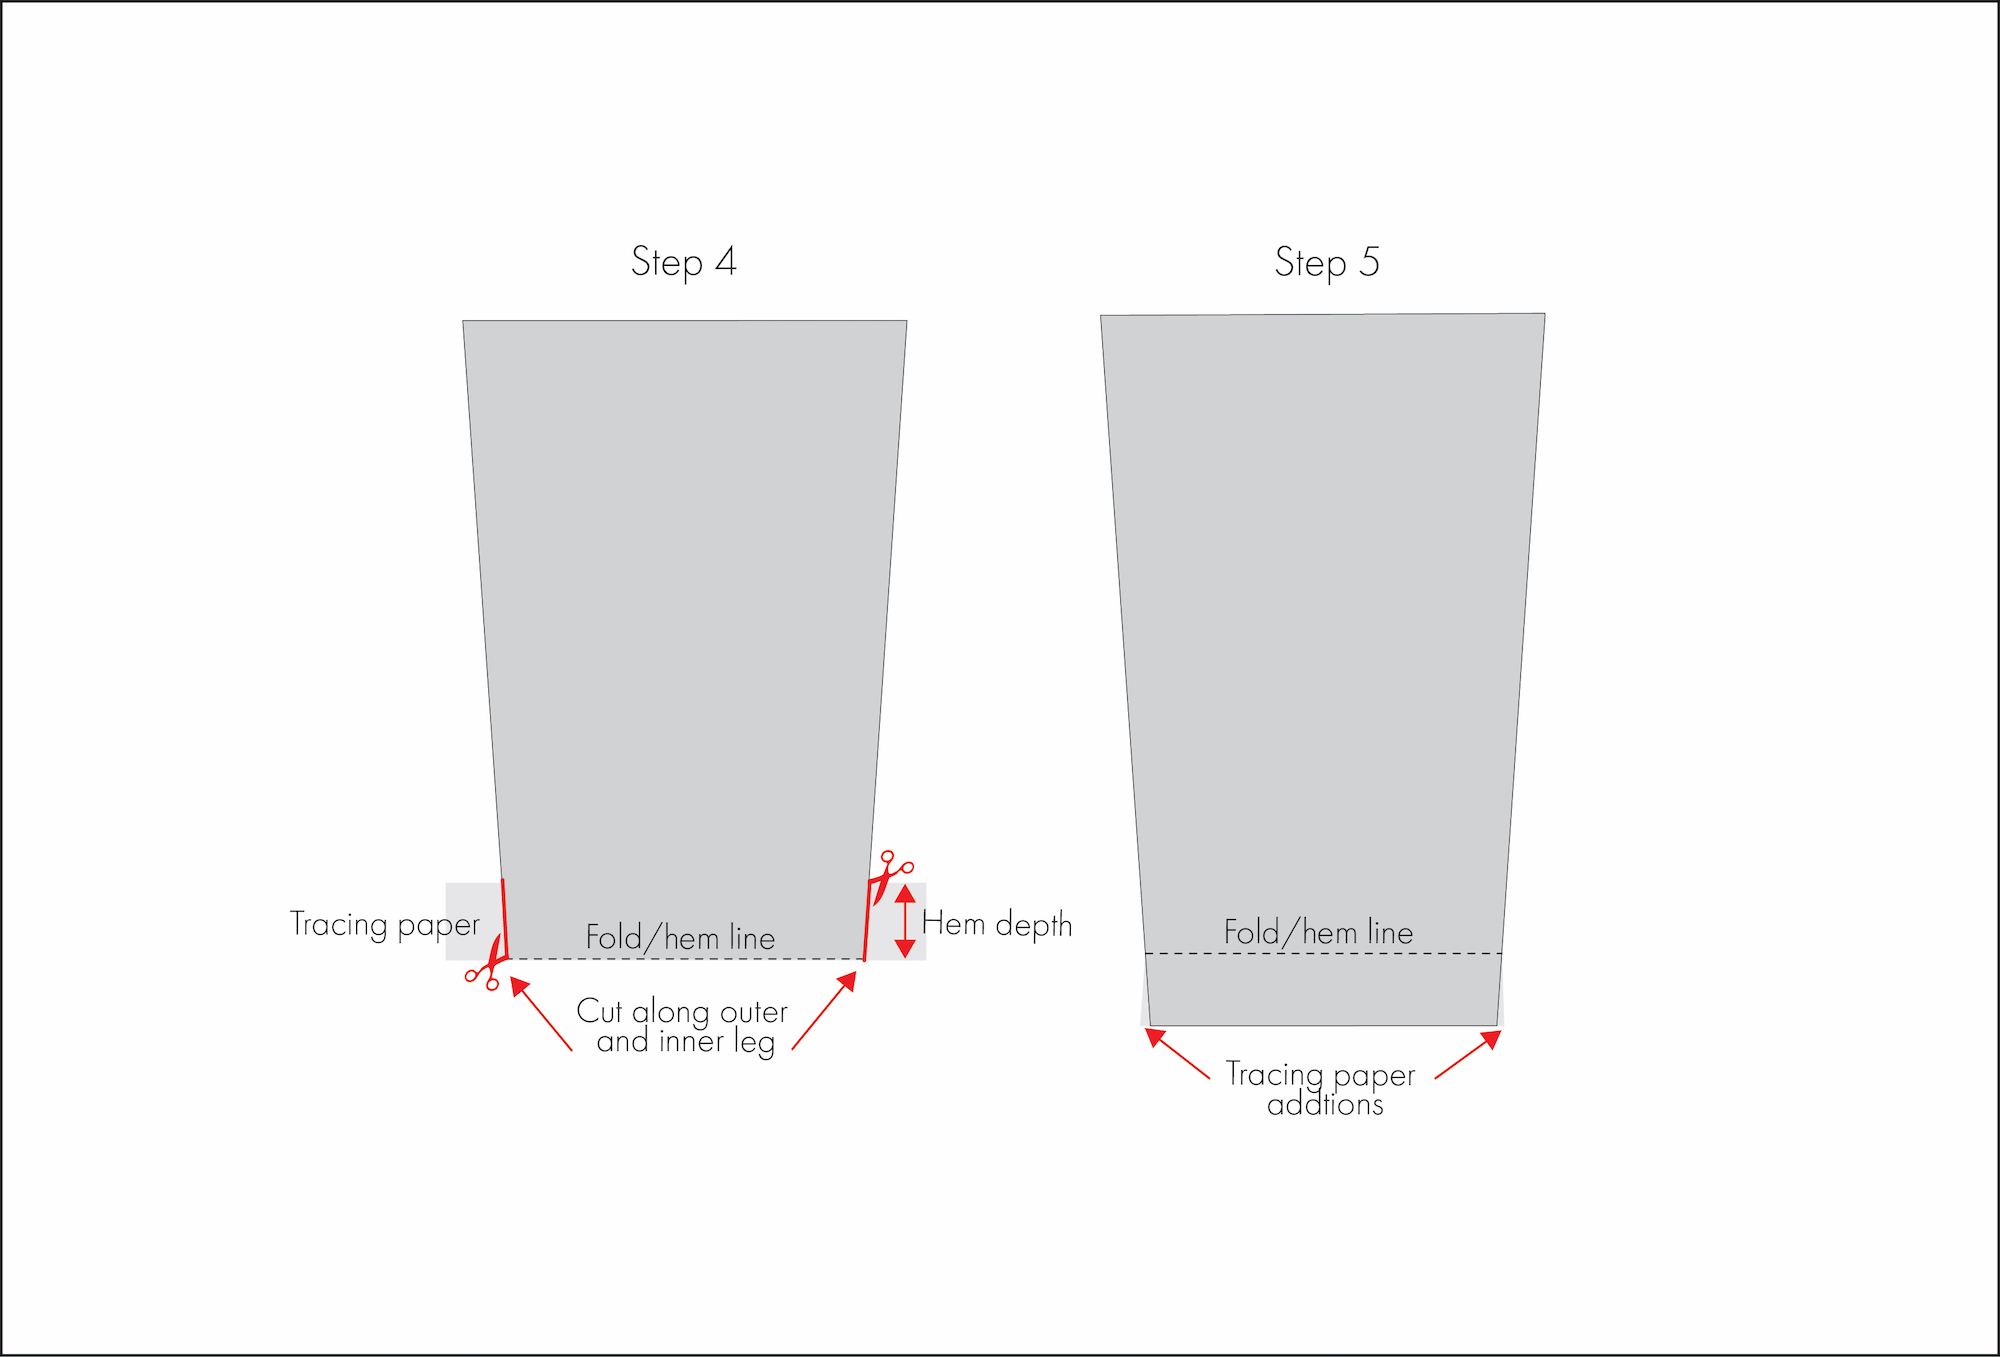
4. Cut along the inner and outer pant leg lines to the depth of the hem. Ensure the original pattern paper and tracing paper are being cut (refer to red cutting lines).
5. Unfold the hem—the additional tracing paper will complete the necessary pant leg shape.
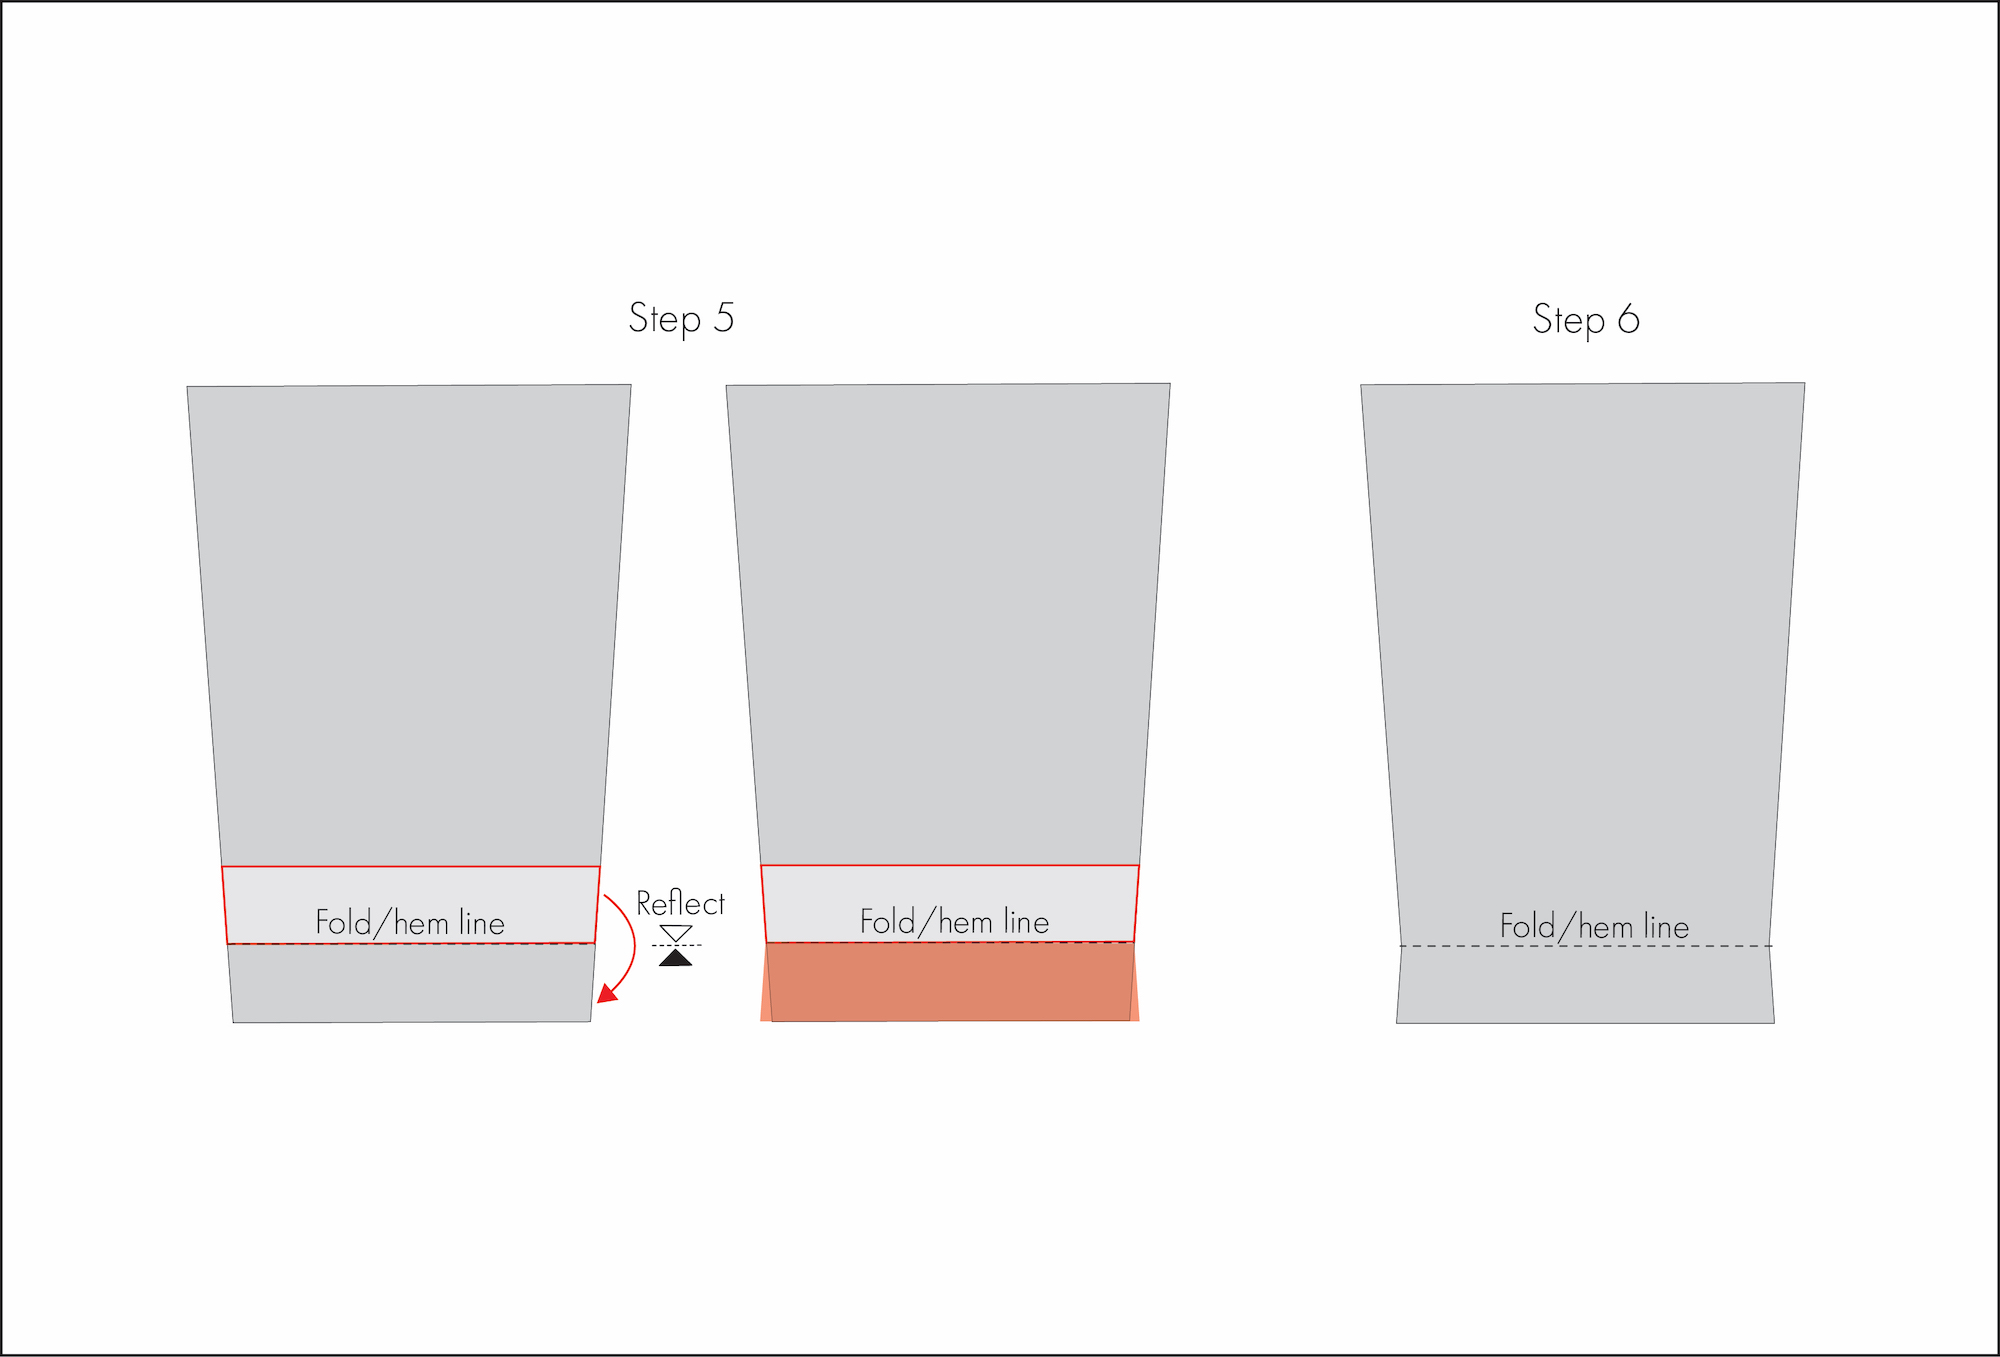
Method 2: Trace Method (suitable for both manual and digital pattern making)
For this example, I’ll demonstrate the manual method, as the same concept can be easily adapted when working digitally.
1. Determine the hem depth and mark the fold line.
2. Place a piece of tracing paper over the finished hem area (i.e. the area above the fold/hem line).
3. Create a working piece by tracing the pant leg along the fold/hem line, extending up to the depth of the hem. For example, if the hem allowance is 4cm, trace a 4cm-deep section of the pant leg above the fold/hem line.
4. Cut out the working piece from the tracing paper (refer to red cutting line).
5. Reflect this working piece downward along the fold/hem line.
6. Re-trace the new hem shape or attach the working piece to the pattern.
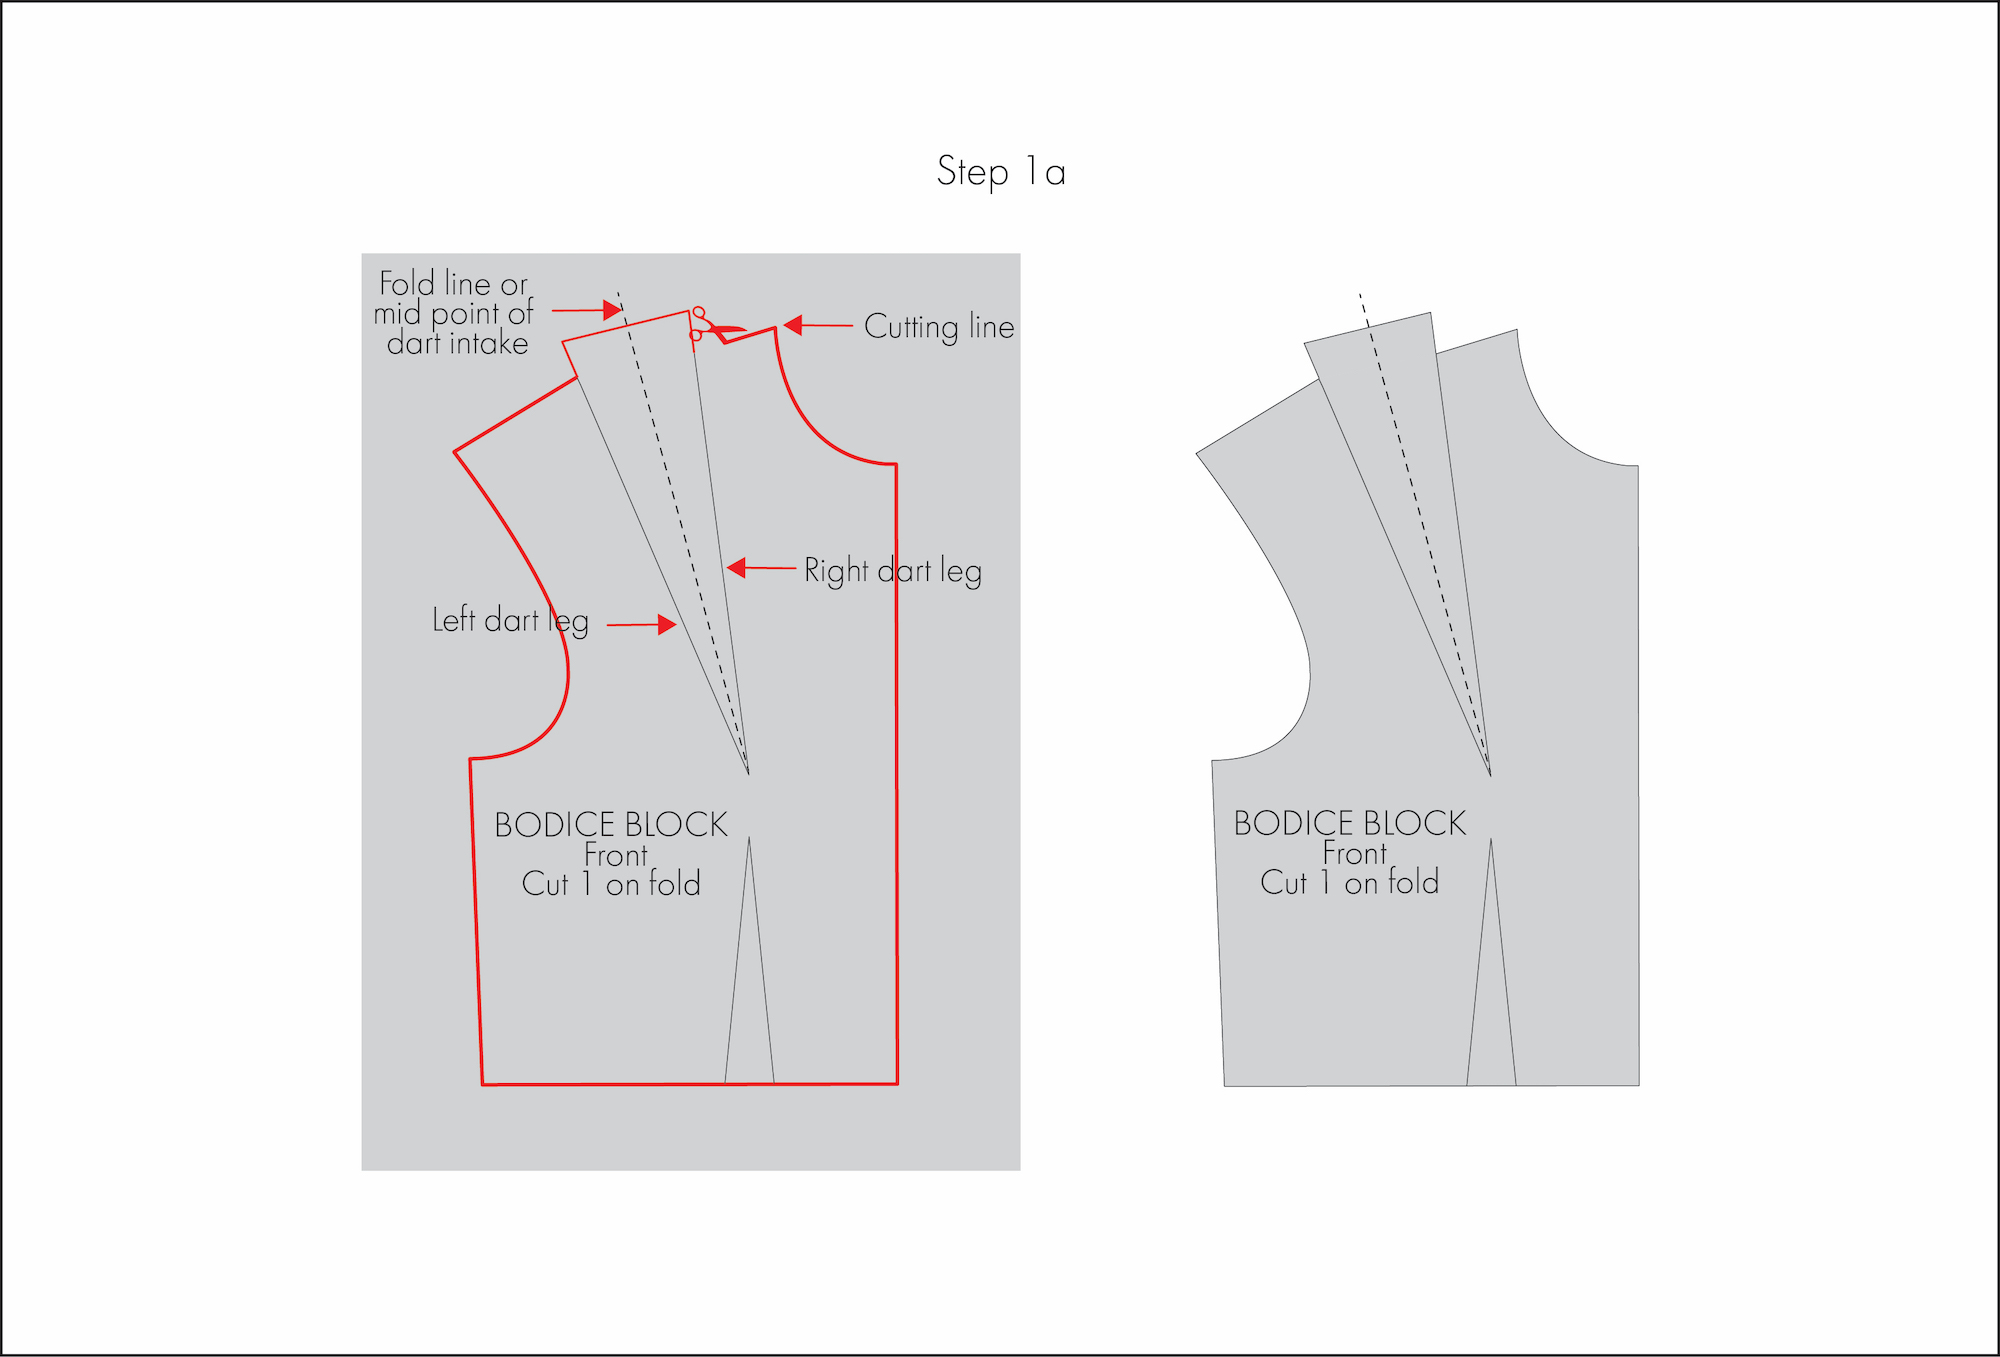
How to true a dart
To demonstrate how to true a dart, I’ll use a basic front bodice block with a shoulder dart. Once again, I’ll walk you through two methods—one designed for manual pattern making and another that works for both manual and digital techniques.
Method 1: The fold method (ideal for manual pattern making)
1a. Truing before cutting out the pattern piece: Extend the left and right dart legs a couple of centimetres beyond the pattern piece. Cut around the pattern piece as usual, including the dart extension (refer to red cutting line).
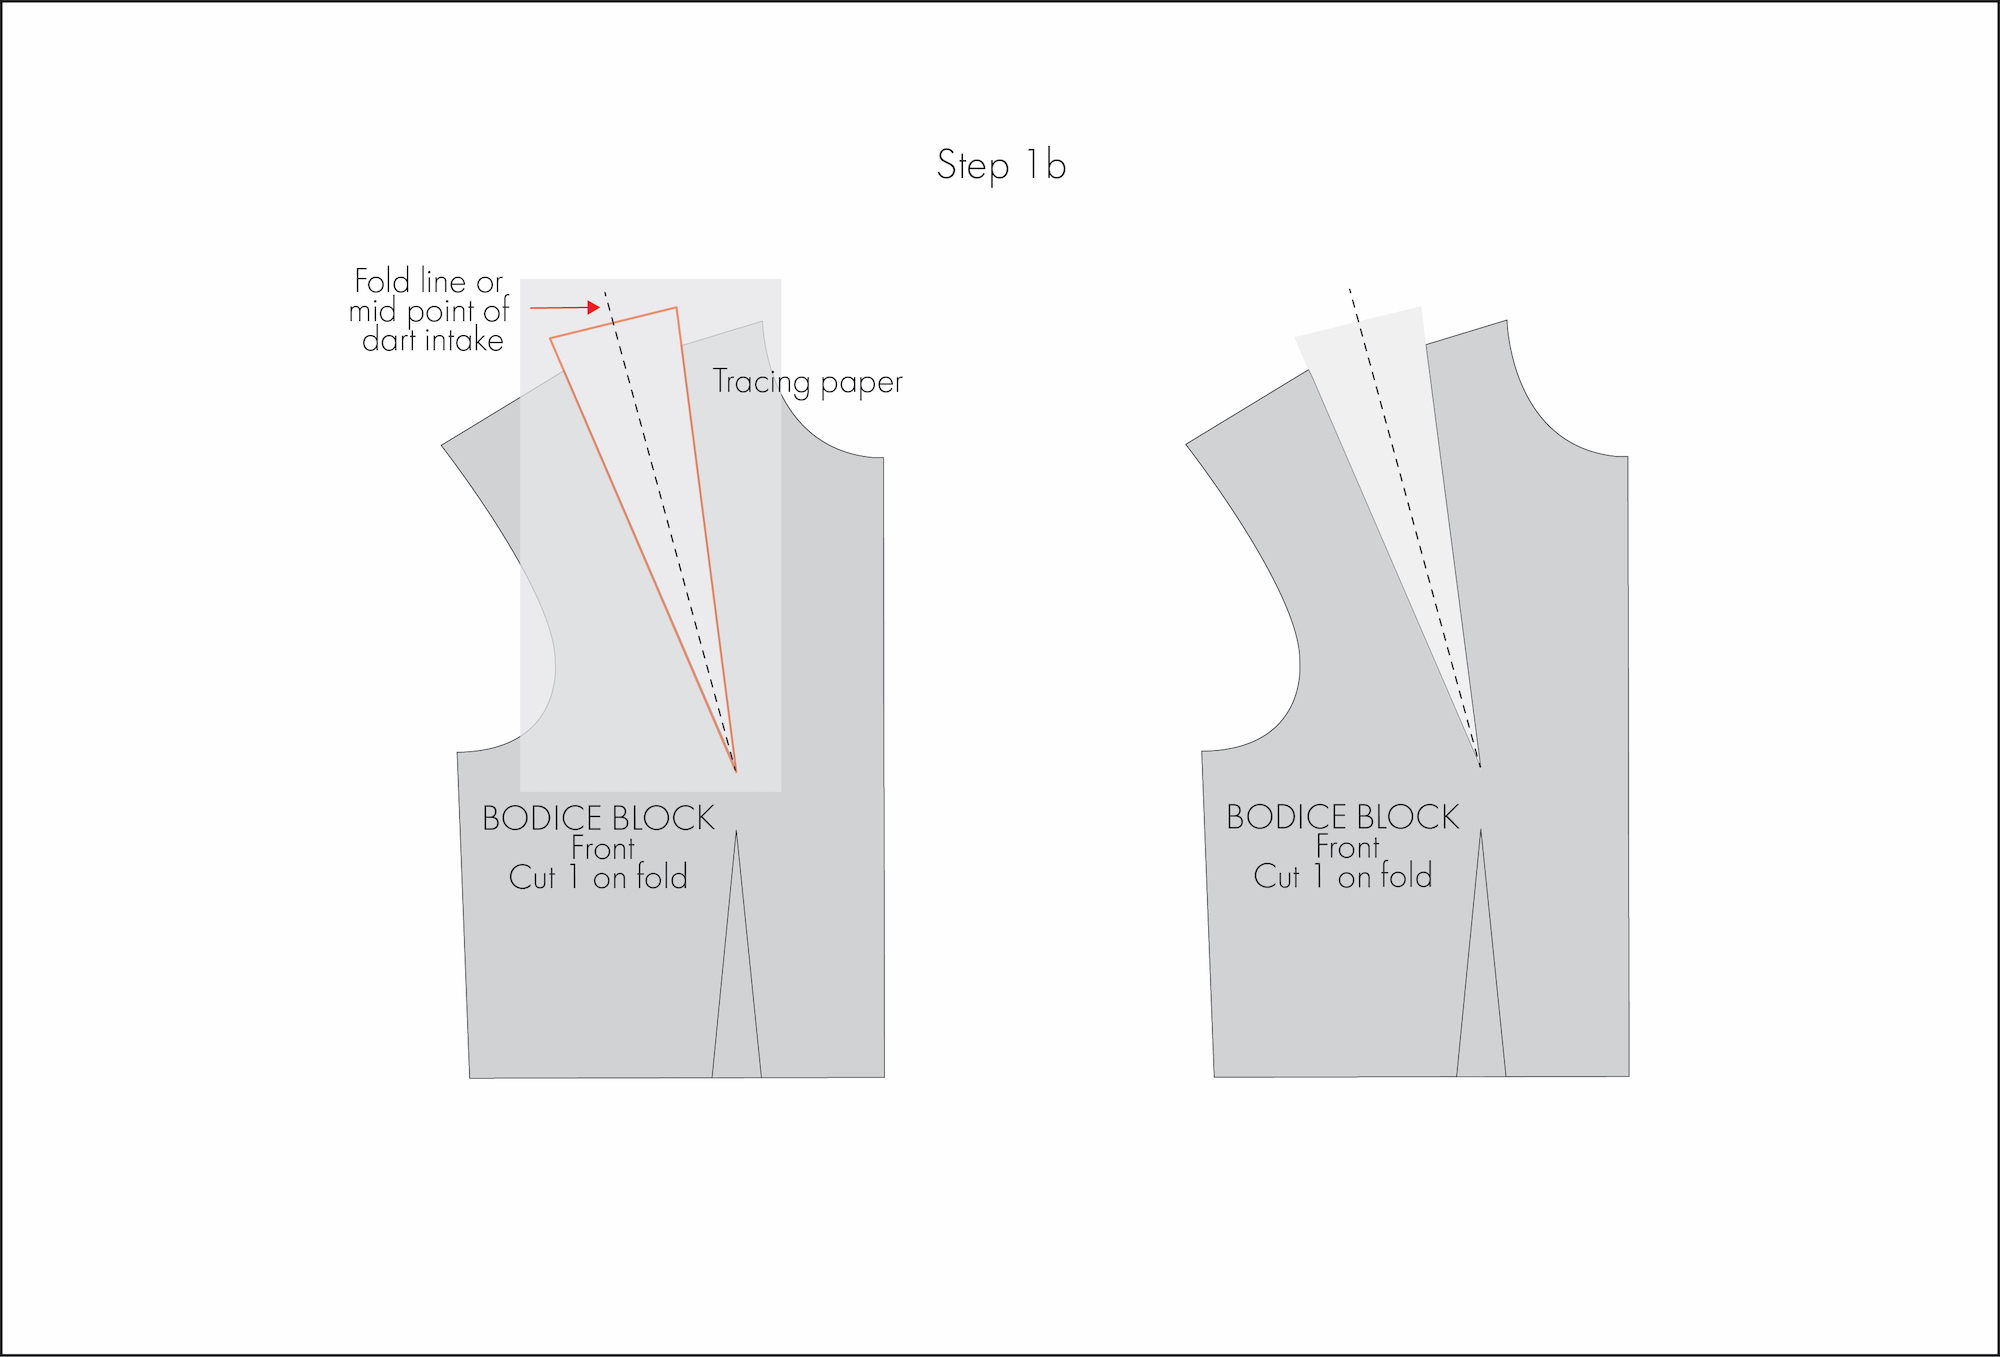
1b. Truing after cutting out the pattern piece: Trace the dart intake onto a separate piece of paper, again extending the dart legs beyond the pattern piece. Attach this work piece to the pattern.
2. Decide which direction the dart will be pressed after sewing. Generally speaking, vertical darts (e.g., waist darts) are pressed toward the centre front or back, and horizontal darts (e.g., side seam darts) are pressed downward.
3. Fold the dart along the fold/midpoint line in the direction it will be pressed.
4. Cut the folded dart intake following the shoulder line (refer to red cutting line).
5. Unfold the dart to reveal the trued cutting line.

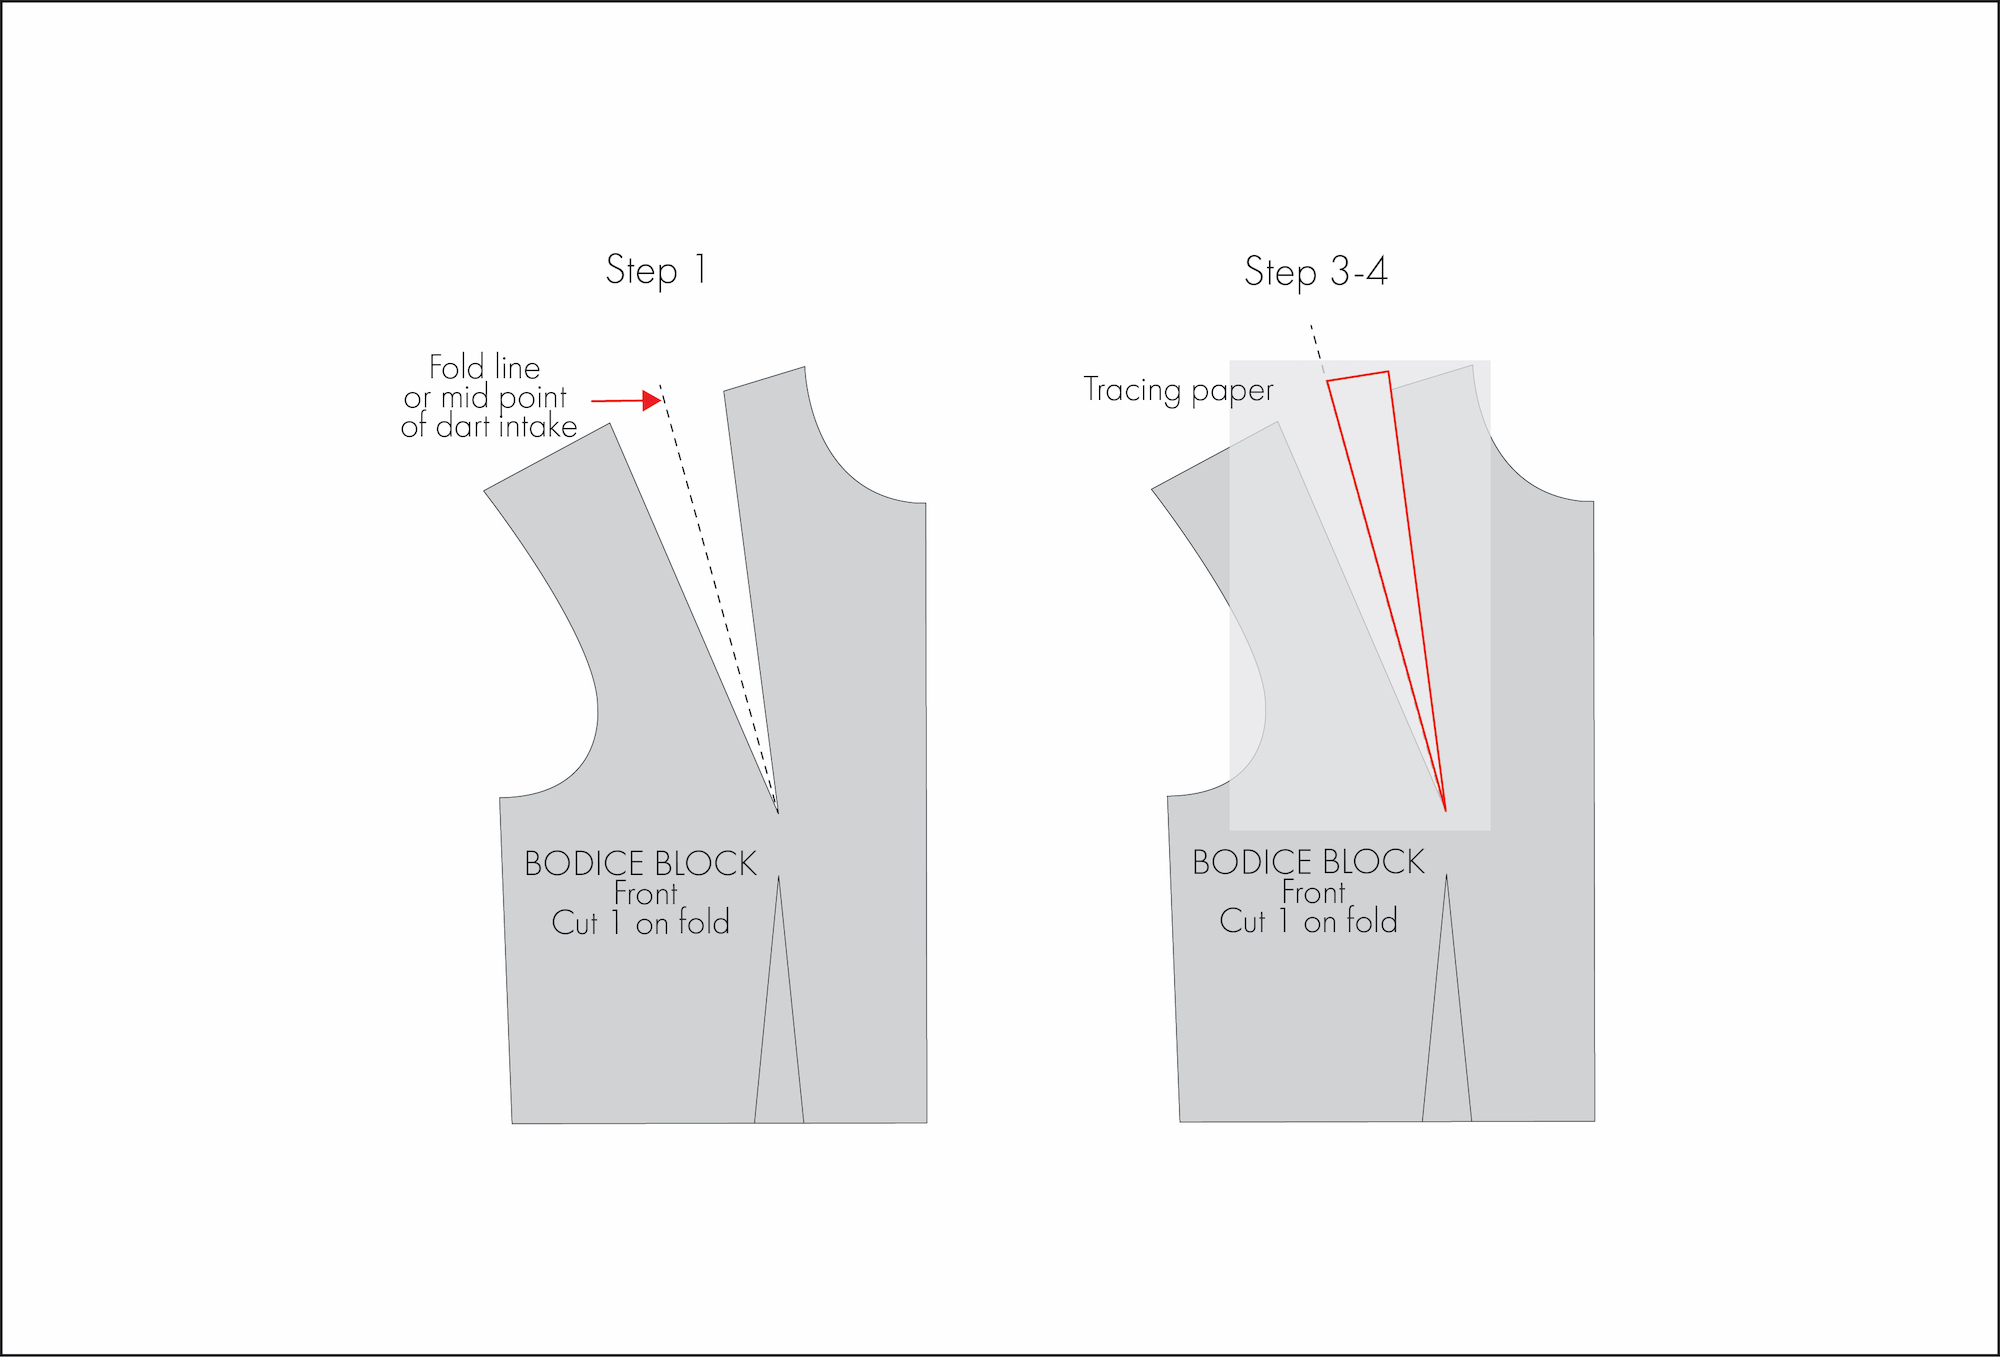
Method 2: Trace Method (suitable for both manual and digital pattern making)
Again, for this example, I’ll demonstrate the manual method.
1. Draw the fold/midpoint line of the dart intake and extend it slightly beyond the pattern piece.
2. Decide which direction the dart will be pressed after sewing.
3. Place a piece of tracing paper over the dart area.
4. Create a working piece by tracing the half of the dart that is closest to the direction in which it will be pressed. Extend this shape beyond the original pattern piece. In this example, the dart folds toward the centre front, so I have traced the right half.
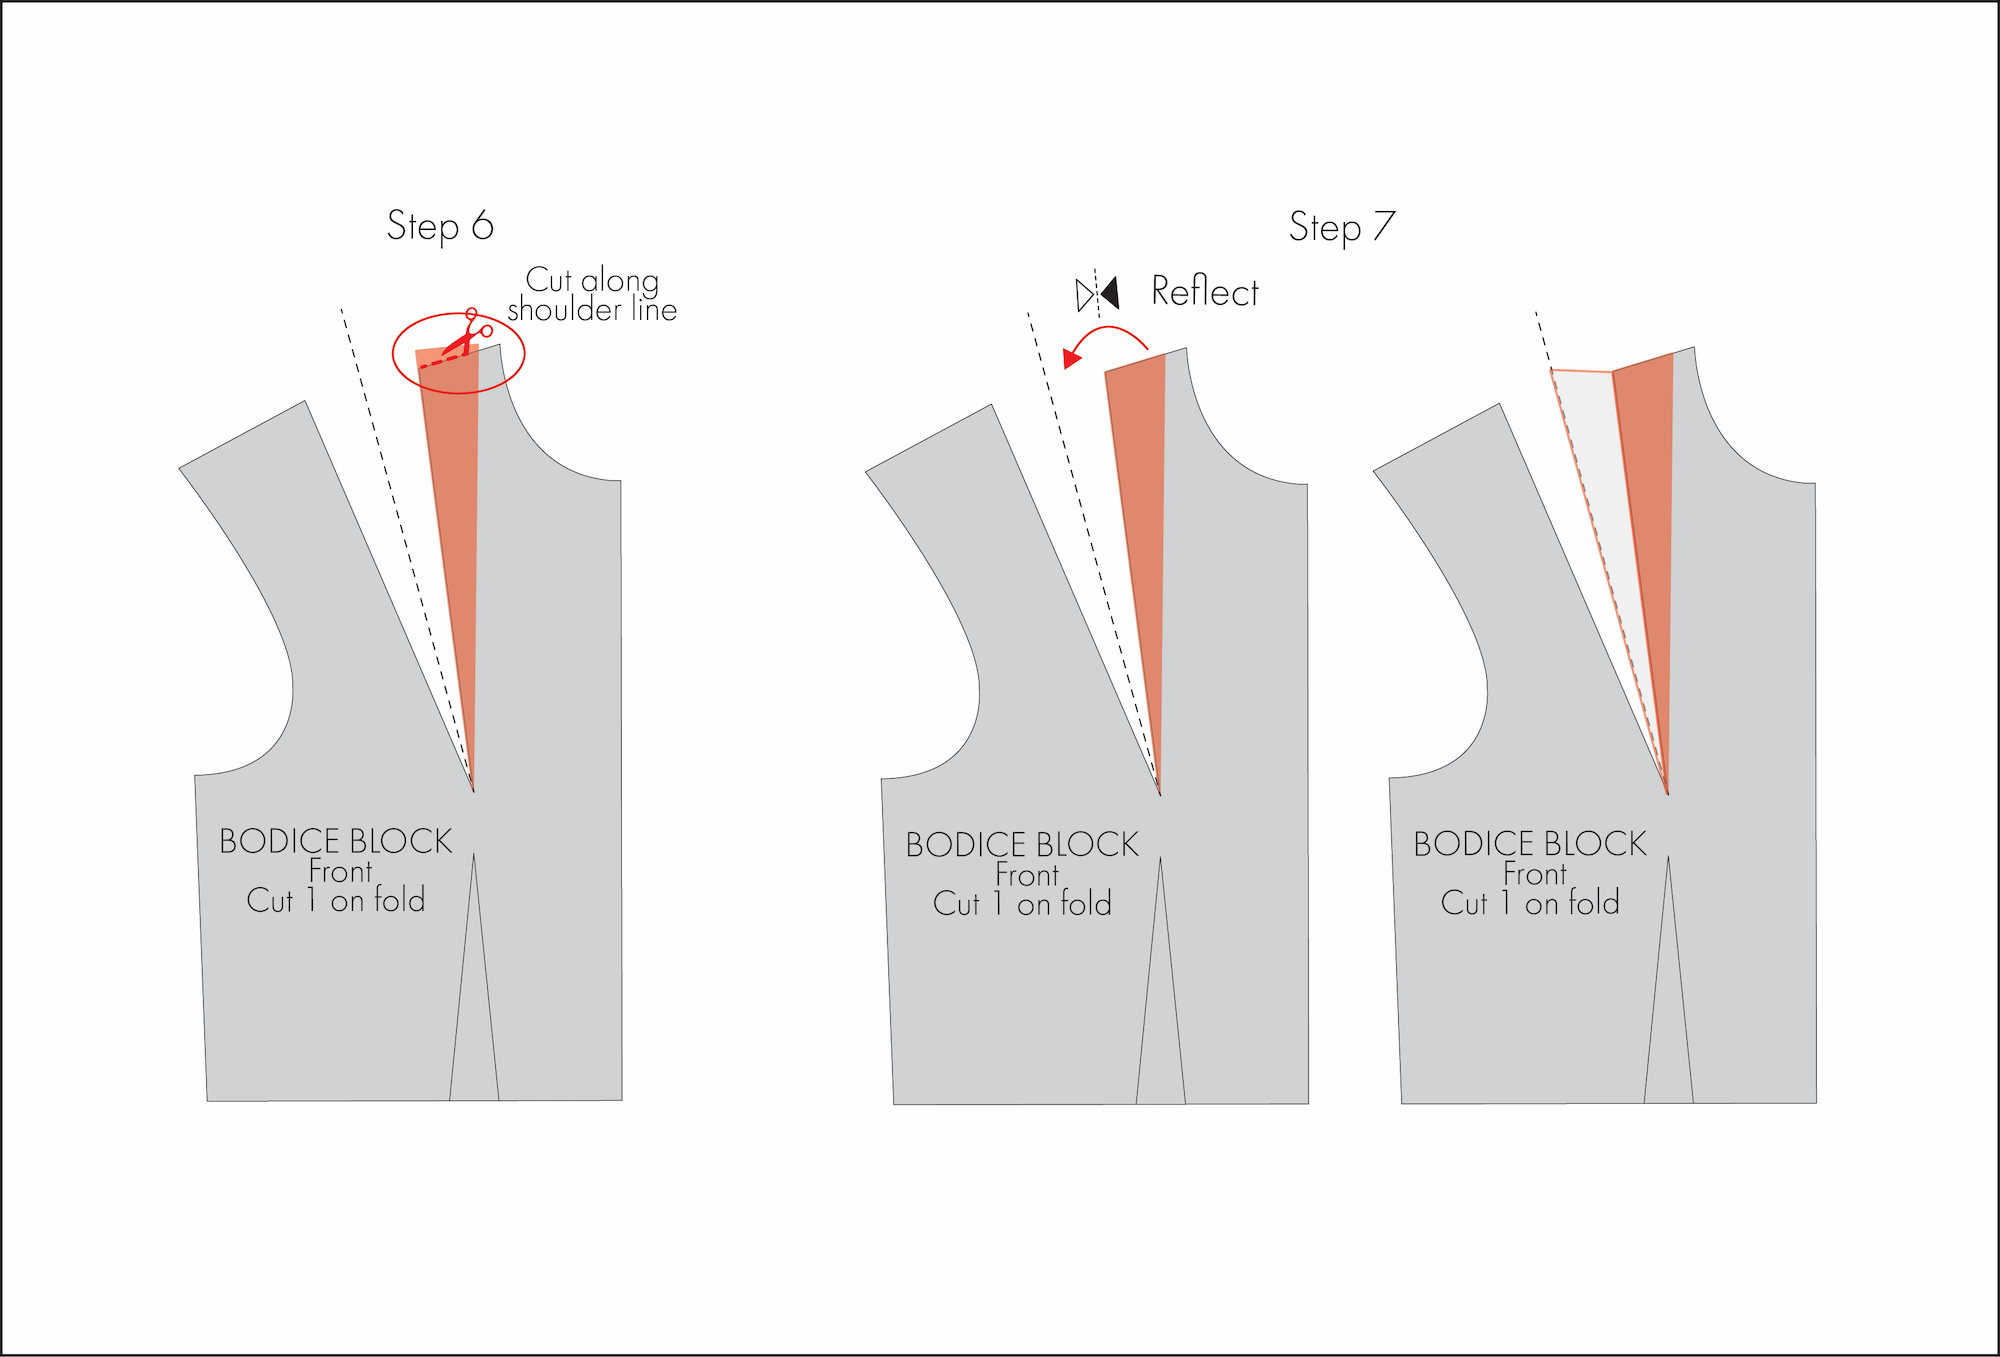
5. Reflect this working piece along the right dart leg to create a mirrored dart shape.

6. Cut this working piece to match the shoulder seam (refer to red cutting line).
7. Reflect this adjusted working piece back along the right dart leg.
8. Trace the top edge of the working piece onto the pattern, from the right dart leg to the fold/midpoint line.
9. Reflect this working piece once more, this time along the fold/midpoint line.
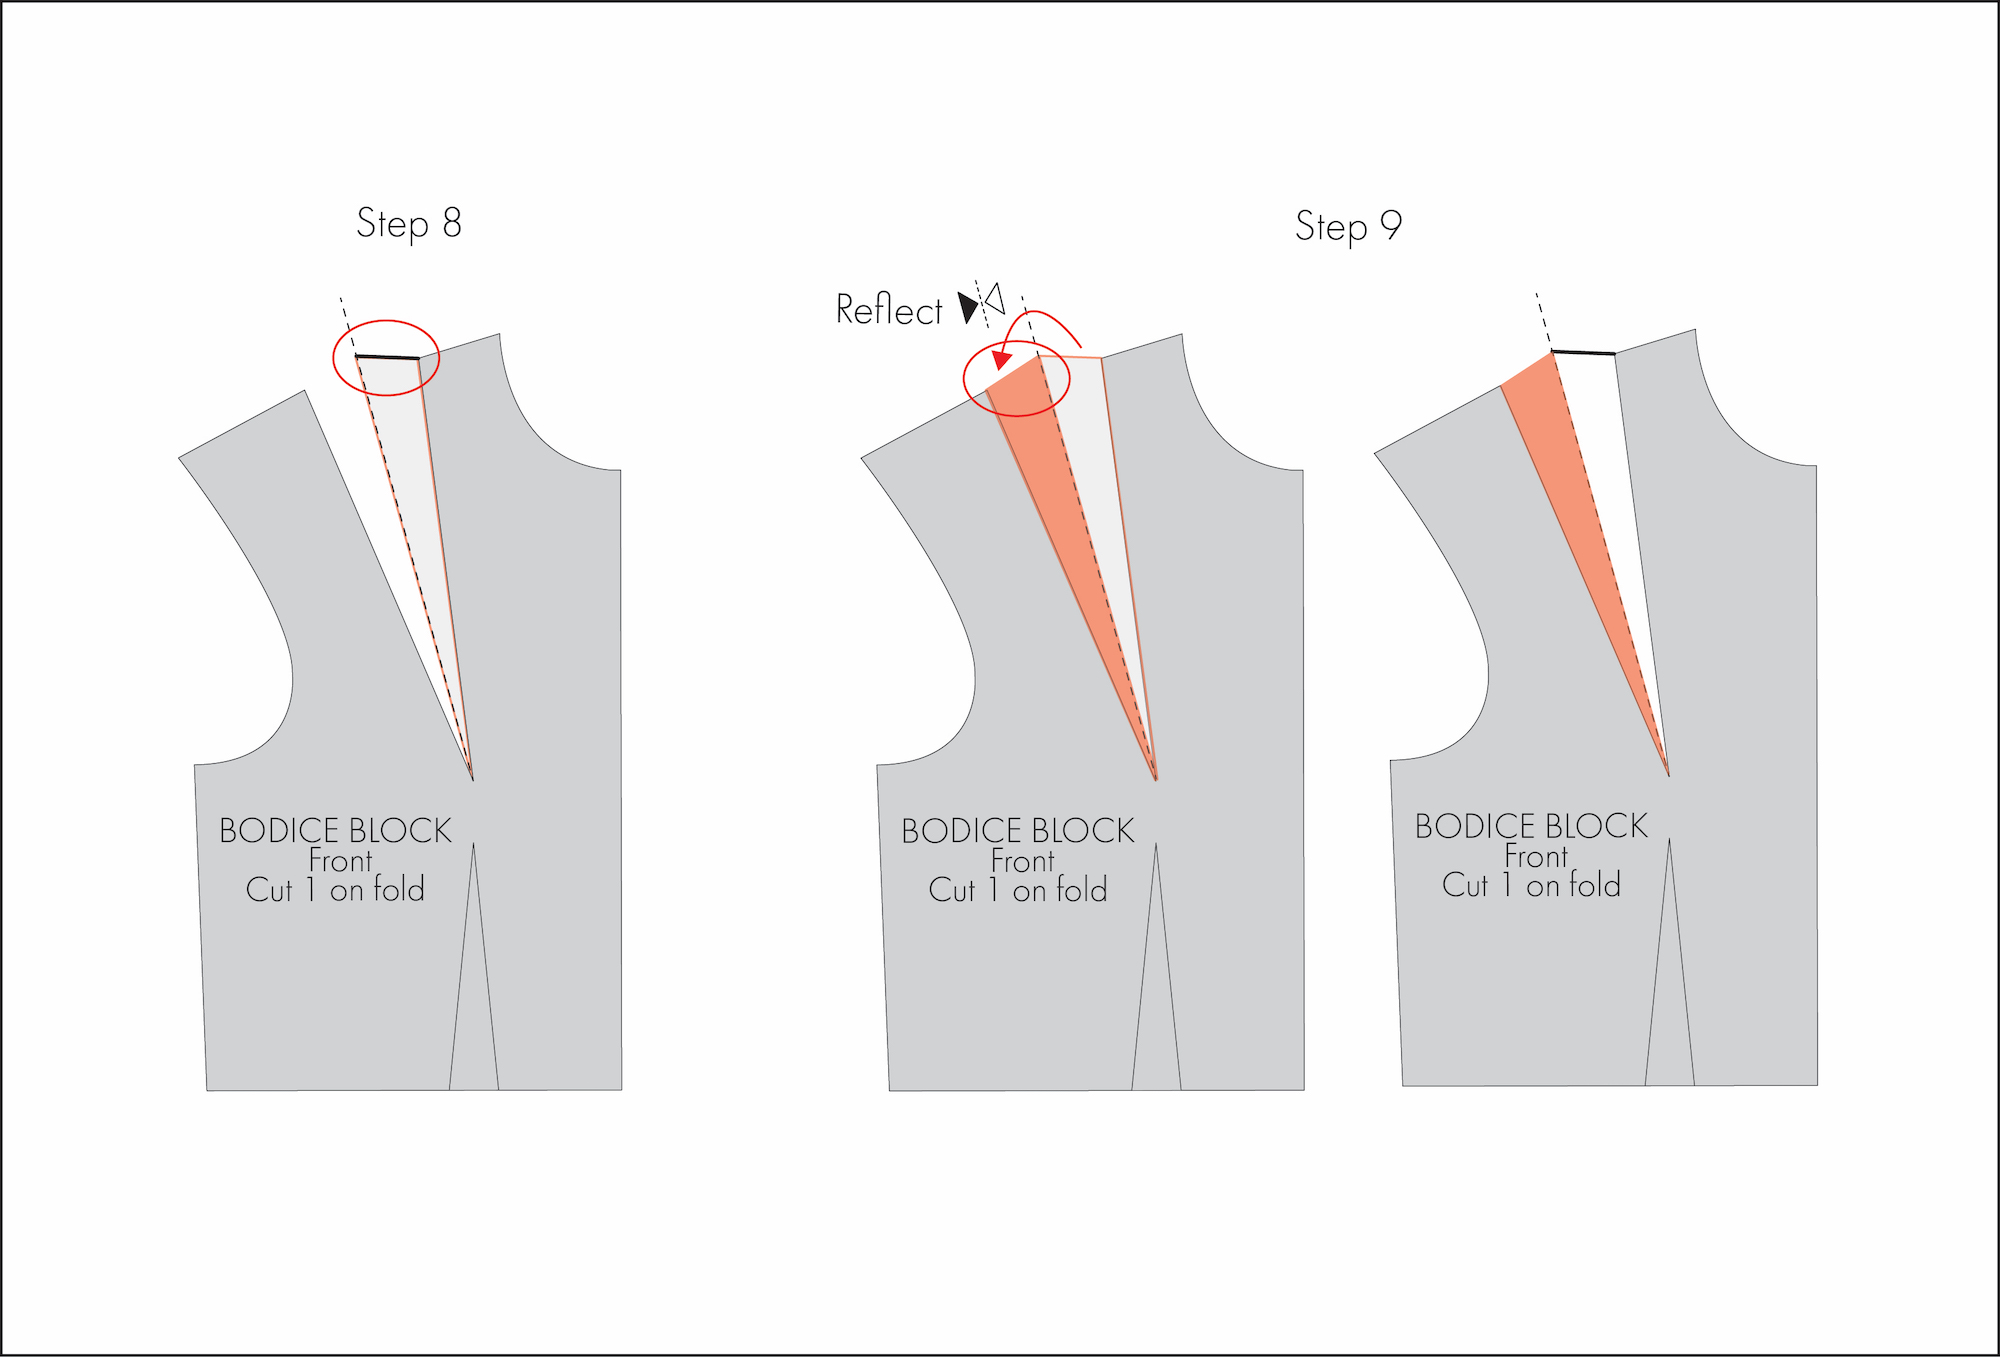
10. Trace the top edge of this working piece onto the pattern again, from the midpoint line to the left dart leg to create the trued cutting line.
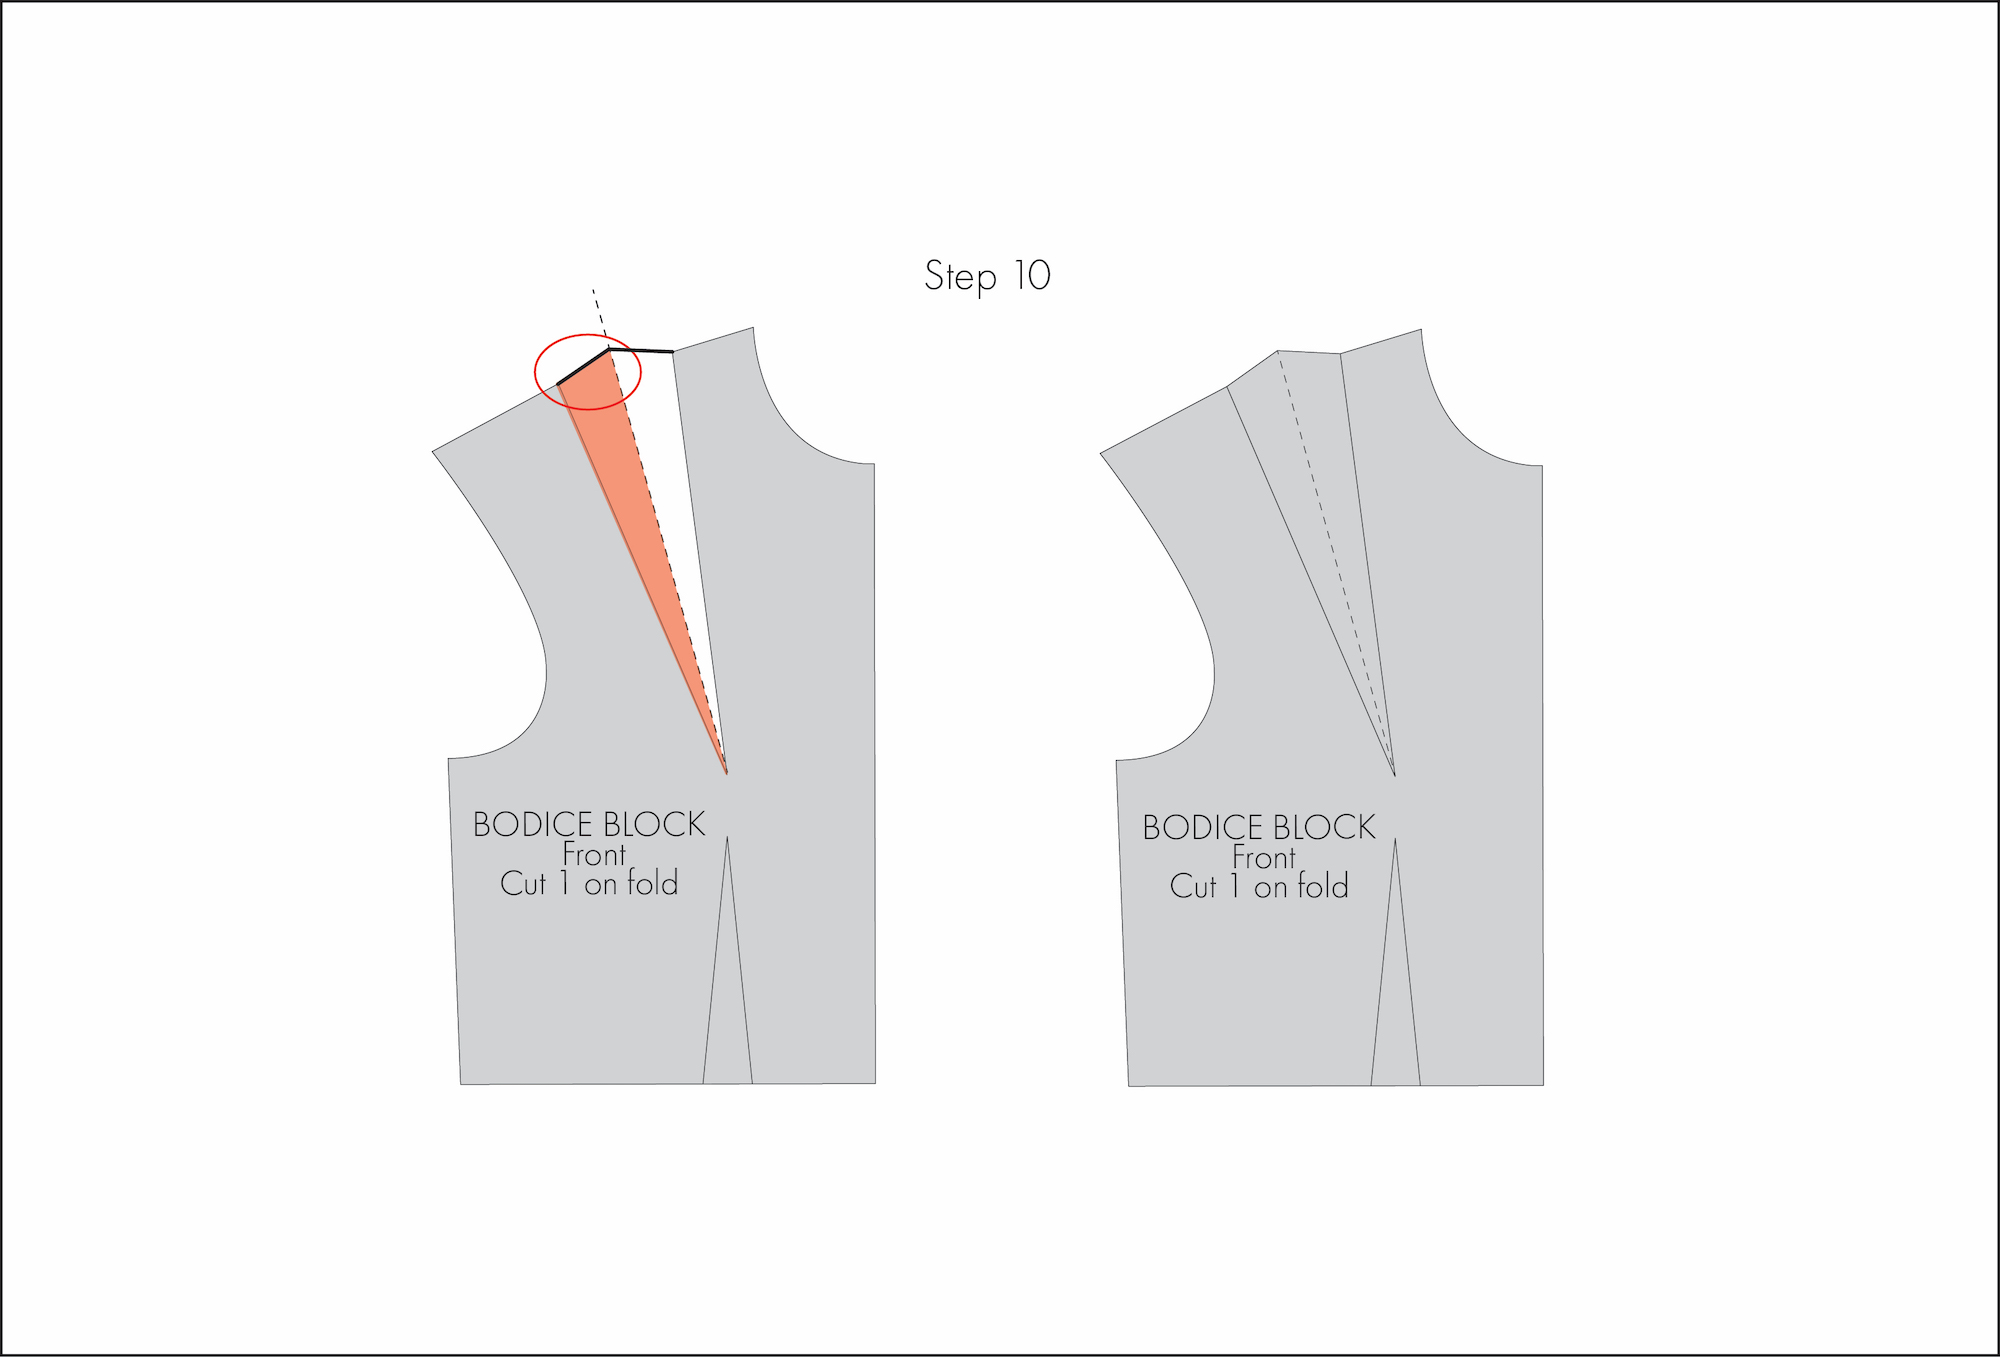
How to true seam allowances
Closed seam allowances
To demonstrate how to true closed seam allowances, I’ll use a basic front and back bodice block and true the shoulder seam.
1. Identify the seam allowance and the direction in which the seam will be pressed. In this example, the seam will be overlocked closed, and pressed towards the back.
2. Fold the seam allowance of the back shoulder on itself (similar to truing a hem). In this example, the cutting line is shorter than the stitching line (like the pant leg shown in Diagram 1).
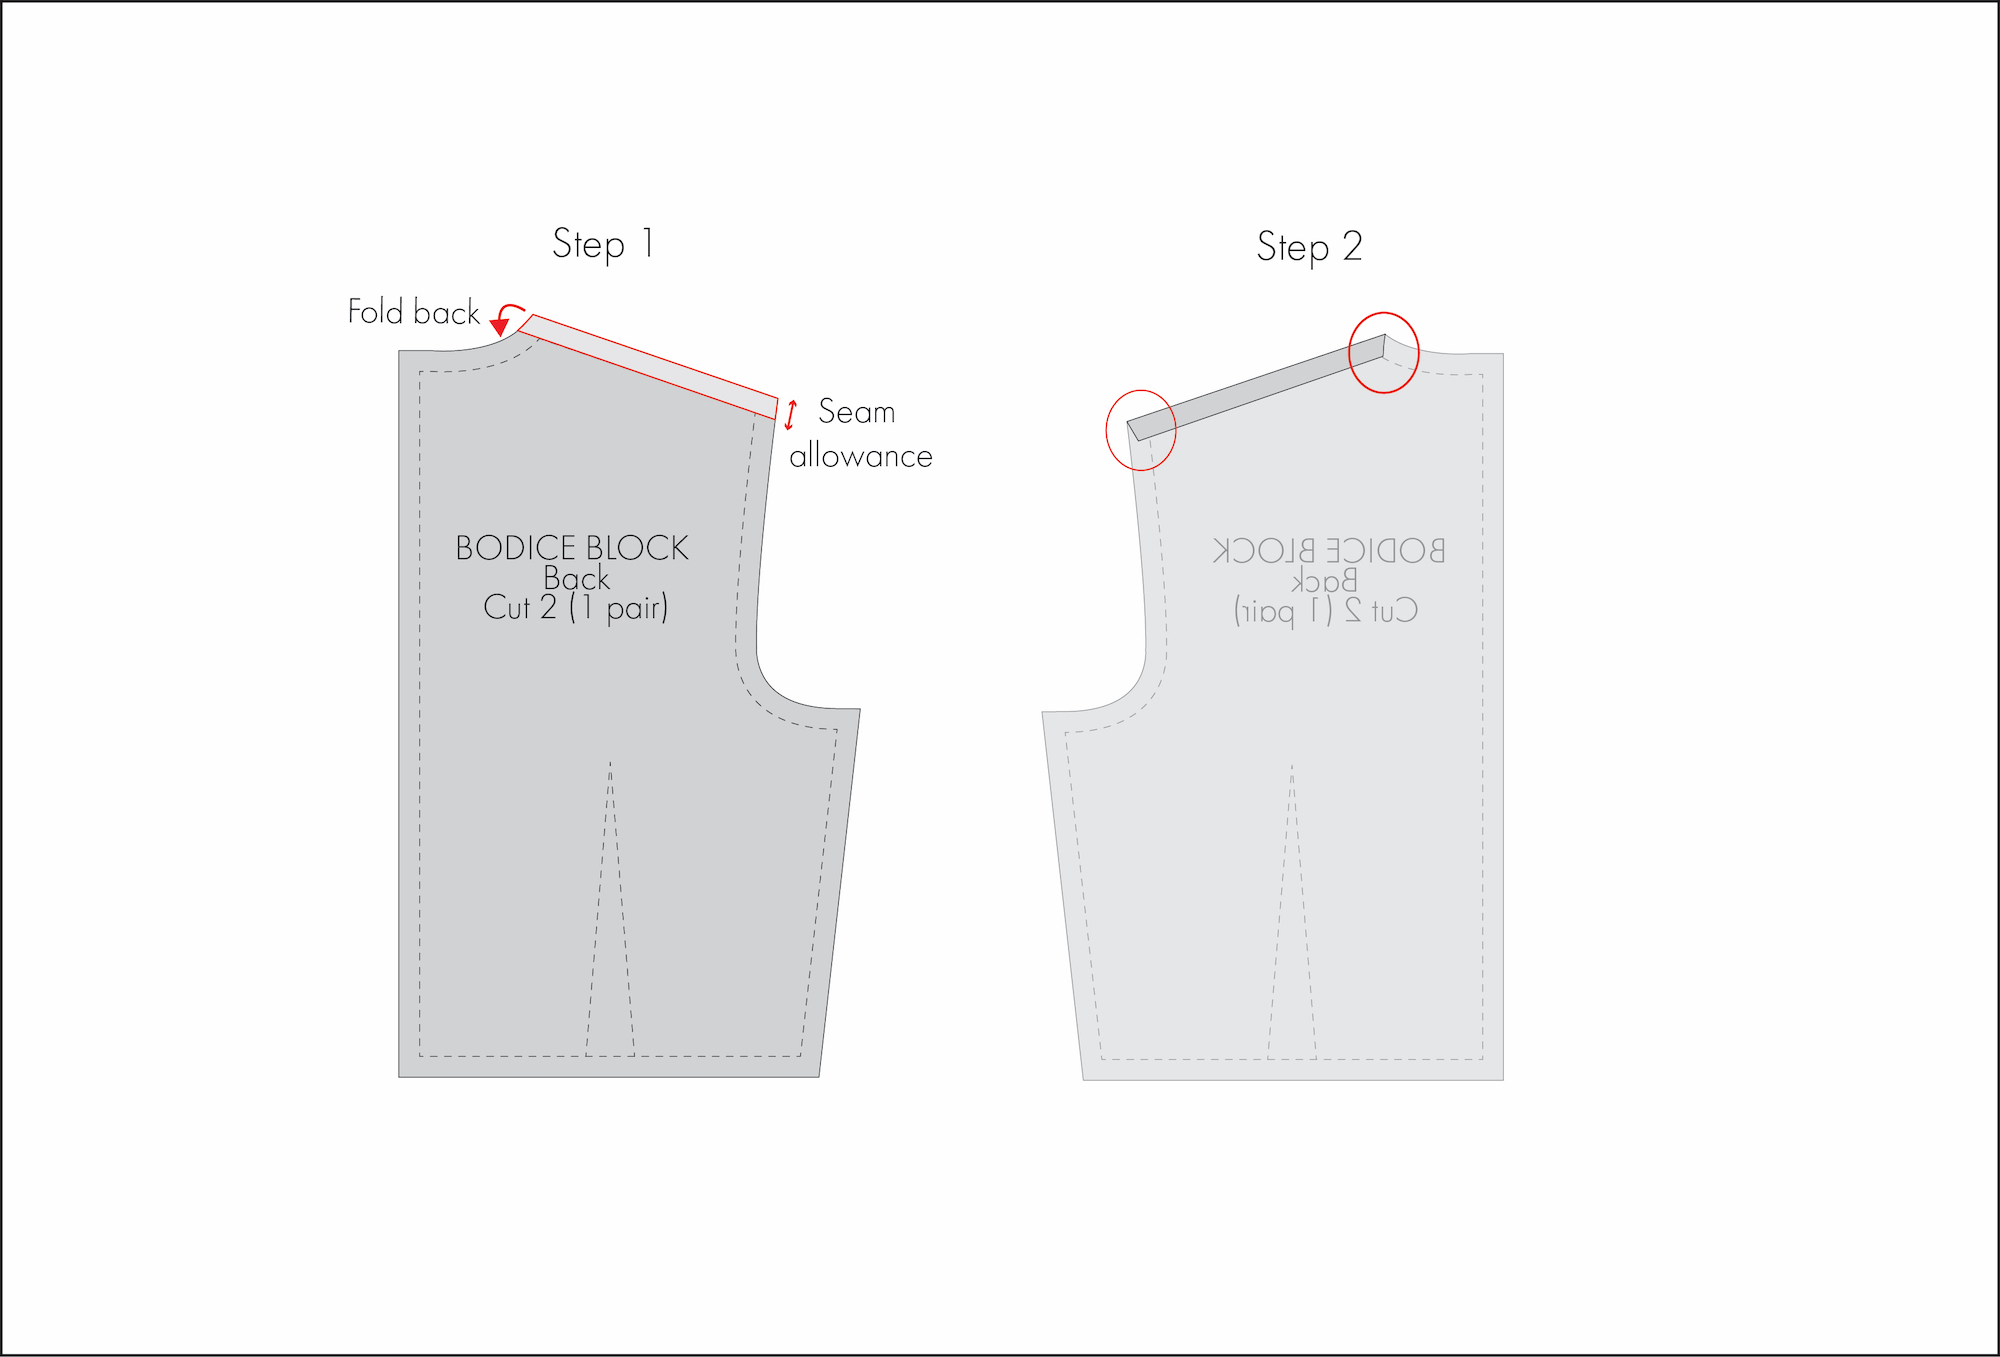
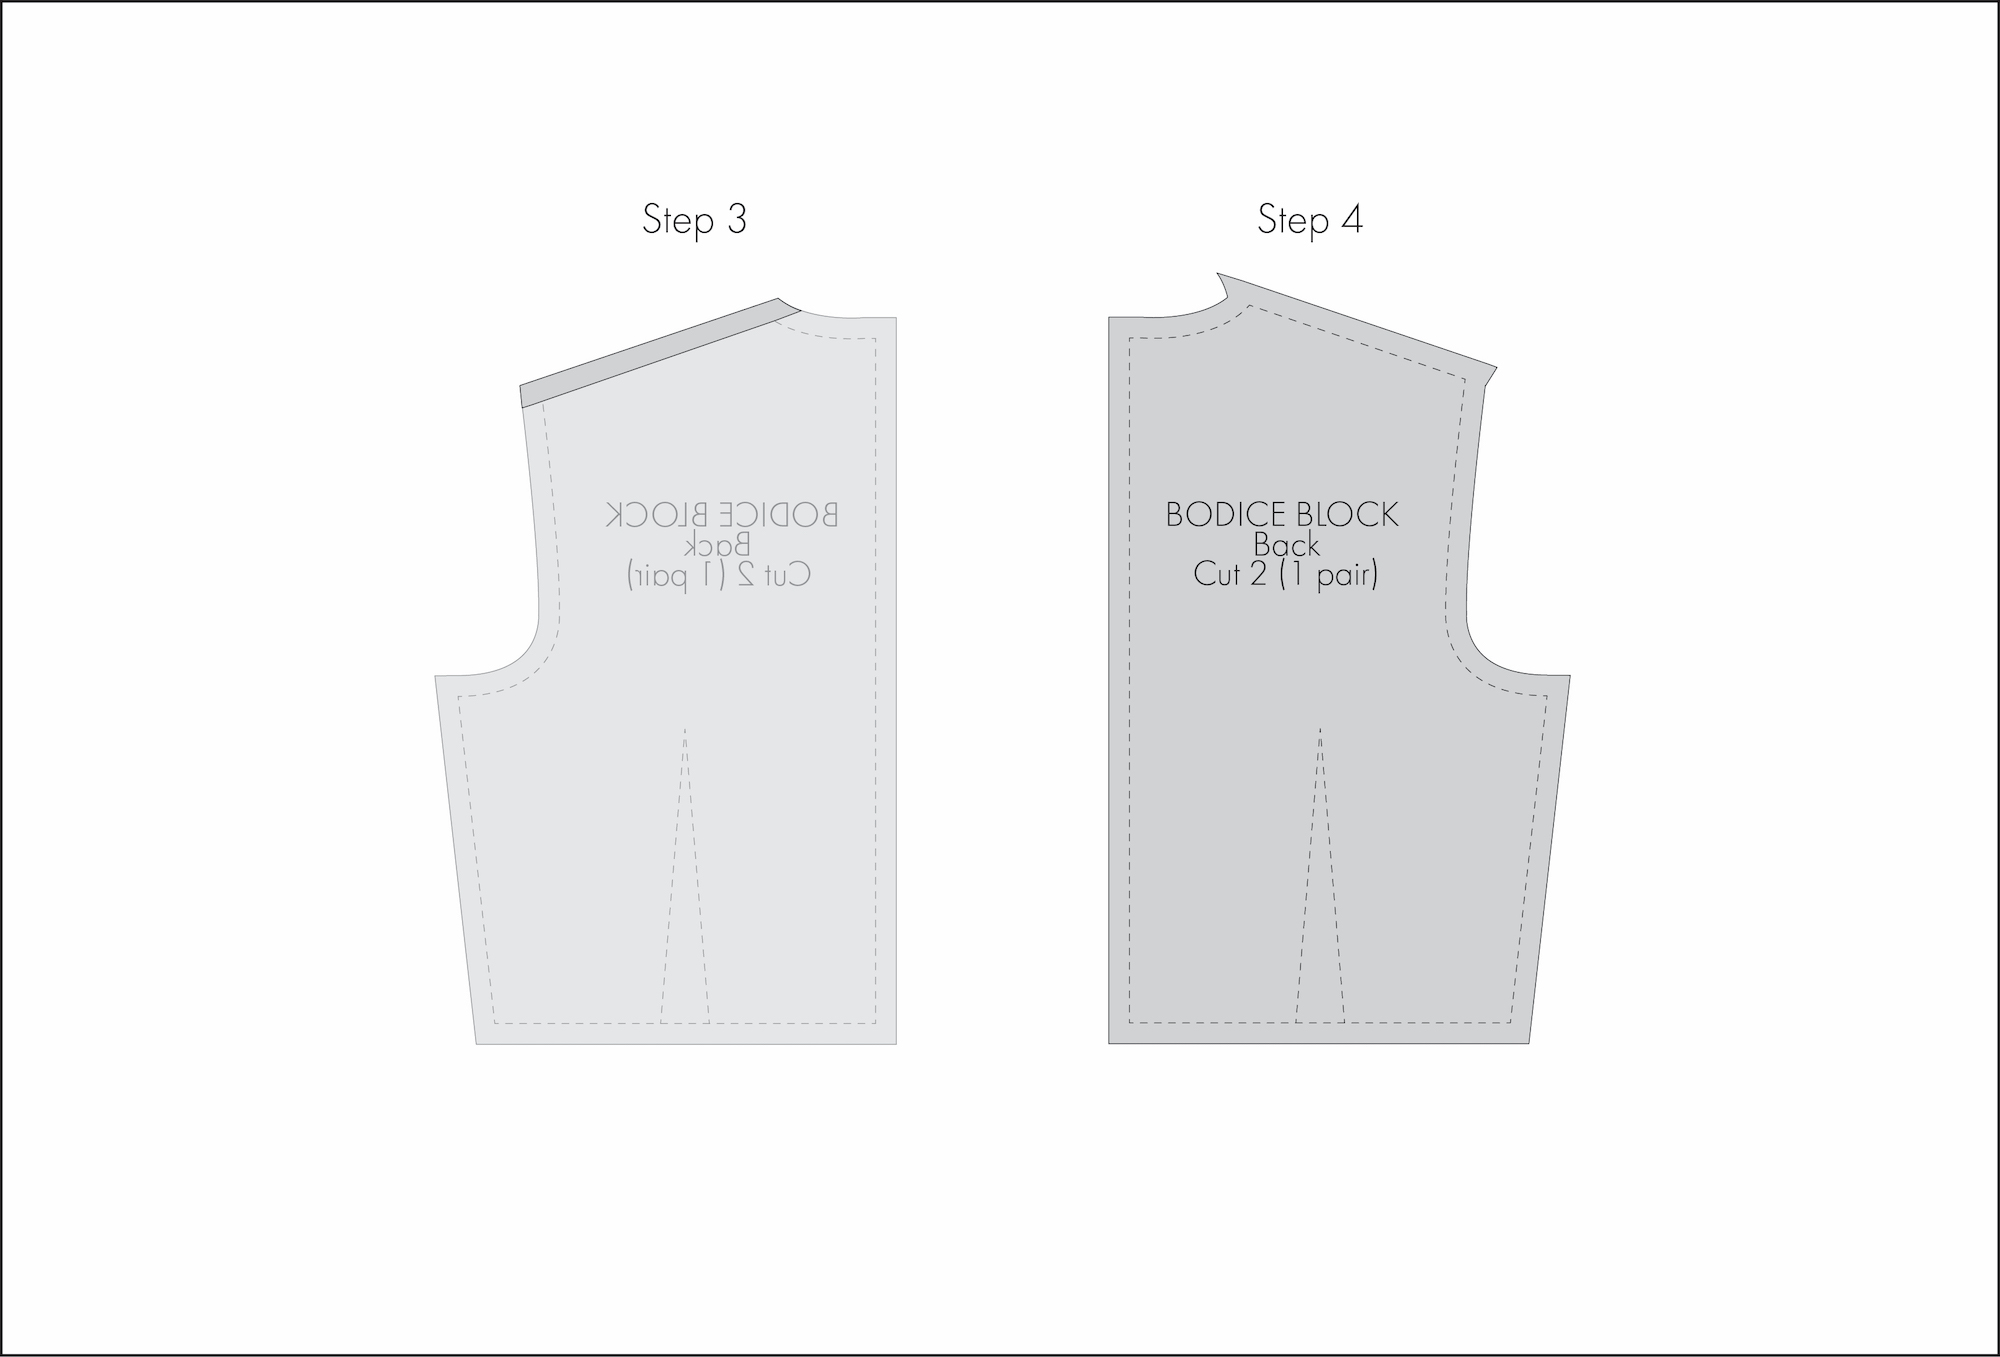
3. Adjust and true the seam allowance just like you would with a hem using your preferred method of folding or tracing (refer back to Diagrams 2 to 7).
4. Unfold the seam allowance.
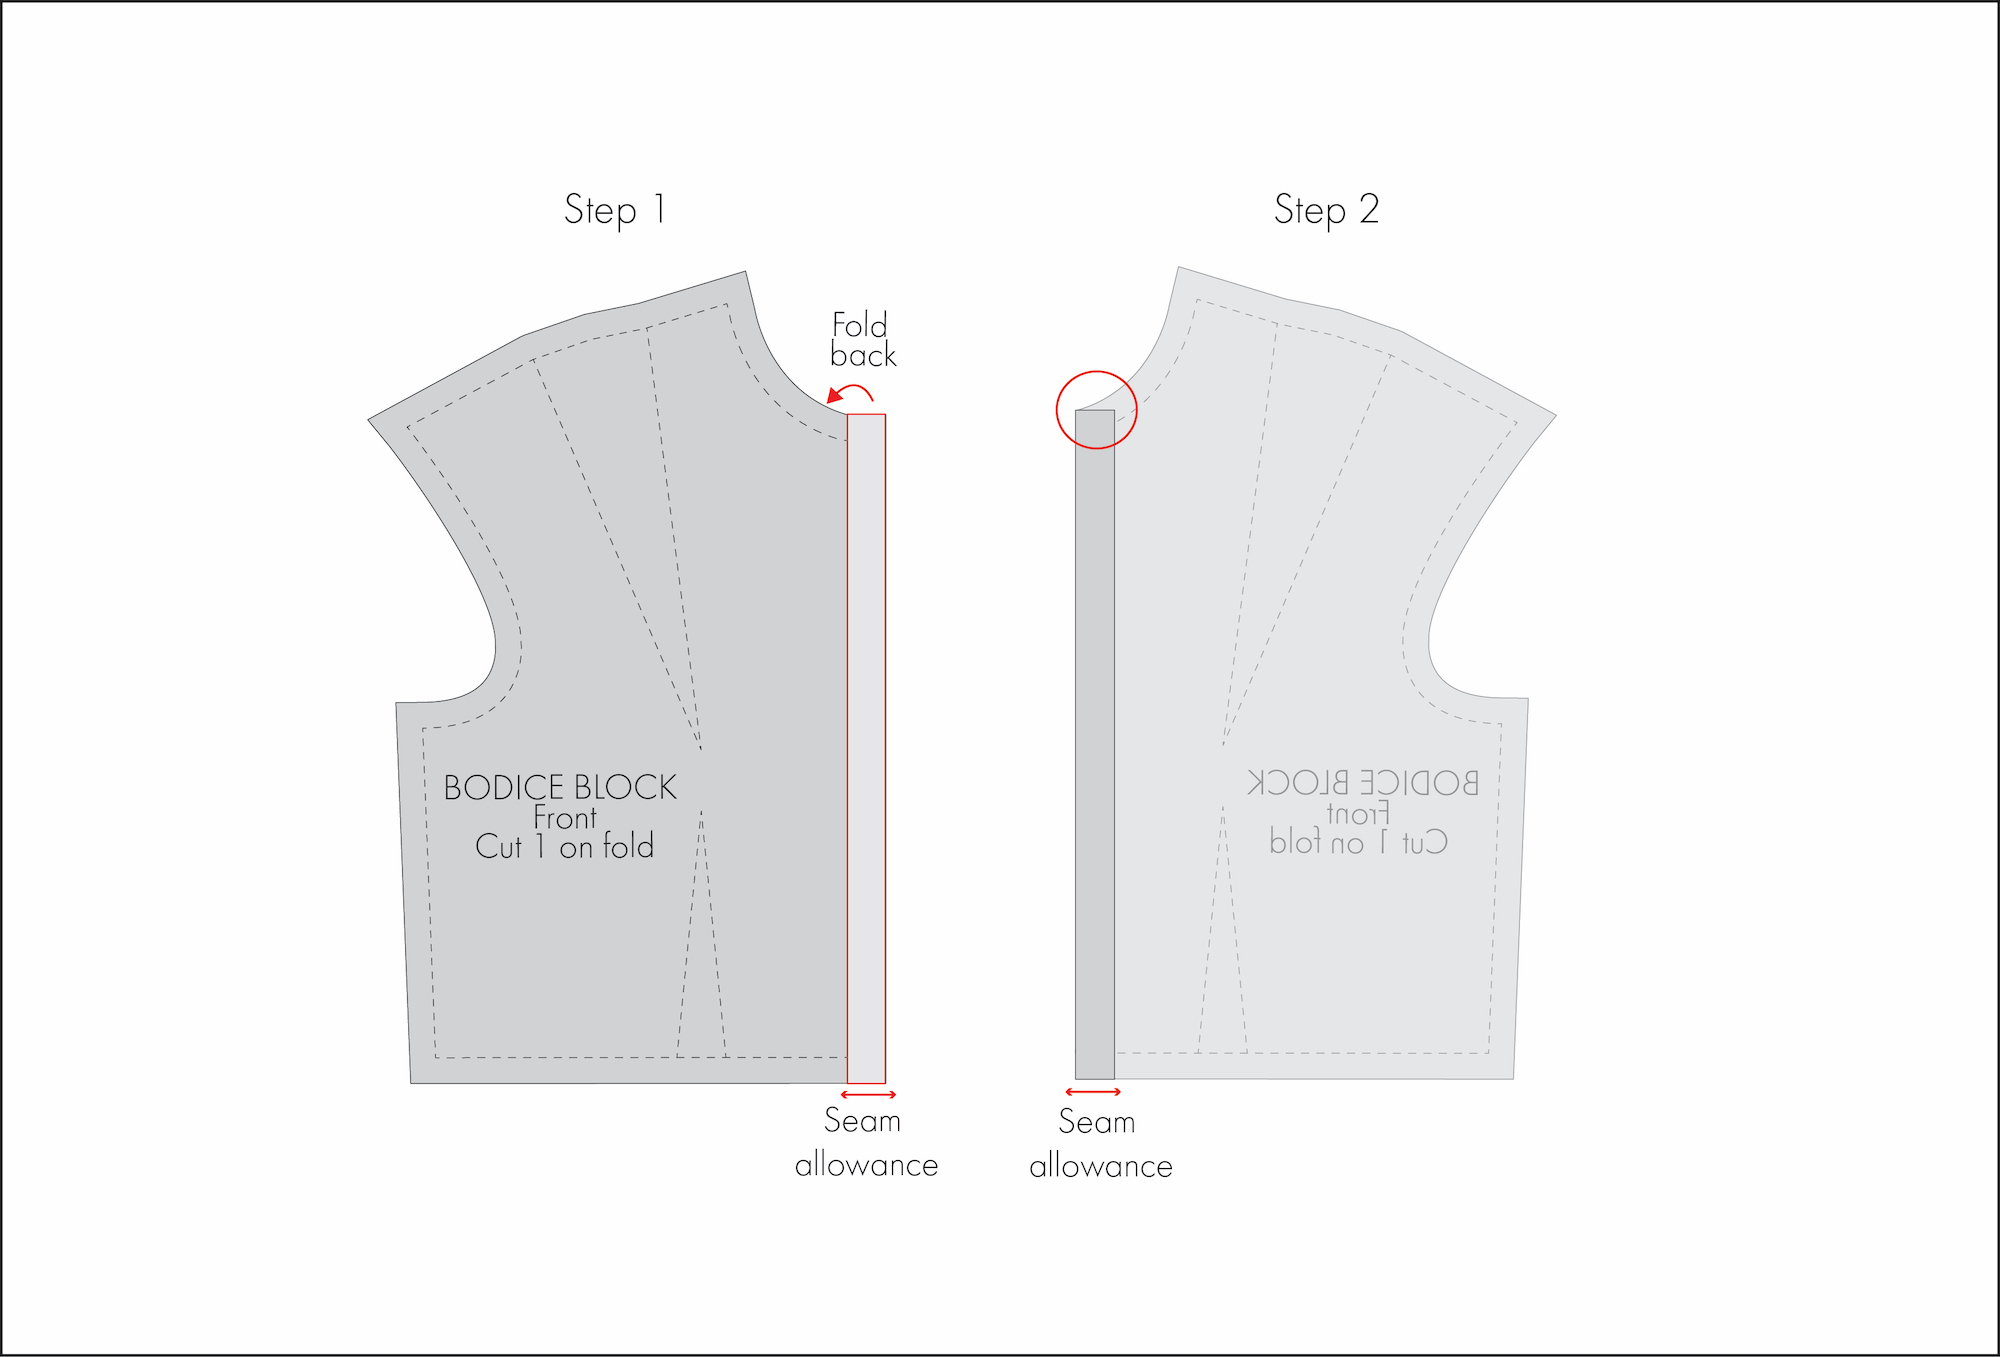
5. Lay the front bodice on top of the back bodice, aligning at the shoulder seams.
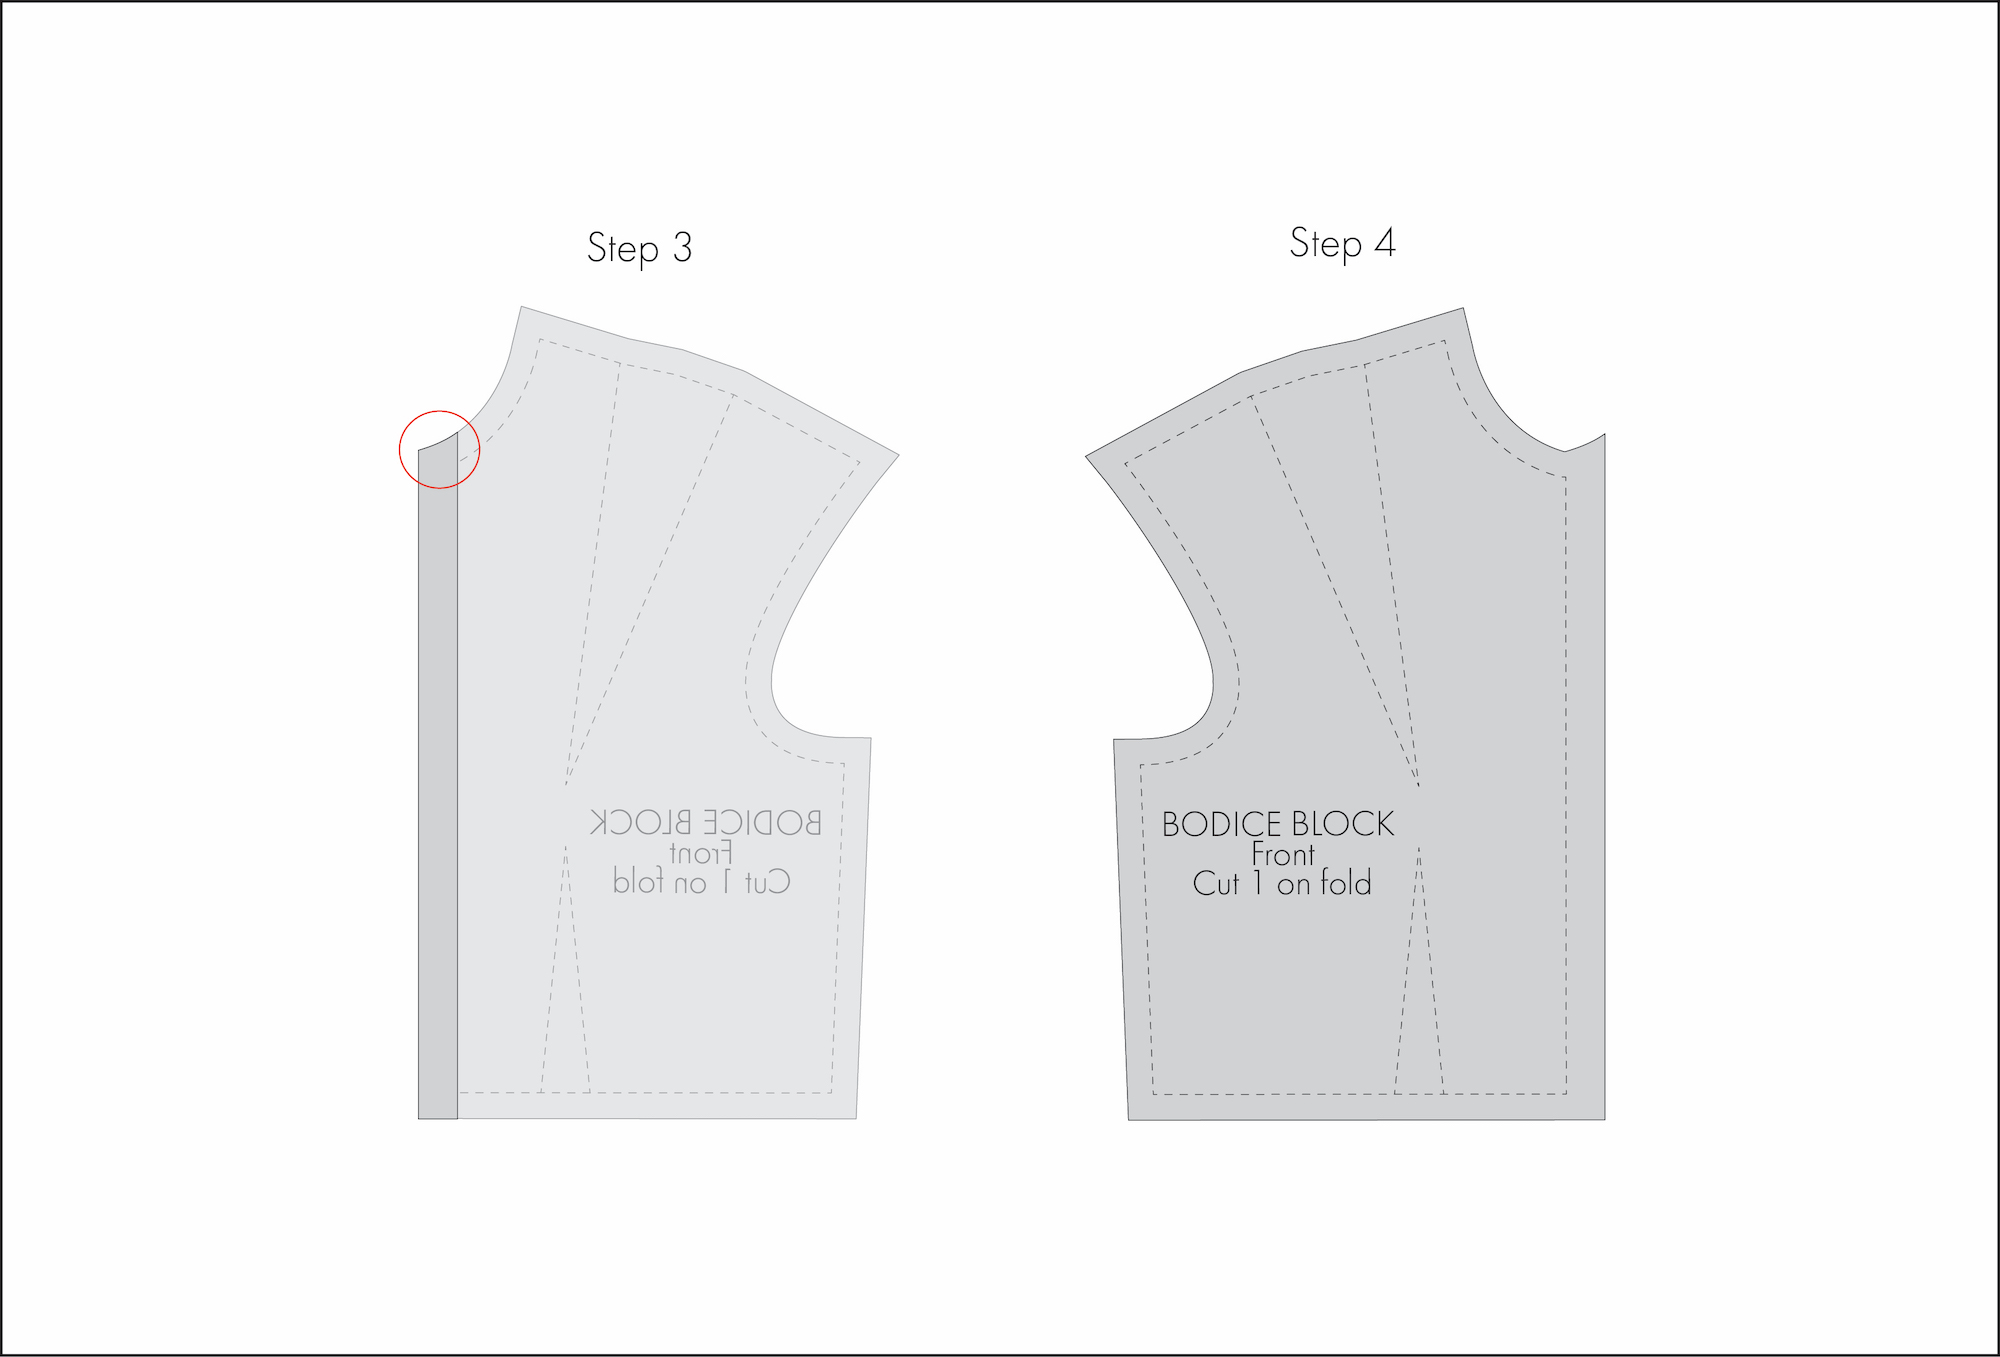
6. Adjust and true the seam allowance of the front bodice using your preferred method so that the front seam allowance matches in shape and width to that of the back bodice.
7. Repeat Steps 4 and 5 for the seam allowance at the front neck point.

Open seam allowances
To demonstrate how to true open seam allowances, I’ll use a basic front bodice block and true the centre front seam.
1. Identify the seam allowance and the direction in which the seam will be pressed. In this example, the seam will be overlocked and pressed open.
2. Fold the seam allowance of the centre front on itself.
3. Adjust and true the seam allowance of the centre front bodice using your preferred method so that the seam allowance matches the contours of the neckline.
4. Unfold the seam allowance.
Truing isn’t something to be scared of! With practice, it will hopefully become second nature and an automatic step when checking a pattern. Paying attention to hems, darts, and seam allowances is just as important as aligning seams—small adjustments can make a big difference in accuracy.
Related Products
About Author
Emma Cartmel
Heya! I’m Emma, and I'm an Aussie living in beautiful Munich with my husband Ben, and our pug Harley. I am a designer, pattern maker, and sewist, and I share my expertise and experience through my ‘cartem.sewing’ page. You can follow me on Instagram @cartem.sewingLeave a comment
Related posts
Sewing Essentials: A Guide to Sewing Threads
You might be thinking “Thread is thread… right?” Well, not always. Sewing thread is a key part of any sewing project. But just like fabric, the thread you choose matters, affecting things like the strength, appearance, and durability of your stitching. But if you have ever shopped for sewing thread, you probably know that it…

Sewing Essentials: Stitch Width, Stitch Length & Needle Position
Thinking back to my high school textiles days, I remember having to test stitch settings on every fabric we planned to use for our projects. We would cut out little squares of fabric and experiment with different stitch lengths and widths, and edge-finishing techniques. At the time, it felt unnecessary, not to mention tedious….

Sewing Essentials: A Simple Guide to Notches
I love a notch, so much so that I’ve decided to dedicate this article to these small but important markings. Here, I’ll explain why they’re so helpful, when to use them, and how to add them to your own patterns or adapt them for existing ones. What exactly are notches? Notches are small markings found…

How to Select and Use Interfacing: A Simple Guide
Iron-on or sew-in, woven or non-woven, lightweight or heavyweight. With so many different types, weaves, and weights to choose from, how do you know which interfacing is best for your project? In this article, I will explain the two main types of interfacing before diving into the differences in weave and weight. Hopefully by the…

Sewing Essentials: A Simple Method for Reversible Seams
There are so many ways to finish a seam, from good old overlocking to French seams and binding. I recently stumbled across another method that’s pretty nifty, and honestly, I kind of wish I had known about it sooner. It is a bit like binding, but topstitched in place so it doesn’t move or flap…


SEW THIS LOOK


Latest Posts


2 Comments
Alisha Cooke
Really great explanation of these techniques Emma. I’m sure this will help many sewists. Thanks for sharing.
Emma Cartmel
Thank you Alisha. I really hope so!