


Sewing Essentials: Stitch Width, Stitch Length & Needle Position
 Thinking back to my high school textiles days, I remember having to test stitch settings on every fabric we planned to use for our projects. We would cut out little squares of fabric and experiment with different stitch lengths and widths, and edge-finishing techniques.
At the time, it felt unnecessary, not to mention tedious. It seemed like an annoying step that was just holding me back from what I really wanted to do: dive straight into sewing.
Looking back now though, I can see a lot of value in those exercises. Maybe not to the extent we had to do them back then, but there was definite logic behind it.
Sure, I don’t test stitch settings for everything I sew nowadays. I often work with the same types of fabric and with similar techniques, so I already know which settings tend to work well. But when I’m using an unfamiliar fabric, or trying to achieve a particular look, taking the time to test can make a real difference.
Settings like stitch width, stitch length, and needle position might seem like small adjustments, but they can have a big impact on your sewing. The right settings influence everything from durability, such as the strength of a seam, to appearance, like the visibility and style of topstitching. They can also help prevent puckering, skipped stitches, and even fabric damage.
In this guide, I’ll walk you through these three key settings, stitch length, stitch width, and needle position, explaining what they do and when they can be used.
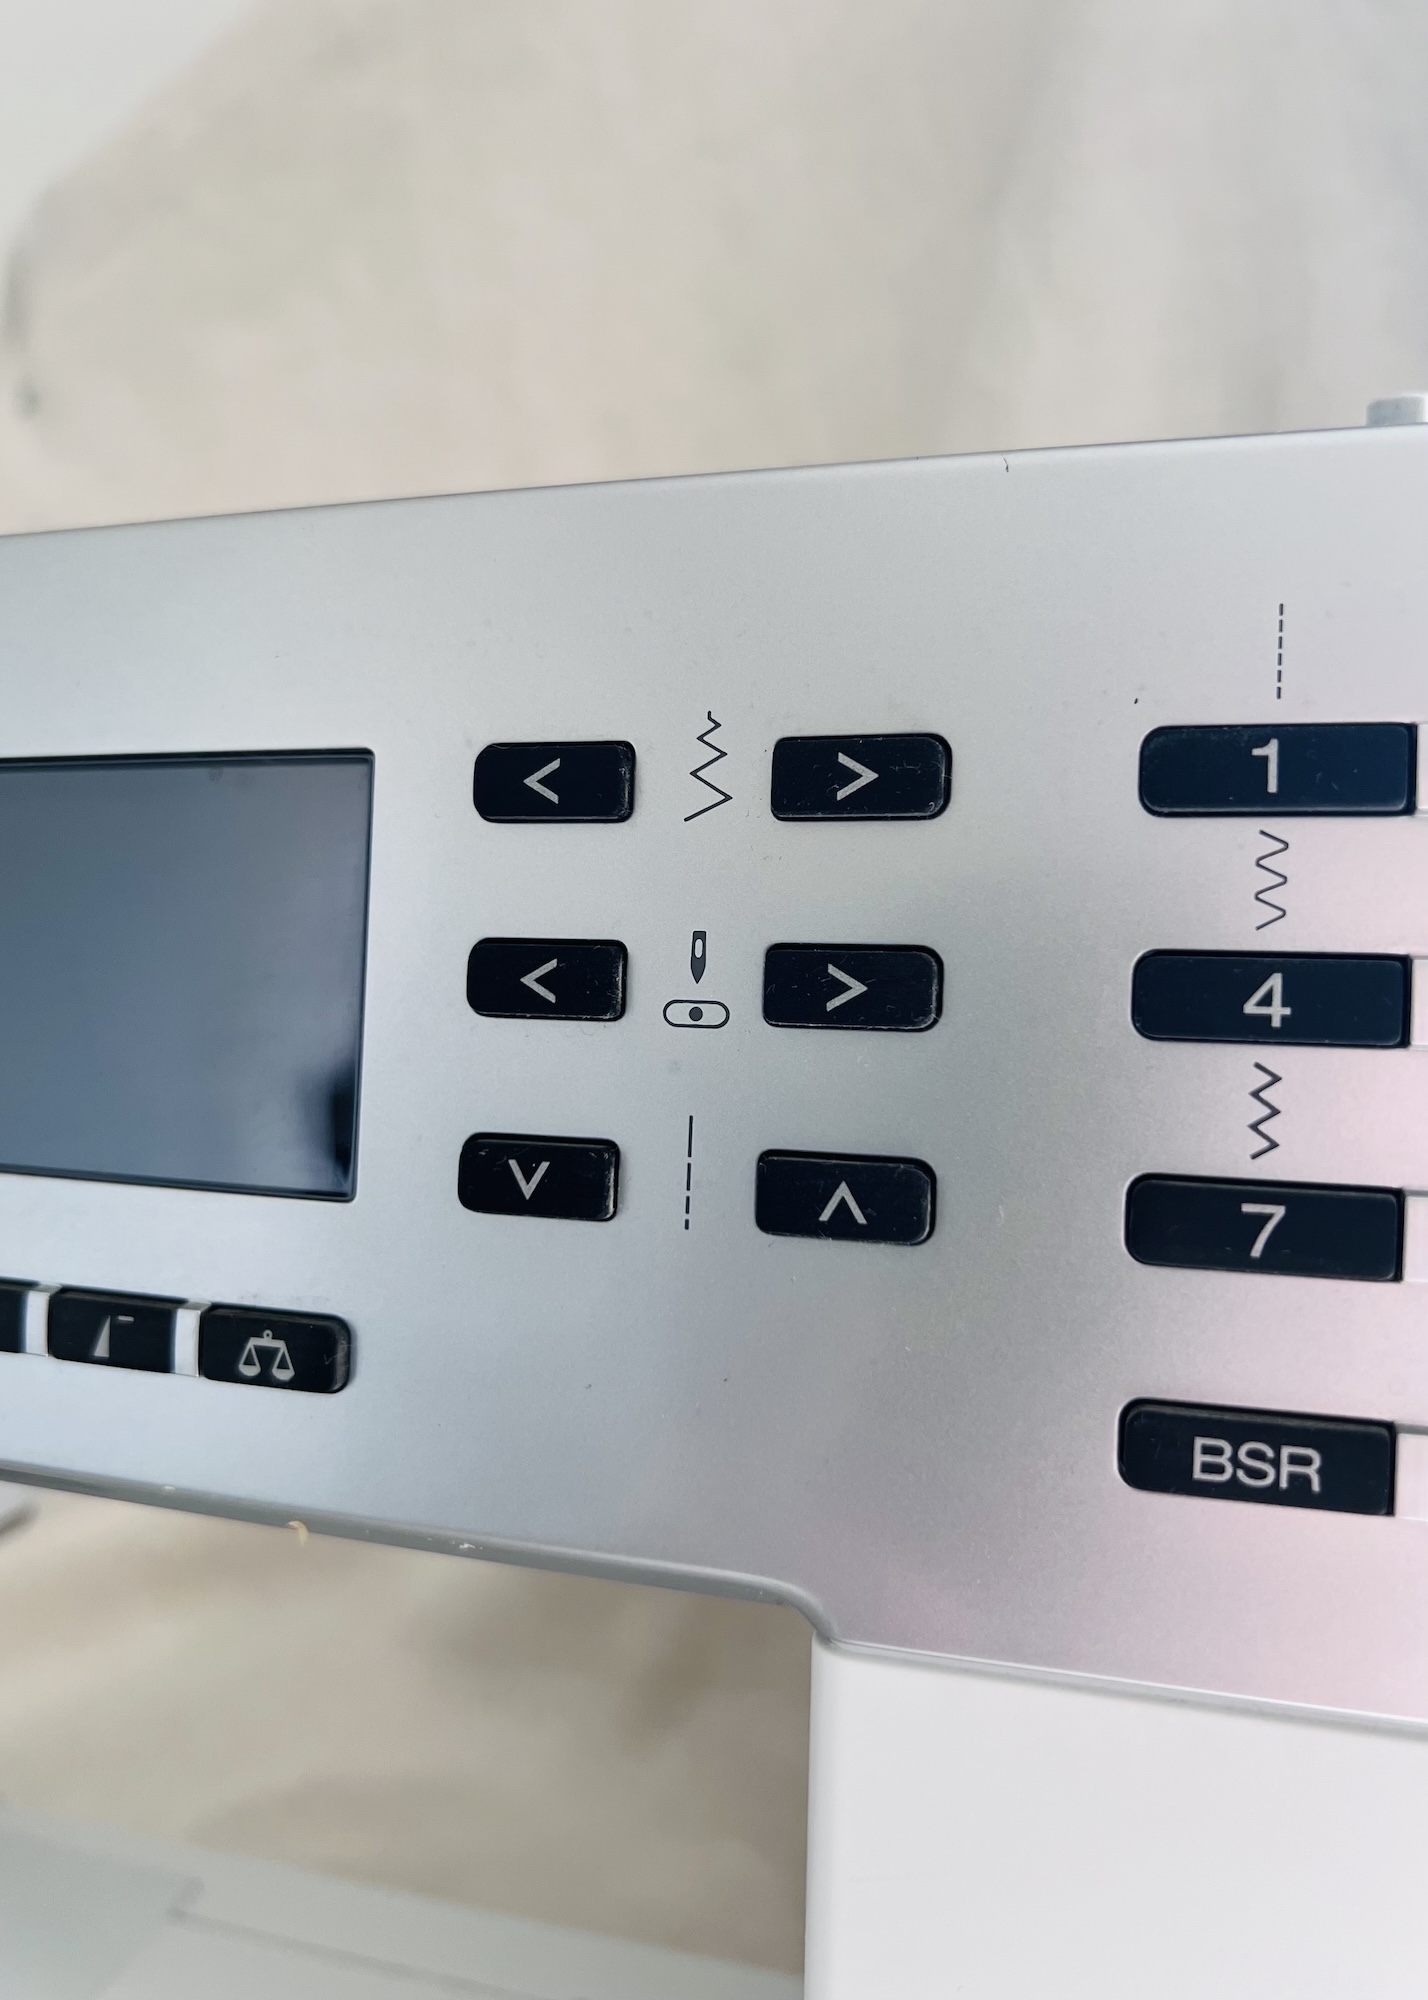
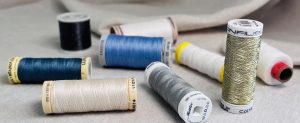
Note: The range of stitch length and width can vary between machines so check in with your machine. My Bernina B530 allows for a 5mm stitch length and 5.5mm stitch width. Both can be adjusted in 0.1mm increments.
What is Stitch Length?
Stitch length refers to how long each stitch is from front to back. It is essentially the distance between each time the needle penetrates the fabric.
Stitch length is usually measured in millimetres (mm). For example, a stitch length of 2.5 typically means each stitch is 2.5mm long.
How Stitch Length Affects Sewing
Adjusting the stitch length tells the machine how far forward (or backward) the feed dogs should move the fabric after each stitch, which ultimately determines the length of each stitch.
- Shorter stitch length: Smaller steps, with the needle moving up and down more frequently and penetrating the fabric more often. This produces shorter, tighter, and more compact stitches.
- A longer stitch length: Larger steps, with the needle moving up and down less frequently and puncturing the fabric less often. This produces longer, more visible, and flexible stitches.
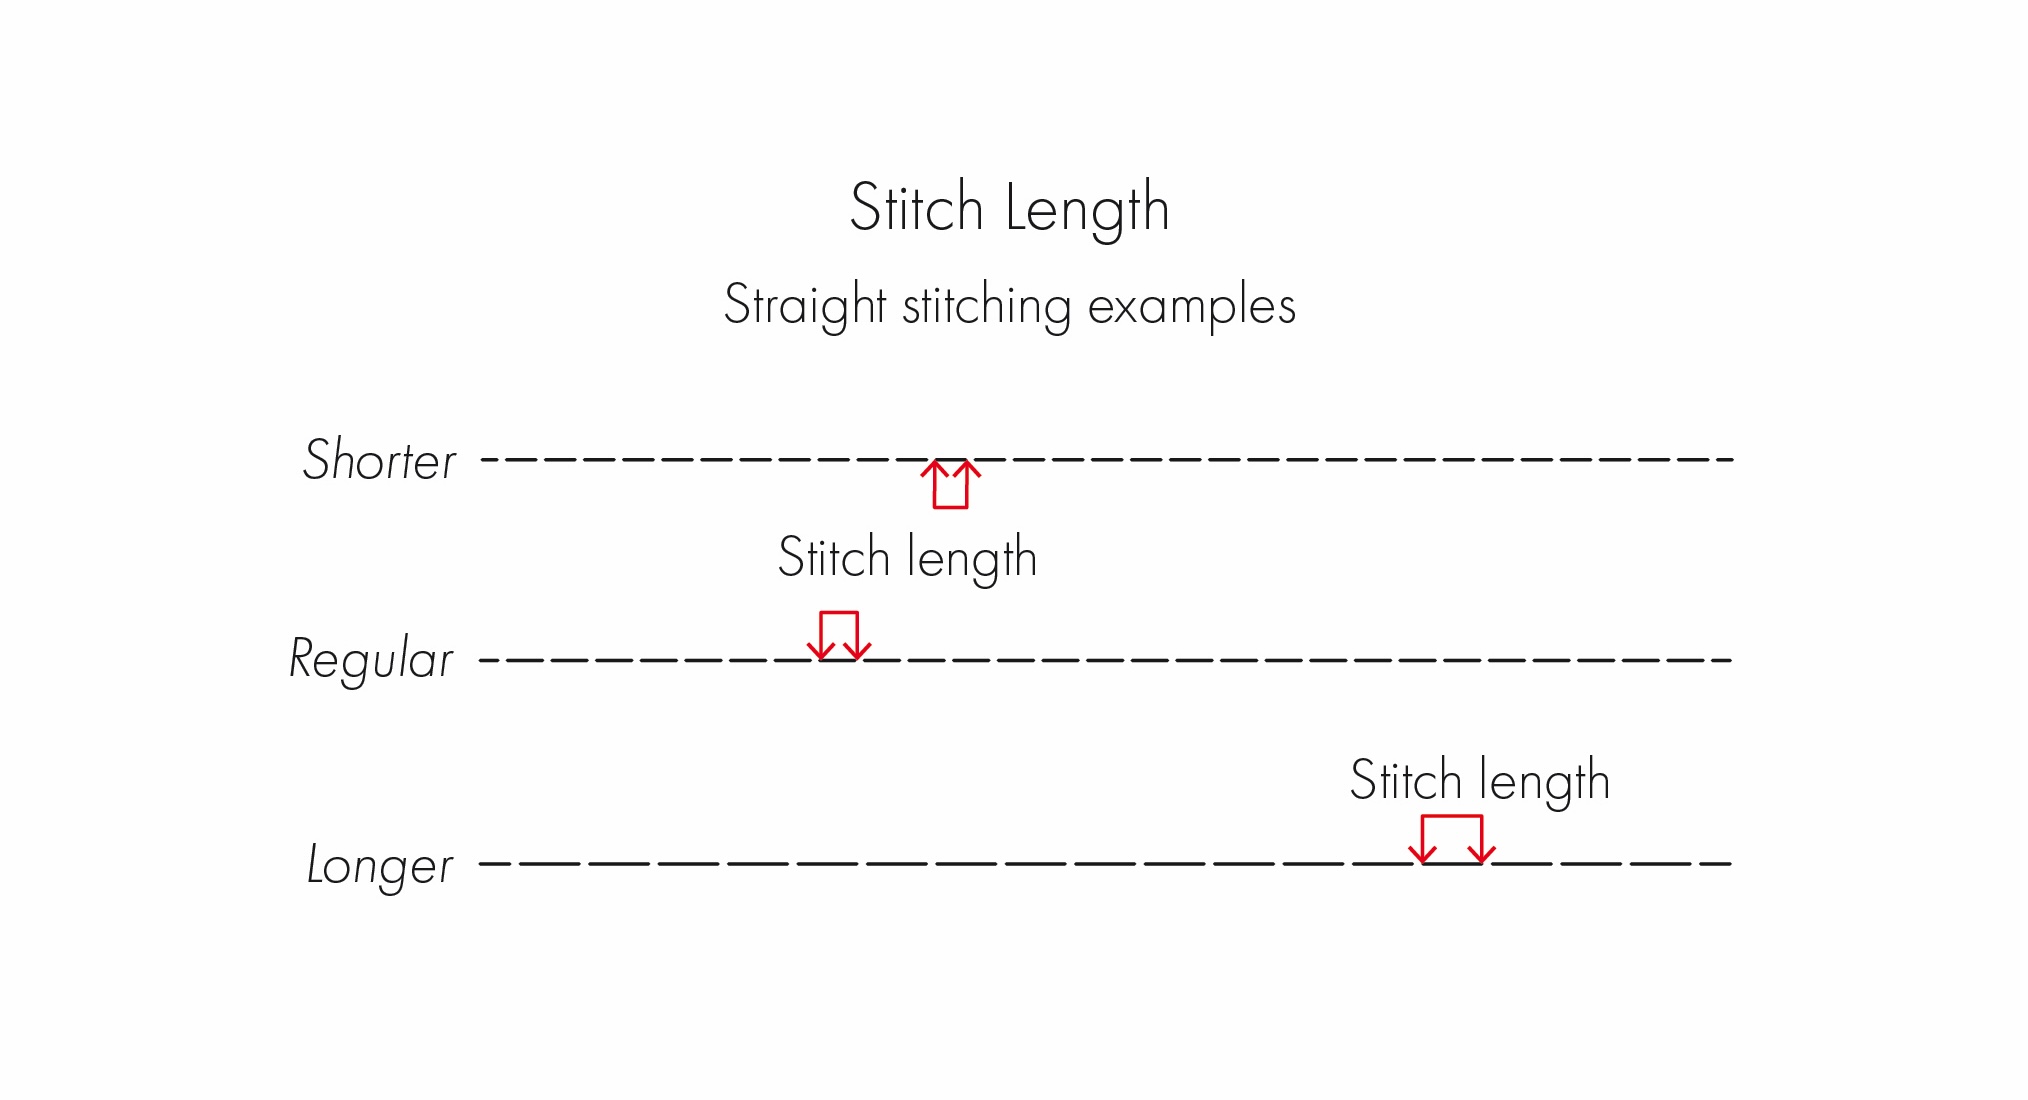
Think of it like this: if I were to sew a 10cm line of straight stitching using a shorter stitch length, there will be many more stitches along that line than if I used a longer stitch length (see diagram below).
Factors Affecting Stitch Length
When sewing with a straight stitch, only the stitch length needs to be adjusted. The stitch width (which I will get to next) remains set to 0. This is because there is no side to side movement, only forward and backward.
Stitch length is one of the adjustments you’ll likely change quite often. I find myself adjusting it several times during most projects. The reason for such adjustments could be:
- Purpose: Standard seam, or topstitching, edge stitching, basting, or stay-stitching?
- Desired finish: Bold and visible, or subtle and blend in?
- Fabric weight Lighter weight fabrics often require a shorter stitch length, whereas heavier weight fabrics generally benefit from a longer stitch length.
- Thread type: Thicker or more decorative threads often look better with a slightly longer stitch length, while finer threads usually work fine with a shorter stitch length.
Examples of Different Stitch Lengths in Practice
1. Standard seam
- Under 2mm: Best for very lightweight or more delicate fabrics, such as silk, chiffon, organza, or voile. Shorter stitches will help to secure these more delicate fabrics and reduce the risk of puckering, creating a smoother and cleaner finish.
- 2.4-2.7mm: Best for light to mid-weight fabrics, such as linen or cotton. This range works well for most of your general sewing needs, producing seams that are durable while still providing some flexibility.
- 3-3.5mm: Best for medium to heavy-weight fabrics, such as denim, twill, or canvas. Longer stitches can be helpful on these thicker fabrics because they feed more smoothly through the machine, and are helpful when sewing over bulky seams or multiple layers of thicker fabric.
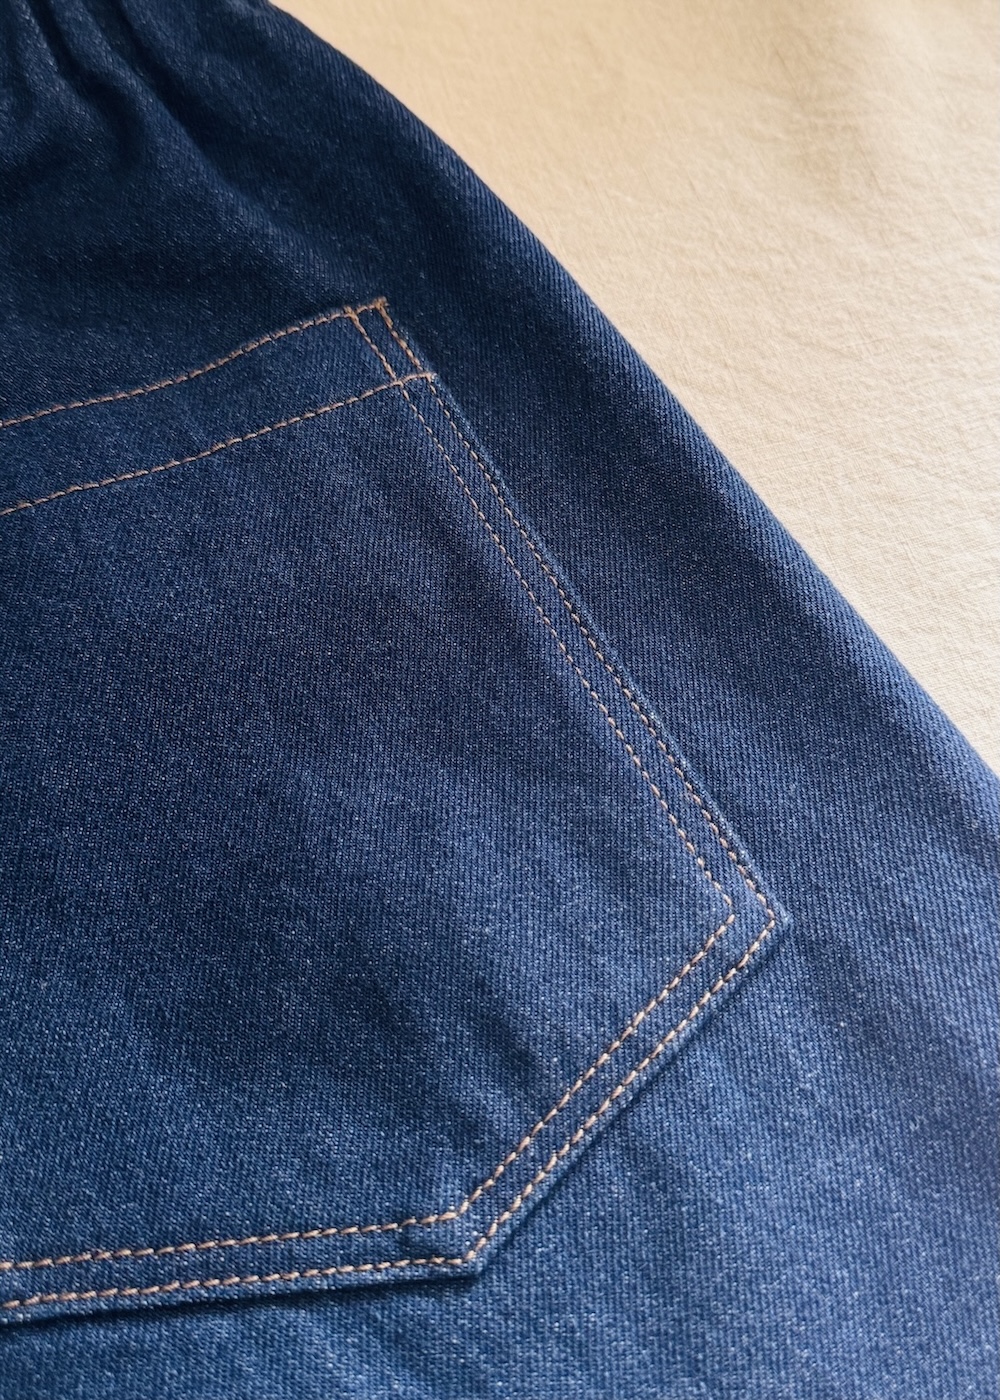
2. Topstitching
Topstitching is generally intended to be visible. Think of the classic orange or brown stitching found on jeans. Therefore, longer stitches of 3-4mm make the stitching stand out and work better with heavier fabrics, and thicker topstitching threads.
My go-to topstitching lengths are:
- 3mm for light to mid-weight fabrics such as cotton or linen.
- 3.2-3.5mm for heavier weight fabrics such as denim.
3. Gathering Stitch
Gathering stitches are (gently) pulled to create and hold gathers before sewing, then removed afterward. Therefore, it’s best to use the longest stitch length available so the threads can be pulled easily without breaking or damaging the fabric.
On my machine, I usually set it between 4-5mm, depending on the weight of the fabric.
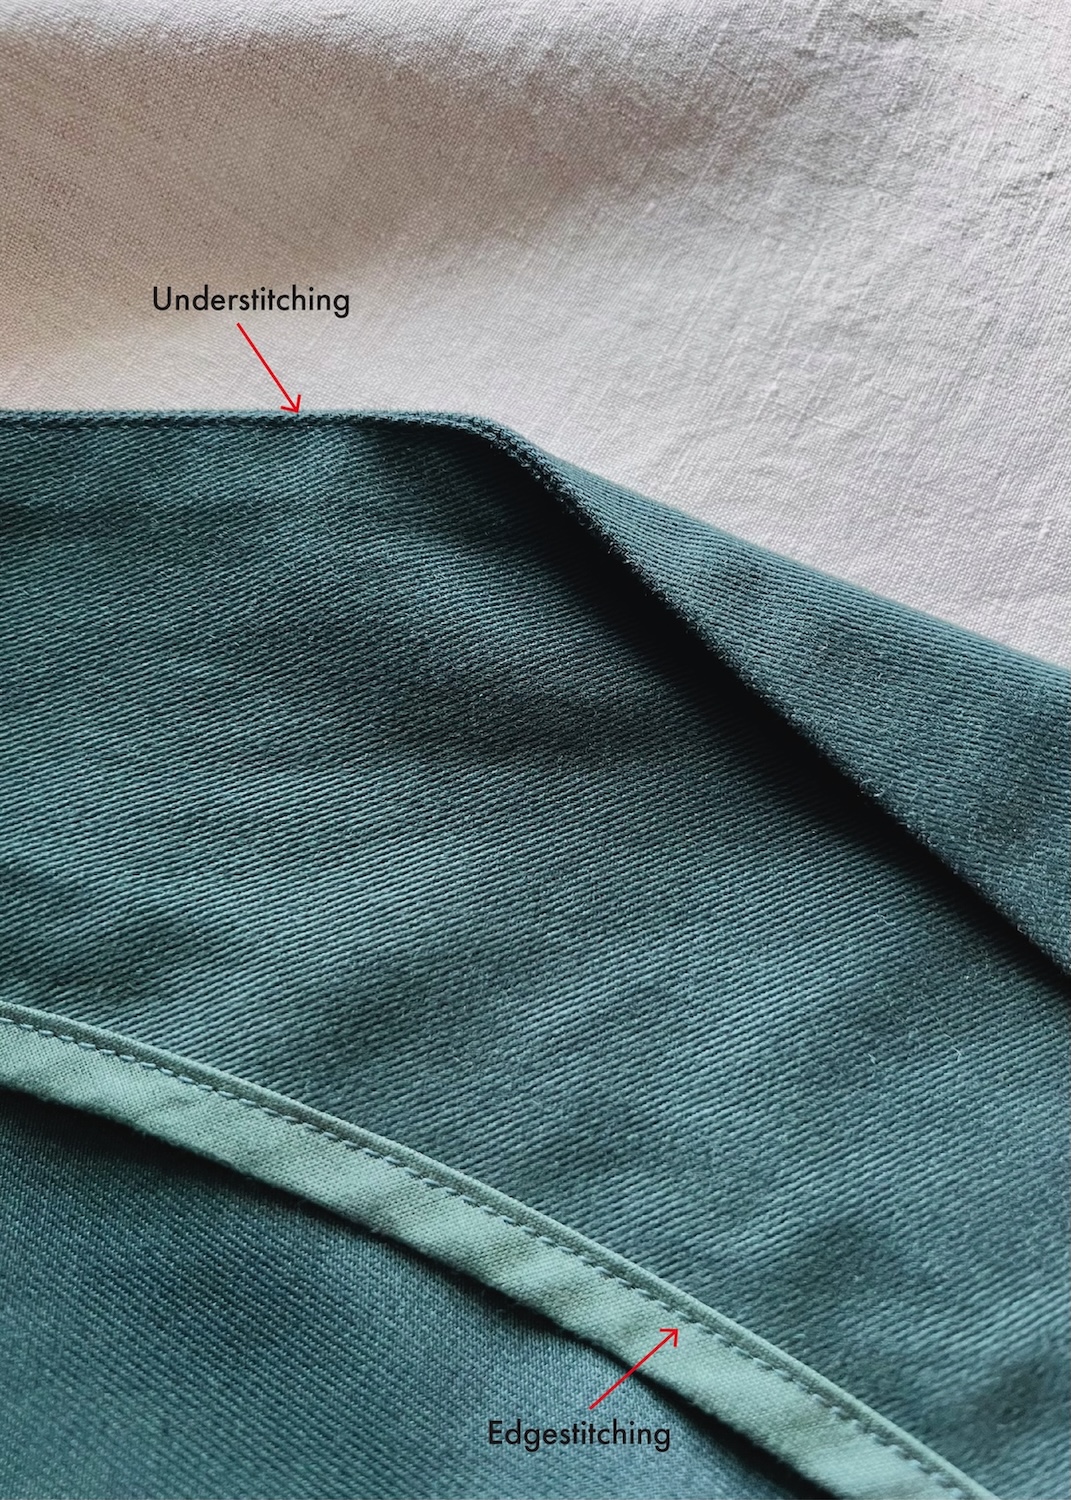
4. Edgestitching and Understitching
Edgestitching is sewn very close to a seam or fold. It neatly secures layers of fabric together, whether it be to hold seam allowances in place, anchor binding, secure waistbands, or to add simple reinforcement.
Understitching differs slightly in that it attaches the seam allowances to a lining or facing just below the seam line. It is used to prevent the fabric from rolling outward.
For both techniques, stitch length can come down to personal preference. You may choose to use the standard seam length for a more subtle finish, or increase it slightly if you want the stitching to be more visible and decorative.
Personally, I often increase my standard stitch length by a couple of millimetres for a neater finish as you’re often sewing through multiple layers of fabric.
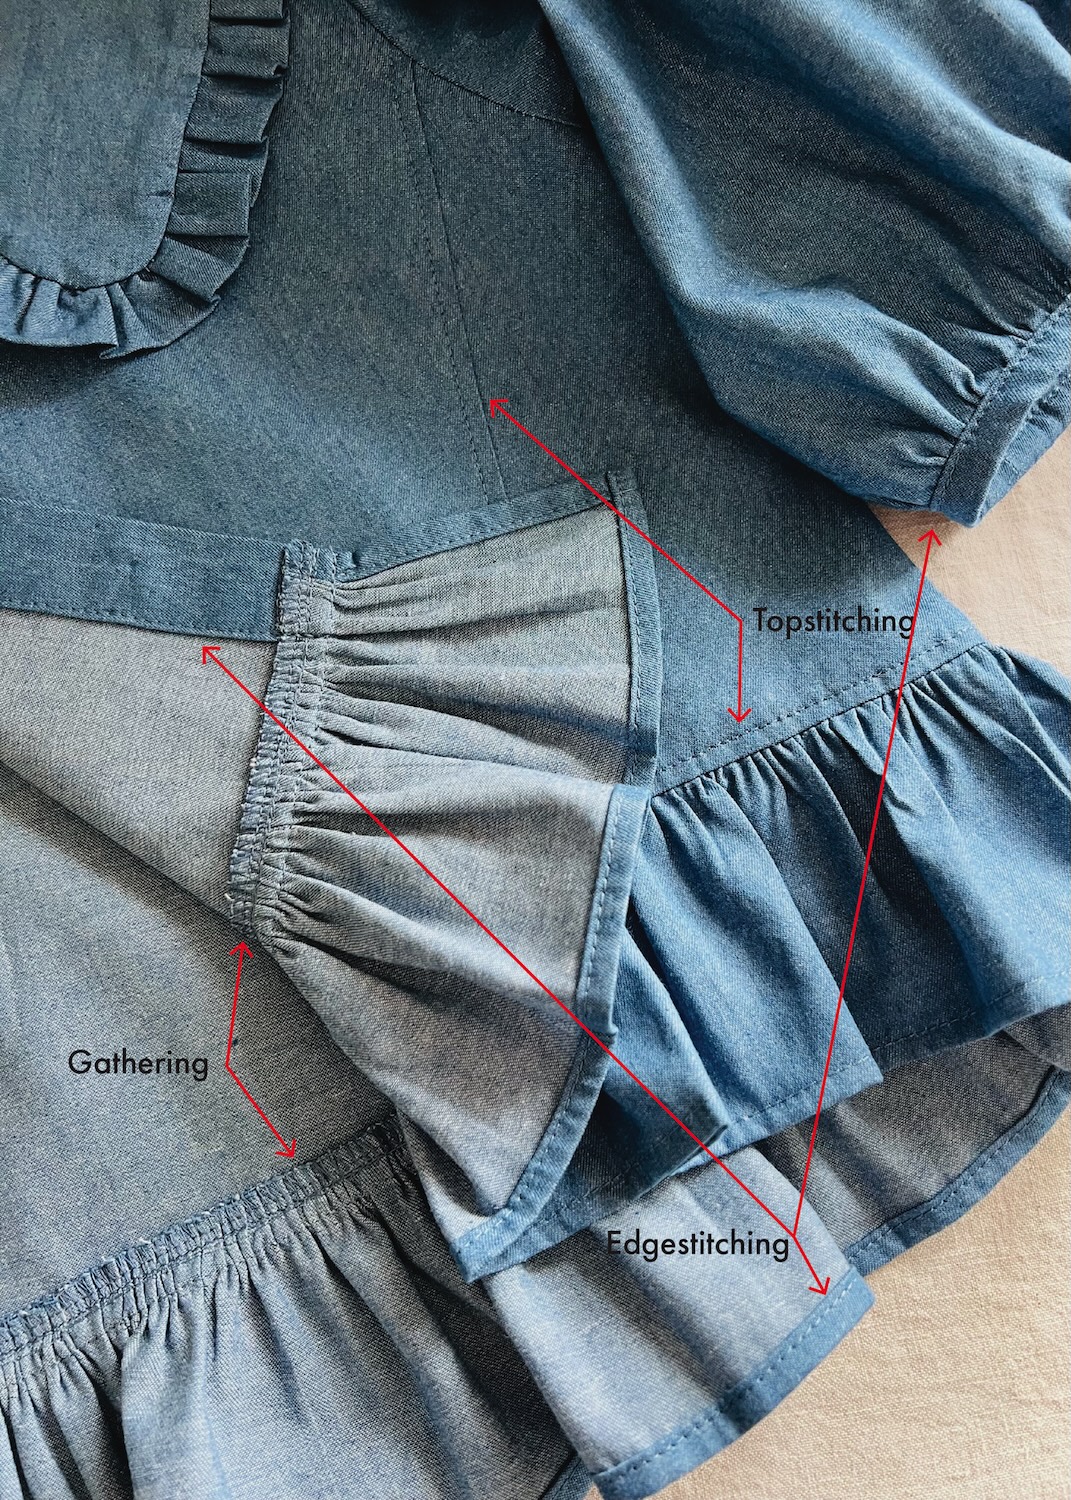
The photograph below is from my latest project (a blouse) and is a great example of how often stitch length can change within a single garment. This blouse includes standard seams, topstitching, edgestitching, and gathering.
5. Basting stitch
Basting stitch is another type of temporary stitching. It is used to hold pieces of fabric in place during construction.
Because this stitching is often removed later, it should be easy to unpick. Therefore, the longest stitch length of 4-5mm is beneficial here.
6. Stay-stitching
Stay-stitching is a row of stitching just inside the seam allowance that prevents areas from stretching out of shape during construction. One of the most common areas to stay-stitch is the neckline as parts of the curve may be cut on the bias, meaning it is more prone to stretching out of shape.
For this, I simply use my standard stitch length.
What is Stitch Width?
Stitch width refers to how far the sewing machine needle swings from side to side. Adjusting the stitch width controls how far the needle needs to move, determining how wide the stitch will be.
Stitch width is also measured in millimetres, so a stitch width of 3 means the needle moves from left to right 3mm.
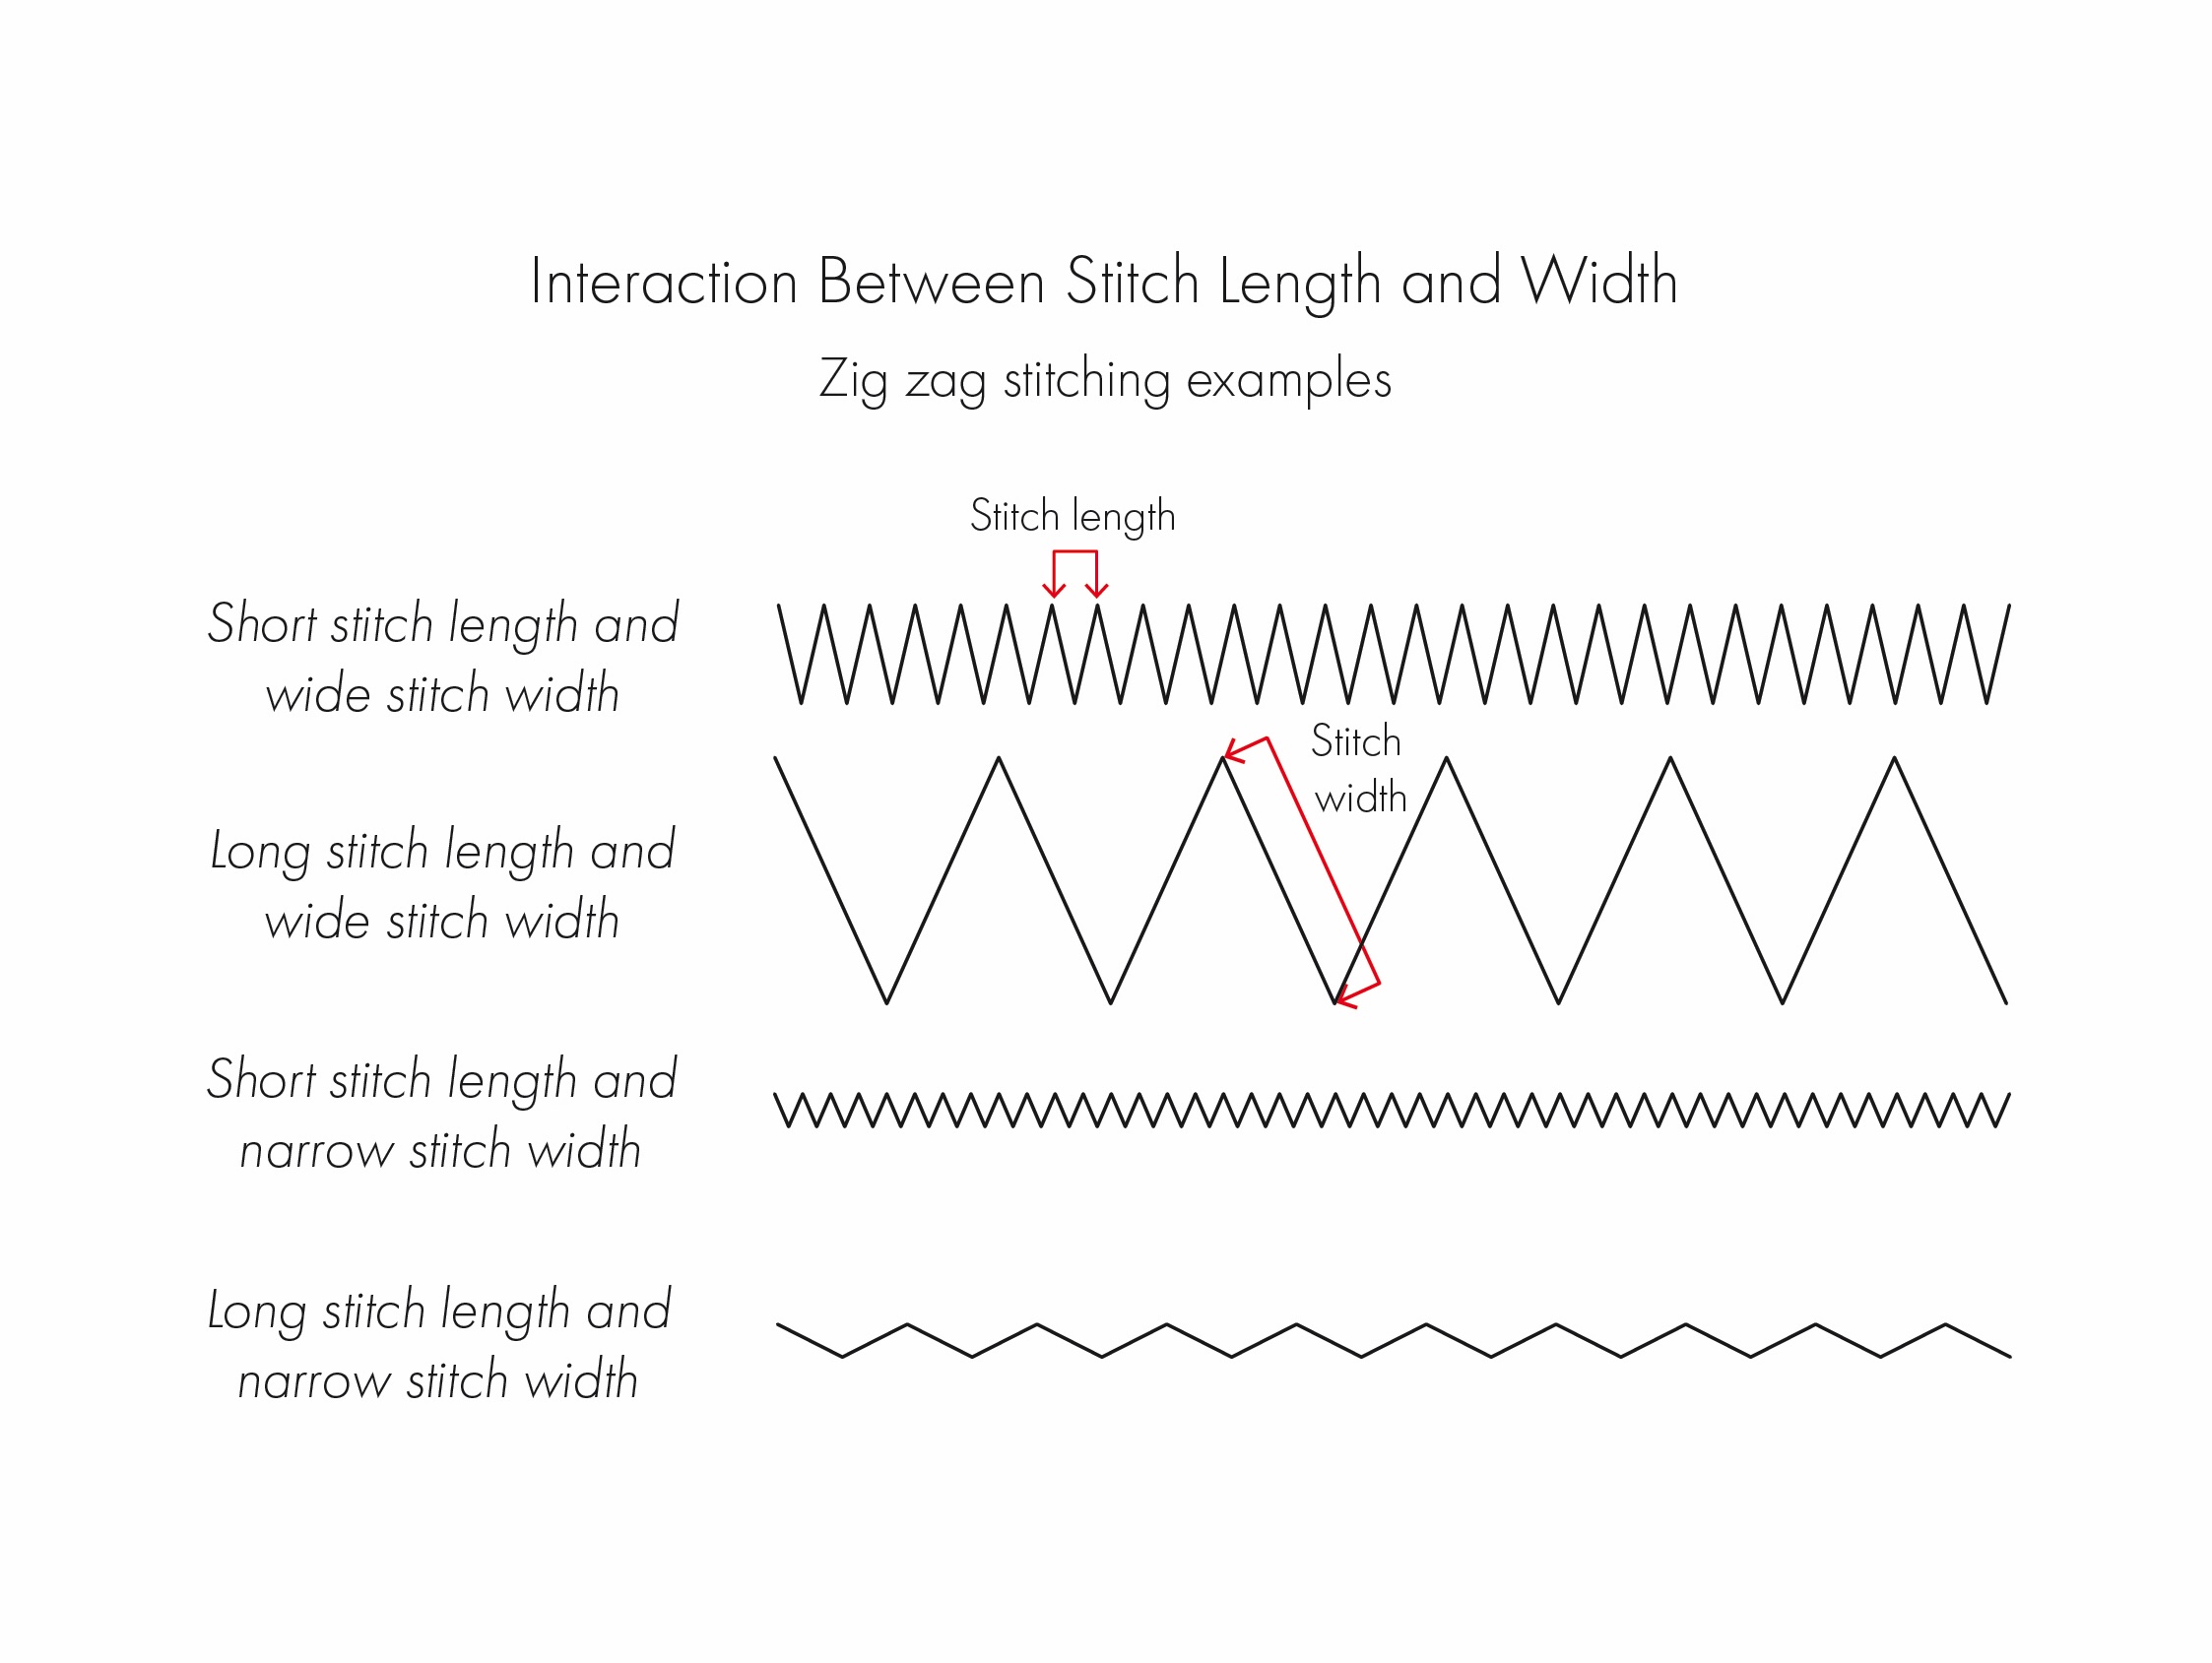
How Stitch Width and Length Interact
For straight stitching, only the stitch length is adjusted. The stitch width remains set to 0. This is because there is no side to side movement, only forward and backward. Stitch width therefore only applies to stitching that is essentially not straight (creating a zig zag style of stitch).
Stitch width works together with the stitch length to determine the overall shape and size of the stitching. Simply speaking:
- Short stitch length + wide stitch width = Denser, wider zig zag.
- Long stitch length + wide stitch width = Spread out, wider zig zag.
- Short stitch length + narrow stitch width = Denser, narrowr zig zag.
- Long stitch length + narrow stitch width = Spread out, narrower zig zag.
Examples of Stitch Width in Practice
Honestly, I don’t adjust the stitch width all that often due to the type of sewing I usually do. But there are a few situations where a zig zag stitch is useful.
There really isn’t one perfect setting as it depends on things like fabric weight, amount of stretch, and what it is you are sewing. But here is a bit of a guide that could be a good starting point for testing:
Note: The first number refers to stitch length, and the second number refers to the width.
1. Sewing stretch fabrics
If you were to sew a straight stitch on a stretchy fabric, it is most likely going to break once tension is applied. You need to provide some flexibility in the stitching that will stretch with the fabric. This is why a zig zag stitch is a good choice.
A setting of 2-2.5, 1-2 will create a medium length and narrower zig zag that would work well for more structural seams like a side or shoulder seam, where a straight seam is needed, but you still want some give.
2. Edge Finishing (when no overlocker is available)
Don’t have an overlocker? No problem. This is where zig zag stitch really comes in handy, help to finish (unfortunately not trim) raw edges and prevent fraying.
A setting of 2-3, 3-4 will create a medium length and wider zig zag. This works well here as you want the needle to swing to the right and land just off the edge of the fabric. These settings also work well for hemming.
3. Buttonholes
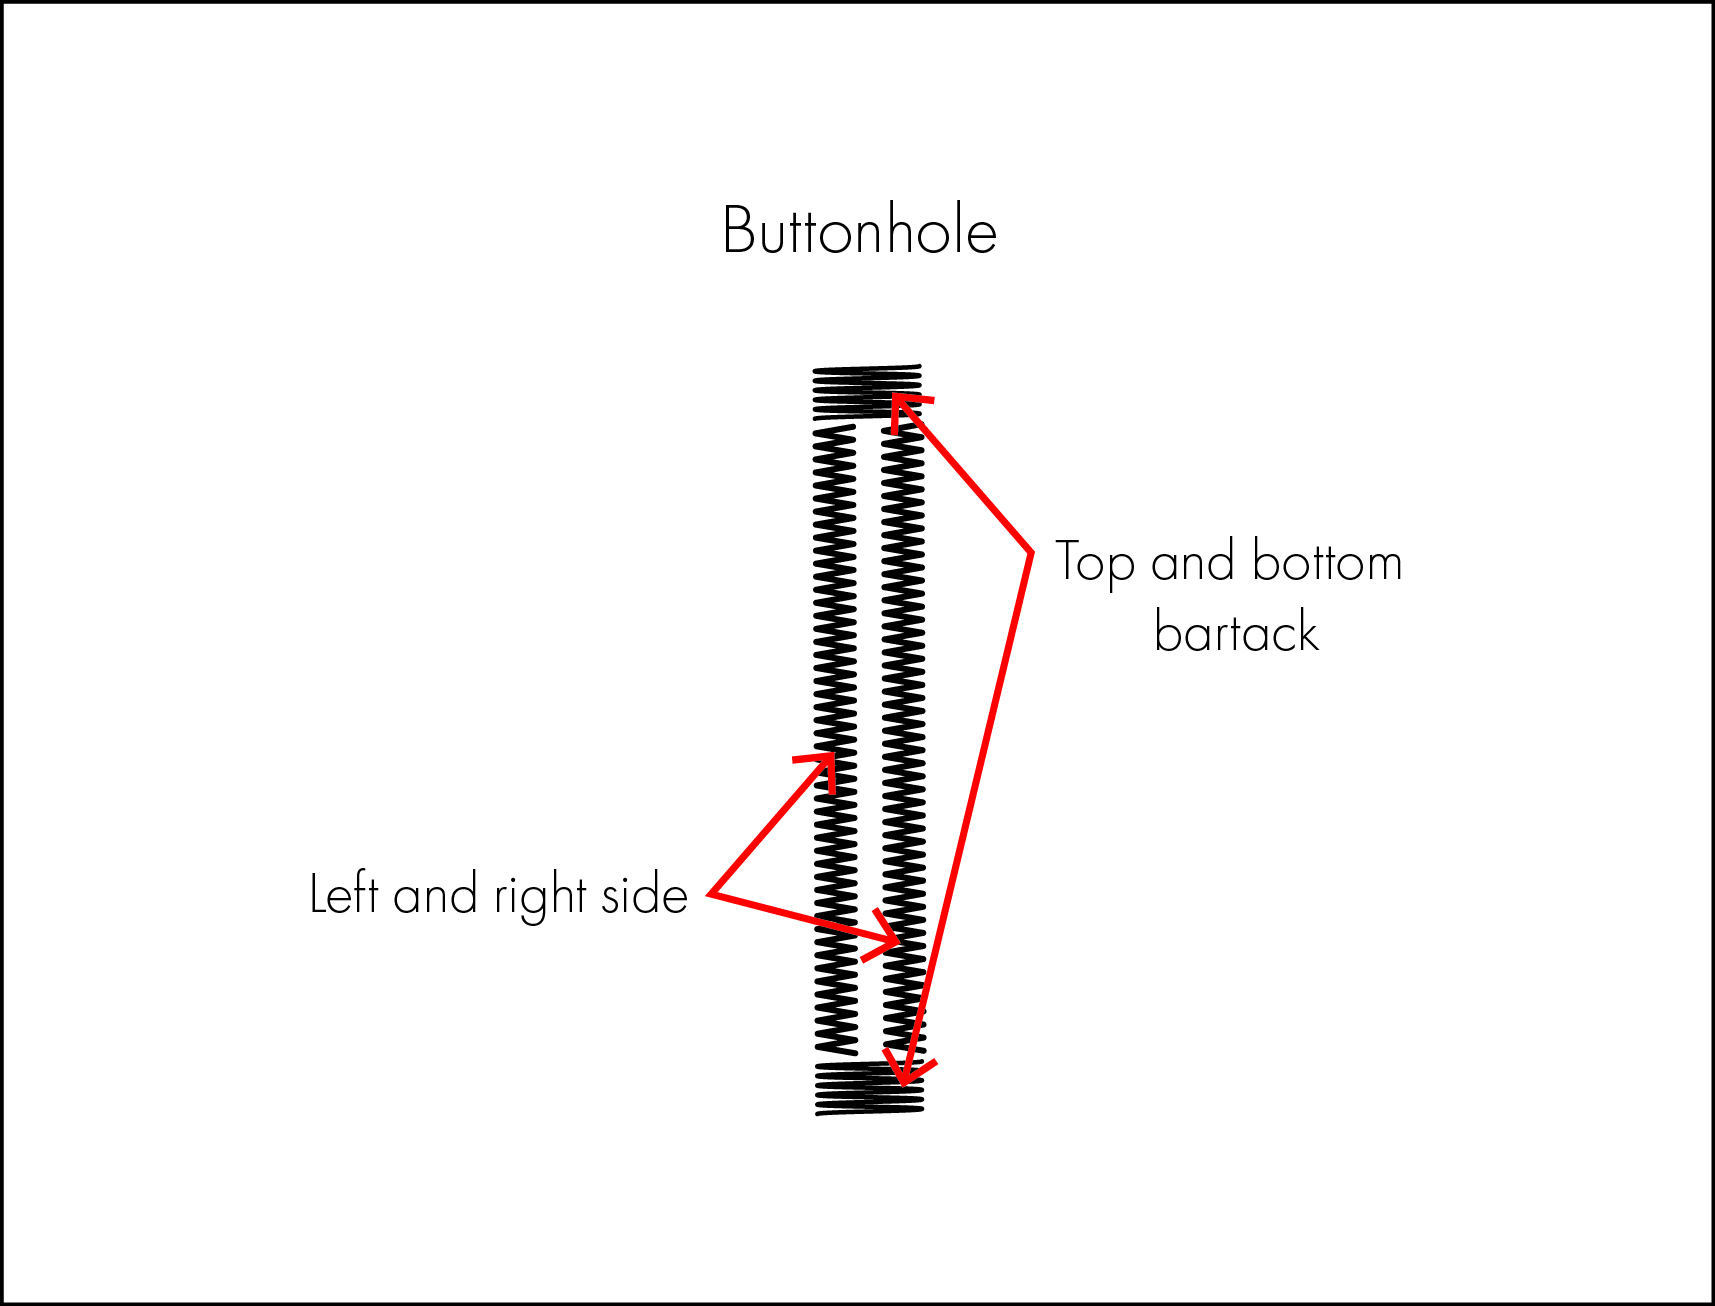
Most modern machines will automatically create a buttonhole for you at the push of a button, setting the stitch length, width, and needle position for you. But having an understanding of the settings can be useful if adjustments are needed.
Buttonholes need to be strong and durable, so are created using a dense zig zag stitch.
A typical buttonhole might have the following settings:
- Left and right side: 0.3-0.8, 2-3 creating a dense and tight, but medium width zig zag.
- Top and bottom bar tack: 0.3-0.8, 4–5 creating a dense but wide zig zag that secures the ends.

Needle Position
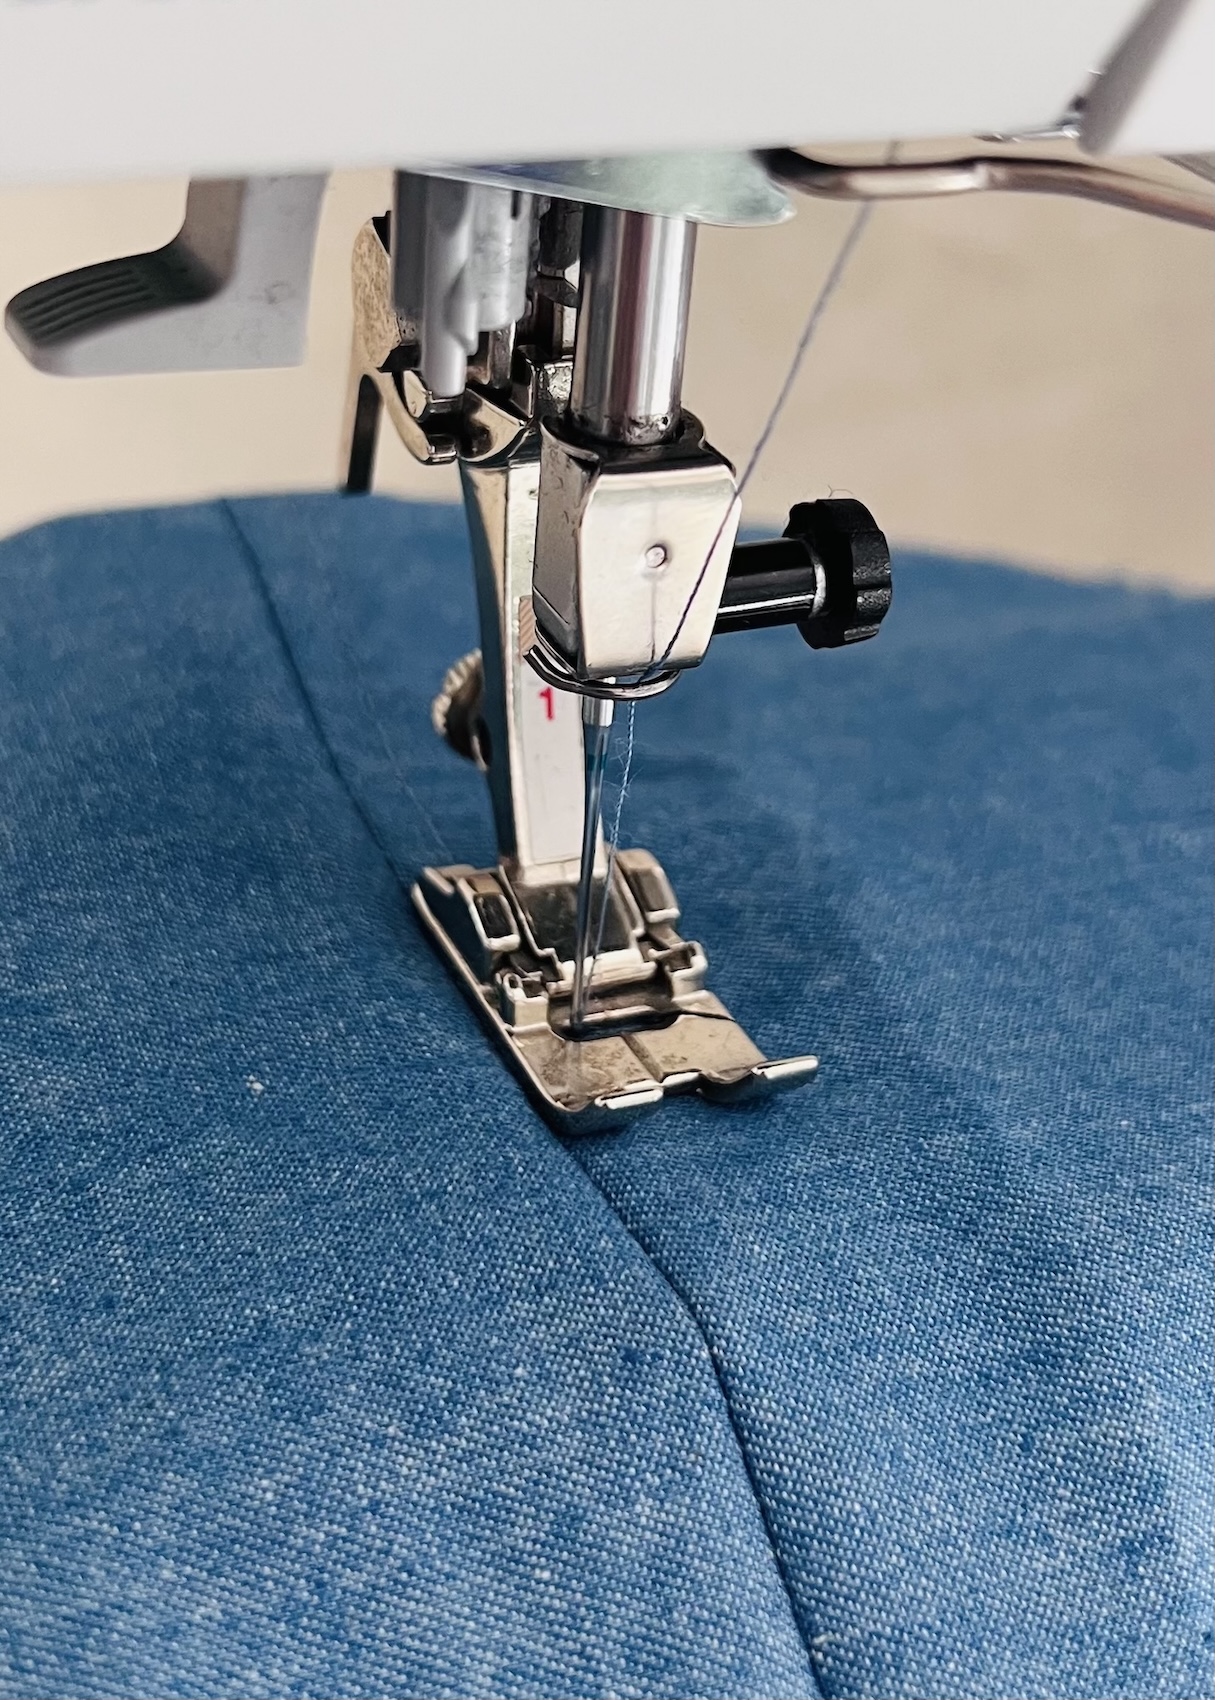
A sewing machine needle can move left and right, shifting the stitching path. Some machines only offer three positions: left, centre, and right. Others, like mine, allow smaller incremental adjustments, moving the needle in small increments.
The photograph below shows the needle at the far left position.
When to Adjust the Needle Position
Again, I often find myself altering the needle position on a single project multiple times. This could be because of:
- Speciality presser feet: Some presser feet require the needle to be aligned in a specific position. For example, some presser feet have a narrow, centrally positioned toe therefore, adjusting the needle ensures it doesn’t hit the foot, while also ensuring alignment and proper stitch formation.
- Edgestitching or understitching: These techniques involving stitching close to a seam therefore moving the needle toward the fabric edge or fold makes sewing easier and more consistent.
- Topstitching: Depending on the desired width of the topstitching you can adjust the needle as far left or right as you wish. I often use the edge of the foot as a guide along the seam, and adjust the needle to the left or right depending on the width of topstitching I want (see photo above for a example of topstitching sewn closer to a seam).
- Stitching hardware (e.g. zippers): Shifting the needle toward the zipper teeth, allows you to stitch close as possible to the hardware without catching the teeth.
For more on different presser feet and examples of needle alignment, take a look at Sewing Essentials: A Simple Guide to Common Presser Feet.
This guide has covered some of the most common uses and adjustments for stitch length, stitch width, and needle position. It’s simply intended as a starting point to help you understand how these settings work and how they can be adapted for different situations.
While I am not suggesting you need to cut out lots of little fabric squares and test every single setting (those days are long gone). However, a quick test on a scrap of your fabric is usually more than enough to see if the stitch is working and looking the way you want. This is especially helpful when working with an unfamiliar fabric, trying a technique for the first time, or sewing with stretch fabrics, which can vary a lot in how they behave.
Happy stitching!
About Author
Emma Cartmel
Heya! I’m Emma, and I'm an Aussie living in beautiful Munich with my husband Ben, and our pug Harley. I am a designer, pattern maker, and sewist, and I share my expertise and experience through my ‘cartem.sewing’ page. You can follow me on Instagram @cartem.sewingLeave a comment
Related posts
Sewing Essentials: A Guide to Sewing Threads
You might be thinking “Thread is thread… right?” Well, not always. Sewing thread is a key part of any sewing project. But just like fabric, the thread you choose matters, affecting things like the strength, appearance, and durability of your stitching. But if you have ever shopped for sewing thread, you probably know that it…

Sewing Essentials: A Simple Guide to Notches
I love a notch, so much so that I’ve decided to dedicate this article to these small but important markings. Here, I’ll explain why they’re so helpful, when to use them, and how to add them to your own patterns or adapt them for existing ones. What exactly are notches? Notches are small markings found…

How to Select and Use Interfacing: A Simple Guide
Iron-on or sew-in, woven or non-woven, lightweight or heavyweight. With so many different types, weaves, and weights to choose from, how do you know which interfacing is best for your project? In this article, I will explain the two main types of interfacing before diving into the differences in weave and weight. Hopefully by the…

Sewing Essentials: A Simple Method for Reversible Seams
There are so many ways to finish a seam, from good old overlocking to French seams and binding. I recently stumbled across another method that’s pretty nifty, and honestly, I kind of wish I had known about it sooner. It is a bit like binding, but topstitched in place so it doesn’t move or flap…

Sewing Essentials: Understanding Different Types of Sewing Elastic
Elastic is a really common notion used in sewing. You’ll find it on everything from waistbands to cuffs and necklines. It plays a crucial role in giving garments both support and shape. Have you ever had the waistband of your pants twist and never sit quite right? Or maybe you’ve noticed the leg opening of…


SEW THIS LOOK


Latest Posts


12 Comments
Nancy Stockman
This is a great general information article. But why not make one specific to fabrics-store linen?? A chart for each of the fs weights, and the various places a stitch is required in a garment or project. For your loyal customers who sew almost exclusively with your linen, that chart would be especially helpful
Karen Baen
This is very helpful. Especially with the images. I realize stitch length is subjective but it is always something I’m curious about when I look at others makes. Your Playdate blouse is really cute! Thanks!
Emma Cartmel
Hi Karen,
Thank you! I’m glad the images helped. I agree, stitch length can be pretty subjective, but it’s always interesting to see what works for different people.
And thanks for the kind words about the Playdate Blouse, I had a lot of fun making it!
Ann Schutt
Thank you. This is very helpful for an intermediate sewist!
Emma Cartmel
Hi Ann, thank you. I am so glad you found it useful.
Tammy Parkinson
Thank you for posting this article. It was very helpful to me. I look forward to reading your next article.
Emma Cartmel
Hi Tammy, thank you. That is very kind. I am so glad you found the article helpful.
Eva Simms
Great reference article. Would have loved to post it to my Pinterest account but your site does not allow me to do that. Not sure if it is a glitch just on my computer and phone or a general problem.
Cindy Bahn
Eva, I was able to save to my Pinterest account. I read and saved on my iPad, using the box with the arrow pointing up (I’m sure there’s a name for that icon!) in the upper right corner of my screen.,
Evelyn Roth
Eva, I found that asking my built-in AI feature how to save something to pinterest was helpful. Different browsers use different buttons. My Windows browser lets me set up “Extensions” next to my URL and i can save my Pinterest icon as an extension, so I can use it anytime.
Megan Mchugh
I would like to know where that blouse pattern might be found. It looks like it has elements I would love to use in a blouse as well. Thank you for such a well-written article!
Emma Cartmel
Hi Megan, thank you! The pattern is the ‘Playdate Blouse’ from Matchy Matchy Sewing Club. I was previewing the pattern for them, but I believe it will be released very soon 🙂