


What is Pattern Grading? A Beginners Guide

Photo by Eugene Golovesov
Grading is the process of creating different sizes from a single base pattern or block. It doesn’t alter the design itself but instead scales the base pattern up or down to accommodate a range of body sizes, such as going from a size XXS to a size 4XL. This allows a single design to fit various sizes while maintaining the intended proportions, fit, and style.
It’s worth noting that there is a difference between grading and fitting. Grading involves generating entirely new sizes. In contrast, fitting is the process of adjusting specific areas of a garment to better suit an individual’s body shape, such as narrowing the waist or enlarging the width of the hips.
Basic Concepts in Grading
Grade Rules
Grade rules are the specific measurements and instructions used to scale the base pattern up or down to create additional sizes. These rules specify the amount and direction of these increases or decreases at key points on the pattern.
Grade rules can vary depending on a few factors, including:
- Body growth patterns: Different parts of the body grow at different rates, so grade rules are not applied uniformly across the entire pattern.
- Garment style: Fitted garments will follow different grading rules to looser or more oversized styles.
- Brand standards: Each company or brand may use its own set of grading guidelines.
- Sizing systems: International sizing can be different (e.g. EU vs. US) and this will impact how patterns are graded.
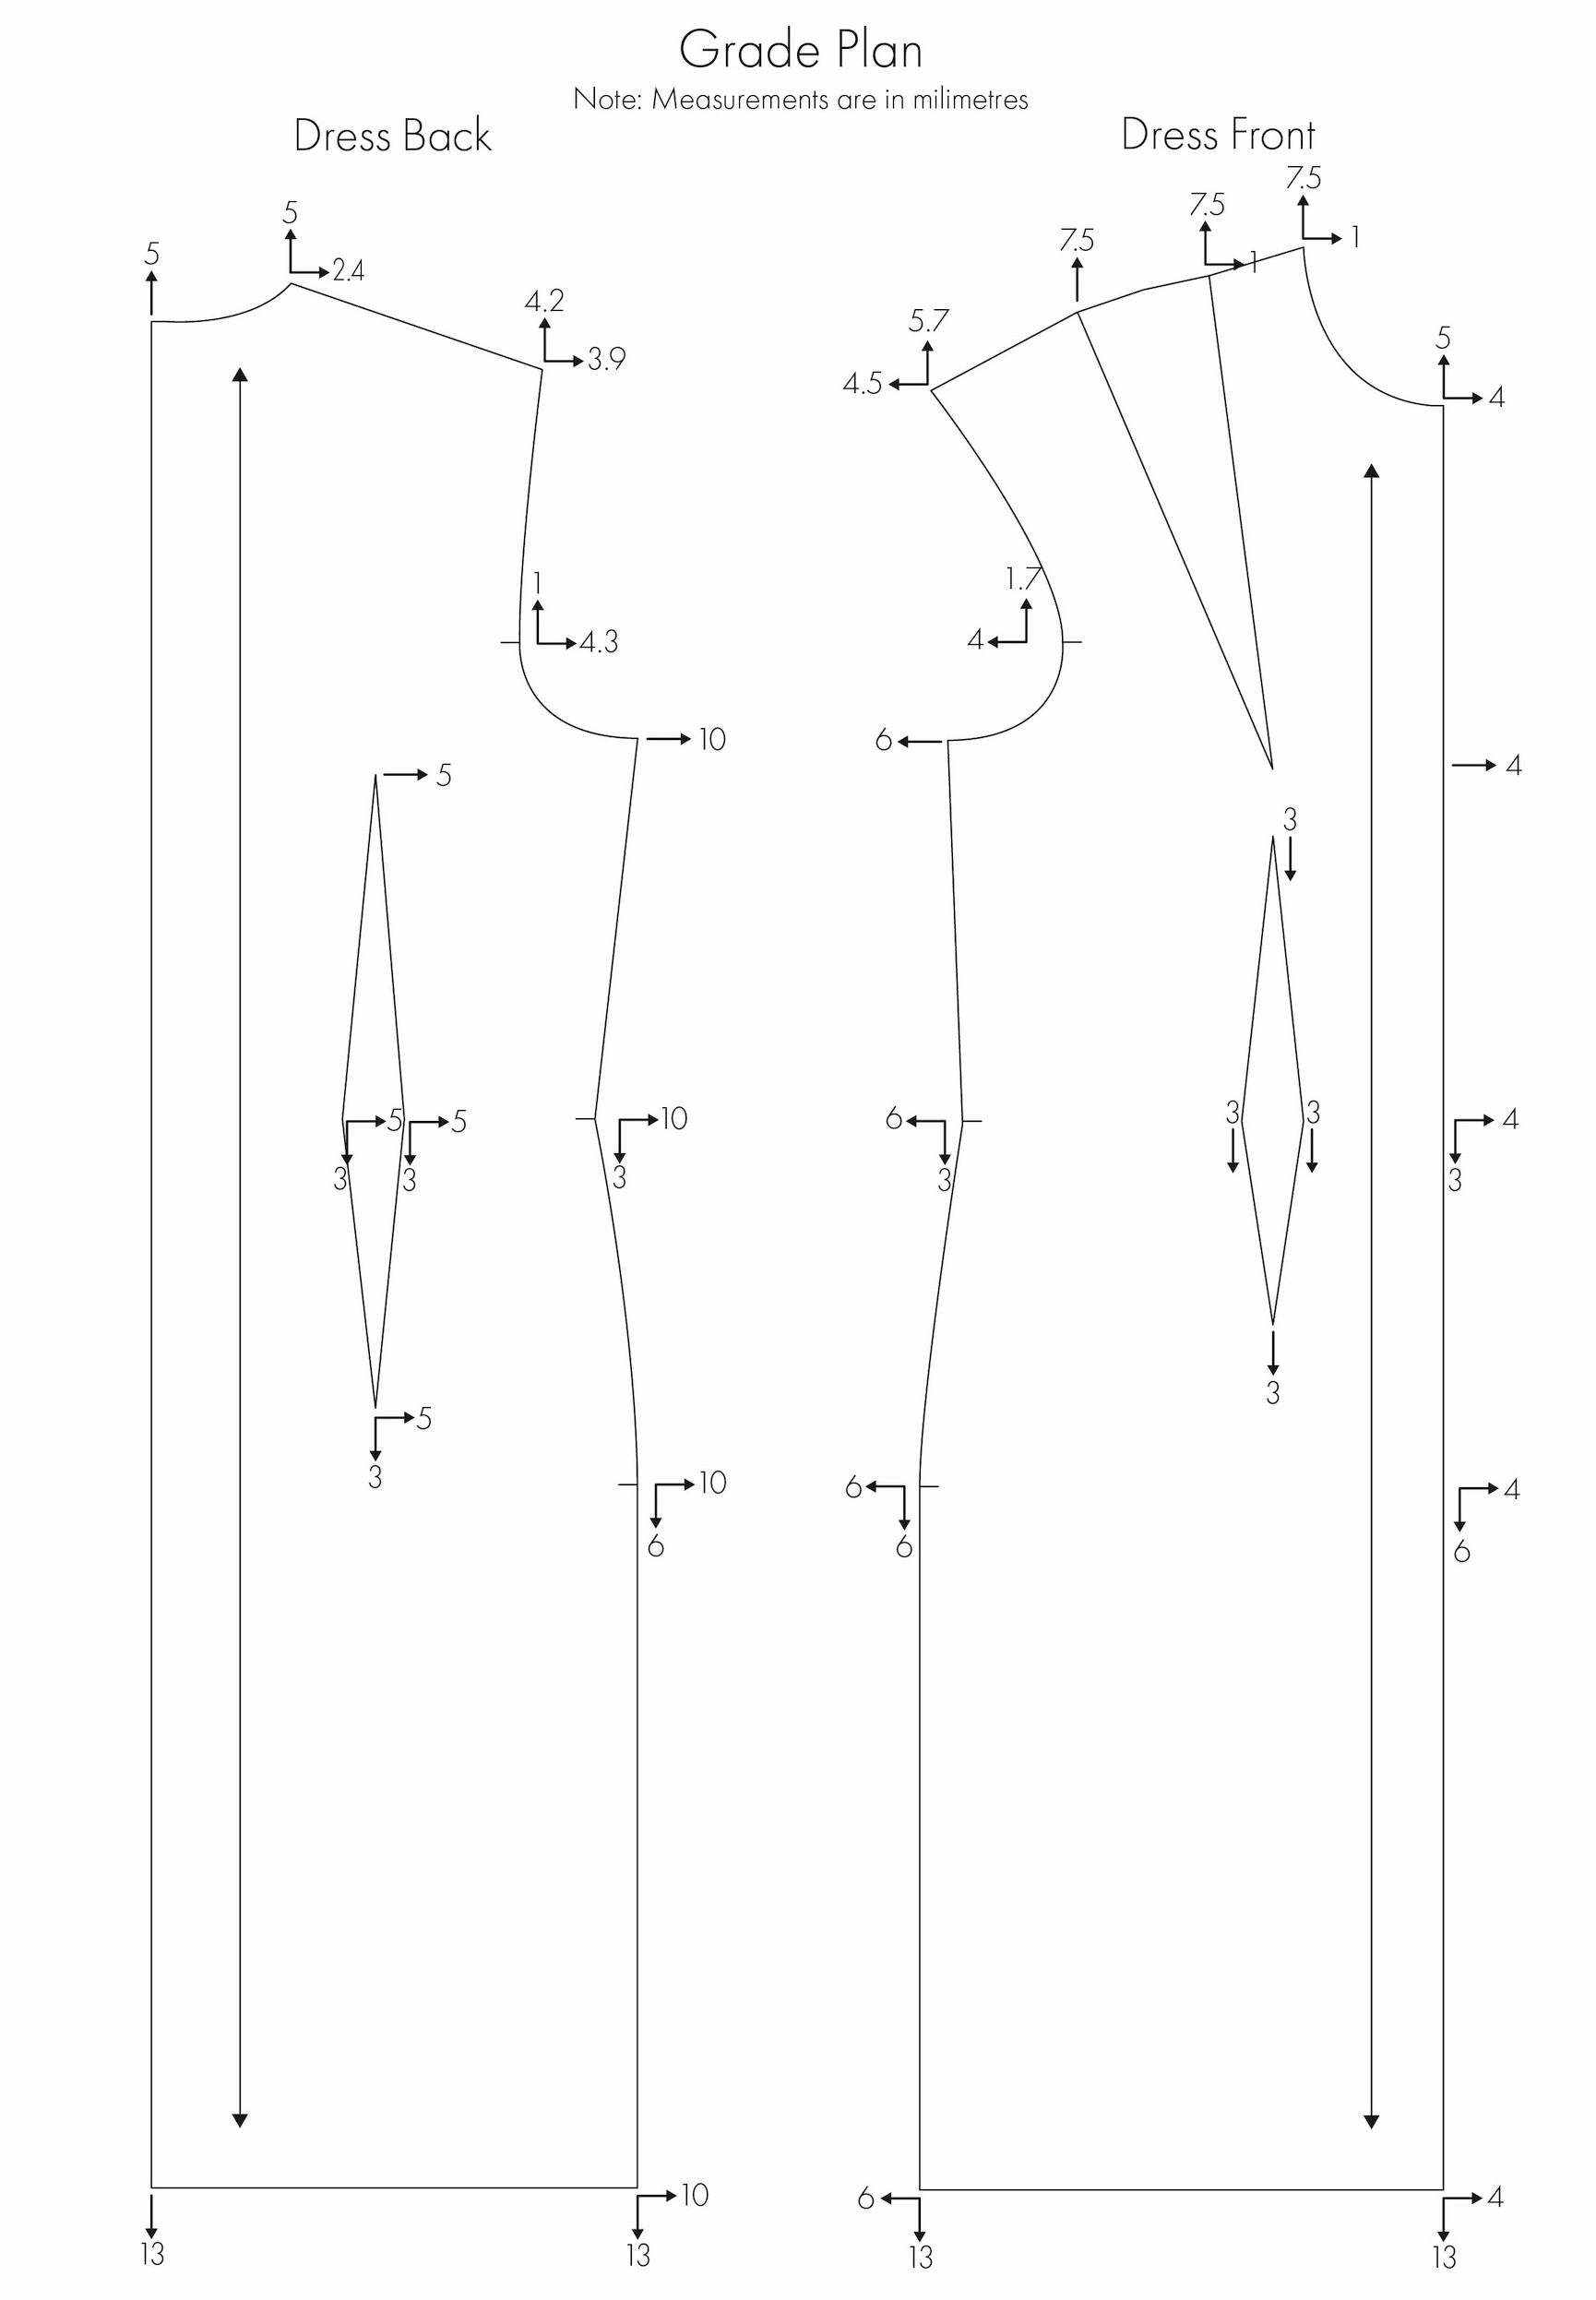
Diagram 1 below is an example of a Grade Plan—an overview (like a roadmap) of how a pattern is graded across sizes, based on these grade rules. It identifies how much to add or subtract and in which direction at key points for each size. The measurements in this example are in millimetres.
Multi-size patterns
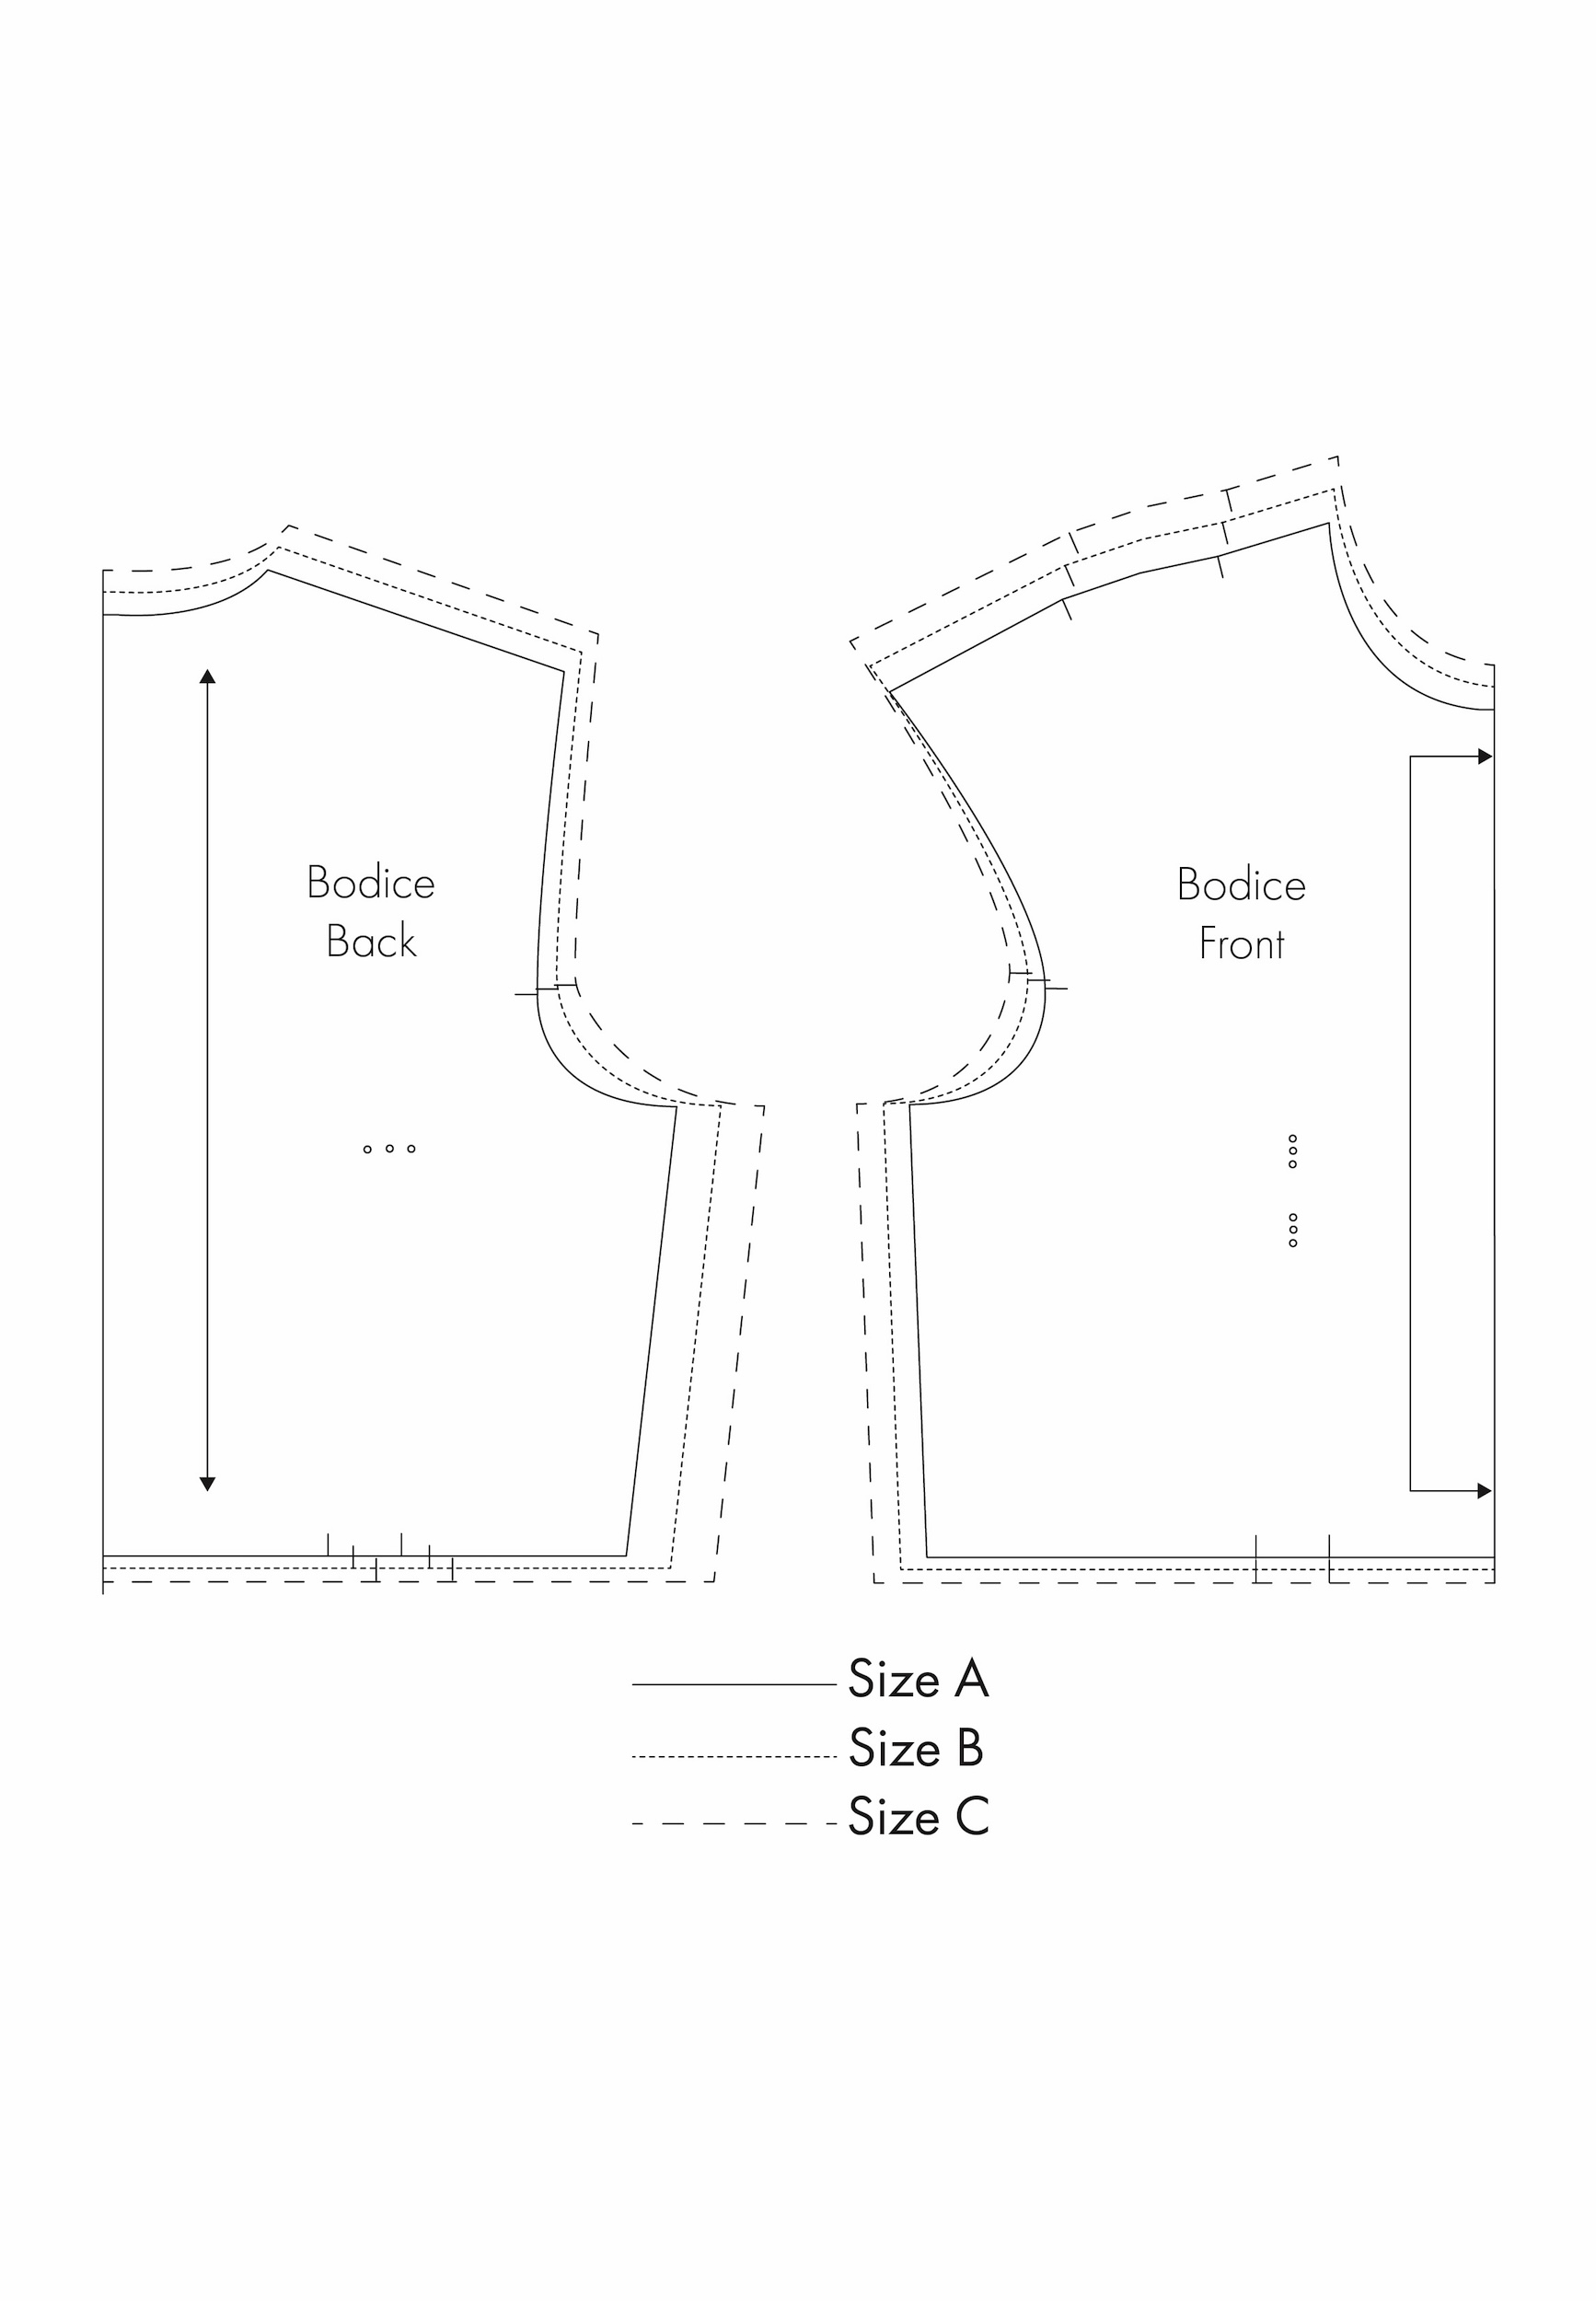
Multi-size or nested patterns, are just as they sound. These patterns include multiple sizes, typically identified by varying line weights, styles (such as dashed or solid lines), or colour-coding, making it easy to identify each size on the same pattern (see Diagram 2 below for a simple example). Multi-size patterns allow the maker to not only choose and cut the size they need, but to blend between sizes where necessary (e.g. a size 10 bust with a size 12 hip).
For more on blending between sizes, see my earlier article, Checking, Blending, and Truing Your Sewing Patterns – Part 2.
Proportional vs. custom grading:
- Proportional grading involves making uniform adjustments across the pattern (e.g., 4cm growth between each size).
- Custom grading is more tailored to specific body measurements and styles and may not follow consistent intervals.
Methods of Grading
Note: In the diagrams below, I demonstrate how to manually grade based on hypothetical grade plans. The diagrams are not to scale. A full demonstration is a bit beyond the scope of this article, which is intended to simply introduce the concept of grading.
Manual Grading:
I was first introduced to manual grading at university around 17 years ago, where I learned the process entirely by hand. Manual grading, while more time consuming and less precise, is definitely a valuable skill to have for understanding how patterns are scaled across different sizes.
There are two common methods of manual grading.
Method 1: Shift (or slide)
The shift method, also known as the slide method, involves moving the block or pattern piece in specific directions—up, down, inward, or outward—by the measured increments, specified by the grade rules.
How it works:
1. Trace the base block or pattern.
2. Mark the measured increments and direction of the increase or decrease, as derived from the grade plan, on the pattern (refer to the blue and green lines).
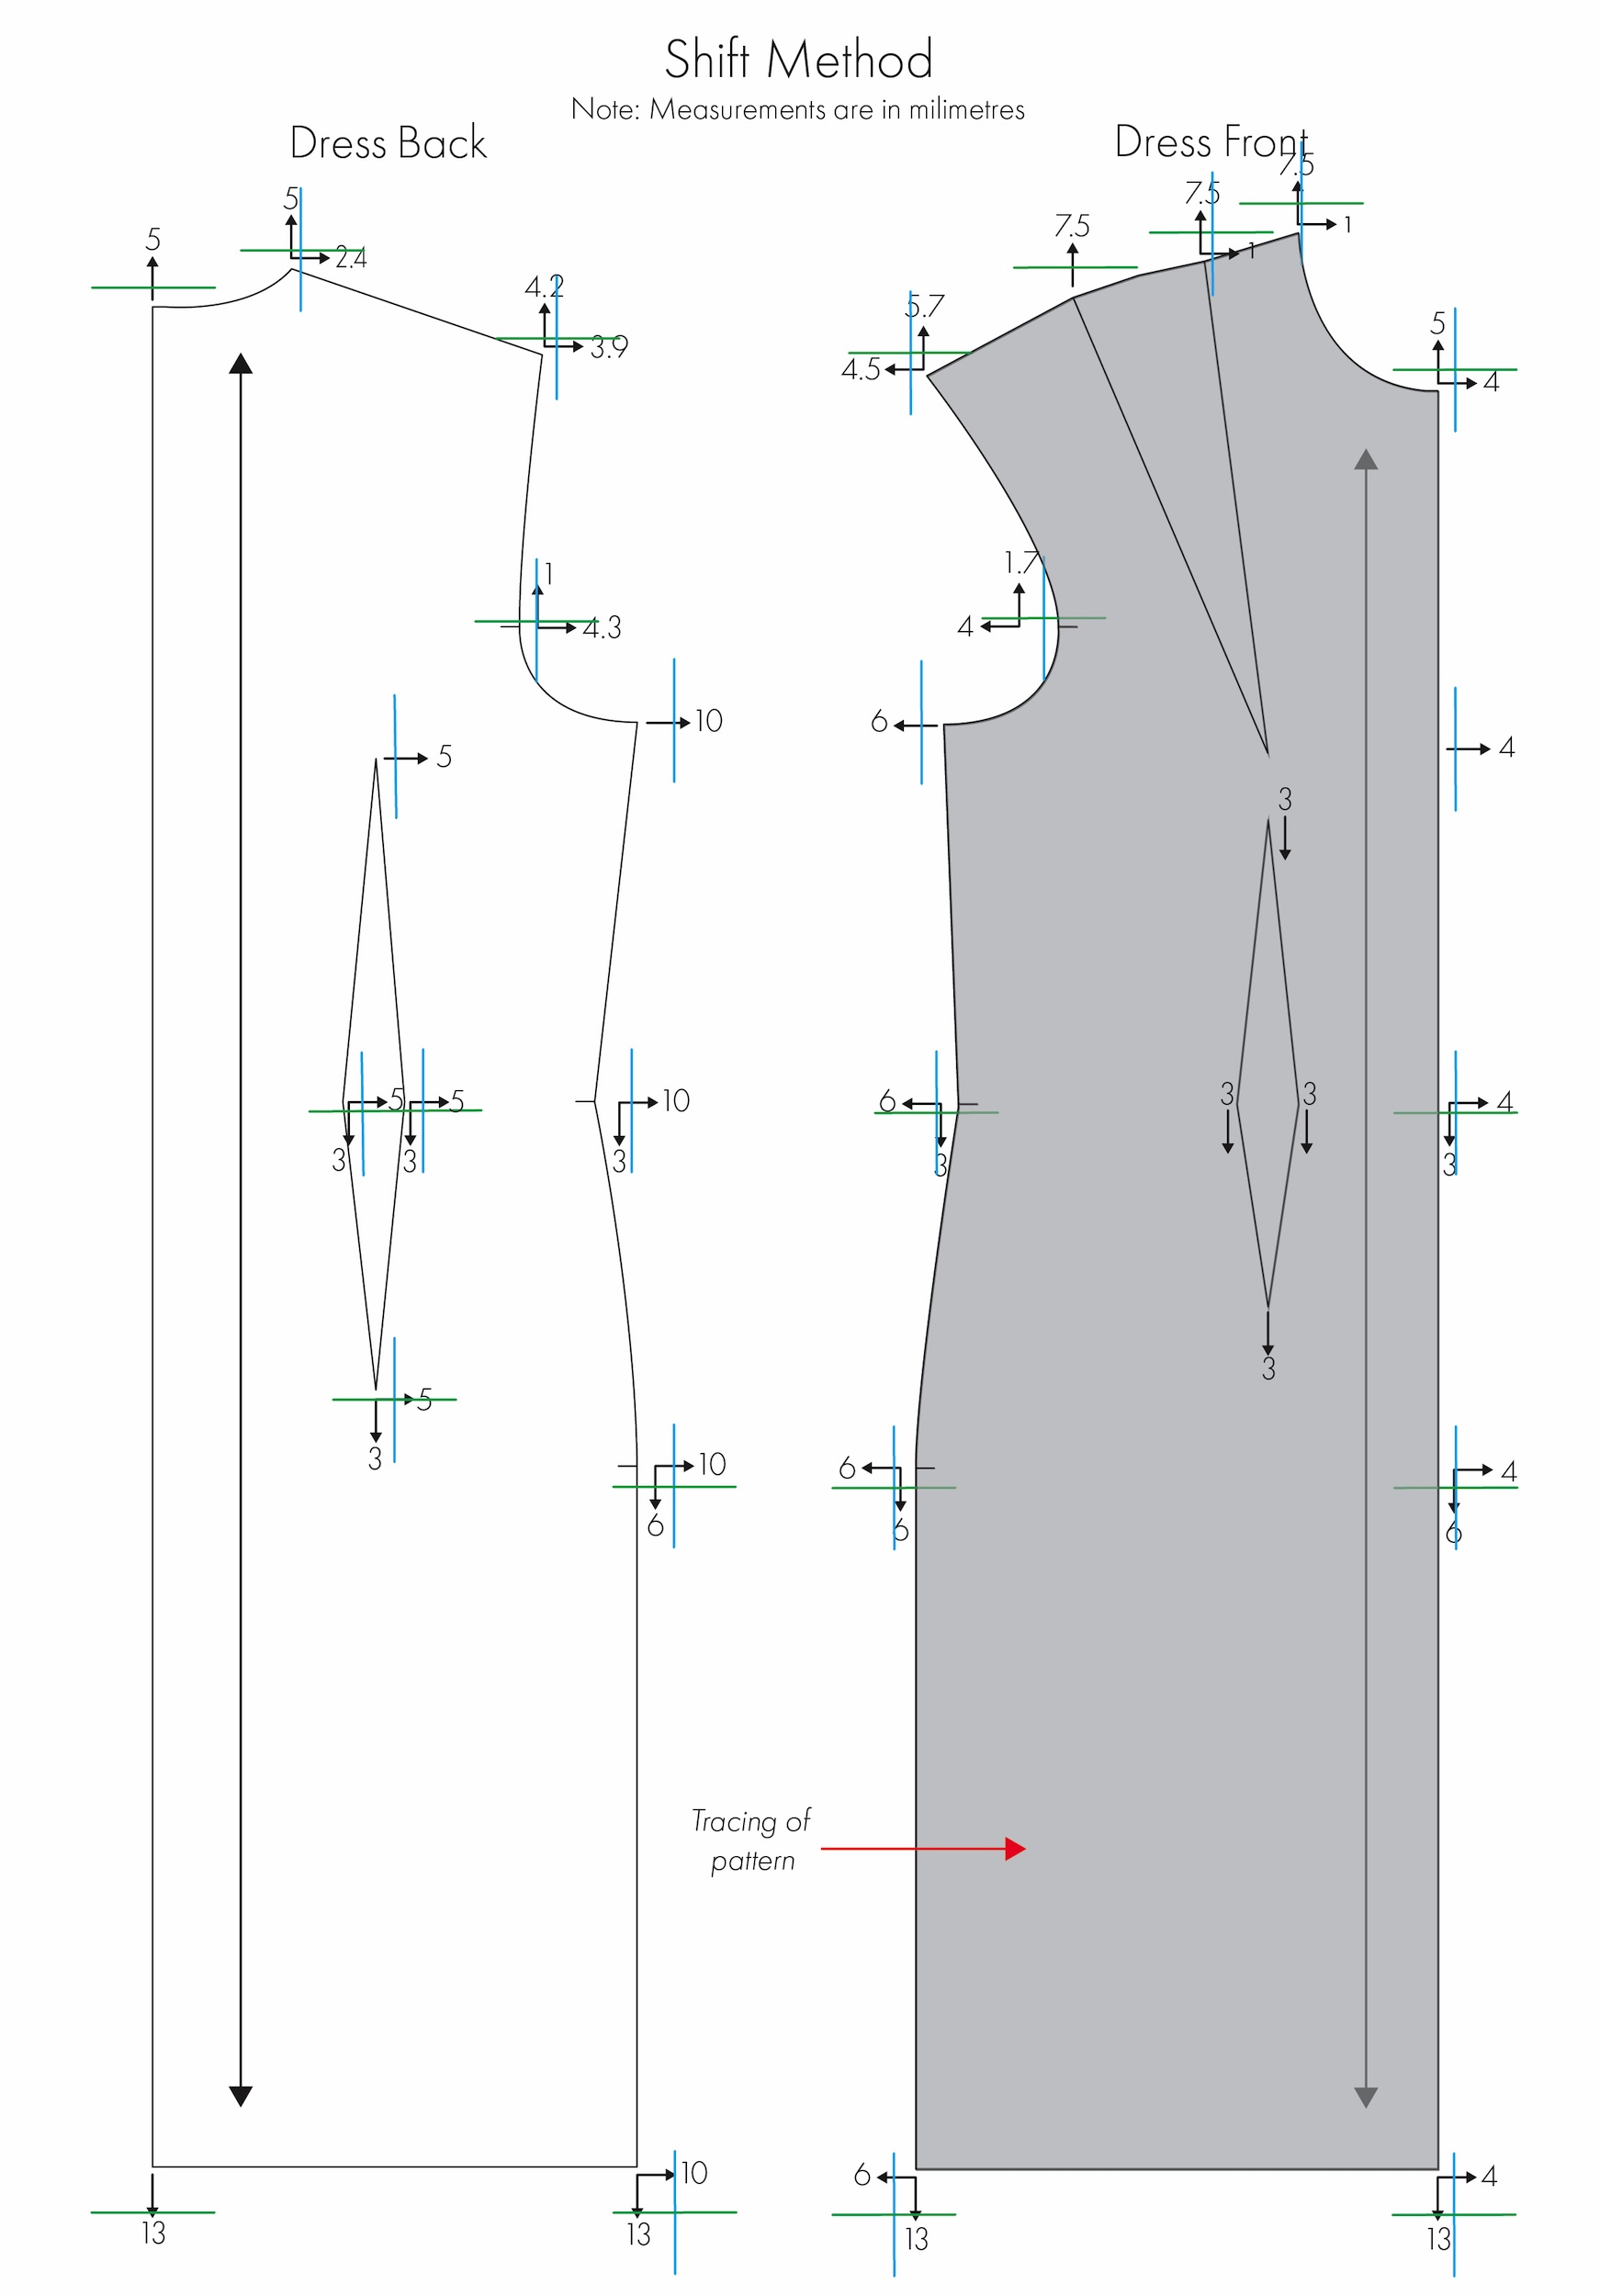
3. Move (or shift) the entire pattern according to the grade plan, ensuring the correct grain is maintained. Trace each new section.
4. Redraw the entire pattern in its new position to create a larger or smaller size, and blend as needed.
This method is relatively quick and effective (once you get the hang of it). It’s also a useful way to understand the fundamental principles of grading. However, despite its simplicity, the technique can be prone to small errors caused by simple factors like pen thickness, or slight misalignments during shifting. Because of this, it’s less ideal for complex or irregular shapes, or situations where a high level of accuracy is needed.
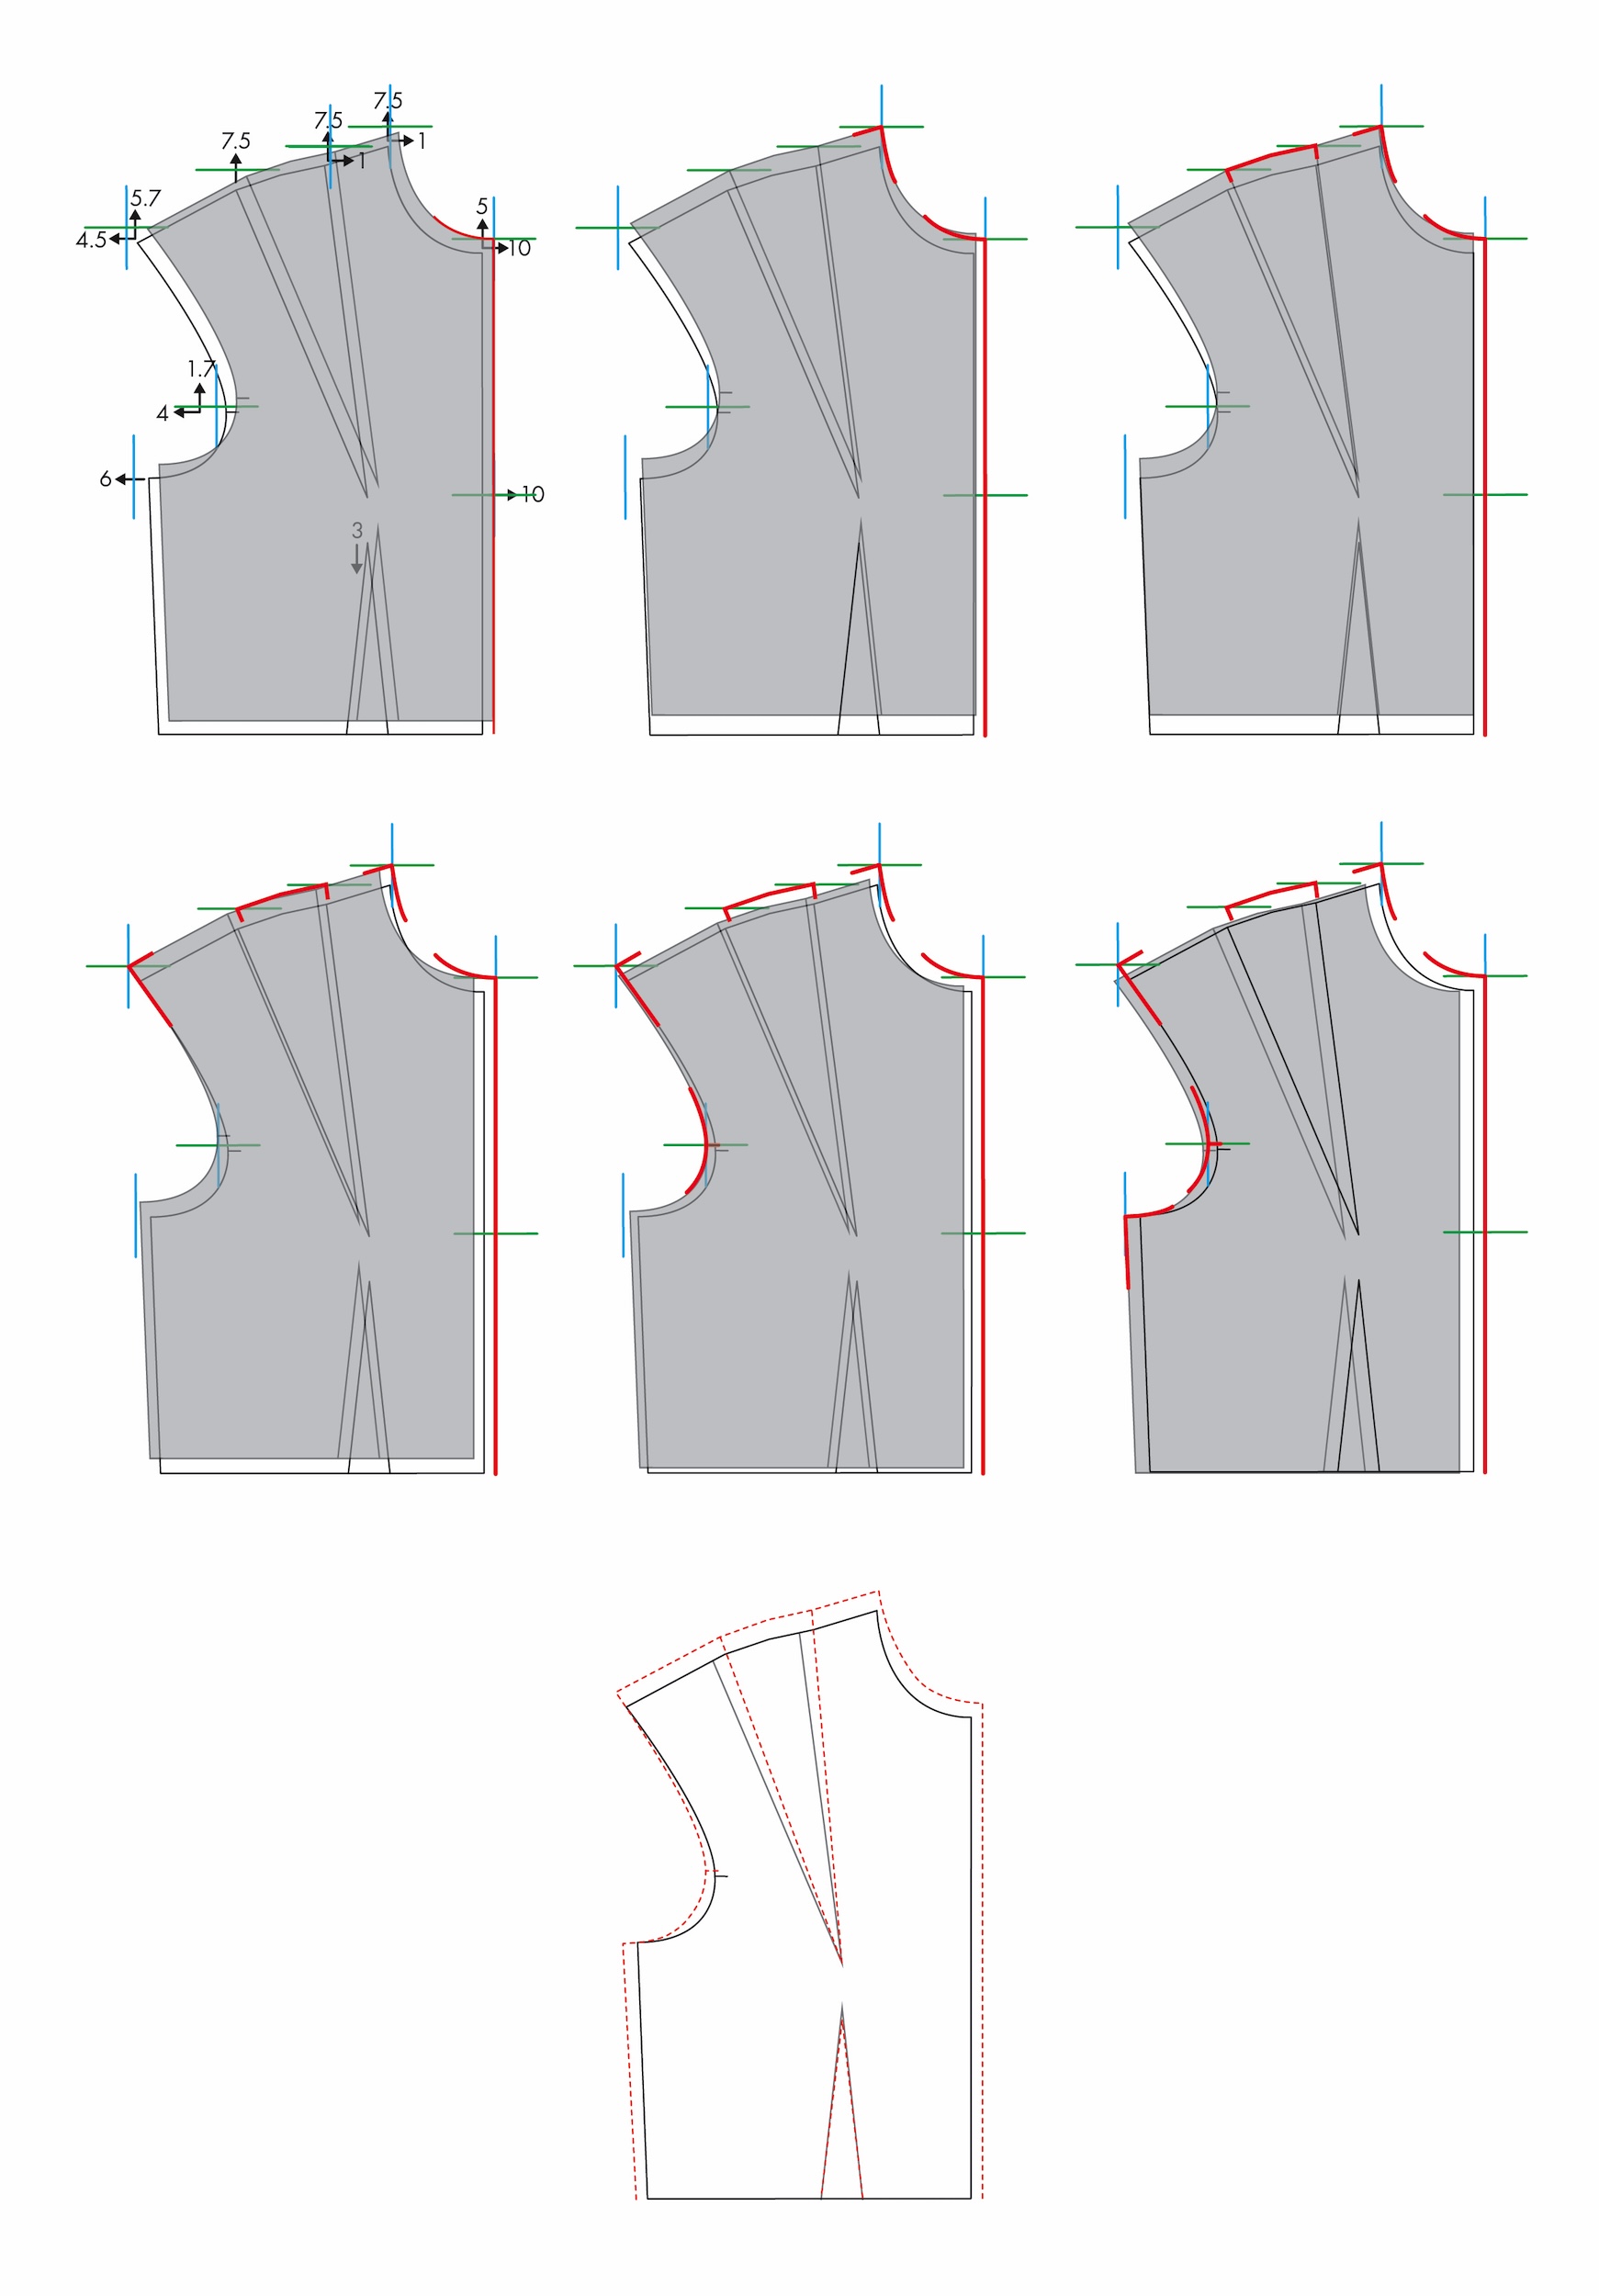
Method 2: Cut and spread (or slash and spread)
The cut and spread, or slash and spread method is a patternmaking technique commonly used to add fullness to specific areas of a pattern (such as for gathering). The same principles can also be applied to grade a pattern.
How it works:
1. Trace the base block or pattern.
2. Mark the measured increments and direction of the increase or decrease, as derived from the grade plan, on the pattern (refer to the blue and green lines).
3. Mark corresponding cut and spread lines (refer to red dashed lines).
4. Cut along cut and spread lines.
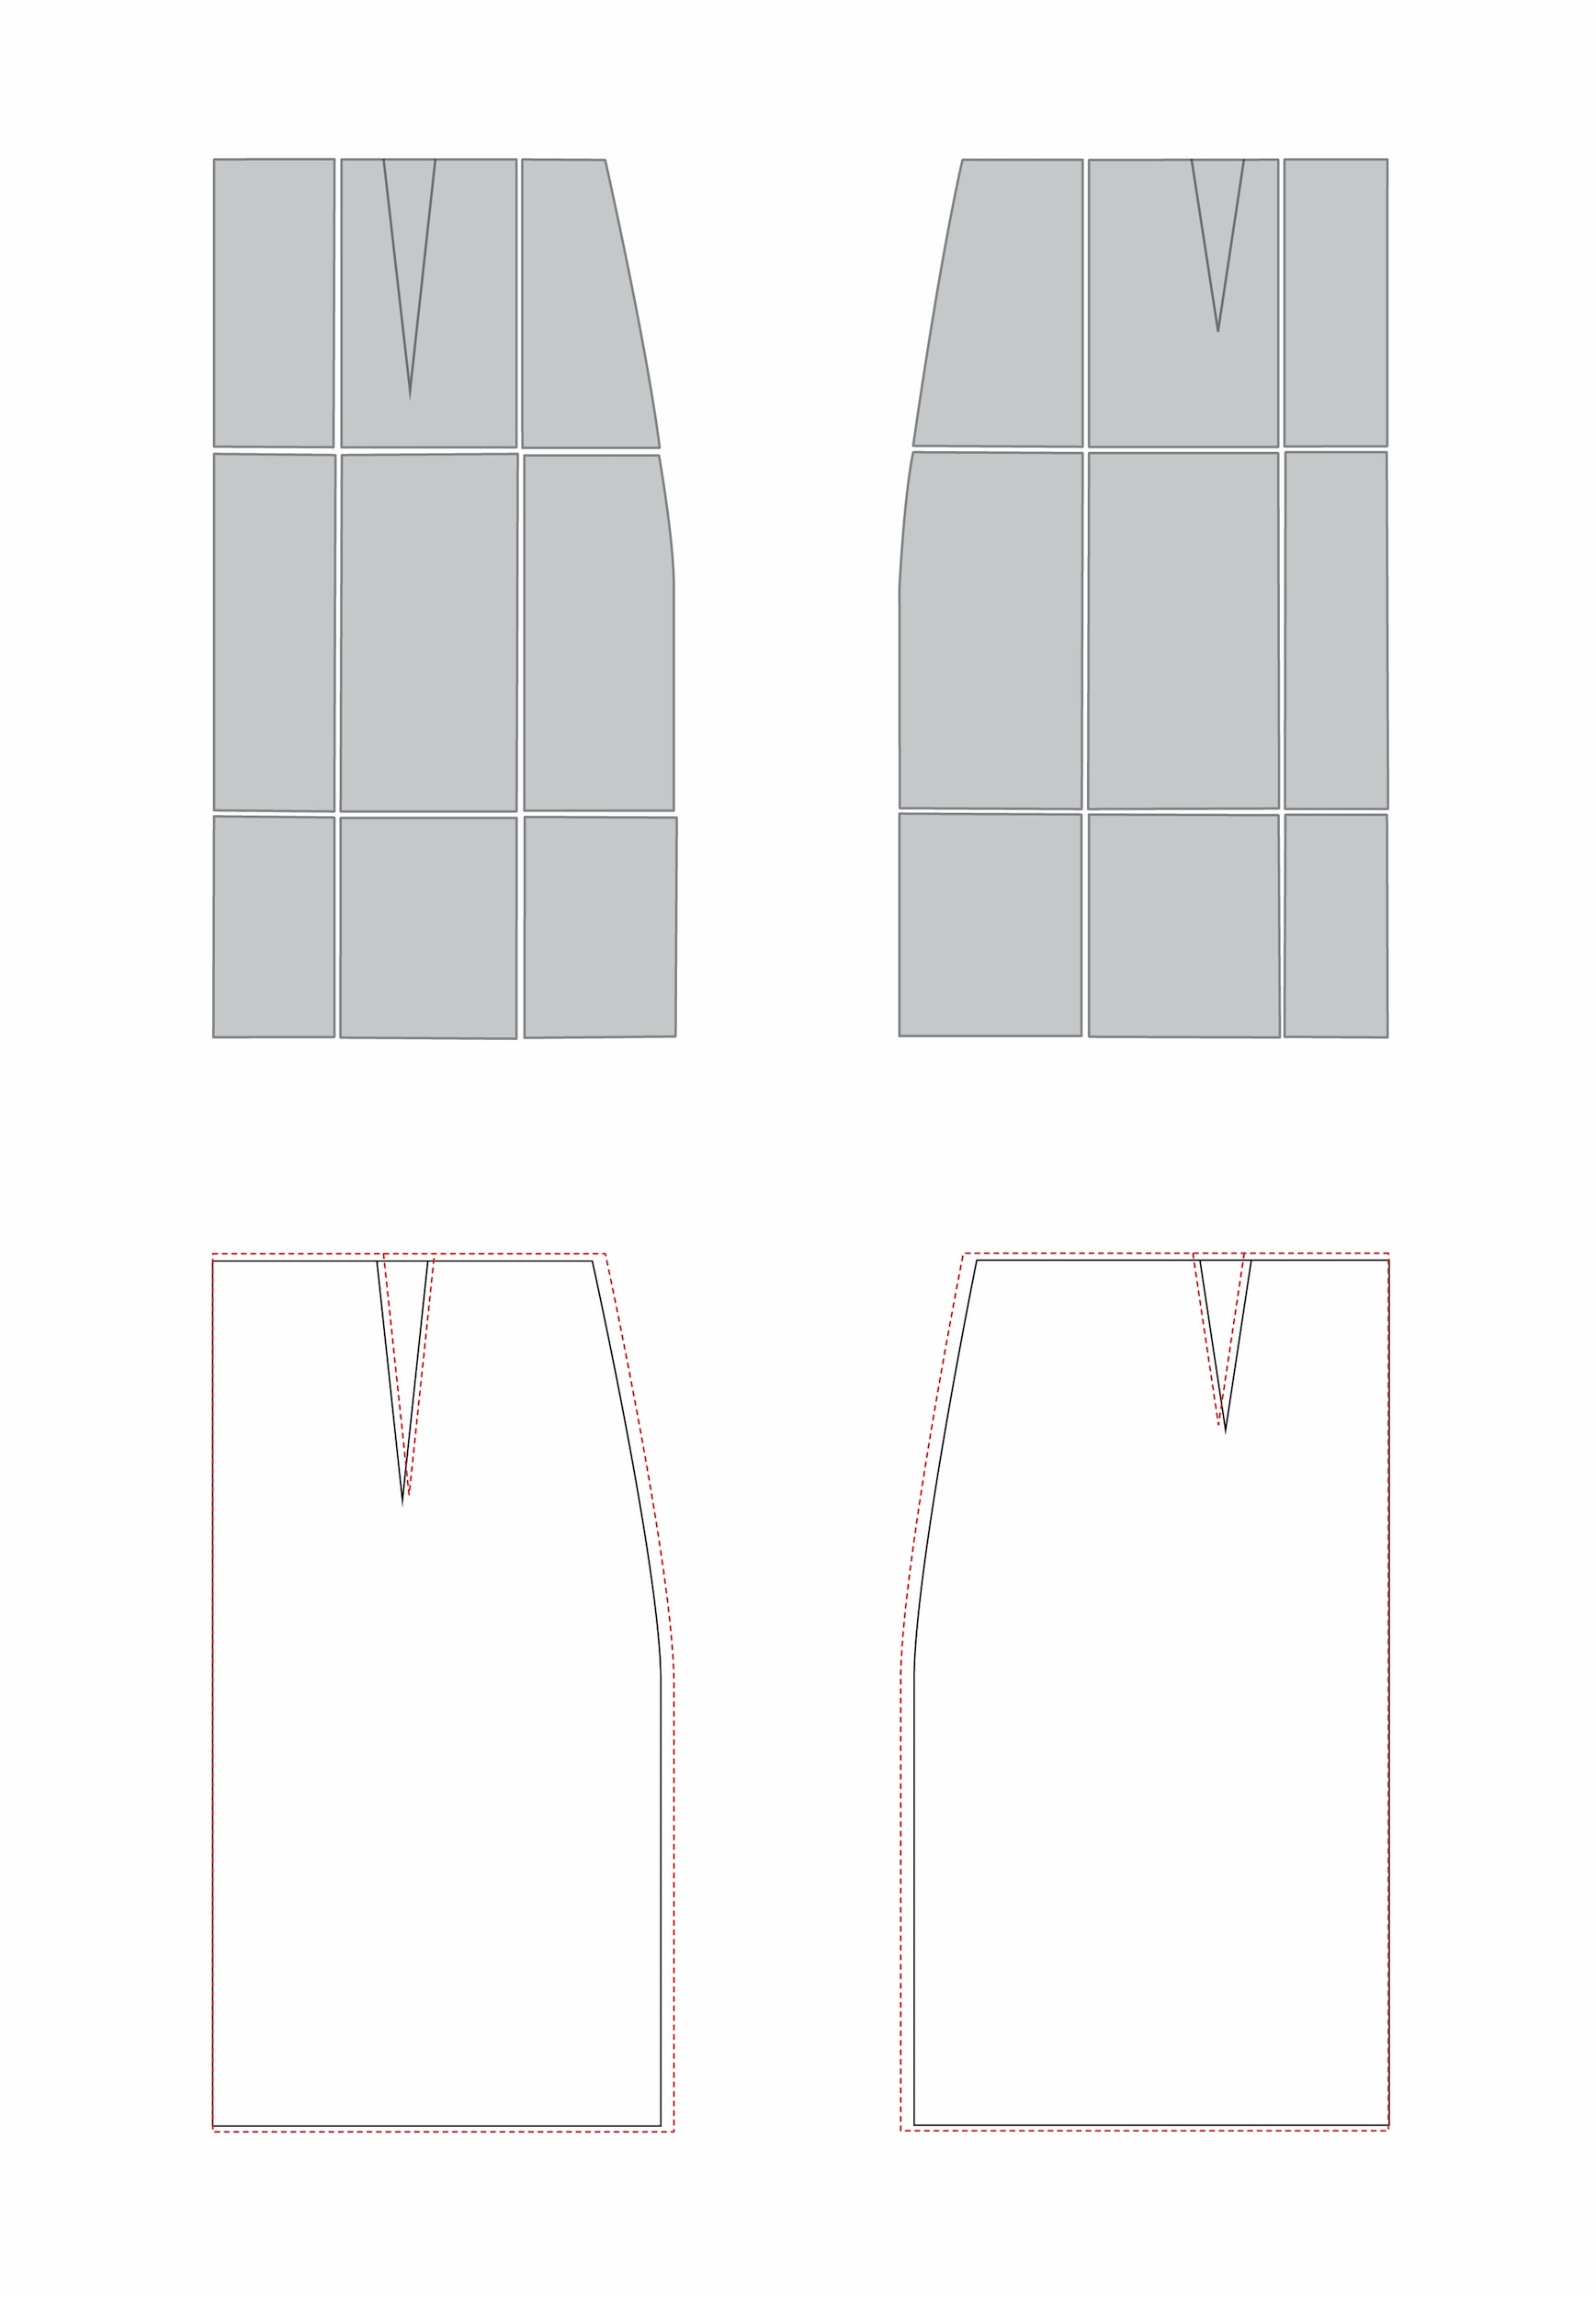
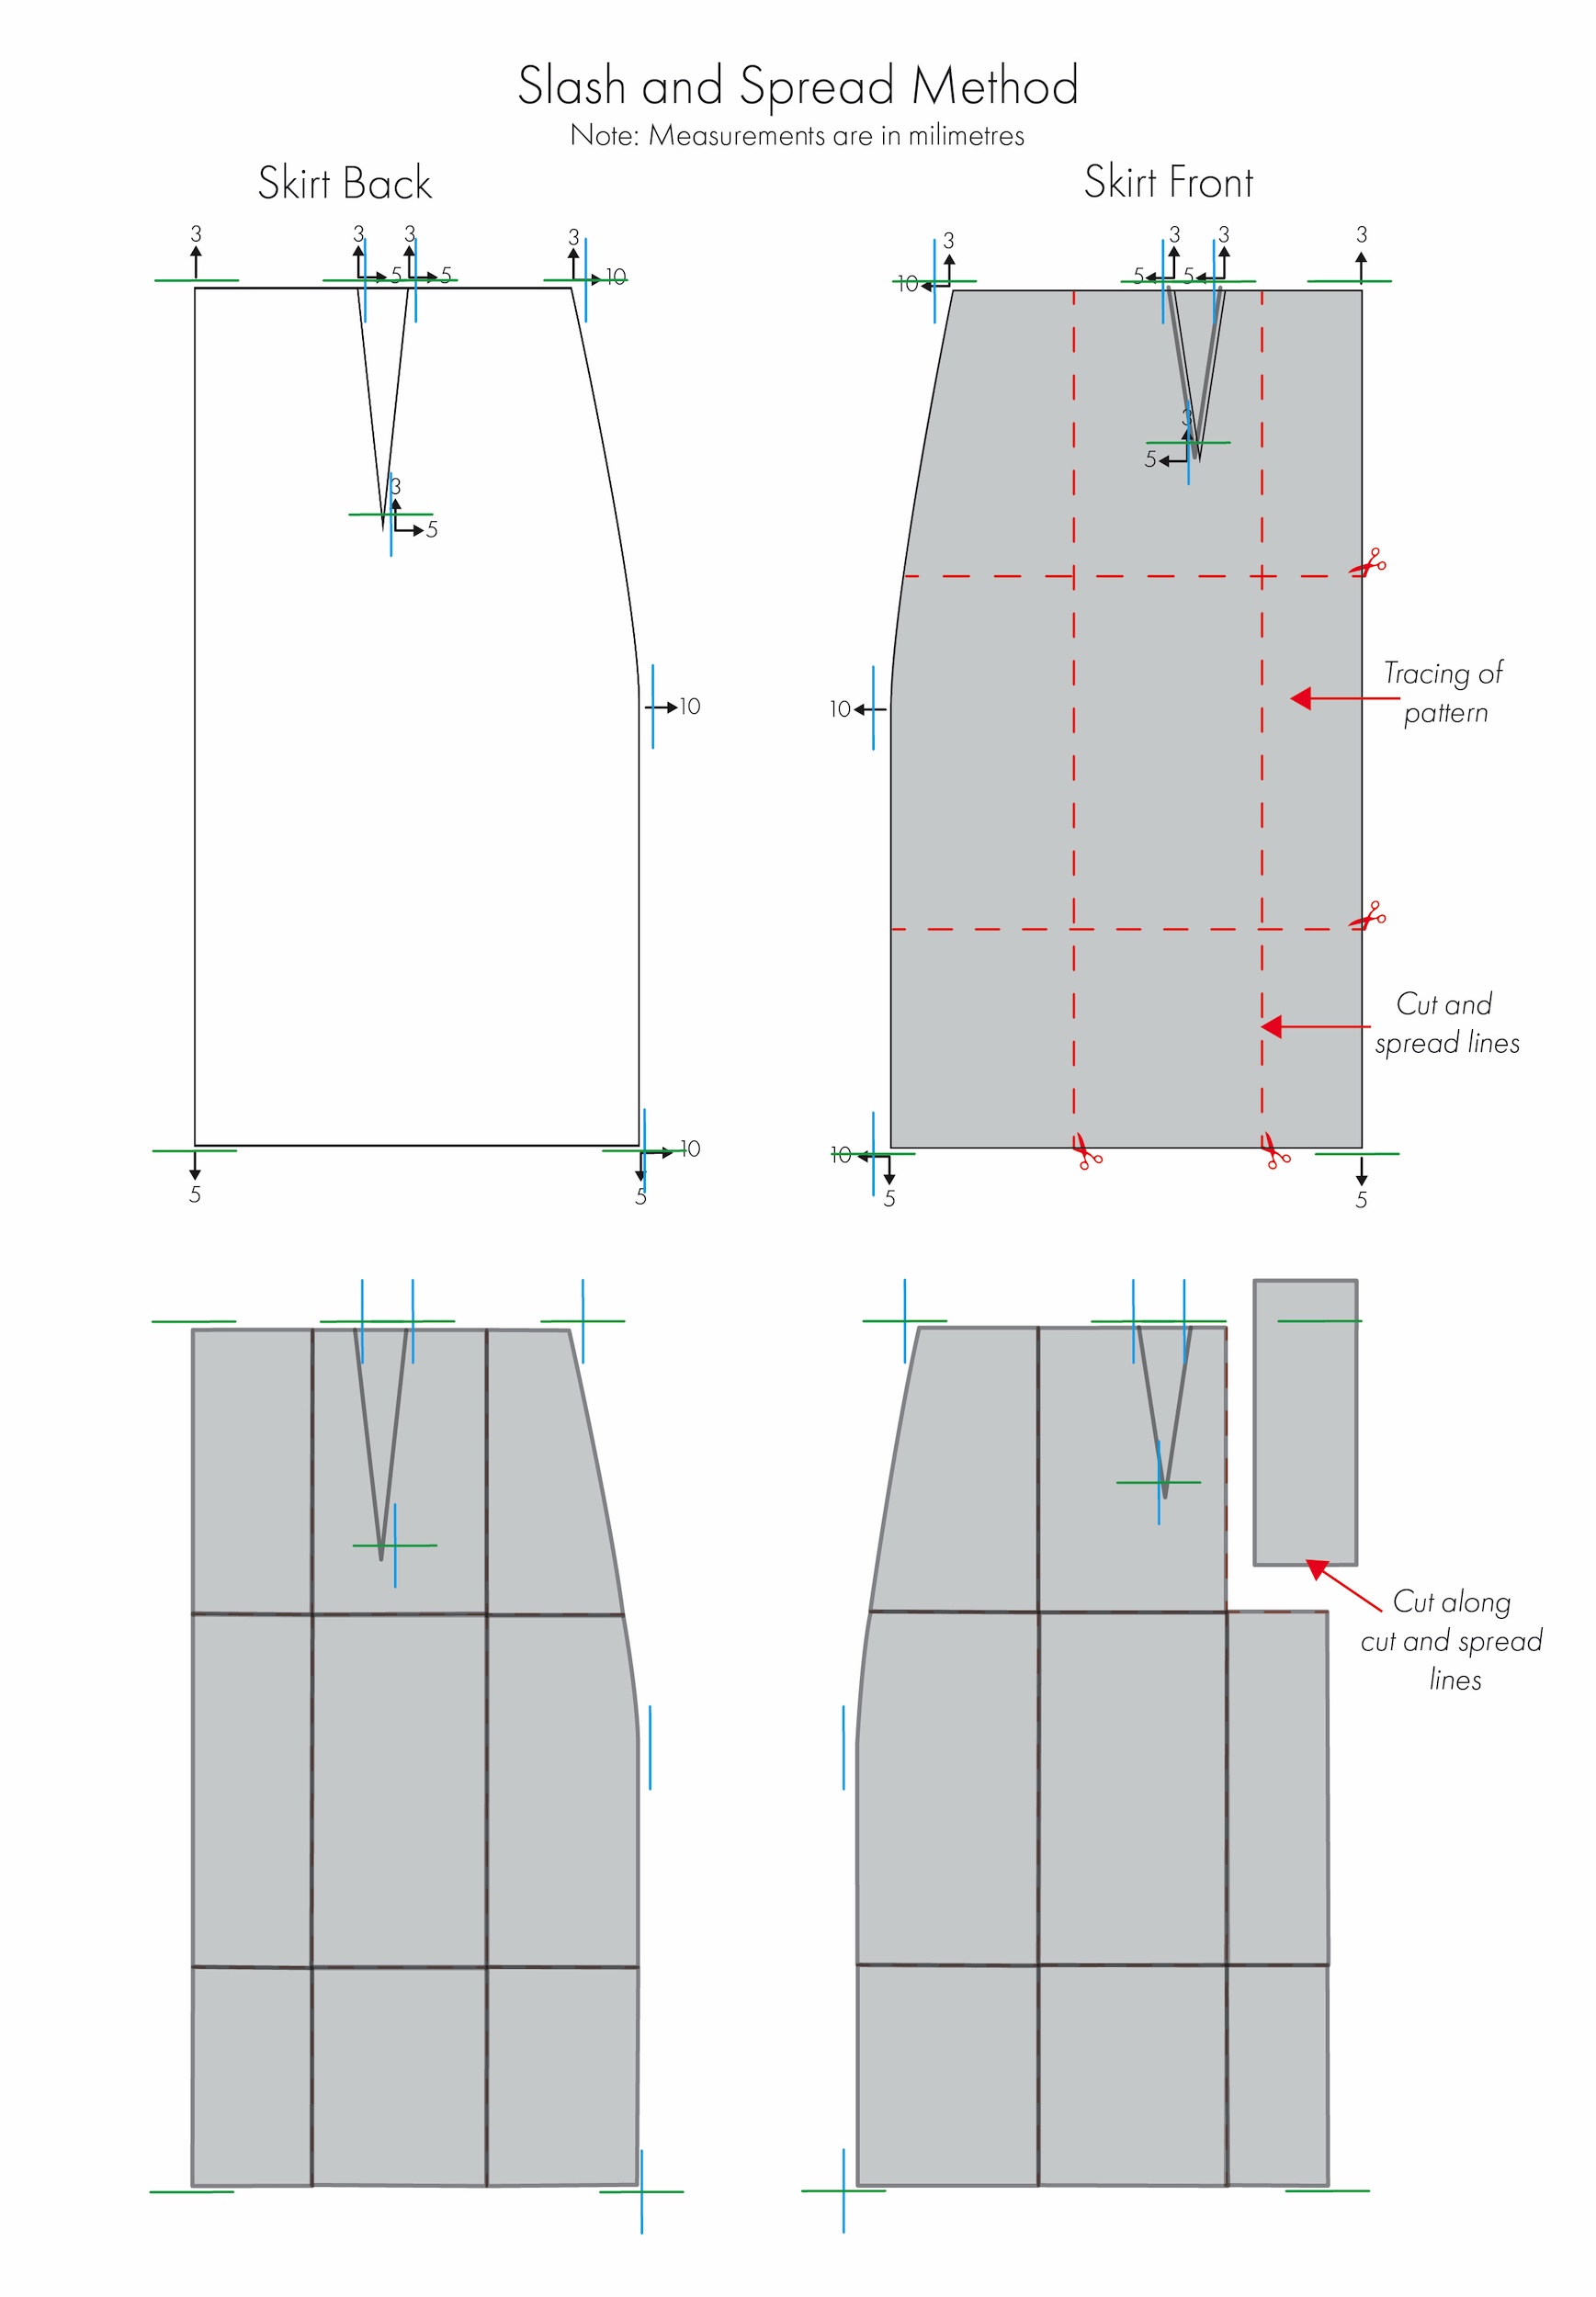 5. Spread the sections apart to increase the size, or overlap them to reduce it.
6. Redraw the pattern in its new position to create the larger or smaller size.
 This method can be a little more time-consuming, and like the shift method, can be prone to minor errors.
Digital Grading:
I was introduced to digital (or computerised) grading after winning a scholarship at university that gave me access to Gerber, a specialised grading program.
It was fascinating but also a little overwhelming. As an advanced, industry focused program this scholarship was only able to offer a surface-level experience, and unfortunately, with limited access to the program I kind of just lost the skill.
Fast forward to recent years, and I’ve learnt a far more accessible way to grade patterns digitally and at home using Adobe Illustrator.
While Illustrator isn’t a dedicated grading software like Gerber, it is great for small-scale designers and home sewists like myself. What once took hours of manual measuring, shifting, and redrawing can now be done in a fraction of the time, with far greater accuracy and consistency.
Learning pattern making using Illustrator really has been a game changer. That said, I’m really glad I learned manual grading first. It gave me a good understanding of how grading works, which makes the digital process a bit more intuitive.
So how does digital grading work in Illustrator? In Illustrator, grading involves scaling a base pattern into additional sizes by manually moving anchor points based on the grade rules. Each new size is usually placed on its own layer and can be colour-coded and labelled to keep everything organised and easy to reference.
Although it does feel a little overwhelming at first, especially if you’re new to the program, Illustrator offers a fast, accurate, and repeatable method for grading. You just got to get past the initial setup and becoming familiar with how it works.
In simple terms, grading means taking one pattern and adjusting it to fit a range of body sizes—while keeping the original style and fit. Once you know the basics, grading is a super useful skill that helps make clothing more inclusive and adaptable for everyone.
About Author
Emma Cartmel
Heya! I’m Emma, and I'm an Aussie living in beautiful Munich with my husband Ben, and our pug Harley. I am a designer, pattern maker, and sewist, and I share my expertise and experience through my ‘cartem.sewing’ page. You can follow me on Instagram @cartem.sewingRelated posts

Sewing Essentials: A Guide to Sewing Threads
You might be thinking “Thread is thread… right?” Well, not always. Sewing thread is a key part of any sewing project. But just like fabric, the thread you choose matters, affecting things like the strength, appearance, and durability of your stitching. But if you have ever shopped for sewing thread, you probably know that it…

Sewing Essentials: Stitch Width, Stitch Length & Needle Position
Thinking back to my high school textiles days, I remember having to test stitch settings on every fabric we planned to use for our projects. We would cut out little squares of fabric and experiment with different stitch lengths and widths, and edge-finishing techniques. At the time, it felt unnecessary, not to mention tedious….

Sewing Essentials: A Simple Guide to Notches
I love a notch, so much so that I’ve decided to dedicate this article to these small but important markings. Here, I’ll explain why they’re so helpful, when to use them, and how to add them to your own patterns or adapt them for existing ones. What exactly are notches? Notches are small markings found…

How to Select and Use Interfacing: A Simple Guide
Iron-on or sew-in, woven or non-woven, lightweight or heavyweight. With so many different types, weaves, and weights to choose from, how do you know which interfacing is best for your project? In this article, I will explain the two main types of interfacing before diving into the differences in weave and weight. Hopefully by the…

Sewing Essentials: A Simple Method for Reversible Seams
There are so many ways to finish a seam, from good old overlocking to French seams and binding. I recently stumbled across another method that’s pretty nifty, and honestly, I kind of wish I had known about it sooner. It is a bit like binding, but topstitched in place so it doesn’t move or flap…


SEW THIS LOOK


Latest Posts


Leave a comment