


Blending Between Sizes on a Sewing Pattern – Part 2: How to Blend

Luana: Apron Dress Sewing Pattern (Free PDF)
If you’ve already read Part 1 of this tutorial, you will hopefully have a good understanding of when blending between sizes on a sewing pattern can come in handy. Let’s get into how to actually do it.
In this Part 2, I will walk you through the basic process using a few different examples. I’ll pick up where I left off in Part 1 (steps 1–3) and move on to step 4 and beyond.
While I’m demonstrating everything with digitally created diagrams, the same techniques apply to paper patterns—just swap out the tools!
Note: The diagrams in this guide are simplified for clarity and are not drawn to scale. Some shaping has been exaggerated or reduced to highlight the key concepts.
Step 4: Gather and prepare the pattern pieces
Before you start blending between sizes, take a moment to prep the pattern pieces.
- Start by collecting the pattern pieces you’ll be adjusting. Make sure each piece includes the full size range required. For example, if you’re blending between a size 8 bust, size 6 waist, and size 10 hips, you’ll need pattern pieces that go up to at least size 10 to accommodate the largest measurement.
- If working manually (on paper), create a working copy of your pattern. You can either trace the pattern onto tracing paper (or use a tracing wheel) to preserve the original, or highlight the sizes you’ll be blending between using different colours for clarity. Whichever method you choose, be sure to clearly mark key details like notches, darts, and grainlines. Alternatively, if you’re using a multi-size printed pattern, you can simply fold back the sizes you don’t need.
- If you’re working digitally, make sure all the relevant size layers are turned on. Always duplicate the original file and work from a copy. As with paper patterns, you can either trace over the sizes you need or highlight them to make blending easier.
Step 5: Identify the key fit points
Next, mark the key fit points on your pattern where you’ll be blending between sizes (for example, the waistline and hips). These points serve as anchor points. Some patterns include these as notches or marked lines, but if yours doesn’t, don’t worry—you can estimate their locations by holding the pattern pieces up against your body to see where each point naturally falls.
Step 6: Start blending
Now for the fun part—blending!
The best way to understand how to blend between sizes is through real examples. Here are some common scenarios where blending might be needed.
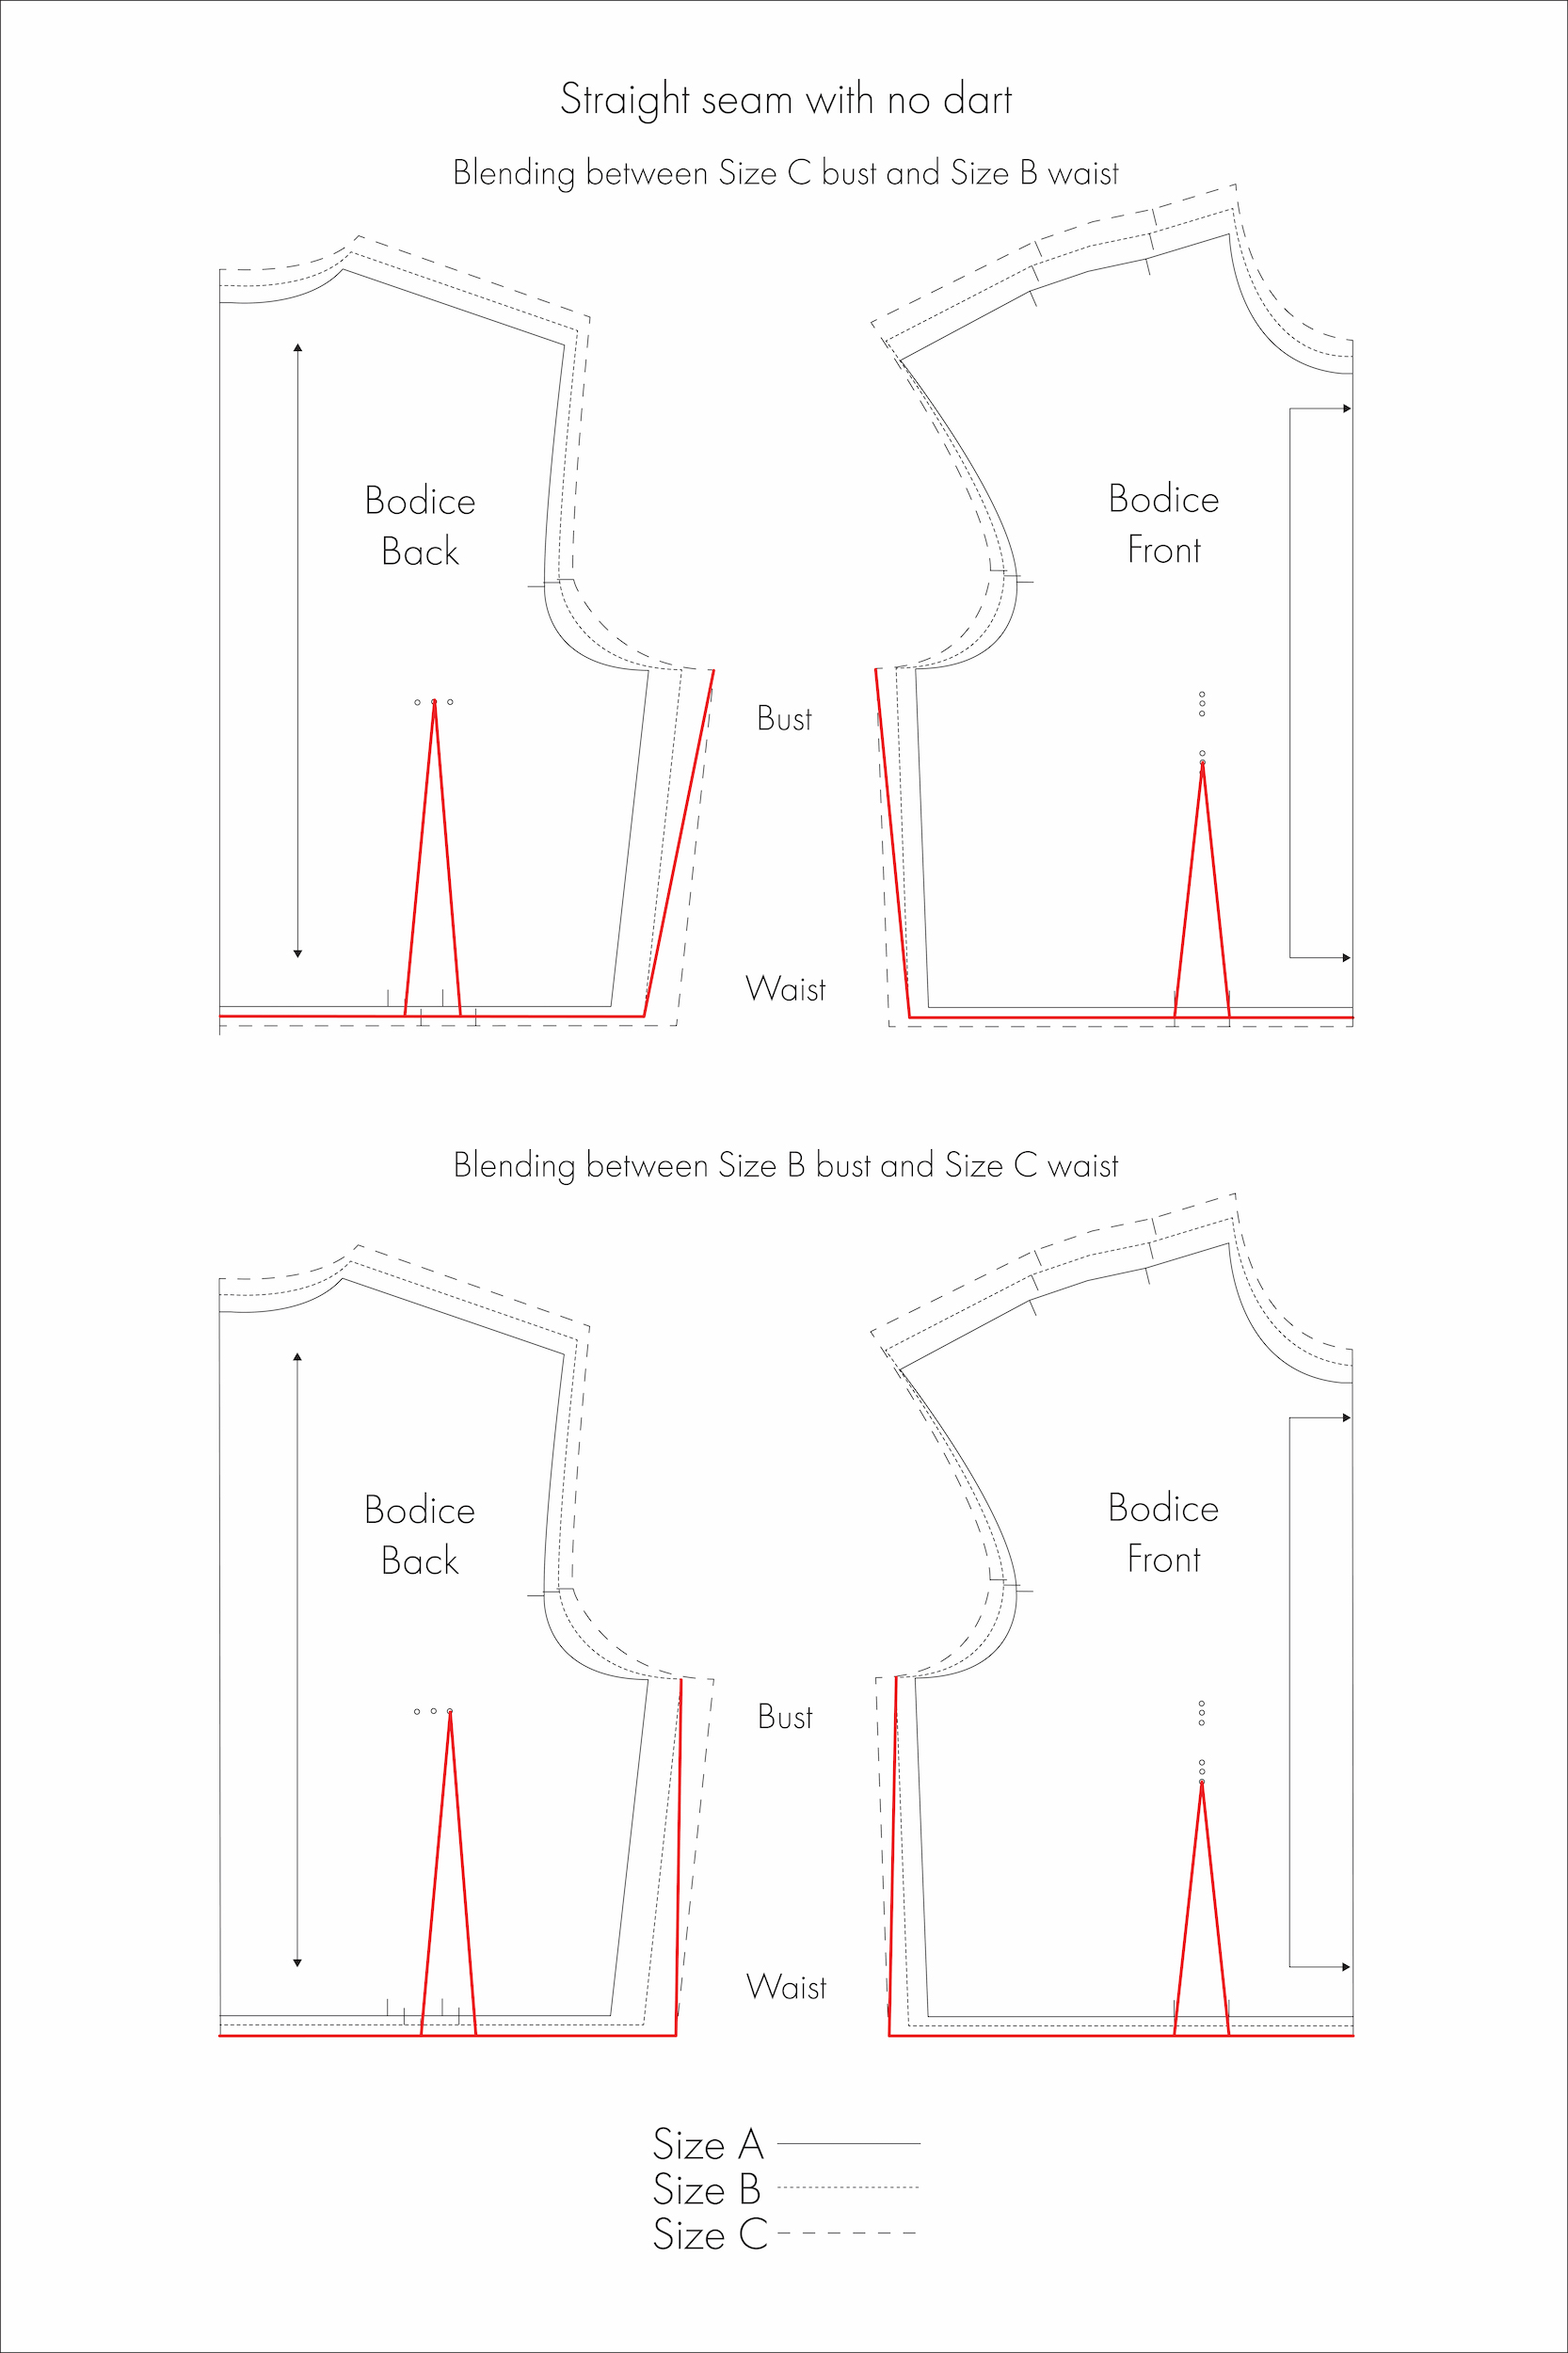
Example 1: Straight seam with no dart
On a straight seam, like a simple side seam without a dart, blending between sizes is quite straightforward.
Let’s say the bust and waist measurements fall into different sizes. In Diagram 1 below, the bust corresponds to Size C, while the waist is a Size B. To blend between these sizes, draw a smooth, diagonal line connecting the bust point (Size C) to the waist point (Size B).
Note: Dart shaping—its placement, width, and angle—is specifically drafted for each size. To maintain proper shaping and seam alignment, use the dart that matches the size at the fit point where the dart is located. In this case, the dart is at the waist, so the Size B dart should be used.
The same method applies in reverse: if you’re a smaller size at the bust and a larger size at the waist, taper the line outwards instead.
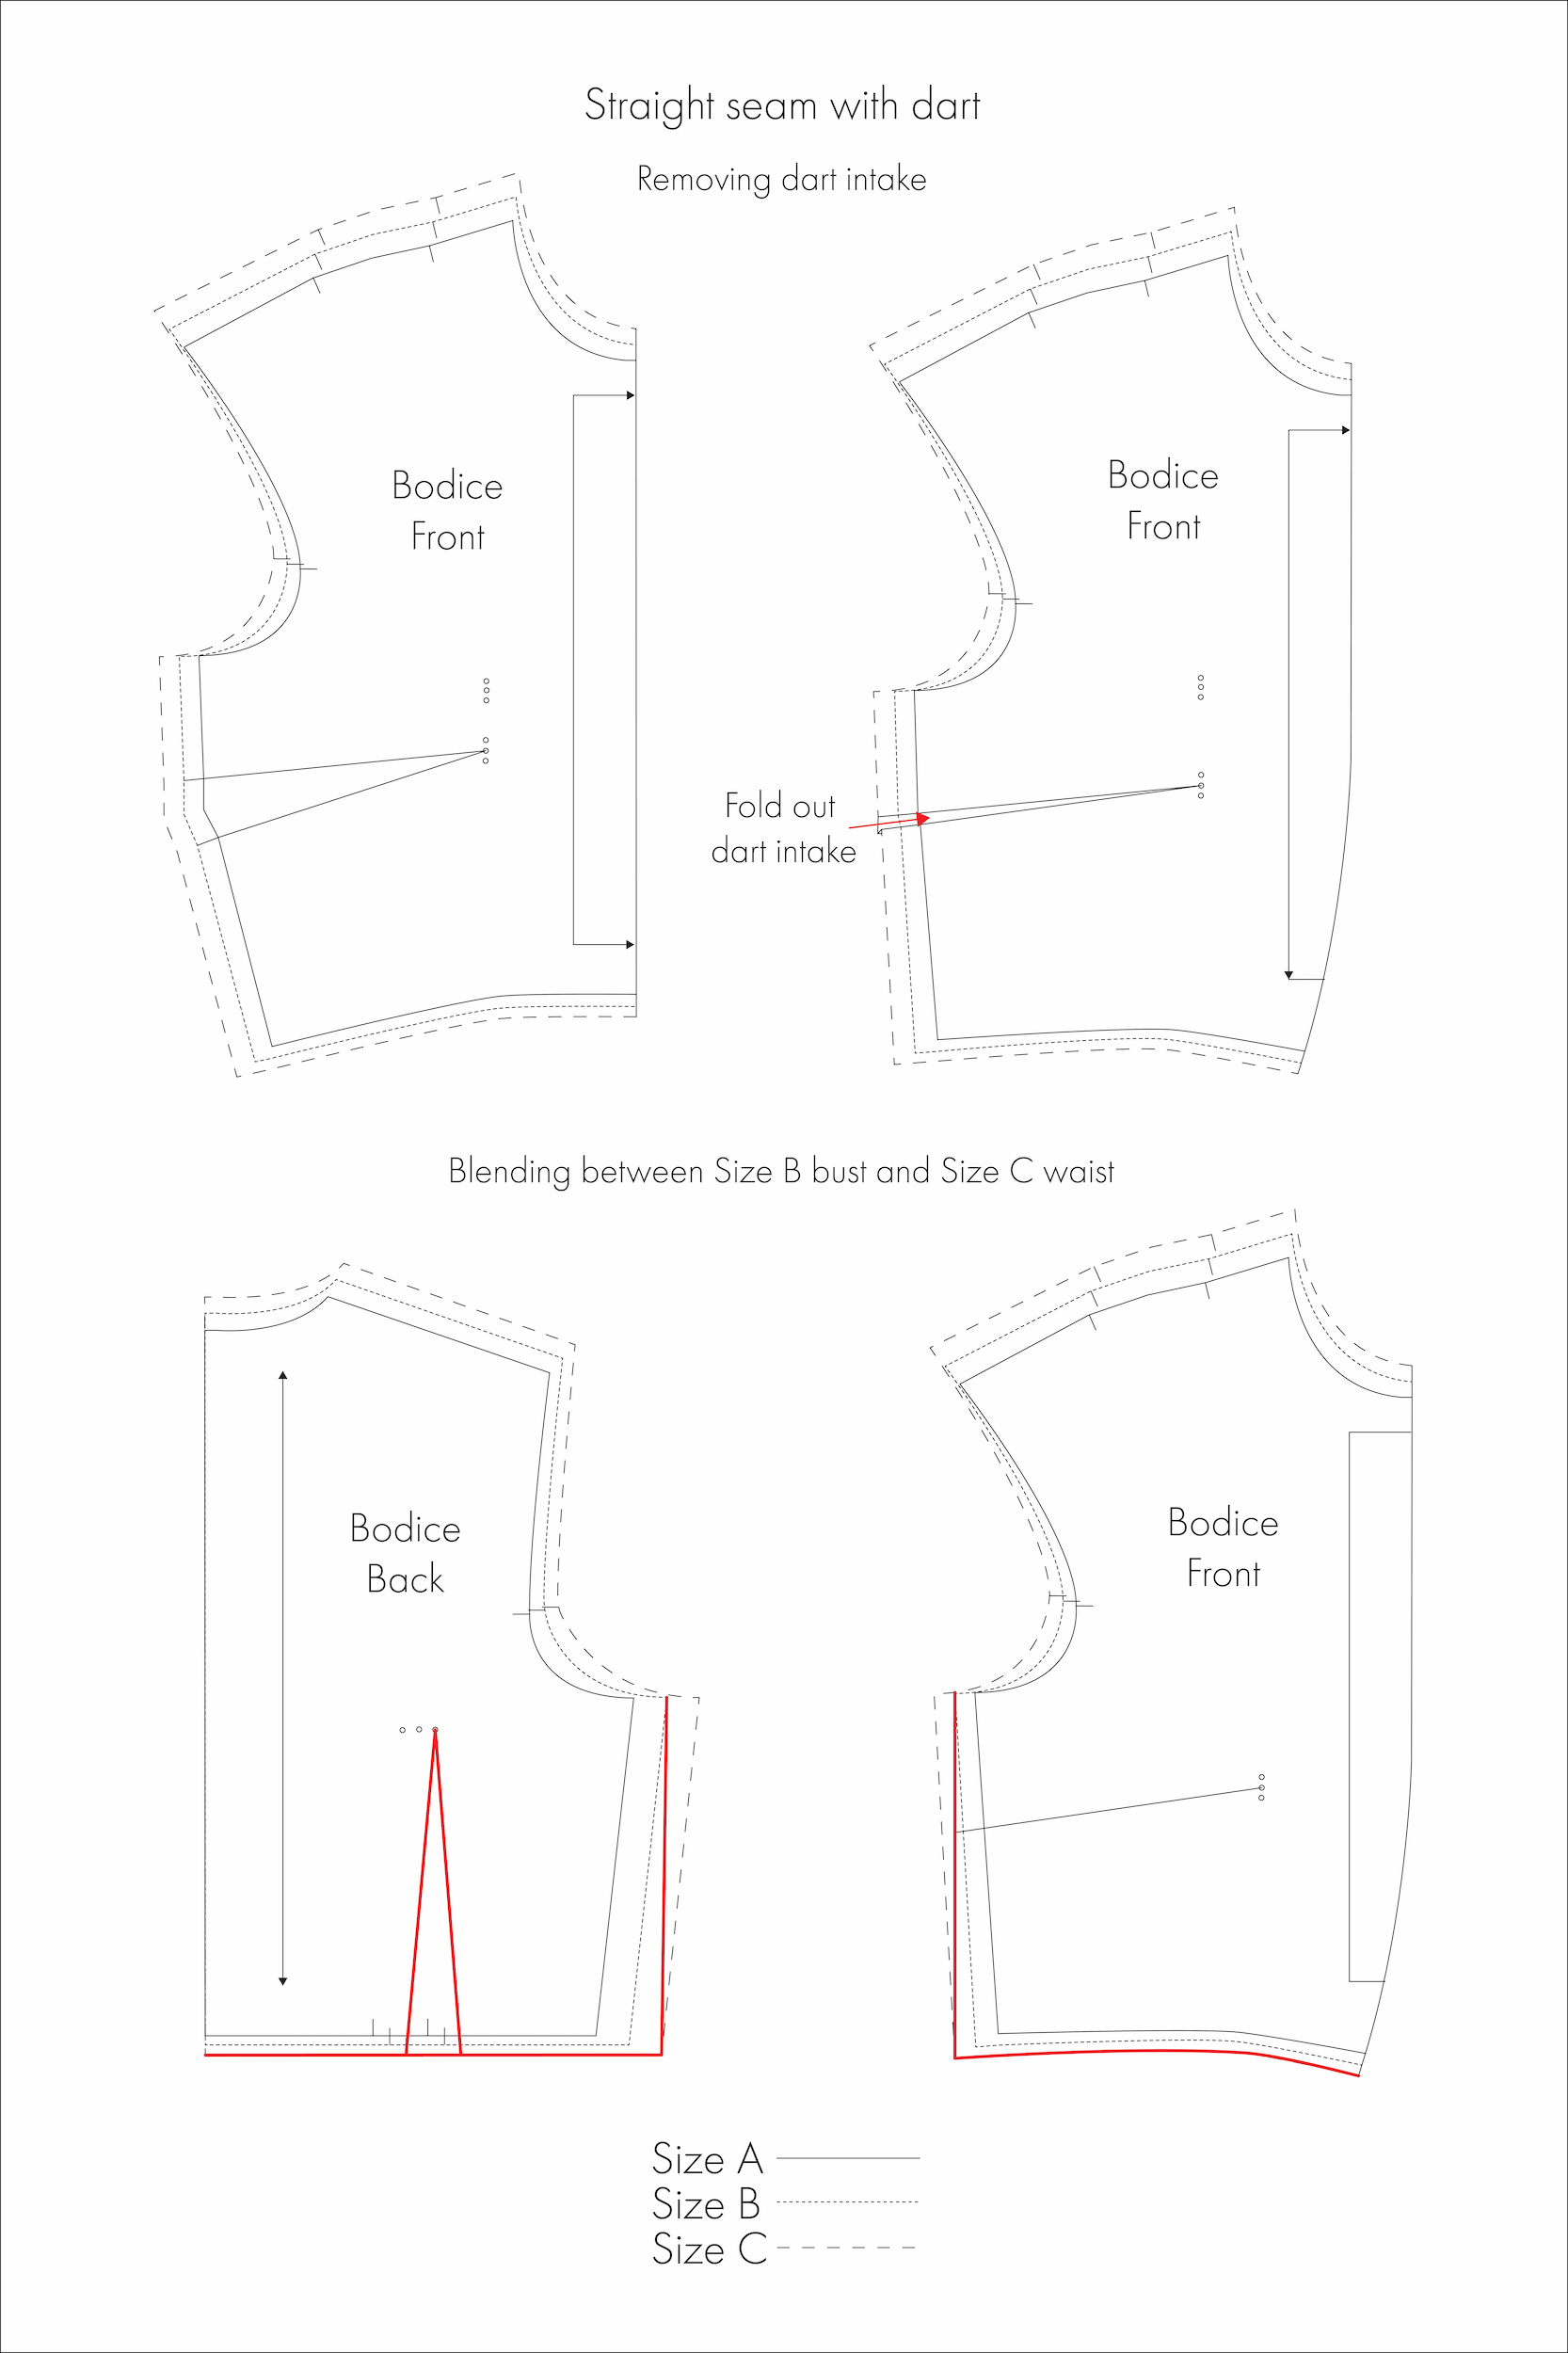
Example 2: Straight seam with a dart
Darts create shaping by removing fabric, which shortens the seam length where the dart is placed. So when the pattern is laid flat, a side seam with a dart is shorter than it would be without one. This means that if you try to blend sizes across an open (unfolded) dart, your new seam line could become inaccurate or distorted.
Blending along a seam with a dart is similar to blending along one without—it just involves one extra step: temporarily folding out the dart intake so the side seam lies flat and continuous before blending.
In Diagram 2 below, I’ll be blending from a Size B bust to a Size C waist. Since the dart corresponds to the bust area, I’ll use the dart legs for Size B.
Start by folding the dart as if you were sewing it: bring the dart legs together and fold the dart intake downward (towards the waist), then flatten.
With the dart folded, simply draw a smooth line from the Size B bust to the Size C waist, passing directly over the folded dart area. If you’re working manually, a tracing wheel is helpful for transferring the new seam line through all the layers of folded paper.
Once your new line is marked, unfold the dart and true the dart intake.
For help with truing darts, refer to my article Checking, Blending, and Truing Your Sewing Patterns – Part 2.
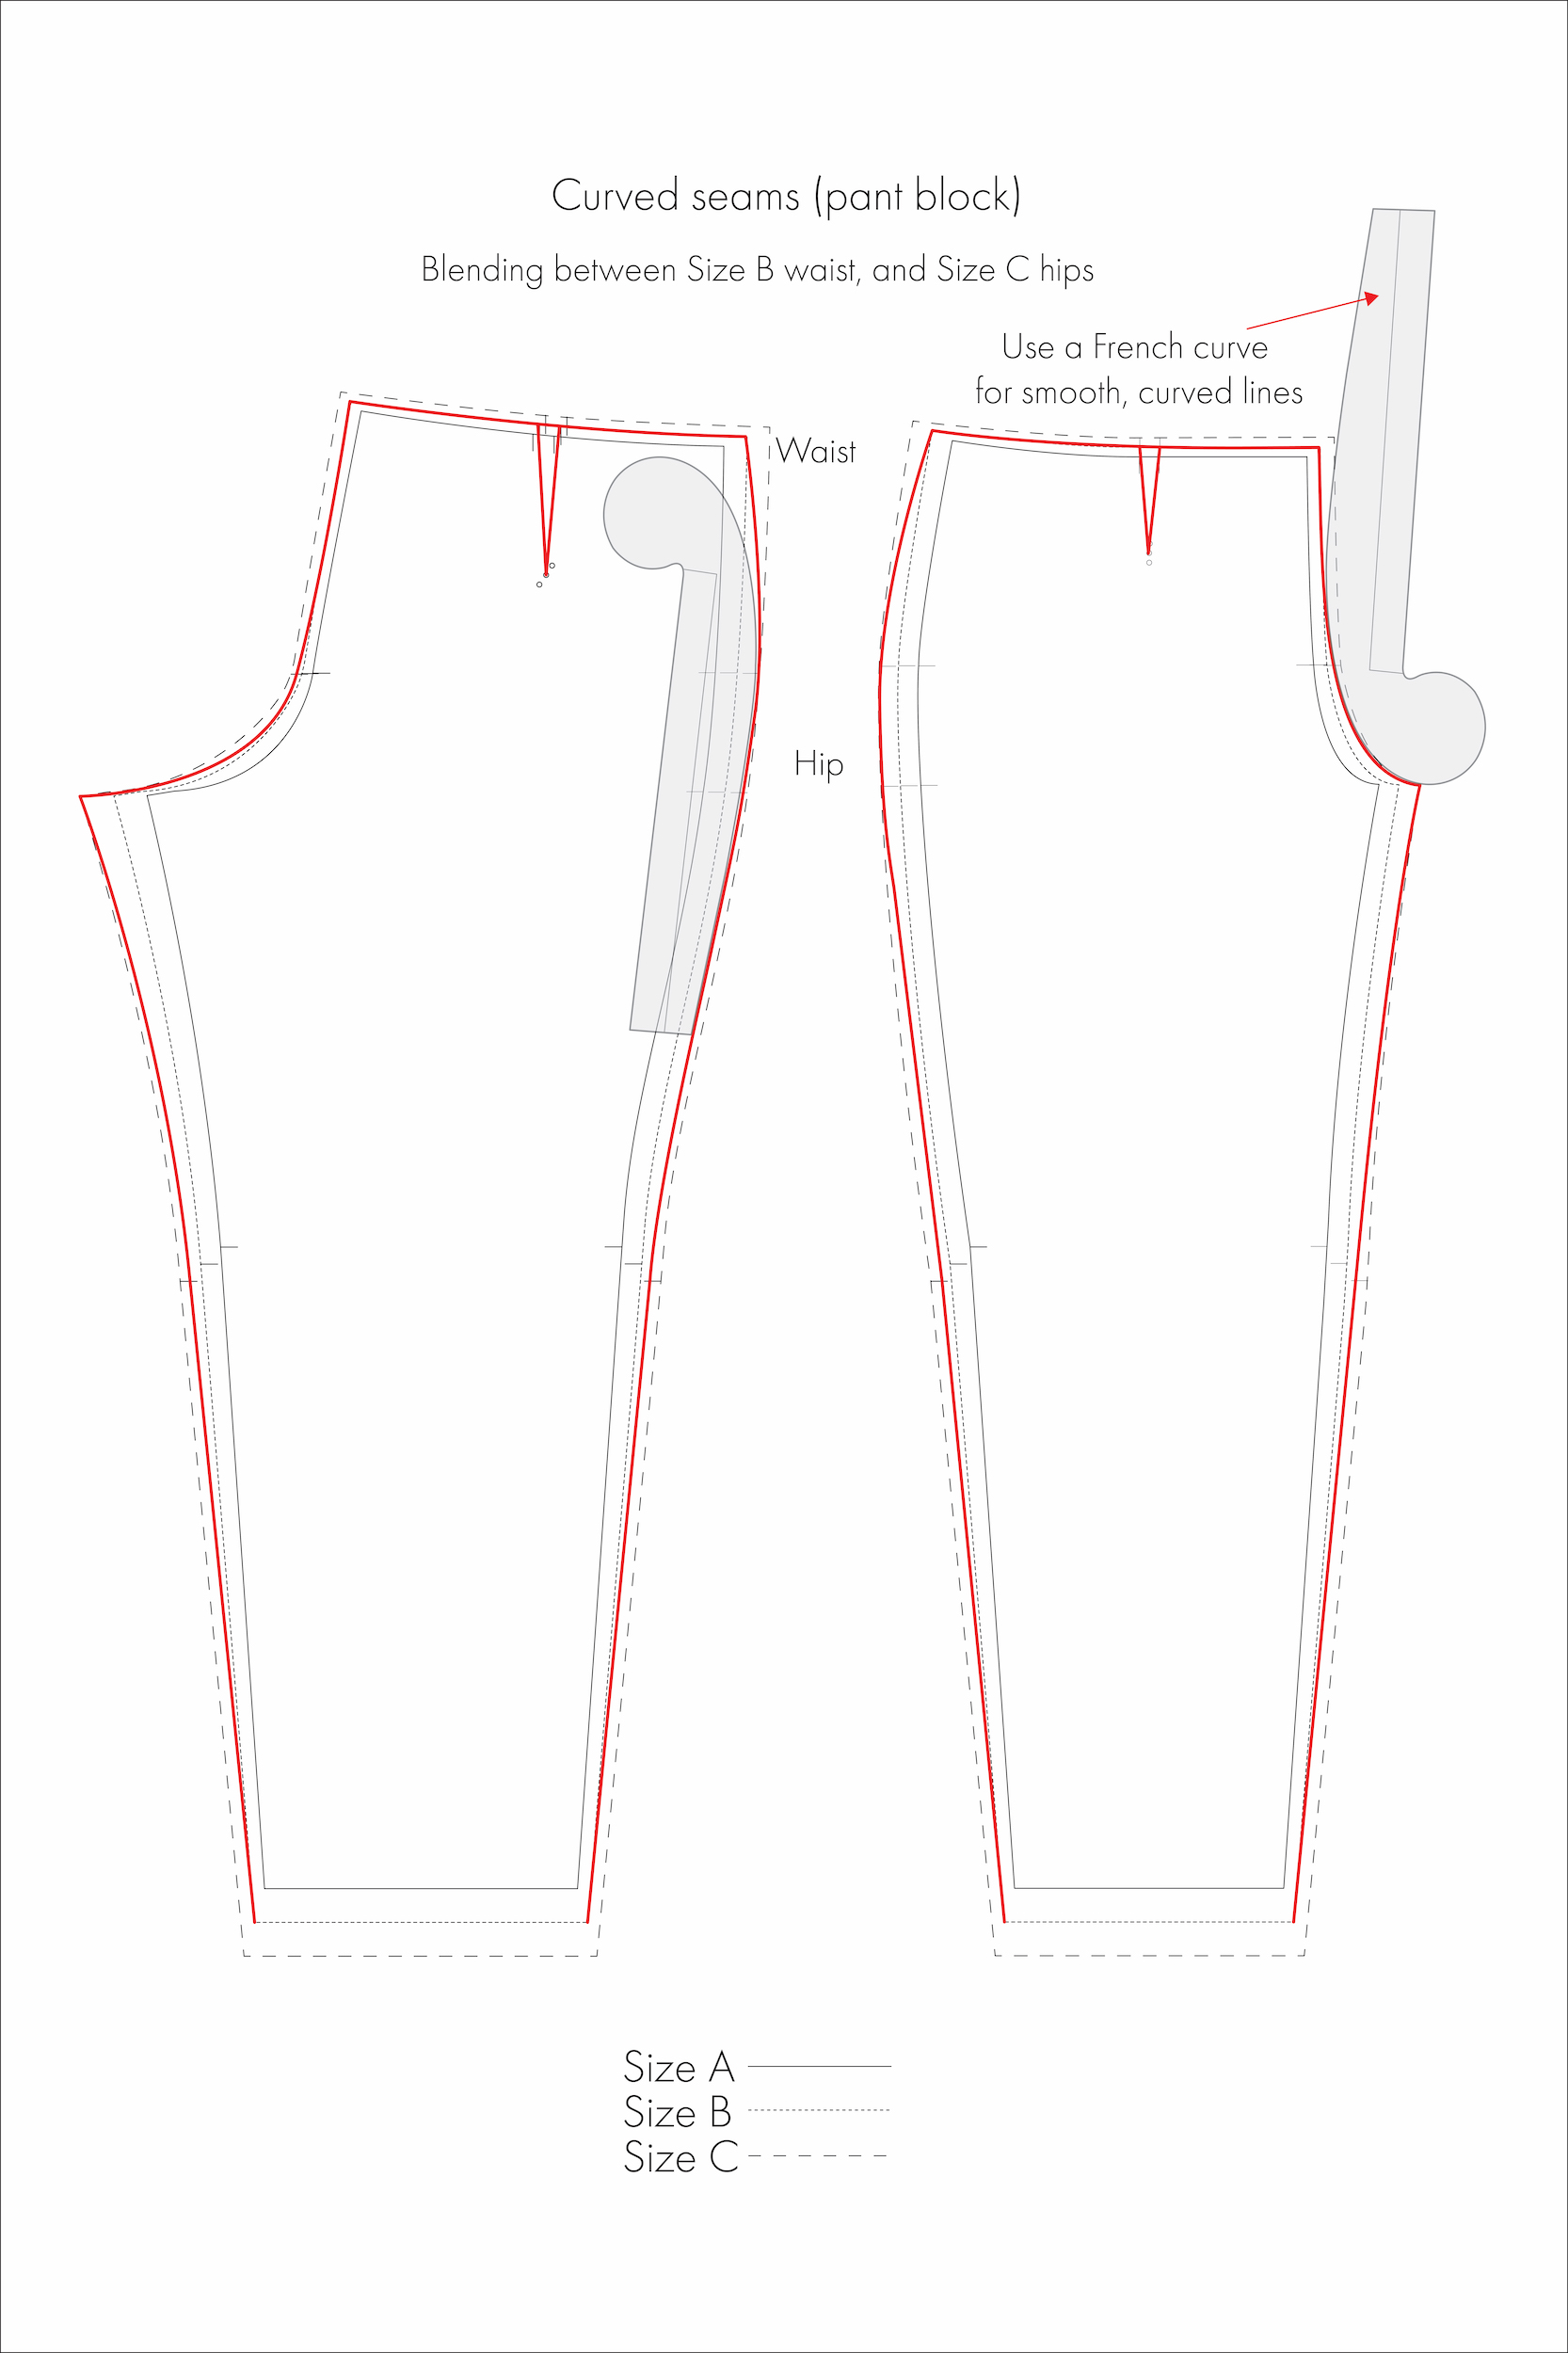
Example 3: Curved seams
When working with curved seams that follow the natural shape of the body, it’s essential to keep your blending lines smooth. Abrupt or sharp transitions between sizes can cause visible bumps, distortion, or poor fit. A French curve is especially helpful here, allowing you to connect different fit points with a natural, flowing line.
In Diagram 3 below, I’ll demonstrate how to blend a curved side seam on a semi-fitted dress block.
Start by marking the key points on your pattern at the required sizes (Size B at the bust, Size A at the waist, and Size C at the hips). Then, draw a smooth, continuous line connecting these points. Again, I’ve used the dart that corresponds with the waist measurement (Size A).
Adjust the curve as needed to follow the natural shape of the original seam, avoiding sharp angles or sudden changes. It may take a few tries to get the curve just right.
Repeat the same blending process on the corresponding seam (i.e., the back) to ensure both sides match. Check that seam lengths are still aligned—small differences may be able to be eased in, but larger mismatches may need to be adjusted.

Diagram 4 further illustrates this concept with a pair of pants, showing how blending is applied at key areas like the hips and crotch depth to help achieve a better fit.
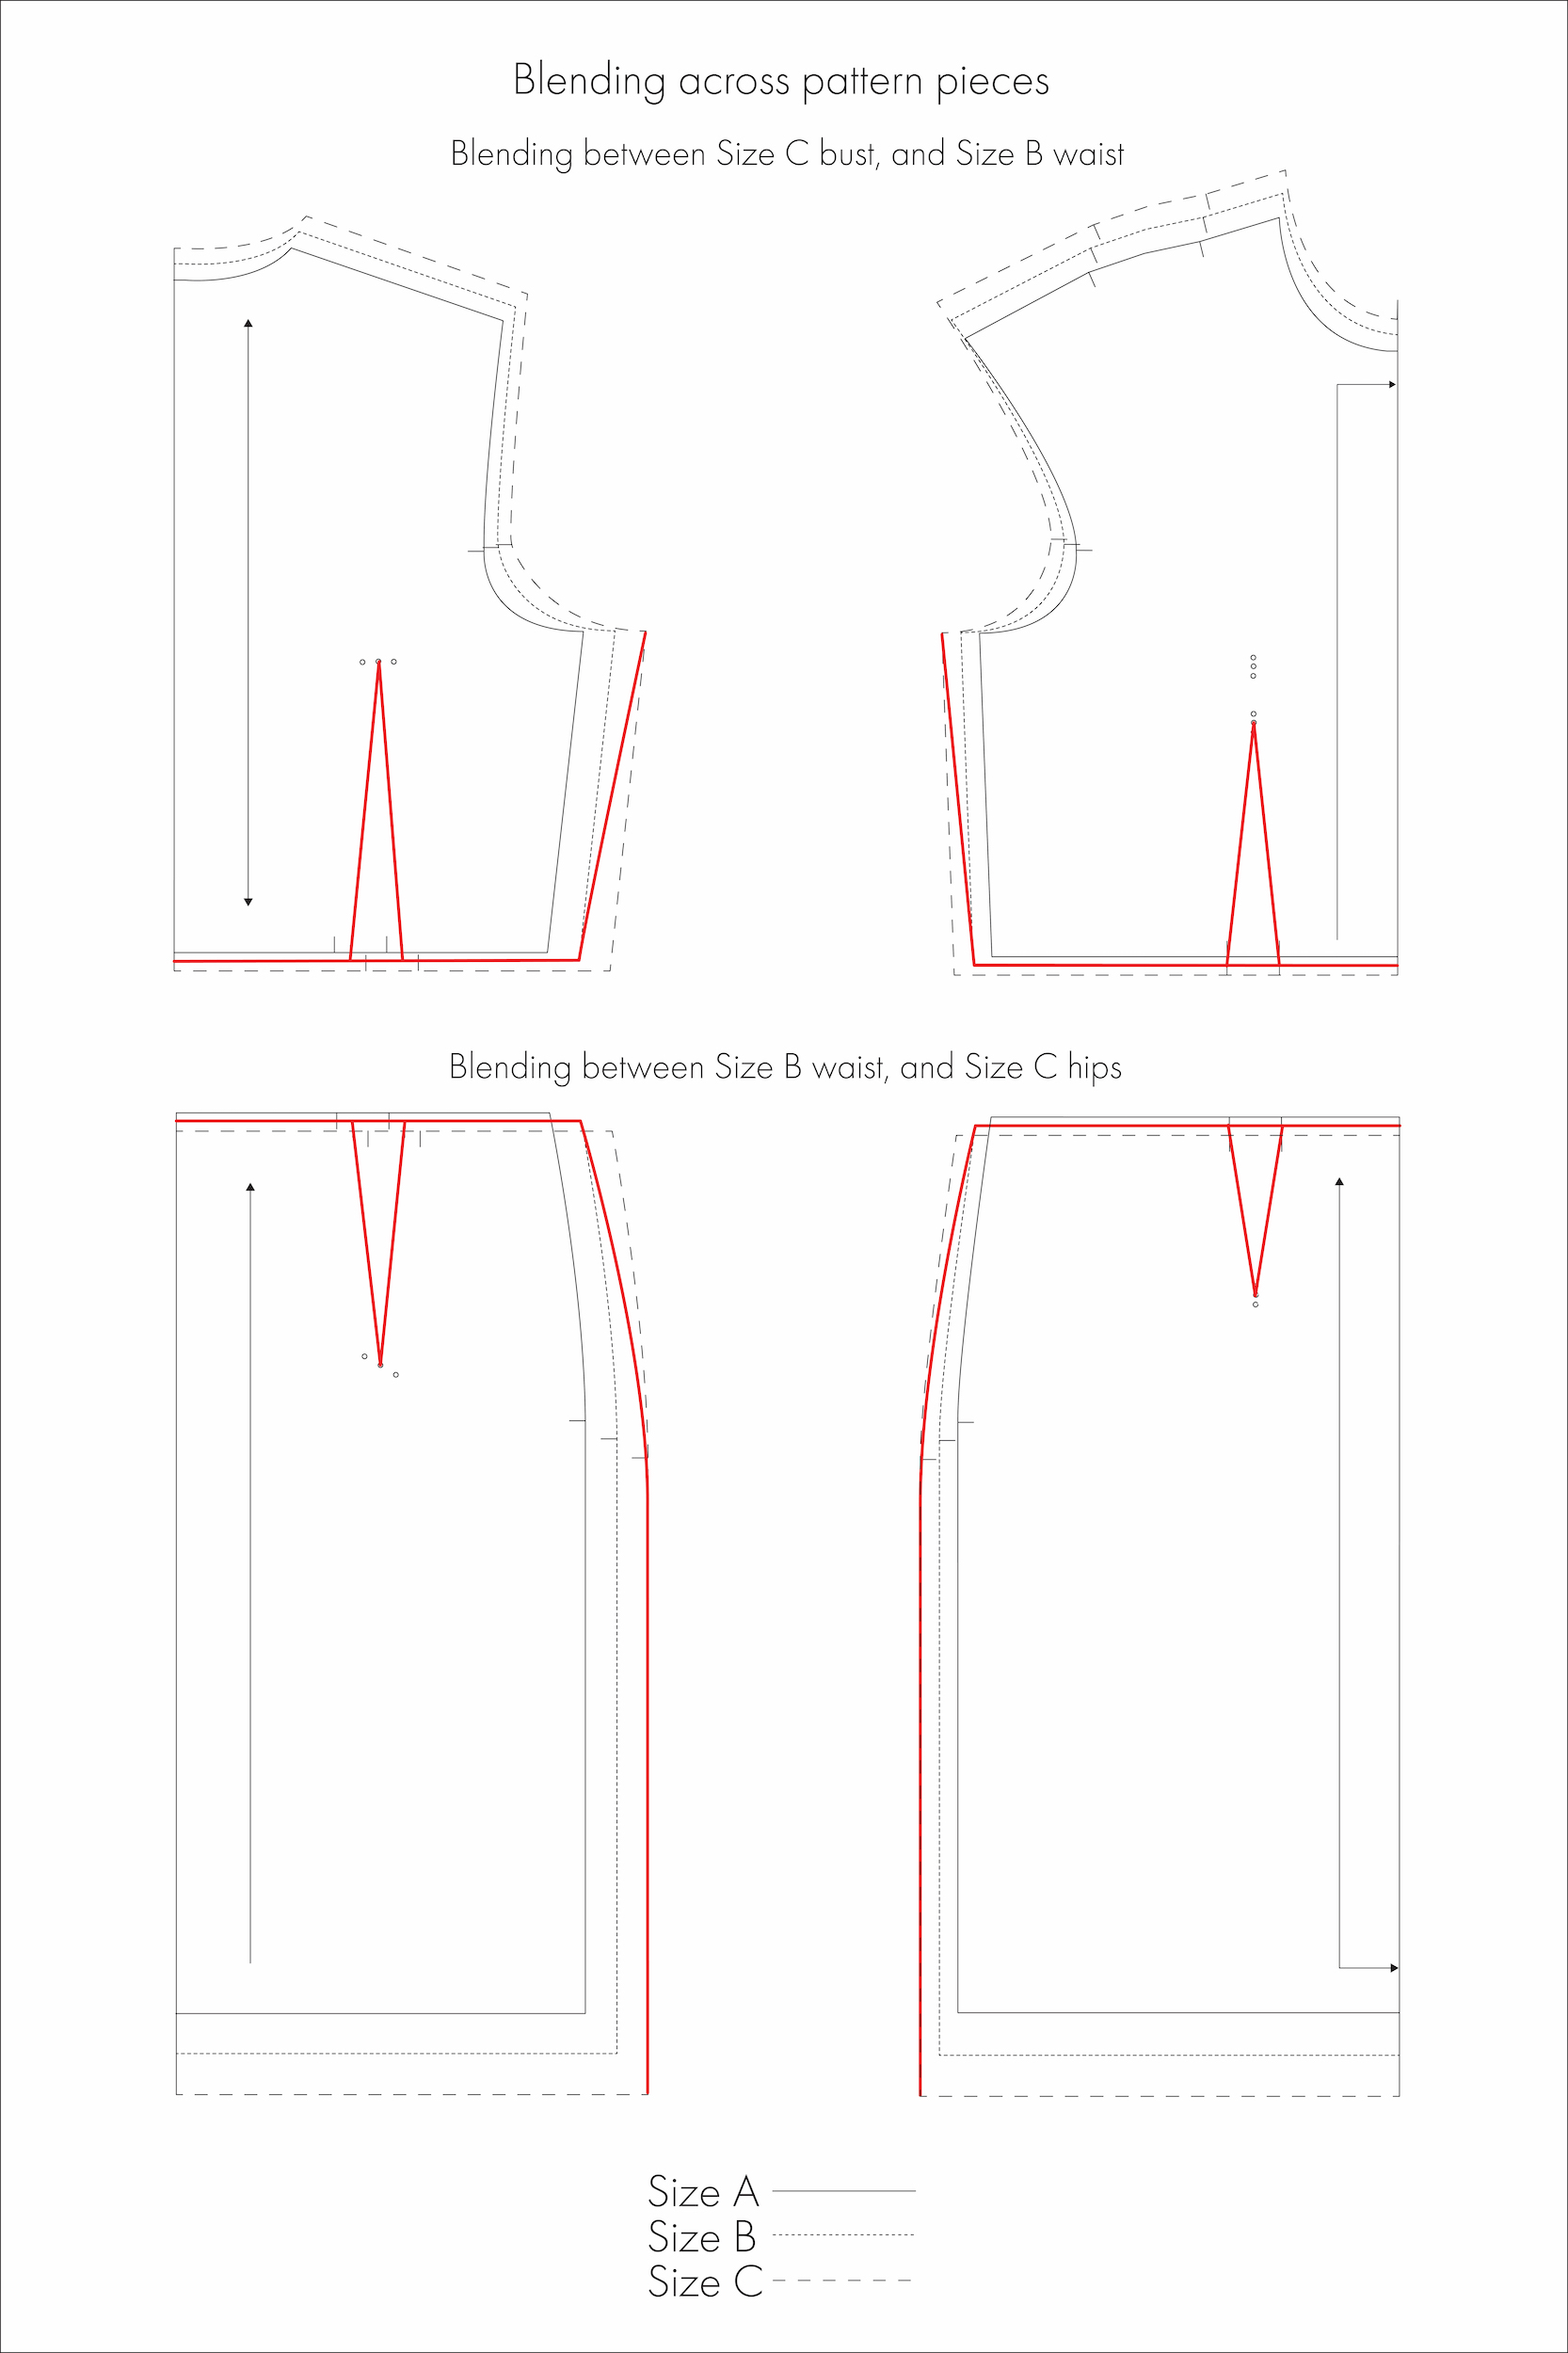
Example 4: Blending across pattern pieces
When you make adjustments to one pattern piece, it’s important to carry those changes through to any other connected pieces to ensure the seams align properly.
For example, in a fitted dress with a separate bodice and skirt joined at the waist (see Diagram 5), if you adjust the bodice waist measurement—for example, blending from Size C to Size B—you’ll also need to make matching adjustments to the skirt’s waist. This ensures the waist seam stays consistent, allowing both pieces to fit together smoothly during sewing.
Step 7: Check your work
Before moving on, take a few minutes to review your adjustments and make sure everything still fits together smoothly.
-
After making changes to your pattern, it’s essential to check that all adjoining seams—like side seams—still match in both length and shape. Begin by “walking your seams” together: align one pattern piece with its corresponding piece and pivot it (walk) along the seam line to ensure it lines up evenly. If you spot any discrepancies, adjust and blend the seam lines on one or both pieces as needed. This step is key to achieving a clean, professional finish in your garment construction.
For more detailed guidance on measuring and refining seams—including walking your seams—see my earlier article, Checking, Blending, and Truing Your Sewing Patterns – Part 1.
- Be sure to preserve all important markings—like notches, darts, grainlines, and reference points—so they align correctly with your new seam lines.
- If you used a curved line to blend sizes, double-check that transitions are smooth and flowing, avoiding sharp angles or bumps that can affect fit and ease of sewing.
FS Maria Paula Open Back Dress (Free PDF Pattern)
Next steps: Test and adjust
Now that you’ve made your pattern adjustments and checked it, it’s a good idea to sew a test garment—often called a toile or muslin—using an inexpensive fabric like calico. This allows you to check the fit and ensure everything works as intended before cutting into your final fabric.
Once your toile is assembled, take the time to evaluate the overall fit. Notice whether your blending has affected how the garment sits or hangs on your body. Pay close attention to seam alignment, ease of movement, and overall comfort.
If you spot any issues—such as seams that don’t match up, areas that feel too tight or too loose, or shaping that doesn’t sit quite right—mark them on the toile and transfer these adjustments back to your pattern.
Testing your adjustments at this stage helps you catch and resolve fit issues early on, ultimately saving fabric, time, and frustration later in the sewing process.
Blending between sizes isn’t as tricky as it seems—it just takes a bit of time and attention. Like anything, the more you do it, the easier and more intuitive it will get. Sewing your own clothes really does give you the freedom to make pieces that fit you just the way you want!
About Author
Emma Cartmel
Heya! I’m Emma, and I'm an Aussie living in beautiful Munich with my husband Ben, and our pug Harley. I am a designer, pattern maker, and sewist, and I share my expertise and experience through my ‘cartem.sewing’ page. You can follow me on Instagram @cartem.sewingRelated posts
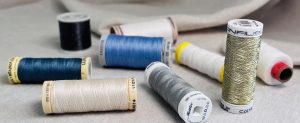
Sewing Essentials: A Guide to Sewing Threads
You might be thinking “Thread is thread… right?” Well, not always. Sewing thread is a key part of any sewing project. But just like fabric, the thread you choose matters, affecting things like the strength, appearance, and durability of your stitching. But if you have ever shopped for sewing thread, you probably know that it…

Sewing Essentials: Stitch Width, Stitch Length & Needle Position
Thinking back to my high school textiles days, I remember having to test stitch settings on every fabric we planned to use for our projects. We would cut out little squares of fabric and experiment with different stitch lengths and widths, and edge-finishing techniques. At the time, it felt unnecessary, not to mention tedious….

Sewing Essentials: A Simple Guide to Notches
I love a notch, so much so that I’ve decided to dedicate this article to these small but important markings. Here, I’ll explain why they’re so helpful, when to use them, and how to add them to your own patterns or adapt them for existing ones. What exactly are notches? Notches are small markings found…

How to Select and Use Interfacing: A Simple Guide
Iron-on or sew-in, woven or non-woven, lightweight or heavyweight. With so many different types, weaves, and weights to choose from, how do you know which interfacing is best for your project? In this article, I will explain the two main types of interfacing before diving into the differences in weave and weight. Hopefully by the…

Sewing Essentials: A Simple Method for Reversible Seams
There are so many ways to finish a seam, from good old overlocking to French seams and binding. I recently stumbled across another method that’s pretty nifty, and honestly, I kind of wish I had known about it sooner. It is a bit like binding, but topstitched in place so it doesn’t move or flap…


SEW THIS LOOK


Latest Posts


Leave a comment