How to Take Your Body Measurements: A Concise Guide
Taking body measurements always felt daunting, so I often avoided it. Even with a fashion design degree, our curriculum only skimmed the surface on this crucial skill, focusing instead on creating patterns for a “standard” size 10. However, a recent digital pattern-making course helped me overcome this. I had to take my full body measurements to draft my own blocks. This hands-on activity proved invaluable, offering insights into where measurements originate on patterns. Understanding these fundamentals clarified the pattern-making process even further and have made fitting and alterations that much easier.
Based on what I’ve learned, I’ve created a reference post—a handy guide for myself and fellow sewists and pattern makers. It will hopefully help ensure accurate body measurements that will achieve that perfect fit.
What you will need?
– Flexible measuring tape
– Mirror
– Narrow elastic
– Pen, or something to record your measurements with
– A helping hand for those tricky back measurements. Alternatively, grab some sticky tape.
Preparation
– Wear something that is fitted but not overly tight or compressive as this can distort your measurements.
– Stand straight, preferably in front of a mirror, and maintain proper posture.
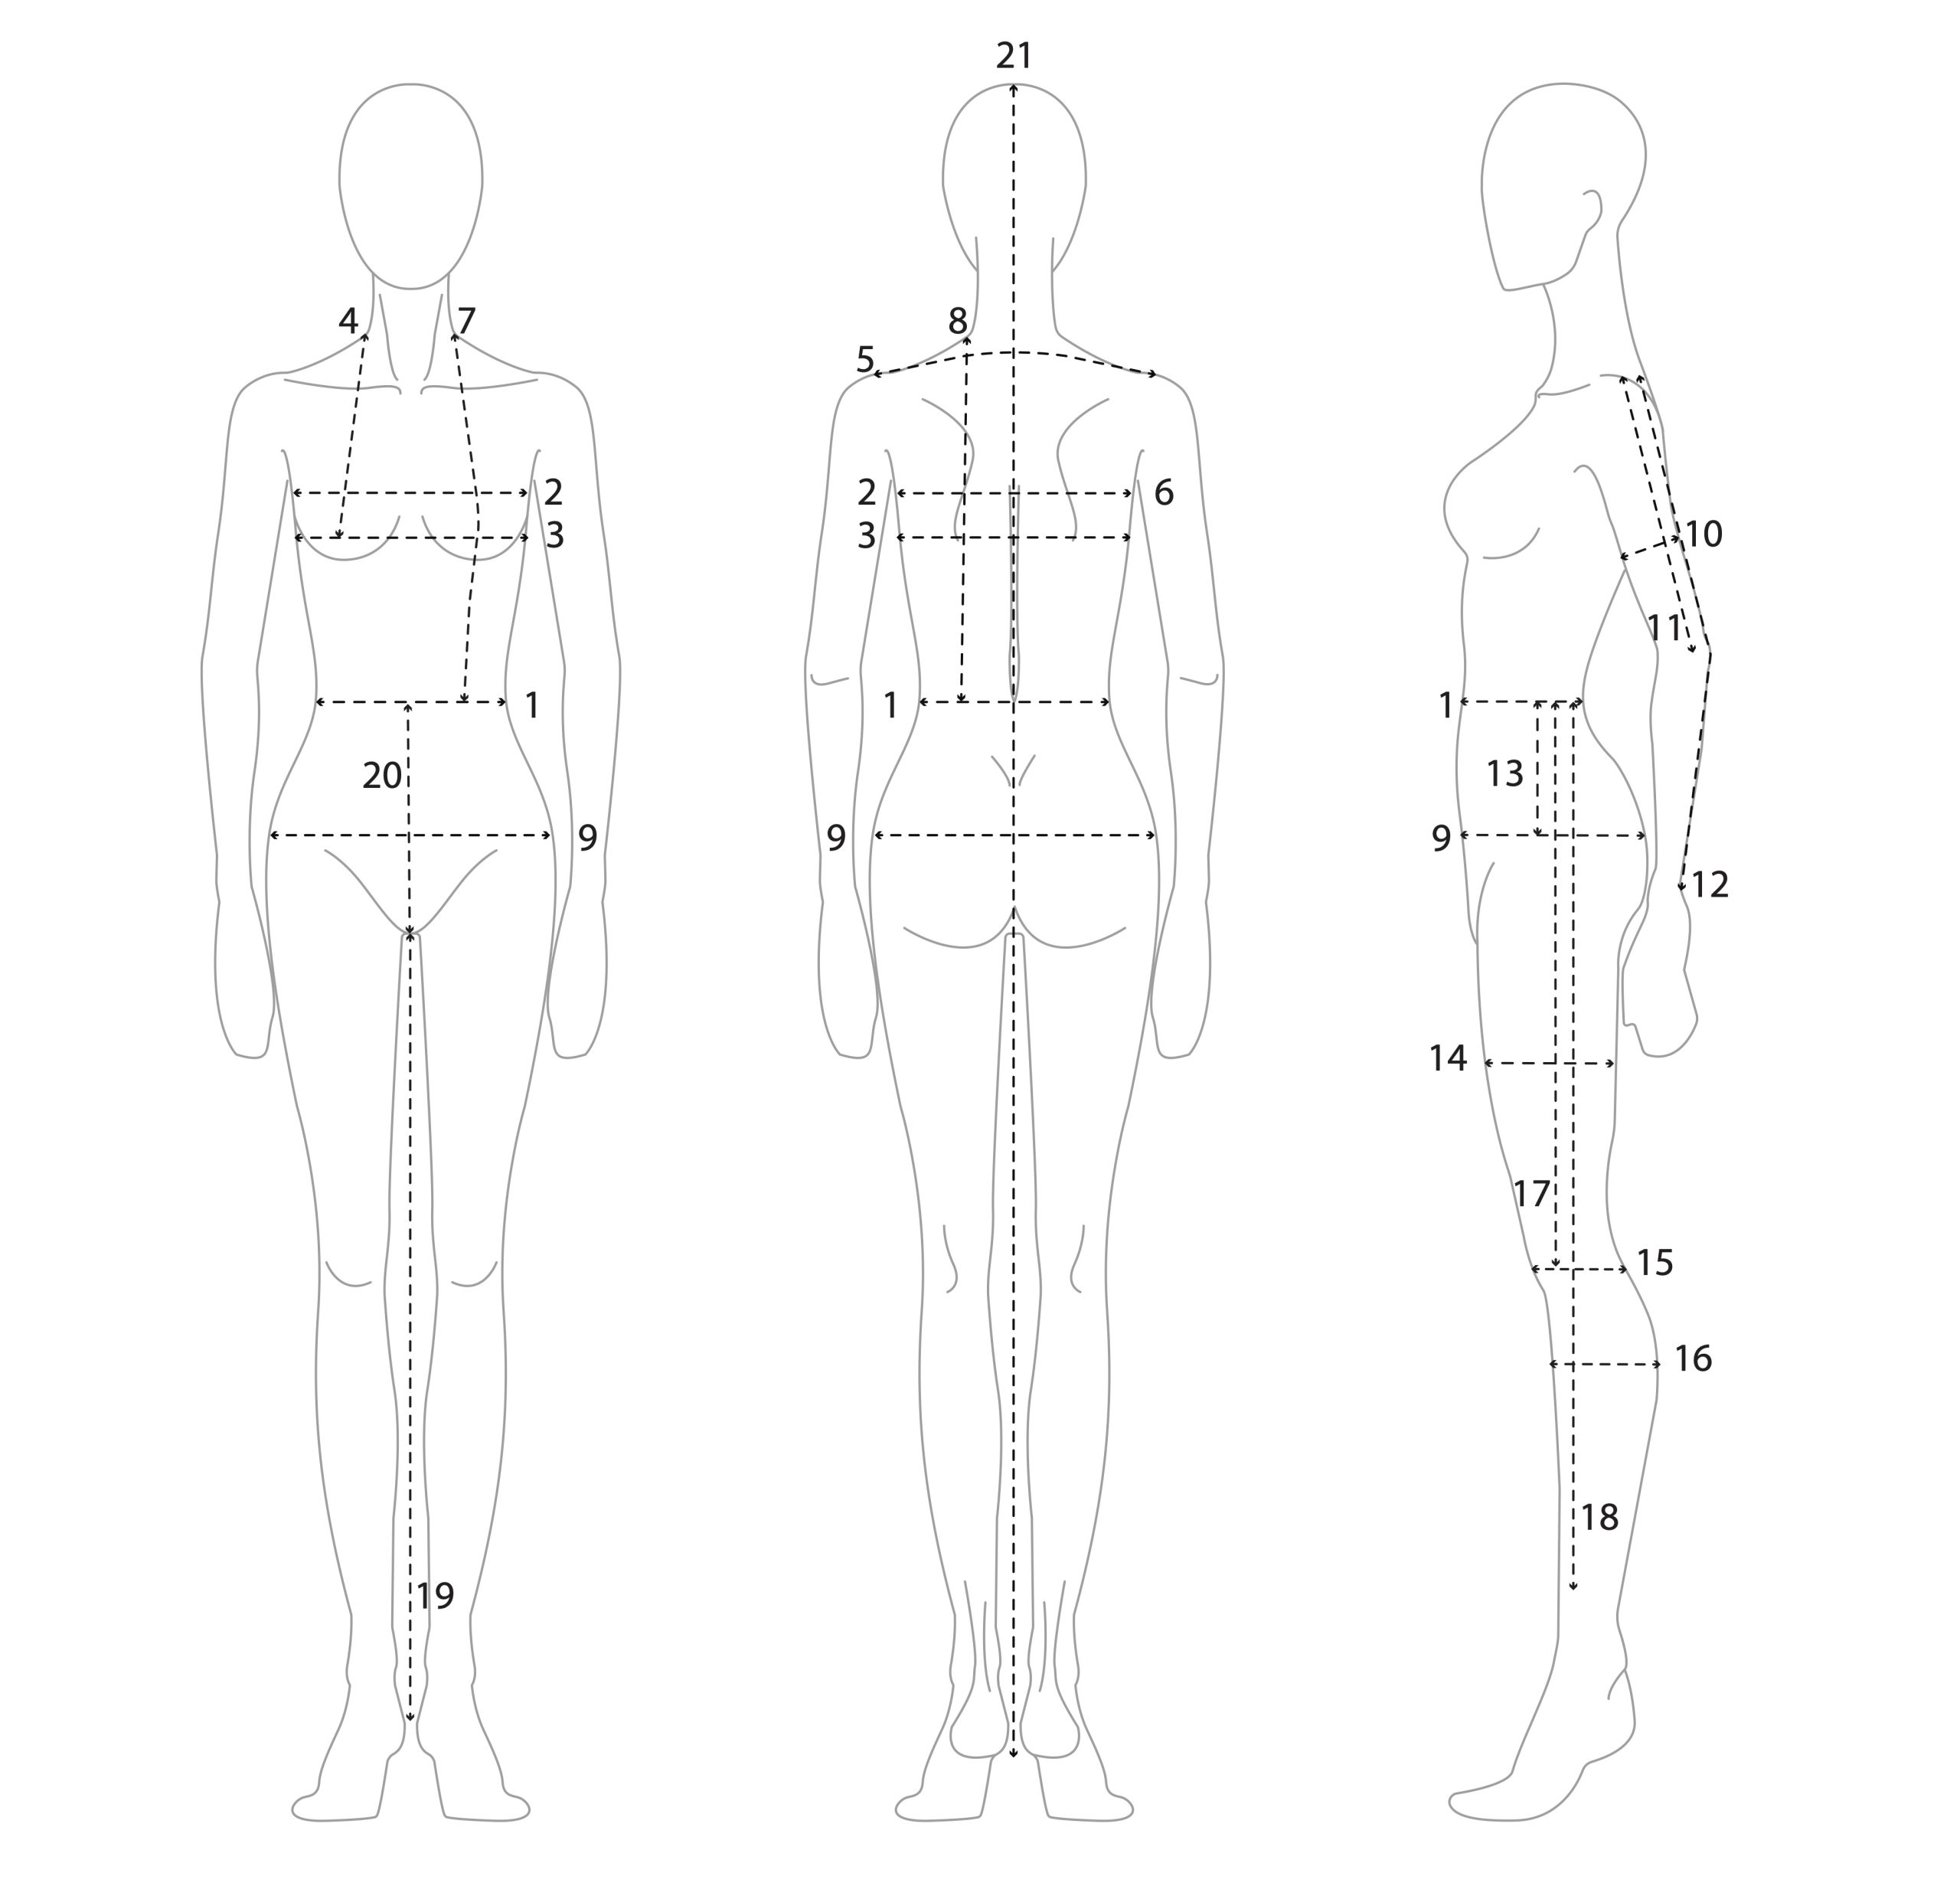
Key body measurements:
I recommend taking your measurements in this order, or as close to, as it will assist in the creation of reference points that will provide more accurate measurements.
1. Waist circumference: Around the narrowest part of the torso. If you are unsure what point this is, try bending to the side, and the crease is typically the natural waist.
Tip: Take a narrow piece of elastic and tie this around your waist. Check in the mirror that this is placed perfectly horizontal (parallel to the floor). This will act as a reference point that you will come back to.
2. Chest circumference: Around the chest from under the arms at the armpit level. Keep your arms relaxed by your side while taking this measurement.
3. Bust circumference: Around the fullest part of the bust.
4. Bust height: From the nape of the neck down the chest to the fullest part of the bust.
Tip: I marked the nape of the neck with a marker as I found I came back to this point a couple of times. I had a necklace on and interestingly found this useful for identifying the nape of the neck.
5. Shoulder width (back): Across the back from shoulder point to shoulder point. The tape may curve upwards slightly for this measurement.
Tip: When trying to identify the shoulder point think about the positioning of the shoulder seams on a tight fitting t-shirt. I recommend marking the shoulder point in some way, whether it be with a pen, or a pin, as you will come back to this point again.
6. Back width:Across the back from armpit crease to armpit crease. Maintain relaxed arms by your side while taking this measurement.
7. Waist length (front): From the nape of neck down the chest (over the fullest part of the bust) to the waist.
8. Waist length (back): From the nape of the neck down the back to the waist.
9. Hip circumference: Around the fullest part of your bottom.
Tip: I recommend marking the hip level, whether it be with a pen, or a pin, as you will come back to this point again also.
10. Bicep circumference: Around the fullest part of the upper arm.
11. Elbow length: From shoulder point to the base of the elbow. Bend the arm for this measurement, ensuring the forearm is parallel to the floor.
12. Sleeve length:From shoulder point to the base (or lowest point) of the elbow then continuing on to the wrist. Keep the arm bent for this measurement also, ensuring the forearm is parallel to the floor.
13. Hip depth: From the side of the body from the waist to hip level.
14. Thigh circumference: Around the fullest part of the upper leg.
15. Knee circumference: Around the fullest part of the knee.
16. Calf circumference: Around the fullest part of the calf.
17. Knee length: From the side of the body from the waist to the knee level.
18. Trouser length:From the side of the body from the waist to the floor, or the top of your foot
19. Inseam: From the crotch and straight down to the height of the ankle bone.
20. Crotch depth:
– Option 1: From the waist to the crotch in between your legs (eg. that point where the seam of trousers typically intersect).
– Option 2: Taken while sitting on something flat and hard and measuring from the waist down to the surface you are sitting on.
Tip: If you take both of these measurements and there is a difference, I would recommend simply averaging the two.
21. Standing height: From the top of the head to the ground.




16 Comments
Pingback:
Fitness 101: How To Support Your Body Transformation For Better Appearances • The Havok JournalPingback:
How to Start Fashion Projects at Home: A Beginner’s Step-by-Step Guide - Flair Trend Novasewing community
Sewing is such a fulfilling journey, and I completely agree that practice makes perfect! If you’re just starting out with garment sewing or looking to take on heavier fabrics, having the right machine can make all the difference. Check out the best heavy-duty sewing machines to help you master your craft: https://sewnscissors.com/best-heavy-duty-sewing-machines/.
Pingback:
How To Select The Suitable Dimension Hoodie - AR Drift ClubMarian Spadone
Thanks so much for this~! It’s clear and seems easy. I’m about to make a pair of pants and this will help me get them just right!
Emma Cartmel
Hi Marian. Thank you so much for your kind words! I’m thrilled to hear that you found the article clear and easy to follow. Good luck with making your pants!
Kelly Singh
Clear and concise. The diagram is so helpful. You’ve inspired me to actually draw up my own body diagram on an 8 ×11 piece of paper and record my measurements. It will serve me so much better than the multiple scraps of paper where I’ve randomly recorded a few measurements which I routinely misplace. Thank you!!!!
Emma Cartmel
Hi Kelly. It is so lovely to hear that you have found this article useful. I created a table that includes my own measurements and it definitely helps having them in one place!
Linda Miller
Thank you for this helpful article. It is so difficult to adjust commercial patterns and no two companies patterns fit the same so it always takes some guesswork to get a descent fit. I’m getting ready to make a fitted blazer and this article is heaven sent!
Emma Cartmel
Hi Linda, I’m glad you found this article helpful! I agree, working with commercial patterns can be tricky at times due to their unique measurements. Best of luck with your fitted blazer!
Celia Case
Thank you so much for this! I’m struggling with a couple of pattern drafting projects for clients and have tried making my own sloper, but how to take correct measurements is the key to doing all this correctly. I am trusting that this chart will work for men as well… I truly appreciate your helpful articles and tools to make our work easier and better!
Emma Cartmel
Hi Celia. Thank you so much for your kind words! I completely agree – getting the measurements right from the start is crucial. While I haven’t worked extensively with menswear, my understanding is that the points of measure are generally the same. Best of luck with your pattern drafting projects for your clients!
Sarah Smith
Really well done! About five years ago, I learned that my favorite nearby fabric and art supply shop had a teacher who would do custom lessons. I asked if she would be willing to take my measurements for me–I came up with a list almost as comprehensive as yours. I wore leggings and a fitted camisole, and away she went. As an experienced garment maker she knew just how to measure. I expect I probably *should* have it done again as our bodies change, even if weight is still similar. I’ve printed out the text and schematic–thank you! I do a periodic newsletter for those who follow my art quilting, but will include a link to this blogpost as many of us also make garments.
Emma Cartmel
Hi Sarah. Thank you so much for your kind words! I’m so glad to hear that you found this resource useful. I completely agree that it’s worth rechecking measurements periodically, as our bodies do change from time to time. Thank you for sharing the post with your newsletter readers! I appreciate the support.
Ellen McPherson
Wow how helpful is this! Detailed but clear, not confusing at all. Reading this I wonder how I ever thought I could make a well fitting garment any other way. Very very illuminating and a thorough read takes the anxiety of wondering if a garment will really fit away. This Guide is a gem and I’ll be referring to it often.
Emma Cartmel
Hi Ellen. Thank you so much for your kind words! I’m so glad to hear that you found the guide helpful and clear. I often refer to my own version as well, so I’m glad it’s become a valuable resource for you too. Happy sewing!