Hitomezashi Sashiko on the Ashton Top: Part TWO
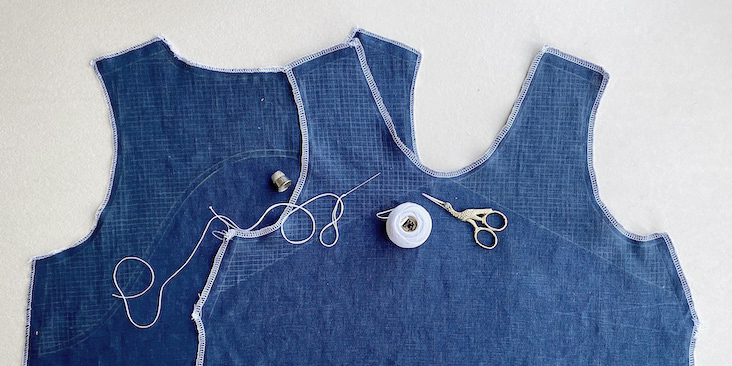
This tutorial will focus on the stitching of Sashiko on the fabric pieces cut out for the front and back bodices of the Ashton Top by Helen’s Closet. These fabric pieces have been prepared for Sashiko stitching by drawing 0.5cm x 0.5cm grids on them. For my preferred method for drawing a grid on dark-coloured fabric in preparation for stitching please visit Hitomezashi Sashiko on the Ashton Top: Part ONE.
Stitching Hitomezashi Sashiko
Materials
Fabric pieces of the Ashton Top . We used FS INSIGNIA BLUE Midweight 100% Linen with Sashiko grids drawn on them. For a detailed tutorial on how to transfer a grid onto dark-coloured fabric, click HERE.
Needle
Thread
Embroidery shears or scissors
Thimble (optional)
Note About Materials
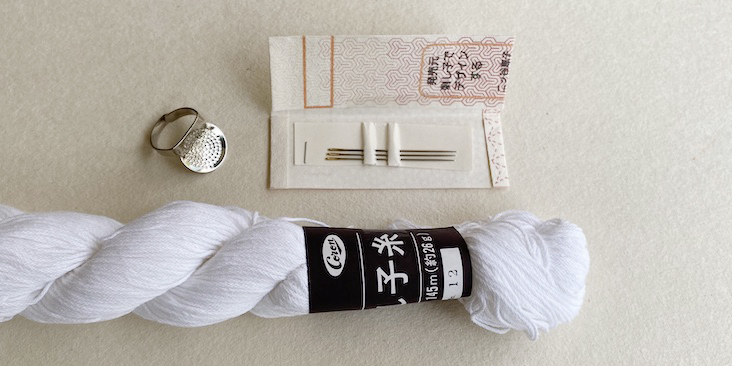
There are needles, threads and thimbles made specifically for Sashiko that can be purchased in stores and online. I like purchasing my Sashiko supplies from Upcycle Stitches for good quality products, and responsive service. It is ideal to sew Sashiko with materials and tools that are made especially for this craft, but alternatives can also be used for good results for your initial experiments which can prove time-saving and cost-effective. Below are some alternatives that can be used to stitch Sashiko.
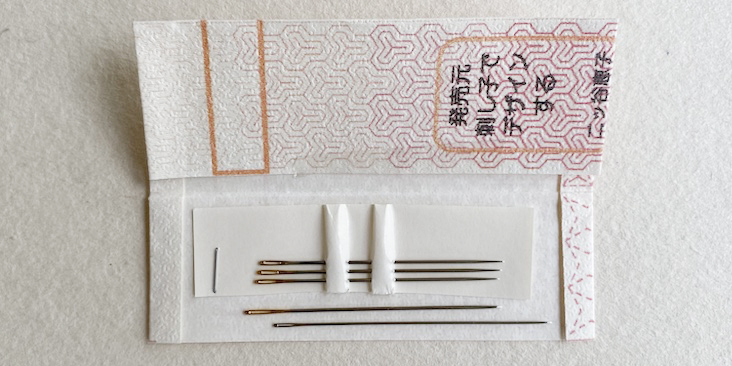
Needles
A Sashiko needle is sharp, long, and slender, with an elongated eye. The length of the needle facilitates the loading of multiple running stitches while stitching, and the long eye allows thicker Sashiko thread to pass through easily without abrasion or weakening. The picture above shows the 3 traditional Sashiko needles grouped together at the top. Right below them for comparison are an embroidery needle and a cotton darner, which are both good alternatives. Make sure that the needles are about 5cm or 2 inches long.
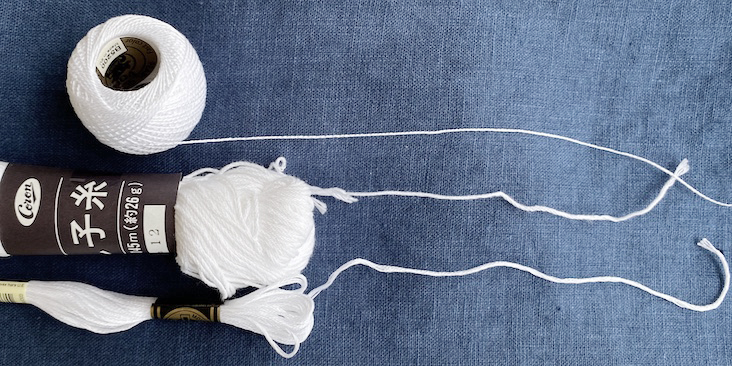
Thread
Since traditional Sashiko thread (pictured in the middle) is made of cotton, embroidery floss (pictured at the bottom) and Perle Cotton embroidery thread (pictured on the top), which are made of 100% cotton, are both possible alternatives. The Sashiko thread pictured here is thick and the embroidery floss (with all 6 threads) is about the same thickness. The only disadvantage with embroidery floss is that it is a relatively more expensive alternative. I chose to work with the No.8 Perle Cotton for this project even though it looks and behaves differently from Sashiko thread. However, it is thinner, which is better-suited to densely stitched Hitomezashi patterns. There are thinner Sashiko threads made specially for Hitomezashi, but I wasn’t able to acquire them in time for this project due to the pandemic. Sashiko threads remain the best option for Sashiko.
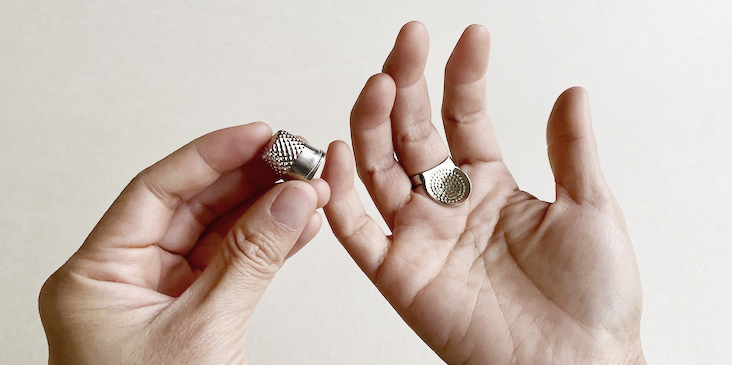
Thimble
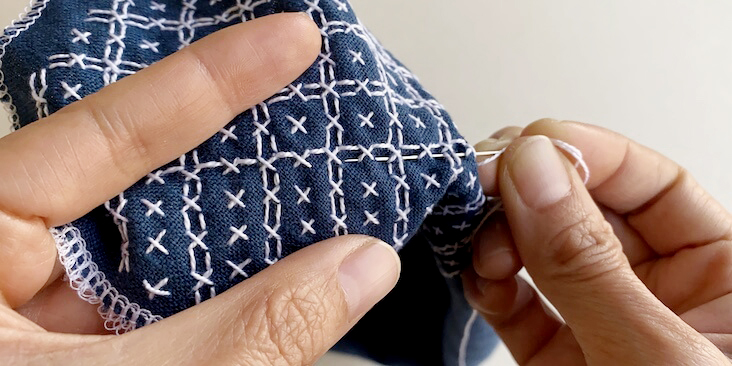
The traditional Sashiko thimble is shaped like a ring and is worn on the third finger in the hand that is holding the needle. Using this thimble requires practice to develop coordination between two hands to produce the stitches. One hand holds the needle with the thimble as the fulcrum for pushing the needle through the fabric; the other hand pleats the fabric to help form the stitches. It takes time to become proficient with the Sashiko thimble, but when proficiency is attained, it makes the stitching go much faster. I highly recommend taking a workshop with Upcycle Stitches to learn “Unshin” – the movement or rhythm of the needle used in tandem with the Sashiko thimble – in order to deepen your Sashiko practice. Running stitches do not have to be produced by “Unshin”; but acquiring this skill will bring one closer to the true spirit of Sashiko, and your patience and dedication will be rewarded. Please note that my hand position in the pictures do not represent “Unshin”. The photos were taken to clearly show the direction that the needle is going to produce the patterns. Even in your early Sashiko explorations, to optimise your enjoyment while stitching, be mindful of your posture and wrist/hand position to prevent overuse fatigue or injury. Using a regular thimble to sew running stitches is optional – some stitchers prefer to stitch with it, and some without.
Basic Hitomezashi Stitches
In addition to the basic Hitomezashi stitches (Yokogushi and Jujizashi), we will also look at how these stitches can be built on for more complex patterns (Komezashi and Kusari Jujizashi). We will touch on a thread looping technique, sewing a stitch pattern called Kawari Kikkozashi and its variation. Rows of Sashiko stitches are secured by beginning and ending with knots, or with the no-knot method. For the traditional no-knot method, several back-stitches are used to secure the stitches. This works really well with Sashiko thread, and has the added bonus of making both sides of the fabric neat and presentable. However, since I am using Perle cotton thread, which has a silkier feel for this project; and the wrong side of the stitching is covered with a facing, I chose to use quilter’s knots at the beginning and at the end of the thread for extra security and better prevention against unraveling.
Yokogushi (Horizontal Rows)
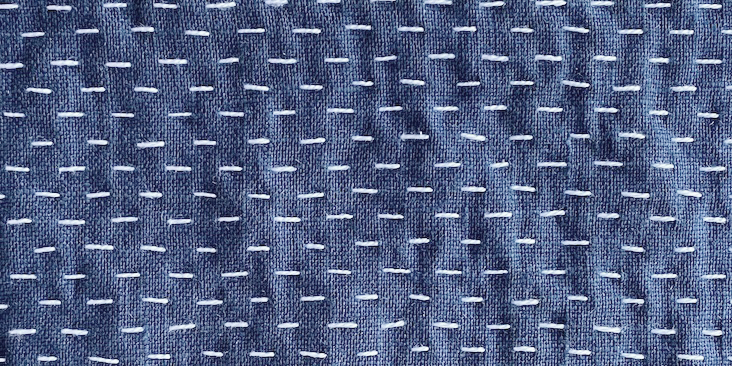
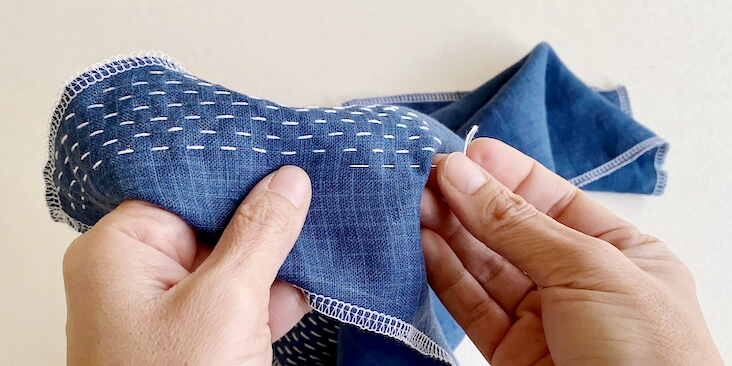
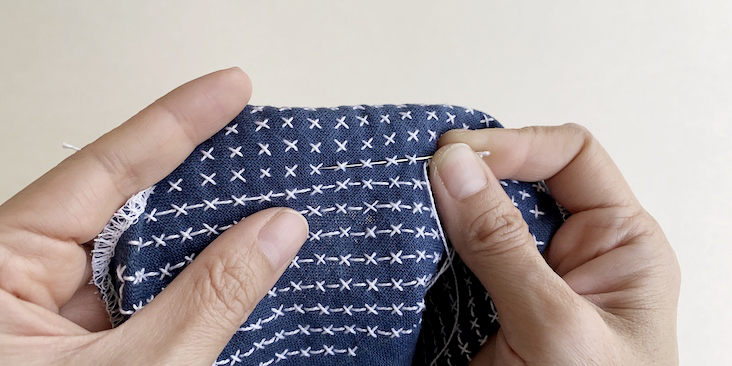
This is the foundational stitch for many other stitching patterns in Hitomezashi Sashiko. After making a quilter’s knot, stitch running stitches on a horizontal line. The stitches are made by stitching the length of one square grid alternating with one square gap. On the next row, alternate between stitches and gaps. Continue stitching the rest of the rows, stitching in the same pattern of alternating stitches and gaps.
Because this is usually the first and foundational stitch made on the fabric, the stitching sets the tone and tension for the other stitches that build on this stitch. This is why it is vital to keep a close eye on thread tension. Puckering happens most when stitching this foundational stitch, so pay special attention when connecting between the rows of stitches. Leave some slack in the loop on the reverse side that connects one row to another. This will prevent the fabric from puckering. It is good practice to always check on thread tension at the end of each stitching row.
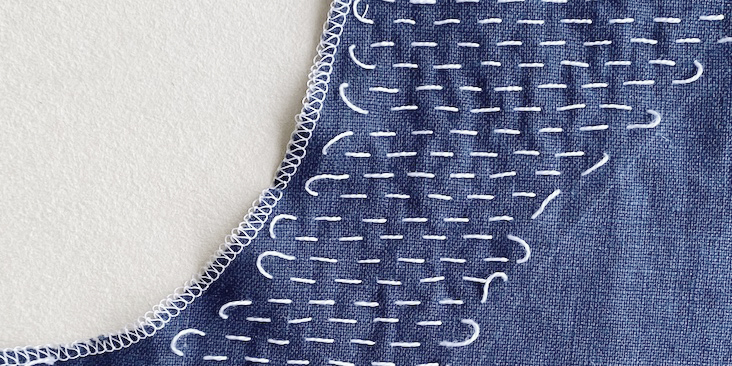
Reverse side of Yokogushi stitch: take note of the slack left between rows to prevent puckering in the fabric
This stitch can also be turned 90 degrees for a vertical column variation.
If the simplicity of this basic stitch appeals to you and fits the style of your garment, you can stop stitching the pattern here. But if you’re looking for a more intricate pattern, then let’s keep building on this stitch.
Jujizashi (’10’ Cross Stitch)
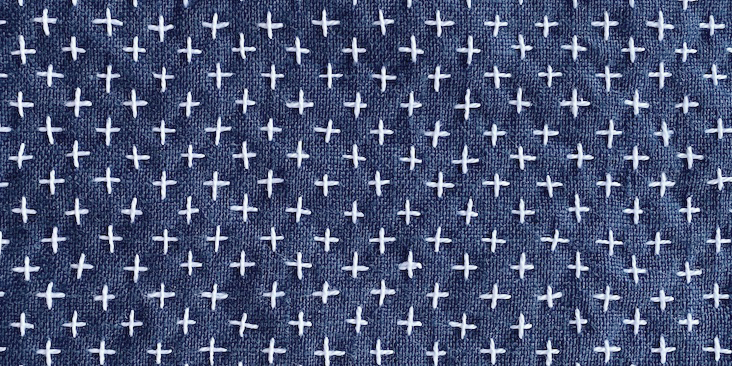
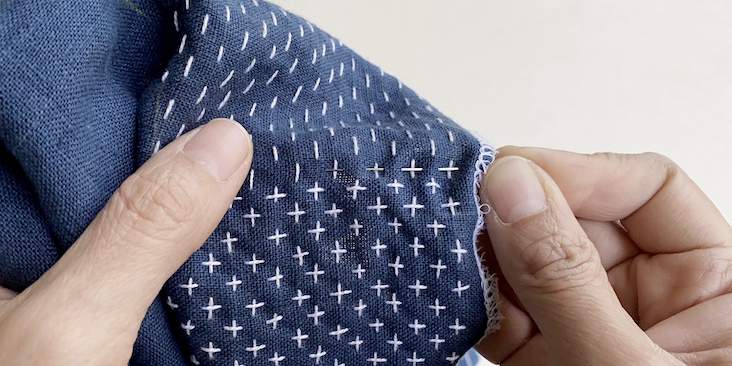
Stitch a vertical stitch in the middle of the horizontal Yokogushi stitch, crossing at right angles. This stitch forms the number “10” character in Japanese and Chinese. Please note that this stitch is not guided by a line on the grid. Determine the position of these crossing stitches by eye-balling it.
This is another basic stitch in the Hitomezashi vocabulary and many patterns are built on this ’10’ cross stitch, like the Komezashi (Rice Stitch).
Building on Basic Stitches
Komezashi (Rice Stitch)
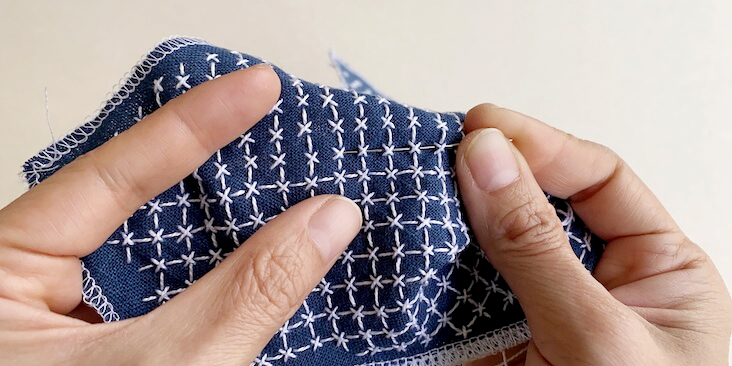
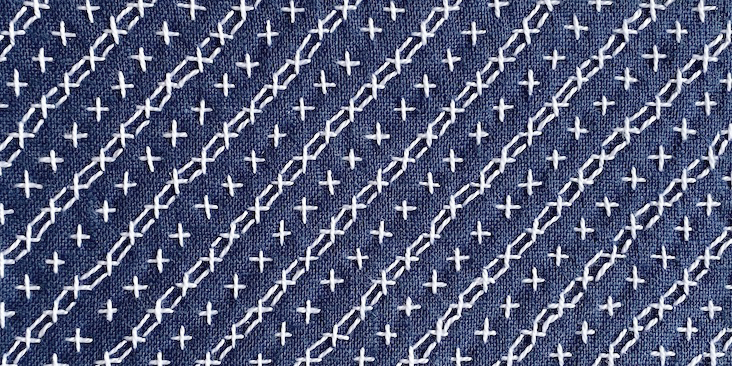
Start by stitching Jujizashi (’10’ Cross Stitch), which is made up of horizontal stitches, then crossed with vertical stitching lines. Now we will stitch on the diagonal by connecting the diagonal stitch from the centre point of each cross stitch to the next. First stitch all the lines going in one diagonal.
When all the diagonal lines going in one direction are stitched, the Sashiko pattern will resemble what’s pictured below:
Then stitch in the lines going in the other diagonal.
This stitch is called the Rice Stitch because it resembles the Chinese and Japanese character for “rice”.
Kusari Jujizashi (Chain Cross Stitch)
Begin by stitching in Jujizashi (“10” Cross Stitch). Then instead of the diagonal stitches linking the centre point of the crosses in Komezashi (Rice Stitch), the diagonal stitches in Kusari (Chain Cross Stitch) link the tips of the crosses to resemble the pattern of a chain.
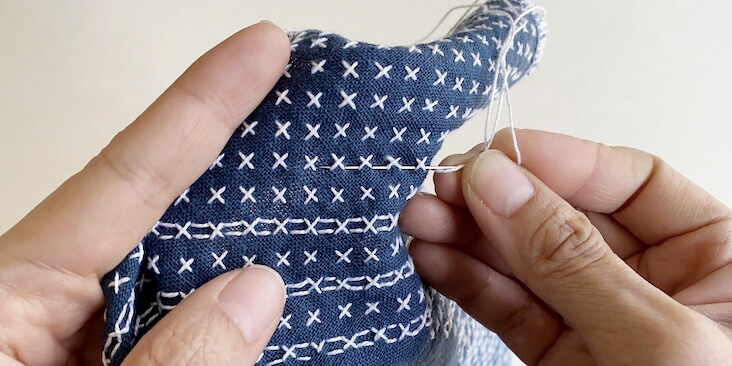
Stitch in a diagonal line to connect the tips of the crosses to begin Kusari Jujizashi (Chain Cross Stitch)
Then another diagonal line is stitched close to the other, linking the other tips of the crosses. One row of diagonal crosses is skipped and then another “chain” pattern is stitched.
The pattern with diagonal stitches going only one way looks like this:
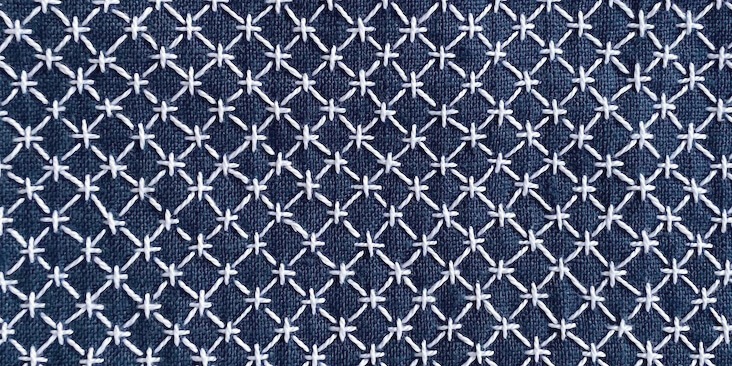
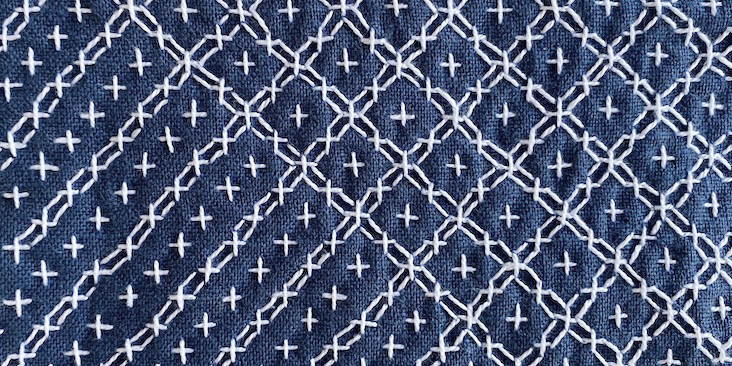
To complete the full pattern, stitch diagonal lines going in the opposite direction. This will create a pattern of square chain links with a cross in the middle of each square.
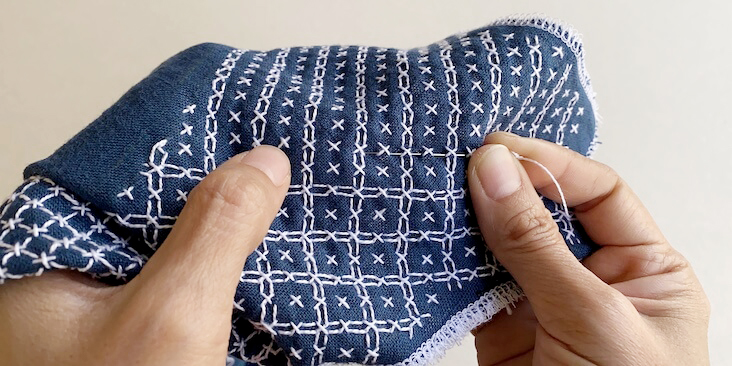
Stitching the diagonal line going in the opposite direction for Kusari Jujizashi (Chain Cross Stitch)
You may also combine a mixture of both patterns – chain links going only in one direction, and the square chain links – as a design interest.
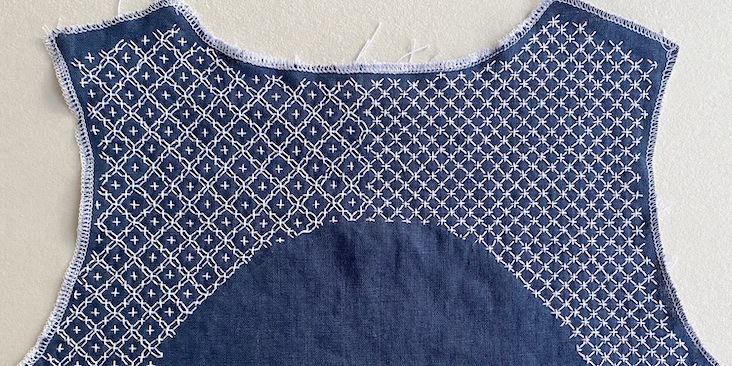
In Sashiko, we draw from a library of traditional stitch patterns to embroider. Individual creativity is expressed through pattern placement and/or juxtaposition. In the back bodice of the Ashton Top, I have chosen to follow the lines of the back facing, and combined two kinds of stitches: Kusari Jujizashi (Chain Cross Stitch) and Komezashi (Rice Stitch).
Thread Looping
Vertical Yokogushi stitches pictured on the left before a thread-looping stitch (pictured on the right) is applied
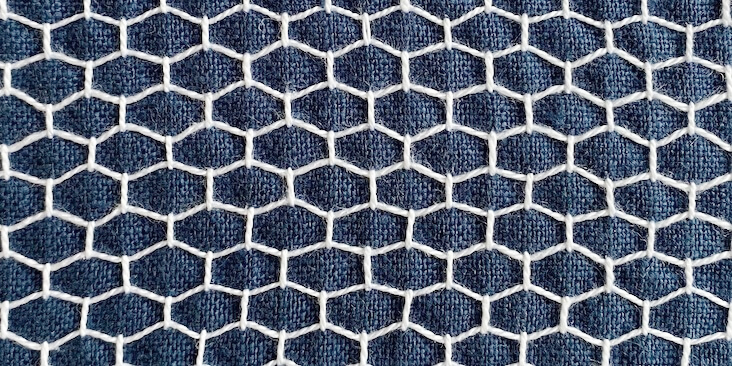
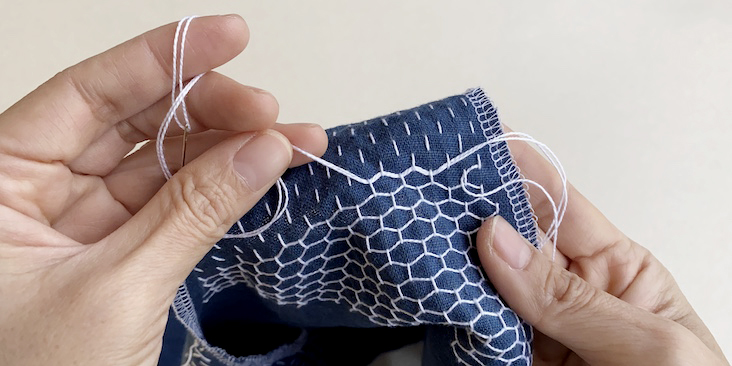
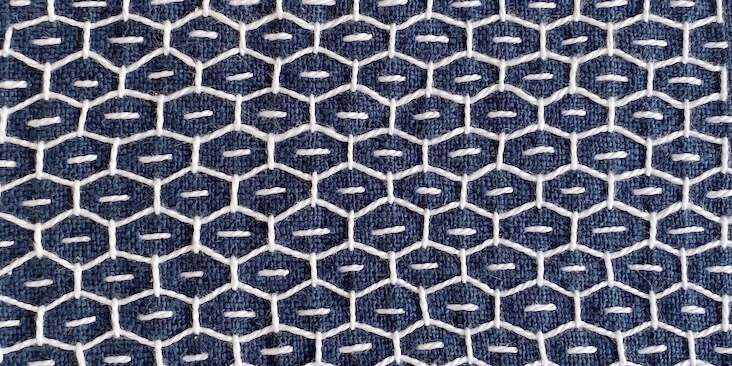
Thread-looping is also one of the techniques of the Hitomezashi vocabulary where the thread is looped between stitches. The following pattern is one of the thread-looping stitches called Kawari Kikkozashi (tortoiseshell stitch variation) and is one of my favourite stitch patterns.
Kawari Kikkozashi Variation One (Tortoiseshell Stitch)
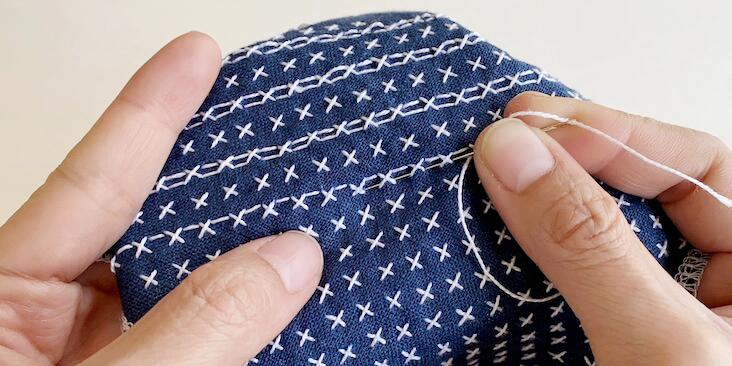
Begin with the basic Yokogushi stitch pattern with the running stitches going in vertical lines. The thread-loop will be going in a horizontal direction as it runs between two rows of vertical stitches.
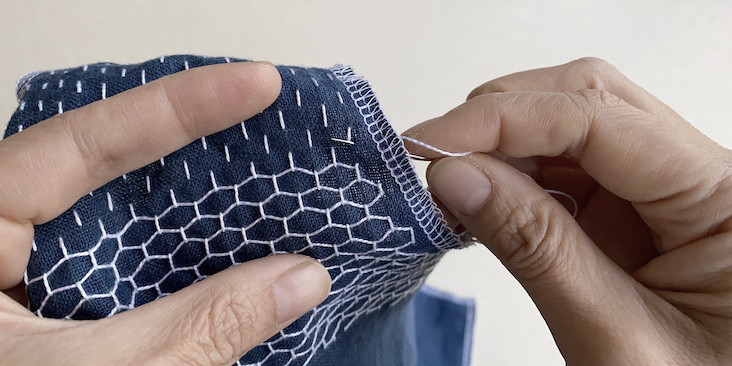
Start the thread-loop by making a stitch close to the tip of a vertical Yokogushi stitch.
Pull the thread through.
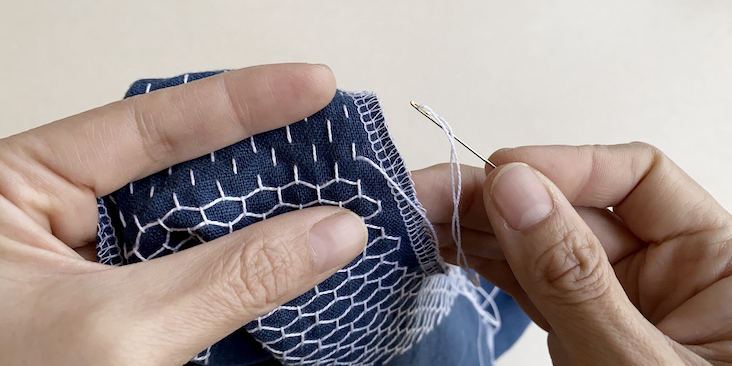
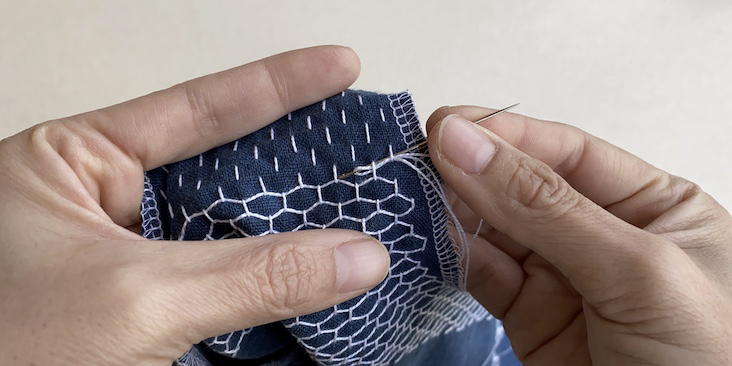
Using the tip of the bottom end of the needle (where the eye is situated) pass it behind that vertical stitch, and in the same movement, pass it also behind the vertical stitch situated in the row below the first vertical stitch.
Pull the thread through these two vertical stitches. Now you’ve made your first thread-looping pass.
Tip: Using the back end of the needle to loop the thread behind the stitches through prevents snags in the fabric and the stitches.
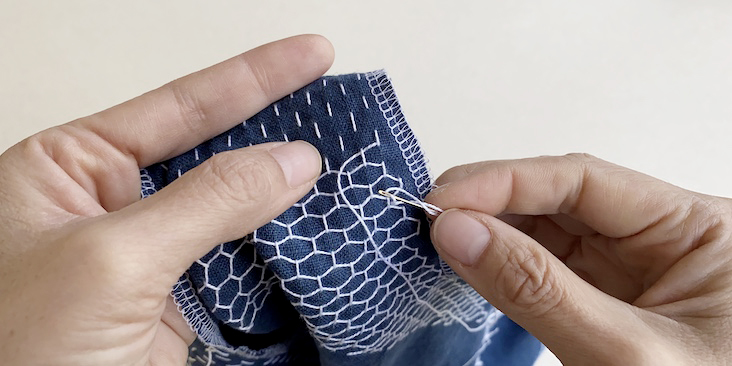
Now continue thread-looping between the two rows of vertical stitches till you arrive at the end of the row. You may loop through several passes before pulling the thread through so that the task goes faster. Just be careful of thread tension when you do this. Pull the thread through gently but firmly so as not to distort the vertical stitches or the thread loops.
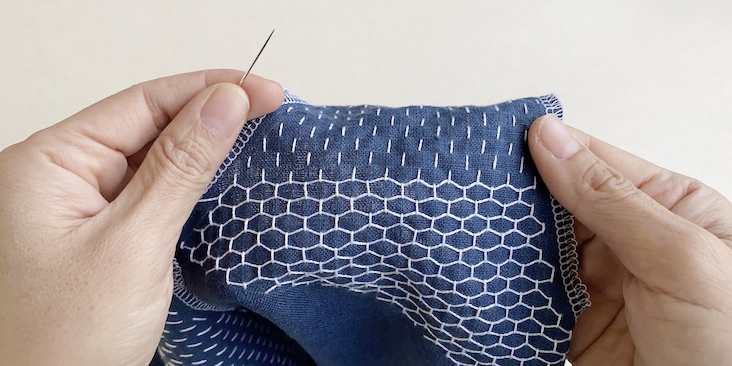
Here’s a picture of a completed row of thread-looping:
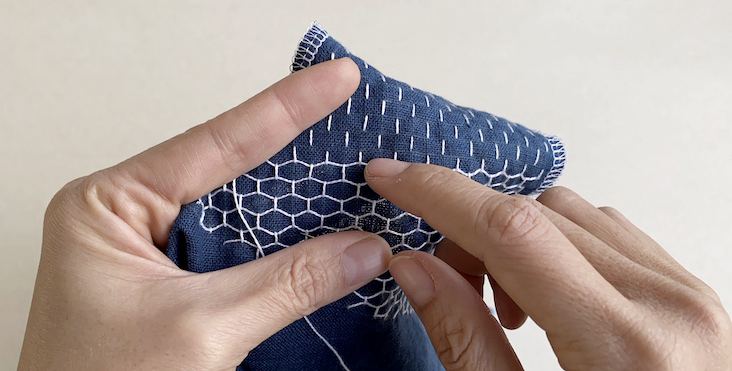
With the back end of the needle, or with your finger, adjust the slack in the tread loops so that the loops have equal tension.
To secure the rows of thread loops, make a stitch between rows. This is done by sewing close to the tips of the vertical stitches.
This pattern reminds me of fish scales, or a honeycomb.
Thread tension is trickier for thread-looping stitches. The right balance has to be achieved so that it is not too tight for puckering to happen, and not too loose so that sagging occurs at the vertical stitches where the thread is looped through. In the following picture, the green circle highlights how there is significantly less slack between the vertical rows of Yokogushi when thread-looping is executed. Compared to the generous slack left between rows of the regular stitches in the red circle, the stitches in the green circle have just enough give so that the stitches won’t pucker the fabric; but tight enough to prevent sagging, and to support the thread-looping stitches.
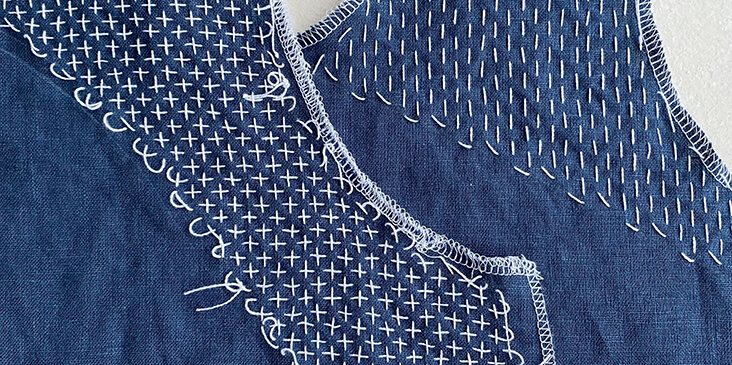
Reverse sides of stitching: the right shows the reduced slack between rows of Yokogushi for thread-looping compared to the more generous slack between rows of Yokogushi and Jujizashi on the left
Kawari Kikkozashi Variation Two (Tortoiseshell Stitch)
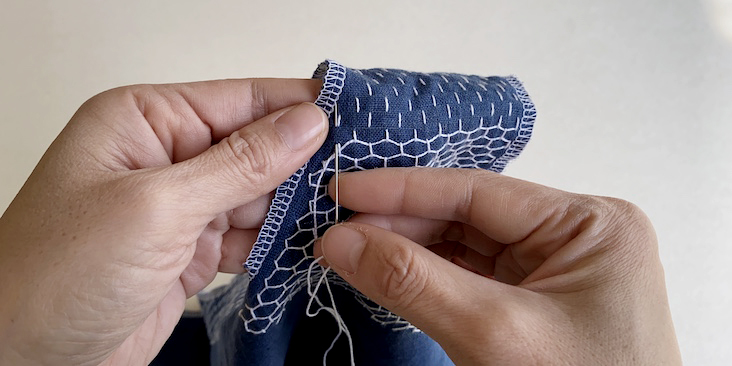
Sew a horizontal stitch positioned in the centre of the hexagons of the first Kawari Kikkozashi variation.
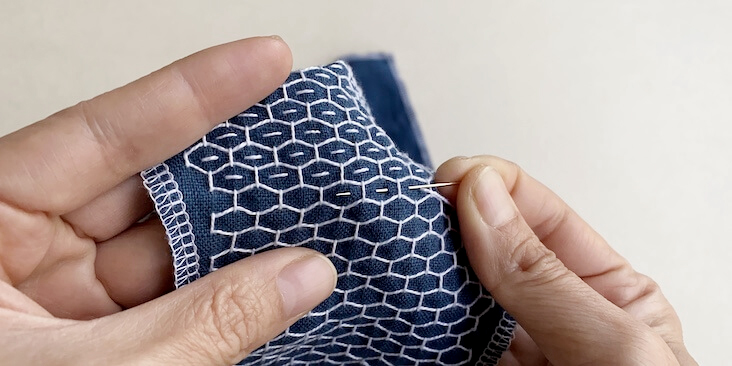
Kawari Kikkozashi Variation Two: Stitching a horizontal row in the centre of Kawari Kikkozashi Variation One
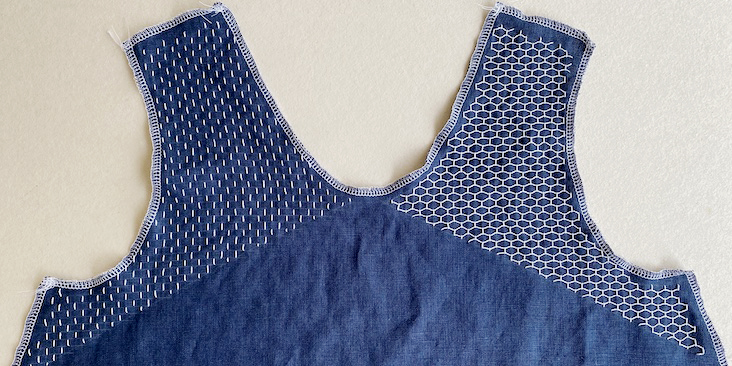
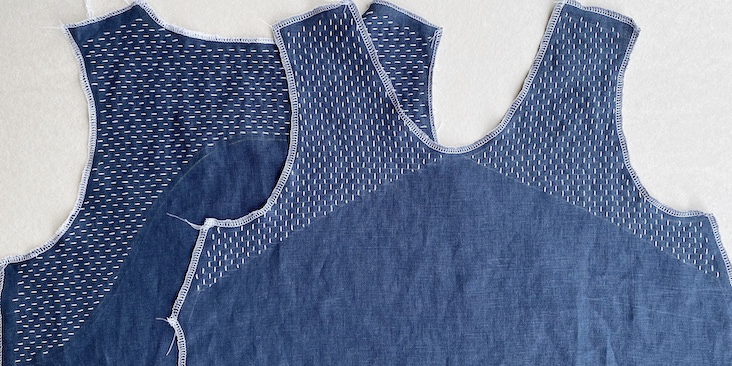
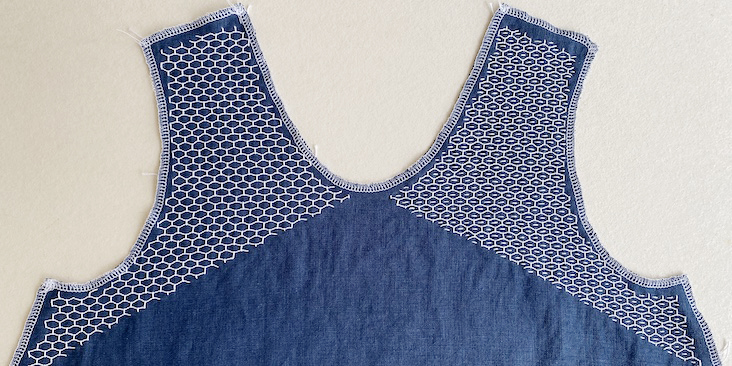
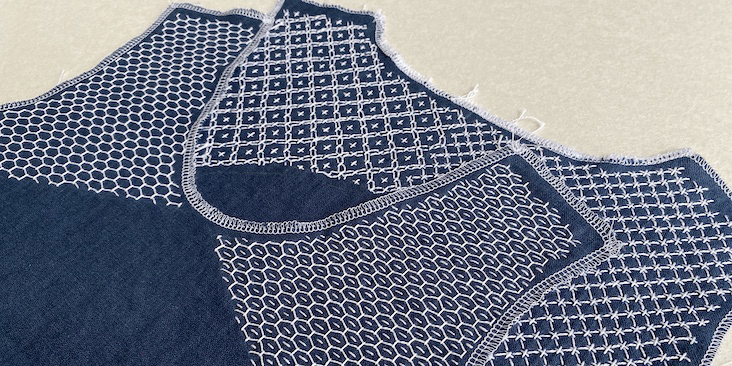
Take note that this stitch is not guided by a grid line, and is made by eye-balling its position in the centre of the hexagon. Pictured below is the completed front bodice of my Ashton Top which is stitched with the two variations of Kawari Kikkozashi (Tortoiseshell stitch).
The back bodice has the Komezashi (Rice Stitch) and Kusari Jujizashi (’10’ Cross Stitch).
It is up to you to embroider whichever Hitomezashi patterns that you want for embellishment. You may embellish only the front bodice or only the back, or you may also embellish the hem of the Ashton Top which has a hem facing. You may even decide to do an all-over stitching of the entire garment. If so, then I suggest to sew a full lining of the top to protect the stitches.
Sewing the Ashton Top
Now that the Sashiko for the two bodices have been completed, what’s left to do is to sew up the Ashton Top, referring to the sewing pattern instructions provided by Helen’s Closet.
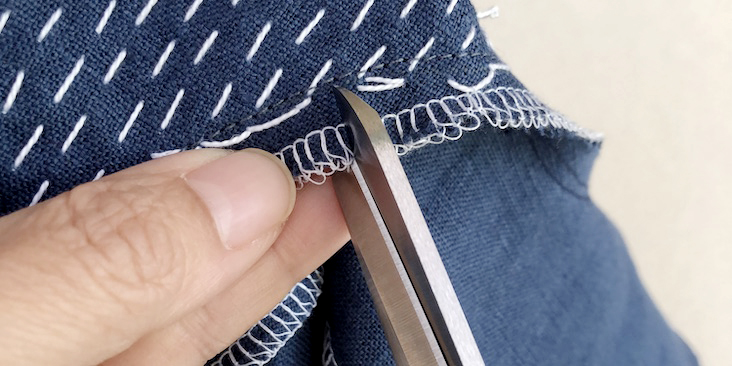
I want to offer a word of caution when sewing up garments with Sashiko stitching embroidered on it. Most of the stitching will start and end close to the seam allowances. When it is required to grade the seams or snip into the seam allowances, be careful NOT to cut into the embroidery stitches. Check both sides of the fabric before cutting or snipping to make sure that you are not cutting into any embroidery stitches or loops.
To Conclude
Hopefully, you now have adequate information to start off on your adventures in Hitomezashi Sashiko stitching. These patterns are just several out of the wide range of stitching patterns that are available.
This method of using graph paper to help transfer the grid can be used for Moyozashi Sashiko as well to draw in the patterns. One benefit of this method is that with this graph paper pattern, it makes it easy to transfer the grid for multiple versions of Ashton Tops.
I wish you happy stitching on your Sashiko journey. If you have any questions, do not hesitate to comment below or you can also drop me a note on Geri In Stitches.










25 Comments
Ana Inocêncio
gostei muito do artigo Parabéns.
MAs não encontrei o ponto de Sashiko que queria aprender. Pena não puder anexa-lo para você ver.
Amy Tompkins
This is incredible! Thank you so much for helping me learn about this, and providing such an excellent tutorial. Now that I am better at sewing linen garments, I’ve been wanting to try my hand at embellishment and you’ve given me so much inspiration.
Maria Prat
Thank you for your work. I love Sachiko style.
Mary P.
C T
Thank you for taking the time to make such a clear explanation and to teach us the background of this beautiful technique. I would like to follow this tutorial- what size embroidery or darner needle did you use? Thank you!
Lauren Gates
Hello! You can purchase specialized sashiko needles from brands like Clover, Olympus and Tulip. They usually come in packs with different sizes. You can use the smaller, thinner needles for lightweight, tightly woven fabrics ( so the needle doesn’t punch large holes in the weave), the thicker needles for fabrics with a looser weave, and the longer needles if you are sewing through multiple layers of fabric.
Dana Schmale
Such amazing work! Really inspiring.
Blair Conger
What an excellent discovery to find your beautiful tutorial. I am so moved by the back story of it all, especially seeing the beautiful work you have created. I am inspired. Thank you.
Sandra Lee
Design was intricate and nice. So gifted.
Geri In Stitches
Hi Sandra,
Thanks so much for your comment! Cheers, Geri
Margaret Fong
Geri’s tutorial on hand-sewing stitches will get you the result you desire, her professional way. Yes, she did me. I learned a lot from her tutorials. Thank you, Geri. You are a talent.
Geri In Stitches
Thank you Margaret for your generous comment! I am happy you found the tutorial helpful! Cheers, Geri
Julia Bowling
Thank you, Geri, for sharing this lovely tutorial! I loved doing a lot of needlework on my 6 children’s clothes when they were small and have gotten away from it. I look forward to trying some of these new, beautiful patterns when I come back to it in the near future!
Geri In Stitches
Hi Julia,
Thank you so much for reading the tutorial, and your lovely comment. How wonderful to apply needlework on your children’s clothes – the garments must be extra precious when you place something so personal on them. I wish you happy stitching! Have a great weekend. Cheers, Geri
Kimberly Albertson
Thank you Geri for this beautiful explore into a beautiful artform! I have done an improvisational sashiko-inspired stitch for mending. It resembles a 3-toed bird footprint. Is there a traditional name for this stitch shape? thanks, Kimber
Geri In Stitches
Hi Kimber,
Thanks so much for your comment! I am happy to hear that you are excited about Sashiko mending! However, I apologise that I am unable to help you identify this pattern that you are describing. Wishing you happy stitching! Best regards, Geri
Laura Dallas
I have been sewing sashiko samplers for a quilt during the Canadian winter as I listen to audiobooks or watch Netflix. This is by far the best tutorial I have seen and it is so clear. Thank you for sharing and now I’m inspired to make some garments with sashiko stitching. My linen is on the way. I must add that sashiko is absolutely addicting!!
Geri In Stitches
Hi Laura,
Thank you so much for your kind and generous comment! It warms my heart to know that you are planning to sew some Sashiko on garments. I love Sashiko for its meditative and reflective benefits, and that is truly addictive. Thank you for reaching out. Happy stitching! Cheers, Geri
Judy Willette
This is so beautiful! I don’t know when, but I have got to try this sometime! Thank you for the tutorials!
Geri In Stitches
Dear Judy, Thank you so much for reading the blog, and your heart-warming comment. It makes me happy to hear that you have some stitching planned for the future. Best regards, Geri
Patti Eff
Absolutely stunning Geri! Thanks you for the detailed post.
Geri In Stitches
Hi Patti,
Thank you so much for your comment. It made my heart smile! And thank you for reading and for your support. Cheers, Geri
Corinne Skulmoski
This is very well done Geri! It’s a beautiful craft.
Geri In Stitches
Hi Corinne,
Many thanks for reading the post and your words of support. It is greatly appreciated. Sashiko is indeed a wonderful practice! Cheers, Geri
Victor Fong
Your tutorial is so clear and precise. Even as a layman i could comprehend easily. Thank you Geri.
Geri In Stitches
Hello Victor,
Wow, thank you for your comment. Your kind support is greatly appreciated! Cheers, Geri