Patternmaking: Easy Neckline Alterations
Today’s tutorial is about one of the most common patternmaking techniques: neckline alteration.
Changing the shape of a neckline is one of the easiest ways to vary the style of a garment. In this tutorial, we will show you how to do a basic alteration to an existing pattern in order to achieve a design that flattering to your face and goes well with your proportions. All you’ll need is a pattern, pencil, ruler and paper to get started!
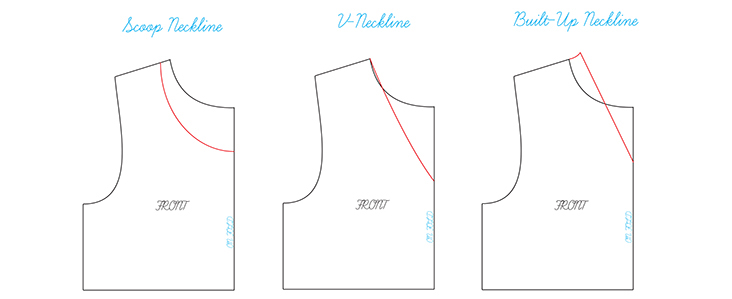
There are so many different neckline styles. The most popular are crew, scoop, halter, square, boat, sweetheart, and v-necklines. We are going to show you how easy it is to change the current “round” neckline into three different styles.
The first two are among most common alterations – transforming a round neck into a scoop neck and a V-neck; and the third, more elaborate style – a so-called built-up neckline.
All these necklines can be made using a basic sloper (like the pattern for our basic tank), a commercial pattern or a pattern you’ve drafted yourself. All you need to do is to take whichever sloper or pattern you’d like to use and trace around it on a new piece of paper. Remember, that in patternmaking we are only working with the right side of a sloper so make sure you only trace the pattern until the fold line at the center front.
Materials & Tools
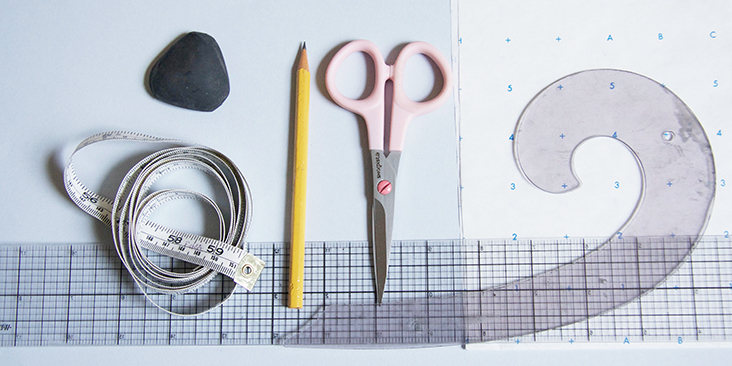
Pattern paper, pen, eraser, #17 curve, measure tape, scissors, ruler
Difficulty
Beginner
Drafting scoop-neck pattern
Scoop neck is a rounded low-cut neckline. So, to transform a basic round neckline into a scoop neck you simply need to lower (and widen if you wish) your existing design.
1. Trace an existing pattern that you would like to change.
2. Using your pencil, mark the new neckline where you want it. Just make sure it’s neither too low nor too wide for your body.
You can draw it freehand, but we recommend using #17 (aka “French”) curve to make the line nice and smooth.
3. Once you are happy with your shape, join the front and the back pattern pieces to make sure that they match. If you changed the length of the front shoulder seam, you’ll need to adjust the back as well.
4. Add your usual seam allowances and cut out the pattern.
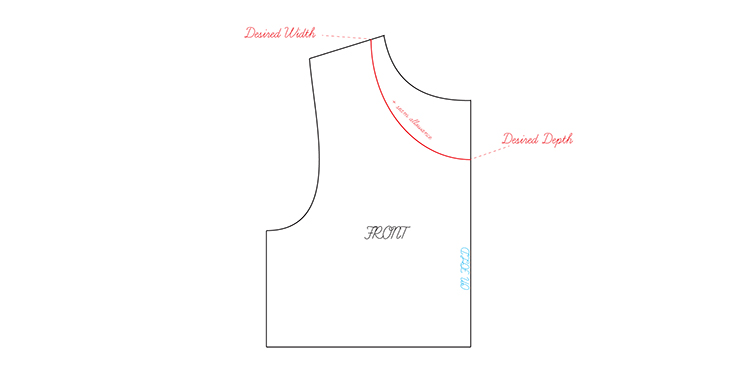
The method for making the scoop-neck pattern applies to any variation in neckline shape, so once you understand how to alter, you can make any other neckline designs.
Drafting V-neck pattern
V-neck is a type of neckline where straight sides meet at a center point to form a V-shape.
To draft a V-neck pattern, follow the same steps as in making the scoop-neck pattern but instead of a rounded shape, you draw a diagonal line from shoulder point to the desired depth at the Center Front. However, your finished V-neck would lie more smoothly if you draw not a straight, but a slightly curved line. It won’t be visible but will give better results.
If you make a pattern that begins at the same place at the shoulder seam as your existing pattern, you do not need to make any alterations to the back neckline.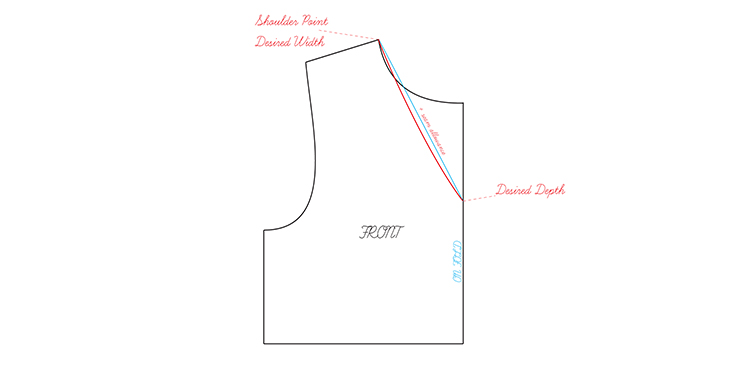
Drafting Built-Up neckline pattern
Built-up necklines extend above the base of the neck and rise up and away from the neck. It can be developed from any point along the shoulder and to any height.
To draft this neckline, follow the same four basic steps as in making the scoop-neck and V-neck patterns.
Since you need to raise your neckline, extend your shoulder point by 1 inch (2 .5 cm) or more depending on your design. Make a slight curve. This is the height of the neckline edge at the shoulder.
From that point, draw a diagonal line from shoulder point to the desired depth at the Center Front. This is your neckline opening.
Now take your back piece and raise the neckline by 1 inch (2 .5 cm).
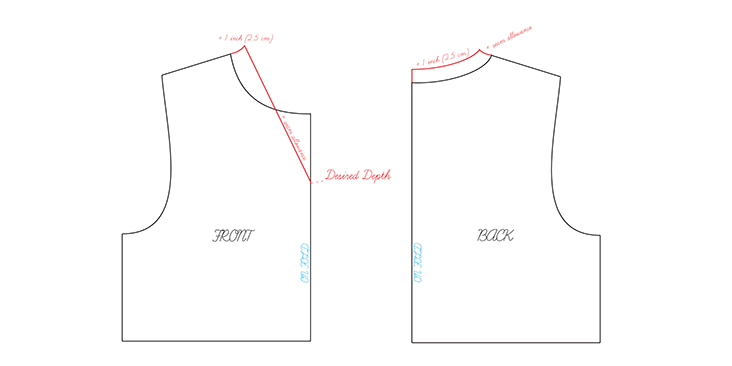
This is it, you are done with drafting. Pretty easy, right? Now that your pattern is finished, we are ready to make the facings.
Drafting facings
Behind every nice looking neckline is a facing. Facing is a great way of finishing the raw edge of the neckline on a garment. Basically, it is a separate strip of fabric that is cut to the same shape as the curve of the neckline.
So, to make a facing for any of the free patterns demonstrated above, you simply need to trace your new neckline outer edge, then draw the shoulder and center seams down about 2″. Repeat for the back neckline and remember to add seam allowance to the shoulder seams and the upper edge of your facing.
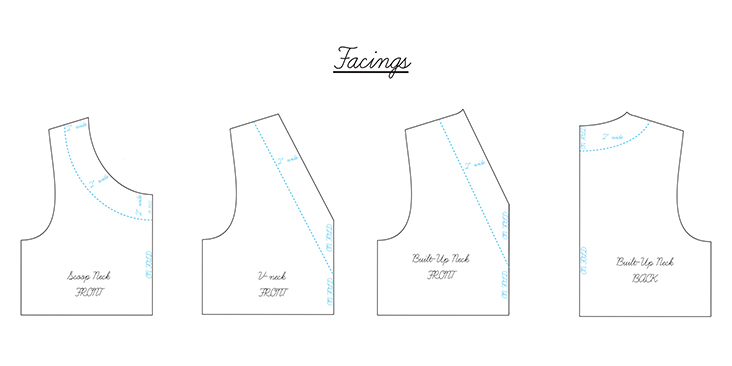
If you need help with attaching facings to your garments, we have this great tutorial that might be useful.
Et voila! Now have fun and create as many new neckline styles as you wish!
Check out our selection of linen fabrics and make something unique using your newly acquired skill!




6 Comments
paulette hackman
How do you fix a gap in a V-neck? I haven’t faced it yet.
Rima Khusainova
Dear Paulette, it’s hard to give you an accurate advice without seeing the actual project but what you could do is to to gather your facing slightly, so that it’s just about 3/8? smaller than the actual V-neck. This way the fabric will lay flatter as it will be pulled slightly towards the inside eliminated the gaping. I hope this helps!
JAB
When I draw a curve across a fold, I draw a short right-angle line at the point where the curve crosses the fold, and draw the curve tangent to this line. No peaks or dips when the work is unfolded.
Rima Khusainova
You can also do that when you attach the facing. A couple of horizontal stitches right at the point of the V. We have a detailed tutorial about that here – https://blog.fabrics-store.com/2016/03/14/sewing-glossary-how-to-sew-a-facing-to-a-v-neckline/
bubbieone
very good instructions, and this comment is from a very experienced, retired seamstress.
Rima Khusainova
Thank you so much! Really appreciate it!