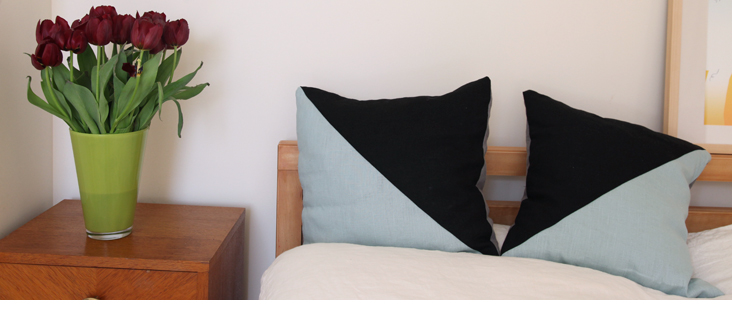
Three Colour Pillow Tutorial
This one is a real simple beauty. Geometric, elegant and so necessary for your bed. I am completely in love with them.
Here is how to make them.
In order to make these two 18″ inch pillows you will need:
Materials:
4 x 14″ by 18″ panels of IL019 Monument Softened
1 x 19″ by 19″ panell of IL019 Black Softened
1 x 19″ by 19″ panel of IL019 Meadow Softened
Matching thread (I used black and tan)
Pins
Scissors
Sewing Machine
Level: Beginner
Time: 2 hours
1. Begin by cutting all your fabric.
2. Take the two 19″ by 19″ squares, fold them in half and pin about half an inch away from the fold. Carefully cut both triangles alongside the fold. You will be left with 4 equal triangles. Two in each colour.
3. Take one Black triangle and one Willow. Align them together, pin and straight stitch alongside the long side. Trim away access fabric.
4.’ Flip it’ onto the other side. At this point we will be hiding the stitch you just made. Fold the square panel in half again and pin alongside the edge stepping away about half an inch. Straight stitch alongside the edge. Flip again- this is the front of your pillow.
5. Take two of your Monument colour back panels and get them ready for hemming. Pin, and straight stitch alongside the edges.
6. Lay down your front panel facing the table. Place first back panel to align with bottom and sides, right side facing you.
7. Place second back panel aligning at the top and the sides, right side facing you. Pin, straights stitch around all four sides. Trim away any access fabric.
8. Turn’ the pillow inside out. Pin about half an inch alongside all four sides and straight stitch. You will now have a concealed edge on all four sides of your pillow. Turn it inside out and you are done!
Related posts
Blending Between Sizes on a Sewing Pattern – Part 1: When to Blend
Let’s be honest—finding a sewing pattern that perfectly matches your measurements is pretty rare. And that makes sense! Every body is unique, fit preferences vary, and each pattern brand uses its own sizing system. If you find yourself falling between sizes, you’re not alone. But the beauty of sewing is that in these situations, you…
How Much Fabric Do You Need? A Simple Estimation Guide
Starting a new sewing project is always exciting. But there is nothing more frustrating than running out of fabric halfway through… or ending up with scraps that aren’t quite big enough for anything useful (trust me, I’ve been there! I have a whole drawer full of pieces like this). If you’re working with a commercial…
Understanding Seam Allowance: A Simple Guide
Every garment needs seam allowance—it’s a crucial part of garment construction. Sometimes it’s already included in the pattern; other times, it may need to be added, especially when working with a self-drafted pattern or after making adjustments. Seam allowance is the extra fabric added around the edges of a pattern piece. It creates space between…
SEW THIS LOOK
LATEST COMMENTS
- Tutorial: How to Make Puff Sleeves
27 Sep 2024 @ 4:31 am by Mastering Puff Sleeves: A Step-by-Step Guide to Creating Stylish and Comfortable Designs - Smart.DHgate – Trusted Buying Guides for Global Shoppers - Taylor Linen Swing Blouse Tutorial
16 Feb 2015 @ 7:20 am by Fabric-Store.com Patterns Are No Longer Free: What Sewists Need to Know - Lu Me Studio - Tutorial: How to Make Puff Sleeves
27 Sep 2024 @ 4:31 am by Mastering Puff Sleeves: A Step-by-Step Guide to Cutting and Sewing Perfect Puff Sleeves - Smart.DHgate – Trusted Buying Guides for Global Shoppers - Tutorial: How to Make Puff Sleeves
27 Sep 2024 @ 4:31 am by Mastering Puff Sewing: A Step-by-Step Guide to Creating Beautiful Puff Details - Smart.DHgate – Trusted Buying Guides for Global Shoppers - Tutorial: How to Make Puff Sleeves
27 Sep 2024 @ 4:31 am by Mastering Puff Sleeves: A Step-by-Step Guide to Creating Stylish and Voluminous Sleeves - Smart.DHgate – Trusted Buying Guides for Global Shoppers
Leave a comment